What Ghost Mannequin Photography Actually Means for Online Sellers
Imagine browsing an online clothing store and seeing a jacket that looks like it's floating in mid-air, perfectly shaped as if someone invisible is wearing it. That's the ghost mannequin effect in action, and it's become the backbone of professional ecommerce product imagery.
What Is Ghost Mannequin Photography
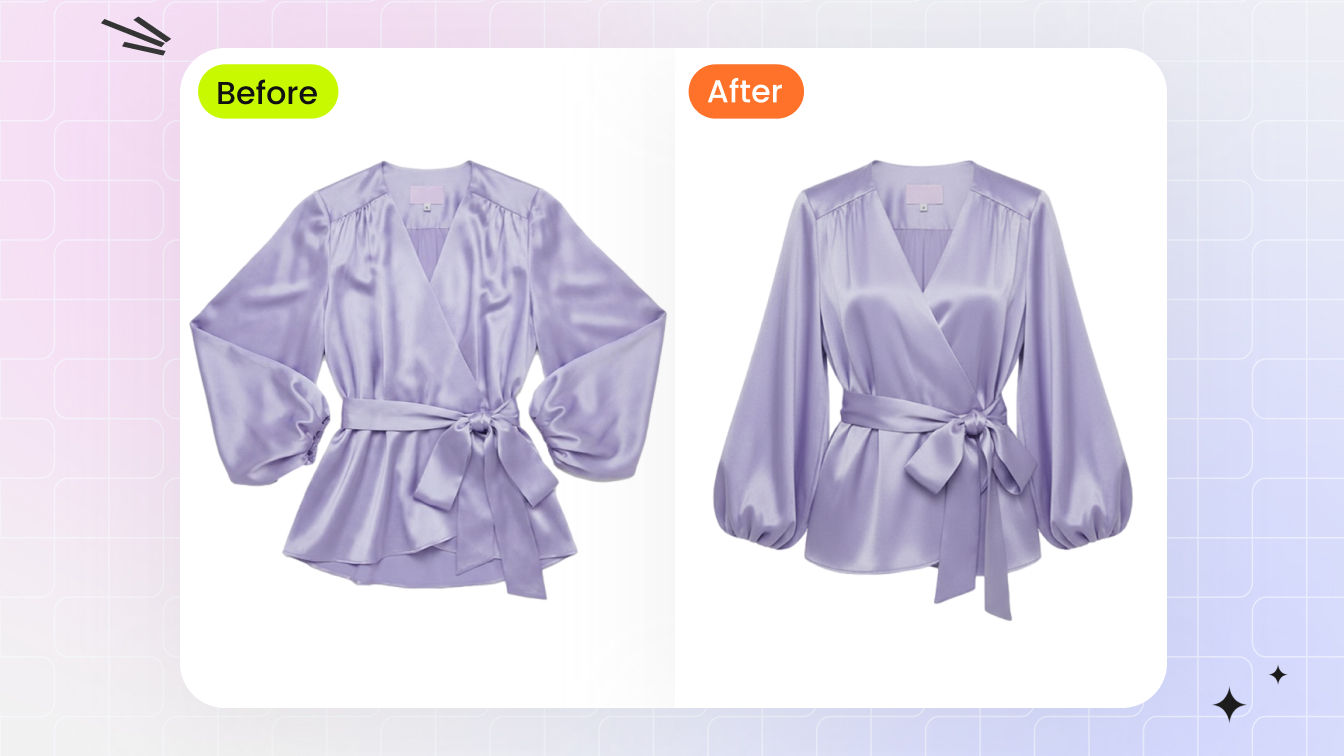
Ghost mannequin photography is a post-production technique where a garment is photographed on a mannequin, and the mannequin is then digitally removed to create a three-dimensional, hollow effect that displays the clothing as if worn by an invisible person.
You'll also hear this called the invisible mannequin technique, the hollow man effect, or the neck joint method. Regardless of the name, the goal is the same: show a garment's shape, structure, and fit without any visual distraction from a model or display form. The final image gives shoppers a realistic sense of how the piece drapes and sits on a body, while keeping all attention on the product itself.
A quick terminology note that often trips people up: the spelling debate of mannequin vs manikin comes down to regional usage and context. "Mannequin" is the standard spelling in fashion and retail, while "manikin" appears more often in medical or artistic contexts. For ecommerce photography, you'll almost always see "mannequin" used.
Why Ecommerce Brands Rely on the Invisible Mannequin Effect
Fashion retailers didn't arrive at ghost mannequins overnight. The evolution followed a clear path. Early online stores relied on flat lay photography, laying garments on a surface and shooting from above. Simple and affordable, but flat lays strip away any sense of how clothing actually fits a human form. Brands then shifted to on-model photography, which solved the fit problem but introduced new ones: high costs, scheduling complexity, and inconsistency across different models and poses.
Ghost mannequin photography emerged as the middle ground that scaled. It delivers the three-dimensional, lifelike presentation of on-model shots with the consistency and cost efficiency closer to flat lays. Every product looks uniform in your catalog, no matter how many SKUs you're shooting per week.
Why does this matter for your bottom line? Customers shopping online can't touch or try on clothing. They rely entirely on imagery to judge fit, quality, and construction. Ghost mannequins let shoppers examine details like stitching, fabric texture, collar shape, and interior lining without anything competing for their attention. As Flat Frog Films notes, this technique creates a polished, professional, and high-converting shopping experience by keeping the focus solely on the clothing.
For brands selling across multiple channels, the consistency factor is equally important. A catalog full of ghost mannequin images looks cohesive and trustworthy, signaling to buyers that they're dealing with a professional operation. That trust translates directly into higher conversion rates and fewer returns driven by mismatched expectations.
The technique itself, though, has traditionally demanded real skill. Producing a single polished image requires multiple photographs, careful compositing, and hours of Photoshop work, which is exactly the bottleneck that modern AI-powered tools are designed to eliminate.
The Traditional Ghost Mannequin Editing Process Explained
So what does that multi-step workflow actually look like in practice? Before AI entered the picture, every single ghost mannequin image required a carefully orchestrated studio shoot followed by meticulous compositing work. Understanding this process helps you appreciate both the craft involved and the friction points that make automation so appealing.
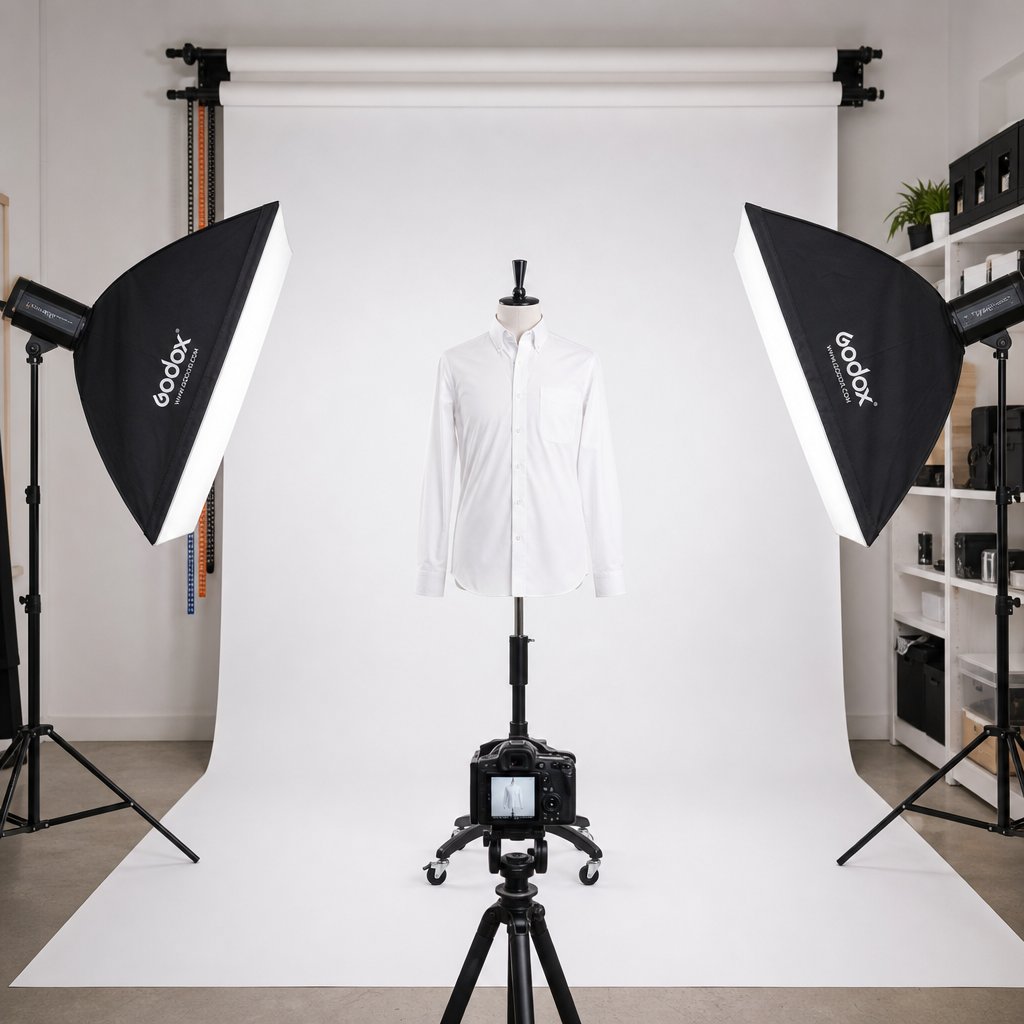
The Multi-Shot Studio Setup
Ghost mannequin photography starts with a minimum of three separate photographs per garment, all captured under identical lighting and camera settings:
- Front view on the mannequin. The garment is dressed, pinned, and styled on a mannequin with removable parts. Camera sits on a tripod at chest height, centered on the product.
- Back view on the mannequin. The mannequin rotates 180 degrees while the camera and lights stay locked in place.
- Interior panel shots. Mannequin sections are removed to expose the garment's inner surfaces: the inside of the collar, the neckline seam, the waistband lining, or sleeve openings. These shots fill the hollow cavity left once the mannequin is erased.
Every shot must share the same white balance, aperture (typically f/8 to f/11), and ISO. Switching to auto settings between takes is the fastest way to create color mismatches that haunt you during editing. A tripod is non-negotiable because even a slight shift in framing between the outer and interior shots makes alignment exponentially harder downstream.
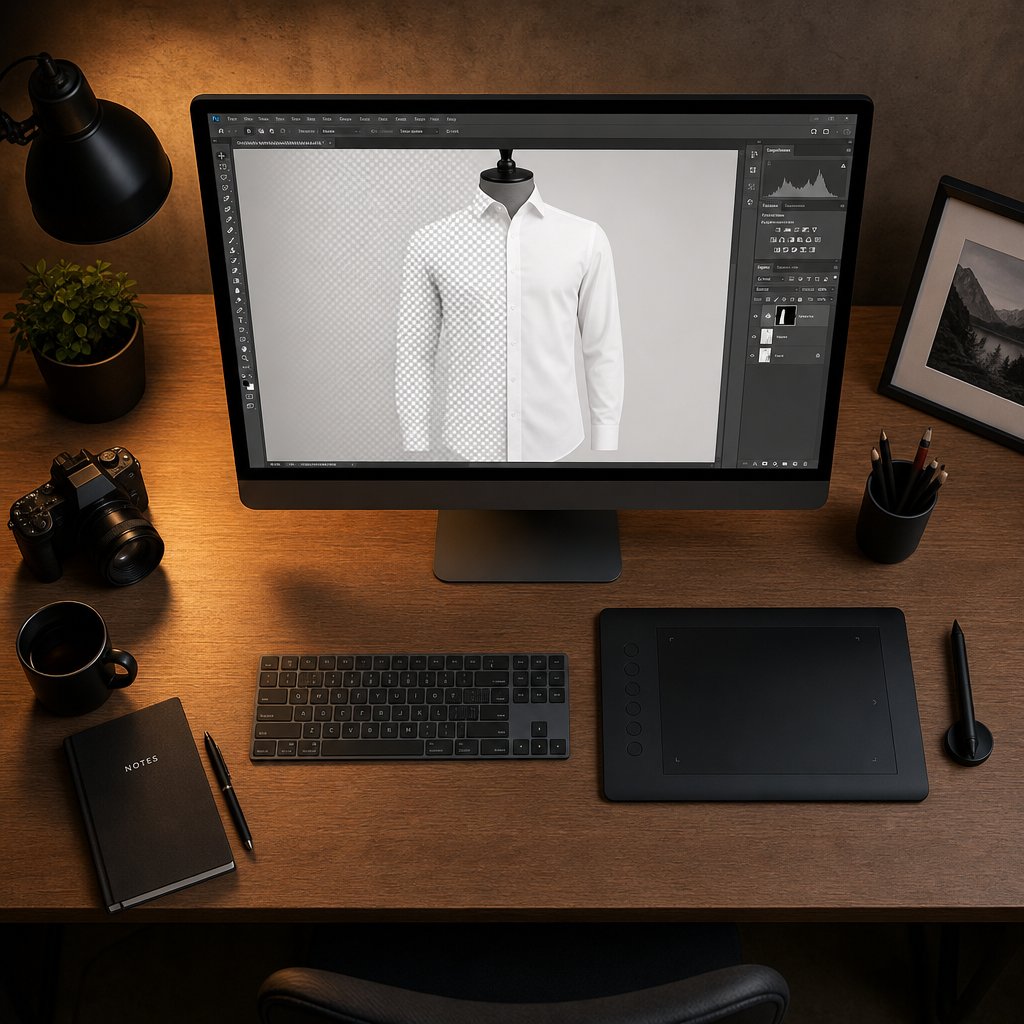
Compositing in Photoshop Step by Step
With your raw files in hand, the ghost mannequin Photoshop workflow follows a predictable sequence. You open the front-view image as your base layer, then bring in the interior shot as a second layer above it. Lowering the opacity lets you align the two frames so the inner collar or waistband sits precisely where the mannequin used to be.
Next comes selection and masking. Using the Pen Tool for precision or the Quick Selection Tool for speed, you trace around every visible mannequin surface and mask it out. The garment remains; the dummy disappears. You then mask the interior layer so only the relevant fill area shows through, blending edges with a soft brush at high zoom, often 200 to 300 percent.
Final cleanup involves removing stray mannequin pixels with the Clone Stamp, adding a subtle drop shadow to ground the garment, correcting any color drift between layers, and exporting at marketplace-ready dimensions. Even experienced editors describe this stage as the most tedious part of invisible mannequin photography because tiny imperfections around collar junctions and sleeve openings are immediately visible to shoppers.
Time and Skill Investment for Manual Editing
How long does all of this take? A skilled retoucher can finish one ghost mannequin editing job in roughly 15 to 30 minutes per image. Beginners often spend 30 to 60 minutes on a single garment. Multiply that across a catalog of several hundred SKUs, and you're looking at weeks of dedicated post-production time.
The pain points stack up quickly:
- Alignment drift between shots when the tripod shifts even slightly
- Color and brightness mismatches between the outer and interior frames
- Edge artifacts where the garment boundary meets the reconstructed interior
- Repetitive strain from performing identical masking operations hundreds of times
Beyond time, the skill barrier is real. Clean ghost mannequin editing demands intermediate-to-advanced Photoshop proficiency, a trained eye for natural-looking edges, and patience for pixel-level detail work. For solo sellers or small teams without a dedicated retoucher, this manual process often becomes the single biggest bottleneck between a photo shoot and a live product listing.
That bottleneck is precisely the gap AI-powered tools are engineered to close, not by skipping the underlying logic of mannequin removal and cavity reconstruction, but by automating it at machine speed.
How AI Ghost Mannequin Generators Work Behind the Scenes
The manual compositing workflow is logical and repeatable, which makes it a perfect candidate for automation. An ai mannequin generator follows the same conceptual steps a human editor would, just compressed into seconds rather than minutes. But how does a machine "see" a mannequin, decide where the garment ends, and fill in the hollow interior convincingly?
How AI Identifies and Separates the Mannequin
At its core, ghost mannequin ai relies on deep learning models trained on massive datasets of garment images. Think tens of thousands of photographs showing clothing on mannequins, off mannequins, inside-out, and from every angle. Through this training, the model learns what a mannequin surface looks like versus what fabric looks like, even when the two share similar colors or textures.
When you upload a photo, the AI performs semantic segmentation, essentially labeling every pixel in the image as either "garment," "mannequin," or "background." It recognizes the smooth, uniform surface of a plastic form and distinguishes it from the weave, stitching, and drape of fabric. This classification happens across the entire image simultaneously, producing a precise mask that isolates the mannequin from everything else in the frame.
Edge Detection and Garment Boundary Mapping
Separating mannequin from garment sounds straightforward until you consider the contact points: where fabric presses directly against the form, where collar edges wrap around the neck, where sleeve openings hug the shoulder. These boundary zones are where most manual editing errors occur, and they're where AI edge detection earns its value.
The model uses convolutional neural networks that analyze pixel-level transitions in color, texture, and depth. It maps the precise boundary where garment ends and mannequin begins, even in tricky areas like sheer fabrics or tight-fitting necklines. Modern architectures use multi-scale feature extraction, examining the image at different resolutions to catch both fine stitch-level details and broader structural contours. The result is a digital mannequin mask with clean, accurate edges that would take a human editor several minutes of careful Pen Tool work to replicate.
Inner Cavity Reconstruction Through Inpainting
Removing the mannequin leaves a gap. In the traditional workflow, you'd fill that gap with your interior panel photograph. An ai mannequin tool uses inpainting instead, a technique where the model generates new pixel data to fill masked regions based on surrounding context.
Here's how the AI processing pipeline works in sequence:
- Image intake and classification. The system identifies the garment type (shirt, jacket, dress) to apply the correct structural expectations for shape and depth.
- Semantic segmentation. Every pixel is classified as garment, mannequin, or background, creating a layered map of the image.
- Edge refinement. Boundary pixels are analyzed at high resolution to produce a clean separation line between fabric and form.
- Mannequin mask removal. All pixels labeled as mannequin are erased, leaving transparent or empty regions behind.
- Contextual inpainting. The AI examines the garment's fabric color, lighting direction, and interior shadows, then synthesizes realistic fill content for the hollow cavity, recreating the look of an inner collar, lining, or waistband.
- Output compositing. The reconstructed interior merges with the garment layer and a clean background to produce the final ghost mannequin image.
The inpainting step is where modern AI truly separates itself from simple background removal tools. As ImagineArt explains, AI inpainting models analyze edges, lighting, and color palette at a pixel level to generate content that feels like it was always part of the original image. Applied to ghost mannequin work, this means the AI doesn't just delete the dummy; it reconstructs what should logically exist behind it, complete with realistic shadow gradients and fabric texture continuity.
The quality of this reconstruction depends heavily on what you feed the system. A well-lit, centered photograph on a clean background gives the AI clear signals to work with. A dark, cluttered, or off-angle shot forces the model to guess, and guesses introduce artifacts. That relationship between input quality and output accuracy is exactly what separates a passable result from a professional one.
Input Image Preparation That Gets the Best AI Results
A ghost mannequin generator is only as good as the image you give it. Feed it a well-lit, properly framed mannequin photo and you'll get a clean, professional result in seconds. Feed it a dimly lit shot with a cluttered background and wrinkled fabric, and you'll spend more time fixing artifacts than you saved by skipping Photoshop. The good news? Nailing your input doesn't require expensive gear. It requires intention.
Lighting and Background Setup for Clean AI Processing
AI models rely on clear visual contrast between the garment, the mannequin, and the background to perform accurate segmentation. Harsh shadows, uneven exposure, or busy backgrounds all introduce noise that confuses edge detection and produces messy results.
Here's what to aim for when setting up your ghost mannequin for photography sessions:
- Use diffused, even lighting. Two to three softbox lights positioned at 45-degree angles on either side of the mannequin eliminate harsh shadows and reduce hot spots. Reflectors help fill any remaining dark areas, particularly under collars and around sleeve openings.
- Aim for at least 1,000 lumens per 100 square feet of shooting space to maintain consistent brightness across the garment surface.
- Choose a solid white or light gray background. A seamless paper sweep or fabric backdrop gives the AI a clean separation zone. Avoid textured walls, colored surfaces, or anything that could bleed into the garment edges.
- Eliminate ambient light interference. Close blinds and turn off overhead fluorescents. Mixed color temperatures create white balance shifts that make the image mannequin boundaries harder for AI to detect accurately.
As Adobe's product photography guide notes, the better your lighting is at capture, the less correction work is needed downstream, whether that correction comes from a human editor or an AI tool.
Camera Settings and Shooting Angles That Matter
Consistency is the word that defines every successful ghost mannequin photography setup. Your camera position, focal length, and settings should remain locked between shots so the AI receives predictable, uniform input across your entire catalog.
- Shoot straight-on at garment center. Position your camera at the midpoint of the garment's height, not at your own eye level. For a shirt, that's roughly chest height. For pants, lower the tripod to hip level.
- Use a 50mm or 85mm lens to minimize barrel distortion. Wide-angle lenses warp garment proportions, which confuses AI boundary mapping.
- Lock your settings to manual mode. Aperture between f/8 and f/11 delivers sharp focus across the full garment. ISO 100 to 200 keeps noise low. A consistent shutter speed prevents exposure variation between frames.
- Shoot at high resolution. Most marketplaces require a minimum of 1,000 pixels on the longest side, but capturing at 3,000 pixels or higher gives the AI more data to work with and leaves room for cropping without quality loss.
- Always use a tripod. Even minor shifts in framing between shots create alignment inconsistencies that degrade output quality, especially if you're processing batches where uniformity matters.
Photography mannequins with removable limbs and neck pieces make repositioning easier between front, back, and interior shots. If you're still shooting interior panels for hybrid workflows, keeping the camera locked in place between takes is critical.
Fabric Preparation and Garment Styling Tips
The garment itself needs attention before it ever touches the mannequin. Wrinkles, loose threads, and poor drape all show up in the final image, and AI won't fix styling problems for you.
- Steam every garment thoroughly. Iron or steam out shipping creases, fold lines, and storage wrinkles. Pay extra attention to collars, cuffs, and hems where creasing is most visible.
- Pin for a natural, fitted silhouette. Use clips or pins on the back of the garment (hidden from the camera) to pull excess fabric taut without distorting the front shape. This creates a clean, body-like contour.
- Stuff sleeves and pant legs lightly. Tissue paper or foam inserts give empty sleeves and legs enough volume to suggest a human form without overstuffing them into unnatural shapes.
- Button, zip, and fasten everything. Close all closures as they'd appear when worn. Open buttons or unzipped flies look sloppy and create confusing edges for AI segmentation.
- Check for lint, tags, and stray threads. These small details are magnified in high-resolution images and can create artifacts that the AI interprets as garment edges.
- Center the garment symmetrically on the mannequin. Shoulders should sit evenly, seams should align with the mannequin's center line, and hemlines should hang level. Asymmetry in the input translates directly to an off-balance final image.
Think of it this way: every minute you spend on garment prep saves you from manual touch-ups later. A properly styled mannequin photo gives the AI clean lines, consistent edges, and predictable fabric behavior to work with. That's the difference between a one-click result you can publish immediately and an output that still needs human intervention before it's marketplace-ready.
Of course, even a perfectly prepared image won't guarantee flawless results across every garment category. Some clothing types are inherently easier for AI to process than others, and knowing which pieces play nicely with automated tools helps you plan your workflow before you ever press the shutter.
Which Garment Types Work Best and Worst With Ghost Mannequin Effects
Not all clothing is created equal when it comes to ghost clothing photography. A structured blazer and a sheer chiffon blouse require completely different handling, and they produce dramatically different results when processed through an AI tool. Knowing where each garment category falls on the difficulty spectrum lets you set realistic expectations, plan your shooting order, and decide which pieces might need manual touch-ups after processing.
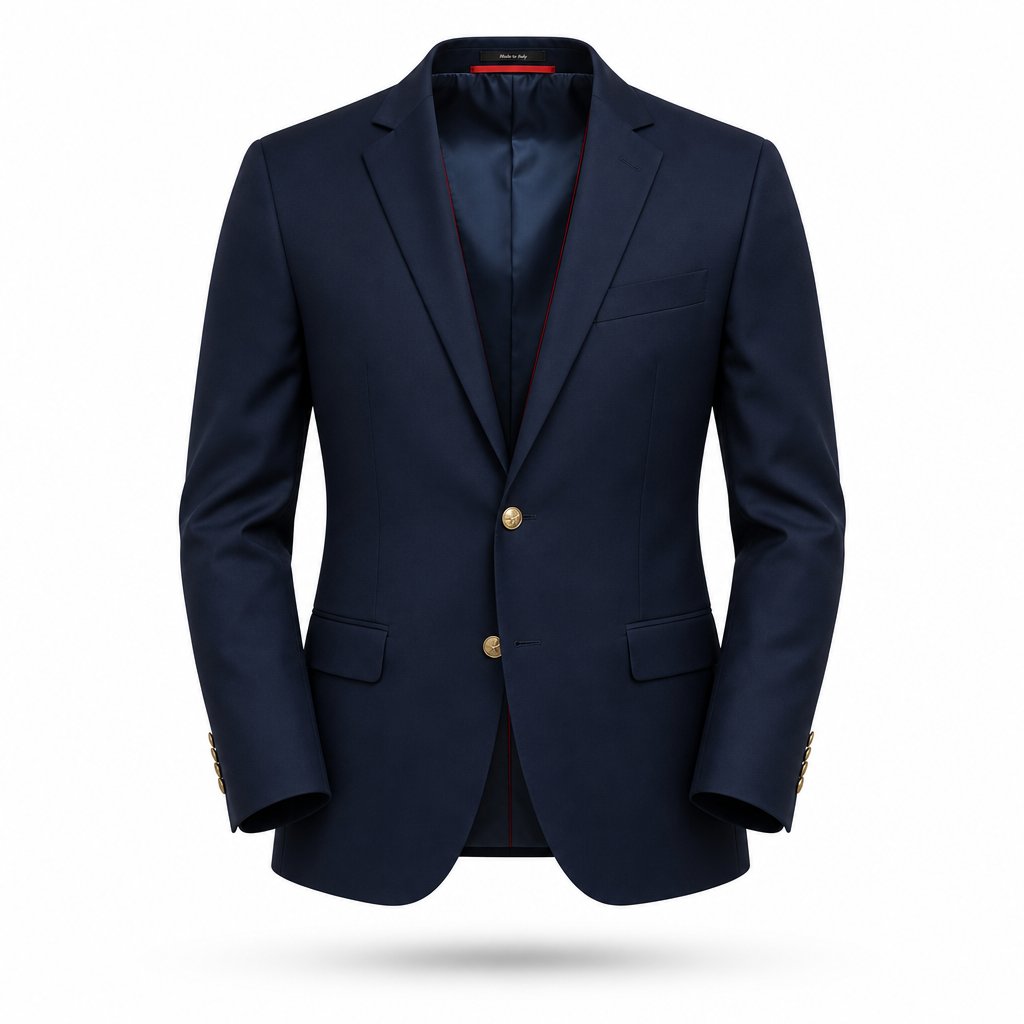
Structured Garments That Work Best
Garments with built-in rigidity are the sweet spot for invisible ghost mannequin photography. Blazers, suit jackets, tailored coats, and structured button-down shirts hold their shape on the mannequin without much intervention. Their defined shoulders, crisp lapels, and firm collars give AI models clear, high-contrast edges to detect and separate.
Why do these work so well? Structured fabrics like wool suiting, heavy cotton twill, and canvas don't collapse or shift once positioned. The garment boundary stays consistent and predictable, which is exactly what edge detection algorithms need. The interior cavity is also easier to reconstruct because the garment's stiffness creates a natural, well-defined hollow space behind the collar and neckline.
Tops and shirts fall into a similar category, though they require a bit more attention during setup. Collar positioning matters: a floppy collar creates ambiguous edges, while a properly shaped one gives the AI a clean line to follow. Sleeve openings should be lightly stuffed to maintain volume. When these details are handled at the shooting stage, shirts and blouses consistently produce professional mannequin ghost results with minimal post-processing.
Bottoms like pants, jeans, and tailored skirts also perform well, with one caveat. The waistband interior is a critical detail that customers want to see, and AI needs clear visual information to reconstruct it convincingly. If you're working with a tool that accepts only a single front-view image, the waistband fill may look generic. Tools that accept both front and interior shots deliver noticeably better results for this category.
Challenging Categories and Workarounds
Dresses introduce complexity that structured garments don't. Length is the first issue: a maxi dress has significantly more fabric surface for the AI to process, and flowing hemlines create soft, irregular edges that are harder to segment cleanly. Fitted dresses with defined waistlines perform better than loose, draped silhouettes where the garment boundary blurs into folds and gathers.
Outerwear presents its own set of challenges. Puffer jackets, parkas, and layered coats have bulk, multiple textures, and overlapping panels that create visual complexity. Hoods, fur trims, and drawstrings add elements that don't follow predictable garment boundaries. As Clothing Photography Studio notes, technical fabrics common in outerwear often have reflective surfaces, coatings, or finishes that react sharply to light, which can appear overly shiny or distorted when not handled correctly.
Fabric type compounds these category-level challenges. Here's where common failure modes appear:
- Sheer and transparent fabrics. Organza, chiffon, and mesh confuse AI segmentation because the mannequin surface is partially visible through the garment. The model struggles to determine where fabric ends and mannequin begins, producing patchy or incomplete removal.
- Heavily textured materials. Sequins, beading, heavy lace, and embroidered surfaces create noisy edge boundaries. The AI may interpret texture elements as garment edges, producing jagged or artifact-heavy outlines.
- Knits with extreme stretch. While knits generally behave well in ghost product photography, ultra-stretchy fabrics that conform tightly to the mannequin surface leave almost no visual gap between garment and form. This makes clean separation difficult.
- Complex layering. Garments with multiple visible layers, like an open jacket over a shirt, force the AI to make decisions about depth and overlap that often produce unnatural-looking results.
Workarounds exist for most of these scenarios. For sheer fabrics, placing a contrasting fabric liner behind the garment during shooting gives the AI a cleaner separation signal. For textured garments, increasing lighting intensity reduces shadow noise around decorative elements. And for layered pieces, shooting each layer separately and compositing manually often produces better results than asking AI to handle the full complexity in one pass.
When Ghost Mannequin Is Not the Right Choice
Some products simply aren't suited to the ghost mannequin approach, regardless of whether you're using AI or manual editing. Accessories like scarves, ties, belts, and hats lack the structural body needed to create a convincing hollow-form effect. They don't "wear" on a mannequin in a way that translates to a natural floating shape. Flat lay or styled product photography typically serves these items better.
Swimwear and lingerie can also be problematic. The minimal fabric coverage means there's more mannequin surface to remove and less garment context for the AI to use during inpainting. Results often look incomplete or unnatural, particularly around straps and cutout details.
The table below maps common garment categories to their expected difficulty level and typical result quality when processed through an AI ghost mannequin tool:
| Garment Category | Difficulty Level | Expected AI Result Quality | Key Consideration |
|---|---|---|---|
| Blazers and suit jackets | Low | Excellent | Defined structure holds shape naturally |
| Button-down shirts | Low | Excellent | Collar and cuff positioning is critical |
| T-shirts and polos | Low | Very good | Light stuffing in sleeves prevents collapse |
| Pants and jeans | Low to medium | Very good | Waistband interior needs clear input data |
| Tailored skirts | Low to medium | Very good | Hemline shape should be consistent |
| Fitted dresses | Medium | Good | Defined waistline helps AI segmentation |
| Flowing or maxi dresses | Medium to high | Variable | Irregular hemlines challenge edge detection |
| Hoodies and sweatshirts | Medium | Good | Hood and drawstrings add complexity |
| Puffer jackets and parkas | High | Variable | Bulk, reflective fabrics, and layering |
| Sheer or lace garments | High | Poor to variable | Transparency confuses mannequin detection |
| Heavily embellished pieces | High | Variable | Texture noise creates edge artifacts |
| Scarves, ties, and accessories | Not recommended | Poor | Lack structural body for hollow effect |
| Swimwear and lingerie | High | Poor to variable | Minimal fabric, excessive mannequin exposure |
A practical approach? Start your AI workflow with the easy wins. Process your structured garments first to build confidence in the tool and establish a consistent catalog look. Then tackle medium-difficulty pieces, reserving manual editing or hybrid workflows for the categories where AI still struggles. This way, you get the speed benefits of automation where it works best and apply human precision only where it's genuinely needed.
Knowing which garments suit which approach naturally raises a bigger question: how does AI-powered processing actually compare to traditional editing and professional outsourcing when you factor in cost, speed, and scalability across your full product range?
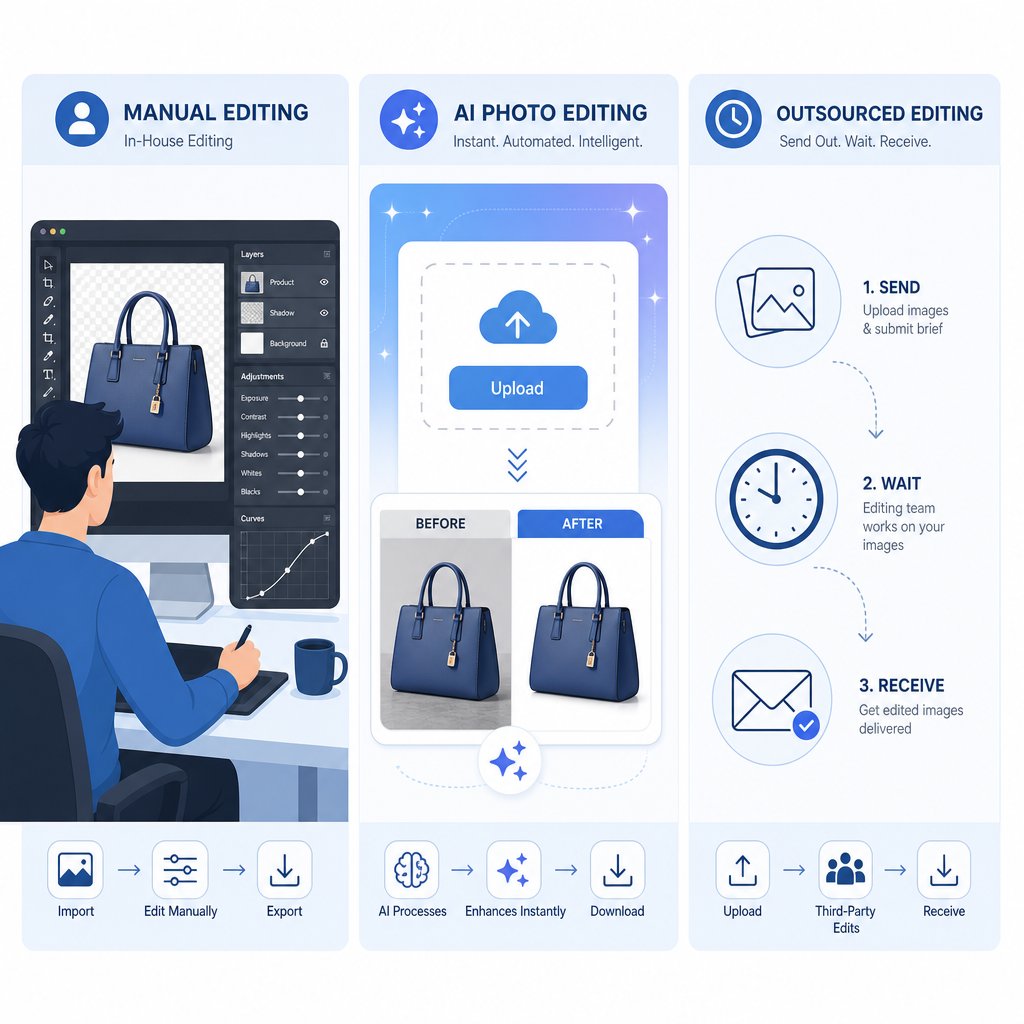
AI Generators vs Traditional Editing vs Outsourcing Compared
You know which garments work best. You've prepped your images properly. The next decision is how to actually process them. Three distinct paths exist for ghost mannequin photo editing, and each one carries different tradeoffs in cost, speed, quality, and scalability. The right choice depends less on which method is "best" in the abstract and more on where your business sits right now.
Cost Per Image Across All Three Methods
Cost is usually the first filter, so let's put real numbers on the table. AI ghost mannequin tools operate on subscription or per-image pricing that drops your effective cost dramatically at volume. Traditional DIY editing in Photoshop costs you time rather than money directly, but that time has a dollar value. Outsourcing to ghost mannequin image editing services charges per image with volume discounts kicking in at higher tiers.
Here's how the three approaches compare across the dimensions that matter most for mannequin product photography workflows:
| Factor | AI Ghost Mannequin Generator | DIY Photoshop Editing | Outsourced Retouching Services |
|---|---|---|---|
| Cost per image | $0.10 to $1.00 (subscription-based) | $0 software cost, but 20 to 45 min of labor per image | $1 to $4 per image, with volume discounts up to 50% |
| Turnaround time | Seconds to minutes per image; batch processing available | 15 to 90 minutes per image depending on complexity | 24 to 72 hours per batch; rush orders cost 25 to 50% more |
| Skill level required | Basic: upload, select garment type, download | Advanced Photoshop proficiency (Pen Tool, masking, compositing) | None: you provide images, they deliver finished files |
| Quality ceiling | Very good for standard garments; occasional artifacts on complex pieces | Highest possible with a skilled editor | High and consistent with vetted providers |
| Quality consistency | Uniform across batches; no editor fatigue | Variable: depends on editor skill and attention on image #200 | Consistent with established providers; variable with freelancers |
| Scalability | Near unlimited at flat or low incremental cost | Linear to labor hours; caps at human capacity | Scales with provider capacity; costs rise proportionally |
| Control over output | Limited to tool settings and post-adjustment | Full pixel-level control | Moderate: revision rounds available, but slower feedback loop |
| Best for | Growing brands needing speed and consistency at scale | Perfectionists with Photoshop skills and low volume | Brands wanting hands-off quality without learning new tools |
For context, a tool like Snappyit's Ghost Mannequin generator represents the AI approach in practice: you upload a flat apparel shot, the tool handles mannequin removal and cavity reconstruction, and you download a polished ghost mannequin image ready for your listings. No Photoshop layers, no waiting on a retouching queue. For ecommerce teams and growing fashion brands that need fast turnaround without manual editing skills, this type of tool collapses what used to be a multi-day process into minutes.
Scalability and Turnaround Time Comparison
Scalability is where the three methods diverge most sharply. If you're processing 20 images a month, any approach works. At 200 images monthly, the math starts to shift. At 1,000 or more, the differences become impossible to ignore.
DIY Photoshop editing hits a hard ceiling. Real-world speed tests show manual ghost mannequin editing averages 28 minutes per image for front-facing shots. A 100-SKU product drop requires roughly 46 hours of editing labor. That's more than a full work week dedicated entirely to image processing, with no time left for shooting, listing, or marketing.
AI tools flip that equation. The same 100 images process in 6 to 7 hours including quality review, representing an 85% reduction in time. For ghost mannequin for ecommerce operations running seasonal launches with hundreds of new SKUs, that speed difference is the gap between listing products on time and missing your window.
Outsourcing scales differently. You can send 5,000 images to a retouching service and they'll handle the volume, but turnaround stretches to days and costs accumulate linearly. A mid-range provider charging $2 per image at volume means a $10,000 monthly bill for 5,000 SKUs. The same volume through an AI subscription might cost a few hundred dollars.
Matching the Right Method to Your Business Size
When sellers ask something like "build me a list of ai ghost-mannequin services," what they're really asking is: which tool fits my situation? The answer maps directly to volume and resources.
Solo sellers and small Etsy shops (under 50 products monthly). You're shooting with a phone or basic camera, budget is tight, and you need results fast. AI generators offer the best value here. The learning curve is minimal, costs are low, and you skip the months of Photoshop practice that manual editing demands. Even a basic photoroom ghost mannequin workflow or dedicated AI tool gets you marketplace-ready images without hiring anyone.
Mid-size brands (50 to 500 SKUs monthly). You have a basic studio setup and maybe one person handling product content. Consistency across your catalog matters for brand perception. AI tools shine at this tier because they deliver uniform results regardless of whether it's image number 5 or image number 500. The time savings free your team to focus on styling, creative direction, and listing optimization rather than pixel-level masking work.
High-volume retailers (500+ SKUs weekly). At this scale, you're likely already outsourcing or running an internal editing team. The question becomes whether AI can replace or supplement that existing workflow. Most operations at this level adopt a hybrid model: AI handles the bulk of standard garments at speed, while skilled editors handle complex pieces and final quality control. This hybrid approach still delivers 70% time savings compared to fully manual workflows while maintaining premium quality standards.
The honest reality? No single method dominates across every scenario. But for the majority of ecommerce sellers processing standard apparel, AI-powered ghost mannequin generators deliver the strongest combination of speed, cost efficiency, and consistent quality. Manual editing remains unmatched for precision on difficult pieces, and outsourcing still makes sense for brands that want zero involvement in the editing process.
Whichever path you choose, the output still needs to meet specific technical standards before it goes live. Marketplaces like Amazon, Shopify, and eBay each enforce their own image requirements, and a beautifully processed ghost mannequin image that fails compliance checks never reaches your customers.
Marketplace Image Standards and Output Quality Evaluation
A flawless ghost mannequin photo means nothing if it gets rejected at upload. Each marketplace enforces its own technical requirements, and even minor violations can suppress your listing or prevent it from going live entirely. Understanding these standards before you process your images saves you from reworking batches after the fact.
Amazon and Shopify Image Standards for Product Listings
Amazon is the strictest gatekeeper. Their product image requirements leave little room for interpretation, and ghost mannequin product photography needs to hit every mark to pass compliance checks.
Amazon main image requirements:
- Pure white background (RGB 255, 255, 255) with no gradients or off-white tones
- Minimum 1,000 pixels on the longest side for zoom functionality (2,000+ pixels recommended)
- Product must fill at least 85% of the image frame
- No text, logos, watermarks, or inset graphics on the main image
- Accepted formats: JPEG, PNG, TIFF, or non-animated GIF
- Must show the actual product, not illustrations or placeholders
Ghost mannequin images naturally satisfy most of these rules. The garment appears isolated on a clean background, filling the frame without distracting elements. The main risk? Your background might read as 254, 254, 254 instead of pure white after AI processing, which is enough to trigger a rejection. Always verify your background hits true white in post.
Shopify store best practices:
- Consistent aspect ratios across all product images (square 1:1 or 4:5 portrait are most common)
- File sizes optimized for fast page loads, ideally under 500KB per image without visible compression
- WebP format preferred for speed; JPEG as fallback for broader compatibility
- Minimum 2048 x 2048 pixels for high-DPI displays and pinch-to-zoom on mobile
- Consistent padding and product positioning across your entire catalog
eBay image standards:
- Minimum 500 pixels on the longest side (but 1,600+ pixels recommended for best placement in search)
- Clean, uncluttered backgrounds strongly preferred for apparel categories
- Multiple angles encouraged: front, back, and detail shots improve buyer confidence
- No borders, promotional text, or artwork overlays
The common thread across all three platforms? Clean backgrounds, high resolution, and product-focused framing. Ghost mannequin images are built for exactly this. The technique removes distractions by design, which is why it became the default for scalable catalog imagery in the first place.
Post-Processing Steps From AI Output to Marketplace-Ready Image
Even a strong AI output rarely goes straight from download to upload without a few finishing touches. Think of the AI result as 90% done. That last 10% is what separates a dummy product image that looks automated from one that looks professionally shot and edited.
Here's the post-processing sequence that bridges the gap:
- Background standardization. Check your background with an eyedropper tool. If it's not pure RGB 255, 255, 255, use a levels adjustment or threshold layer to push it to true white without blowing out garment highlights.
- Shadow addition. A subtle drop shadow or soft reflection beneath the garment grounds it visually. Without any shadow, ghost mannequin images can look like they're floating in a void. A 2 to 5 pixel soft shadow at 10 to 20% opacity adds depth without violating marketplace rules.
- Color accuracy verification. Compare your processed image against the original photo. AI processing can shift colors slightly, particularly in saturated reds and blues. A quick curves or hue/saturation adjustment brings the output back in line with the actual garment.
- Cropping and framing. Crop to your target aspect ratio with the garment centered and filling 85% or more of the frame. Maintain consistent padding across your catalog so product pages look uniform when shoppers browse.
- File format optimization. Export as JPEG at 80 to 90% quality for Amazon and eBay. Use WebP for Shopify where page speed matters. PNG works for images where you need transparency, but file sizes run 3 to 5 times larger than JPEG at equivalent quality.
- Batch consistency check. When processing multiple ghost mannequin images in one session, compare them side by side. Look for brightness drift, color temperature shifts, or inconsistent shadow placement across the set.
This entire sequence adds 2 to 5 minutes per image, a fraction of the time saved by using AI for the heavy lifting. For batch workflows, most of these adjustments can be recorded as Photoshop actions or Lightroom presets and applied across hundreds of files simultaneously.
Spotting Quality Issues and When Manual Touch-Up Is Needed
How do you know if a ghost mannequin photo is actually ready to publish? Train your eye to scan for these common artifacts that AI tools occasionally produce:
- Unnatural edges. Look along the garment outline, especially around collar points, shoulder seams, and armholes. Jagged, overly smooth, or wavy edges signal that the AI struggled with boundary detection. Zoom to 200% and trace the silhouette. If it doesn't look like a clean fabric edge, it needs manual refinement.
- Missing or generic interior detail. The hollow cavity behind the collar or neckline should show realistic fabric texture, stitching, or lining. If it looks flat, blurry, or like a solid color fill, the inpainting didn't have enough context to reconstruct convincingly.
- Color bleeding. This appears as faint color halos where the mannequin used to be, often a slight gray or skin-tone tint along the inner garment edges. It happens when the AI doesn't fully separate mannequin color from garment color at the boundary.
- Symmetry breaks. Collars that lean to one side, shoulder widths that don't match, or hemlines that tilt. These sometimes result from the AI interpreting garment folds as structural edges.
- Shadow inconsistencies. Light should fall consistently across the garment. If the AI-generated interior shows shadows coming from a different direction than the rest of the image, it breaks the illusion immediately.
When should you intervene manually? A good rule of thumb: if you notice the artifact at normal viewing size (not zoomed in), it needs fixing. Shoppers won't pixel-peep your images at 400% zoom, but they will notice a collar that looks pasted on or an interior that reads as obviously fake at thumbnail scale.
For most standard garments processed from well-prepared input images, you'll find that 80 to 90% of outputs pass quality checks without intervention. The remaining 10 to 20% typically need minor edge cleanup or shadow correction, work that takes 2 to 3 minutes rather than the 20 to 30 minutes a full manual edit would require. That ratio is what makes AI-powered workflows practical at scale while still maintaining the professional standard that marketplace shoppers expect.
Meeting technical requirements and passing your own quality checks gets images live. But the broader question remains: which processing approach makes the most sense for your specific business, given your volume, budget, and growth trajectory?
Choosing the Right Ghost Mannequin Approach for Your Business
Your volume, budget, and team capabilities should drive this decision, not hype about any single method. A solo seller processing 30 SKUs a month faces a completely different equation than a brand launching 2,000 new products every quarter. Here's how to match your situation to the right workflow.
Recommendations by Business Size and Volume
Beginners and micro-sellers (under 50 products monthly). You're likely shooting with a smartphone or entry-level camera, and you don't have Photoshop skills or the budget for outsourcing. A ghost mannequin app or AI-powered tool is your fastest path to professional-looking listings. The investment is minimal, the learning curve is nearly flat, and you avoid the upfront cost of buying a physical mannequin for photography or hiring a retoucher. At this stage, speed to market matters more than pixel-perfect precision.
Growing brands (50 to 500 SKUs monthly). Consistency becomes critical here. Your catalog is large enough that visual inconsistency across listings erodes brand trust. AI generators deliver uniform ghost mannequin effects across every image regardless of batch size, which keeps your product grid looking cohesive. You might still search for a ghost mannequin for sale to set up a basic studio for your hero products, but the bulk of your catalog flows through automated processing. The cost savings at this tier are substantial: hundreds of dollars monthly compared to outsourcing, and dozens of hours compared to manual editing.
Enterprise operations (500+ SKUs weekly). At this scale, you likely already have an editing team or retouching contract in place. The question isn't whether to adopt AI but how to integrate it into existing workflows. Most high-volume operations find that AI handles 70 to 80% of standard garments cleanly, freeing skilled editors to focus on complex pieces and final quality assurance rather than repetitive masking tasks.
Hybrid Workflows That Combine AI Speed With Manual Precision
The most effective approach for most brands isn't purely AI or purely manual. It's a hybrid. Use AI processing as your default for standard garments: shirts, pants, blazers, and anything with defined structure. Reserve manual editing for the 10 to 20% of your catalog that challenges automated tools: sheer fabrics, heavily layered outerwear, or hero products where every shadow and fold needs to be perfect.
This hybrid model delivers the best of both worlds. You get the speed and cost efficiency of a virtual manikin workflow for the majority of your images, while maintaining premium quality standards on the pieces that represent your brand at its highest level. A practical split might look like processing 80% of your catalog through AI in a single afternoon, then spending focused time on the remaining 20% with manual tools over the following day or two.
Be honest about current AI limitations. Complex interior reconstructions on unusual necklines can look generic. Extremely detailed embellishments sometimes produce edge artifacts. And color accuracy on saturated fabrics occasionally drifts. These aren't dealbreakers; they're known boundaries that inform where you apply human attention.
Getting Started With Your First Ghost Mannequin Images
Ready to move from research to results? Here's a clear action plan:
- Choose 5 to 10 representative garments from your inventory. Pick a mix of easy pieces (structured tops, basic pants) and one or two challenging items (a dress, a hoodie) to test realistic range.
- Prepare and photograph each garment following the input guidelines covered earlier: even lighting, white background, steamed fabric, centered framing at high resolution.
- Process your test batch through an AI tool. Snappyit's Ghost Mannequin tool is a practical starting point for marketplace sellers and fashion brands looking to test AI-driven generation without committing to expensive studio setups or retouching contracts. Upload your photo mannequin shots, select the garment category, and evaluate the output quality against your standards.
- Compare results against marketplace requirements. Check background purity, resolution, framing, and edge quality for your target platform (Amazon, Shopify, eBay).
- Identify which garments need manual touch-up and which passed quality checks on the first try. This ratio tells you how much of your catalog can run on autopilot versus where human editing adds value.
- Scale your workflow based on what you learned. Process your easy-win garments in bulk through AI, schedule manual editing sessions for complex pieces, and establish a consistent post-processing routine for final adjustments.
You don't need to overhaul your entire production pipeline overnight. Start with a small test batch, validate the quality against your own standards, and expand from there. Whether you're a solo seller listing your first 20 products or a brand scaling into thousands of SKUs, the path forward is the same: match your tools to your volume, apply human skill where it genuinely matters, and let automation handle the repetitive work that used to eat your week.
Ghost Mannequin Generator FAQs
What is a ghost mannequin generator and how does it work?
A ghost mannequin generator is an AI-powered tool that automatically removes the mannequin from product photos and reconstructs the garment's interior cavity to create a hollow, three-dimensional effect. It uses semantic segmentation to classify each pixel as garment, mannequin, or background, then applies inpainting technology to fill the empty space with realistic fabric texture and shadows. The entire process takes seconds compared to the 15 to 60 minutes required for manual Photoshop editing.
How much does ghost mannequin photo editing cost?
Costs vary by method. AI ghost mannequin generators typically range from $0.10 to $1.00 per image on subscription plans. Outsourced retouching services charge $1 to $4 per image with volume discounts. DIY Photoshop editing has no direct software cost beyond your subscription but requires 20 to 45 minutes of skilled labor per image. For growing brands processing hundreds of SKUs monthly, AI tools like Snappyit's Ghost Mannequin tool at snappyit.ai/ghost-mannequin offer the strongest cost-to-quality ratio.
Which garment types produce the best ghost mannequin results?
Structured garments like blazers, suit jackets, tailored coats, and button-down shirts consistently produce excellent results because their rigid fabrics hold shape and create clear, high-contrast edges for AI detection. T-shirts, pants, and tailored skirts also perform very well with proper preparation. Challenging categories include sheer fabrics, heavily embellished pieces, puffer jackets, and flowing dresses. Accessories like scarves and ties are generally not suited to the ghost mannequin technique at all.
What image requirements do I need to meet for Amazon and Shopify listings?
Amazon requires a pure white background at RGB 255, 255, 255, minimum 1,000 pixels on the longest side for zoom functionality, and the product filling at least 85% of the frame. No text, logos, or watermarks are allowed on main images. Shopify recommends consistent aspect ratios, minimum 2048 x 2048 pixels for high-DPI displays, WebP format for speed, and file sizes under 500KB. Ghost mannequin images naturally satisfy most marketplace rules since the garment appears isolated on a clean background without distracting elements.
Can I use a ghost mannequin generator with just a phone camera?
Yes, but input quality directly affects output quality. For best results with a phone camera, use even diffused lighting from two or more sources, shoot against a solid white or light gray background, position the phone at garment center height on a tripod or stable surface, and steam all wrinkles from the fabric before shooting. Modern phone cameras capture sufficient resolution for marketplace compliance. The key is consistent lighting and a clean background so the AI can accurately separate the garment from the mannequin.