Open Amazon's apparel category and you'll see the same image style across dozens of brands: a t-shirt or dress that looks like it's being worn by someone invisible. The garment holds its shape — neckline, sleeve drape, hemline — all without a body in the frame. This is the invisible mannequin effect, and it's the catalog standard for clothing on every major marketplace.
The technique goes by three names: invisible mannequin effect, ghost mannequin, and hollow man effect. They all describe the same outcome — a 3D-worn appearance produced without an actual model in the frame. What changed in the past two years is how you produce it: AI tools can now generate the effect from a single flat-lay photo in under a minute, where the traditional Photoshop neck-joint workflow used to take 5 to 15 minutes per image.
This guide explains what the invisible mannequin effect is, how the three production methods work, what each costs, where it shines, and where it doesn't. By the end you'll know whether to invest in a studio setup, hire an outsourced editor, or run a flat-lay through an AI tool.
What Is the Invisible Mannequin Effect?
The invisible mannequin effect is a product photography output where a garment appears to be worn — preserving the natural fall of fabric, the shape of the neckline, the drape of sleeves — without a visible model or mannequin in the final image. Done well, the viewer sees only the clothing, suspended in mid-air with its 3D shape intact.
The naming convention varies by audience. Photographers and post-production editors call it ghost mannequin or hollow man effect, because the technical workflow involves shooting on an actual mannequin and then "ghosting" the mannequin out in editing. E-commerce platforms — Shopify, Amazon Seller Central, Etsy — and most marketplace sellers call it invisible mannequin, because that's what the customer experiences. All three terms refer to the same final image.
Why Top E-Commerce Brands Use It
The invisible mannequin output is the dominant catalog style for apparel for four reasons. Each one ties back to a measurable conversion or operations metric, which is why the technique has survived more than two decades of e-commerce trends and emerged as the default look on every major marketplace.
- Shape is visible without distraction. A flat-lay shows the garment but flattens the silhouette — buyers struggle to read fit from a 2D outline. A model shot adds personality but introduces variables (skin tone, pose, expression) that can distract from the product or unintentionally signal a brand archetype the seller didn't intend. The invisible mannequin output sits between these two extremes — the buyer sees fit and proportion, nothing else, and your hero image carries no demographic baggage.
- It scales without humans in the frame. No model release forms, no booking dates, no shoot day, no body-type matching. One mannequin (or one AI tool) produces the same look across an entire catalog of any size. For a reseller cycling through 200 unique vintage items per month, the invisible mannequin technique is the only economically viable way to show fit on every listing.
- Marketplace algorithms reward consistency. Amazon's apparel image guidelines explicitly prefer product-only images for the main listing photo, and on-model shots are typically allowed only as secondary images. The invisible mannequin output satisfies the main-image requirement while still communicating 3D shape — a combination that flat-lay alone cannot achieve. Etsy, eBay, and most fashion-focused marketplaces apply similar implicit ranking preferences.
- Returns drop when fit is communicated visually. Apparel returns are driven heavily by fit mismatch. Invisible mannequin shots show exactly how a piece sits on a body — neckline depth, shoulder width, hem length, sleeve drape — without forcing the buyer to mentally translate from a flat surface. The lower the perceived fit ambiguity, the lower the return rate.
Beyond these four primary drivers, there's a fifth practical reason: brand consistency at scale. Once you've established the angle, lighting, and crop conventions for your invisible mannequin output, every new SKU drops into a coherent grid view on category and search-results pages. Buyers who land on your store from any traffic source see a unified visual language — something a mix of phone-shot flat-lays and model photos can never deliver.
How the Invisible Mannequin Effect Is Created (3 Methods)
There are three production paths to the same output. They differ in cost per image, time per image, and minimum order size.
Method 1 — Studio shoot + Photoshop neck-joint
Shoot the garment on a real white or skin-toned mannequin under controlled lighting. Take a separate "interior" shot of the inside of the neckline (so the back of the neck is visible). In Photoshop, mask out the mannequin and composite the interior shot in to fill the neckline cavity. This is the original method; the technique itself is sometimes called the neck-joint workflow because the join between the front of the garment and the interior neck shot is the trickiest part.
Method 2 — Flat-lay + outsourced editing service
Lay the garment flat on a neutral surface, shoot top-down with even lighting, then upload to an editing service. The service uses a combination of AI cutout, manual masking, and Photoshop neck-joint compositing to produce the 3D-worn look. Companies like Pixelz and Path Edits are the established players in this space.
Method 3 — Single flat-lay → AI tool
Upload a single flat-lay photo to an AI tool like Snappyit's AI ghost mannequin generator. The tool predicts the 3D shape — including the interior neckline — and generates the invisible mannequin output in under 30 seconds. No second photo of the interior is required.
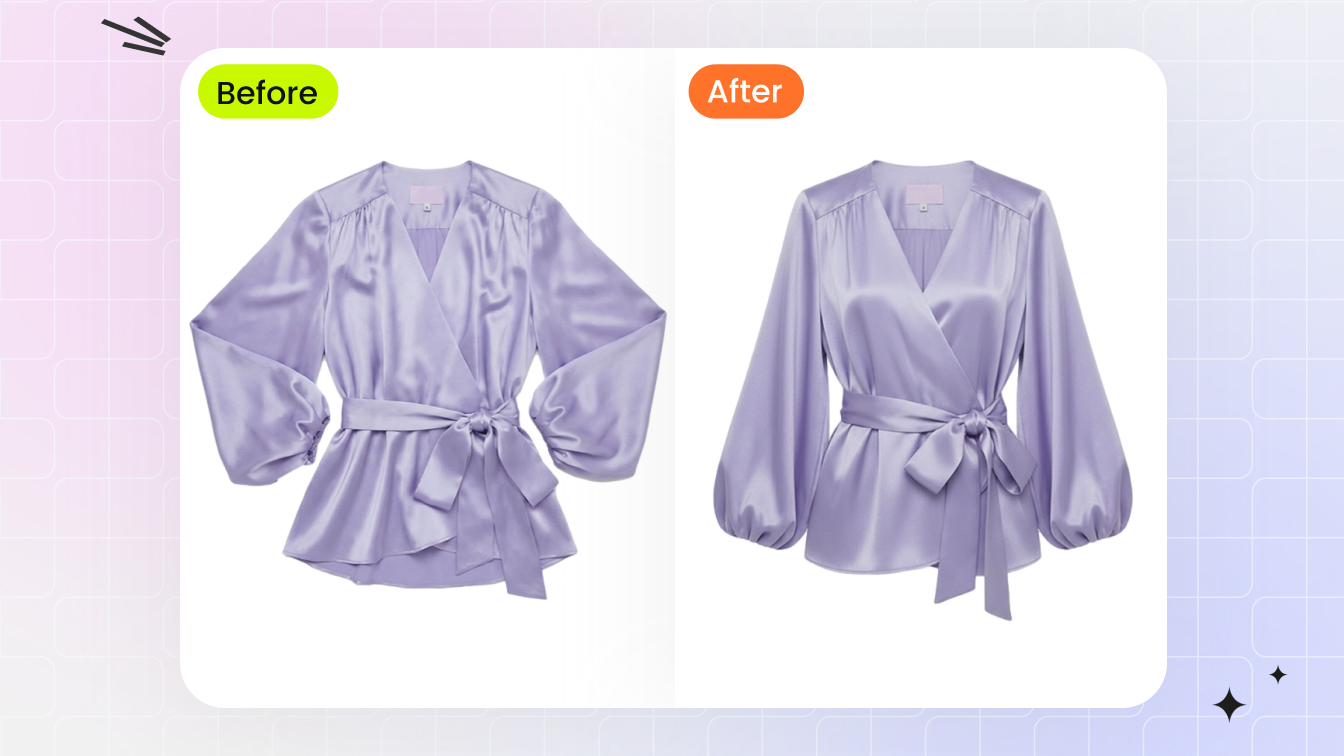
Single flat-lay → invisible mannequin output. Generated by Snappyit's AI Ghost Mannequin tool on the Basic plan, no manual edits afterward.
Try the AI route on your own garment photo. Free credits, no card required. Try Snappyit Ghost Mannequin free →
The Photography Setup (Traditional Workflow)
Method 1 is what apparel studios have used for the better part of two decades. It still produces the highest-fidelity output for high-end fabric — silk, lace, sheer knit — where AI tools occasionally misread the texture. Here's the equipment list and the step-by-step:
- Mannequin. White or skin-toned, in the size that matches your sample garment. A fitted mannequin (e.g., women's size 6 / men's medium) is standard for apparel catalog work.
- Continuous lighting or strobes with two large softboxes positioned at 45° from each side of the mannequin to flatten shadows.
- Backdrop. White seamless paper or a light-gray cyclorama wall.
- Camera. A tripod-mounted DSLR or mirrorless body with a 50mm or 85mm lens at f/8 to f/11 for edge-to-edge sharpness.
- Photoshop. A copy of Adobe Photoshop ($19.99/month on the Photography plan) plus a ghost mannequin action or a freelance editor who knows the neck-joint workflow.
Plan on roughly $2,000 to $5,000 for a basic in-house studio setup, plus 5 to 15 minutes of editing per image once you have the two raw shots in hand.
The AI Workflow (How It Works in Seconds)
Method 3 collapses the studio + Photoshop work into a single upload. The actual flow is three steps:
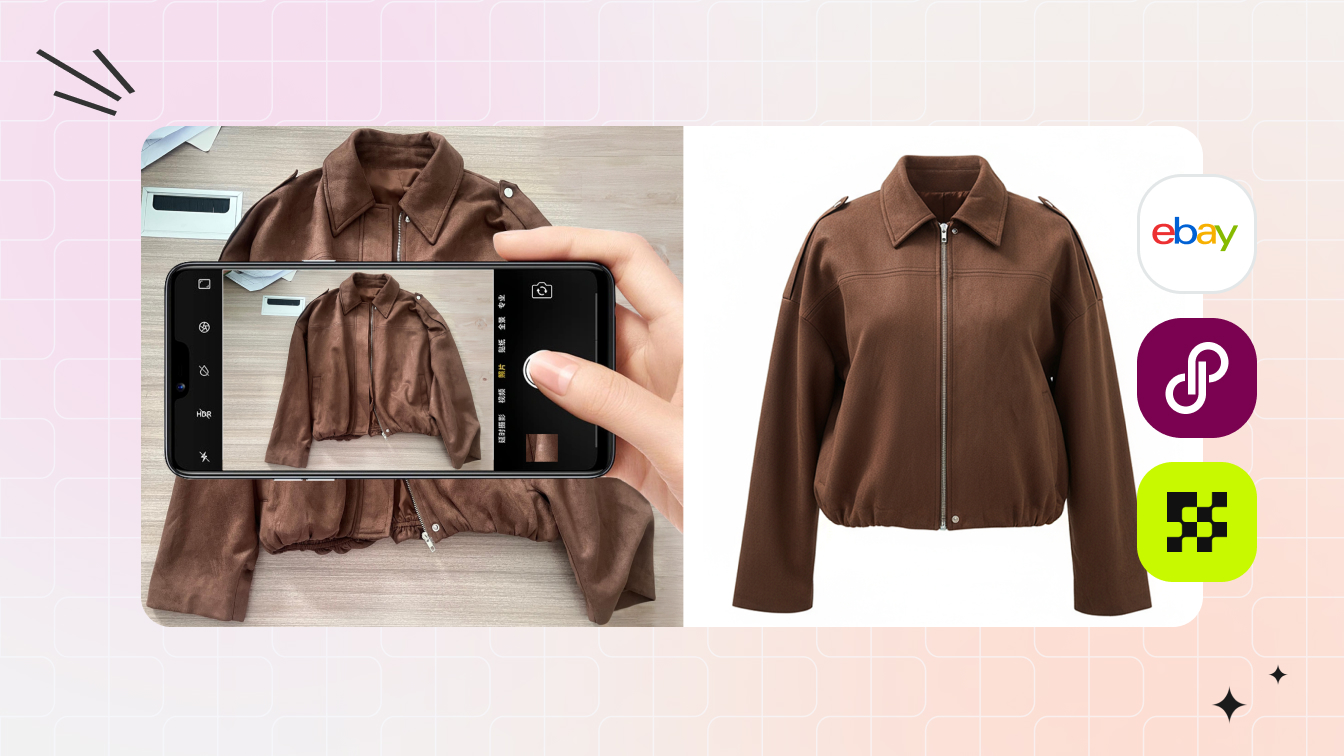
- Upload a flat-lay (~30 seconds). A top-down photo of the garment on a neutral surface. Phone-quality is fine.
- AI predicts the 3D shape (~20 seconds). The model generates the worn silhouette, including the interior neckline cavity.
- Download the result (instant). 2000px+ PNG with transparent or white background — listing-ready.
No second interior shot is required, no Photoshop skills are required, and the workflow runs entirely in the browser. Snappyit's flat-lay to ghost mannequin workflow is one example; the same pattern applies to the other AI-native tools covered in our 2026 invisible mannequin tools comparison.
How AI Reads Your Flat-Lay (And When It Fails)
Understanding what the AI is doing under the hood helps you produce better input photos — and helps you spot when the output needs a touch-up before it hits your listing.
An AI ghost mannequin model is trained on tens of thousands of paired examples — flat-lay photos on one side, the corresponding 3D-worn output (typically from a real photo shoot or a high-quality manual neck joint composite) on the other. Given a new flat-lay, the model predicts what the garment would look like worn: where the shoulders sit, how the sleeves fall, what the interior of the neckline reveals, and where natural fabric drape creates folds and shadow.
The model handles three sub-tasks in parallel:
- Shape inference. The AI estimates the underlying 3D structure of the garment from 2D cues — collar shape, button placement, side-seam curvature. Structured pieces (a button-down shirt, a fitted tee, a denim jacket) give the model many strong cues; unstructured pieces (a draped silk slip, an oversized sweater with no defined waist) give weaker cues and produce more variable output.
- Interior generation. The hardest part of the hollow man effect is hallucinating the interior of the back neckline so it shows correctly through the front opening. The AI generates this from training-set patterns — what the inside of a similar garment typically looks like — rather than from your specific photo. This is where AI tools occasionally produce a back-neck that's the wrong color or texture for the actual garment.
- Lighting and color matching. The model copies the lighting direction and color tone from your input flat-lay so the output looks coherent. If your flat-lay is shot under mixed lighting (window light + tungsten lamp, for example), the model can struggle to produce a consistent light direction in the output.
AI fails most often in three predictable scenarios: (1) sheer or semi-transparent fabrics where the interior generation produces an opaque back neck that doesn't match the see-through look of the actual garment; (2) heavily textured cable knits or jacquards where the interior pattern doesn't match the front; and (3) garments shot at an off-axis angle (not perfectly top-down) where the AI struggles to infer the symmetry plane. Knowing these failure modes lets you spot bad output in two seconds and either re-shoot the input or fall back to a manual workflow for that one SKU.
Cost & Time Comparison: Traditional vs. AI
The apples-to-apples comparison for a single invisible mannequin image, assuming you already have your garment in front of you:
| Method | Cost per image | Time per image | Notes |
|---|---|---|---|
| Traditional in-studio | $25–$75 | ~30–60 minutes | Mannequin time, lighting, two raw shots (front + interior), 5–15 min Photoshop editing. Initial studio setup adds $2,000–$5,000. |
| Outsourced (Path Edits) | $0.89–$1.79 | 6–24 hours turnaround | Manual edit by trained editor; bulk dashboard upload. |
| Outsourced (Pixelz) | $1.50–$3.00 | 3–24 hours turnaround | AI cutout + human review on every image. API for bulk. |
| AI (Snappyit) | $0.07–$0.20 | under 30 seconds | Single flat-lay input. Basic plan $6.9/mo annual (100 cr, ~$0.07/image); pay-as-you-go pack $5.9/30 credits (~$0.20/image). Free credits on signup. |
An AI tool at $0.07/image is roughly 370× cheaper than a $25/image in-studio shot. The gap closes (but doesn't disappear) when comparing AI to outsourced services at $0.89–$3.00/image.
See your own flat-lay turn into an invisible mannequin shot. 30 seconds. Free trial credits, no payment information required to start. Generate free →
Where the Invisible Mannequin Effect Shines (Use Cases)
The technique fits some catalogs better than others. The four strongest use cases:
Amazon apparel sellers
Amazon's apparel category is dominated by ghost mannequin / invisible mannequin main images. Pure flat-lays read as "low effort" to buyers; on-model shots are typically allowed only as secondary images. The invisible mannequin output is the safest main-image style for Amazon Apparel categories.
Shopify boutiques and DTC fashion brands
Brand consistency matters when your store carries 50–500 SKUs. A studio-shot invisible mannequin (or AI-generated equivalent) gives every product the same drape angle, the same lighting, the same crop — turning a category page into a coherent grid instead of a patchwork of inconsistent shots.
Etsy resellers and vintage clothing sellers
Resellers cycle through hundreds of unique items per month. Booking a model for each one is unrealistic; even Photoshop neck-joint editing eats too much time. AI invisible mannequin tools have made this category economically viable for the first time — see our reseller tools roundup for the broader workflow.
Jewelry on neck displays
For necklaces, the invisible mannequin technique adapts using a clear acrylic neck display, then editing the display out in post. The piece appears to float against the background, making the chain length and pendant proportion immediately readable. Pure ghost mannequin tools focus on apparel; for jewelry, a dedicated AI jewelry retouch workflow often produces better results.
Common Mistakes That Ruin the Effect
Five recurring problems show up in low-quality invisible mannequin shots:
- Wrong neck angle. The interior neck shot must match the angle of the front shot. A 3° tilt off-axis makes the join visible and the garment look "wrong" without the viewer being able to articulate why.
- Visible mannequin shadow. Even after masking, the mannequin's shadow on the backdrop sometimes leaks through — look at the floor area below the garment.
- Garment not steamed. Wrinkles read as "low quality" instantly. Steam every garment before shooting; AI tools do not reliably remove wrinkles.
- Wrong lighting on the interior shot. The interior fill should match the front exposure within roughly half a stop. A bright interior pasted onto a softer front looks like a Photoshop accident.
- Color cast from a tinted backdrop. A "white" backdrop that's actually slightly cool or warm will tint the garment edges. Use a true neutral backdrop, or correct in color-change post-processing.
Pre-Shoot Checklist for the Best Invisible Mannequin Output
Whether you're shooting on a real mannequin for the manual neck joint workflow or laying garments flat for an AI tool, the same prep determines whether the final image looks listing-ready or "almost there." Run through this checklist before every shoot:
- Steam the garment thoroughly. Wrinkles are the single most common reason an invisible mannequin shot looks amateur. Steam every panel, then let the garment hang for 5 minutes before laying flat or putting on the mannequin. AI tools do not reliably remove wrinkles — what you photograph is what you publish.
- Check the neckline tag and label position. Most apparel ships with the brand label visible at the back interior of the neck. For ghost mannequin output, this label will be visible through the front opening — make sure it's straight, undamaged, and on-brand. For resold or vintage items, decide ahead of time whether to leave the original label visible or remove it in post.
- Match your input lighting to the output style. If your store uses bright, evenly-lit hero images, shoot your flat-lay under bright even light. If your brand uses moodier, directional lighting, lean that way in the input. AI tools mirror the input lighting; pick the lighting style you want in the output and shoot accordingly.
- Use a true white or light gray backdrop. Avoid colored surfaces, patterned backdrops, or surfaces that show wear (scratched white tabletops, wrinkled paper). The backdrop influences the AI's color reading and can introduce cast on the garment edges. A clean white sheet of seamless paper or a freshly-painted matte wall is the cheapest reliable option.
- Shoot top-down (or perfectly front-facing for mannequin shots). Off-axis flat-lays — even small 5° tilts — confuse the AI's symmetry inference. Use a tripod with a horizontal arm, or place your phone on a flat surface above the garment. For mannequin shots, the camera should be at the same height as the chest of the mannequin, parallel to the garment plane.
- Capture the garment edges clearly. The hem, sleeve cuffs, and shoulder seams need clean visible edges so the AI can identify the garment outline. Tuck or pin loose threads, smooth out folded-under hems, and make sure no part of the garment is cropped out of frame.
- Plan for color accuracy. If color fidelity matters (jewel tones, brand-specific hues), include a small color reference card in your test shots and adjust your camera's white balance before the real shoot. Color drift between input and output is harder to fix than shape drift.
Sellers who run through this checklist consistently report that they keep ~95% of AI-generated invisible mannequin output as-is, with no manual touch-up needed. Skip the checklist and that number drops to roughly 60% — meaning you'll be re-shooting or manually fixing four out of every ten photos.
When NOT to Use the Invisible Mannequin Effect
The technique isn't always the right answer. Three cases where on-model or lifestyle imagery converts better:
- Lifestyle / activewear. Yoga pants, running gear, swimwear — buyers want to see the piece in motion or in context. An invisible mannequin shot strips out exactly the information that drives purchase.
- Texture-heavy or unstructured fabrics. Heavy knit sweaters, draped silks, asymmetric cuts. The texture and movement of the fabric is part of the product story; invisible mannequin flattens it.
- High-fashion or editorial brands. If your brand's positioning is editorial, on-model shots in real environments do more for brand equity than a clean catalog grid. Run both — invisible mannequin for the main listing image, on-model for secondary images.
For brands that want both a catalog-clean main shot and a lifestyle on-model secondary shot from the same input, an AI fashion model tool is the natural pair to an invisible mannequin tool.
Frequently Asked Questions
What is the invisible mannequin effect in product photography?
The invisible mannequin effect is a product photography technique that shows a garment in its 3D-worn shape — preserving the neckline, sleeves, and overall drape — without any visible model or mannequin. It is the catalog standard for apparel listings on Amazon, Shopify, Etsy, eBay, and most fashion marketplaces.
Is the invisible mannequin effect the same as ghost mannequin?
Yes. Invisible mannequin, ghost mannequin, and hollow man effect are three names for the same outcome — a garment that appears worn but with no model or mannequin in the final image. Photographers tend to use "ghost mannequin" or "hollow man"; e-commerce platforms and marketplaces tend to use "invisible mannequin".
How is the invisible mannequin effect created without a model?
Three methods: (1) Studio photography on a real mannequin plus a separate interior shot, then composited together in Photoshop using the neck-joint technique. (2) Flat-lay photography of the garment laid out on a surface, then sent to an editing service or AI tool. (3) AI tools like Snappyit that take a single flat-lay photo and generate the 3D-worn look in under a minute.
Can AI tools create the invisible mannequin effect from a flat-lay photo?
Yes. Modern AI ghost mannequin tools accept a flat-lay photo as input and produce the invisible-mannequin output in seconds. Snappyit's AI ghost mannequin tool, for example, generates the 3D-worn look in under 30 seconds from a single garment photo, including the interior neck dimension.
How much does invisible mannequin photography cost per image?
Costs range widely. Outsourced editing services charge $0.89 to $3.00 per image (Path Edits and Pixelz are the common references). AI tools like Snappyit cost roughly $0.07 to $0.20 per image depending on plan tier. Traditional in-studio shooting costs much more — typically $25 to $75 per image when accounting for photographer, mannequin, and Photoshop neck-joint editing time.
What equipment do I need for traditional invisible mannequin shots?
A studio mannequin (typically white or skin-toned, in the size that matches your sample garment), continuous lighting or strobes with softboxes, a neutral backdrop (white or light gray), a tripod-mounted DSLR or mirrorless camera, and Photoshop with a ghost mannequin action or manual neck-joint workflow. Plan on roughly $2,000 to $5,000 for a basic setup.
Does the invisible mannequin effect work for jewelry and accessories?
Partially. The technique adapts to jewelry by using neck displays, ring forms, or earring stands, then editing the display out so the piece appears to float or hover. For most jewelry, on-model shots or retouched still-life shots actually convert better than ghost mannequin because the scale and proportion of the piece is what buyers want to see.
How long does it take to edit one invisible mannequin photo?
AI tools: under a minute end to end. Photoshop neck-joint workflow by an experienced editor: 5 to 15 minutes per image. Outsourced services: typically 6 to 24 hours turnaround for delivery, though active edit time per image is similar to in-house Photoshop work.
The Bottom Line
The invisible mannequin effect — by any of its three names — is the apparel catalog standard, and it's no longer the production bottleneck it used to be. For under $0.20 per image and under 30 seconds per shot, AI tools have collapsed what was a $25-per-image, 30-minute studio process into something a single seller can run from a phone on a kitchen table.
The traditional studio + Photoshop workflow still has a place for high-end fabric and editorial brands. The outsourced services still have a place for sellers who want human review on every image. But for the 80% case — apparel resellers, Shopify boutiques, Amazon FBA brands, Etsy vintage shops — the AI route has become the obvious default.
Try the invisible mannequin effect on your own garment
Upload a flat-lay, get a 3D-worn output in 30 seconds. Free credits on signup, no payment information required.