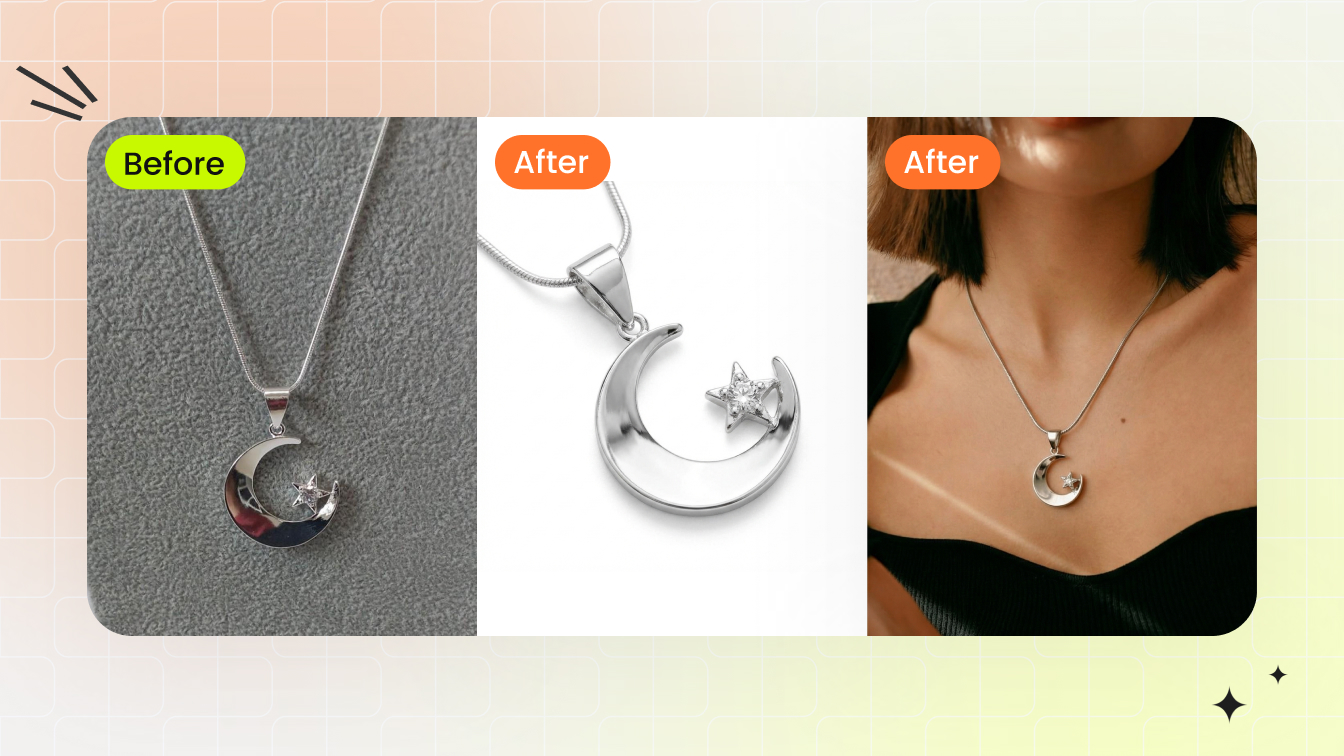
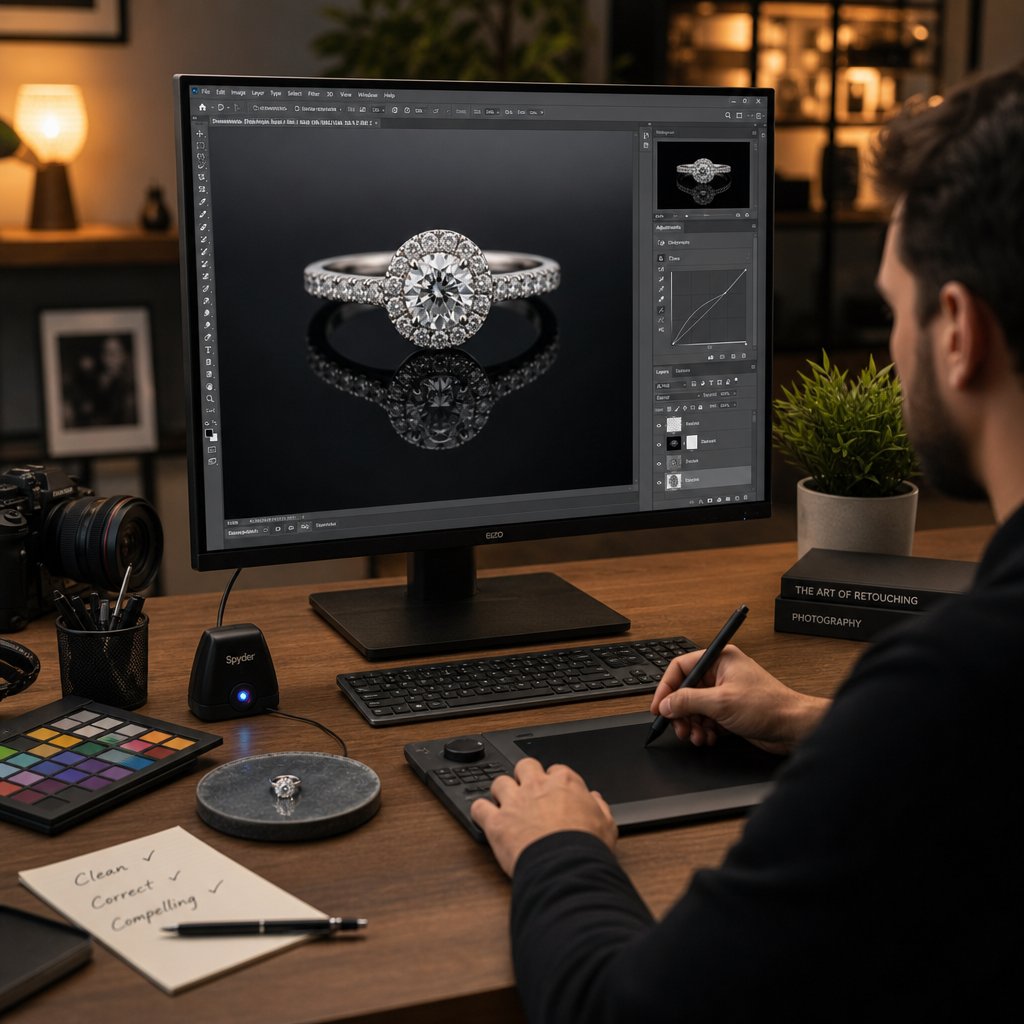
What Jewelry Image Retouching Really Means
Imagine photographing a diamond ring. The camera picks up dust particles invisible to the naked eye, the metal band mirrors the photographer's hand, and the gemstone facets look flat instead of fiery. This is where jewelry image retouching steps in, and it demands a completely different skill set than editing a portrait or a landscape.
Jewelry image retouching is the specialized process of enhancing jewelry photographs by correcting reflections, refining microscopic details in gemstones and metal surfaces, adjusting color accuracy for precious materials, and removing imperfections to present pieces as they appear in real life, only through a screen.
General photo editing handles broad corrections like exposure, cropping, and color balance. Jewelry retouching goes deeper. You're working with objects that are tiny, highly reflective, and packed with intricate detail at a scale most product categories never require.
What Sets Jewelry Retouching Apart from General Photo Editing
Jewelry presents a unique set of optical challenges that standard editing workflows simply cannot address. Metals act like mirrors, picking up reflections from lights, cameras, and surrounding objects. Gemstone facets interact with light in complex ways, producing brilliance, fire, and scintillation that a single photograph often fails to capture. Gold can shift toward an unnatural orange, silver can appear dull gray, and diamonds can look lifeless without careful intervention.
Unlike general product photography, where surface textures are relatively uniform, jewellery image retouching requires editors to zoom in at extreme magnification. A single prong holding a stone might need individual attention. Scratches invisible at normal viewing distance become glaring flaws in high-resolution ecommerce images. The goal is not to alter the piece but to correct what the camera failed to capture accurately, presenting the jewelry as it truly looks when held in hand under ideal light.
Who Needs Jewelry Image Retouching
The audience for jewelry retouching services spans a wide spectrum. Independent jewelers selling handmade pieces on marketplaces need clean, consistent product shots that compete with larger brands. Mid-size ecommerce stores managing hundreds of SKUs require scalable workflows that maintain visual quality across entire catalogs. Luxury brands demand pixel-perfect imagery for advertising campaigns and hero banners where every facet and surface texture must look flawless.
Photographers specializing in jewelry also rely on retouching to deliver final images that match client expectations, since even the best lighting setup cannot eliminate every reflection or dust particle in-camera. Whether you're shooting a single engagement ring or an entire seasonal collection, the retouching stage is where raw captures transform into images that communicate craftsmanship, quality, and value to buyers who cannot physically inspect the piece.
The techniques behind this transformation matter more than the tools you use. Throughout this guide, you'll find practical, tool-agnostic methods covering everything from color accuracy for specific metals to batch workflows for large catalogs, all built around the principle that great jewelry photography and skilled retouching work together to drive real sales results.
Why Professional Retouching Drives Jewelry Sales
Jewelry retouching services often get categorized as a finishing touch, something nice to have after the "real" work of photography is done. That framing misses the point entirely. For ecommerce jewelry brands, retouching is not a cosmetic step. It is a revenue lever with measurable impact on conversions, returns, and long-term brand equity.
Think about how customers shop for jewelry online. They cannot hold the ring, tilt it under light, or feel the weight of a bracelet on their wrist. The product image is the entire experience. When that image fails to communicate the sparkle, color depth, and craftsmanship of a piece, the sale disappears. Professional jewelry photo retouching services bridge the gap between physical beauty and digital presentation, giving buyers the confidence they need to click "add to cart."
How Image Quality Impacts Ecommerce Conversion
90% of online shoppers rank image quality among their top purchase factors. For jewelry, that number carries even more weight. A $2,000 engagement ring demands a level of visual trust that a $20 t-shirt simply does not. Customers need to see exact stone color, true metal finish, and precise craftsmanship details before committing.
The conversion data backs this up. Professional product photography can increase conversion rates by up to 33% compared to low-quality alternatives. Jewelry specifically shows some of the strongest improvements: amateur photography typically generates conversion rates between 1% and 2%, while professional imagery elevates that range to 3% to 5%. A jump from 2% to 3.5% means 75% more sales from the same traffic volume, with no additional ad spend required.
Multiple high-quality images per product amplify the effect further. 60% of shoppers examine 3 to 4 images before buying, and listings with multi-angle coverage show conversion lifts as high as 65%. For jewelry, where customers want to inspect prong settings, clasp details, and how light plays across a stone, those extra angles are not optional. They are expected.
The Cost of Poor Jewelry Photography Online
Subpar visuals do not just fail to attract buyers. They actively erode trust and inflate costs. 22% of online returns happen because the product looked different in person than it did on screen. For jewelry, where color accuracy and detail matter enormously, that mismatch is especially damaging. Products with professional, multi-angle photography show return rates 23% lower than those with basic images.
Consider a jewelry store doing $100,000 in monthly sales with a 25% return rate. If polished, accurately retouched imagery reduces returns to 10%, that saves $15,000 every month, or $180,000 annually. The jewelry photo editing services investment pays for itself within weeks through return reduction alone.
Beyond returns, poor imagery damages brand perception in ways that compound over time. Customers form first impressions within milliseconds based on visual quality. When your product photos look inconsistent, poorly lit, or amateurish next to a competitor's polished catalog, you lose the sale before the shopper even reads your product description. Visual content quality signals business legitimacy, and for jewelry, where trust is everything, that signal determines whether a browser becomes a buyer or bounces to the next store.
Jewellery retouching services are not about making pieces look better than they are. They are about making pieces look as good on screen as they do in person, closing the sensory gap that every online jewelry buyer faces. When your images accurately represent brilliance, texture, and color, customers trust what they see, buy with confidence, and keep what they ordered.
The business case is clear. The next question becomes practical: how do you actually achieve that level of quality across different jewelry types, each with its own retouching challenges?
Retouching Techniques by Jewelry Type
A diamond solitaire ring and a multi-strand chain necklace sit at opposite ends of the retouching spectrum. Each jewelry category presents distinct optical behaviors, structural complexities, and detail priorities. Treating them all the same way is one of the fastest paths to inconsistent catalog imagery. Effective jewelry photo retouching starts with understanding what each piece demands before you ever open your editing software.
The techniques below are tool-agnostic. Whether you work in Photoshop, Lightroom, GIMP, or Affinity Photo, the principles remain the same. What changes is the specific menu path, not the underlying approach.
Rings and Stone Settings
Rings are deceptively complex. The band is a curved mirror that reflects everything in the studio, including your camera, tripod, and light modifiers. The stone setting introduces microscopic geometry where prongs, bezels, or pave clusters each interact with light differently.
When retouching jewelry photos of rings, focus on three priority areas:
- Prong sharpening: Prongs often appear soft in photographs because they sit at the edge of the depth of field. Use selective sharpening or the high-pass filter method on a separate layer to restore crispness without introducing noise to the surrounding metal.
- Band reflection cleanup: The inner curve of a ring band picks up color casts from the shooting surface. Use the clone stamp or healing brush to replace distracting reflections with clean, consistent tonal gradients that preserve the metal's natural curvature.
- Halo and pave enhancement: Small accent stones in halo settings frequently lose individual definition. Dodge the highlight facets of each stone at low opacity to restore sparkle, then burn the gaps between stones to create separation and depth.
Gold bands benefit from gentle warming after reflection cleanup, while platinum and white gold need careful attention to avoid blue-gray color shifts that make the metal look dull rather than bright.
Necklaces and Chain Jewelry
Chains introduce a repetition problem. A necklace might contain hundreds of identical links, and inconsistency in just a few of them draws the eye immediately. Jewelry photography retouching for chains requires patience and a systematic approach.
The biggest challenge is link-by-link consistency. Some links catch light beautifully while adjacent ones appear dark or flat. Use dodge and burn on a neutral gray layer set to overlay blending mode. This lets you brighten underlit links and deepen shadow-side links without altering the underlying color information.
Clasp areas deserve special attention. Clasps are functional hardware, and they rarely photograph as elegantly as the decorative portion of the piece. Depending on the shot's purpose, you might minimize the clasp by positioning it out of frame during shooting, or clean it up in post by removing scratches and smoothing the spring mechanism's visible edges. For ecommerce, where customers want to see the full piece, keep the clasp visible but polished. For editorial or hero imagery, consider framing that hides it entirely.
Pendant necklaces add another layer: the bail connecting pendant to chain often creates a visual break. Ensure the transition between chain and pendant reads as one cohesive piece by matching highlight intensity across both elements.
Earrings, Bracelets, and Watches
Earrings demand symmetry. When you photograph a pair, one earring almost always catches light better than the other. A practical technique, used by professional jewelry photographers, is to retouch the stronger earring to perfection, then duplicate and mirror it to create a flawless pair. This works for manufactured earrings with identical construction. For handmade or asymmetrical designs, retouch each individually but match overall brightness and contrast so they read as a cohesive set.
Post and back details matter for ecommerce buyers who want to understand the fastening mechanism. Sharpen these small elements selectively so they remain legible at typical viewing sizes.
Bracelets present link uniformity challenges similar to chains, but with added complexity at hinge points and clasps. Hinges accumulate micro-scratches from wear during sample handling, and these show up prominently in macro photography. The spot healing brush handles isolated scratches well, while the clone stamp works better for larger areas where you need to rebuild texture patterns.
Watches occupy the highest difficulty tier in jewellery photo retouching. The dial must be perfectly legible, with crisp indices, clean hands, and accurate lume pip rendering. The crystal (glass face) creates a double challenge: it reflects the environment while simultaneously allowing you to see through to the dial beneath. Managing crystal reflections often requires compositing multiple exposures, one optimized for the dial and another for the case and bracelet.
Watch bezels, whether ceramic, metal, or gem-set, each need distinct treatment. Ceramic bezels require smooth tonal transitions, metal bezels need controlled specular highlights, and gem-set bezels demand the same pave techniques used for ring halos.
| Jewelry Type | Difficulty Rating | Key Techniques Required | Estimated Skill Level |
|---|---|---|---|
| Rings (simple band) | 3/10 | Reflection cleanup, surface smoothing, basic sharpening | Beginner |
| Rings (stone setting) | 6/10 | Prong sharpening, dodge and burn, halo enhancement, color accuracy | Intermediate |
| Necklaces (chain) | 5/10 | Link consistency, clasp cleanup, dodge and burn on overlay layer | Intermediate |
| Necklaces (pendant) | 6/10 | Chain techniques plus stone enhancement, bail transition matching | Intermediate |
| Earrings (pair) | 4/10 | Symmetry correction, duplication and mirroring, post detail sharpening | Beginner to Intermediate |
| Bracelets | 6/10 | Link uniformity, hinge scratch removal, clasp refinement, clone stamping | Intermediate |
| Watches | 9/10 | Multi-exposure compositing, crystal reflection management, dial sharpening, bezel treatment | Advanced |
| Loose gemstones | 7/10 | Facet sharpening, color depth preservation, brilliance boosting, background interaction control | Intermediate to Advanced |
Loose gemstones round out the spectrum. Without a metal setting to anchor them visually, every facet edge and internal color zone becomes the entire story. Facet sharpening must be precise, targeting only the edges where light refracts, not the flat planes between them. Color depth requires careful saturation control: push too far and the stone looks synthetic, hold back too much and it appears washed out.
Each jewelry type rewards a tailored approach. The retoucher who applies ring techniques to a watch or chain techniques to loose stones will produce mediocre results regardless of their technical skill. Matching your method to the material is what separates competent editing from professional-grade jewellery photo retouching that actually sells product.
Of course, technique selection is only half the equation. Getting the color right for each metal and gemstone type is where many retouchers struggle most, and where small errors create the biggest gap between how a piece looks on screen versus in hand.
Color Accuracy for Metals and Gemstones
You can master every dodge and burn technique, nail your background removal, and sharpen every prong to perfection, but if the gold looks orange or the sapphire reads purple, the image fails. Color accuracy is the single most technically demanding aspect of jewelry image editing, and it is where the gap between amateur and professional results becomes immediately visible to buyers.
Metals and gemstones are extremely sensitive to color shifts. A slight white balance error that would go unnoticed on a cotton shirt becomes glaringly obvious on a polished gold surface. Customers know what gold looks like. They know what a ruby should be. When your images drift from those expectations, trust evaporates, and so do sales.
White Balance Calibration for Gold, Silver, and Platinum
White balance is your first line of defense against inaccurate metal tones. Each metal type has a narrow range of acceptable color temperatures, and drifting outside that range produces results that look wrong even to untrained eyes.
The challenge is that reflective metal surfaces confuse automatic white balance systems. A gold ring reflects warm ambient light back into the sensor, causing the camera to overcorrect toward cool tones. Silver does the opposite, sometimes triggering warm compensation that adds an unwanted yellow cast. This is why professional jewelry photographers recommend a color temperature between 5000 and 6500K with manual white balance set using a gray card, rather than relying on auto settings.
When you reach the retouching stage, here is what to aim for with each metal type:
- Yellow gold: Target a color temperature between 5200K and 5800K. Gold should feel warm and rich without tipping into orange or mustard territory. If your gold looks too saturated in the yellow-orange channel, reduce orange saturation selectively rather than cooling the entire image. The goal is a buttery warmth that reads as luxurious.
- White gold and platinum: Work within 5500K to 6200K. These metals should appear bright and neutral with a subtle cool undertone. Watch for blue or purple shifts that make the metal look like silver costume jewelry rather than precious metal. If highlights skew blue, use selective color adjustments to pull cyan and blue out of the highlight range only.
- Silver and sterling silver: Keep between 5400K and 6000K. Silver needs a clean, neutral tone with controlled brightness. The common mistake is letting silver go too gray and flat. Maintain specular highlights that read as bright white to communicate the metal's reflective quality.
- Rose gold: Aim for 5200K to 5600K. Rose gold requires the most delicate touch. The pink warmth must be present but subtle. Push too far and it looks like copper. Pull back too much and it becomes indistinguishable from yellow gold. Fine-tune using the hue slider in selective color, targeting reds and magentas independently.
A practical tip: when shooting multiple metal types in one session, set your white balance using a gray card at the start and shoot in RAW. This preserves full color data and lets you make precise adjustments per metal type during jewellery image editing without degrading image quality. Auto white balance should be avoided entirely for jewelry work, as reflective surfaces easily confuse the camera and cause inconsistent color results between shots.
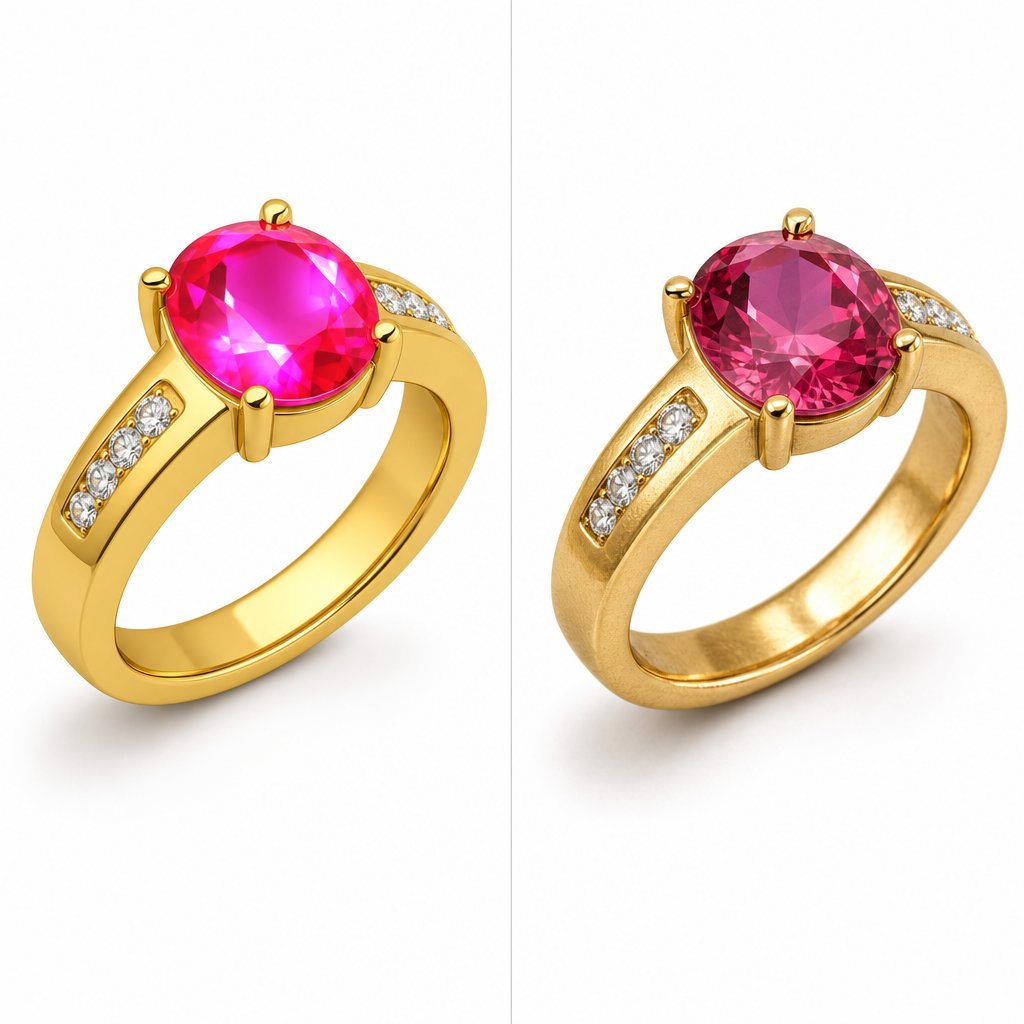
Preserving Gemstone Color Fidelity
Gemstones present a different color challenge than metals. Where metals need accurate surface tone, gemstones need accurate transmitted and refracted color with proper saturation depth. The temptation to oversaturate is strong, and it is the most common amateur mistake in high end jewelry retouching.
Each stone type has specific pitfalls:
Diamonds should appear neutral with brilliant white fire. The biggest error is introducing a yellow or blue tint during white balance correction. Diamonds reflect their environment, so if your lighting or background introduces a color cast, the stone absorbs it visually. Use the whites and highlights sliders to ensure diamond facets read as clean, bright neutrals. Avoid boosting clarity or contrast so aggressively that the stone loses its transparent quality and starts looking like cubic zirconia.
Rubies demand saturated red without clipping into pure magenta or losing shadow detail in the deeper tones. The red channel clips easily in 8-bit files, which is one reason high end jewellery retouch workflows use higher bit depths. When adjusting ruby color, work with the HSL panel to target reds specifically. Push luminance slightly to maintain depth in darker areas, and watch your histogram for red channel clipping.
Emeralds need green depth without muddiness. The challenge is that emeralds contain complex internal inclusions (called jardin) that scatter light unevenly. Over-sharpening makes these inclusions look like flaws rather than natural character. For color, target the green and yellow channels independently. Emeralds often benefit from a slight boost in green luminance paired with reduced yellow saturation to prevent the stone from looking olive or khaki.
Sapphires require rich blue without purple drift. Many sapphires contain secondary violet or green hues that cameras tend to exaggerate. Use hue adjustments to pull the blue channel toward pure blue if the stone reads too purple, or desaturate the violet range slightly. The goal is a deep, confident blue that matches how the stone appears under daylight-balanced illumination.
Across all gemstone types, the principle is the same: enhance what the camera failed to capture, but never push beyond what the stone actually looks like in person. Customers who receive a ruby that looks less vivid than the product photo will return it. Accuracy builds trust. Exaggeration destroys it.
Color Spaces and Bit Depth for Jewelry Work
Sounds technical? It is. But these decisions directly affect whether your final images display accurate color or introduce subtle errors that accumulate across an entire catalog.
sRGB vs. Adobe RGB: The choice depends on your output destination. Adobe RGB is approximately 35% larger than sRGB, capturing more color information particularly in greens and blues. For jewelry image editing destined for print catalogs, lookbooks, or advertising, Adobe RGB preserves richer tonal data that professional printers can reproduce. For ecommerce product images displayed on screens, sRGB is the standard color space for web browsers and most consumer monitors.
The practical workflow for most jewelry brands: shoot and edit in Adobe RGB to preserve maximum color data throughout your retouching pipeline, then convert to sRGB on export for web use. This approach gives you the widest working gamut during editing, where you need it most for distinguishing subtle metal tones and gemstone hues, while ensuring your final images display correctly across all devices.
16-bit vs. 8-bit editing: This matters enormously for metallic surfaces. An 8-bit file contains 256 tonal levels per channel. A 16-bit file contains 65,536. When you are working with smooth metallic gradients, like the curved surface of a polished gold band transitioning from highlight to shadow, those extra tonal levels prevent visible banding. Every curves adjustment, every levels tweak, every color correction in 8-bit mode destroys tonal information that cannot be recovered. In 16-bit mode, you have thousands of times more headroom for non-destructive adjustments.
For jewelry retouching specifically, always perform your color corrections, exposure adjustments, and metal enhancement work in 16-bit mode. Convert to 8-bit only at the final export stage when saving for web.
Monitor calibration: None of the above matters if your display is lying to you. An uncalibrated monitor might show gold as warmer or cooler than it actually is in the file, leading you to "correct" colors that were already accurate. Hardware calibration devices measure your monitor's actual output and create a profile that compensates for its specific characteristics. For high end jewelry retouching, calibrate monthly at minimum, targeting a white point of D65 (6500K), gamma of 2.2, and brightness between 80 and 120 cd/m2 depending on your working environment.
Without calibration, you are making color decisions based on inaccurate information. Two retouchers working on the same file with uncalibrated monitors will produce visibly different results, which is a consistency disaster for any brand managing a multi-SKU catalog.
Color accuracy is the foundation that every subsequent retouching step builds upon. Get it wrong, and even flawless technique elsewhere cannot save the image. Get it right, and you have a solid base for the enhancement pipeline that transforms a raw capture into a polished, sale-ready product image.
The Complete Retouching Pipeline from RAW to Final Export
Color accuracy gives you a truthful starting point. But a single correct white balance setting does not produce a finished, sale-ready image. Jewelry photo editing is a sequential process where each stage builds on the one before it, and skipping or reordering steps creates problems that compound downstream. A structured pipeline eliminates guesswork, protects your original file, and ensures repeatable results whether you are editing one hero shot or five hundred catalog images.
The pipeline below works regardless of your software choice. The specific tools differ between Photoshop, Capture One, Lightroom, GIMP, and Affinity Photo, but the sequence and logic remain constant. Follow these stages in order, and you will move from a raw capture to a polished export without backtracking or destructive edits.
- RAW development - Exposure correction, white balance, lens distortion correction, chromatic aberration removal, and initial noise reduction.
- Non-destructive workflow setup - Layer structure creation, smart object conversion, and adjustment layer organization.
- Dust and scratch removal - Spot healing, clone stamping, and micro-imperfection cleanup on a separate layer.
- Background removal - Isolating the jewelry from its shooting environment using pen tool paths, AI selection, or channel masking.
- Metal enhancement - Highlight recovery, reflection cleanup, and surface smoothing while preserving texture.
- Gemstone enhancement - Facet sharpening, brilliance boosting, and color depth refinement.
- Shadow creation - Adding drop shadows, natural shadows, or reflection shadows to ground the piece.
- Final export - Color space conversion, resizing, sharpening for output, and file format selection.
RAW Development and Non-Destructive Workflow Setup
Every professional jewelry editing workflow starts with the RAW file, never a JPEG. RAW files preserve the full tonal and color data captured by your sensor, giving you far more latitude for exposure recovery and white balance correction without introducing artifacts. JPEG compression discards this data permanently, and for jewelry where subtle metallic gradients and gemstone color transitions matter, that loss is unacceptable.
During RAW development, handle these adjustments first:
- Exposure: Correct overall brightness. For jewelry, slightly underexposing at capture and recovering in post often preserves highlight detail in reflective metal surfaces better than overexposing and trying to pull back blown highlights.
- White balance: Apply the metal-specific temperature settings covered in the previous section. If you shot with a gray card, use the eyedropper tool on the card for a neutral starting point, then fine-tune per metal type.
- Lens correction: Enable profile-based distortion correction. Macro lenses used for jewelry can introduce subtle barrel distortion that makes round stones appear slightly oval. Fix this before any retouching work begins.
- Chromatic aberration removal: High-contrast edges on metal and gemstones frequently show purple or green fringing. Most RAW processors handle this with a single checkbox, but verify the correction visually at 100% zoom on prong tips and stone edges.
Once your RAW development is complete, open the file into your pixel editor and immediately establish a non-destructive layer structure. The principle is simple: never edit your background layer directly. Every adjustment, every cleanup stroke, every enhancement should live on its own layer or adjustment layer so you can modify, reduce, or remove it later without starting over.
A practical layer stack for jewelry photo editing looks like this from bottom to top: original background (locked), dust removal layer (empty layer for clone and heal work), metal enhancement group (curves, dodge/burn layers), gemstone enhancement group (sharpening, brilliance layers), and shadow layers. Name everything clearly. When you are working on a catalog of 200 pieces, "Layer 47 copy 2" tells you nothing six hours into a session.
Smart objects add another layer of protection. Converting your base image to a smart object before applying filters means those filters remain editable. A surface blur applied to smooth metal can be revisited and adjusted at any point without undoing subsequent work. For jewelry editing, where you frequently need to fine-tune filter intensity after seeing the cumulative effect of later adjustments, this flexibility is essential.
Background Removal and Shadow Creation Methods
Jewelry almost always needs to be separated from its shooting background for ecommerce use. White backgrounds are standard for marketplace listings, while lifestyle and editorial contexts might call for custom environments. Regardless of the destination, clean isolation is the foundation.
Three primary methods exist for background removal, each with distinct strengths:
Pen tool (manual path creation): The pen tool produces the cleanest, most precise edges. You manually trace the jewelry's outline with bezier curves, creating a vector path that converts to a pixel-perfect selection. For pieces with smooth, defined edges like polished bands or bezel-set stones, the pen tool is unmatched. The downside is speed. A complex piece with chain links, prongs, and filigree can take 30 to 60 minutes to path accurately. Professional retouching services still favor hand clipping paths for high-end results, especially for delicate pieces like chains or earrings where automated tools struggle.
AI-powered selection: Tools like Photoshop's Select Subject, Remove Background, and dedicated services like Remove.bg use machine learning to detect and isolate objects automatically. For simple jewelry shapes on clean backgrounds, AI selection works remarkably well and reduces a 30-minute task to seconds. The limitation appears with fine details: thin chain links, wispy prong tips, and translucent gemstone edges often get clipped or partially erased. AI selection works best as a starting point that you refine manually rather than a finished result.
Channel masking: This technique exploits contrast differences between color channels to create selections. If your jewelry was shot on a background that differs strongly in one channel (a white ring on a dark background shows extreme contrast in all channels), you can duplicate that channel, increase its contrast, and convert it to a selection. Channel masking excels with fine, wispy details like chain links and hair-thin prong tips that the pen tool handles slowly and AI handles poorly. It struggles when the jewelry and background share similar tonal values in all channels.
Most professional workflows combine methods. Use AI selection for the bulk shape, refine edges with the pen tool where precision matters, and employ channel masking for ultra-fine details like chain links. This hybrid approach balances speed with accuracy.
Shadow creation happens after background removal and serves a critical visual purpose: grounding the jewelry so it does not appear to float in empty space. Three shadow types suit different contexts:
- Drop shadow: A soft, offset shadow beneath the piece. Simple to create, works well for catalog consistency, and adds subtle depth. Best for flat-lay product shots where the jewelry sits on a surface.
- Natural shadow: Mimics the shadow the piece would cast under directional lighting. More realistic than a drop shadow but requires careful attention to light direction, shadow softness, and falloff. Ideal for lifestyle-adjacent product shots.
- Reflection shadow: A mirrored reflection beneath the piece, as if it sits on a glossy surface. Creates a premium, editorial feel. Duplicate the isolated jewelry, flip vertically, reduce opacity to 20-40%, and apply a gradient mask that fades the reflection to nothing. This style works particularly well for watches and statement pieces where you want to communicate luxury.
Metal and Gemstone Enhancement Techniques
With your jewelry cleanly isolated on a proper layer structure, enhancement work begins. This is where a competent jewelry photo editor separates from a general retoucher. Metal and gemstone surfaces demand opposite approaches applied to the same image, often within millimeters of each other.
Metal enhancement focuses on three goals: recovering blown highlights, cleaning up distracting reflections, and smoothing surface imperfections without destroying texture.
Highlight recovery starts in RAW development but often needs further attention at the pixel level. Specular highlights on polished metal frequently clip to pure white, losing all detail. Use a curves adjustment layer to pull the brightest highlights down slightly, restoring a hint of tonal information that reads as metallic sheen rather than a featureless white blob. Mask this adjustment to affect only the blown areas.
Reflection cleanup is where you remove unwanted environmental reflections, the photographer's silhouette, equipment outlines, or color casts from surrounding objects. The clone stamp set to current layer sampling works well for replacing reflections with clean metal tone. Work at low opacity and build up gradually to maintain natural-looking tonal variation. A perfectly uniform metal surface looks artificial. Real polished metal shows subtle gradients and soft environmental reflections that communicate its three-dimensional form.
Surface smoothing addresses micro-scratches, dust marks, and handling wear visible in macro photography. The surface blur technique on a separate layer with an inverted mask is a professional standard: apply surface blur to a duplicate layer, hide it entirely with a black mask, then paint white on the mask only over areas that need smoothing. This preserves intentional texture like brushed or hammered finishes while eliminating flaws. The key is restraint. Over-smoothed metal looks like plastic, not precious material.
Gemstone enhancement prioritizes facet definition and brilliance without pushing into artificial territory.
Facet sharpening targets the edges where light refracts, not the flat planes between facets. Use unsharp mask or high-pass sharpening on a masked layer, painting the effect only onto facet boundaries. This creates the visual snap that makes a diamond look alive in a photograph. Apply sharpening at your final output resolution, not before, since resizing after sharpening degrades the effect.
Brilliance boosting uses dodge and burn to amplify the light-dark contrast within a stone. Dodge the brightest facets at 5-10% opacity to increase their pop. Burn the darkest facets slightly to deepen contrast. The cumulative effect mimics how the stone looks when you tilt it under light, that flash of fire and brilliance that photographs often flatten. Work on a 50% gray layer set to overlay blending mode so your adjustments remain fully non-destructive and adjustable.
When you edit jewelry photos at this stage, constantly zoom out to check your work at the size customers will actually view it. Enhancement that looks perfect at 400% zoom might appear over-processed at normal viewing distance. The final image needs to look natural and inviting, not technically impressive to other retouchers.
The last step before export is output sharpening, applied after resizing to your final dimensions. Web images typically benefit from a light unsharp mask pass (amount 50-80%, radius 0.5-1.0px) that compensates for the softening inherent in downsampling. Save your final ecommerce images as JPEG at quality 80-85% for the best balance of file size and visual fidelity, or PNG if you need transparency for overlay compositions. Always embed the sRGB color profile to ensure consistent display across browsers and devices.
A disciplined pipeline like this transforms jewelry photo editing from an improvised, inconsistent process into a repeatable system. Every image follows the same path, hits the same quality benchmarks, and arrives at the same professional standard. That consistency matters enormously when your catalog contains hundreds of pieces that all need to feel like they belong to the same brand.
Still, even the most refined manual pipeline has a speed ceiling. When volume scales up and deadlines compress, the question becomes which parts of this workflow can be accelerated with automation, and which absolutely require a human eye.
Skip the studio — retouch jewelry photos with AI →
AI-Assisted vs Manual Jewelry Retouching
Speed and precision pull in opposite directions. A fully manual pipeline delivers flawless results but hits a hard ceiling when you need 500 product images ready by Friday. Fully automated tools process those 500 images in minutes but introduce errors that erode the luxury feel your brand depends on. The real question is not which approach wins. It is where each one belongs in your workflow.
Jewelry photography AI has matured rapidly, and understanding its current strengths and blind spots helps you deploy it where it adds value without compromising the details that drive conversions.
What AI Can Handle Reliably in Jewelry Retouching
AI-powered tools excel at repetitive, pattern-based tasks where the margin for creative interpretation is low. For jewelry specifically, these areas deliver consistent results:
- Background removal: Separating a piece from a clean studio backdrop takes seconds with AI selection tools. For simple shapes like bands, pendants, and stud earrings on high-contrast backgrounds, accuracy is high enough to use with minimal manual cleanup.
- Dust and blemish spotting: Neural network-based healing identifies and removes sensor dust, surface particles, and minor scratches across batch volumes that would take a human retoucher hours.
- Batch color correction: Applying consistent white balance and exposure normalization across hundreds of catalog images ensures baseline uniformity before any fine-tuning begins.
- Basic surface cleanup: Primary blemish removal and initial noise reduction work well on smooth, less detailed surfaces where the AI does not need to distinguish between a flaw and an intentional design element.
For high-volume ecommerce sellers managing large catalogs of simple to moderately complex pieces, an ai jewelry photo editor can reduce initial processing time by up to 85% on basic repetitive tasks like color correction and background removal. That efficiency frees your budget and attention for the work that actually requires human judgment.
Where Manual Expertise Still Outperforms Automation
AI interprets images through learned patterns. Jewelry breaks those patterns constantly. Faceted gemstones produce reflections that AI frequently misreads as noise or artifacts, attempting to smooth or reconstruct them in ways that destroy the very sparkle that makes a diamond valuable.
Here is where manual retouching remains essential:
- Complex reflections on faceted stones: AI cannot distinguish between a genuine facet reflection that communicates brilliance and an unwanted environmental reflection that needs removal. A skilled retoucher understands the physics of light refraction and knows exactly which highlights to enhance and which to eliminate.
- Metal texture preservation: AI tends to over-smooth metals, making them look like plastic rather than precious material. Maintaining the natural grain of brushed gold or the subtle gradients on a polished platinum surface requires human dodge and burn work that respects the material's character.
- Brand-specific aesthetic standards: Your brand might call for warm, romantic lighting on engagement rings or stark, high-contrast edits for modern minimalist pieces. AI applies generic enhancement patterns. It cannot interpret a brand style guide or make creative decisions about mood and presentation.
- Structural accuracy: Intricate designs like filigree work, pave settings, and delicate chain links frequently confuse AI algorithms. You might see merged prongs, distorted shapes, or over-polished patterns that misrepresent the actual piece, leading to customer disappointment and returns.
The conversion impact is measurable. Manually retouched images of high-value jewelry can increase conversions by up to 40% compared to basic AI-processed alternatives, precisely because they preserve the authentic detail and luxury feel that buyers expect from premium pieces.
Hybrid Workflows That Balance Speed and Quality
The most effective jewelry photo editing service providers do not choose one approach over the other. They layer both strategically. Think of AI as handling the groundwork and manual retouching delivering the finishing precision.
A practical hybrid workflow looks like this:
- AI handles initial processing: Background removal, batch white balance normalization, dust spotting, and basic exposure correction across the full catalog.
- Human review and triage: A retoucher evaluates AI output, flagging pieces that need manual intervention based on complexity, value, and intended use (hero image vs. thumbnail).
- Manual precision work: Skilled editors handle gemstone enhancement, metal texture refinement, reflection management, and brand-specific creative adjustments on flagged images.
- Quality control pass: Final review ensures consistency across the catalog, catching any AI artifacts that slipped through and verifying color accuracy against reference standards.
This layered approach lets brands scale their catalog output without sacrificing the quality that drives purchases. Services like Snappyit's jewelry retouching operate on this principle, combining AI efficiency for volume processing with quality-focused output tuned for ecommerce presentation. For brands managing growing catalogs that need consistent, polished imagery without fully manual processing of every single frame, this hybrid model hits the practical sweet spot between speed and visual integrity.
Whether you build a hybrid workflow in-house or partner with a dedicated jewelry photo editing service, the key insight remains the same: let automation handle what it does well, and protect the creative decisions that make your imagery sell. A free jewelry editing photo service or basic AI tool might handle your social media thumbnails, but your primary product listings, the images customers zoom into before spending hundreds or thousands of dollars, deserve the precision that only a structured, quality-controlled process can deliver.
Knowing where AI fits and where it falls short is one thing. Recognizing the specific errors that degrade jewelry images, whether AI-generated or human-made, is what keeps your catalog from quietly losing sales through preventable quality issues.
Common Retouching Mistakes That Ruin Jewelry Photos
Every retoucher, whether working manually or reviewing AI output, eventually develops blind spots. You spend hours perfecting a single ring image, zoom out, and it looks stunning. But your customer sees something different. Maybe the gold looks like painted plastic. Maybe the ruby glows like a neon sign. Maybe the entire catalog feels disjointed when browsed as a collection.
These jewellery photo editing errors are subtle enough to slip past a tired editor yet obvious enough to trigger doubt in a buyer's mind. Most jewelry image editing mistakes are invisible at first glance, but customers notice them subconsciously, and that subconscious doubt kills sales faster than high prices ever could. Here are the most damaging errors and exactly how to fix them.
Over-Processing Metal Surfaces
Imagine a hammered gold bangle. Its entire visual appeal comes from those tiny, irregular facets catching light at different angles. Now imagine running a surface blur across it until those facets disappear into a smooth, featureless gradient. That is what over-smoothing does. It turns precious metal into something that looks like a 3D render or, worse, cheap plastic.
Why does this happen? Retouchers trying to remove micro-scratches or manufacturing marks often apply smoothing tools globally rather than selectively. Automated tools are especially prone to this, treating intentional texture the same as surface flaws. The result is gold that loses its natural texture variations, which are part of the quality that communicates craftsmanship to buyers.
The correction approach is restraint and precision. Work on a separate layer with an inverted mask, painting smoothing only onto actual flaws like scratches or dust marks. Leave the surrounding texture completely untouched. Ask yourself before every stroke: is this a defect, or is this the character of the metal? Brushed finishes, hammered surfaces, satin textures, and even the subtle grain of polished gold all need to survive your retouching. If you zoom out and the metal looks uniformly smooth with no tonal variation, you have gone too far.
A useful test: compare your retouched image to a macro photograph of the same metal type from a reputable jeweler's website. Does your version still show the same surface quality? If it looks noticeably smoother, dial back your edits.
Gemstone Saturation and Reflection Errors
This is the most visible amateur mistake in jewellery retouching, and it comes in two forms: oversaturated color and artificial sparkle.
Oversaturation happens when editors push vibrance or saturation sliders too aggressively, trying to make stones "pop" on screen. A sapphire shifts from rich blue to electric neon. A ruby goes from deep crimson to fire-engine red. An emerald turns radioactive green. These colors do not exist in nature, and buyers recognize the fakery instantly, even if they cannot articulate why the image feels wrong. As one industry analysis notes, over-brightening gemstones creates glare instead of that desirable natural fire.
The fix: work with HSL adjustments targeting specific hue ranges rather than global saturation. Increase luminance slightly to add perceived vibrancy without pushing chrominance into clipping territory. Check your histogram for channel clipping, particularly in the red channel for rubies and the blue channel for sapphires. If any channel hits the wall, you have lost recoverable color data.
Reflection errors are the second half of this problem. Adding fake sparkle overlays, those pre-made "diamond shine" effects, is immediately recognizable. Real gemstone brilliance follows the physics of facet geometry. Light exits specific angles based on the stone's cut. When you add sparkle that does not align with actual facet positions, the stone looks like clip art rather than a precious gem.
The correction: enhance existing sparkle points using dodge at low opacity on the brightest facets. Never create new light sources that the original photograph does not support. If a facet is dark in the capture, it should remain relatively dark in the final image. You are refining what the camera recorded, not inventing what it did not.
Catalog Consistency Failures
A single beautifully retouched image means nothing if it looks different from every other image in your product line. When a customer browses your catalog and the same 14K yellow gold appears warm on one page, cool on the next, and slightly greenish on a third, it communicates carelessness. Worse, it makes buyers question whether the pieces are actually the same material.
Consistency failures typically stem from three sources: white balance drift between shooting sessions, different retouchers applying different aesthetic preferences, and inconsistent shadow styles across product categories. When shadows do not match across your product line, it means the photos were edited without guidelines, and that breaks the visual cohesion customers expect from a professional brand.
The fix is systemic rather than image-by-image. Establish a brand style guide that defines exact color temperature targets for each metal type, shadow style and direction, background tone (pure white at RGB 255,255,255 or a specific neutral), and sharpening parameters. Apply these standards as presets or actions, and review images side-by-side rather than individually. Jewellery editing at catalog scale requires you to think in collections, not single frames.
Beyond these three major categories, watch for these additional errors that quietly degrade quality:
- Aggressive noise reduction: Heavy-handed denoising wipes out fine detail in engraving, filigree, and pave settings. Reduce noise only to the point where grain is no longer distracting, then stop. Detail is more valuable than smoothness.
- Unrealistic shadow placement: Shadows that fall in a direction inconsistent with the image's lighting look pasted on. Match shadow angle and softness to the actual light source visible in the highlights.
- Color banding: Smooth metallic gradients that show visible stepping or posterization indicate the file was edited in 8-bit mode with too many tonal adjustments stacked. Always work in 16-bit until final export.
- White balance drift in series: Shooting across multiple sessions without a gray card reference produces images where the same gold alloy appears different colors. Anchor every session to a calibrated reference point.
Use this checklist to evaluate your own retouching before delivery:
- Does metal retain visible surface texture appropriate to its finish type?
- Do gemstone colors fall within realistic saturation ranges without channel clipping?
- Are all sparkle and brilliance points aligned with actual facet geometry?
- Is shadow direction and softness consistent across all images in the set?
- Does the same metal alloy appear identical in color across every product shot?
- Are smooth gradients free of visible banding or posterization?
- Do fine details like prongs, engravings, and chain links remain sharp and legible?
- Is the background tone uniform across the entire catalog?
- Does the image look natural at the size customers will actually view it?
Run through this list at 100% zoom on a calibrated monitor before marking any image as complete. Catching these errors before they reach your product pages is infinitely cheaper than losing sales to the subconscious doubt they create in buyers.
Fixing individual mistakes is one thing. Preventing them systematically across hundreds of SKUs requires a different kind of thinking: batch workflows, reusable presets, and quality control processes designed for scale.
Let AI handle batch retouching at catalog scale →
Batch Processing and Catalog Workflows at Scale
Retouching one ring to perfection takes skill. Retouching 400 rings to the same standard takes a system. When your catalog grows beyond a handful of SKUs, individual image-by-image editing becomes unsustainable. You need repeatable processes that deliver consistent quality without requiring every frame to be treated as a one-off creative project.
The shift from single-image retouching to catalog-scale production is where many jewelry brands hit a wall. The techniques do not change, but the workflow around them must. Presets, actions, naming conventions, and structured quality checkpoints transform a chaotic editing marathon into a manageable, predictable pipeline.
Building Reusable Presets and Actions for Catalog Consistency
The core idea behind batch processing is simple: edit one image, then apply those same adjustments to the rest using automated processes. In practice, this means building presets and actions that encode your brand's visual standards into reusable templates.
In Lightroom, the Sync Settings feature lets you develop one image to completion, then push selected adjustments across an entire batch. Select your edited reference image, multi-select the remaining shots from the same session, and sync only the settings that translate well across the group: exposure, white balance, contrast, and lens corrections. Settings like local adjustments or spot removal rarely batch well and should stay per-image.
In Photoshop, actions record a sequence of steps that you can replay on any file. For jewellery photo editing services workflows, a typical action might include:
- Creating a standard layer structure (dust removal layer, enhancement groups, shadow layers)
- Applying a curves adjustment preset calibrated for your metal type
- Running output sharpening at your standard web dimensions
- Converting to sRGB and saving with consistent JPEG quality settings
You can then apply that action to a batch of images through Adobe Bridge, letting Photoshop open each file, execute the recorded steps, and save the result without manual intervention. The key is keeping your actions general enough to apply broadly. Encode the structural and tonal baseline, then handle piece-specific refinements individually.
A practical naming convention ties everything together. Use a logical structure like brand_collection_SKU_view.jpg so files sort predictably and integrate cleanly with your ecommerce platform. Clear file naming supports internal tracking and SEO, and prevents the chaos of duplicate or misidentified images when you are managing thousands of assets.
Template-based workflows take this further. Create a master PSD template with your standard layer stack, adjustment layers set to neutral, and shadow layers pre-positioned. For each new piece, drop the isolated jewelry into the template, adjust the piece-specific elements, and export. The structural decisions are already made, saving minutes per image that compound into hours across a full catalog.
Photography Techniques That Reduce Retouching Workload
The fastest retouching is the retouching you never have to do. Disciplined capture technique eliminates problems at the source rather than creating post-production work that scales linearly with your SKU count.
A light tent creates even lighting and reduces reflections on shiny surfaces, which is why it remains the default setup for high-volume jewelry catalogs. The diffused, wrap-around illumination minimizes harsh specular highlights and environmental reflections that would otherwise require manual cleanup on every single image. For brands shooting dozens of pieces per session, a tent setup means less time cloning out reflections and more time on value-adding enhancement.
Dark field lighting takes the opposite approach, placing lights behind or beside the piece so only the edges and facets catch illumination against a dark background. This technique produces dramatic images with strong contrast and visible gemstone fire, reducing the need for dodge-and-burn brilliance work in post. It is particularly effective for loose gemstones and diamond-heavy pieces where sparkle is the primary selling point.
Light painting, where you move a small light source around the piece during a long exposure, gives you precise control over exactly which surfaces catch highlights. The trade-off is speed: each shot takes longer to capture, but the resulting image often needs minimal retouching because you have already sculpted the light exactly where you want it.
Beyond lighting, two capture techniques dramatically reduce post-production effort:
- Macro lens selection: A dedicated macro lens with 1:1 reproduction ratio captures fine detail that cheaper alternatives cannot resolve. When prongs and facet edges are sharp in-camera, you spend less time applying corrective sharpening in post. Lenses in the 90mm to 105mm range offer comfortable working distance without introducing the perspective distortion of shorter focal lengths.
- Focus stacking: Jewelry's small size means depth of field is razor-thin even at narrow apertures. Shooting multiple frames at different focus distances and combining them in software produces front-to-back sharpness that a single exposure cannot achieve. This eliminates the need to artificially sharpen out-of-focus areas during retouching, a process that always looks inferior to genuine optical sharpness.
The principle connecting all of these techniques is the same: keeping your settings consistent when shooting makes batch processing viable. When 40 images share the same exposure, white balance, and lighting conditions, syncing adjustments across the batch works reliably. When every shot is different, batching becomes impossible and you are back to editing each frame from scratch.
Quality Control at Scale
Automation speeds up production, but without structured review checkpoints, it also speeds up the propagation of errors. One miscalibrated preset applied to 200 images means 200 images with the same color drift. Quality control at scale requires deliberate verification gates built into your workflow.
Research from McKinsey found that a single negative experience has four to five times greater relative impact than a positive one, which means one inconsistent image in your catalog does disproportionate damage to customer trust. Visual coherence must be verified at every step, not assumed.
A practical QA process for jewellery photo retouching services includes these checkpoints:
- Post-batch review: After applying presets or syncing settings, spot-check at least 10-15% of the batch at 100% zoom. Look for images where the preset produced unexpected results due to slight variations in capture conditions.
- Side-by-side comparison: View images from the same collection together rather than individually. Color drift, shadow inconsistencies, and brightness variations become immediately obvious when pieces are displayed as a group.
- Reference image matching: Maintain a set of approved reference images for each metal type and product category. Compare new edits against these references to catch gradual style drift that accumulates over time.
- Final delivery audit: Before images go live, review the complete set as a customer would see it. Check that everything looks like one brand by examining lighting uniformity, background tone consistency, shadow style, and color accuracy across the full catalog.
For brands managing large volumes, the decision between handling everything internally versus partnering with a dedicated jewellery photo editing service often comes down to whether you can maintain these QA standards consistently. The table below compares three common approaches:
| Approach | Speed | Consistency | Cost per Image | Quality Ceiling |
|---|---|---|---|---|
| Fully Manual (in-house editor) | Slow: 15-45 min per image depending on complexity | Variable: depends on editor fatigue and skill level | High: salary plus software plus hardware costs | Highest: unlimited creative control and precision |
| Preset-Assisted (batch workflow) | Moderate: 3-10 min per image with preset base plus manual refinement | Good: presets enforce baseline standards across batches | Medium: same infrastructure but higher throughput | High: presets handle routine work, manual effort targets complex pieces |
| Service-Based (outsource jewelry photo clipping services and retouching) | Fast: turnaround measured in hours or days for full batches | High: professional QA processes and style guides enforced across teams | Low to medium: per-image pricing scales with volume | High: professional retouchers with jewelry-specific expertise |
Most growing jewelry brands move through these approaches sequentially. You start fully manual when your catalog is small and your budget is tight. As volume increases, you build presets and actions to maintain throughput. Eventually, the combination of volume, turnaround pressure, and consistency demands makes outsourcing part or all of the retouching workload the more practical choice.
The right approach depends on where you sit today: your current catalog size, your growth trajectory, your internal skill level, and how much of your time retouching consumes versus other business priorities. That calculation, knowing exactly when to keep retouching in-house and when to hand it off, is the decision that separates brands scaling efficiently from those drowning in an ever-growing backlog of unedited product shots.
When to Outsource Your Jewelry Retouching
That growing backlog of unedited product shots is not just a workflow inconvenience. It is revenue sitting on the shelf. Every day an image remains unretouched is a day that SKU is either absent from your store or represented by a subpar photo that underperforms. The decision to outsource jewelry photo retouching services is not about admitting defeat. It is about recognizing where your time generates the highest return.
The DIY vs Outsource Decision Framework
Not every brand needs to outsource, and not every brand should keep retouching in-house. The right answer depends on four variables working together:
- Volume: If you are editing fewer than 20 images per week, DIY retouching with presets is manageable. Once you consistently exceed 50 to 100 images weekly, the time cost starts competing with revenue-generating activities like product development, marketing, and customer relationships.
- Complexity: Simple band rings on white backgrounds are straightforward enough for a trained in-house editor. Multi-stone pieces, watches, and high-end editorial shots with complex reflections demand specialized skill that takes years to develop.
- Turnaround pressure: Seasonal launches, flash sales, and marketplace listing deadlines create spikes that an in-house team cannot absorb without sacrificing quality. Outsourcing offers the flexibility to scale up or down based on project volume without the overhead of permanent staff.
- Internal skill level: Be honest about your team's capabilities. General photo editors can handle basic cleanup, but jewelry-specific challenges like facet sharpening, metal texture preservation, and gemstone color accuracy require dedicated expertise. Experienced retouchers know how to handle tricky reflections, tiny details, and color accuracy that generalists struggle with.
A simple test: calculate your opportunity cost. If the hours you spend retouching could generate more revenue when redirected to photography, sales, or product sourcing, outsourcing delivers better ROI even before you factor in quality improvements. A 2020 Deloitte survey confirmed that cost savings, flexibility, and business agility remain the top three reasons companies outsource editing work.
What to Look for in a Jewelry Retouching Service
The spectrum of providers ranges from individual freelancers on marketplace platforms to dedicated jewelry retouching companies with specialized teams. Freelancers offer lower per-image costs but introduce consistency risks when they are unavailable or overbooked. Dedicated services cost more per image but deliver predictable quality, defined turnaround windows, and the capacity to handle volume spikes without notice.
When vetting any jewellery retouching service, evaluate these criteria:
- Jewelry-specific portfolio: General product retouching experience is not enough. Ask for before-and-after samples of rings, necklaces, and gemstone pieces specifically. A provider like Snappyit's jewelry retouching service focuses specifically on polishing jewelry imagery for ecommerce and brand presentation, which means their workflow is built around the unique challenges metals and stones present.
- Consistency guarantees: Can they maintain identical color standards across 500 images? Ask how they enforce brand guidelines across their editing team and what QA checkpoints exist before delivery.
- Turnaround time: Most professional services deliver edited images within 24 to 48 hours depending on complexity and volume. Confirm rush order capabilities for time-sensitive launches.
- Revision policies: Understand how many revision rounds are included and what the process looks like. A service that resists revisions is a service that will not match your brand standards long-term.
- Color accuracy standards: Ask whether they work in 16-bit, whether they calibrate monitors, and how they handle metal-specific white balance. These technical details separate a jewelry photo retouching service from a generic editing shop.
- Scalability: Your catalog will grow. Can the provider handle 50 images this month and 500 next month without quality degradation? Outsourcing lets you easily scale up or down without stress, but only if your provider has the team depth to absorb volume changes.
- Data security: Your product images represent unreleased designs and proprietary photography. Confirm secure file transfer methods and willingness to sign NDAs protecting your intellectual property.
Scaling Image Quality as Your Catalog Grows
Most jewelry brands hit the outsourcing inflection point somewhere between 100 and 300 active SKUs. Below that threshold, a skilled in-house editor with good presets can maintain quality and turnaround. Above it, the math shifts decisively. The cost of hiring, training, and equipping additional in-house editors exceeds the per-image cost of a dedicated jewelry retouching company, and the consistency advantages of a specialized team with established QA processes become difficult to replicate internally.
The transition does not need to be all-or-nothing. Many brands start by outsourcing their routine catalog shots, the straightforward white-background product images that benefit most from batch efficiency, while keeping hero images and campaign photography in-house where creative control matters most. This hybrid model lets you maintain your brand's creative vision on high-visibility assets while ensuring your full catalog meets professional standards without bottlenecking your internal team.
Whatever path you choose, the underlying principle stays constant: your jewelry deserves imagery that matches its craftsmanship. Whether you achieve that through disciplined DIY workflows, a trusted outsource partner, or a combination of both, the goal is the same. Every piece in your catalog should look as stunning on screen as it does in the hand of the customer who buys it.
Frequently Asked Questions About Jewelry Image Retouching
What is jewelry image retouching and how is it different from regular photo editing?
Jewelry image retouching is a specialized post-production process focused on correcting reflections, enhancing microscopic gemstone facets, adjusting color accuracy for precious metals, and removing imperfections from jewelry photographs. Unlike general photo editing that handles broad corrections like cropping and exposure, jewelry retouching requires working at extreme magnification on highly reflective surfaces, managing complex light interactions with metals and stones, and preserving fine details like individual prongs and chain links that standard editing workflows cannot address.
How much does professional jewelry retouching improve ecommerce sales?
Professional jewelry imagery can increase conversion rates from the typical 1-2% range up to 3-5%, representing a potential 75% or more increase in sales from the same traffic. Additionally, products with professionally retouched, multi-angle photography show return rates approximately 23% lower than those with basic images. The investment pays for itself through both increased conversions and reduced return costs, since 22% of online returns happen because products looked different in person than on screen.
Should I use AI or manual retouching for my jewelry photos?
The most effective approach combines both. AI handles repetitive tasks reliably, including background removal, batch color correction, dust spotting, and basic exposure normalization, reducing processing time by up to 85% on routine work. However, manual expertise remains essential for complex reflections on faceted stones, preserving metal texture without over-smoothing, maintaining brand-specific aesthetics, and ensuring structural accuracy in intricate designs. Services like Snappyit (https://snappyit.ai/jewelry-retouch) use this hybrid model to balance speed with quality for ecommerce jewelry at scale.
What are the most common jewelry retouching mistakes to avoid?
The three most damaging mistakes are over-smoothing metal surfaces (which makes precious metal look like plastic by removing natural texture), oversaturating gemstone colors (pushing stones into unrealistic neon tones that buyers immediately distrust), and catalog consistency failures (where the same gold alloy appears different colors across product listings). Each of these errors triggers subconscious doubt in buyers and directly reduces conversion rates. Working on separate layers, using HSL adjustments instead of global saturation, and establishing brand style guides with defined color targets prevents these issues.
When should a jewelry brand outsource retouching instead of doing it in-house?
The outsourcing inflection point typically arrives between 100 and 300 active SKUs, or when you consistently exceed 50-100 images per week. Key signals include retouching time competing with revenue-generating activities, turnaround pressure from seasonal launches, and complexity beyond your team's specialized skill level. Calculate your opportunity cost: if hours spent retouching could generate more revenue when redirected to photography, sales, or product development, outsourcing delivers better ROI. Many brands start by outsourcing routine catalog shots while keeping hero images in-house for creative control.
Retouch your first jewelry photo in 60 seconds
You can absolutely build out the in-house pipeline above — calibrate your monitor, work in 16-bit Adobe RGB, dial in pen tool paths, paint shadows on Multiply layers, and refine every facet by hand. Many luxury brands rely on that craft for their hero imagery. But if you need a clean, color-accurate, listing-ready jewelry image today, without subscribing to Photoshop, hiring a freelance retoucher, or learning HSL panels, Snappyit's AI jewelry retouching turns a raw supplier or phone photo into a polished, white-background ecommerce shot in about 60 seconds. Same metal accuracy, same gemstone clarity. Free to try, no credit card.
Try the AI jewelry retouching tool →