What Professional Ecommerce Product Photography Studios Deliver
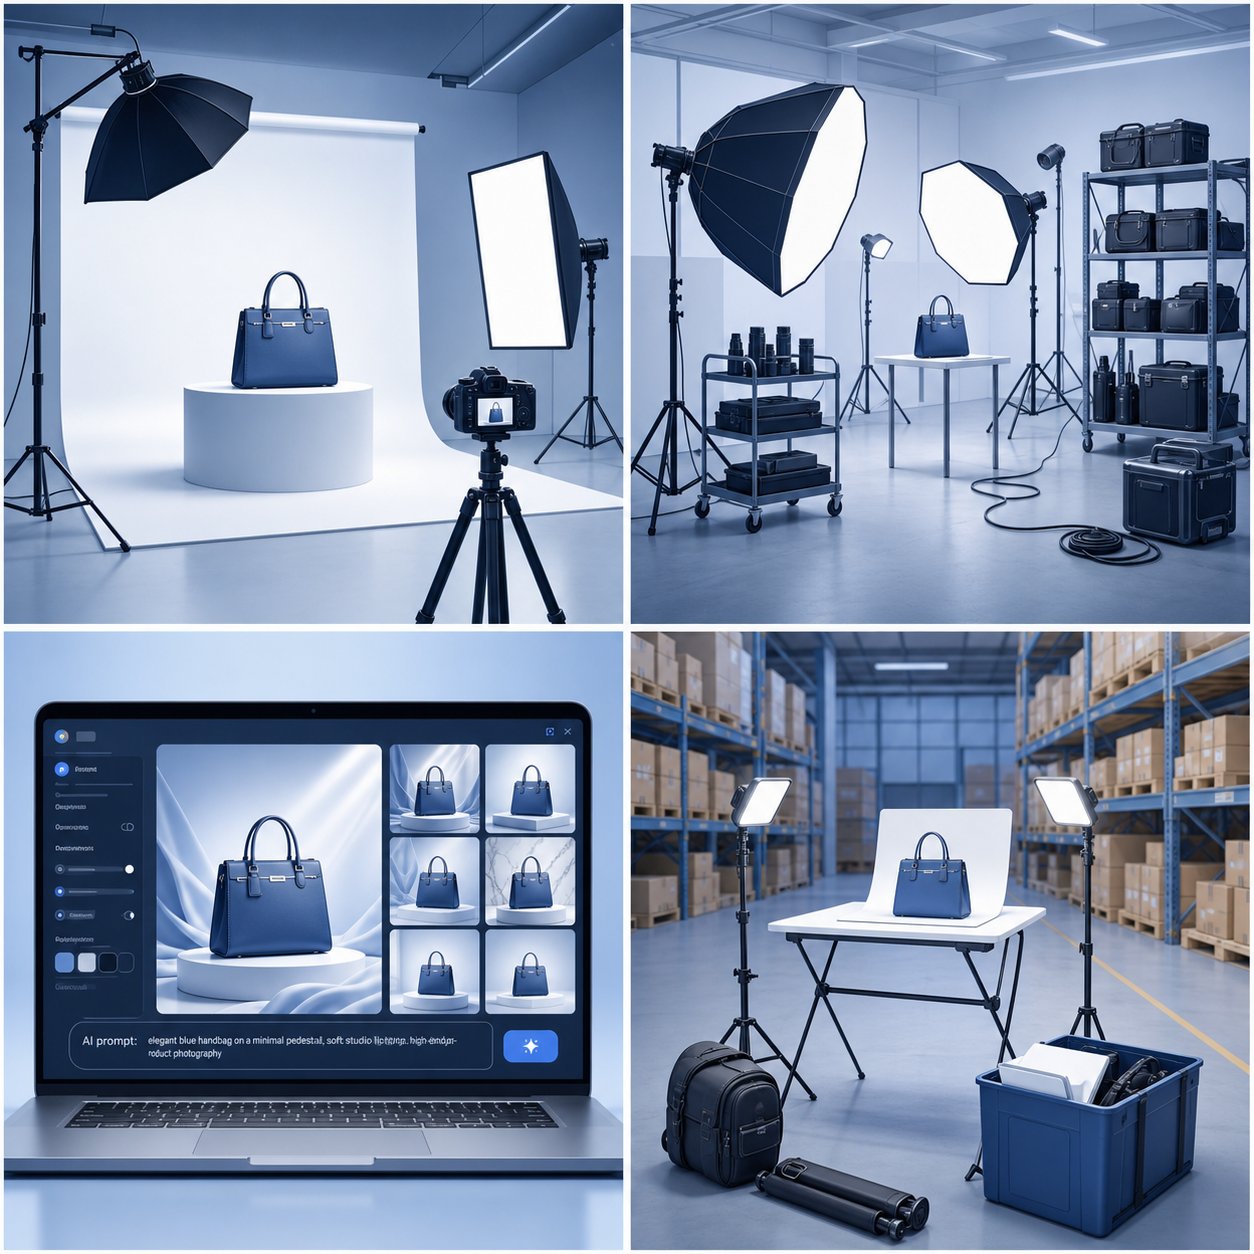
Imagine you have a product that looks great in person. Customers who hold it tend to buy it. But online, nobody gets to hold anything. Your product photo becomes the handshake, the pitch, and the proof of quality rolled into one frame. Professional photo studios for ecommerce product photography exist specifically to solve this problem. They turn physical products into digital assets that sell.
These aren't general commercial photography studios that happen to shoot products on the side. Ecommerce product photography studios are a specialized service category built around one goal: creating images that convert browsers into buyers across online marketplaces and storefronts. Their entire workflow, from lighting rigs to post-production pipelines, is designed for the demands of selling online.
What Professional Ecommerce Photography Studios Actually Do
At their core, ecommerce product photography studios bundle several services into a single pipeline. You send them a product (or bring it in), and you receive back a set of platform-ready visual assets. The typical service bundle includes:
- Product shooting with professional lighting, backdrops, and camera equipment tailored to your item type
- Styling and art direction to present your product in its best context, whether that means clean white-background shots or lifestyle scenes
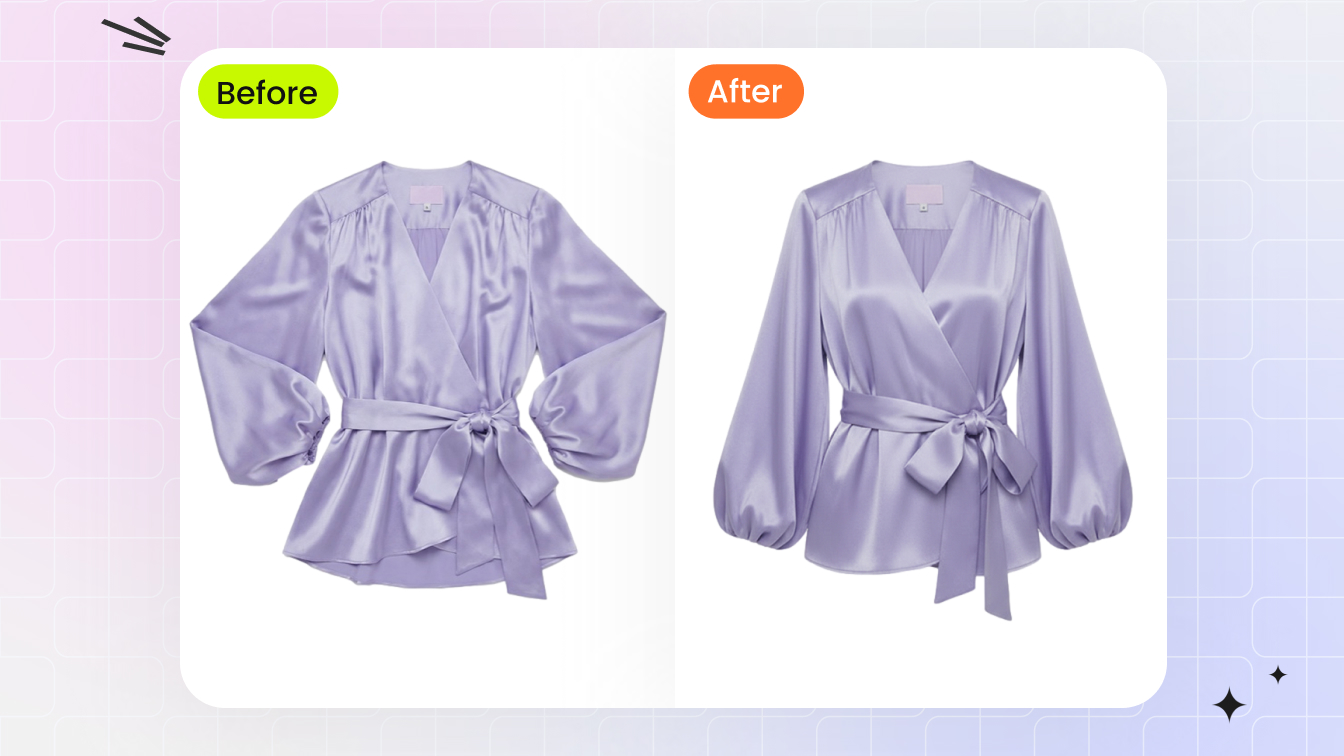
- Post-production editing covering retouching, background removal, color correction, and shadow creation
- Platform formatting that delivers images sized, cropped, and optimized for specific marketplaces like Amazon, Shopify, or Etsy
This end-to-end approach is what separates dedicated ecommerce photography studios from a freelance photographer with a DSLR. The studio understands not just how to make a product look good, but how to make it look good within the technical and visual constraints of online storefront photography. Every angle, every pixel count, every background color choice ties back to platform compliance and buyer psychology.
Why Product Visuals Drive Ecommerce Success
You might wonder whether professional ecommerce product photography actually moves the needle. The research is unambiguous. Baymard Institute's UX research found that 56% of users in its usability testing explored product images as their very first action on a product page, before reading titles or descriptions. The image isn't supplemental. It's primary.
When shoppers can't touch, hold, or inspect a product in person, image quality becomes the single strongest signal of product value and seller credibility.
This principle plays out across every measurable metric. Salsify's 2025 Consumer Research Report shows that 77% of shoppers say high-quality images and videos are important to their purchase decisions. On the returns side, 71% of consumers have sent products back because the item didn't match what the listing showed them. Better imagery doesn't just increase conversions. It reduces costly returns by setting accurate expectations.
For sellers on marketplaces, the effect is even more direct. eBay's own data shows listings with higher-quality photos are 4.5% more likely to sell. A Cornell University study found that handbag listings with better photo quality were roughly 1.25 times more likely to sell. Across hundreds of SKUs, these gains translate into meaningful revenue that was previously left on the table.
If you sell online and your current images were shot on a kitchen table with a phone camera, you already sense the gap. Professional ecommerce photography bridges it, transforming your raw product into a conversion-ready asset that meets platform requirements, builds buyer confidence, and competes visually with established brands investing heavily in online storefront photography.
The real question isn't whether professional product visuals matter. It's which service model fits your catalog size, budget, and growth stage, and that's where the options diverge significantly.
Comparing Service Models for Product Photography
Four distinct service models dominate the ecommerce product photography services landscape today. Each one solves the same core problem — turning your product into a sellable image — but through very different mechanisms. The right fit depends on your catalog size, budget constraints, turnaround needs, and how much creative control you want to retain.
AI-Powered Alternatives for Scaling Product Visuals
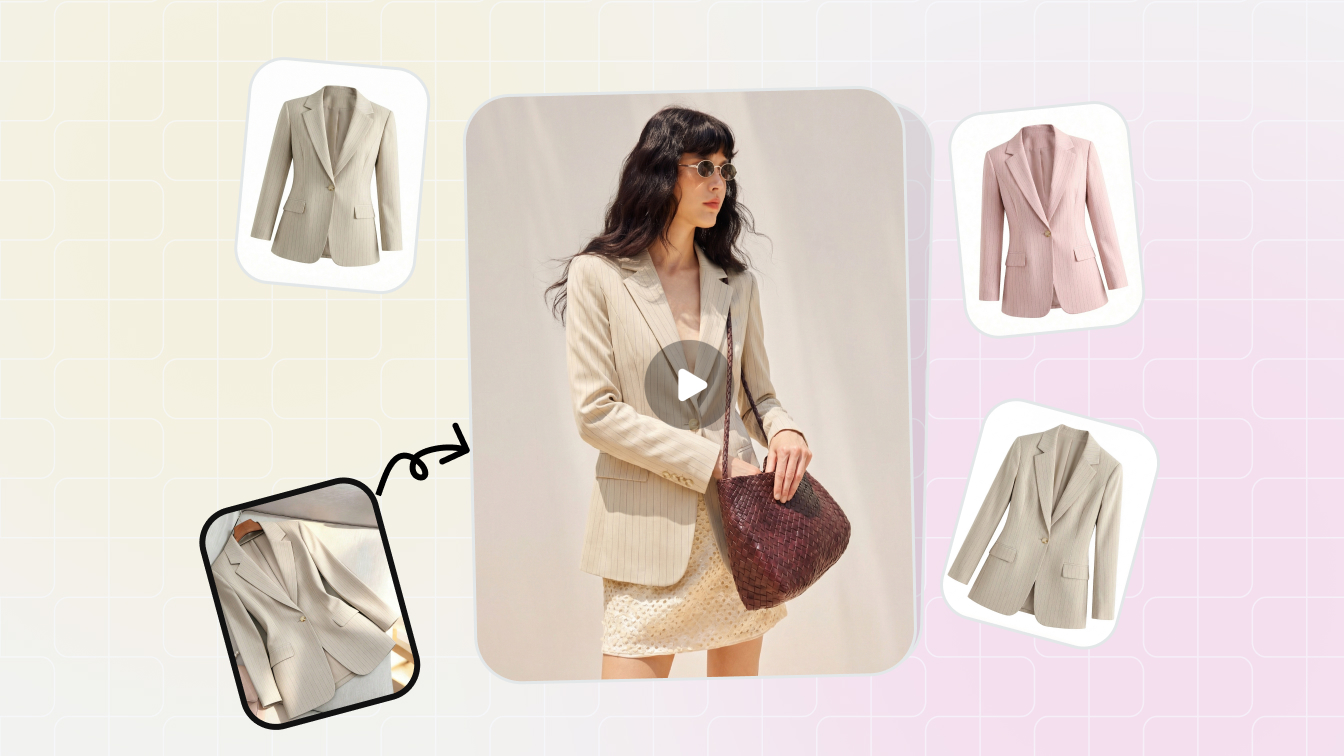
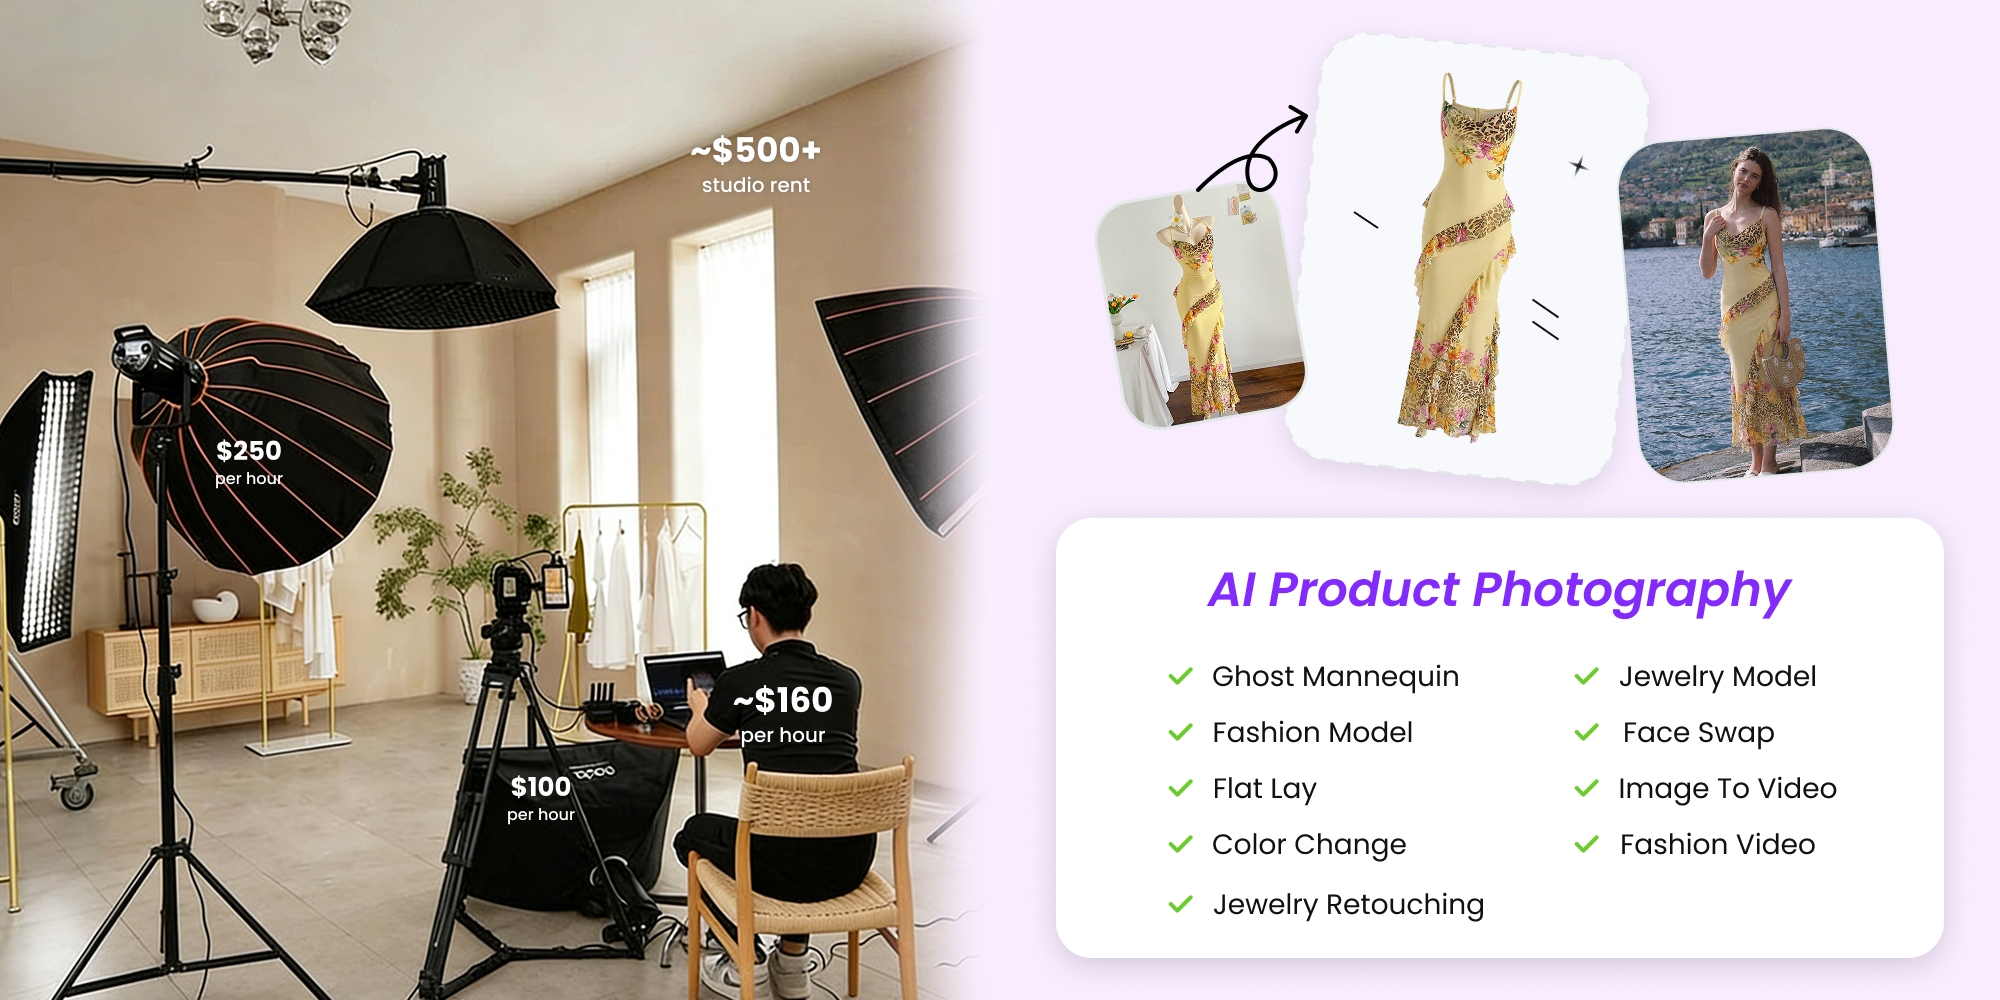
The newest entry in this space is AI-powered product photography. Instead of shipping products to a physical location or booking studio time, you upload existing product photos and receive studio-quality visuals generated digitally. Platforms like Snappyit allow ecommerce sellers to produce professional product images without geographic constraints, physical studio bookings, or lengthy turnaround windows. This model works especially well for sellers who need volume and speed — think dozens of SKUs that all need consistent, marketplace-ready images within hours rather than days. The trade-off is creative flexibility: while AI platforms handle standard catalog imagery efficiently, complex lifestyle compositions or highly stylized brand campaigns may still benefit from human direction.
Full-Service Studios vs. Studio Rentals
A full-service ecommerce studio handles everything. You ship your products, provide a brief, and receive finished, edited images back. Current market rates for this model run $25 to $75 per image for standard white-background catalog work, with volume discounts dropping costs significantly on batches of 50 or more. Standard turnaround is 5 to 10 business days. This is the hands-off option: minimal involvement from you, consistent results, but limited real-time creative input.
Studio rentals flip the equation. You book the space — typically $75 to $150 per hour — and bring your own photographer, stylist, or creative team. Equipment is usually included. You get full creative control and can shoot 10 to 30 products per session, but you're responsible for coordinating talent, managing the shoot, and handling post-production separately. This model suits brands that already work with a preferred ecommerce photography agency or have an in-house creative team that just needs professional-grade space and lighting.
On-Location Photography
On-location photography brings the e commerce photo studio to you. A photographer arrives at your warehouse or office with portable lighting and backdrop setups, shoots products in your space, and delivers edited files afterward. This ecommerce photography service works well for oversized or fragile items that are difficult to ship, or for brands that want behind-the-scenes content captured alongside product shots. The downside: on-location setups rarely match the lighting consistency of a dedicated studio environment, and hourly rates for experienced on-site specialists range from $150 to $500.
| Service Model | Cost Per Image | Turnaround Time | Minimum Order | Scalability | Best Use Case |
|---|---|---|---|---|---|
| AI-Powered Platforms | $1 - $25 | Minutes to hours | None or 1 image | Very high | High-volume catalogs needing speed and consistency |
| Full-Service Studios | $25 - $75 | 5 - 10 business days | Often 10+ images | High | Hands-off catalog and lifestyle work |
| Studio Rentals | $75 - $150/hour (space only) | Same day (shooting); editing separate | Hourly minimum (1 - 4 hrs) | Moderate | Brands with existing creative teams |
| On-Location Photography | $150 - $500/hour | 3 - 7 business days | Half-day or full-day booking | Low to moderate | Large, fragile, or hard-to-ship products |
Each model occupies a specific niche. Many growing brands combine two or more — using an AI platform for routine catalog updates while reserving a full-service ecommerce photography service for seasonal lifestyle campaigns. The key is matching the model to the task rather than committing entirely to one approach.
Whichever path you choose, the images still need to meet strict technical specifications that vary by selling platform — and getting those wrong can mean listing rejections, suppressed visibility, or wasted studio spend.
Platform-Specific Image Requirements Every Seller Must Know
Every marketplace enforces its own image standards, and the penalties for non-compliance range from suppressed listings to outright removal from search results. If you're investing in product photography for ecommerce, understanding these specifications upfront saves you from costly reshoots and lost visibility. This is also where professional studios earn their keep — they build these requirements into their workflow so your images arrive ready to upload.
Amazon Product Image Requirements and Compliance
Amazon's rules are the strictest in ecommerce, and they enforce them aggressively. Amazon's Seller Central documentation confirms that non-compliant main images trigger listing suppression — your product disappears from search until you fix the issue. The core requirements for main images:
- Pure white background (RGB 255, 255, 255) — no exceptions
- Minimum 1,000 pixels on the longest side to enable zoom functionality (Amazon recommends 1,600+ pixels for the best zoom quality)
- Product must fill 85% or more of the image frame
- No text, logos, watermarks, graphics, or inset images
- Accepted formats: JPEG, PNG, TIFF, or GIF (no animation)
- Maximum 10,000 pixels on the longest side
- No props, packaging, mannequins (in apparel), or additional items not included in the sale
Common rejection reasons on Amazon include:
- Non-white or off-white backgrounds on the main image
- Promotional text like "Best Seller" or discount callouts overlaid on images
- Product shown inside packaging or with swing tags still attached
- Blurry or pixelated images that fail quality thresholds
- Product too small within the frame (not filling 85%)
- Human models used for non-clothing product categories
Amazon's listing gallery gives you 6 image slots plus 1 video slot. Secondary images are more flexible — lifestyle shots, infographics, and multi-angle views are encouraged — but the main ecommerce photo must follow every rule precisely.
Shopify, eBay, and Etsy Image Standards
Shopify operates differently because you control your own storefront. According to Shopify's official documentation, product images can be any size up to 5,000 x 5,000 pixels (25 megapixels) with a maximum file size of 20 MB. The recommended size for square product images is 2,048 x 2,048 pixels. Accepted formats include PNG (preferred), JPEG, TIFF, BMP, GIF, SVG, HEIC, and WebP. There's no mandated background color, but consistent white or neutral backgrounds are standard practice for catalog-style stores.
eBay requires a minimum of 500 pixels on the longest side, and eBay's photo guidelines recommend 800 to 1,600 pixels on the long side for optimal display. Main images should use a white or light-gray background, and watermarks, borders, or text overlays are restricted. Uploaded photos can be up to 7 MB each (12 MB when adding an image from a web address), and JPEG is among the accepted formats.
Etsy recommends listing photos of at least 2,000 pixels on the shortest side, and suggests keeping file sizes to around 1 MB or less so pages load quickly. JPEG and PNG are the primary formats. Etsy allows up to 10 images per listing and doesn't enforce a strict background color, though clean, uncluttered backgrounds perform better in search.
Common rejection or quality issues across these platforms:
- Shopify: oversized files (over 20 MB) fail to upload entirely
- eBay: stock photos or images copied from other sellers trigger IP removal requests
- Etsy: low-resolution images reduce listing visibility in search ranking algorithms
| Platform | Resolution (Min/Recommended) | Background Requirement | File Format | Max File Size | Image Count / Angles |
|---|---|---|---|---|---|
| Amazon | 1,000px longest side (1,600+ recommended) | Pure white (RGB 255,255,255) for main image | JPEG, PNG, TIFF, GIF | Not specified | 6 images + 1 video (lifestyle, detail, scale) |
| Shopify | 2,048 x 2,048px recommended | None mandated (white recommended) | PNG, JPEG, TIFF, BMP, GIF, SVG, HEIC, WebP | 20 MB | No requirement (theme-dependent display) |
| eBay | 500px minimum (800-1,600px recommended) | White or light gray for main image | JPEG, PNG, TIFF, GIF, BMP, WebP | 7 MB (12 MB via web address) | Main + up to 23 additional |
| Etsy | 2,000px shortest side recommended | None mandated (clean backgrounds preferred) | JPEG, PNG, GIF | ~1 MB recommended (loading speed) | Up to 10 images per listing |
How Studios Ensure Multi-Platform Compliance
Here's where e-commerce product photography services demonstrate their value beyond just "taking nice pictures." A professional studio shooting for multi-platform sellers doesn't produce one set of images and call it done. They deliver multiple output files from a single shoot session — each formatted, cropped, and background-processed to meet the specific platform's technical demands.
For sellers listing across Amazon, Shopify, and Etsy simultaneously, this means receiving separate deliverables: a pure-white-background hero image that satisfies Amazon's strict compliance, a higher-resolution lifestyle variant formatted for Shopify's generous size allowances, and compressed versions optimized for Etsy's roughly 1 MB file-size guidance. Studios that specialize in e commerce product photography build these output profiles into their production pipelines, eliminating the guesswork and manual reformatting that trips up sellers handling ecommerce product photos on their own.
The practical takeaway: when evaluating any provider of photography for ecommerce products, ask specifically which platforms they deliver for and whether multi-platform formatting is included in their quoted price or treated as an add-on. Studios that understand compliance will have ready answers. Those that hesitate or offer generic "we deliver high-res files" responses may leave you doing the reformatting work yourself.
Platform requirements represent the technical floor. Meeting them keeps your listings live, but meeting them well — with proper lighting, styling, and category-appropriate presentation — is what separates images that merely comply from images that actually convert. And that presentation challenge shifts dramatically depending on what you're actually selling.
Get marketplace-ready product photos with Snappyit →
Unique Studio Challenges by Product Category
A silver ring and a cotton sweater both need professional product photos. But the equipment, techniques, and expertise required to photograph them well have almost nothing in common. Your product category dictates the studio setup, and choosing a studio without considering this mismatch is one of the most common mistakes sellers make when investing in commercial ecommerce photography.
Jewelry, Electronics, and Reflective Product Photography
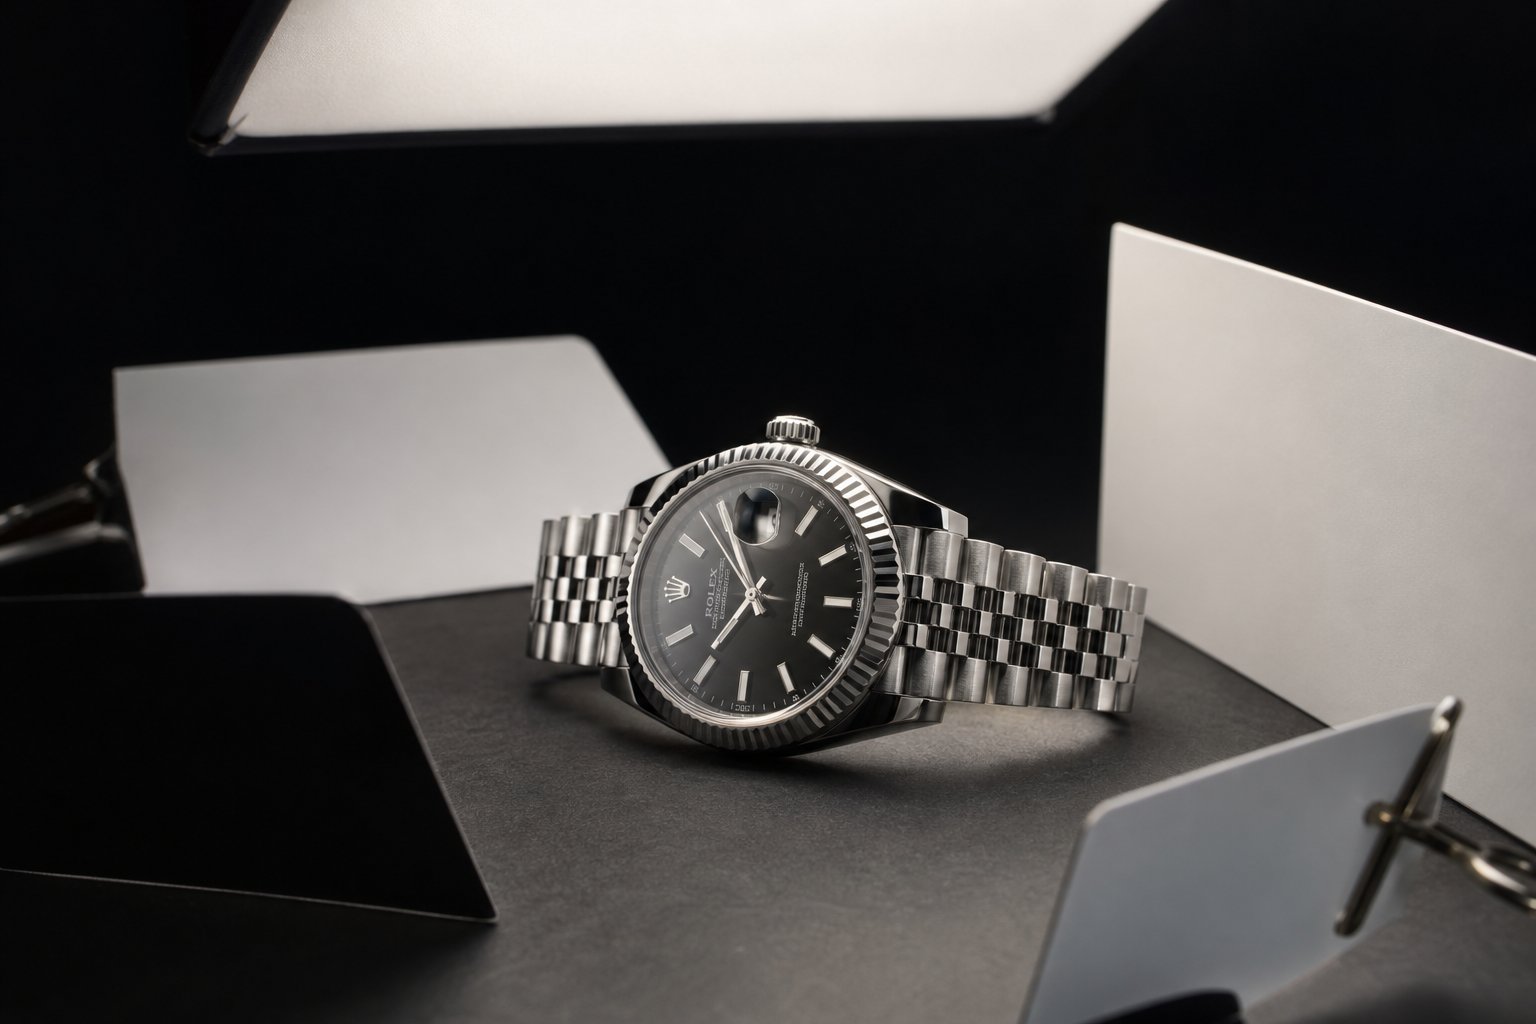
Reflective surfaces are the hardest challenge in ecommerce product photography. Shiny metal, polished chrome, glass screens, and gemstones act like mirrors — they reflect everything around them, including the camera, the photographer, and every stray object in the room. The solution isn't simply "more light." It's controlling exactly what those surfaces see.
As demonstrated in The Slanted Lens's lighting breakdown for shiny metal, the key principle is reflecting white and black cards at precise incident angles to create gradation across metallic surfaces. Without this gradation, metal looks flat and plastic in photos. With it, you get three-dimensional depth that communicates the actual material quality to shoppers.
Equipment and techniques required for reflective products:
- Large overhead softboxes positioned to create broad, even highlights across curved metal surfaces
- V-flats and white fill cards placed at calculated incident angles to reflect controlled highlights into specific areas
- Black cards and flags to introduce gradation — preventing an all-white reflection that makes metal look like plastic
- Polarizing filters to selectively reduce glare on glass screens and eliminate unwanted reflections from electronics
- Macro lenses (100mm or 105mm) for small items like rings, earrings, and watch faces
- Focus stacking using a macro focusing rail — as detailed in Really Right Stuff's macro guide, this technique combines multiple exposures at different focal distances to achieve full sharpness across three-dimensional objects where no single aperture provides adequate depth of field
- Dark field illumination for translucent gems and crystals, where backlighting makes the subject glow against a pure black background
For electronics specifically, you'll notice additional concerns: fingerprints are invisible to the naked eye but appear clearly under studio lighting, screen reflections need to show either a designed UI or be perfectly blacked out, and matte versus glossy finishes on the same device require separate lighting passes.
Food, Beverage, and Time-Sensitive Shoots
Food photography operates under a constraint no other product category faces: your subject is actively deteriorating from the moment you set it up. Ice cream melts. Lettuce wilts. Condensation on a cold glass disappears. A plated dish that looks appetizing at minute one looks tired by minute fifteen.
This time pressure fundamentally changes how a studio approaches the shoot. Everything must be pre-lit, pre-composed, and test-fired with stand-in items before the hero product ever enters the frame. Equipment and techniques specific to food and beverage work:
- Continuous LED lighting (rather than flash) so the team can see exactly how the food looks in real time without chimping test shots
- Dedicated food styling tools: tweezers, brushes, glycerin sprays for artificial moisture, blowtorches for selective browning
- Multiple identical hero products — a food stylist may go through three steaks to get one with the right char pattern
- Backlit setups for beverages to show color, clarity, and carbonation through transparent glass
- Cooling and heating equipment on set to maintain freshness windows during extended composition adjustments
- Steam machines or microwaved cotton balls to simulate the appearance of hot food in a photo-ready state
For sellers producing product photos for e-commerce in the food and beverage space, the gap between reality and photograph is wider than in any other category. A studio that doesn't specialize in food will struggle with the timing, the styling knowledge, and the sheer waste factor involved.
Fashion and Lifestyle Product Photography Needs
Fashion introduces human variables. An ecommerce fashion photographer must manage not just lighting and composition, but fit, movement, and model direction. Garments need to show drape, texture, and true color — three things that are surprisingly difficult to capture simultaneously under studio conditions. An experienced e commerce fashion photographer understands that fabric reflects and absorbs light differently than hard goods, requiring larger, softer light sources positioned to reveal texture without creating harsh shadows in folds.
Equipment and techniques for ecommerce apparel photography:
- Full-length seamless backdrops (9 feet or wider) to accommodate full-body model shots with movement
- Fan machines for controlled fabric movement in lifestyle imagery
- Ghost mannequin setups (invisible mannequin technique) for catalog shots showing garment shape without a visible form
- Steaming equipment to remove wrinkles immediately before shooting — fabric re-wrinkles quickly under hot lights
- Multiple model sizes if showing fit across a range
- Color calibration tools (X-Rite ColorChecker) to ensure fabric colors match the physical product accurately across monitors
Ecommerce model photography adds logistical complexity too. You're coordinating model bookings, hair and makeup artists, and potentially wardrobe changes across dozens of SKUs in a single session. Studios experienced in this category optimize their shot lists to minimize model downtime and maximize throughput.
The takeaway here is straightforward: a fashion-focused studio may lack the macro rails and focus-stacking software needed for jewelry. A food specialist may not own ghost mannequins. And a studio that primarily shoots hard goods on white backgrounds may struggle with the timing demands of perishable products. Knowing your product category's specific requirements helps you ask the right questions — and those questions extend beyond just the subject matter to the equipment powering the results.
Studio Equipment and Post-Production Explained
Knowing what category your product falls into is one piece of the puzzle. The other is understanding the actual tools a studio uses to produce those results — and how those tools translate into the quality you see in the final image. When you're evaluating professional photo studios for ecommerce product photography, their equipment list tells you a lot about what they can (and can't) deliver well.
You don't need to become a lighting technician. But understanding the basics of e-commerce photography equipment gives you the vocabulary to ask better questions, evaluate portfolios more critically, and recognize when a studio's capabilities genuinely match your product needs.
Lighting Equipment and Why It Matters
More than the camera body, the backdrop, or the post-processing pass, lighting is what decides whether a product image reads as catalog-quality or amateur. As FrameOnce's lighting guide puts it bluntly: get it right and your products look professional regardless of your camera. Get it wrong and no amount of editing will fix it.
Here's what the core lighting tools actually do and when each one matters:
Softboxes are enclosed fabric boxes that fit over a light source, diffusing the output through a translucent front panel. They produce soft, even light with gentle shadow transitions — the standard tool for most product categories. A two-softbox setup (one key light at 45 degrees, one fill light on the opposite side at 50-70% power) handles apparel, electronics, packaged goods, and most general catalog work. The larger the softbox relative to the product, the softer and more wrapping the light becomes.
Strobes (flash units) fire a powerful burst of light synchronized with the camera shutter. They're more powerful than continuous lights and freeze any motion, making them the standard in high-end commercial photography. The trade-off: you can't see the final lighting effect until you take a test shot and review it on screen. This adds friction and slows down high-volume catalog shoots where speed matters.
Continuous LED lights stay on constantly — what you see is what you get. This makes them more practical for photography for e-commerce at scale because you can evaluate the lighting in real time and make adjustments without firing test shots. Modern LED panels offer adjustable color temperature (typically 3200K to 5500K) and brightness, allowing precise control that stays consistent session after session.
Reflectors and V-flats don't produce light themselves. They redirect existing light. A white foam-core reflector bounced opposite your key light fills in shadows without adding a second power source. V-flats — large foldable panels, white on one side and black on the other — serve double duty: the white side bounces fill light into shadow areas, while the black side subtracts light to create depth and contrast on reflective products.
Diffusers sit between the light source and the subject, spreading and softening the output. Think of them as the reason studio lighting looks natural rather than harsh. A bare bulb produces hard, directional light with sharp-edged shadows. Pass that same light through a diffusion panel and the shadows become gradual, the highlights become broader, and the overall look becomes more flattering for most product types.
When does hard light make sense? Rarely in standard commerce photography, but it has its place. Hard light — produced by small, undiffused sources — creates dramatic shadows and emphasizes surface texture. Some brands use it intentionally for editorial-style product shots where mood and contrast are part of the visual identity. For standard catalog work, soft, diffused lighting is the default because it shows the product clearly without distracting shadows.
The practical benchmark for a well-equipped ecommerce studio: two LED softboxes with CRI 95+ (color rendering index, measuring how accurately colors appear under the light), a dedicated background light, reflectors or V-flats for fill control, and adjustable power on every source. Studios with this setup can handle 80% or more of product categories effectively.
Backdrops, Surfaces, and Shooting Environments
The surface and background behind your product aren't just aesthetic choices — they directly impact platform compliance, editing efficiency, and the overall impression of your listing. Studios use several systems depending on the shoot type:
Seamless paper rolls are the workhorse of product photography studios. A wide roll of paper (typically 9 feet across) hangs from a wall-mounted or stand-mounted system and sweeps down to form both the background and the surface beneath the product. This seamless curve eliminates the visible horizon line where wall meets floor, creating the clean, infinite-background look that Amazon and most marketplaces require. White seamless is standard, though studios keep multiple colors on hand for brand-specific needs.
Sweep tables serve the same purpose at a smaller scale. These are curved-surface shooting platforms — usually acrylic or PVC — designed for small to medium products. The gentle curve produces a seamless transition from surface to background without visible edges. Studios use white sweep tables for quick white-background catalog shots and translucent versions for backlighting transparent products like glassware.
Textured and lifestyle backdrops come into play for brand-forward imagery. As SLR Lounge's backdrop guide highlights, photorealistic surfaces — marble, subway tiles, hardwoods, concrete — let studios create the illusion that a product was shot in a real environment without leaving the studio. Dual-sided backdrop boards (like V-Flat World's Duo Boards) give photographers two surface options per panel, making it practical to offer multiple visual styles within a single session.
The key consideration when evaluating a studio's backdrop capabilities: do they offer both clean catalog backgrounds (white seamless, sweep tables) and lifestyle surfaces? Sellers listing on Amazon need pure white main images, but secondary images and Shopify storefronts benefit from contextual backdrops that tell a richer story about the product.
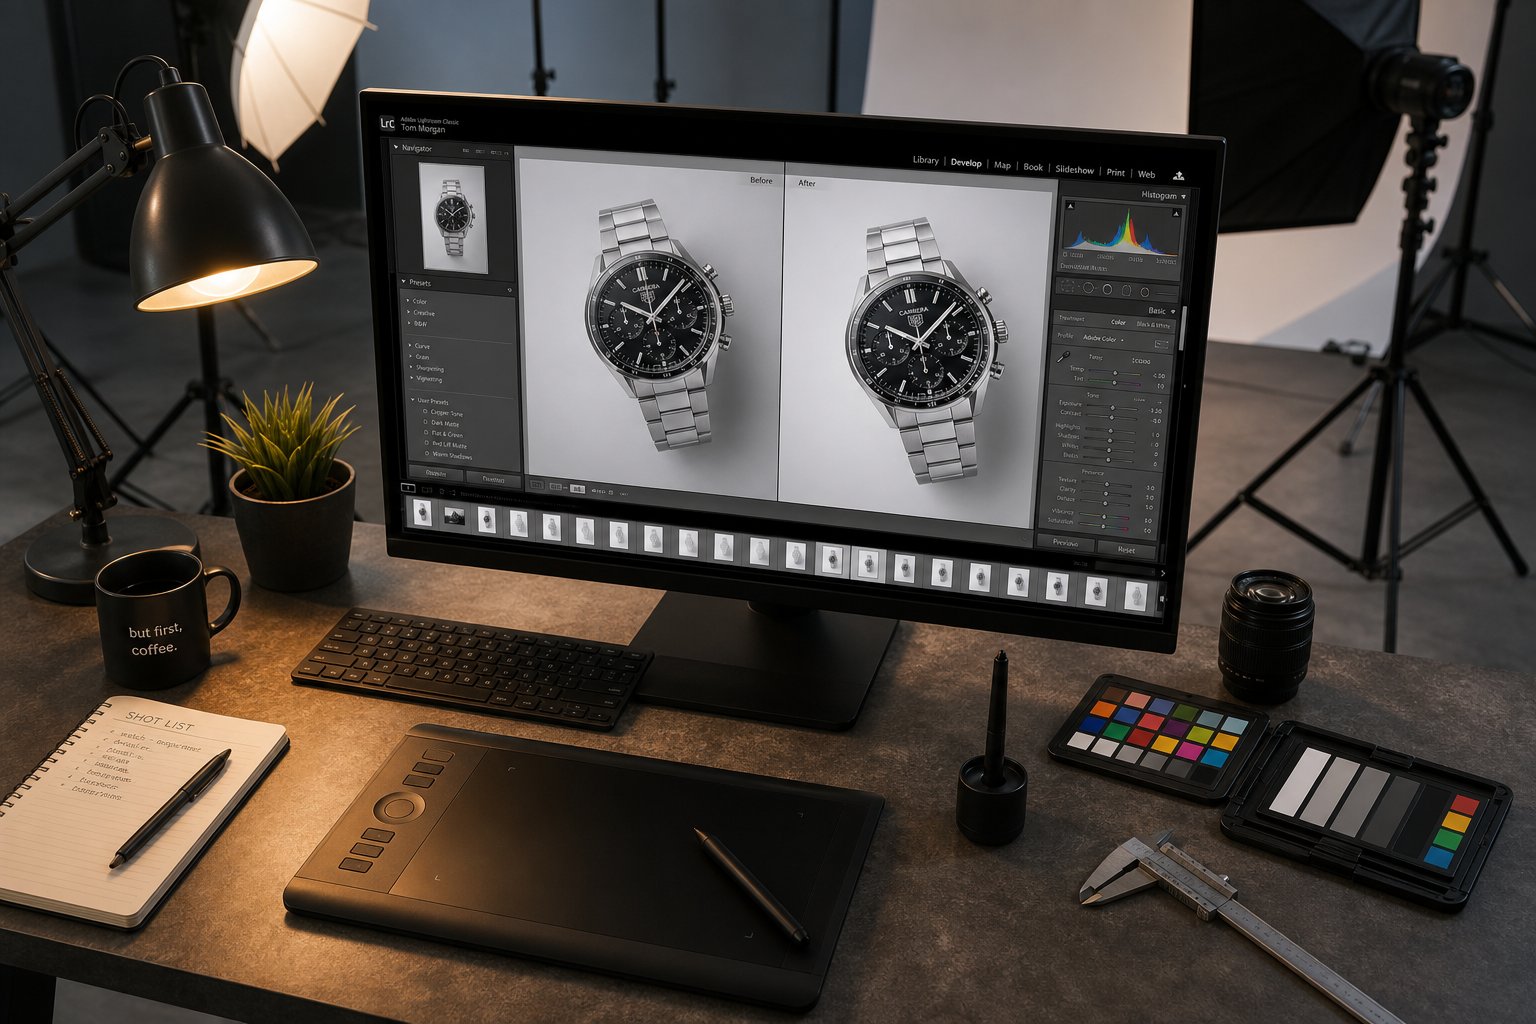
Post-Production Services and Workflow
Shooting is half the job. What happens after the shutter closes determines whether you receive marketplace-ready assets or raw files that still need hours of work. Photography for e-commerce doesn't end when the lights go off — it continues through a post-production pipeline that polishes, formats, and optimizes every image.
Studios handle post-production in two ways: bundled into their per-image pricing (the full-service model) or offered as separate line items you can add based on need (a la carte). Understanding what each deliverable involves helps you compare quotes accurately and avoid paying for services you don't need — or missing ones you do.
Common post-production deliverables and what each involves:
- Background removal and replacement: Isolating the product from whatever was behind it during the shoot. For white-background compliance, this means achieving a true RGB 255,255,255 background uniformly across the image. For lifestyle variants, it may mean compositing the product onto a different scene.
- Clipping paths: Creating precise vector outlines around the product boundary. These paths allow anyone downstream (your designer, your marketplace listing tool) to cleanly separate the product from its background at any point. Essential for sellers who repurpose images across multiple platforms and marketing materials.
- Color correction: Adjusting the image so product colors match the real item accurately across different screens. This involves setting proper white balance, correcting any color cast from lighting, and ensuring consistency across all images in a batch. Studios typically shoot a color calibration card (X-Rite ColorChecker) at the start of each session as a reference point.
- Retouching: Removing imperfections that appeared during the shoot — dust particles, minor scratches, stray threads on garments, fingerprints on glossy surfaces, or small label misalignments. The goal is a clean representation of the product in its ideal state, not a fabricated version of something it's not.
- Shadow creation: Adding natural-looking drop shadows or reflection shadows beneath a product photographed on white. This grounds the product visually, preventing it from looking like a floating cutout — a subtle but noticeable quality difference between amateur and professional ecomm photography results.
- Image resizing and platform formatting: Delivering final files at the exact pixel dimensions, file size limits, and format specifications each marketplace requires. A single product shoot might yield a 2,000px Amazon main image, a 2,048px square Shopify variant, and a compressed sub-1MB Etsy version — all from the same source file.
- Ghost mannequin compositing: For apparel shot on invisible mannequins, this involves photographing the garment on the form, then shooting the interior (neckline, waistband) separately, and compositing both to create the hollow-man effect that shows garment shape without visible support.
When comparing studio quotes, pay attention to which of these services are included by default versus added at extra cost. A studio quoting $30 per image with full retouching, background removal, and multi-platform formatting bundled in is a different proposition than one quoting $20 per image with each post-production step billed separately at $5 to $15 each.
This equipment and post-production knowledge gives you a practical framework for evaluating any studio's capabilities. You can read their equipment list and understand what it means for your product. You can review their post-production workflow and know whether it covers your platform requirements. The next step is knowing what questions to ask — and which answers should raise red flags — when you're actually vetting studios for your business.
How to Evaluate and Choose the Right Ecommerce Product Photographer
Understanding equipment and post-production workflows gives you the language. Applying that language during actual studio selection is where it pays off. Whether you're searching for "ecommerce product photography services near me" or evaluating remote studios across the country, the evaluation criteria remain the same — and most sellers don't know what to prioritize.
Here's a ranked checklist that moves from most critical to supplementary. Each criterion builds on the previous one, so start at the top and work down:
- Portfolio relevance: Does the studio have published work in your specific product category? A gorgeous fashion portfolio means nothing if you sell electronics.
- Visual consistency: Across a single brand's images in their portfolio, are the lighting, shadows, positioning, and background treatment uniform? Inconsistency signals a process problem.
- Post-production quality: Zoom into their sample images. Check for clean background removal, accurate color, natural shadows, and no visible retouching artifacts around product edges.
- Turnaround commitments: Do they publish delivery timelines on their ecommerce photography website, or is it vague? Specific, written timelines indicate an organized production pipeline.
- Revision policy clarity: How many rounds of revisions are included? What constitutes a revision versus a reshoot? Get this in writing before your first order.
- Platform expertise: Can they articulate the specific image requirements for your selling platforms without you having to explain them?
- Scalability: If your catalog doubles next quarter, can they handle the volume without extending timelines or dropping quality?
Questions to Ask When Vetting a Studio
A phone call or email exchange with a potential e-commerce photographer reveals more than any website ever will. As Squareshot's studio selection guide emphasizes, asking specific process questions exposes whether a studio's operations match their marketing claims. Key questions to bring to the conversation:
- What does your typical workflow look like from brief submission to final delivery?
- Does your published turnaround time include retouching and formatting, or just the shoot itself?
- How do you handle revisions — is there a cap, and what's the turnaround on revision requests?
- What's included in your quoted per-image price versus what triggers additional charges?
- Can you do a paid test shoot of 3 to 5 products before I commit to a larger order?
- How do you maintain consistency across large batches shot over multiple sessions?
- What file formats and resolutions do you deliver, and do you format for specific platforms?
Pay close attention to how they answer, not just what they say. An experienced ecommerce product photographer will respond with specifics — named tools, defined timelines, concrete policies. Vague answers like "we'll figure it out" or "it depends" without follow-up clarification signal a lack of established process.
Portfolio Evaluation and Red Flags
A studio's portfolio is the single most telling indicator of what your images will look like. When reviewing it, look beyond whether the images are "nice" and assess them technically: Are highlights controlled on reflective surfaces? Are garment colors rendered accurately? Is the background removal seamless or are there telltale halos around product edges?
Equally important: does the portfolio show variety across product types and shooting styles, or is it a narrow slice that might not extend to your needs? As noted in Squareshot's evaluation framework, checking domain expertise — whether a studio has shot for brands in your specific category — is one of the strongest predictors of a good outcome.
Red flags that should give you pause when evaluating any ecommerce photographers:
- No visible portfolio on their website, or only 5 to 10 sample images with no context about the brands or projects shown
- No published pricing or pricing structure — suggesting either disorganization or a tendency toward unpredictable invoices
- Unwillingness to do a small paid test shoot before a larger commitment
- Vague delivery timelines with no written commitments ("usually about a week" without contractual backing)
- Portfolio images that look inconsistent in lighting, color temperature, or shadow treatment within the same brand's set
- No mention of revision policies or a stated zero-revision policy with no exceptions
- Inability to name the platforms they format for or unfamiliarity with basic marketplace requirements
Pricing Structures and Contract Terms to Expect
Pricing for professional ecommerce product photography typically follows one of three models: per-image, hourly, or project-based. Per-image pricing is the most transparent for sellers because you know your exact cost before the shoot begins. As of 2026, standard white-background catalog shots typically run $25 to $75 per image for entry-level work, $75 to $150 at mid-tier professional studios, and $150 to $300+ for premium specialists.
Volume significantly affects what you pay. Most studios offer tiered discounts that reduce per-unit costs as order size grows — discounts often begin around the 50-image mark and deepen at higher volumes. As an illustrative example, a mid-tier studio charging $100 per image for small batches of 1 to 25 might drop to $60 to $70 per image at 250+ units. Setup time gets distributed across more shots, the photographer maintains consistent settings, and workflow tightens. Those efficiencies translate directly into better pricing for you.
Turnaround tiers also vary with volume and urgency:
- Standard delivery (5 to 10 business days): The default for most orders. Includes shooting, full retouching, and platform formatting.
- Expedited delivery (2 to 3 business days): Available at most established studios for a 25% to 50% premium. Useful for product launches with fixed dates.
- Rush delivery (same-day or next-day): Offered selectively and priced at a significant premium. Not all studios provide this, and quality control may be compressed.
On the contract side, watch the language carefully. Contract specialists at Pixsy highlight a critical distinction: a "transfer of rights" clause means the studio retains no ownership and you receive full copyright — which is what you want as a seller. A "grant of rights" gives you usage permission but keeps copyright with the photographer. For ecommerce product images you're paying to have created for your listings, full transfer of rights should be standard. If a contract uses terms like "exclusive," "irrevocable," or "without limitation" regarding the studio's retained rights, ask for clarification before signing.
Other contract terms to confirm upfront: whether there's a minimum order commitment, what happens if the studio misses its delivery deadline, and whether your images can appear in the studio's portfolio (most will request this — it's reasonable, but should be stated rather than assumed).
With evaluation criteria, red flags, and pricing expectations clear, the remaining variable is you. The quality of your studio output depends significantly on how well you prepare your products and communicate your expectations before the shoot ever begins.
Preparing Your Products for a Professional Ecommerce Photoshoot
You've chosen a studio, confirmed pricing, and locked in a shoot date. The temptation at this point is to box up your products and ship them off. But how you prepare before your ecommerce photoshoot has a direct impact on the quality of results you get back — and on how much you end up paying for retouching. Every wrinkle, fingerprint, or misaligned label that shows up under studio lighting either gets fixed in post-production (at your expense) or ends up in your final images.
As Skupics Studios notes in their prep guide, even small imperfections become clearly visible under high-resolution lenses and professional lighting. What looks fine to the naked eye on a shelf will appear as dust particles, smudges, or fabric creases once magnified. A little preparation time on your end translates directly into faster shoots, lower editing costs, and images that accurately represent your brand.
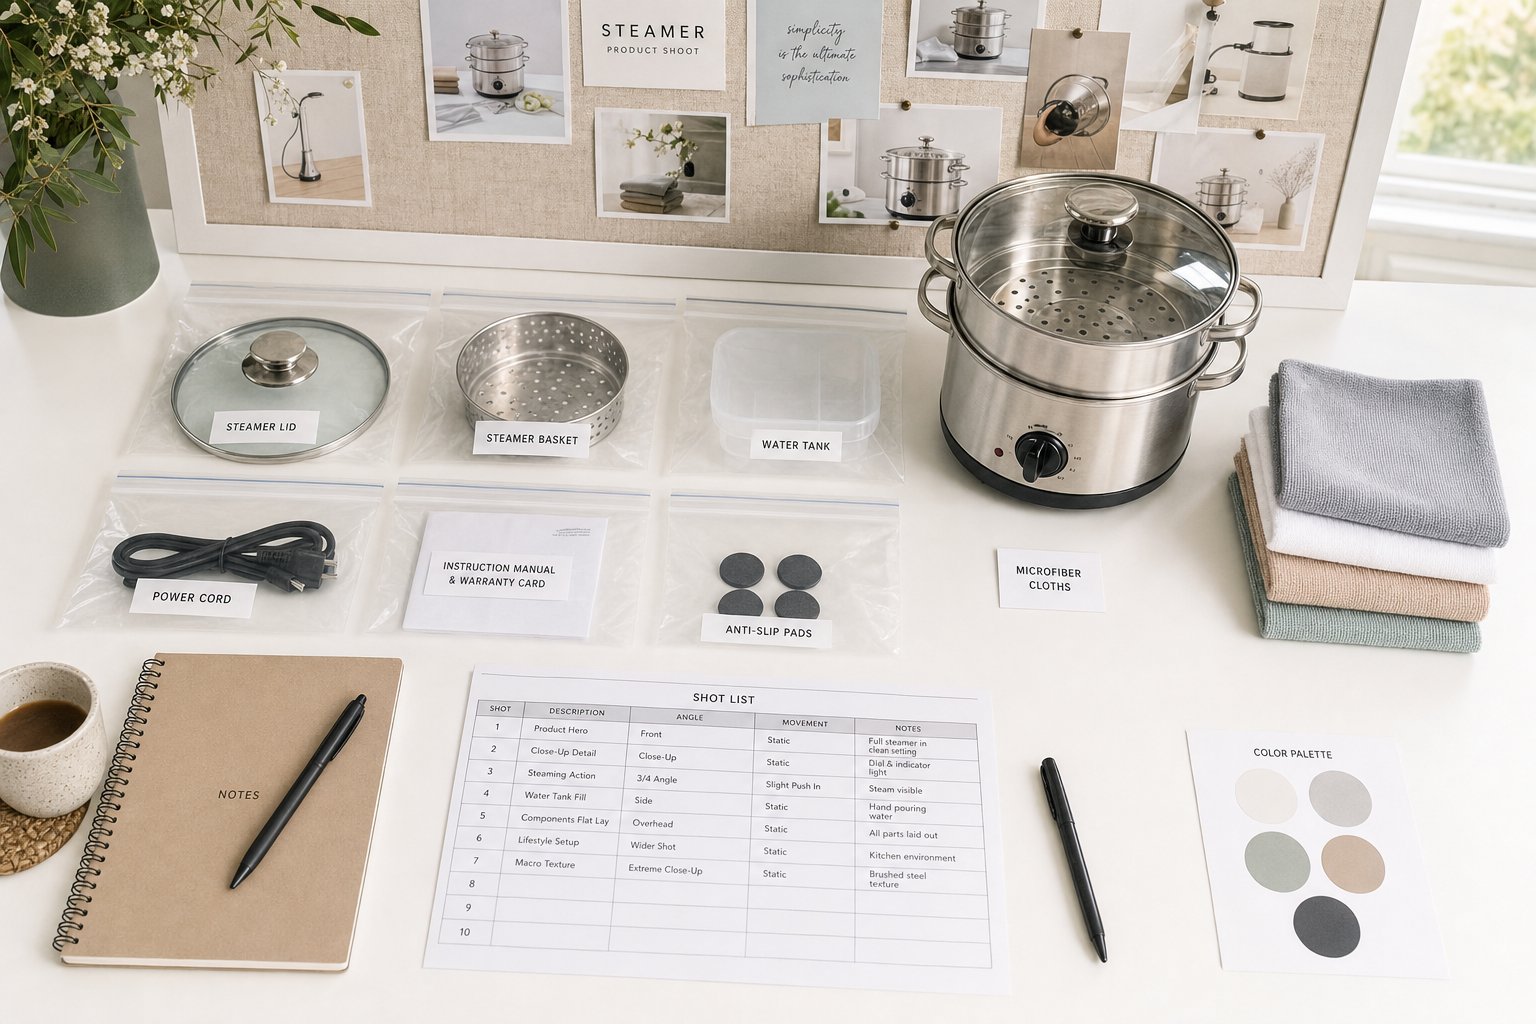
Here's a step-by-step checklist to follow before any e commerce shoot:
- Finalize your shot list and creative direction: Decide which angles, compositions, and detail shots you need for each product. Include platform-specific requirements (white background hero, lifestyle secondary, detail close-up) so nothing gets missed on shoot day.
- Select your best product samples: Pick the cleanest, most flawless units you have rather than grabbing whatever happens to be left over in storage. Check for dents, tears, worn labels, uneven stitching, or malfunctioning features before packing anything.
- Clean and prep each item thoroughly: Steam or press all garments, remove tags and stickers, and use microfiber cloths to wipe fingerprints and dust from hard goods. Charge any electronics that need lit displays.
- Include backup units: Always send at least one duplicate for fragile or high-priority items. If a product gets damaged in transit or doesn't sit well under lights, having a spare prevents delays and reshoots.
- Label and organize everything by SKU: Use zip bags or individual wrapping for each item, and include a spreadsheet matching SKU numbers to your shot list. This eliminates confusion when a studio is handling dozens of products across multiple brands.
- Prepare your brand assets and mood board: Gather inspiration images, your brand color palette, logo files, and any specific styling notes into a single reference document the photography team can review before shoot day.
- Flag tricky products in advance: If any items have reflective surfaces, transparent packaging, or unusual shapes, mention these upfront so the studio can prep specialized lighting and setups accordingly.
Cleaning, Styling, and Labeling Your Products
The specifics of product prep vary by category. For apparel, industry-standard practice involves steaming every garment, removing all retail tags and lint, and using clips or pins to maintain shape during transport. Bring proper hangers rather than folding items into boxes where they'll re-wrinkle immediately.
For hard goods like tech products, beauty items, and home goods: wipe every surface with a microfiber cloth, ensure logos and labels are aligned and legible, and check that any packaging you want photographed is free of scuffs or misprints. If you need shots of both flat and assembled packaging, include both versions.
Labeling seems like a minor detail, but studios processing a high-volume ecom photoshoot with 50 or more SKUs can lose significant time if products aren't clearly identified. A simple system — numbered bags matching a shared spreadsheet — keeps everything organized and ensures the right images get matched to the right product listings in your store.
Communicating Your Brand Vision to Photographers
Your photography team will deliver better results when they understand what you're trying to communicate visually. As product photographer Diana Stainton explains, thinking about your brand positioning, target customer, and color palette before the shoot leads the way for styling decisions around props, backgrounds, and composition.
A mood board is the most efficient tool here. Gather 5 to 10 reference images that reflect the look and feel you're after — these can come from competitor listings, Pinterest, or your own previous marketing materials. Include notes about what you like in each reference image (the lighting angle, the background texture, the prop arrangement) so the photographer understands the principle, not just the example.
Other information to provide upfront for a smooth photoshoot for online products:
- Final image dimensions needed for each platform (square for marketplace listings, banner ratio for website headers)
- Whether images need space left for text overlays or logos
- Your brand's color palette so props and backgrounds complement rather than clash
- Any specific angles or details that are selling points (texture close-ups, interior pocket shots, ingredient label visibility)
The more specific your brief, the fewer revision rounds you'll need — and revision rounds cost both time and money.
Shipping and Logistics for Remote Studio Shoots
When you're working with a ship-to-studio service, logistics planning becomes part of your prep process. Build a buffer into your production timeline: factory delays, customs holds, and shipping damage are all common, and a missed delivery date can push your entire e commerce photoshoot back by weeks if the studio has other bookings queued behind yours.
Pack products individually with adequate protection. Wrap fragile items in bubble wrap, use tissue paper between stacked garments to prevent creasing, and include silica packets for moisture-sensitive goods. Clearly mark the exterior of any shipment box with your order number and the studio's project reference so it doesn't sit in a receiving dock unclaimed.
The geographic question often comes down to control versus specialization. A local studio makes sense when you need hands-on art direction — think complex lifestyle compositions, food styling where timing is critical, or brand shoots where real-time creative decisions matter. Shipping to a specialized remote studio makes more sense when your priority is consistent catalog imagery at volume, your products are easy to ship, and your budget benefits from a studio in a lower cost-of-living market.
Many sellers use both approaches: a local studio for seasonal lifestyle campaigns where they want to be present and direct the creative, paired with a remote e commerce shoot service for routine white-background catalog updates that don't require their physical presence. The prep work described above applies in both cases — the only difference is whether you're handing products over in person or packing them into a box.
Preparation determines how efficiently a studio can work on your behalf. But efficiency and image quality only matter if the investment generates measurable returns — and that calculation looks different depending on where your business stands today.
Making the Right Investment for Your Business Stage
A studio shoot that costs $5,000 can generate $50,000 in additional revenue for one brand and barely break even for another. The difference isn't the photography itself — it's whether the investment aligns with the business stage, catalog size, and growth trajectory of the seller making it. Understanding which ecommerce photography services fit your current reality keeps you from overspending prematurely or underinvesting at the exact moment better images would accelerate growth.
The ROI of Professional Product Photography
The financial case for professional product imagery is well documented at this point. Industry analyses report that products with professional photography can convert at 30 to 40 percent higher rates than those with amateur shots, and that Amazon listings with high-quality images can see click-through rates increase by up to 65 percent. These aren't marginal improvements — across a catalog of hundreds of SKUs, they represent a substantial revenue gap between sellers who invest in visuals and those who don't.
Returns tell the other side of the story. When customers receive products that look different from the listing images, return rates spike. Every return costs you shipping, restocking labor, and often the product itself. Industry benchmarks confirm that accurate, on-model visuals reduce returns by setting correct expectations at the product page — before anyone clicks "buy." The ROI of professional e commerce photography isn't just about selling more. It's about selling more accurately.
Where this calculation gets interesting is in the asset reuse layer. A single product image doesn't just sit on one listing. It gets deployed across ads, email campaigns, social media, marketplace listings, and retargeting flows. The cost of producing that image should be measured against the revenue of all the channels it touches — not just the listing where it first appeared.
Matching Your Photography Approach to Your Business Stage
The right approach isn't universal. It's contextual. Here's how the decision typically maps across business stages:
Early-stage sellers (under 50 SKUs, validating demand): DIY setups make financial sense here. A smartphone from the last three years, a $100 to $300 lighting kit, and careful attention to consistency can produce acceptable catalog imagery while you prove product-market fit. Invest professional photography budget only in your top 10 to 20 hero products — the ones driving 80 percent of initial revenue. Total year-one budget for this approach typically runs $1,200 to $2,200 plus your time.
Established brands (200+ SKUs, proven product lines): At this stage, you need the consistency, speed, and technical expertise that professional studios provide. Complex products — jewelry, fashion on models, food — demand specialized e-commerce photography services that DIY simply can't replicate at scale. Budget 2 to 4 percent of gross revenue for photography annually, covering reshoots, seasonal updates, and new product launches.
Scaling sellers (50 to 200 SKUs, growing fast): This is the middle ground between the two stages above, and it's where the math gets tricky. You've outgrown DIY — the time investment of 2 to 4 hours per product is unsustainable when you're adding dozens of new items monthly. But you may not yet need $10,000+ studio commitments for every catalog update. This is where AI-powered platforms fill a genuine gap.
Scaling Product Visuals Without Scaling Costs
The traditional equation was simple: more products meant proportionally more photography spend. Double your catalog, roughly double your costs. That math has shifted fundamentally.
The photography landscape has moved toward hybrid workflows where AI handles volume and consistency for routine catalog imagery, while traditional studios focus on complex creative work that requires human judgment and physical product interaction.
For sellers in the scaling phase who need studio-quality results at higher volume without proportionally increasing costs, AI-powered platforms like Snappyit offer a practical middle path. You upload existing product photos and receive professionally styled images — consistent backgrounds, proper lighting simulation, marketplace-ready formatting — in minutes rather than weeks. No shipping logistics, no scheduling constraints, and no need to limit yourself to whatever turns up when you search "e commerce photography near me".
Brands using AI workflows can cut per-image costs substantially once catalog volume exceeds a few hundred SKUs. That doesn't mean traditional studios become irrelevant. It means they get deployed strategically — for hero product launches, complex lifestyle campaigns, and product categories (jewelry, food, luxury goods) where physical shooting remains irreplaceable.
The most successful visual programs in e-commerce photography today aren't choosing one path exclusively. They're routing each image to the right production method based on what it needs to accomplish. A hero product getting a dedicated studio shoot. Routine catalog additions processed through AI. Seasonal lifestyle campaigns shot on location with a creative team. Each approach serves a different purpose at a different price point.
Whether you're just starting out with a phone and a lightbox or managing a multi-thousand-SKU catalog across four marketplaces, the principle stays the same: match your photography investment to the revenue it protects and the growth it enables. Start where you are, measure the impact, and scale your visual production as your business justifies it. The tools exist at every price point — the decision is which combination serves your products, your customers, and your margins best right now.
Want studio-grade images without the studio invoice? Upload your existing product shots and get marketplace-ready photos back in minutes. Try Snappyit free →
Frequently Asked Questions
How much does professional ecommerce product photography cost per image?
Pricing varies by service model and complexity. Standard white-background catalog shots at full-service studios typically range from $25 to $75 per image for entry-level work, $75 to $150 for mid-tier professionals, and $150 to $300+ for premium specialists. Volume discounts commonly apply — large orders of 250+ images often bring per-unit costs down substantially. AI-powered platforms like Snappyit offer an alternative at $1 to $25 per image for sellers who need high volume with fast turnaround. Studio rentals charge $75 to $150 per hour for space only, with photographer and editing costs added separately.
What image specifications does Amazon require for product listings?
Amazon enforces strict main image requirements: a pure white background (RGB 255, 255, 255), minimum 1,000 pixels on the longest side (1,600+ recommended for zoom), and the product must fill at least 85% of the frame. No text, logos, watermarks, or props are allowed on main images. Accepted file formats include JPEG, PNG, TIFF, and GIF. Listings that fail these standards face suppression from search results. Secondary images allow more flexibility, including lifestyle shots, infographics, and scale references. Professional studios build these compliance rules into their delivery workflow to prevent costly rejections.
Should I use a traditional photo studio or an AI photography platform for my products?
The best choice depends on your business stage and product type. Traditional studios excel at complex creative work — jewelry with reflective surfaces, food requiring real-time styling, fashion on live models, and lifestyle campaigns needing art direction. AI platforms like Snappyit work best for scaling sellers who need consistent catalog imagery at volume without proportionally increasing costs, offering minutes-long turnaround with no shipping logistics. Many successful brands use a hybrid approach: AI for routine catalog updates and white-background standards, traditional studios for hero product launches and complex compositions that require human judgment.
How do I prepare my products before sending them to a photography studio?
Proper preparation reduces retouching costs and improves final image quality. Steam or press all garments and remove tags. Wipe hard goods with microfiber cloths to eliminate fingerprints and dust. Send your most pristine units — not warehouse leftovers — and include backup samples for fragile items. Label each product by SKU using zip bags or individual wrapping, paired with a spreadsheet matching items to your shot list. Provide a mood board with 5 to 10 reference images showing your desired look, plus platform-specific requirements for angles and dimensions. Flag any reflective, transparent, or unusually shaped products so the studio can prepare specialized setups.
What are the biggest red flags when choosing an ecommerce photography studio?
Watch for studios that lack a visible portfolio or show only a handful of samples without brand context. No published pricing structure often signals disorganized operations or unpredictable invoicing. Other warning signs include unwillingness to do a paid test shoot before larger commitments, vague delivery timelines without written guarantees, inconsistent lighting or color treatment within the same brand's image set, zero-revision policies, and inability to articulate specific marketplace image requirements. A credible studio will have clear turnaround commitments, defined revision policies, and demonstrable experience in your product category.
Studio shoots and AI generation aren't rivals — they're two tools in the same kit. See how the digital half works in Snappyit's AI product photography workflow.