The problem: your PNG turns black on Etsy
You spent time cutting out your logo or product, exported a clean transparent PNG, and it looks perfect on your computer. The background is gone, the checkerboard pattern shows through in your image viewer, and the file is ready to go. Then you upload it to Etsy and the transparent area shows up as a solid black box. Sometimes it is dark gray instead of black, but either way the clean cutout you worked on is suddenly framed by an ugly rectangle.
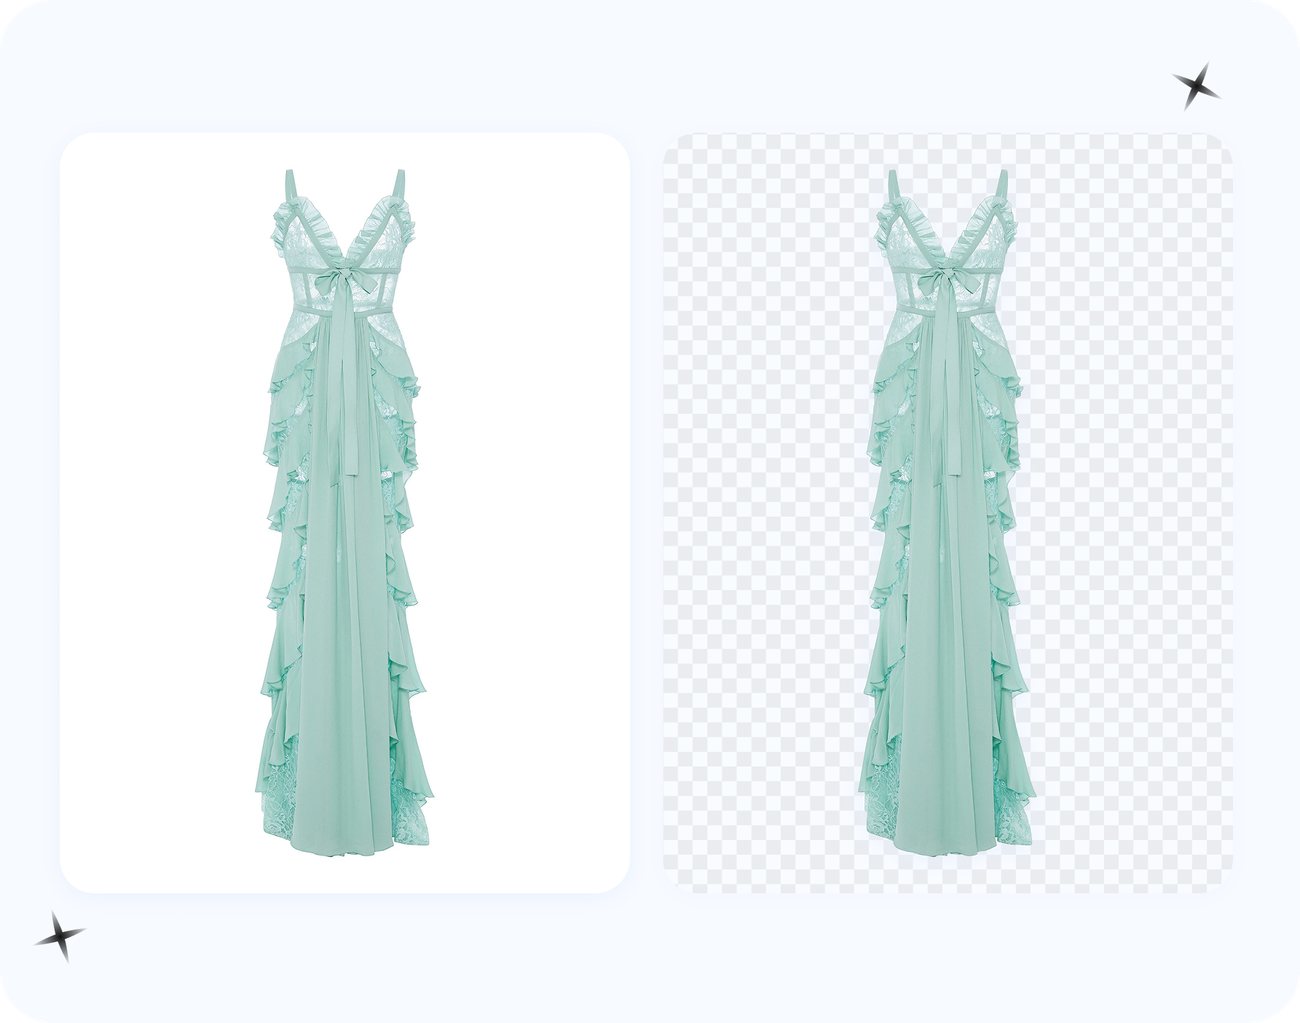
This is one of the most common and confusing problems Etsy sellers run into, and the frustrating part is that nothing is actually wrong with your file. It really is transparent. The issue is what happens to that transparency after it leaves your computer. Below is exactly the kind of clean cutout that triggers this, sitting on the standard transparency checkerboard so you can see there is genuinely no background baked in.

If your file looks like this locally but renders with a black background on your listing, you are not doing anything wrong. This is documented behavior, not a glitch on your end. Etsy's own Help center, in Requirements and Best Practices for Images in Your Etsy Shop, lists transparent PNG (along with animated GIF) as not supported for listing photos, and Etsy community staff have stated plainly that "when listing photos are uploaded Etsy reformats and compresses them, and pngs with transparent backgrounds are assigned a black background." So the black box is expected, not random. The good news: the fix takes about two minutes and does not require Photoshop, a subscription, or any design skills. The rest of this guide explains the exact mechanism so you understand why it happens, shows which platforms behave the same way, tells you when you actually want to keep transparency, and walks through flattening correctly and verifying the file before you ever hit upload.
Why a Transparent PNG Turns Black on Upload: The RGBA + Matte Mechanism
To fix this for good, it pays to understand the plumbing. A PNG with transparency is an RGBA image: it stores red, green, and blue color values plus a fourth alpha channel that records how opaque each pixel is, from 0 (fully transparent) to 255 (fully opaque). The detail that trips everyone up is that PNG uses straight (unassociated) alpha, not premultiplied alpha. That means the RGB color of a pixel is stored completely independently of its opacity. A red pixel at 50% opacity is stored as the literal values (255, 0, 0, 128) — the red is still "full red" in the file; the 128 just describes how see-through it should be. (This is the model described in libpng's PNG: The Definitive Guide, chapter 8, and the Wikipedia entry on the RGBA color model.)
Because the color is stored separately from the opacity, the actual visible color of any partially or fully transparent area is decided not by your file but by whatever the renderer paints behind it. Every renderer in existence uses the same alpha-compositing formula:
result = foreground × alpha + background × (1 − alpha)
Plug in a fully transparent pixel — alpha = 0 — and the math collapses to result = background × 1. In other words, a transparent area shows nothing but the background color the renderer composites it over. If that background is white, the area looks white. If the renderer's default canvas is black (RGB 0, 0, 0), the area becomes pure black. (This compositing identity is the same one described in references on alpha compositing and the RGBA color model.)
Now connect the dots to Etsy. When you upload a listing photo, Etsy does not store your bytes verbatim — it re-encodes and compresses every image so listings load fast and look consistent. During that pass it flattens the picture, and instead of compositing your transparent regions over white, its pipeline composites them over a black default canvas. Every formerly invisible pixel gets the result = black outcome above, and you get a black rectangle. The alpha channel that protected those pixels on your machine is gone; the underlying color shows through against black.
This also explains the maddening "but it looks fine on my computer" part. Your operating system's file preview, your browser, and your image editor all composite the PNG over a friendly background — usually a white page or the gray-and-white checkerboard that signals transparency — so you literally never see the problem until a platform composites the same file over its own (black) default. The file did not change; the background behind it did.
And it is not an Etsy-only quirk. Shopify's default Dawn theme has documented cases — search the Shopify community for "Transparent PNGs have black background on product pages — Dawn" — where transparent product images render on a black background on the product page. The mechanism here is slightly different: the theme's media card carries a dark CSS background-color that shows through the PNG's transparency (Shopify does preserve the alpha), but the visible result is the same. Once you frame it this way, the cure is obvious: bake the background into the RGB pixels before you upload. If you flatten the cutout onto solid white and discard the alpha channel, there is no transparency left for any platform to mis-composite, and the black box can never appear.
Why transparency breaks on upload
Here is the same idea in plain terms, with a concrete example. A normal photo is made of three color channels: red, green, and blue. Every pixel gets a value for each, and together they make the colors you see. A transparent PNG adds the fourth channel, alpha. Alpha is not a color. It is a per-pixel instruction that says how see-through that pixel should be, from fully solid to fully invisible.
In the area you erased, the alpha channel says "invisible," but the RGB color underneath those pixels still exists — depending on the exporter it may be black, white, or leftover edge color. On your computer, your image viewer reads the alpha channel, sees "invisible," and politely hides whatever color is underneath, showing the checkerboard instead. The transparency is being respected, so you never notice the black hiding underneath.
Marketplaces handle uploads differently. As covered above, Etsy re-compresses and flattens every image, and it does not preserve the PNG alpha channel. When it flattens the file, it composites those formerly invisible pixels over a black default canvas, so they render solid black. That is the black box you see. The image below shows the same garments two ways. On one side they sit on the transparency checkerboard as a PNG; on the other they have been flattened onto white. The flattened version is what you actually want for a listing, because there is no alpha channel left for Etsy to mishandle.
So it is not that your file is broken or that Etsy is buggy. It is a mismatch: you gave the platform a format built around transparency, and the platform's pipeline is built around flattened, fully opaque images. While you are exporting, it is worth getting the rest of Etsy's listing specs right too, because a correctly flattened image that is the wrong size will still look amateurish. Per the published Etsy image specs (summarized in soona's Etsy image-size guide), aim for:
- Resolution: at least 2000 px on the shortest side; about 3000 × 2250 px is a commonly recommended target for the first photo.
- Aspect ratio: 4:3 works well, and your first photo should be landscape or square so Etsy's thumbnails crop it cleanly.
- Color and density: sRGB color space, 72 PPI.
- File size: ideally under about 1 MB for faster upload (flattening to JPG helps here).
- Count and file types: up to 10 photos per listing, with at least 5 recommended; Etsy accepts JPG, GIF, PNG, SVG, and HEIC — but no WebP, no transparent PNG, and no animated GIF.
Once you know the platform wants opaque, correctly sized files, the fix is obvious.
Does It Preserve Transparency? A Platform-by-Platform Table
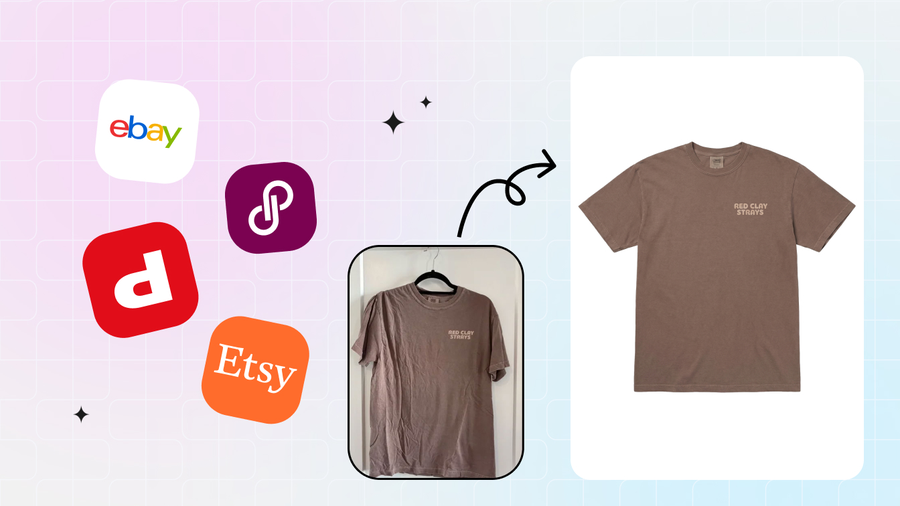
Etsy is the most reported case, but the "transparent PNG turns black (or white, or gray)" problem shows up across selling channels, and each platform behaves a little differently. Before you re-export the same file five times, here is what actually happens to transparency on each one, and what to do about it.
| Platform | Is transparency preserved in listing images? | What to upload |
|---|---|---|
| Etsy | No. Transparent PNG is officially unsupported for listing photos; transparent areas render black after Etsy re-compresses. Etsy accepts JPG, GIF, PNG, SVG, and HEIC (no WebP, no animated GIF). (Etsy Help; soona specs guide) | Flatten onto white, export JPG or opaque PNG. |
| Amazon | No. The main product image must be a pure white background, RGB 255,255,255, with the product filling roughly 85% of the frame. Transparent PNG is rejected for the main image. (pathedits / removebackgroundai Amazon guide) | Flatten onto pure white; fill ~85% of the frame. |
| eBay | No. eBay does not mandate a specific background color (white or a clean, neutral light background is best practice) and does not preserve transparency in the gallery. (eBay Seller Center; pathedits guide) | Flatten onto white (or very light gray). |
| Shopify | Technically yes — Shopify supports transparent PNG and even recommends it for logos and graphics — but the default Dawn theme has documented cases of transparent product images rendering on a black background on product pages. (Shopify community) | Flatten unless you control the theme CSS. |
| Poshmark / Depop / Mercari | Not applicable. These are photo-based marketplaces — you shoot the actual item — so there is no transparent-PNG workflow. White background is a best-practice convention, achieved by editing/compositing onto white. | Composite your photo onto white during editing. |
| Instagram / Facebook / Pinterest (feed) | No. Feed posts flatten to a background (often white or black per app). Transparency only survives in some sticker/story assets, not standard feed images. | Flatten onto a chosen background before posting. |
One important exception that confuses a lot of sellers: transparency survives just fine in PNG digital-download files sold on Etsy. If you sell clipart, sublimation PNGs, or logo packs, the file the buyer downloads keeps its real alpha channel. It is only the listing preview image — the photo a shopper sees in search — that turns black. So you flatten the mockup you show buyers, while delivering the genuine transparent PNG as the product itself.
When You Actually NEED a Transparent PNG (and When to Flatten Instead)
The lesson from the table above is not "transparency is bad." Transparency is essential for some jobs and pointless for others, and most of the frustration comes from using the wrong one in the wrong slot. Use this as a decision guide so you stop fighting the platform when flattening is the correct answer, and keep transparency only where it genuinely earns its place.
Keep the transparent PNG when…
- You are selling the cutout as a digital download. Clipart, sublimation PNGs, and logo packs are composited by the buyer, so the deliverable must keep its alpha channel. For print use, the standard is 300 DPI at the actual print size.
- You print DTG or DTF on demand. Direct-to-Garment and Direct-to-Film both require a transparent-background PNG, because any solid background baked into the file will print onto the garment. (Printful's "Create the perfect DTG file" guidance and Printify's file-types guide both call for transparent PNG here.)
- You will overlay the graphic on something else — logos and watermarks placed over other images, where the underlying art needs to show through.
- You make stickers or die-cut products, where the cut line follows the alpha edge of the shape.
Flatten onto solid background when…
- It is a marketplace listing or thumbnail image — Etsy, Amazon, eBay. Flatten to white, every time.
- You print sublimation or all-over print. Here the print is edge-to-edge, so transparency is unnecessary; Printify actually prefers JPG (no transparency) for sublimation, all-over, and paper products.
- It is an email or feed graphic that will render on an unknown background you cannot control.
The practical rule of thumb: keep one transparent master file, but export a separate flattened white-background JPG (or opaque PNG) specifically for the listing slot. You are not choosing one format forever — you are matching each export to its destination. If you want the longer comparison with side-by-side examples, see transparent PNG vs white background product photos.
The two-minute fix
The fix is to remove the transparency before you upload. Instead of handing Etsy a PNG with an alpha channel it might drop, you flatten the image onto a solid background — usually white — so every pixel is fully opaque. There is no alpha channel left to lose, which means there is nothing that can render as black. As shown by the compositing formula earlier, once alpha = 1 everywhere, the result no longer depends on the platform's default background at all.
You have two quick ways to do this:
- Flatten onto white. Place your transparent cutout on a solid white background and export it as a JPG, or as a PNG with no transparency. The black box disappears because the formerly invisible pixels are now genuinely white. Exporting as JPG is the surest route, because the JPG format has no alpha channel — there is physically nothing left for a platform to mishandle.
- Re-export from the source. If you still have the original photo, just export a clean white-background version of the product instead of a transparent one. For marketplace listing photos this is what Etsy wants anyway, and it matches the specs (sRGB, 3000 × 2250 px, under ~1 MB) listed above.
Either approach gets you to the same place: a flat, fully opaque image that every platform renders identically. You do not need expensive software to do it. A free background-removal tool will both cut out your subject and let you download it flattened onto white in full resolution.
Flattening the transparency fixes the black box:
The before shows the dreaded black rectangle around the cutout after upload. The after is the same artwork flattened onto clean white, which is exactly how it will appear in your listing. Two minutes of work and the problem is gone for good.
How to Flatten onto White Correctly and Verify Before You Upload
Flattening sounds trivial, but two things go wrong often enough to be worth their own section: people think they flattened when an alpha channel is still hiding in the file, and people upload a cutout with messy edge pixels that only become visible against the platform's background. Here is how to do it cleanly and prove it before you upload.
1. Flatten so the white is actually baked in
Place a solid white (or brand-color) layer underneath your cutout, then merge or export so the white becomes part of the RGB pixels and the alpha channel is removed entirely. The most reliable way to guarantee no alpha survives is to export as JPG — that format cannot store transparency, so the problem is structurally impossible. If you must stay in PNG (for example, to keep maximum sharpness on text or line art), flatten the layer stack first so the exported PNG is fully opaque rather than a transparent PNG with white painted on one layer.
2. Verify on a non-white background before uploading
The single most useful QA habit is to look at your file over something that is not white. A white fringe is invisible on white but glaringly obvious on black; a dark halo hides on black but shows on white; an incomplete cutout reveals itself against a solid color. Practical ways to check:
- Drop the image onto a black or checkerboard canvas in your editor and zoom to 200% along the edges.
- Use a free transparency checker that previews the image over white, black, and gradient backgrounds at once — for example imageonline.io's "preview transparency" and "check transparency" pages, or onlinepngtools' "check if PNG is transparent."
- Command line: run
identify -verbose file.png | grep Alphawith ImageMagick — if it reports an alpha channel, your "flattened" file still isn't. - In Photoshop, open Window > Channels; if an Alpha channel is listed, transparency is still present and needs to be flattened out.
3. Decode the symptom you are seeing
Not every bad upload is a black box. Match what you see to the cause:
| What you see | What it means | Fix |
|---|---|---|
| Black box behind the subject | A transparent area was composited on a black default canvas (the classic Etsy case). | Flatten onto white and re-upload. |
| White or gray box | The platform or theme defaults to white/gray, or a gray matte was baked into a JPG during a sloppy export. | Re-flatten onto pure white (RGB 255,255,255); confirm no gray matte remains. |
| Dark halo / fringe around the edge | Leftover dark or semi-transparent edge pixels from a rough cutout — they only show once a background appears behind them. | Defringe before flattening (see below). |
If the culprit is a dark halo, Photoshop's matting tools are built for exactly this. Layer > Matting > Defringe at 1–2 px replaces contaminated edge pixels with neighboring interior colors, and Layer > Matting > Remove Black Matte / Remove White Matte cleans anti-aliased edges left over from a cutout made on a black or white background. (Adobe's "fringe pixels" help and the Photoshop Training Channel defringe tutorial cover both.) Clean the edge first, then flatten — flattening a haloed cutout just locks the halo in.
If you would rather not open Photoshop at all, you can do the edge cleanup right in Snappyit's free background remover. After the automatic cutout, the manual KEEP / REMOVE / ERASE brush lets you paint a dark fringe away or restore a chewed-off edge by hand at full resolution — useful for jewelry chains, hair, and thin graphic lines. To be clear about what it is: it is a free, full-resolution, no-watermark cutout and cleanup tool, not AI photography — it removes and refines the background you already have rather than generating new scenes.
How to re-export a clean image free
Here is the full workflow for producing a clean, upload-safe image at no cost. The free background remover handles the cutout and the export, and it is genuinely free: full-resolution download, no watermark, no credits, and no sign-up.
Step by step
- Upload your photo. Drop in your product shot or graphic. The tool detects the subject and removes the background automatically.
- Clean up the edges if needed. If a stray bit of background remains or part of your subject got cut, use the manual KEEP / REMOVE / ERASE brush to fix it by hand. This matters for fine details like jewelry chains, hair, or thin graphic lines — and it is where you kill any dark fringe before flattening.
- Choose your background for export. For an Etsy or Amazon listing, export the image flattened onto solid white. There is no alpha channel, so it will never turn black on upload. (For Amazon, frame the product to fill roughly 85% of the canvas to meet the main-image rule.)
- Keep a transparent PNG for your own files. If you also want a true transparent cutout for a website banner, a mockup, or a DTG/DTF print template, export that version too. Transparency is great for those uses; it is only marketplace upload pipelines that mishandle it.
- Verify, then download at full resolution. Glance at the cutout against a dark or checkerboard background to confirm the edges are clean, then save the file at its native size with no watermark and upload the white-background version to your listing.
The key decision is matching the export to the destination. White-background flattened image for the marketplace; transparent PNG for places that actually preserve alpha, such as your DTG templates and overlay graphics. If you are unsure which is better for a given use, the deeper comparison in transparent PNG vs white background product photos walks through both with examples.
How to avoid it next time
The simplest way to never see a black box again is to stop sending marketplaces transparent files in the first place. For listing photos, a clean white or lifestyle background beats transparency every time, for three reasons.
- Marketplaces expect opaque images. As the platform table showed, Etsy, Amazon, eBay, and Shopify (on default themes) all flatten uploads, and a fully opaque white-background image sails through every one of them without surprises. Amazon goes further and requires pure white (RGB 255,255,255) for the main image, so a flattened white file is the only thing that satisfies the strictest channel and the most lenient one at once.
- White backgrounds convert. Buyers scanning search results respond to a crisp, consistent product shot. A clean white background looks professional and keeps attention on the item, while a lifestyle shot can show scale and context. Either way, the image renders predictably across desktop and mobile thumbnails.
- Transparency has no payoff here. The listing thumbnail sits on Etsy's own white-ish card anyway, so even when transparency happens to survive, it usually just looks like a white background — but with the risk of breaking into a black box. You take on the downside with none of the upside.
Keep transparent PNGs for the jobs they are actually good at: logos, watermarks, mockup overlays, banners, DTG/DTF print files, stickers, and design files you control. For anything you upload to a storefront, flatten first — and keep a master transparent file so you never have to re-cut. If you want your listings to do more than just display correctly, the practical tips in how to create an Etsy listing that ranks and sells cover photos, titles, and tags together.
Bottom line: the black background is not your fault and not a permanent problem — it is the predictable result of a transparent file being composited over a platform's dark default. Flatten your image onto white, verify the edges over a non-white background, re-export at full resolution, and upload with confidence. It takes about two minutes and it is free.
Make a clean white-background image →
Once your images display correctly, give the rest of the listing the same attention — our guide to creating an Etsy listing that ranks and sells walks through titles, tags, and photo order. And for the wider photo workflow beyond transparency, the AI product photography hub covers white backgrounds, model shots, and recolors.
Frequently Asked Questions
Why does my transparent PNG show a black background on Etsy?
Etsy flattens images and doesn't preserve PNG transparency the way you see it locally — the transparent (alpha) areas get filled, often rendering as black or gray. It's a transparency-handling issue, not a corrupted file.
How do I fix a PNG that turns black when uploaded?
Flatten the transparency onto a solid background (usually white) and re-export, or re-export a clean PNG/JPG. Uploading a white-background image instead of a transparent one avoids the black fill entirely.
Should I upload a transparent PNG or a white background to Etsy?
For Etsy listing photos, a white (or lifestyle) background is safer — transparency isn't reliably preserved. Keep the transparent PNG for your own compositing and upload a flattened version.
Does Etsy support transparent images?
Etsy accepts PNGs but doesn't reliably display their transparency in listings, so transparent areas can appear black. Treat Etsy uploads as solid-background images.
How do I re-export a clean PNG or white-background image for free?
Remove the background, place the product on white (or keep it transparent for your own files), and export at full resolution for free — Snappyit does this with no watermark or sign-up.
Why does my PNG look transparent on my computer but turn black on Etsy?
Your computer's image viewer and browser composite the PNG over a white or checkerboard preview canvas, so the empty (alpha) areas look transparent. Etsy does not preserve that alpha channel: when it re-encodes and compresses your listing photo it flattens the image and composites the transparent pixels over a default black background, turning them solid black. The fix is to bake a white background into the pixels yourself before uploading (flatten to white, or export as JPG) so there is no alpha left for Etsy to mis-composite. Note Etsy officially lists transparent PNG as unsupported for listing photos.
Can I still sell transparent PNG files on Etsy as a digital download?
Yes. The black-background problem only affects the LISTING PREVIEW images shoppers see in your shop — not the actual file a buyer downloads. Your sold transparent PNG (clipart, sublimation art, logo pack) keeps its real transparency when the customer opens it. So upload a flattened white-background JPG or PNG as the listing photo/mockup, and deliver the genuine transparent PNG (ideally 300 DPI at print size) as the digital file inside the listing.
Do I ever actually need to keep the background transparent instead of flattening?
Yes, in a few cases. Direct-to-Garment (DTG) and DTF print-on-demand effectively require a transparent PNG, because any solid background saved in the file will physically print onto the garment. You also need transparency for stickers/die-cuts, logos and watermarks you overlay on other images, and clipart you sell for buyers to composite themselves. But for full-bleed sublimation and all-over-print, a flat JPG is actually preferred since the print is edge-to-edge and no transparency is needed — and for every marketplace listing thumbnail you should flatten to white.