
At a glance
Kill edge halos and color fringing when you change a background in Photoshop: diagnose light vs dark halos and fix them with Decontaminate, Defringe, and more.
| Need | What to do |
|---|---|
| Get oriented | Read the short summary, then use the checklist below. |
| Create a test image | Try Background Remover Free |
A halo is the single most common reason a background swap looks "Photoshopped." You make a clean-enough selection, drop in a new color, zoom to 100%, and there it is: a thin bright or dark rim hugging the subject, or a faint color band where the old backdrop bled onto the edges. This article assumes you already know how to make the swap — it is only about removing that rim.
The fixes below are ordered from fastest to most surgical. Most images are solved by the first two or three. The later techniques (Inner Glow, Blend If, channel-level work) are for the edges that refuse to cooperate. Throughout, the goal is the same: get the edge to belong to the new background instead of carrying a ghost of the old one.
What an Edge Halo Actually Is
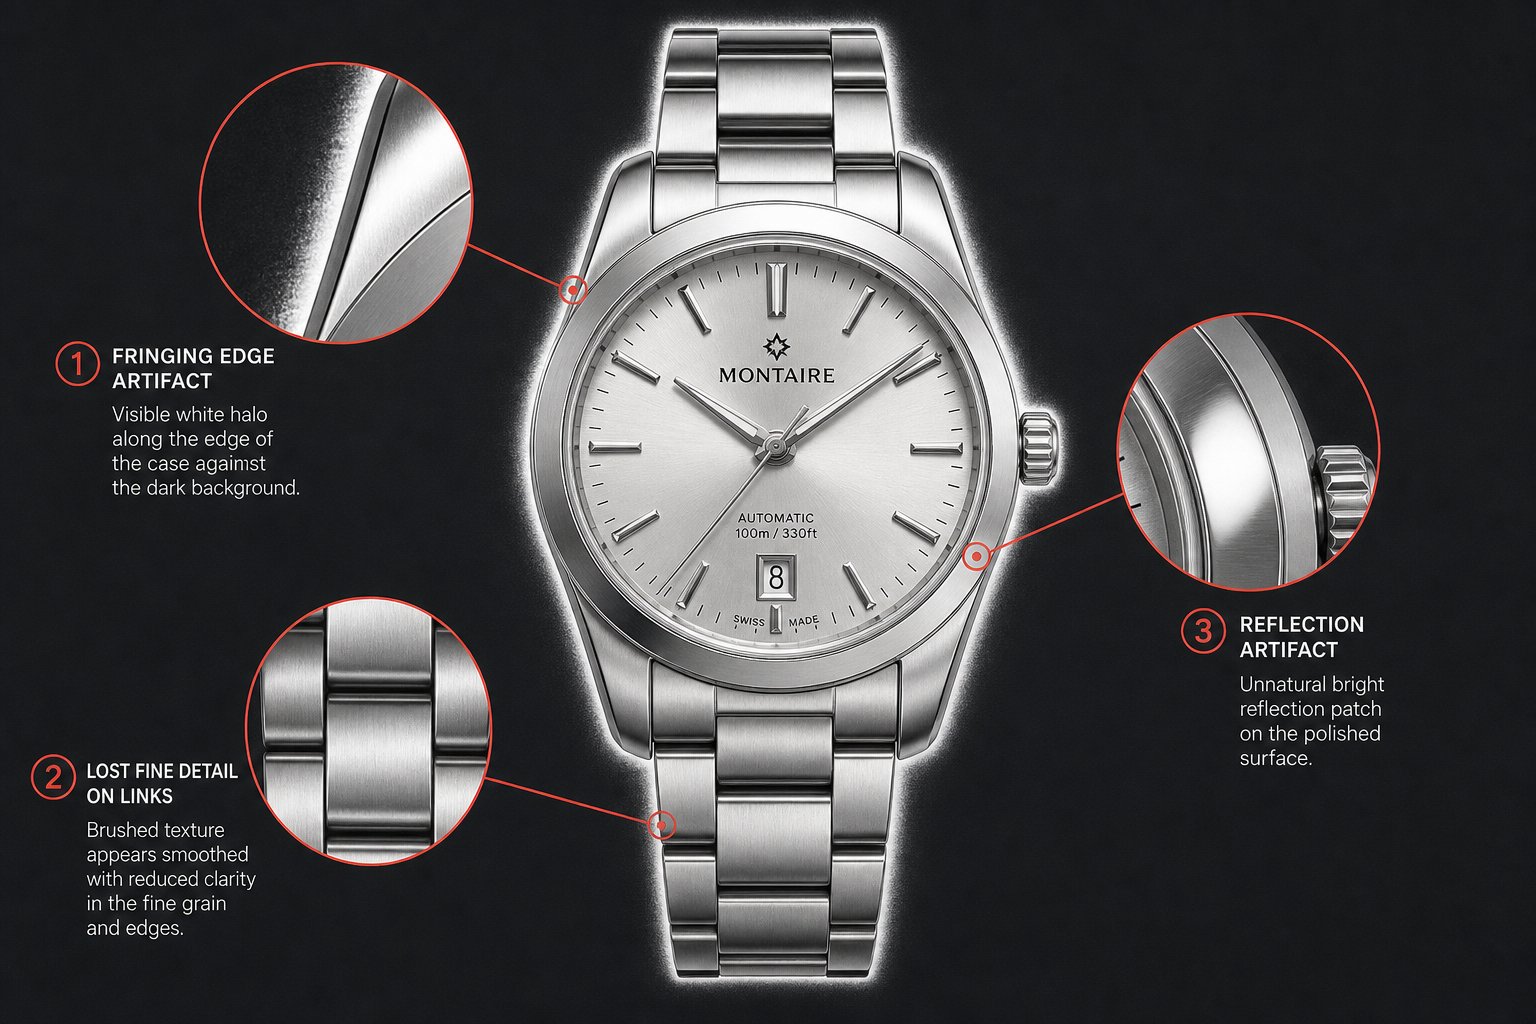
A halo is not random. Along the boundary between your subject and the original background, pixels are partially transparent — they are a blend of subject color and backdrop color. Your camera's anti-aliasing and any lens softness guarantee this transition zone exists; no edge is one pixel sharp. When you cut the subject out and place it on a new color, those mixed edge pixels still contain a percentage of the old background.
Two distinct artifacts come from this:
- A halo is a luminance problem — the edge pixels are brighter or darker than the new background, so they read as a glowing or shadowed rim.
- Color fringing is a hue problem — the edge pixels carry the old backdrop's color (the classic green spill from a green screen, or cyan from a blue studio wall) that becomes obvious against the new color.
You often get both at once. Knowing which one you are looking at determines the fix: luminance halos respond to contracting the mask, while color fringing needs the contaminated hue replaced or desaturated. Treating a color-fringe problem with a mask contraction just eats into your subject without removing the tint.
Diagnose Light vs. Dark Halos First
Before you reach for any tool, identify the direction of the problem. It tells you which way to push.
| What you see | Cause | First move |
|---|---|---|
| Bright / glowing rim | Light original backdrop left in the edge, now sitting on a darker new color | Contract the mask (Shift Edge negative, or Minimum filter) |
| Dark / shadowed rim | Mask cut slightly into the subject, exposing the new dark color through soft edge pixels — or a dark original on a light new color | Expand the mask slightly, or feather + paint white on the mask edge |
| Colored rim (green, cyan, magenta) | Hue of the old background trapped in semi-transparent edge pixels | Decontaminate Colors or a clipped Hue/Saturation desaturation |
| Stair-stepped / jagged edge | Selection made without anti-aliasing or with Smooth set too low | Add a little Smooth in Select and Mask, not more contraction |
The practical test: temporarily fill your background layer with mid-grey, then with white, then with black. A halo that appears bright on the dark fill and disappears on the white fill is a classic light-rim luminance halo. A green tint that stays green on every fill is color contamination. Diagnosing this in 10 seconds saves you from applying the wrong fix three times.

Shift Edge in Select and Mask (Fastest Fix)
The Select and Mask workspace (Select > Select and Mask, or Ctrl/Cmd + Alt/Opt + R) is where most halos die. The single most useful control for a luminance halo is Shift Edge under Global Refinements.
- Open Select and Mask with your subject selection active.
- Set a View Mode that exposes the rim — On Black reveals bright halos, On White reveals dark ones. Press F to cycle views.
- Drag Shift Edge negative to contract the mask boundary inward. There is no universal number — start small and watch the rim. Pull just far enough to swallow the fringe without nibbling visible detail off the subject.
- Add a touch of Smooth (a low value) only if the edge is stair-stepping; high Smooth rounds off corners on hard-edged products.
- Keep Feather minimal for crisp products; a hair-width of feather helps organic subjects blend.
- Output as a Layer Mask so the fix stays non-destructive and re-editable.
Shift Edge is global — it contracts the entire boundary uniformly. That is perfect for a halo that rings the whole subject, but if the rim only shows in one area, contracting everywhere will erode hair or fine edges elsewhere. For localized halos, fix the spot directly: zoom in, grab a small soft black brush, and paint on the mask only where the rim appears.
Decontaminate Colors for Hue Fringing
When the rim is colored rather than just bright, contracting the mask will not remove the tint — you need to replace the contaminated pixels. Decontaminate Colors, in the Output Settings of Select and Mask, samples clean color from just inside the subject and paints over the edge pixels with it. This is the standard fix for green-screen spill or any saturated backdrop.
- Check Decontaminate Colors and raise the Amount until the color tint disappears. Too high and it can smear fine detail like flyaway hair, so push it to "just clean" and no further.
- It is destructive — it must output to a New Layer with Layer Mask because it rewrites pixel data. Keep your original beneath it.
- For faces and skin, go gentle. Aggressive decontamination can introduce odd color shifts on necks and shoulders. Pair it with a clipped Hue/Saturation layer instead if it overcorrects.
If the spill reaches deeper than the edge — for example green cast soaking into blonde hair — Decontaminate alone will not catch it. Clip a Hue/Saturation adjustment layer to the subject, target the offending color range with the eyedroppers, and pull Saturation down hard. That neutralizes the spill without touching the subject's real colors.
Skip the masking entirely for simple cutouts. Snappyit's AI background remover ships edge-aware results with decontaminated edges built in. Try Snappyit free →
Defringe and Remove White / Black Matte
Photoshop has a dedicated menu for edge cleanup that many people overlook: Layer > Matting. It works on a layer that already has transparency (a cutout), replacing edge pixels with neighboring interior color.
- Defringe — choose Layer > Matting > Defringe and set a small width (1 px is usually enough, 2 px for softer edges). It pushes interior color outward into the fringe ring. Fast, no extra layers, and ideal for a thin colored or bright rim.
- Remove White Matte — use this when the original background was pure white (a common e-commerce situation). It specifically removes the white halo left after cutting a subject off white.
- Remove Black Matte — the mirror case, for subjects cut off a black backdrop.
Matting commands are most effective on a true cutout layer with an alpha edge, not on a fill-layer-plus-mask setup. If you used a Solid Color fill layer for the new background, convert your subject to its own layer with transparency first, then apply Defringe. The result is a clean edge you can drop onto any new color.
The Minimum Filter Trick on the Layer Mask
For precise, previewable mask contraction, apply the Minimum filter directly to the layer mask. This is my recommended go-to for a uniform bright halo because you watch it choke the rim away in real time.
- Click the layer mask thumbnail in the Layers panel so you are editing the mask, not the image.
- Go to Filter > Other > Minimum.
- Set a small Radius — increase it pixel by pixel only until the halo is gone. There is no magic number; the right radius is "the smallest one that clears the rim," which depends on edge softness and image resolution. Larger radii start visibly shrinking the subject.
- Set Preserve to match your subject. Photoshop's two options are Roundness (for organic shapes — people, plants, animals) and Squareness (for hard-edged products and architecture). Choosing correctly keeps corners crisp instead of rounding them.
Because Minimum runs on the mask, it is non-destructive to your pixels and fully re-editable — delete and reapply if you overshoot. It contracts the whole mask, so the same localized-vs-global caveat from Shift Edge applies: brush the mask by hand where the halo is only in one zone.
The Inner Glow Edge-Cover Technique
Some fringes survive every mask contraction — the rim sits inside the visible subject, not on the cut edge, so shrinking the mask cannot reach it. The Layer Style Inner Glow trick paints over the contaminated pixels from the inside without altering your mask at all.
- Double-click the subject layer to open Layer Style, and enable Inner Glow.
- Set the blend mode to Normal (not Screen — Screen only fixes bright fringes).
- Click the color swatch and sample a color from just inside the subject's edge so the glow blends in.
- Set Source to Edge, then dial a small Size (1–3 px) and raise Choke high so the fill hugs the rim tightly.
- Adjust Opacity until the fringe is covered without painting a visible band inward.
Think of it as a controlled, recolored border drawn just inside the edge. It is non-destructive (it is a layer style), so you can toggle or tweak it any time. Reserve it for the persistent cases — it is more finicky than Shift Edge or Defringe, but it rescues edges nothing else fixes.
Blend If for Stubborn Bright or Dark Edges
When the halo is purely tonal — a bright rim against a dark background, or vice versa — Blend If can hide it by simply telling Photoshop not to show the offending tones. Double-click the subject layer to open Blend Options, and find the Blend If sliders at the bottom.
- For a bright halo, drag the right (white) slider of "This Layer" inward to drop the brightest edge pixels out of the composite.
- For a dark halo, drag the left (black) slider inward to drop the darkest edge pixels.
- Always split the slider. Hold Alt/Option and drag one half of the triangle to feather the transition — an unsplit slider creates a new hard, jagged edge that looks worse than the halo.
Blend If is non-destructive and instant, but it acts on tone across the whole layer, so test that it is not also knocking out highlights you want to keep inside the subject (a white shirt button, a specular glint). When it works cleanly it is the fastest tonal-halo fix there is; when it eats real highlights, fall back to a mask contraction.
Processing a whole catalog? Batch-remove backgrounds with consistent edges instead of hand-fixing each file. Try Snappyit free →

Cleaning Up AI Cutout and Generative Fill Edges
AI tools are fast but not halo-proof. Two common Photoshop paths and how they fringe:
Generative Fill backgrounds
Generative Fill (available in Photoshop CC 2024 / version 25 and the later 24.6 beta and up) builds a new background from a text prompt and often matches lighting and perspective well. But because the generated content meets the subject along the same soft selection edge, you can still get a rim — especially on hair. After generating, inspect at 100% and apply the same fixes: a Minimum-filter contraction on the generative layer's mask, or a Defringe pass on the subject layer above it.
Remove Background and Select Subject cutouts
The one-click Remove Background button and Select Subject both produce a mask, not a hand-traced edge. Select Subject's cloud-powered "Detailed Results" option — available since Photoshop 2022 (version 23.5), not a brand-new feature — gives noticeably cleaner edges on intricate detail like strands and spokes than local device processing, so enable it under Preferences > Image Processing for tricky subjects. Even so, finish with a manual check: Shift Edge or Minimum for a luminance rim, Decontaminate for color spill.
A dedicated background remover that decontaminates edges automatically can skip most of this. Snappyit's AI is built for product and apparel cutouts where clean edges decide whether a listing image looks professional, and it scales across a batch without per-image masking — useful for sellers handling whole catalogs, the same case covered in our free clothing background removal guide.

Avoid Banding (the Halo's Cousin) by Working in 16-bit
One edge artifact that gets blamed on halos is actually banding — visible stepped rings in a smooth gradient background, often most obvious right around the subject. It is not a masking problem; it is a bit-depth problem.
An 8-bit image has only 256 tonal levels per channel, which is not always enough to render a subtle gradient smoothly over a large area, so you see steps instead of a clean blend. The fix is structural:
- Convert to 16-bit before building a gradient background: Image > Mode > 16 Bits/Channel. With far more tonal steps available, stepping disappears in nearly every case.
- If you must stay in 8-bit, add a tiny amount of monochromatic Gaussian noise to the gradient layer (Filter > Noise > Add Noise). The noise dithers the boundaries between tones so the steps no longer read as bands, and it is invisible at normal viewing distance.
- Use a Gradient fill layer rather than a painted gradient — fill layers render at full precision regardless of the document's bit depth.
For flat solid-color backgrounds (white for Amazon, grey for headshots) banding is a non-issue — it only appears in gradients. But if your "halo" is actually a ring of stepped tone in a graduated backdrop, no mask fix will help; switch to 16-bit and the problem is gone.
Stop fixing halos one image at a time
Manual edge work is worth it for a hero shot. For everything else — product cutouts, apparel, batches of listing images — let AI handle the edges. Snappyit removes backgrounds with decontaminated, halo-free edges in seconds, no Select and Mask required, so you can swap to any new color cleanly.
More Resources for Clean Background Edits


Frequently Asked Questions
Why do I get a white halo after changing a background in Photoshop?
The edge pixels between your subject and the original background are partially transparent and still contain some of the old, lighter backdrop. When you place the subject on a darker new color, those bright mixed pixels show as a glowing rim. Contract the mask to remove them: pull Shift Edge negative in Select and Mask, or apply Filter > Other > Minimum to the layer mask at a small radius until the rim disappears.
What is the difference between a halo and color fringing?
A halo is a brightness problem — the edge pixels are lighter or darker than the new background, reading as a glowing or shadowed rim. Color fringing is a hue problem — the edge carries the old backdrop's color, like green spill from a green screen. Halos are fixed by contracting the mask; fringing needs the contaminated color replaced, using Decontaminate Colors or a clipped Hue/Saturation desaturation.
How do I remove green spill from hair after cutting out a subject?
For edge spill, check Decontaminate Colors in the Output Settings of Select and Mask, which samples clean color from inside the subject and paints over the contaminated edge. If the green soaks deeper into the hair, clip a Hue/Saturation adjustment layer to the subject, target the green range with the eyedroppers, and pull Saturation down hard so the spill neutralizes without shifting the subject's true colors.
What does the Minimum filter do to a layer mask?
The Minimum filter (Filter > Other > Minimum) contracts a mask uniformly, choking the outermost edge ring inward to remove halo pixels with a live preview. Click the mask thumbnail first so you edit the mask, not the image, then raise the Radius only until the rim clears. Set Preserve to Roundness for organic subjects like people, or Squareness for hard-edged products, so corners stay crisp.
Why does my gradient background show stepped rings instead of a halo?
That is banding, not a halo, and no masking fix will help. It happens because 8-bit images have only 256 tonal levels per channel, which is too few to render a smooth gradient over a large area. Convert to 16-bit (Image > Mode > 16 Bits/Channel) before building the gradient, or add a small amount of monochromatic Gaussian noise to the gradient layer to dither the steps away.
Can an AI background remover avoid halos without Photoshop?
Largely, yes. A dedicated AI background remover detects the subject and decontaminates edges automatically, producing clean cutouts you can drop onto any new color without manual Select and Mask work. It will not match a hand-traced edge on the most difficult hair or transparent glass, but for product and apparel photos it removes halos in seconds and scales across an entire batch, which manual masking cannot match.