At a glance
Change a picture's background color in seconds with a free AI tool, or get precise control in Photoshop. Includes the exact colors Amazon and passports
| Need | What to do |
|---|---|
| Get oriented | Read the short summary, then use the checklist below. |
| Create a test image | Try Product Photo Editor Free |
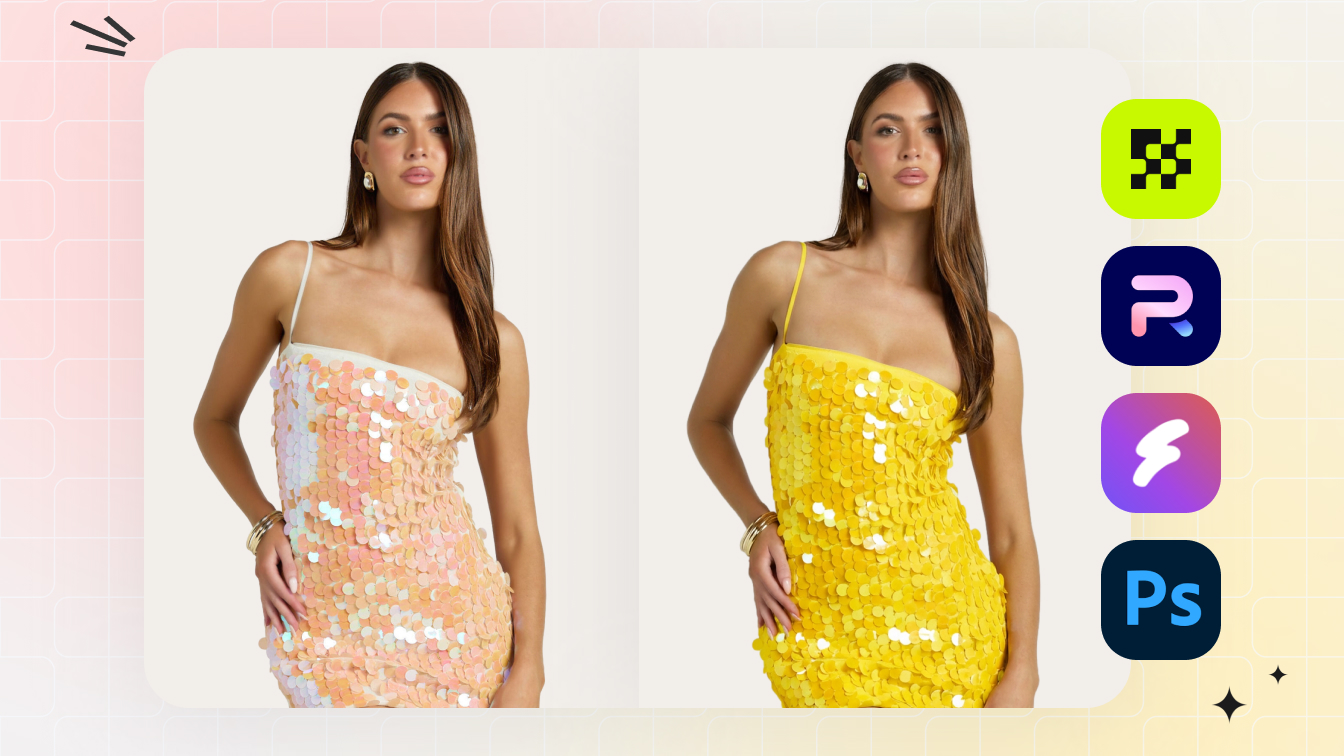
To change a picture's background color, upload your photo to a free AI tool, let it isolate the subject, choose a new solid color (or enter an exact HEX code), and export. Tools like remove.bg, Canva, and Snappyit's Color Change do this in seconds with no software to install. For complex edges like hair, or when you need pixel-level control, Photoshop's Select Subject plus a Solid Color fill layer gives you a precise, editable result.
The harder part is usually knowing which color to use, because that depends entirely on where the image is headed.
Know the Color Your Platform Requires First
Many platforms don't suggest a background color, they enforce it. Picking the wrong shade gets your image rejected, suppressed, or just looking out of place. So before you touch a tool, confirm the target.
| Destination | Required background | Notes |
|---|---|---|
| Amazon main product image | Pure white, RGB 255/255/255 (#FFFFFF) | Non-compliant images can be suppressed from search. See Amazon's image standards. |
| US passport | Plain white, uniform, shadow-free | No gradients or texture. |
| UK passport | Light grey or cream | Pure white is not required. |
| Germany (biometric) | Plain light grey | Official guidelines prefer grey over bright white. |
| France (ID photos) | Light blue-grey accepted | One of the few countries allowing it. |
| LinkedIn headshot | Neutral, non-distracting | No strict color rule, but clean backdrops read as more credible. |
There is no single correct background color. A pure-white studio backdrop is perfect for Amazon but can be rejected for a German passport that expects light grey. Once you know the exact value you're aiming for, the actual editing is easy.
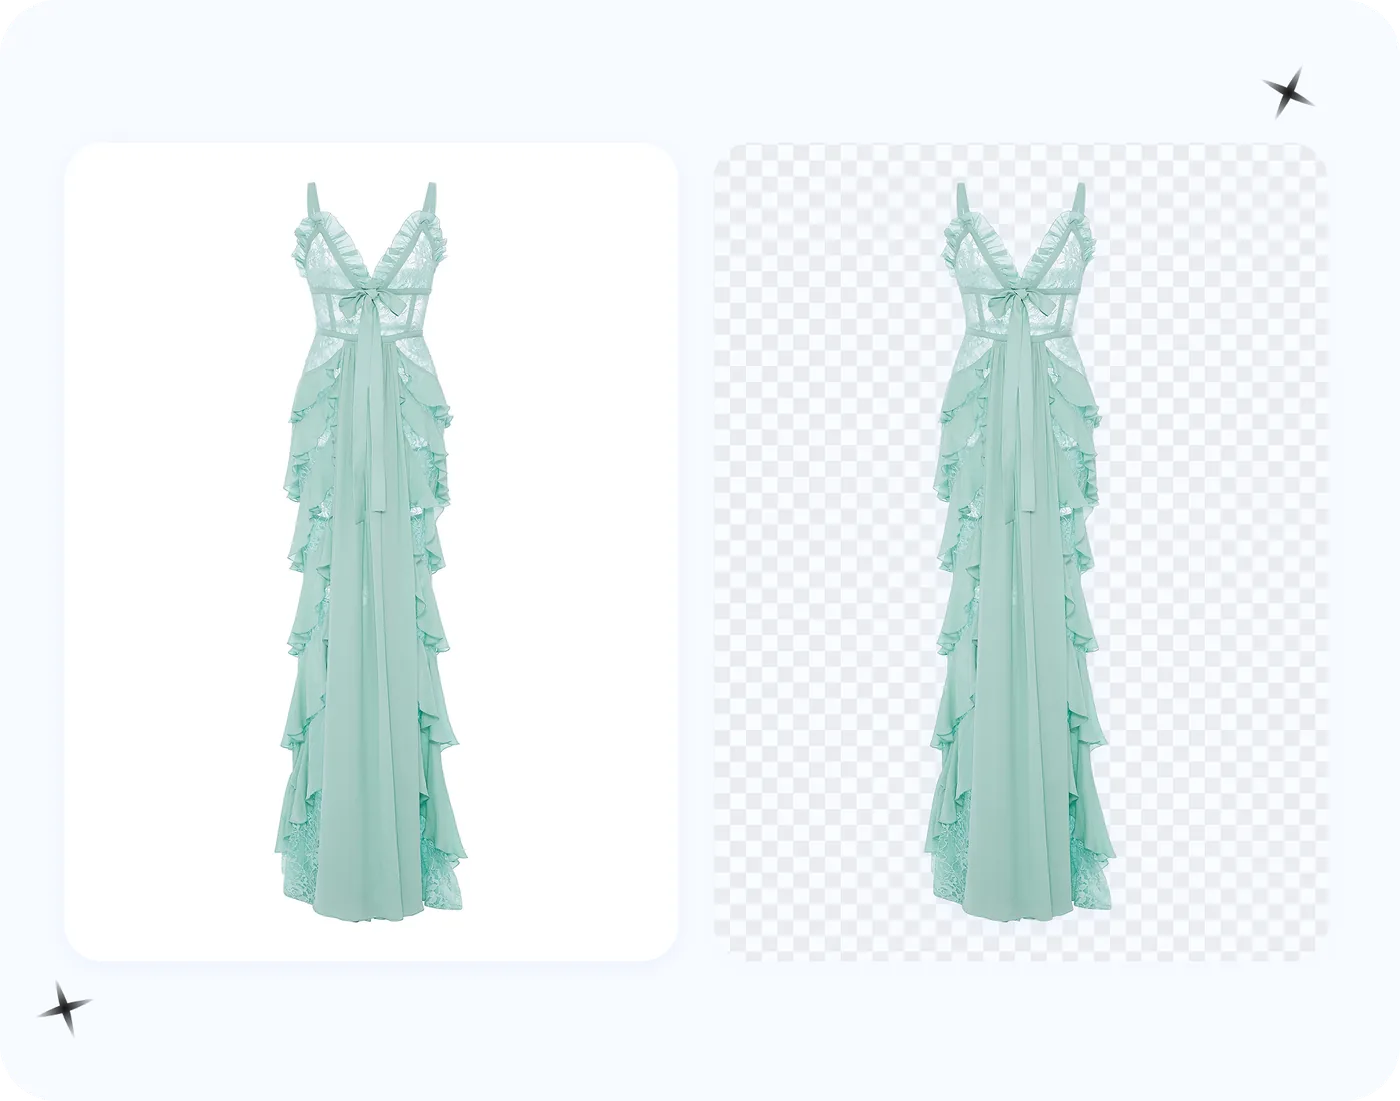
Removing a Background vs. Changing Its Color
These two operations look similar but produce different files, and choosing wrong leaves you with an image that won't work.
Removing a background deletes every pixel that isn't your subject, leaving transparency. Technically this writes an alpha channel that marks which pixels are visible and which are see-through. You save it as a PNG and reuse that single cutout on white for Amazon, grey for your site, or a brand color for ads.
Changing the background color gives you a finished image with the old backdrop swapped for a new solid fill. No transparency survives, and the file is smaller and ready to upload.
Remove the background when you want flexibility to reuse the cutout. Change the color directly when you just need one finished image now.
Transparency is also the wrong choice in a few specific places. JPEG doesn't support it, so a transparent PNG converted to JPG turns those areas white or black, often with rough edges. Many email clients and word processors do the same. And final deliverables like passport photos and listing images need a defined color, not an empty one. A PNG color-changer workflow usually means removing to transparency first, then compositing a new color behind the subject before saving.

Choosing the Right Background Color
The right color is functional, not decorative. It controls how clearly your subject stands out and whether the image passes its requirements.
Two things decide it: contrast and color cast
Contrast is the main driver. A dark product on white pops; a pale product on white fades into it. You want clear separation between subject and backdrop, which matters more than any single "best" color. For a light subject, a darker background does more than a white one.
Color cast is the quieter issue. A bright backdrop reflects its hue onto the subject's edges, so a red wall can tint a product's rim pink. Neutral greys reflect neutral light and avoid this, which is why photographers default to them. Warm colors feel energetic and visually advance; cool colors recede and feel calmer. For most backgrounds you want the backdrop to recede so the subject leads, and neutrals do that best.
Recommended colors by use case
| Use case | Color | HEX | Why |
|---|---|---|---|
| E-commerce (Amazon, eBay) | Pure white | #FFFFFF | Required by platforms; distraction-free; loads fast |
| Professional headshot | Light grey / off-white | #F0F0F0 or #E8E8E8 | Softer than pure white; flatters skin tones |
| US passport | Plain white | #FFFFFF | Must be uniform and shadow-free |
| UK passport | Light grey | #D3D3D3 | Meets UK biometric standards; less glare |
| Social media branding | Brand color | Varies | Keeps posts visually consistent |
| Presentations / dramatic product shots | Black or brand color | #000000 or brand HEX | High contrast makes light subjects glow |
| Creative / lifestyle | Cream / warm neutral | #FAF3E0 or #F5F0E8 | Soft, inviting, still neutral enough to recede |
For headshots, off-white or light grey usually beats pure white, which can wash out skin under flat lighting. Cream tones suit lifestyle and wedding work. Black backdrops convey the high-contrast, premium look luxury brands lean on.
Stick to a single solid color for anything that needs to comply or stay consistent across a set. Gradients add depth for marketing banners and feed graphics, but they're rejected for e-commerce main images and passports, and they make a catalog harder to keep uniform. When unsure, go solid; you can add a gradient later for one-off creative assets.
Free Online Methods That Take Seconds
You don't need to install or pay for anything. A neural network identifies your subject, separates it from the background, and lets you drop in a new color. What used to be careful Photoshop masking now happens in a browser, and the workflow is nearly identical across every tool:
- Upload your image. Most tools accept JPG, PNG, and WebP.
- Let the AI isolate the subject. A segmentation model splits foreground from background.
- Check the selection. Look closely at hair, clothing edges, and fine detail; a checkerboard preview shows transparent areas.
- Choose the new color. Use a preset (white, black, grey) or enter a custom HEX for an exact match.
- Refine edges if needed. Better tools include a brush or eraser to fix what the AI missed.
- Export. PNG for transparency, or JPG/WebP with the solid color baked in.
This holds whether you use remove.bg for a quick cutout, Canva's built-in remover for design work, or Photoroom on mobile. The differences are edge quality, resolution limits, and what each lets you do after step four.
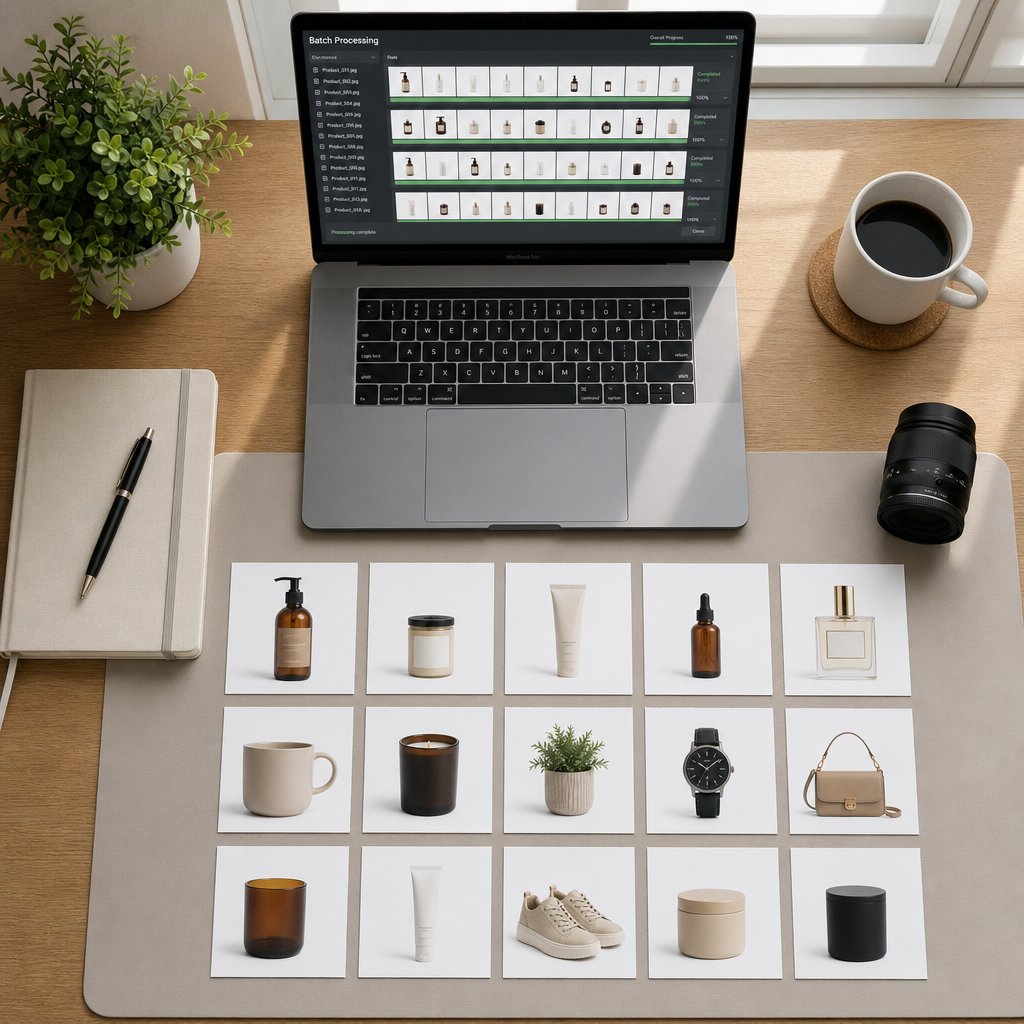
If you're a seller changing backgrounds across dozens or hundreds of product photos, Snappyit's Color Change tool is built for that case: set the target color once and it applies the same background uniformly across the batch, so every listing image matches without any Photoshop work.
Where free tiers fall short
Free tools are genuinely capable, but the limits are real:
- Resolution caps. Remove.bg, for example, limits free downloads to 0.25 megapixels, fine for thumbnails but well below the 2000x2000px most marketplaces want for product images.
- Watermarks. Some tools brand free exports, making them unusable professionally until you upgrade.
- Hard edges. Wispy hair, glass, and low-contrast boundaries still trip up free AI, leaving fringing or lost detail.
- One at a time. Free tiers rarely batch, so 50 photos means 50 uploads and downloads.
For a single headshot, a few product shots, or a social post, free tools are good enough. Where they break down is consistency at scale and precision on difficult subjects. That's when you reach for Photoshop.
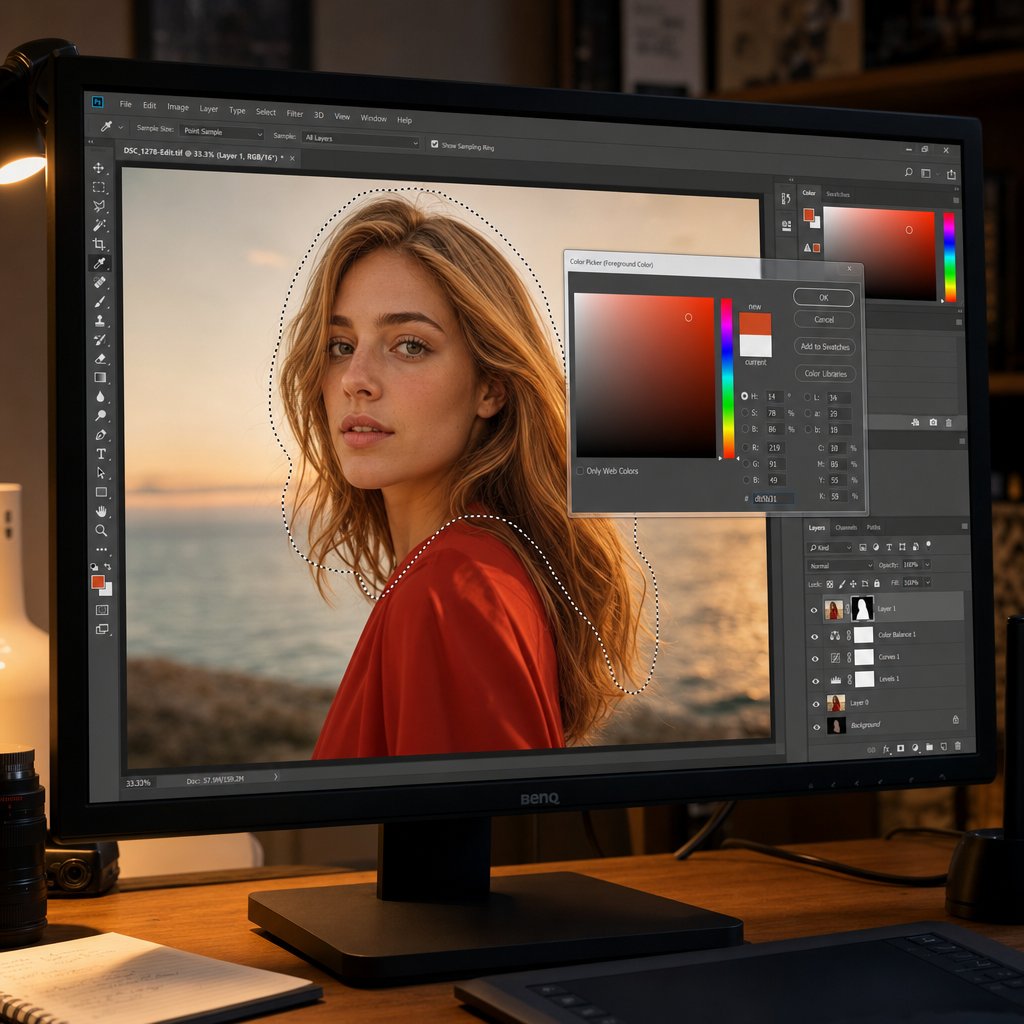
How to Change Background Color in Photoshop
Photoshop gives you more control than any browser tool, at the cost of a steeper learning curve. Three methods cover almost everything; pick the one that matches your image.
Select Subject + Solid Color fill (fastest)
Best for subjects with clean, well-defined edges, like product shots and headshots on a uniform backdrop.
- Open the image. Grab Quick Selection or Object Selection, then click Select Subject in the Options bar to auto-detect the subject.
- Invert so the background is selected: Select > Inverse (Shift+Ctrl+I / Shift+Cmd+I).
- Open Select > Select and Mask to clean up edges. Paint hair and complex boundaries with the Refine Edge Brush, then nudge the Smooth and Feather sliders.
- With the background selected, add a New Adjustment Layer > Solid Color from the Layers panel.
- Pick your color, entering a HEX like #FFFFFF for Amazon. The fill layer masks itself to your selection, so only the background changes.
To swap the color later, double-click the fill layer's thumbnail and choose a new shade, no re-selection needed. That non-destructive habit is why layer-based workflows are standard.
Color Range (uneven backdrops)
When the background is one color but not perfectly even, like a studio sweep with lighting variation, Color Range selects by color similarity instead of edges.
- Go to Select > Color Range.
- Click the background with the eyedropper; selected areas show white in the preview.
- Shift-click to add shadow and highlight variations in the backdrop.
- Adjust Fuzziness to widen or tighten the match, then click OK and add a Solid Color fill layer.
This shines on photos shot against colored paper or fabric where lighting creates gradients across the surface.
Replace Color (hue shift only)
When you just want to shift the background's hue rather than swap it entirely, like turning a blue backdrop green, Replace Color transforms a color range directly.
- Duplicate the layer first (Ctrl+J / Cmd+J); Replace Color is destructive.
- Go to Image > Adjustments > Replace Color and eyedropper the background color.
- Use the + eyedropper or Fuzziness to expand the range.
- Move Hue to the new color, then fine-tune Saturation and Lightness.
It preserves the original texture and lighting, which often looks more natural than a flat fill, but it shifts the subject too if the subject shares colors with the background.
Across all three, keep the original on a locked layer, work on duplicates, and lean on adjustment layers so you can always step back.
Manual Selection for Hair, Glass, and Hard Cases
AI selection handles clean subjects well but stumbles on flyaway hair, partially transparent glass, or a subject that matches the wall behind it. Manual techniques give you pixel-level control, and each tool fits a specific problem.
Magic Wand and Quick Selection
The Magic Wand grabs connected pixels within a tolerance you set, ideal when the background is a uniform tone distinct from the subject. A Tolerance of 20-30 covers most solid backdrops; check Contiguous for connected areas only. Quick Selection instead reads color and texture as you paint, so it forgives slightly uneven backgrounds (hold Alt/Option to subtract). Both are great starting points but hit their limits on curly hair or intricate edges.
Pen Tool for product photography
The Pen Tool draws mathematically precise paths from anchor points and Bezier curves. It ignores color and contrast entirely, following whatever outline you draw, which makes it the standard for hard-edged products like shoes, bottles, and electronics.
- Zoom in and place your first anchor on the subject's edge.
- Click along the edge; click for straight lines, click-drag for curves.
- Work all the way around until the path closes.
- In the Paths panel, right-click and choose Make Selection.
- Invert (Select > Inverse) and apply your new background color.
Tracing a complex product takes a few minutes, but the edges look like the subject was photographed on the new background from the start.
Select and Mask for hair and fur
Hair is too fine for the Pen Tool and too varied for the Magic Wand. The Select and Mask workspace was built for it. Start with a rough Quick Selection, open Select and Mask, and paint the hair-meets-background zone with the Refine Edge Brush so Photoshop separates individual strands. Three settings matter:
- Smart Radius on, with a larger radius, so Photoshop adapts to varying edge widths.
- Decontaminate Colors to strip old-background color fringing from the strands.
- Shift Edge slightly negative to contract the edge and kill any halo.
Output as a New Layer with Layer Mask so you can keep refining without touching the original.
Channel-based selection for high contrast
When the subject has strong tonal contrast against the background, channels exploit it. Open the Channels panel, find the channel with the most contrast, duplicate it, then push it with Levels (Ctrl+L / Cmd+L) until the subject is near-black and the background near-white. Ctrl-click the channel to load it as a selection. This excels on tree branches against sky, dark hair against a light wall, or lace against a solid backdrop, and struggles only when subject and background share tones.
| Method | Best for | Difficulty | Edge quality |
|---|---|---|---|
| Magic Wand / Quick Selection | Solid-color, high-contrast backgrounds | Beginner | Good on simple edges, rough on detail |
| Pen Tool | Products, hard-edged subjects | Intermediate | Excellent, pixel-perfect curves |
| Select and Mask | Hair, fur, feathers, soft edges | Intermediate | Excellent for fine organic detail |
| Channel-based | High-contrast silhouettes | Advanced | Excellent when contrast exists |
You can combine them: Quick Selection for the body, Select and Mask for the hair, Pen Tool for a hard-edged accessory. Professional retouchers rarely use one tool for an entire selection.
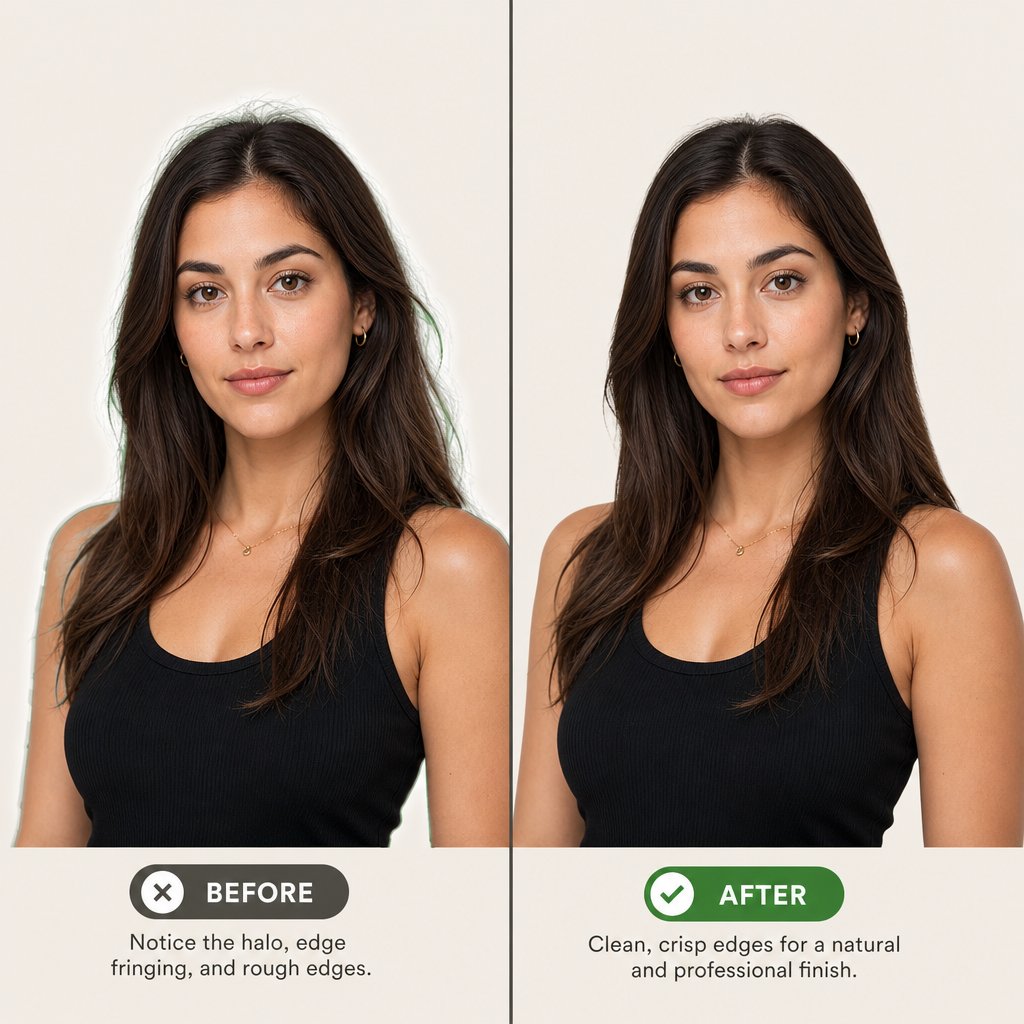
Fixing Halos, Hair, and Missing Shadows
Made the swap and something looks off, a glowing outline, scissor-cut hair, or a flat image with no shadows. These show up after almost any background change, AI or manual, and each has a reliable fix.
Halos and color fringing
A thin bright or dark outline means the selection left remnants of the original background on the subject's edge. It's worst when a light original meets a dark new color. Try these, roughly in order:
- Contract the selection 1-2px before applying the mask (Select > Modify > Contract). This clips the fringe without eating into the subject, and usually fixes it outright.
- Pull Shift Edge left in Select and Mask to shrink the mask boundary.
- Apply Filter > Other > Minimum at 1-2px to contract the whole mask with a live preview.
- Enable Decontaminate Colors in the Select and Mask panel to replace edge pixels with colors sampled from the subject.
- Brush black on the mask only where fringing shows, to preserve detail elsewhere.
If the mask includes hair, duplicate the layer, apply the contract fix to the body copy, and keep the original mask for the hair, then combine.
Hair and semi-transparent elements
Hair that looked fine on the original backdrop turns choppy when you move it onto a very different color; white strands fringe against dark blue. Fix it in Select and Mask: Refine Edge Brush along the boundary, Smart Radius on, Shift Edge slightly negative, Decontaminate Colors checked. For veils, glass, or motion blur, the new background should partly show through; use a soft brush at low opacity (10-20%) on the mask to reveal it gradually.
Preserving shadows
Strip the original shadows and the subject looks like a sticker on a colored rectangle. Duplicate the masked layer, invert the duplicate's mask so only the shadow shows, and set its blend mode to Multiply. Multiply hides white pixels and keeps dark ones, so the shadow darkens whatever color sits beneath it. Add a clipped Levels layer to dial shadow intensity until it looks natural.
When to stop
Zoom to 100% and check the edges. If you can see fringing at actual pixel size, fix it. If you only spot issues at 300%, most viewers never will. A phone-screen social post tolerates imperfections a full-zoom marketplace hero image won't. For large batches, apply one consistent rule, a contract-by-1px pass, a standard decontaminate, a fixed output color, then manually fix only the outliers.
Picking a Workflow You Can Repeat
Which approach fits you depends on how many images you process, how often, and how precise the result must be. A once-a-year headshot has nothing in common with 200 product images a week.
| You are | Use | Best for |
|---|---|---|
| E-commerce seller / brand team | Snappyit Color Change (batch) | Consistent catalog backgrounds without Photoshop skills |
| Casual / personal | Free tools (remove.bg, Canva, Pixlr) | One-off headshots, social posts, passport photos |
| Photographer / retoucher | Photoshop / Lightroom | Complex subjects, hair detail, creative composites |
| Marketing team | Canva Pro or Photoroom + brand presets | Brand-consistent campaign assets |
| High-volume catalog | API tools (Claid, Photoroom API) | Thousands of SKUs at scale |
For marketplace listings, a tool built for e-commerce saves real time over a general editor. Snappyit's Color Change fits here: set your target color once, upload the product images, get uniform results across the batch, no masks or subscription. Photoshop stays the right pick when you're wrestling with hair, glass, or composites, but it's overkill for plain product shots on a studio backdrop.
Build a repeatable process
Consistency comes from process, not from deciding image by image:
- Lock your target color as a HEX code. Don't eyeball it; enter #FFFFFF, #F0F0F0, or your brand value every time.
- Save presets. Photoshop actions, Canva brand kits, and batch settings all let you reuse color and export configs.
- Batch past five images. Batch changers apply identical settings across the whole set.
- Document the steps so a teammate follows the same template and gets the same output.
- Review at display size. A grid thumbnail doesn't need the edge perfection a full-screen banner does.
For e-commerce white backgrounds, the loop is short: upload, isolate the subject, apply #FFFFFF, export JPG at your marketplace's dimensions. Doing it the same way every time is what keeps a catalog looking cohesive.
Habits that apply to any tool
- Work on copies. Keep the source untouched so you can re-process when requirements change.
- Save the right format. JPG for finished solid backgrounds, PNG only when you need transparency later, WebP when web file size matters.
- Match resolution to the platform. Amazon wants at least 1000px on the longest side (2000px recommended); LinkedIn profile photos need 400x400px minimum.
- Keep a set consistent. Same HEX, same export settings, same edge treatment across every image, so half your catalog isn't warm white and the other half cool.
Frequently Asked Questions
Can I change the background color of a picture without Photoshop?
Yes. Free browser tools like remove.bg, Canva, and Snappyit's Color Change (snappyit.ai/color-change) use AI to detect your subject, remove the existing background, and apply a new solid color or custom HEX code. It takes seconds, needs no installation or design skills, and works well for product photos, headshots, and social images with clearly defined subjects.
What background color does Amazon require for product images?
Amazon requires a pure white background, RGB 255/255/255 (HEX #FFFFFF), for main product listing images, and the background must be uniform and shadow-free. Images that fail this can be suppressed from search results. Secondary images have more flexibility, but the main image must comply.
How do I fix the white halo after changing a background color?
White halos come from remnants of the original background on the subject's edge. Contract the selection by 1-2 pixels before applying the mask (Select > Modify > Contract), pull Shift Edge to roughly -10 to -30% in Select and Mask, enable Decontaminate Colors, or apply Filter > Other > Minimum at 1-2px to the layer mask. For most images a 1-2 pixel contraction clears it completely.
What is the difference between removing a background and changing its color?
Removing a background deletes all non-subject pixels and creates a transparent PNG with an alpha channel, so you can place the cutout on any color later. Changing a background color produces a finished image with a specific new backdrop, ready to use immediately. Remove when you need one cutout on multiple backgrounds; change the color when you need a single final image for a specific platform.
How do I change the background color for a passport photo?
Requirements vary by country: US passports need plain white (#FFFFFF), UK accepts light grey (#D3D3D3), Germany prefers light grey, and France allows light blue-grey. Use any background tool to isolate your face and shoulders, then apply the exact HEX your country requires. Keep it uniform with no shadows or gradients, since agencies reject photos that deviate from their standard.
A clean background is the base layer under almost every AI product photography task.