What Is the Ghost Mannequin Effect
Imagine browsing an online store and seeing a jacket that appears to float in mid-air, perfectly shaped as if worn by an invisible person. No model, no mannequin visible, just the garment in its natural 3D form. That floating look is the ghost mannequin effect in action.
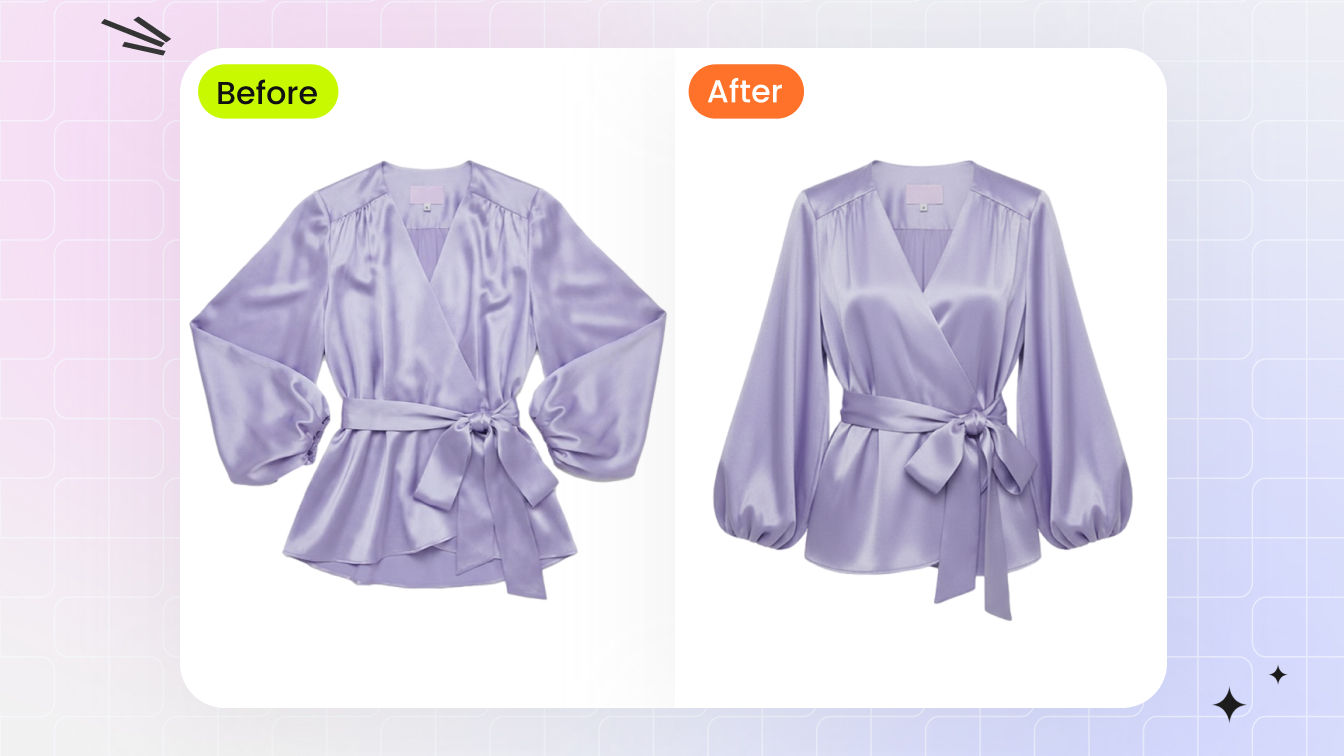
The ghost mannequin effect is a photography and post-production technique where a mannequin is digitally removed from clothing images, leaving a hollow 3D shape that shows the garment's fit, structure, and interior construction without visual distraction.
The process works in two stages. First, you photograph the garment on a physical mannequin to capture its shape and drape. Then, through careful editing, you erase the mannequin from the final image. What remains is a lifelike, three-dimensional representation of the clothing that highlights necklines, collars, interior labels, and stitching details customers care about.
Why It Goes by Many Names
You'll hear this technique called several things depending on who you ask. Photographers often refer to it as invisible mannequin photography because the mannequin becomes unseen in the final result. Others call it the "hollow man" effect, a nod to the empty, body-shaped silhouette left behind. Some studios simply say "neck joint" editing, referencing the most common compositing step in the workflow. Regardless of the label, ghost mannequins all produce the same outcome: clothing that looks worn without anyone wearing it.
Fashion e-commerce brands, product catalogs, and seasonal lookbooks rely heavily on this approach. Retailers like ASOS, Zara, and H&M use it across thousands of SKUs because it delivers consistent, distraction-free imagery at scale. The technique also appears in wholesale platforms, marketplace listings, and brand websites where clean product presentation drives purchasing decisions.
This guide covers everything from shooting methods and equipment settings to post-production workflows, AI-powered alternatives, and troubleshooting common mistakes, giving you a complete roadmap to produce professional ghost mannequin images regardless of your experience level.
Why Fashion Brands Rely on Ghost Mannequin Photography
A single product shot might seem like a small detail. But when you're running an online store with hundreds or thousands of garments, the way you photograph each item shapes how customers perceive your entire brand. Ghost mannequin photography solves a specific set of business problems that flat lays and inconsistent lifestyle shots simply cannot address.
Professional Consistency Across Product Catalogs
Picture a shopper scrolling through your product grid. Some items are shot on models in different poses, others are flat on a table, and a few sit awkwardly on visible mannequins. That visual inconsistency signals disorganization, and it erodes trust before a customer even clicks into a product page.
Ghost mannequin product photography eliminates this problem. Every garment gets the same treatment: identical lighting, identical framing, identical hollow 3D presentation. The result is a catalog that looks cohesive and polished from the first thumbnail to the last. This uniformity reinforces brand identity and gives shoppers the impression they're dealing with a professional operation that pays attention to detail.
For e commerce product photography at scale, that consistency also streamlines internal workflows. Your creative team follows a repeatable process rather than reinventing the approach for each SKU, which means faster turnaround and fewer quality control issues.
Cost Efficiency Compared to Live Model Shoots
Hiring live models for every product in your catalog adds up fast. You're paying for the model's time, a makeup artist, a stylist, and often a larger studio space to accommodate the team. Scheduling conflicts and reshoots push costs higher. For a brand launching 200 new items per season, that expense becomes difficult to justify.
Ghost mannequin photography for ecommerce cuts those recurring costs significantly. Once your studio setup is dialed in, the mannequin, lighting rig, and camera position stay consistent shoot after shoot. There's no model availability to coordinate, no wardrobe styling beyond pinning the garment for a clean fit. A single photographer can move through dozens of SKUs in a day, making this approach far more scalable for brands managing large inventories.
That said, the technique isn't a complete replacement for model photography. On-model shots still work well for hero images, social media content, and storytelling. The practical advantage of a ghost mannequin service is handling the bulk of your catalog efficiently while reserving model shoots for select pieces that benefit from a human element.
Impact on Shopper Confidence and Returns
Here's where the business case gets especially compelling. Industry data consistently shows that higher-quality product imagery correlates with improved conversion and lower returns. Salsify's 2025 Consumer Research Report found that 77% of shoppers say high-quality images and videos are important to their purchase decisions. Meanwhile, 71% of consumers have returned products because the actual item didn't match the description.
Ghost mannequin photography directly addresses both sides of that equation. By showing the garment's true shape, interior construction, collar detail, and stitching quality, you give shoppers a clearer picture of what they're buying. They can evaluate neckline depth, sleeve length, and fabric drape without guessing. That clarity builds confidence at checkout and reduces the gap between expectation and reality that drives returns.
Baymard Institute's UX research reinforces this point: 56% of shoppers' first action on a product page is exploring the images before reading any text. Your product photo isn't supporting the sale. It is the sale, at least in those critical first seconds.
- Uniform, professional presentation across every SKU in your catalog
- Lower per-image cost compared to recurring live model sessions
- Clear visibility of garment construction, fit, and interior details
- Faster production turnaround for high-volume seasonal launches
- Reduced return rates through accurate visual representation
- Scalable workflow that grows with your product line
The scalability factor deserves emphasis. A brand adding 50 products a week needs a photography process that keeps pace without ballooning budgets or sacrificing quality. Ghost mannequin photography delivers that repeatability. The same setup, the same technique, the same professional output, whether you're shooting item number five or item number five hundred.
Of course, knowing why this technique matters is only half the picture. The real question becomes which specific method fits your garment type, because a structured blazer demands a different approach than a flowing summer dress.
Ghost Mannequin Methods and When to Use Each
Not every garment gets the same treatment. A crew-neck t-shirt and a tailored blazer share almost nothing in terms of construction, so the editing approach that makes each one look natural differs significantly. Understanding the specific methods used in ghost mannequin for photography helps you choose the right technique before you even pick up the camera, saving hours of frustration in post-production.
There are four core methods, each named for the area of the garment where the mannequin removal and compositing happens. Think of them as building blocks: simple garments need one block, while complex pieces stack several together.
Neck Joint Technique
This is the most common method in invisible ghost mannequin photography, and the one you'll use on nearly every upper-body garment. The process involves two separate shots: one of the garment on the mannequin showing the exterior, and a second shot of the interior neckline area, typically captured with the garment turned inside-out or draped over a foam board.
In editing, you remove the mannequin from the exterior shot, then composite the interior collar and label image into the hollow space left behind. The result shows the inside of the neckband, giving the garment that characteristic depth and three-dimensionality. For basic items like t-shirts, polo shirts, and simple blouses, a neck joint alone is often all you need.
Bottom Joint and Sleeve Joint Methods
Some garments reveal more of their interior construction than just the neckline. That's where bottom joint and sleeve joint techniques come in.
The bottom joint addresses the hem area of shirts, jackets, and sweaters. You photograph the inside of the garment's lower opening separately, then blend it into the main image so shoppers can see the interior fabric and finishing at the waistline. This is especially useful for untucked button-downs and cropped jackets where the hem is a visible design element.
The sleeve joint works the same way but targets the arm openings. When you photograph a jacket or coat with the sleeves positioned to show their hollow interior, you need a separate shot of the inner sleeve construction. This technique is critical for clothing photography ghost mannequin work on blazers, leather jackets, and outerwear where the lining is a selling point. A well-executed sleeve joint makes the arm area look naturally open and three-dimensional rather than flat or pinched.
Full Removal for Complex Garments
Dresses, jumpsuits, and full-length pants often require complete mannequin extraction rather than targeted joint work. In a full removal, the entire mannequin is masked out of the image, and multiple interior shots are composited to fill every visible opening: neck, sleeves, waist, and leg openings.
This method demands the most editing skill because you're managing several composite layers simultaneously. The payoff is a garment that appears to float with full dimensional depth from top to bottom. Ghost mannequin clothing photography for evening gowns, structured dresses, and tailored trousers almost always requires this comprehensive approach.
Choosing the Right Method by Garment Type
Sounds complex? It doesn't have to be. The decision comes down to one question: which interior areas of the garment will be visible in the final image? If only the neckline shows, use a neck joint. If the hem and sleeves also need depth, layer in those additional joints. If the garment is full-length with multiple openings, plan for full removal from the start.
Here's a practical framework mapping common garment categories to the recommended technique:
| Garment Category | Recommended Technique | Difficulty Level | Notes |
|---|---|---|---|
| T-shirts and basic tops | Neck joint only | Beginner | Simple neckline composite; minimal layering required |
| Button-down shirts | Neck joint + bottom joint | Intermediate | Hem area often visible; collar detail is a key selling point |
| Blazers and jackets | Neck joint + sleeve joint + bottom joint | Advanced | Lining visibility matters; multiple interior shots needed |
| Pants and trousers | Full removal (waist + leg openings) | Intermediate | Waistband interior and leg hems both require compositing |
| Dresses and jumpsuits | Full removal | Advanced | Multiple openings; longest editing time per image |
| Accessories (scarves, hats) | Simple background removal | Beginner | No interior compositing needed; standard cutout is sufficient |
A few practical patterns emerge from this framework. Structured garments with visible linings, like tailored blazers and winter coats, almost always need the full combination of neck, sleeve, and bottom joints. Casual basics rarely need more than a clean neck joint. And pants sit in their own category because the waistband and leg openings create a different set of compositing challenges than upper-body garments.
Knowing which method you need before the shoot shapes everything that follows: how many reference shots to capture, which mannequin parts to remove between takes, and how much editing time to budget per SKU. That preparation starts with the right equipment and camera settings dialed in for clean, consistent captures.
Equipment and Camera Settings for Ghost Mannequin Shoots
The right method means nothing if your captures are soft, unevenly lit, or distorted. Every minute spent dialing in your mannequin photography setup saves ten minutes in post-production, because clean source files make compositing faster and more convincing. Here's the complete gear list and settings framework you need for a professional mannequin photoshoot.
Camera Body and Lens Selection
Any DSLR or mirrorless camera with full manual controls will work. The key requirement is the ability to lock aperture, shutter speed, ISO, and white balance independently so every frame in your sequence matches perfectly. Popular choices include the Canon EOS 6D Mark II, Sony Alpha A7R III, and Nikon D850, though mid-range bodies like the Canon EOS 7D Mark II deliver excellent results at a lower price point.
Lens choice matters more than the body for mannequin photography. A focal length between 70mm and 105mm minimizes barrel distortion that can warp garment proportions, especially along the edges of the frame. A 50mm lens works in tight spaces, but you'll notice subtle stretching on wider garments. If you're shooting full-length dresses or pants, a short telephoto in the 85-105mm range keeps lines straight and fabric proportions accurate.
Optimal Camera Settings for Minimal Post-Production
Consistency between your exterior mannequin shot and your interior reference shot is everything. If exposure, color temperature, or focus shifts between captures, your compositing seams will show. Lock these settings in manual mode and leave them untouched throughout the session.
| Setting | Standard Garments | Dark or Textured Fabrics | Transparent or Sheer Fabrics |
|---|---|---|---|
| Aperture | f/8 - f/11 | f/8 - f/11 | f/11 - f/14 |
| ISO | 100 - 200 | 100 - 200 | 100 |
| White Balance | Custom (matched to lighting) | Custom (matched to lighting) | Custom (matched to lighting) |
| Focus Mode | Manual (locked on garment center) | Manual (locked on garment center) | Manual (locked on garment center) |
| Shutter Speed | Adjust to lighting (typically 1/125+) | Adjust to lighting (may need slower) | Adjust to lighting (typically 1/125+) |
| File Format | RAW | RAW | RAW |
Why f/8 to f/11? This aperture range hits the sharpness sweet spot on most lenses, delivering edge-to-edge clarity across the entire garment. Go wider and you risk soft sleeves or hems falling outside the depth of field. Go narrower than f/14 and diffraction starts softening the image. For sheer fabrics, stopping down slightly to f/11 or f/14 ensures both the garment and the visible interior layers stay sharp.
Always shoot in RAW format. The extra data gives you flexibility to correct minor exposure or white balance inconsistencies between shots without degrading image quality.
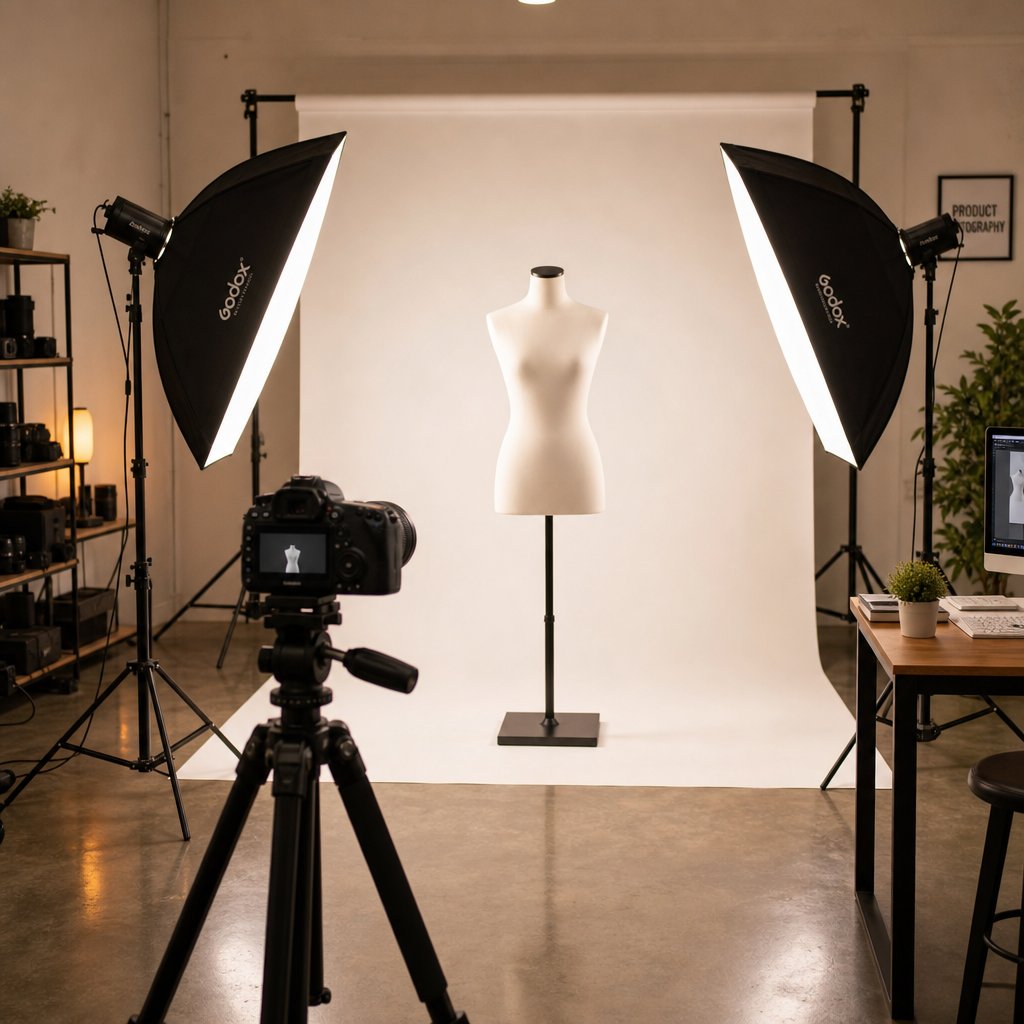
Lighting Setup for Even Exposure
The goal is flat, even illumination with minimal shadows. Shadows complicate mannequin removal because they create tonal variations that don't match between your exterior and interior shots.
A two-light softbox setup positioned at 45-degree angles on either side of the photography mannequin delivers the most consistent results. Each softbox should be roughly the same distance from the garment and set to equal power output. Add a fill reflector or a third light below or in front to eliminate any shadows under collars, lapels, or pocket flaps.
You have two main options for light type:
- Continuous LED softboxes - What you see is what you get; easier for beginners to judge exposure and shadow placement in real time
- Studio strobes with diffusion - Higher output, better color consistency over long sessions, and faster recycle times for high-volume shoots
Either works well. The critical factor is using daylight-balanced bulbs (5000K-5500K) and setting a custom white balance on your camera to match. This prevents color shifts between frames that create visible seams during compositing.
Use a seamless white or light gray paper backdrop. White backgrounds simplify mannequin extraction in editing and meet marketplace requirements for platforms like Amazon and Shopify.
Mannequin Types and Styling Tools
Not all photography mannequins are created equal. For ghost mannequin work, you need a modular form with removable parts: detachable arms, removable neck pieces, and ideally a torso that splits so you can photograph interior collar areas without fully removing the garment.
White or neutral-toned mannequins are easiest to mask out in editing because they create clean contrast against most fabric colors. Skin-tone mannequins work too, but dark-colored forms can reflect onto light fabrics and create color contamination along edges.
Beyond the mannequin itself, a handful of styling tools make the difference between a garment that looks naturally worn and one that looks draped over plastic:
- DSLR or mirrorless camera body with full manual controls
- 70-105mm lens (or 50mm minimum for tight spaces)
- Sturdy tripod with precise height adjustment and level indicator
- Two softbox lights or studio strobes with diffusion panels
- White or silver reflector for fill
- Seamless white or light gray paper backdrop
- Modular mannequin with removable limbs and neck piece
- Garment steamer for wrinkle removal
- Bulldog clips and binder clips for pulling fabric taut from behind
- Fashion tape and straight pins for securing collars and hems
- Lint roller for removing dust and fibers before shooting
- Color calibration card for accurate white balance reference
A garment steamer deserves special emphasis. Wrinkles are the single most common issue that ruins otherwise clean captures. Steam the garment after it's on the mannequin for photography, not before, because dressing the form can introduce new creases. Work from top to bottom, letting gravity help the fabric relax into its natural drape.
Clips and pins do their work from behind, pulling the garment snug against the mannequin so it looks fitted rather than baggy. Position them symmetrically so the front of the garment hangs evenly. Just remember: anything visible from the camera's angle will need to be edited out later, so keep all styling hardware hidden behind the form.
With your equipment locked in and your studio configured for repeatable results, the actual shooting process becomes a matter of following a consistent sequence, capturing the right angles in the right order so your editing workflow stays efficient.
How to Photograph Clothes on a Mannequin Step by Step
Gear is ready, settings are locked, and your studio is configured. The shooting process itself is where preparation meets execution. Knowing how to photograph clothing on a mannequin efficiently comes down to a repeatable sequence: prepare the garment, capture multiple angles, and maintain absolute consistency between frames so your compositing workflow stays seamless.
Garment Preparation and Styling
Every successful mannequin photo starts before the shutter fires. Steam the garment thoroughly while it's already on the form, working from the shoulders down so gravity pulls the fabric smooth. Pay close attention to collars, cuffs, and plackets, as these areas catch wrinkles that become magnified in the final image.
Once the fabric is smooth, style for symmetry. Align the shoulder seams so they sit evenly on both sides. Straighten the collar points or lapels so they mirror each other. Use bulldog clips behind the mannequin to pull excess fabric taut, creating a fitted silhouette without visible hardware from the camera's perspective. Secure hems and cuffs with fashion tape if they curl or lift.
Take a moment to inspect the garment from the exact camera angle. Look for stray threads, lint, uneven buttons, or pins peeking around edges. Fixing these details now eliminates tedious retouching later.
The Multi-Shot Capture Process
Understanding how to photograph clothes on a mannequin for the ghost effect means accepting that one shot is never enough. You need multiple captures of the same garment to build the final composite. Here's the sequential workflow that keeps your photoshoot mannequin sessions organized:
- Capture the front exterior shot. Photograph the garment straight-on with the mannequin fully dressed. Frame the entire garment with a small margin of space on all sides for cropping flexibility.
- Capture the back exterior shot. Rotate the mannequin 180 degrees without moving the tripod or lights. Use the same framing and settings to ensure the back view matches the front in exposure and color.
- Capture the interior neckline shot. Remove the garment from the mannequin and either turn it inside-out over a foam board or drape it so the inner collar, neckband, and label area are clearly visible. Photograph this under the same lighting to maintain color consistency.
- Capture interior sleeve or hem shots (if needed). For jackets, blazers, or garments where the arm openings or bottom hem will be visible in the final image, photograph those interior areas separately using the same approach.
- Review all captures on-screen. Check that exposure, white balance, and focus match across every frame before moving to the next garment. Catching mismatches now prevents unusable composites later.
This multi-shot approach is the foundation of all mannequin product photography. Each frame serves a specific purpose in the final composite, so skipping a shot means going back to reshoot, which breaks your workflow rhythm.
Maintaining Consistency Between Shots
The invisible enemy of clean compositing is variation between frames. Even small shifts in camera position, lighting angle, or garment placement create misalignment that shows up as visible seams in the edited image.
Lock your tripod in position and mark the floor beneath its legs with tape. Do the same for the mannequin's base. If you need to rotate the form for back shots, mark the rotation points so it returns to the exact same spot. Use your camera's grid overlay to verify the garment sits in the same position within the frame for every capture.
Keep your lighting untouched throughout the entire session. Don't adjust power, angle, or distance between the exterior and interior shots. Even a half-stop difference in exposure between your mannequin photo and your interior reference creates a tonal mismatch that's difficult to correct convincingly in post.
For high-volume shoots where you're cycling through dozens of garments, establish a rhythm: dress, steam, style, shoot front, shoot back, remove garment, shoot interior, review, repeat. This batch workflow keeps your speed up while maintaining the consistency that makes editing predictable. Some studios process 40 to 60 garments per day using this cadence.
Handling Difficult Fabric Types
Standard cotton and polyester garments are forgiving. Challenging fabrics require adjustments to your approach:
Transparent and sheer fabrics. The mannequin shows through the material, making extraction harder. Place a colored backdrop, typically black or dark gray, directly behind the mannequin so the editing software can distinguish between the garment edge and the form beneath it. This contrast gives you a cleaner selection path during masking.
Knitwear and stretch fabrics. These materials conform to the mannequin's shape but can stretch unnaturally at pin points. Use wider clips rather than sharp pins to distribute tension evenly. Avoid pulling knits too tight, as the stretched texture looks artificial in the final image. Let the fabric drape with its natural weight.
Structured jackets and blazers. Arm positioning is critical. If the mannequin has removable arms, position them at a slight natural angle rather than pinned flat against the torso. This creates realistic sleeve volume and avoids the stiff, lifeless look that comes from arms pressed tight to the body. Ensure both sleeves hang at matching angles for visual symmetry.
Lightweight and flowing garments. Silk blouses, chiffon dresses, and similar pieces move with the slightest air current. Turn off fans and air conditioning during the shoot. If the fabric still won't settle, use small weights or hidden clips at the hem to anchor it in place.
Each fabric type teaches you something about how materials interact with the mannequin form. Over time, you'll develop an instinct for which garments need extra attention and which ones practically style themselves. The real test of your shooting technique, though, comes in the next phase: when you open those files in editing software and begin the compositing work that transforms a mannequin shot into a floating garment.
Post-Processing Workflow and Editing Tools Compared
Your raw captures are only half the equation. The compositing stage is where two separate photographs merge into a single, convincing ghost mannequin photo that looks like the garment was never on a form at all. This workflow relies on precise layer management, careful masking, and attention to the small details that separate amateur cutouts from professional ghost mannequin images.
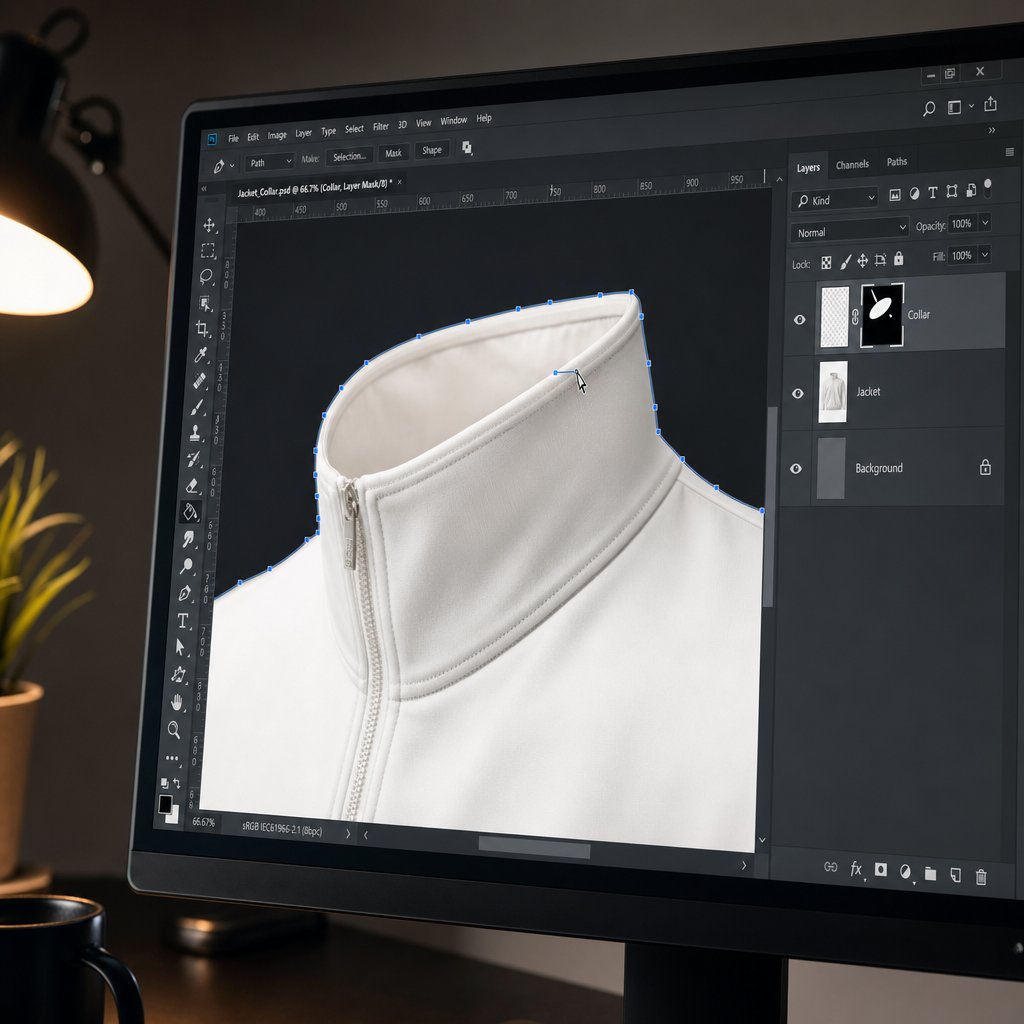
Layer Management and Masking in Photoshop
Ghost mannequin Photoshop editing follows a predictable layer-based structure. Open your exterior mannequin shot as the base layer, then drag the interior neckline or hem shot in as a second layer above it. Lower the top layer's opacity to around 50% so you can align the two frames. If you shot on a locked tripod, they should register almost perfectly. If not, use Free Transform to nudge the interior shot into position.
With both layers aligned, switch to the mannequin layer and grab the Pen Tool. Trace a precise path around every visible mannequin area: the neck, upper chest, arms, and any body parts showing through or around the garment. The Pen Tool gives you anchor-point control that the Quick Selection Tool can't match, especially along smooth curves where the fabric meets the mannequin edge.
Convert your path to a selection, then create a layer mask. The mannequin vanishes, leaving a hollow gap. Switch to the interior layer and mask out everything except the collar, label area, or inner hem that fills that gap. Use a soft-edged brush at 2-5px on the mask boundary to blend where the exterior garment meets the interior fill.
For complex edges like lace, fringe, or loose knit textures, the Select and Mask workspace (formerly Refine Edge) is essential. Paint over the tricky boundary with the Refine Edge Brush, and Photoshop calculates semi-transparent pixels that preserve delicate fabric detail rather than cutting through it with a hard line.
Once your composite looks solid, flatten and clean up. The Clone Stamp tool handles stray mannequin pixels around collars and cuffs. The Healing Brush smooths visible seam lines where your two layers meet. Add a subtle drop shadow beneath the garment at 3-5% opacity using a Gaussian blur to ground the image and prevent that "pasted onto white" look.
Alternative Editing Software Options
Photoshop dominates ghost mannequin photo editing for good reason, but it's not the only path. Your budget, skill level, and volume requirements might point you toward a different tool.
GIMP delivers a surprisingly capable free alternative. It supports layers, paths, and channel-based masking, so the fundamental compositing workflow translates directly. The tradeoff is speed: GIMP's interface feels less polished, keyboard shortcuts differ from Photoshop conventions, and operations like Refine Edge require manual workarounds using channel extraction. For occasional ghost mannequin editing on a tight budget, it gets the job done.
Affinity Photo sits in the middle ground. A one-time purchase with no subscription, it offers strong masking tools, non-destructive layer adjustments, and PSD file compatibility. Its Selection Brush and Refine Selection features handle garment edges well, and the performance on large files is snappy. The main limitation is a smaller plugin ecosystem and fewer automation options compared to Photoshop's Actions and scripting.
AI-based removal tools represent the newest category. These platforms automate mannequin detection and extraction, handling the bulk masking work in seconds rather than minutes. They excel at standard garments with clean edges but can struggle with unusual constructions, sheer fabrics, or garments where the interior composite requires precise manual placement.
| Software | Key Capabilities | Learning Curve | Cost | Best For |
|---|---|---|---|---|
| Adobe Photoshop | Pen Tool, layer masks, Select and Mask, Actions for batch processing, Clone Stamp, Healing Brush | Moderate to steep | Subscription (~$23/month) | Professional studios needing full control and automation |
| GIMP | Paths tool, layer masks, channel-based selection, customizable interface | Moderate (different shortcuts) | Free (open source) | Budget-conscious editors comfortable with a slower workflow |
| Affinity Photo | Selection Brush, Refine Selection, non-destructive layers, PSD compatibility, RAW editing | Moderate | One-time purchase (~$70) | Solo editors wanting professional tools without a subscription |
| AI-based tools (AutoRetouch, ZMO.AI, etc.) | Automated mannequin detection, batch processing, background removal, edge blending | Low | Pay-per-image or subscription ($1-5/image) | High-volume catalogs prioritizing speed over manual precision |
Many studios use a hybrid approach: AI tools handle the initial mannequin extraction for speed, then a retoucher refines edges and composites interior shots manually in Photoshop. This combination balances throughput with quality control.
Fixing Common Compositing Artifacts
Even experienced editors encounter artifacts during ghost mannequin editing. Knowing what causes them makes them faster to fix.
Misaligned seams. When the exterior and interior layers don't register perfectly, you'll see a visible line where they meet. Fix this by selecting the interior layer and using Free Transform with small nudges (arrow keys) until the fabric grain and edge contours align. Zoom to 200-300% to verify.
Color shifts between layers. If your white balance drifted between the mannequin shot and the interior shot, the two layers will have a noticeable temperature difference. Use a Curves or Hue/Saturation adjustment layer clipped to the interior layer to match its color temperature to the exterior. Sample a neutral area on each layer to compare values.
Inconsistent shadows. The interior shot often has slightly different shadow density because the garment was repositioned for that capture. Paint subtle shadows on a separate layer set to Multiply mode, using a soft brush at low opacity (5-10%) to rebuild natural shadow gradients where the neck opening meets the collar interior.
Hard cutout edges. If your mask is too sharp, the garment looks like it was cut with scissors and pasted onto the background. Apply a 0.5-1px feather to the mask edge, or paint along the boundary with a soft black brush at 20% opacity to create a natural transition. For fabric edges with texture, the Select and Mask Refine Edge Brush recovers those fine fibers that a hard mask clips away.
Each of these fixes takes seconds once you know where to look. The real skill in ghost mannequin photo editing isn't mastering any single tool. It's developing the eye to spot artifacts at full zoom and knowing which correction applies. That diagnostic ability grows with every image you process, and it's what separates a clean composite from one that looks obviously stitched together.
Of course, the manual workflow described here assumes you have the time and skill to handle each image individually. For brands processing hundreds of SKUs per week, the question shifts from "how do I edit this?" to "how do I scale this without sacrificing quality?" That tension between craftsmanship and throughput is exactly where AI-powered approaches enter the conversation.

AI-Powered vs Traditional Ghost Mannequin Editing
Speed and precision pull in opposite directions. A skilled retoucher can produce flawless ghost mannequin images, but that craftsmanship takes time, and time is the one resource high-volume brands can't manufacture. Ghost mannequin AI tools promise to collapse that timeline from minutes per image to seconds. The real question isn't which approach is better in the abstract. It's which one fits your specific volume, quality threshold, and budget.
Traditional Manual Editing Strengths and Limits
Manual retouching remains the gold standard for quality ceiling. A trained editor working in Photoshop controls every pixel: the softness of a mask edge, the direction of a reconstructed shadow, the precise alignment of an interior collar seam. For complex garments like structured blazers with visible linings, sheer fabrics, or avant-garde pieces with unusual construction, human judgment catches problems that automated systems miss entirely.
The limits are practical, not creative. Industry benchmarks show experienced retouchers spend 10 to 30 minutes per ghost mannequin image depending on garment complexity. A 2026 head-to-head study by Color Experts International found human retouchers averaged 28.65 minutes per image while scoring 8.85 out of 10 on quality. That's exceptional output, but it means a 500-SKU catalog requires roughly 240 hours of editing labor. For brands launching weekly drops or managing thousands of active listings, the math simply doesn't scale without a large team.
There's also the consistency variable. When a batch of images gets distributed across multiple editors, subtle differences in shadow density, edge treatment, and color handling creep in. One retoucher feathers edges softly while another cuts sharply. Managing that variation requires style guides, QC reviewers, and revision cycles that add overhead.
How AI Ghost Mannequin Tools Work
AI-powered ghost mannequin tools use trained models to detect the mannequin within a garment photograph, separate it from the fabric, and reconstruct the hollow interior automatically. Instead of a human tracing paths with the Pen Tool, the ai mannequin generator identifies garment boundaries, removes the form, and fills the resulting gap with synthesized interior detail, all in seconds rather than minutes.
Tools like Snappyit are built specifically for this workflow, helping fashion brands and online sellers produce clean hollow-man product images faster without the cost and complexity of traditional post-production. You upload your mannequin shot, the AI handles extraction and compositing, and you download a production-ready image. No Photoshop expertise required.
The same Color Experts International study found AI tools processed images in under 2.5 minutes on average, with the fastest models completing work in roughly 25 seconds. That's a 22x speed advantage over manual editing. The tradeoff? AI scored between 4.14 and 6.00 out of 10 on quality, depending on the model. The gap is real, but it's narrowing as training data improves and models learn to handle more garment types reliably.
Where a ghost mannequin app excels is predictable work: standard t-shirts, simple dresses, basic outerwear with clean edges and conventional construction. When the garment geometry is straightforward, AI output is often production-ready without human intervention. Problems surface with sheer fabrics, complex layering, reflective materials, and garments where the AI must infer hidden structure it hasn't been trained on.
When to Use Each Approach
The honest answer is that most brands benefit from both. A hybrid workflow, where AI handles the bulk extraction and a human retoucher refines the details, captures the speed advantage without sacrificing quality on the images that matter most.
| Approach | Speed per Image | Cost per Image | Quality Ceiling | Ideal Use Case |
|---|---|---|---|---|
| AI-powered services (Snappyit, etc.) | Under 30 seconds to 2 minutes | Low (pennies to a few dollars) | High for standard garments; moderate for complex pieces | High-volume catalogs, weekly drops, standard apparel |
| Traditional manual editing | 10 to 30 minutes | $1.50 to $10+ per image | Highest (pixel-perfect control) | Premium brands, complex garments, hero images |
| Hybrid (AI first pass + human refinement) | 3 to 8 minutes | Moderate | High (near-manual quality at faster speed) | Mid-to-large brands balancing quality and throughput |
Here's a practical framework for deciding:
- Standard garments at high volume - Route through ghost mannequin AI tools for speed. Spot-check a percentage for quality and only escalate problem images to manual editing.
- Complex or premium garments - Start with AI for the rough extraction, then hand off to a retoucher for shadow rebuilding, seam alignment, and edge refinement.
- Hero images and campaign assets - Full manual editing from the start. These images carry disproportionate brand weight and justify the time investment.
Quality control looks different for each path. With manual editing, you're reviewing for consistency across editors. With AI, you're reviewing for structural accuracy: did the model reconstruct the collar correctly? Are the shadows physically plausible? Does the garment maintain its natural proportions? Build a QC checklist that flags common AI weaknesses, like neck joint alignment and shoulder structure, so issues get caught before images go live.
The hybrid model is gaining traction because it respects both realities. AI is fast and cheap but imperfect. Human retouching is precise but slow and expensive. Combining them lets you process a 500-SKU catalog in days rather than weeks while still maintaining the visual standard your brand requires. The key is knowing which images can ship straight from the AI pipeline and which ones need that human pass, a judgment call that gets easier as you learn your specific tool's strengths and blind spots.
Even with the right workflow in place, both approaches share a common vulnerability: garbage in, garbage out. If your source captures have inconsistent lighting, shifted garment positions, or visible wrinkles, no amount of editing, manual or automated, produces a convincing result. That reality brings us to the mistakes that sabotage ghost mannequin images before they ever reach the editing stage.
Common Mistakes and How to Troubleshoot Them
You can have the best editing software and the fastest AI tools available, but if your source files carry problems baked in from the shoot, the final image will always look off. Most ghost mannequin effects that fall flat trace back to a handful of repeatable errors, some made during capture, others introduced during compositing. Knowing what to watch for lets you catch issues early rather than discovering them after an entire batch has shipped.
Shooting Mistakes That Complicate Editing
Inconsistent lighting between shots. When you adjust a softbox position or power level between the exterior mannequin capture and the interior collar shot, the two frames won't match in tone or shadow direction. Your composite will show a visible brightness seam where the layers meet. The fix is simple: lock your lighting and don't touch it until the entire garment sequence is complete. If you accidentally bump a light, reshoot both frames rather than trying to correct the mismatch later.
Garment shifting position between captures. Removing the garment from the mannequin to photograph the interior means it won't sit in exactly the same spot when you composite. Even a few millimeters of drift creates misaligned seams. Mark your mannequin's base position with tape, and when shooting the interior reference, align it using the same framing guides on your camera's live view. Some photographers leave the garment on the mannequin and simply remove the neck piece to expose the collar area, avoiding repositioning entirely.
Incorrect white balance causing color mismatch. If your camera is set to auto white balance, each frame may render slightly warmer or cooler depending on how much of the white mannequin fills the scene. That temperature shift makes ghost clothing photography composites look obviously stitched. Set a custom white balance using a gray card at the start of your session and leave it locked in manual mode throughout.
Wrinkles or styling pins visible in the final frame. Rushing through garment prep leaves creases that become permanent once the image is processed. Pins peeking around garment edges require tedious clone work to remove. Steam thoroughly before shooting, and do a final visual check from the camera's exact angle before firing the shutter. Two minutes of prevention saves twenty minutes of retouching.
Common Editing Errors and How to Fix Them
Visible seam lines where layers meet. This is the most frequent artifact in invisible mannequin photography. It happens when the exterior and interior layers don't blend at the junction point. Fix it by zooming to 200-300% along the composite boundary and using a soft-edged brush on your layer mask to feather the transition. If the fabric grain doesn't align, nudge the interior layer with Free Transform until the texture flows continuously across the seam.
Unnatural or missing shadows. Removing the mannequin often strips away the subtle shadows that give a garment its three-dimensional appearance. Without them, the image looks flat and pasted. Rebuild depth by painting shadows on a separate layer set to Multiply mode. Use a soft brush at 5-10% opacity and build gradually, focusing on areas where fabric folds inward: collar openings, armholes, and the interior hem. Conversely, if shadows from the mannequin's form remain in the image after extraction, they'll look like dark smudges floating in empty space. Remove these with the Healing Brush before adding your own controlled shadows.
Color banding in gradient areas. Smooth tonal transitions, like the shadow gradient inside a collar, can break into visible bands when working in 8-bit mode or after heavy Curves adjustments. Switch to 16-bit mode for compositing work, and add a tiny amount of noise (0.5-1%) to gradient areas to break up banding before final export.
Over-sharpening that reveals compositing edges. Applying global sharpening to the finished image amplifies every imperfection along your mask boundaries. Halos appear around garment edges, and the seam between layers becomes glaringly obvious. Instead, sharpen selectively using a High Pass filter on a separate layer masked to the garment's fabric areas only, avoiding the composite junctions entirely. Preview at 100% zoom before exporting to catch any artifacts that aggressive sharpening introduces.
Quality Control Checklist Before Publishing
Before any invisible mannequin product photography image goes live on your store, run through this checklist. It takes less than a minute per image and catches the issues that erode shopper trust:
- No visible mannequin edges, pins, clips, or styling hardware anywhere in the frame
- Seamless transition between exterior and interior composite layers with no visible seam line
- Consistent color temperature across the entire image, no warm-to-cool shifts between layers
- Natural shadow depth at collar, armholes, and hem openings that creates a 3D appearance
- No color banding in smooth gradient areas, especially inside the neckline
- Garment proportions look accurate, no stretched shoulders, pinched waists, or distorted hems
- Edges are smooth and natural at 100% zoom, no jagged pixels, halos, or hard cutout lines
- Background is clean and uniform with no remnant shadows or color contamination from the mannequin
- Labels and interior branding are legible and properly aligned
- Image meets your platform's technical specs for resolution, file size, and aspect ratio
Print this list or pin it next to your editing station. When you're processing dozens of images in a session, fatigue causes you to miss things your fresh eyes would catch immediately. A systematic check keeps quality consistent whether you're editing image number three or image number three hundred.
Troubleshooting is reactive by nature. You fix what went wrong. The more strategic question is how to structure your entire workflow, from capture through delivery, so these problems rarely surface in the first place. That decision depends on your brand's size, catalog volume, and where you want to invest your time and budget.
Choosing the Right Ghost Mannequin Workflow for Your Brand
Your catalog size, budget, and quality expectations aren't the same as the brand next door. A solo seller listing 20 new items per month faces a completely different equation than a retailer managing 5,000 SKUs across seasonal collections. The workflow that makes sense for one can bankrupt or bottleneck the other. So rather than prescribing a single path, here's a decision framework that matches your situation to the approach most likely to deliver results without wasted effort or money.
Decision Framework by Business Size and Volume
Think about where you fall on two axes: monthly image volume and garment complexity. A brand producing fewer than 50 images per month with straightforward garments has very different needs than one pushing 1,000 images monthly across structured blazers, sheer fabrics, and layered outerwear.
| Business Type | Recommended Approach | Estimated Cost Tier | Key Considerations |
|---|---|---|---|
| Solo seller (under 50 images/month) | Learn manual editing (Photoshop, Affinity Photo, or GIMP) | Low ($0-$70 software + time investment) | Time-intensive but builds a transferable skill; works when volume is manageable and budget is tight |
| Mid-size brand (50-500 images/month) | AI-powered ghost mannequin photography service (Snappyit, similar platforms) | Low to moderate (subscription or per-image pricing) | Speed and consistency without heavy post-production overhead; frees your team to focus on creative work |
| Large retailer (500+ images/month) | Dedicated in-house team or scalable outsourced studio | High (staff salaries, studio infrastructure, or agency retainers) | Full control over quality and turnaround; justified when volume makes per-image outsourcing more expensive than fixed overhead |
Solo sellers benefit most from investing time rather than money. Learning the compositing workflow in Photoshop or Affinity Photo gives you complete control over output quality, and at low volumes the time commitment stays reasonable. Budget 15 to 30 minutes per image as you build proficiency. The tradeoff is clear: your editing hours could go toward marketing, sourcing, or customer service instead.
Mid-size brands hit the inflection point where manual editing becomes a bottleneck. When you're launching 100 new products per month, spending 25 hours on ghost mannequin editing alone isn't sustainable. This is where AI-powered tools like Snappyit fit naturally, handling the bulk of standard garments quickly so your team can focus on the creative decisions that actually differentiate your brand. Route complex or premium pieces to a retoucher for final polish, and let the AI handle everything else.
Large retailers operating at scale need infrastructure, not tools. A ghost mannequin photography studio with dedicated operators, standardized processes, and quality control checkpoints delivers the consistency and throughput that thousands of SKUs demand. Some build this in-house; others partner with a ghost mannequin photography service that operates as an extension of their team. The deciding factor is whether photography is a core competency you want to own or an operational function you want to delegate.
Cost Considerations Across Approaches
Honest cost comparison requires looking beyond the sticker price of software or services. Factor in the hidden costs that each approach carries:
- DIY manual editing: Software cost is low (free with GIMP, ~$70 one-time for Affinity Photo, ~$23/month for Photoshop). The real expense is your time. At 20 minutes per image and a modest 100 images per month, that's 33 hours of editing labor. Value that time at even $25/hour and you're spending $825 monthly in opportunity cost.
- AI-powered services: Subscription models typically range from $20 to $100 per month for moderate volumes, with per-image costs dropping to pennies at scale. The break-even point versus manual editing usually arrives around 50 to 100 images monthly, depending on your time valuation and the platform's pricing tier.
- Professional outsourcing: A ghost mannequin photographer or retouching service charges $2 to $25 per image depending on complexity and quality tier. At 500 images monthly, that's $1,000 to $12,500 per month. Predictable quality, but costs scale linearly with volume.
- In-house studio: Upfront investment in equipment, space, and training, but amortized over years of production. Industry data suggests the tipping point where in-house becomes cheaper than outsourcing sits around 500 to 1,000 images per year, with payback periods typically falling between 6 and 12 months for high-volume operations.
The pattern is straightforward: low volume favors DIY or per-image services. Medium volume favors flat-rate AI subscriptions. High volume favors fixed-cost infrastructure, whether that's an in-house ghost mannequin photography studio or a dedicated outsourcing partner with volume pricing.
Actionable Next Steps for Your Workflow
Wherever you land on the spectrum, here's how to move forward without overthinking it:
If you're a solo seller or small brand: Start with the manual workflow outlined earlier in this guide. Practice on 10 garments using Photoshop or Affinity Photo. Track how long each image takes. If your per-image time drops below 15 minutes and your volume stays under 50 monthly, you've found a sustainable rhythm. If editing starts eating into revenue-generating activities, that's your signal to explore automation.
If you're a growing mid-size brand: Test an AI-powered service with a batch of 20 to 30 standard garments. Compare the output quality against your manually edited images. If 80% or more of the AI results are production-ready without manual correction, you've found your scalable workflow. Reserve manual editing for the 20% of complex pieces that need human judgment. An ai generator like Snappyit lets you validate this approach quickly without committing to long-term contracts.
If you're a large retailer: Audit your current per-image costs across the full production chain: photography, editing, QC, and revisions. Compare that total against the cost of building or expanding an in-house capability. If your annual spend on mannequin photography for ecommerce exceeds the amortized cost of dedicated infrastructure, the business case for bringing production in-house writes itself. Start with a pilot program covering one product category before scaling across the full catalog.
The ghost mannequin effect isn't a single technique with a single solution. It's a spectrum of approaches that flex with your business. The brands that get the best results are the ones that match their workflow to their actual volume and complexity rather than forcing a one-size-fits-all process. Start where you are, measure what works, and scale the approach as your catalog grows.
Ghost Mannequin Effect: Frequently Asked Questions
1. What is the ghost mannequin effect in product photography?
The ghost mannequin effect is a two-stage technique combining photography and digital editing. You photograph a garment on a physical mannequin to capture its 3D shape, then digitally remove the mannequin in post-production. The result is a hollow, lifelike silhouette that shows the clothing's fit, interior construction, neckline detail, and stitching without any visible support structure. It's also called the invisible mannequin or hollow man technique and is widely used in fashion e-commerce catalogs.
2. How much does ghost mannequin photography cost?
Costs vary by approach. DIY manual editing requires minimal software investment (free with GIMP, around $70 for Affinity Photo, or $23/month for Photoshop) but demands 15-30 minutes per image in labor. AI-powered services like Snappyit offer subscription or per-image pricing that typically ranges from pennies to a few dollars per image. Professional outsourcing runs $2 to $25 per image depending on complexity. The break-even point between manual editing and AI services usually arrives around 50-100 images monthly.
3. Can AI replace manual ghost mannequin editing?
AI tools can handle the bulk of standard ghost mannequin work at dramatically faster speeds, processing images in seconds rather than the 10-30 minutes manual editing requires. However, AI currently scores lower on quality for complex garments like structured blazers, sheer fabrics, or pieces with unusual construction. Most professional studios use a hybrid workflow where AI handles initial extraction for standard items and human retouchers refine complex pieces, balancing speed with precision.
4. What camera settings work best for ghost mannequin photography?
Set your aperture between f/8 and f/11 for edge-to-edge sharpness across the garment. Keep ISO at 100-200 to minimize noise, use a custom white balance matched to your lighting setup, and shoot in RAW format for maximum editing flexibility. Lock all settings in manual mode and keep them unchanged between your exterior mannequin shot and interior reference shot. Any variation between frames creates color or exposure mismatches that show up as visible seams during compositing.
5. What is the difference between neck joint and full removal in ghost mannequin editing?
Neck joint is the most common method, involving two shots: the garment on the mannequin and a separate interior neckline capture. You composite the collar area into the hollow space after removing the mannequin. Full removal is used for complex garments like dresses, jumpsuits, and pants where multiple openings (neck, sleeves, waist, leg hems) all need interior compositing. Full removal requires managing several composite layers simultaneously and takes significantly more editing time per image.