What Ghost Mannequin Photo Editing Actually Means
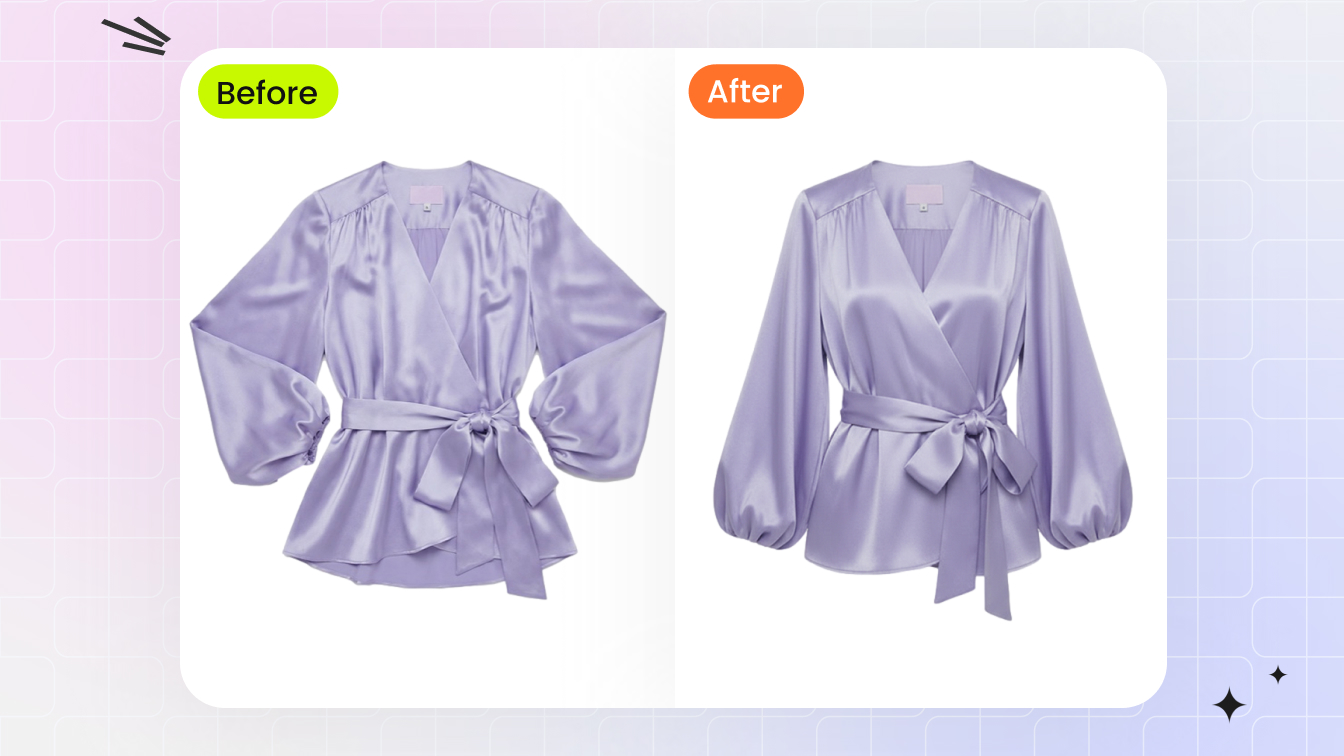
You've seen the effect everywhere on fashion retail sites: a garment floating in space, holding its natural shape as if worn by an invisible body. No hanger wrinkles, no distracting model, no plastic mannequin in sight. That polished, three-dimensional look is the result of ghost mannequin photo editing.
Ghost mannequin photo editing is a post-production compositing technique where multiple photographs of a garment, typically shot on a mannequin, are combined and the mannequin is digitally removed to create a hollow, three-dimensional product image that preserves the clothing's natural shape and fit.
What Is the Ghost Mannequin Effect
The ghost mannequin effect, sometimes called the invisible mannequin or hollow man technique, works by layering separate shots of the same garment into a single composite. An editor photographs the piece on a mannequin from the front, then captures the interior (neckline, inner lining, or back panel) separately. In post-production, the mannequin is masked out and the interior shot is aligned behind the outer layer, giving the garment visible depth and structure without any physical support showing.
A quick note on terminology: you'll see both "mannequin" and "manikin" used online. In the context of photography and editing, "mannequin" is the standard spelling. "Manikin" typically refers to medical training models. The distinction matters when searching for the right equipment or services.
This guide focuses specifically on the editing side of the process. Plenty of resources cover studio setup and camera gear. Here, you'll get the workflow details, software techniques, and troubleshooting knowledge that turn raw shots into conversion-ready product images.
Why Ecommerce Brands Rely on This Technique
Flat-lay photography works for accessories and casual lifestyle content, but it strips garments of their form. On-model shoots deliver realism yet introduce variables like casting, styling, and inconsistent poses across hundreds of SKUs. The ghost mannequin effect sits in the sweet spot: it communicates fit and silhouette while keeping the focus entirely on the product.
For ecommerce brands, the business case is straightforward. Clean, consistent imagery builds perceived quality and lifts both conversion rates and average order value. Shoppers scrolling through a catalog want to see shape, drape, and construction details instantly. When every product image shares the same visual language, the store feels intentional and trustworthy rather than stitched together from different campaigns.
That consistency also scales. Unlike model shoots that require scheduling and coordination for every new collection, ghost mannequin composites follow a repeatable editing workflow. Shoot, composite, export. The real complexity lives in the editing stage, and that's exactly where this article goes deep.
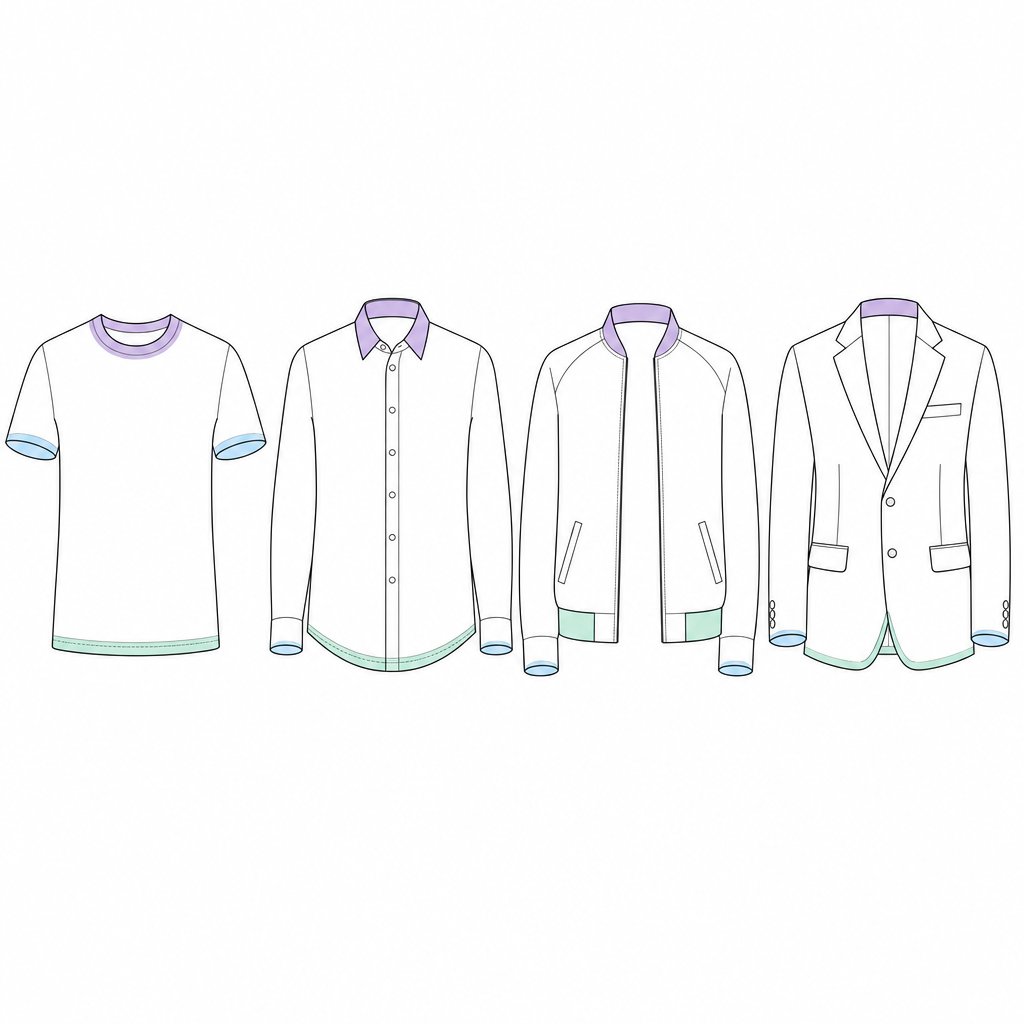
Types of Ghost Mannequin Joints and Their Editing Requirements
Every garment has areas where the mannequin peeks through, and each of those areas demands a different compositing strategy. Editors refer to these as "joints" because they represent the seam between the outer garment shot and the interior fill shot. Understanding which joint types a garment requires before you open your editing software saves time and prevents rework down the line.
Think of it this way: a simple crew-neck t-shirt needs one type of interior fill, while a blazer with structured shoulders, open sleeves, and a visible hem might need three or four. The garment's construction dictates the editing complexity, not the other way around.
Neck Joint Editing for Tops and Dresses
The neck joint is the most common type of ghost mannequin editing. It fills the neckline area where the mannequin's neck and upper torso were visible. You'll typically need two source images: the front-on mannequin shot and a separate interior or back-panel shot showing the inside collar, label area, and inner neckline.
The editing challenge here is alignment. The interior shot must match the curvature and scale of the neckline opening precisely. Even a one- or two-pixel misalignment at the collar creates a visible seam that breaks the illusion. Garments with high necklines (turtlenecks, mock necks) are easier because less interior area needs filling. Wide scoop necks and V-necks expose more interior surface, requiring more careful blending and often additional warping to match perspective.
Bottom Joint and Sleeve Joint Techniques
Bottom joints close the hem area of tops, jackets, and dresses where the mannequin's waist or legs were visible. This joint type typically requires a shot of the garment's interior hem, often captured by flipping the garment inside-out on a flat surface or photographing it from below on the mannequin. The difficulty level is moderate: you're matching a relatively straight edge, but fabric drape at the hem can create inconsistencies between shots if the garment shifted during photography.
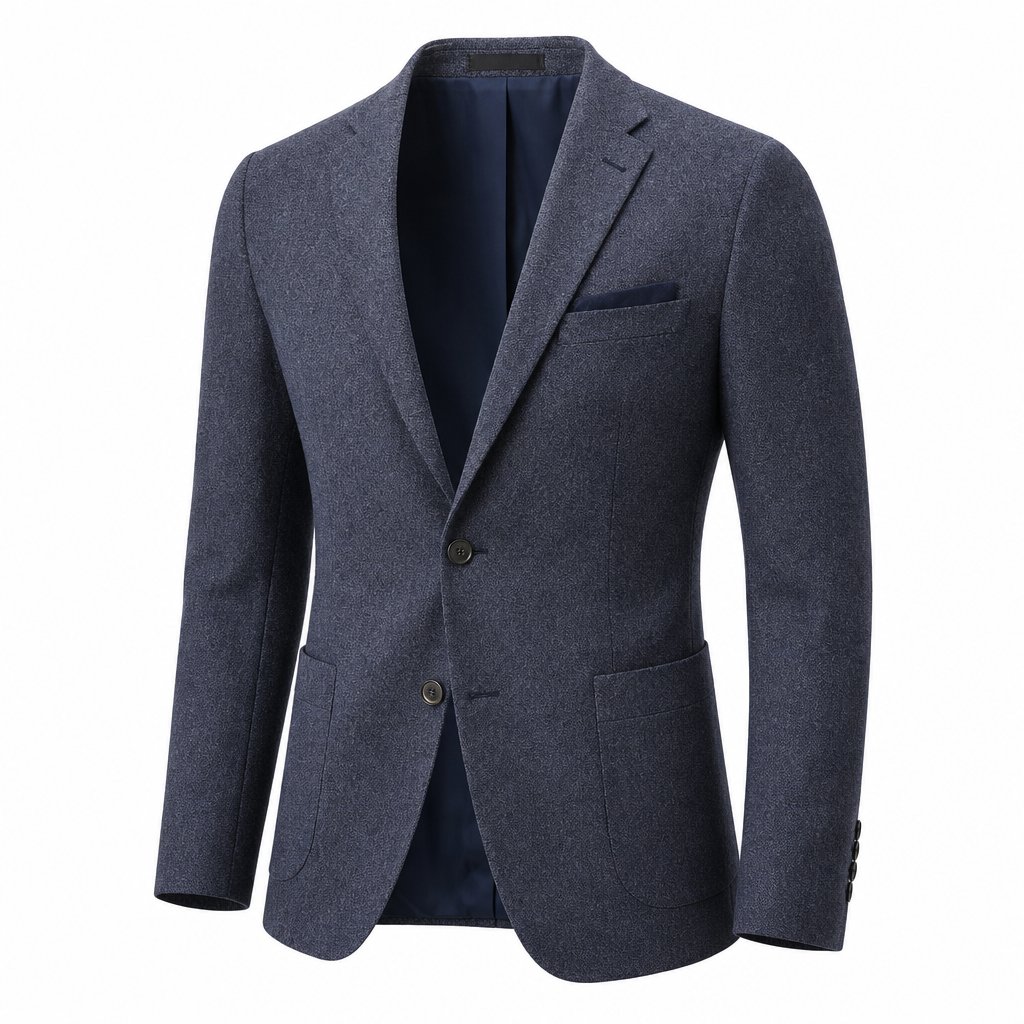
Sleeve joints are where ghost mannequin editing gets more demanding. The sleeve opening needs to show depth and interior fabric, which means capturing the inside of each sleeve separately. A well-edited sleeve joint makes the garment look like it's being worn by a real person with arms. Misalignment here is especially noticeable because viewers instinctively understand how sleeves should hang. Jackets, blazers, and structured coats present the highest difficulty since their sleeves hold rigid shapes that must match perfectly between the exterior and interior shots.
Full Ghost Composites for Complex Garments
Some garments require all joint types combined into a single composite. A full ghost edit on a tailored blazer, for example, might involve a neck joint, two sleeve joints, and a bottom joint, pulling from four or five source images. Invisible mannequin photography for these complex pieces demands precise planning during the shoot and meticulous layer management during editing.
Full ghost composites also apply to items like hoodies with open hoods, zip-up jackets shown partially unzipped, or dresses with cutout details. Each opening in the garment that reveals the mannequin underneath becomes another joint requiring its own interior fill shot and careful edge blending.
The table below breaks down each joint type so you can quickly assess what any garment in your queue will require:
| Joint Type | Source Images Needed | Difficulty Level | Typical Use Cases |
|---|---|---|---|
| Neck Joint | 2 (front + interior/back panel) | Beginner to Intermediate | T-shirts, blouses, dresses, polos |
| Bottom Joint | 2-3 (front + interior hem + optional back) | Intermediate | Untucked shirts, cropped jackets, skirts |
| Sleeve Joint | 3-4 (front + interior of each sleeve) | Intermediate to Advanced | Jackets, coats, short-sleeve structured tops |
| Full Ghost Composite | 4-6 (all openings + multiple interior shots) | Advanced | Blazers, hoodies, open-front cardigans, complex outerwear |
Garment construction is the deciding factor. Lightweight, unstructured fabrics like jersey knits typically only need a basic neck joint because the material conforms closely to the mannequin and doesn't create deep openings elsewhere. Structured fabrics like wool suiting or heavy denim hold their shape away from the body, exposing more mannequin surface and requiring additional joints. Before starting any ghost mannequin editing session, lay out your source images and identify every visible mannequin area. That quick audit tells you exactly which joints you're working with and how many layers your composite will need.
Knowing the joint types also helps when communicating with photographers or outsourcing partners. Instead of vague requests, you can specify exactly which interior shots are missing, saving revision cycles and keeping production on schedule. The editing workflow for each joint type follows a similar pattern of masking, aligning, and blending, but the precision required scales with complexity.
Preparing Your Photography for Easier Editing
Every joint type discussed above relies on one thing: source images that actually line up. The cleanest masking technique in the world can't rescue a composite built from shots with mismatched lighting, shifting camera angles, or inconsistent white balance. Preparation during the mannequin photoshoot directly determines how much time you'll spend fixing problems in post-production, and whether the final result looks seamless or stitched together.
This is the gap most guides skip. They cover studio setup or they cover Photoshop workflows, but rarely do they explain how to photograph clothing on a mannequin in a way that specifically reduces editing friction. The decisions you make before pressing the shutter, from tripod placement to color temperature, either set your editor up for a smooth composite or create hours of corrective work downstream.
Shooting Multiple Angles for Clean Composites
Ghost mannequin photography requires a minimum of three shots per garment: front view, back view, and at least one interior insert. Complex pieces may need five or six. The critical rule across all of them is consistency. Your camera cannot move between shots. Your lights cannot shift. The garment's position on the photography mannequin should change as little as possible between angles.
Here's why this matters for editing: when you composite the interior shot behind the masked-out neckline, the perspective, scale, and shadow direction must match the outer shot. If the camera was two inches higher for the insert, the collar curvature won't align. If the lighting shifted, the fabric color will look different between layers. These mismatches force manual warping, color correction, and edge blending that could have been avoided entirely.
For the interior shot specifically, you have two reliable approaches. The first is removing detachable mannequin sections (neck piece, shoulder caps) and photographing the garment's inner collar while it remains on the torso. The second is flipping the garment inside-out on a flat surface. Both work, but the first method maintains more consistent perspective with the main shot since the garment stays in roughly the same spatial position.
Lighting and Camera Settings That Simplify Post-Production
Imagine compositing two layers where one has warm, yellowish tones and the other skews cool and blue. That color mismatch is the single most common problem editors face with poorly prepared source files. It happens when photographers use auto white balance, which recalculates color temperature for every frame based on what the sensor sees.
In a ghost mannequin photography studio, the fix is simple: set a custom white balance using a gray card at the start of each session, then lock it in manual mode. Every shot in that session will share identical color rendering, making layer compositing far smoother. Pair this with manual exposure settings (aperture between f/8 and f/11, ISO at 100-200) so brightness stays consistent across your front, back, and interior captures.
Focal length matters more than most photographers realize for this technique. Switching between a 50mm and an 85mm lens between shots changes the perspective compression of the garment. Collars, shoulders, and hems will appear slightly different in proportion, making alignment during compositing unnecessarily difficult. Pick one focal length, ideally between 50mm and 85mm, and use it for every shot in the set.
Two softbox lights positioned at 45-degree angles on either side of the mannequin create even, diffused illumination that minimizes harsh shadows. Mark the light positions on the floor with tape so they stay fixed throughout the session. Consistent shadow direction across all source images means your composite won't have conflicting light cues that make the final image look unnatural.
Use the following checklist to ensure your photography stage sets up a smooth editing workflow:
- Lock the tripod in position and mark its legs on the floor with tape
- Set custom white balance with a gray card before shooting begins
- Use manual exposure mode: f/8-f/11, ISO 100-200, fixed shutter speed
- Choose one focal length (50-85mm) and do not change it between shots
- Mark the mannequin's floor position so it returns to the same spot after rotation
- Steam or iron every garment before dressing the mannequin
- Pin excess fabric at the back to create a clean front silhouette
- Capture the interior shot under the same lighting without moving any equipment
- Shoot RAW files to preserve maximum editing flexibility for color correction
- Include a color reference card in the first frame of each batch for post-production calibration
Skipping even one of these steps compounds editing time. A shifted tripod means manual realignment of every layer. Mixed white balance means color-matching across composite seams. A wrinkled garment means clone-stamping fabric texture that should have been smooth from the start. Poor preparation doesn't just add minutes to each edit; it creates exponentially more work as errors in one layer cascade into mismatches with every other layer in the composite.
When your source files arrive in the editing application with matched color, matched perspective, and matched lighting, the actual compositing becomes almost mechanical. Mask, align, blend, done. That's the goal: make the creative problem-solving happen in the studio so the editing stage can focus on precision rather than damage control.
The Complete Editing Workflow From Import to Composite
Well-prepared source files make the editing stage predictable rather than chaotic. But predictable doesn't mean simple. Ghost mannequin Photoshop work still demands a precise sequence of steps, each building on the last. Skip one, rush another, and the composite falls apart at the seams, literally.
The workflow below applies whether you're editing a single product shot or processing a batch for a client. It's the same sequence professional ghost mannequin photo editing services follow, scaled up with automation for volume. Here's the full process from raw file to finished composite:
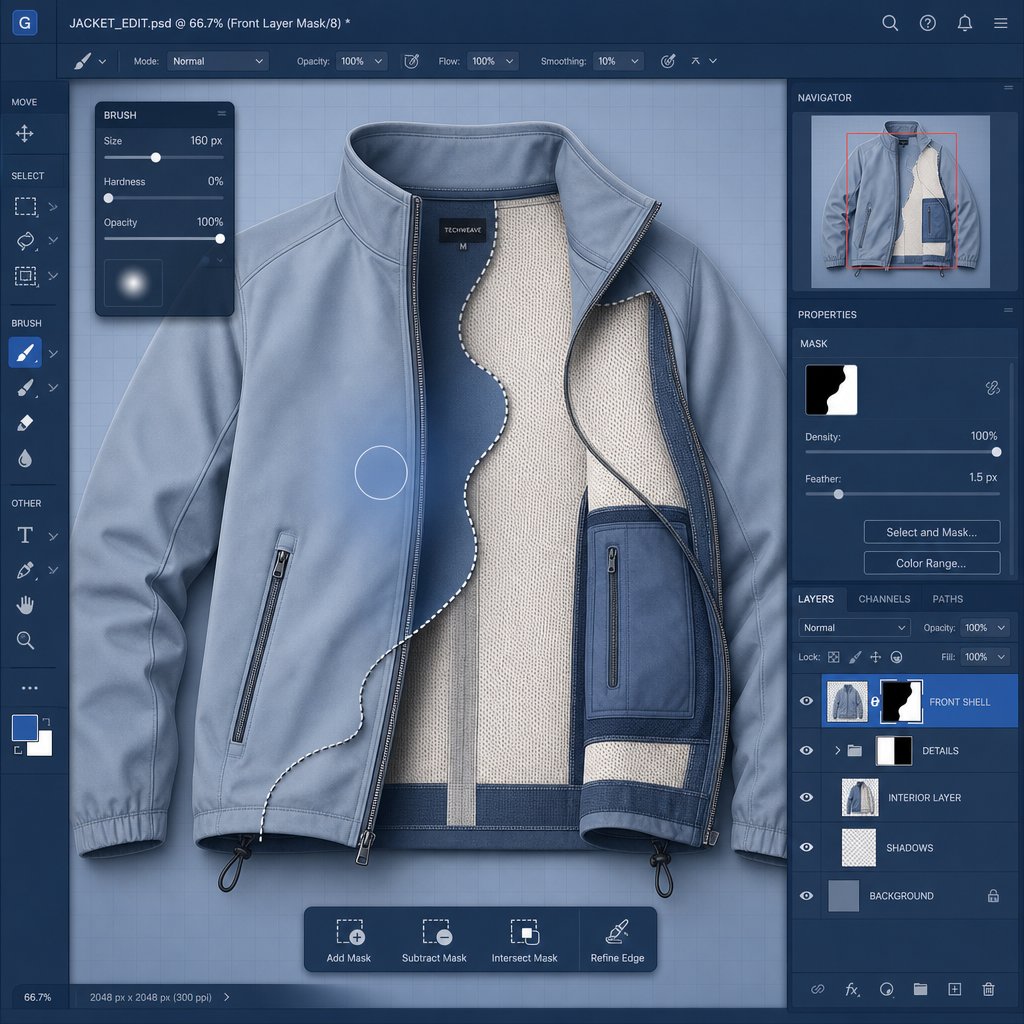
- Import and organize raw files. Open your front shot, back shot, and interior captures in Photoshop. Convert RAW files using identical Camera Raw settings across all images in the set. Create a master PSD and place each shot on its own layer. Name layers clearly: "Front_Outer," "Interior_Neck," "Interior_Sleeve_L," "Back_Outer." This naming convention pays off immediately when you're managing four to six layers per garment.
- Create vector paths around the garment. Select the Pen Tool and draw a precise clipping path along the garment's outer edge on your front shot, excluding the mannequin entirely. Work at 200-300% zoom for accuracy. Save the path in the Paths panel as "Front_Outline" so you can reload it later without redrawing.
- Convert paths to masks and remove the mannequin. Load your saved path as a selection, then apply it as a layer mask. The mannequin disappears, leaving only the garment floating against transparency. This is non-destructive: the original pixel data remains intact beneath the mask, so you can refine edges without permanent loss.
- Position and align the interior shot. Move the interior neck layer beneath the masked front layer. Use Edit > Free Transform to scale and rotate until the inner collar aligns with the neckline opening. Drop the layer opacity to 50% temporarily so you can see both layers simultaneously during alignment. Match seam lines, label placement, and fabric grain direction.
- Blend composite edges. Switch to a soft brush (hardness 0-15%) on the interior layer's mask. Paint along the junction where inner fabric meets outer fabric, feathering the transition so no hard line appears. For most garments, a feather radius between 0.3 and 0.7 pixels on the initial path selection creates natural-looking edges without visible halos.
- Repeat for additional joints. Apply the same mask-align-blend sequence to sleeve openings, bottom hems, or any other area where the mannequin was visible. Each joint gets its own named layer and mask.
- Final cleanup and export. Flatten visible layers onto a new merged layer (Ctrl+Shift+Alt+E) while keeping originals intact below. Run the Healing Brush over lint, stray threads, or minor wrinkles. Adjust Levels or Curves if brightness needs matching across layers.
Masking and Path Creation for Mannequin Removal
The Pen Tool is the backbone of professional ghost mannequin effects. Unlike quick selection or magic wand tools, it produces clean vector paths that don't degrade at edges or struggle with low-contrast boundaries between garment and mannequin. Place anchor points at every directional change along the garment's silhouette, pulling Bezier handles to match curves smoothly.
A common question: how tight should the path sit against the fabric edge? For crisp fabrics like cotton poplin or denim, path directly along the pixel boundary. For fuzzy materials like fleece or mohair, path slightly inside the edge and use Refine Edge later to recover soft fibers. Saving each path with a descriptive name ("Front_Collar_Path," "Sleeve_R_Path") lets you reload and adjust without starting over, a habit that separates efficient editors from those who redo work constantly.
Aligning and Compositing Interior Shots
Alignment is where ghost mannequin image editing services earn their reputation. The interior shot must sit behind the outer layer so convincingly that viewers never question whether it's a single photograph. Three alignment checkpoints keep you on track:
- Seam continuity. Side seams on the interior shot should flow directly into the side seams visible on the outer layer. If they don't connect, use Edit > Warp to nudge the interior fabric into position.
- Scale match. The interior collar opening should be slightly smaller than the masked neckline hole. If it's larger, the inner fabric will peek beyond the outer edge unnaturally.
- Color consistency. Even with matched white balance during shooting, slight tonal shifts happen. Use a Curves adjustment layer clipped to the interior layer to nudge its midtones until the fabric reads as one continuous surface.
For the blending itself, the Multiply blend mode at reduced opacity (10-20%) on a shadow layer beneath the garment adds depth at the neck opening without looking artificial. This subtle shadow sells the three-dimensional illusion that makes ghost mannequin composites convincing.
Edge Refinement and Layer Management
Zoom to 200% and scan every edge of your composite. You're looking for three things: hard mask lines that weren't feathered, color fringing where the mannequin's hue bled onto the garment, and alignment gaps where background shows through between layers.
For hard edges, paint on the layer mask with a soft white or black brush at low opacity (20-30%), gradually softening the transition. For color fringing, a Hue/Saturation adjustment layer targeting the mannequin's color (usually neutral gray or beige) and desaturating it eliminates the cast without affecting the garment's true color.
Professional file organization matters as your catalog grows. Group related layers into folders: "Front Composite," "Interior Fills," "Shadow Layers," "Corrections." Lock finished groups to prevent accidental edits. Save the layered PSD as your master file and export a flattened copy for delivery. This non-destructive structure means any revision, whether from a client or a platform requirement change, takes minutes instead of a full redo.
With the composite assembled and edges refined, the garment should look like a single, seamless photograph. But even technically perfect composites can fail if common mistakes slip through unnoticed, and certain errors are far more subtle than a visible mask edge.
Common Mistakes and How to Troubleshoot Them
A technically assembled composite can still look wrong. The mask edges are clean, the layers are named properly, the interior shot sits behind the outer layer, and yet something feels off when you zoom out. These subtle failures are harder to diagnose than obvious errors because they mimic the kind of visual discomfort a shopper feels without being able to articulate why a ghost mannequin photo looks "cheap."
Below are the most frequent issues editors encounter with ghost mannequin images, paired with specific fixes you can apply immediately. Use this as a quality control checklist whether you're reviewing your own work or evaluating results from an outsourced provider.
Fixing Misaligned Seams and Edges
Misalignment between the front shot and the interior fill is the number-one giveaway that an image is a composite. When side seams don't flow continuously from the outer garment into the inner panel, the viewer's eye catches the break instantly. This usually happens because the garment shifted on the photo mannequin between captures, or the camera position changed slightly.
- Problem: Side seams on the interior layer don't connect with the outer layer's seams. Fix: Use Edit > Warp in Photoshop to nudge the interior fabric until seam lines align. Work in small increments and toggle layer visibility to check continuity.
- Problem: The collar opening on the interior shot is too large or too small relative to the masked neckline. Fix: Free Transform the interior layer with Constrain Proportions off, scaling width and height independently until the collar edge sits just inside the outer mask boundary.
- Problem: Shoulder points on the interior don't match the outer silhouette, creating a "double shoulder" effect. Fix: Mask out the conflicting shoulder area on the interior layer entirely. Only the neck cavity needs to show through, not the full shoulder line.
Correcting Color Shifts Between Composite Layers
Even when you shoot under controlled lighting, the interior shot often reads slightly different in tone. The fabric is angled differently, catching light from another direction, or the mannequin photo was captured after a minor white balance drift. The result is a visible color seam where inner and outer layers meet.
- Problem: The interior fabric appears warmer or cooler than the outer garment. Fix: Add a Curves adjustment layer clipped to the interior layer. Adjust the Blue and Red channels in the midtones until the fabric temperature matches. A color-averaged layer set to Color blend mode can also unify tones across the entire composite.
- Problem: Brightness mismatch makes the interior look like a separate photograph. Fix: Use Levels on the interior layer, pulling the midpoint slider until luminosity matches the surrounding fabric. Compare at 100% zoom along the junction line.
- Problem: Fabric color looks slightly different due to the garment being inside-out for the insert shot. Fix: Sample the outer fabric color with the Eyedropper, create a Solid Color fill layer clipped to the interior, set it to Color blend mode at 10-20% opacity. This tints the interior to match without destroying texture detail.
Eliminating Unnatural Artifacts
Artifacts are the small details that break the illusion: a faint halo around the garment edge, a shadow falling in the wrong direction, or a proportion that looks slightly stretched. These often go unnoticed during editing because you're zoomed in on individual sections rather than evaluating the image as a whole.
- Problem: White or light halo around the garment silhouette from an overly generous mask feather. Fix: Contract the mask by 1-2 pixels (Select > Modify > Contract on the mask selection), then re-feather at a lower radius. For persistent halos, use the Minimum filter on the mask at 0.5-1 pixel.
- Problem: Shadow direction on the composite conflicts with the lighting in the original shot. Fix: Delete any auto-generated shadows and rebuild them manually using a soft black brush on a separate layer set to Multiply at 5-15% opacity. Match the shadow angle to the key light position from your shoot.
- Problem: Proportion distortion where the garment looks unnaturally stretched or compressed. Fix: This typically results from mismatched focal lengths between shots. If the interior was captured at a wider angle, it will appear slightly barrel-distorted. Apply Lens Correction or manual perspective warp to the interior layer until proportions feel natural.
- Problem: Visible jagged edges along curved sections like armholes or necklines. Fix: Zoom to 300% and paint on the layer mask with a 2-3px soft brush, smoothing the stair-step pattern. Alternatively, apply a 0.3px Gaussian Blur to the mask only (Alt+click the mask thumbnail to view it directly).
A reliable quality control pass catches these issues before delivery. View the final mannequin photo at the size it will appear on the product page, typically 1000-2000px wide, and ask yourself: does this look like a single photograph? Toggle between your composite and a competitor's product image. If anything draws your eye to the editing rather than the garment itself, there's still work to do. The goal is invisibility. When the technique disappears, the product sells.
Software and Tools for Every Skill Level
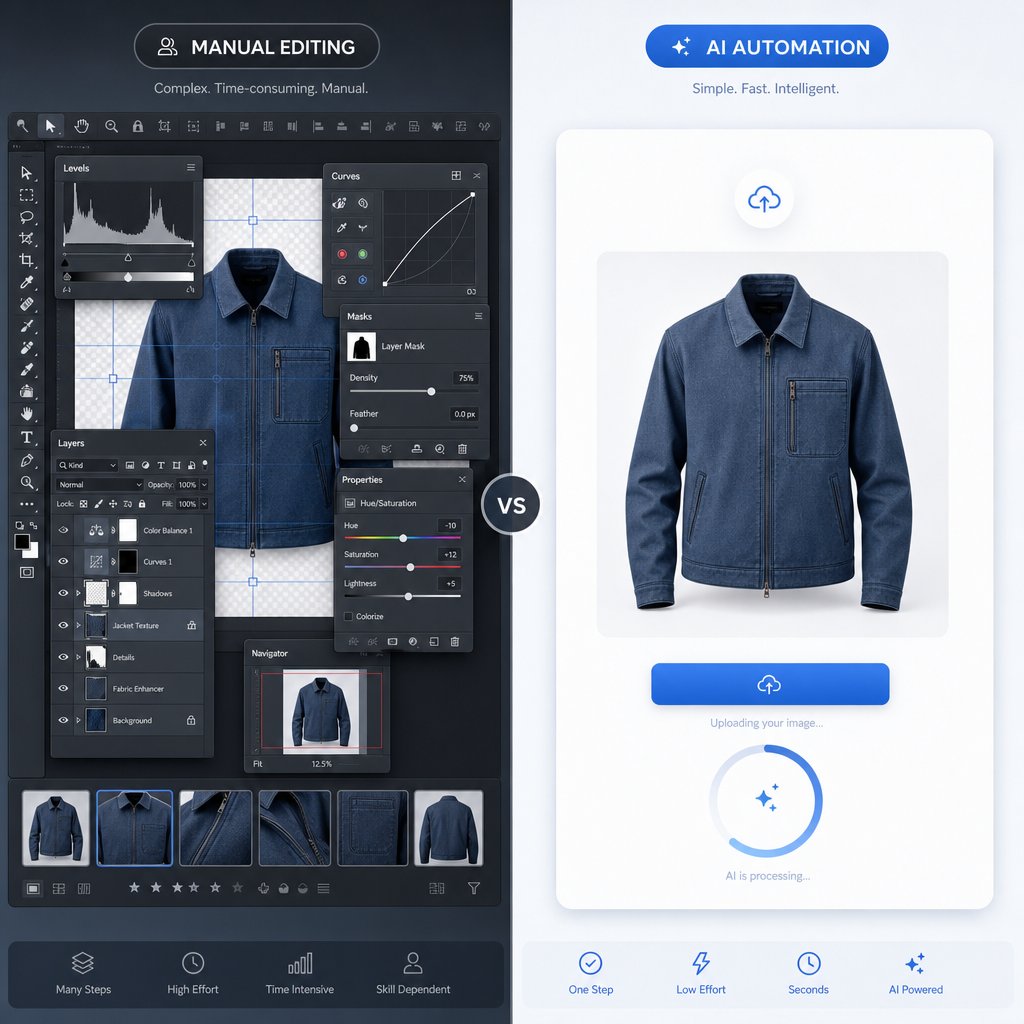
Knowing how to spot and fix composite errors is one thing. Having the right tool for the job is another. The software you choose shapes everything from your per-image turnaround time to the quality ceiling you can realistically hit. And the landscape has shifted considerably: what once required advanced Photoshop expertise can now be handled by a ghost mannequin app powered by machine learning, while manual editors still hold the edge for complex, editorial-grade work.
The right choice depends on three variables: your current volume, your editing skill level, and your budget. A boutique processing ten SKUs a week has different needs than a fast-fashion operation launching hundreds. Here's an honest breakdown of what's available.
Manual Editing in Photoshop and Alternatives
Adobe Photoshop remains the industry standard for manual ghost mannequin editing. Its Pen Tool, layer masking, and non-destructive adjustment layers give editors complete control over every pixel. More than 90% of professional retouchers use it as their primary tool. The tradeoff is time: a structured blazer can take 45-90 minutes per image, and the learning curve spans months before you're producing consistent, client-ready results.
Affinity Photo offers a compelling alternative at a one-time purchase price. It handles PSD files, supports frequency separation for texture work, and provides robust layer management. You won't find generative AI features here, but for editors who want Photoshop-level control without the subscription, it delivers. GIMP rounds out the free tier with full layer support, customizable workflows, and a capable selection toolset. Its interface feels less polished, and keyboard shortcuts differ from Adobe's conventions, but the price (zero) makes it a legitimate starting point for editors building their skills.
Photoroom bridges the gap between manual and automated. Its AI-powered background removal and object isolation handle simpler garments quickly, though complex composites with multiple joints still benefit from manual intervention. For operators exploring a ghost mannequin AI workflow without fully committing to automation, it's a useful middle ground.
AI-Powered Ghost Mannequin Tools for Faster Production
The real shift in this space is the emergence of dedicated AI mannequin generators built specifically for ecommerce product imagery. These tools treat the garment as a digital mannequin, reconstructing three-dimensional volume from flat or hanger shots without requiring the traditional multi-shot compositing process. Instead of spending 20-45 minutes per image in Photoshop, you upload a photo and receive a processed result in seconds.
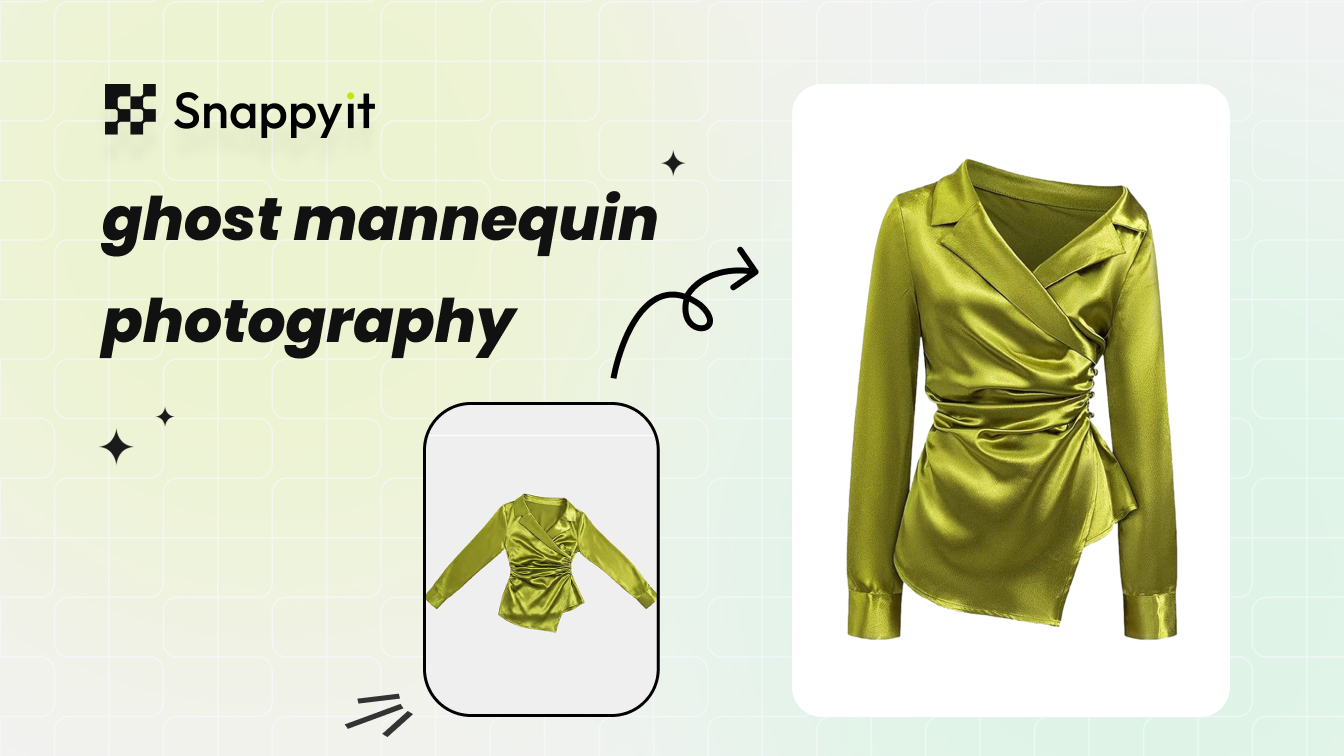
Snappyit's Ghost Mannequin tool is purpose-built for this workflow. It targets photographers, retouchers, and ecommerce operators who want the invisible mannequin look without time-consuming manual editing. Upload your garment image, and the AI handles mannequin removal, 3D volume reconstruction, and edge cleanup automatically. For stores managing growing catalogs where manual editing becomes a bottleneck, this kind of tool turns a multi-step Photoshop process into a single action.
The concept of a virtual manikin, where AI reconstructs how a garment would look on an invisible body, has matured rapidly. Early AI tools struggled with complex necklines and structured fabrics, but current solutions handle the majority of standard apparel categories reliably. The practical question isn't whether AI can do the work; it's whether the quality meets your brand's specific threshold.
Use the comparison below to match your situation to the right approach:
| Tool / Approach | Learning Curve | Cost | Speed Per Image | Quality Ceiling | Best For |
|---|---|---|---|---|---|
| Snappyit Ghost Mannequin | Minimal | Subscription-based | Seconds | High (standard apparel) | Ecommerce operators scaling catalogs quickly |
| Adobe Photoshop | Steep (months) | $22.99/month | 15-90 minutes | Maximum | Professional retouchers needing full control |
| Affinity Photo | Moderate | ~$70 one-time | 15-90 minutes | High | Editors avoiding subscriptions |
| GIMP | Moderate-Steep | Free | 20-100 minutes | Moderate-High | Budget-conscious beginners |
| Photoroom | Low | Free tier / subscription | Seconds to minutes | Moderate | Quick background removal and simple composites |
| AutoRetouch | Low | Pay-as-you-go | Minutes | Moderate-High | Batch processing with automated ghost mannequin |
A few patterns emerge from this comparison. Manual tools offer the highest quality ceiling but demand significant time and skill investment. AI-powered solutions compress turnaround dramatically and lower the skill barrier, making them the practical choice for volume-driven operations. The hybrid approach, using AI for the bulk of standard garments and reserving manual editing for complex or premium pieces, gives most ecommerce brands the best balance of speed, cost, and quality.
Whichever tool you choose, the output still needs to look polished on the product page. And polished means more than just removing the mannequin cleanly. It means realistic shadows that ground the garment in space and color that stays true across every image in your catalog.
Shadow Creation and Color Correction Techniques
A garment floating against a pure white background with no shadow beneath it looks pasted in, not photographed. Shadows anchor the product in physical space, giving the viewer's brain the depth cue it needs to perceive the image as real rather than digitally assembled. Color consistency does the same thing across your catalog: when every ghost mannequin product photography image shares the same tonal language, the store feels cohesive and the editing becomes invisible.
These two steps, shadow creation and color correction, are often treated as afterthoughts. They shouldn't be. They're the difference between a composite that reads as a photograph and one that reads as a cutout.
Creating Realistic Shadows for Depth and Dimension
Not every product image calls for the same shadow style. The type you choose depends on the garment, the platform's visual standards, and the overall aesthetic of the brand. In ghost product photography, where the mannequin has been removed and the garment appears to stand on its own, the shadow is what sells the illusion of physical presence.
Here are the three primary shadow types and when to use each:
- Drop shadow: A soft, offset shadow beneath the garment that creates the impression of slight elevation off the background. Best for clean ecommerce listings where you want minimal visual distraction. Apply using a duplicated silhouette layer, filled with black, Gaussian blurred at 8-15px, and set to Multiply at 15-25% opacity. Keep the offset subtle, just 3-5 pixels downward.
- Natural shadow: Mimics the shadow a garment would cast if lit from a specific direction in a real studio. This works well for clothing photography ghost mannequin images where you want a lifestyle-adjacent feel without a full environmental backdrop. Build it with a soft black brush on a separate layer, painting along the garment's base and one side to match your original key light angle.
- Reflection shadow: A mirrored, fading duplicate beneath the garment that simulates a glossy surface. This suits premium or editorial presentations, particularly structured outerwear, leather jackets, or formal wear. Create it by duplicating the garment layer, flipping it vertically, reducing opacity to 15-30%, and applying a gradient mask that fades to full transparency within 50-80 pixels.
Garment type influences shadow decisions directly. Sheer fabrics like chiffon blouses look unnatural with heavy drop shadows because the garment itself is lightweight and airy. A barely-there natural shadow at 8-10% opacity suits them better. Heavily structured items like wool coats or tailored blazers can support bolder shadows because their visual weight justifies a stronger ground presence. Knitwear falls in between: a moderate drop shadow grounds the piece without competing with the texture detail that makes knitwear appealing in invisible ghost mannequin photography.
Color Matching Across Multiple Composite Layers
When your composite pulls from two, three, or even five source images, color consistency becomes a deliberate editing step rather than something you can assume. Even with locked white balance during the shoot, the interior fabric panel often reads slightly different from the outer layer. The angle changes how light interacts with the weave, and that shift shows up as a visible tonal seam in the final image.
The fix starts with a reference point. Sample the outer garment's midtone color with the Eyedropper tool, then compare it against the interior layer at the junction where they meet. If the interior skews warmer, add a Curves adjustment layer clipped to that layer and pull down the Red channel slightly in the midtones. If it skews cooler, do the same with the Blue channel. Small moves, 3-5 points on the curve, are usually enough.
For ghost mannequin clothing photography at scale, where you're processing dozens of garments per session, a more efficient approach is using Photoshop's Match Color function or a Photo Filter adjustment layer set to a sampled tone from the dominant layer. Apply it globally at low density (10-20%) to unify the entire composite without flattening individual color variation in the fabric.
Fabrics with complex color behavior need extra attention. Dark navy garments often shift toward purple or green depending on the light angle, making interior panels look like a different color entirely. Heavily textured knits scatter light differently on the inside versus outside, creating brightness mismatches even when hue is correct. And sheer or semi-transparent fabrics pick up color from whatever sits behind them, meaning the mannequin's color may have contaminated the interior shot. In each case, a targeted Hue/Saturation adjustment clipped to the problem layer resolves the issue without affecting the rest of the composite.
Consistent shadows and matched color across every image in your catalog create the visual cohesion that shoppers associate with professional brands. But maintaining that consistency manually across hundreds of SKUs introduces a different kind of challenge: one that's less about technique and more about production efficiency.
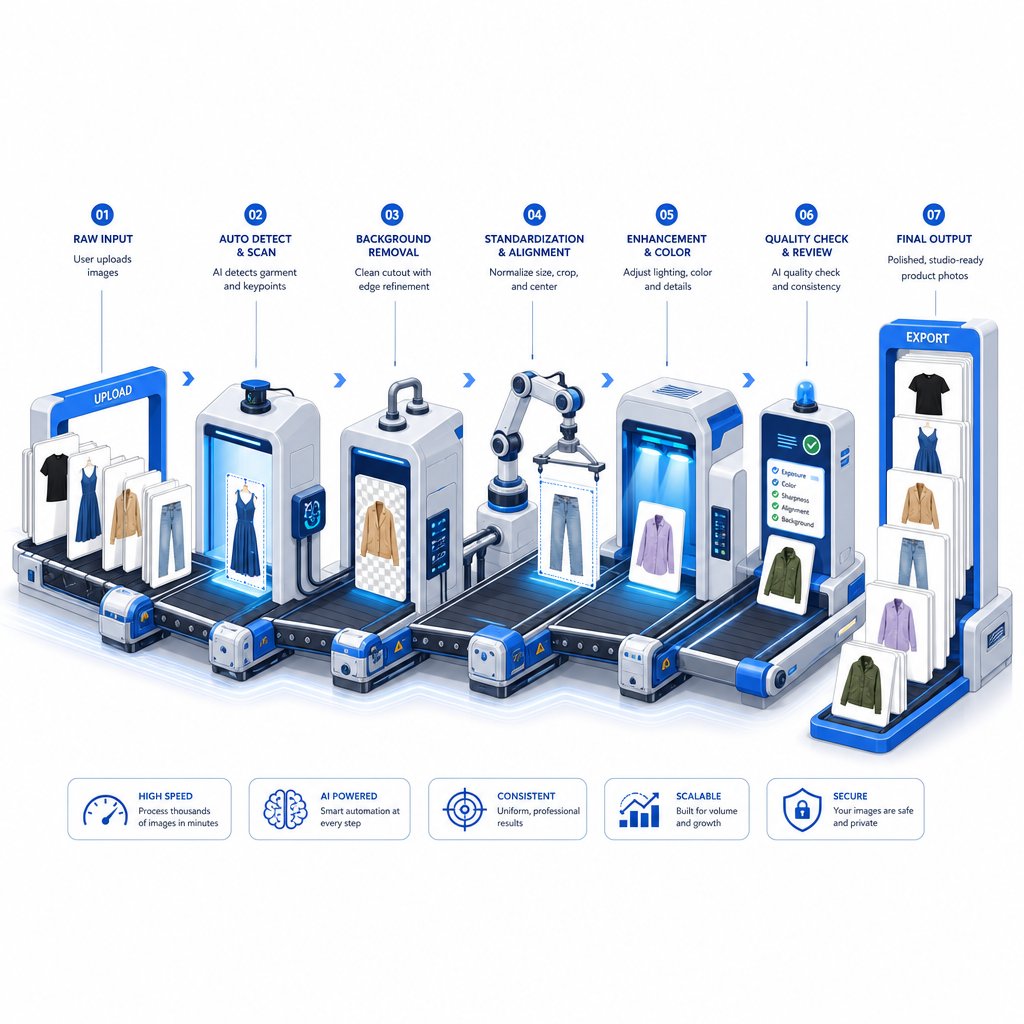
Batch Processing and Automation for High-Volume Stores
Editing one ghost mannequin composite to perfection is satisfying. Editing your 200th using the same manual steps is not. At some point, usually around 50-100 SKUs per week, the per-image workflow that works beautifully for a small catalog becomes a production bottleneck that delays launches, burns out editors, and eats into margins. The technique doesn't change at scale. The infrastructure around it has to.
High-volume ecommerce operations need systems, not just skills. Whether you're running a fast-fashion brand with weekly drops or managing a marketplace store with thousands of active listings, the question shifts from "how do I edit this?" to "how do I edit all of these without sacrificing quality or missing deadlines?"
Building Photoshop Actions for Repetitive Steps
Not every step in the ghost mannequin editing workflow requires creative judgment. Background cleanup, canvas resizing, color profile conversion, sharpening for web, and export formatting are mechanical tasks that follow the same parameters every time. Photoshop Actions let you record these sequences once and replay them across your entire queue.
Here's how to set up a batch automation workflow for the repetitive portions of your ghost mannequin service pipeline:
- Identify repeatable steps. Separate your workflow into creative tasks (masking, alignment, edge blending) and mechanical tasks (canvas sizing, background fill, sharpening, format conversion). Only the mechanical steps belong in an Action.
- Record the Action. Open the Actions panel (Window > Actions), create a new folder for your ghost mannequin actions, then click the New Action button. Perform each mechanical step in sequence: set canvas to your target dimensions, fill the background layer with pure white (#FFFFFF), apply Unsharp Mask at your standard settings (Amount 80-100%, Radius 0.8-1.2px, Threshold 0), convert to sRGB, and save as JPEG at quality 10-12.
- Test on a single file. Revert your test image and run the Action. Verify every step executed correctly and the output matches your platform requirements.
- Run as a batch. Go to File > Automate > Batch. Select your Action, point the source to your folder of finished composites, and set the destination to your export folder. Define a file naming convention (e.g., SKU-number_front_ghost.jpg) so outputs are catalog-ready without manual renaming.
- Add conditional logic for variations. If your catalog includes both landscape and portrait orientations, insert a conditional step using File > Automate > Conditional Mode Change, or record separate Actions for each orientation and batch them against pre-sorted folders.
Actions handle the last mile of production efficiently, but they don't solve the core compositing bottleneck. The creative steps, masking the mannequin, aligning interior shots, blending edges, still require either human judgment or a fundamentally different approach.
For editors processing moderate volumes (20-80 images per week), combining manual compositing with automated finishing steps cuts total production time by roughly 30-40%. You spend your attention on the work that actually requires it and let the machine handle everything else. Photoshop's Image Processor script (File > Scripts > Image Processor) adds another layer of efficiency by converting file formats, resizing, and applying Actions in a single pass across entire folders.
Scaling Production With AI and Outsourcing
There's a threshold where even well-automated Photoshop workflows can't keep pace. If you're launching 200+ new SKUs weekly, or managing seasonal spikes that triple your normal volume overnight, the math stops working for manual editing regardless of how many Actions you've recorded. At that point, you're choosing between three paths: hiring more editors, outsourcing to a ghost mannequin service provider, or adopting AI-powered automation.
Each path fits a different operational profile:
- DIY with Photoshop Actions (best for 10-80 images/week): You maintain full creative control, keep costs variable, and build internal expertise. The ceiling is your team's available hours. Works well for brands with a dedicated editor who handles other retouching tasks alongside ghost mannequin work.
- AI-powered tools (best for 50-500+ images/week): Snappyit's Ghost Mannequin solution processes images in seconds rather than minutes, removing the per-image time constraint entirely. For ecommerce operators who need to scale catalog production without proportionally scaling headcount, this approach converts what was a multi-step Photoshop workflow into an upload-and-download pipeline. The cost per image drops dramatically compared to manual editing, and turnaround shifts from days to minutes.
- Full outsourcing to invisible ghost mannequin services (best for 100-1000+ images/week with complex garments): When you need human-level precision on structured blazers, sheer fabrics, or editorial-grade composites at volume, dedicated outsourcing teams handle the work end-to-end. You send raw files, receive finished composites. The tradeoff is less direct control and longer turnaround (typically 24-48 hours), but the capacity is essentially unlimited.
Many brands searching for ghost mannequin photography near me are actually looking for a local provider who can handle both the shooting and the editing. That bundled ghost mannequin photography service model works for smaller catalogs, but it rarely scales beyond a few hundred images per month without significant cost increases. Separating photography from editing, and automating or outsourcing the editing portion independently, gives you more flexibility as volume grows.
The decision framework comes down to three factors:
| Decision Factor | DIY + Actions | AI Tools (e.g., Snappyit) | Outsource Ghost Mannequin Image Editing Services |
|---|---|---|---|
| Weekly volume | 10-80 images | 50-500+ images | 100-1000+ images |
| Turnaround needed | Flexible (hours to days) | Immediate (seconds) | 24-48 hours typical |
| Skill requirement | Intermediate-Advanced Photoshop | Minimal (upload workflow) | None (fully managed) |
| Cost per image | Time-based (your labor) | $0.10-$0.30 | $0.50-$5.00+ |
| Best garment types | Any (full control) | Standard apparel categories | Complex/premium garments |
A hybrid approach often makes the most sense for growing brands. Use AI automation for the bulk of your standard catalog, t-shirts, basic tops, simple dresses, where speed and consistency matter most. Reserve manual editing or outsourced ghost mannequin services for hero products, complex outerwear, or pieces where the brand demands editorial-level precision. This split keeps your per-image cost low on volume items while protecting quality where it has the highest revenue impact.
Whatever production pipeline you build, the output still needs to meet specific technical requirements before it goes live. Each ecommerce platform enforces its own image dimensions, file sizes, and color profile standards, and getting these wrong means rejected listings or degraded image quality on the storefront.
Export Specifications for Major Ecommerce Platforms
Your composite looks flawless at full resolution in Photoshop. But if you export it at the wrong dimensions, color profile, or file size, the platform either rejects it outright or compresses it into something muddy. The final step in any ghost mannequin for ecommerce workflow is formatting your output to match exactly what each storefront expects.
Platform-Specific Image Requirements
Every major marketplace enforces its own standards for e commerce product photography, and those standards differ enough to cause problems if you're using a one-size-fits-all export. Amazon is the strictest: your main product image must sit on a pure white background (RGB 255, 255, 255), and images below 1000px on the shortest side won't activate the zoom feature that increases conversion by up to 6%. Shopify gives you more creative freedom but demands internal consistency across your catalog. WooCommerce inherits whatever your theme dictates, which means you need to check your theme's crop settings before exporting.
The table below covers the specs you'll reference most often when exporting mannequin product photography:
| Platform | Recommended Dimensions | Max File Size | Accepted Formats | Background Requirement | Color Profile |
|---|---|---|---|---|---|
| Amazon | 2000 x 2000px+ | 10MB | JPEG (preferred), PNG, TIFF | Pure white (RGB 255,255,255) | sRGB |
| Shopify | 2048 x 2048px | 20MB (under 3MB ideal) | JPEG, PNG, WebP | Brand choice (consistent) | sRGB |
| WooCommerce | 1200 x 1200px+ (theme-dependent) | No hard limit (under 2MB ideal) | JPEG, PNG, WebP | Theme-dependent | sRGB |
| eBay | 1600px+ on longest side | 7MB | JPEG, PNG, WebP, TIFF | White recommended | sRGB |
| Walmart | 2000 x 2000px+ | 5MB | JPEG, PNG | White or light grey | sRGB |
One universal rule applies across all platforms: use the sRGB color profile. Adobe RGB has a wider gamut, but browsers that don't support it will render your colors washed out, making your invisible mannequin product photography look flat on the very pages where it needs to sell.
Setting Up Export Presets for Consistent Output
Rather than manually adjusting settings for every file, build export presets that lock in each platform's requirements. In Photoshop, use File > Export > Export As and save your configurations: JPEG at quality 10 (roughly 80-90% in other scales), sRGB conversion checked, and dimensions set to your target. Save separate presets named by platform, like "Amazon_2000sq" or "Shopify_2048sq," so anyone on your team exports correctly without memorizing specs.
For mannequin photography for ecommerce at scale, Photoshop's Image Processor (File > Scripts > Image Processor) lets you batch-convert an entire folder of finished composites into platform-ready files in a single pass. Point it at your completed PSD folder, select your target format and dimensions, and let it run. Pair this with the file naming convention from your Actions workflow (SKU_color_angle.jpg) and your images arrive upload-ready without any manual renaming.
Export is where editing meets deployment. Get it right once, save the preset, and every ghost mannequin composite you produce flows directly from your editing application to your storefront without friction, rejection, or quality loss along the way.
Ghost Mannequin Photo Editing FAQs
What is ghost mannequin photo editing?
Ghost mannequin photo editing is a compositing technique where multiple photographs of a garment shot on a mannequin are combined in post-production. The mannequin is digitally removed using masking and layer alignment, while interior shots fill the exposed areas to create a hollow, three-dimensional product image. The result shows the clothing's natural shape and fit without any visible support, making it ideal for ecommerce catalogs that need consistent, professional imagery at scale.
How many photos do you need for a ghost mannequin effect?
The number of source photos depends on the garment's complexity. A basic t-shirt or blouse typically requires two shots: one front view on the mannequin and one interior or back-panel shot for the neckline fill. Structured garments like blazers or hoodies with open hoods may need four to six images covering the front, back, interior neck, sleeve openings, and hem. Shooting all angles under identical lighting and camera settings is critical for seamless compositing during the editing stage.
Can AI tools replace manual Photoshop ghost mannequin editing?
AI-powered tools like Snappyit's Ghost Mannequin solution can handle standard apparel categories in seconds rather than the 15-90 minutes required for manual Photoshop work. They work well for high-volume ecommerce operations processing hundreds of SKUs weekly. However, complex garments with multiple joints, sheer fabrics, or editorial-grade requirements may still benefit from manual editing. Many brands use a hybrid approach: AI for bulk catalog items and manual editing for premium or structurally complex pieces.
What is the difference between a neck joint and a full ghost mannequin edit?
A neck joint is the simplest type of ghost mannequin composite, filling only the neckline area where the mannequin's neck was visible. It requires just two source images and suits most basic tops and dresses. A full ghost mannequin edit combines multiple joint types, including neck, sleeve, and bottom joints, into one composite. This approach requires four to six source images and applies to complex garments like tailored blazers, open-front cardigans, or outerwear with visible sleeve and hem openings.
What image specs do ecommerce platforms require for ghost mannequin photos?
Requirements vary by platform. Amazon demands at least 2000x2000px on a pure white background (RGB 255,255,255) in sRGB color profile with a 10MB file size limit. Shopify recommends 2048x2048px with flexible background choices but ideally under 3MB. All major platforms require sRGB color profiles since Adobe RGB renders incorrectly in most browsers. Setting up export presets for each platform ensures your ghost mannequin composites meet specifications consistently without manual adjustment per file.