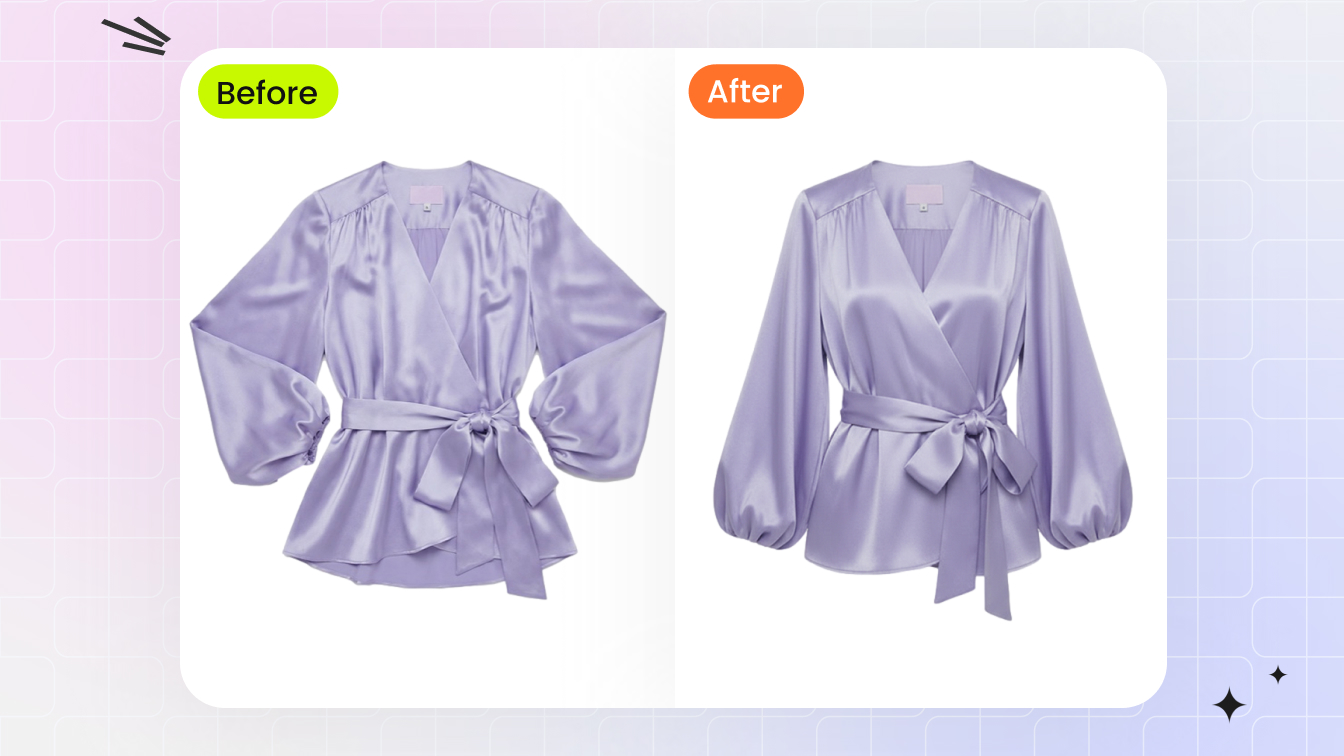
What Is Ghost Mannequin Photography and Why It Matters
Imagine browsing an online store and seeing a jacket that looks like it is being worn by an invisible person. No model, no visible mannequin, just the garment floating in space with its full three-dimensional shape on display. That is ghost mannequin photography in action, and it is the backbone of how most fashion brands present clothing online.
Ghost mannequin photography is a product photography technique where clothing is photographed on a mannequin, then the mannequin is digitally removed in post-production to create a 3D, hollow-man image that shows the garment's shape, fit, and construction without any distractions.
What the Ghost Mannequin Effect Actually Is
The ghost mannequin effect relies on compositing multiple photographs of the same garment. You shoot the clothing on a mannequin to capture its exterior shape, then photograph the interior (collar lining, inner neckline, waistband) separately. In post-production, you remove the mannequin and combine both shots so the garment appears to have depth and dimension, as if worn by an invisible body. The result is a clean, distraction-free product image that highlights fit, drape, and construction details a flat lay simply cannot convey.
Ghost Mannequin vs Neck Joint Editing
These two terms get used interchangeably, but they refer to different scopes of work. The neck joint technique is a specific editing step within the broader ghost mannequin workflow. It focuses on compositing the interior collar or neckline area into the gap left after the mannequin's neck is removed. The full ghost mannequin effect, by contrast, covers the entire garment, including sleeves, hems, and waistbands. Think of neck joint editing as one piece of the puzzle rather than the whole picture.
Why Ecommerce Brands Rely on This Technique
Online shoppers cannot touch or try on clothing. They rely entirely on visuals to judge whether a product is worth buying. The invisible mannequin approach gives customers a realistic sense of how a garment contours a body, how fabric falls, and how design details like stitching or lapels actually look when worn. Compared to flat lay photography, it adds depth. Compared to on-model shoots, it keeps the focus squarely on the product while costing a fraction of the price. That combination of visual impact, consistency, and cost efficiency is why this technique dominates product catalogs across major retailers.
The real question is not whether ghost mannequin photography works. It is whether your specific products and brand strategy call for it over other methods, and what gear and settings you actually need to pull it off well.
When to Use Ghost Mannequin Instead of Other Techniques
Not every product belongs on a mannequin. A silk scarf, a pair of earrings, or a loosely draped kimono will look awkward forced onto a rigid form. The technique shines in specific situations, and knowing when to reach for it versus a flat lay or on-model shoot saves you time, money, and reshoots.
Garment Types That Work Best on a Ghost Mannequin
Structured garments are where mannequin photography for ecommerce delivers the strongest results. Think blazers, tailored shirts, jackets, coats, and fitted dresses. These pieces have defined silhouettes that a photoshoot mannequin holds in a natural, body-like shape. The technique also works well for items where interior construction matters to buyers, like a lined sport coat or a dress with a branded inner collar.
Here is a quick breakdown by garment category:
- Ideal fit: Blazers, button-down shirts, structured dresses, jeans, trousers, polo shirts, outerwear, suits
- Works with some styling: T-shirts (stuff shoulders for volume), hoodies, lightweight blouses, skirts
- Better suited to other methods: Scarves, belts, jewelry, heavily draped or unstructured garments, swimwear with minimal form
The common thread? If the garment has a shape customers need to visualize on a body, the invisible mannequin product photography approach communicates that shape far better than laying it flat on a table.
Flat Lay vs On-Model vs Invisible Mannequin
Each method has trade-offs across cost, speed, and visual impact. The right choice depends on what you are selling and how many SKUs you need to photograph. Here is how they compare side by side:
| Criteria | Ghost Mannequin | Flat Lay | On-Model |
|---|---|---|---|
| Cost per image | $15-50 | $5-15 | $50-200+ |
| Production speed | Moderate (shoot + edit) | Fast | Slow (model coordination) |
| Shows 3D garment shape | Yes | No | Yes |
| Catalog consistency | High | High | Low (varies by model) |
| Best garment types | Structured clothing | Accessories, casual basics | Hero products, lookbooks |
| Visual impact | Strong, product-focused | Clean, minimal | Highest (lifestyle context) |
| Post-production effort | Significant (compositing) | Minimal | Moderate (retouching) |
You will notice that ghost mannequin for ecommerce occupies a sweet spot: it delivers much of the visual depth of on-model photography at a fraction of the cost, while maintaining the catalog-wide consistency that flat lays offer. That middle ground is exactly why brands like ASOS and Zara rely on it across thousands of product listings.
Choosing Based on Brand Strategy and Volume
Budget and brand positioning should drive your decision just as much as garment type. Consider these scenarios:
High-volume sellers (100+ SKUs per season): E commerce product photography at scale demands speed and consistency. Shooting every item on a model is financially impractical. The ghost mannequin approach lets you process large catalogs with uniform framing, lighting, and presentation, keeping per-image costs manageable.
Luxury and premium brands: On-model photography often makes more sense for hero pieces because it communicates lifestyle and aspiration. But even luxury labels use the invisible mannequin technique for secondary catalog images, size guides, and marketplace listings where clean product-focused shots are required.
Startups and small brands on tight budgets: Flat lay is the cheapest entry point, but it undersells structured garments. If you are selling tailored clothing or outerwear, investing in a basic mannequin setup pays for itself quickly through higher conversion rates. The 3D presentation builds buyer confidence in ways a flat image cannot.
Many successful brands blend all three methods strategically. Ghost mannequin images serve as the primary product shots, flat lays handle accessories and detail close-ups, and on-model photography is reserved for marketing campaigns and top-selling items. The key is matching the method to the product and the channel rather than defaulting to one approach for everything.
Whichever direction you choose, the quality of your results depends heavily on what happens behind the camera. The right equipment and settings make the difference between a composite that looks seamless and one that looks obviously stitched together.

Camera Settings and Equipment Setup for Sharp Results
Here is where most guides get vague. They tell you to "use good lighting" and "shoot in manual mode" without specifying what that actually means in practice. Mannequin photography demands precision because you are compositing multiple exposures later. If your settings drift between shots, your final image will show it. Let's get specific.
Optimal Camera Settings for Clothing on a Mannequin
When you photograph clothing on a mannequin, every setting choice serves one goal: maximum sharpness and consistency across every frame. Here are the exact parameters that produce clean, composite-ready files.
Aperture: f/8 to f/11. This is the sweet spot for ghost mannequin for photography work. Most lenses reach their peak optical sharpness in this range, delivering edge-to-edge detail across the entire garment. You might be tempted to push to f/16 or f/22 for deeper depth of field, but diffraction starts softening your image at those extremes. At f/8 to f/11, a garment on a mannequin roughly 1.5 to 2 meters from the camera falls entirely within the plane of focus without sacrificing resolution.
ISO: 100 to 200. Keep this as low as your camera allows. A low ISO minimizes grain and noise, which matters enormously when you are making precise selections around fabric edges during post-production. Noise makes clean masking nearly impossible. Since your camera is on a tripod and your subject is stationary, there is no reason to push ISO higher. If your exposure is too dark at ISO 100, add more light rather than increasing sensitivity.
Shutter speed: 1/125 or slower. With a tripod-mounted camera and still subject, shutter speed becomes your flexible variable. Let it fall wherever the light meter dictates after you lock in aperture and ISO. Speeds of 1/60 to 1/125 are common in well-lit studio setups. If you are using continuous lighting rather than strobes, you may drop to 1/13 or even longer exposures without issue, as long as nothing moves.
White balance: manual, matched to your light source. This is the setting most people overlook, and it causes the most headaches in editing. Auto white balance shifts color temperature between frames, which means your exterior shot and interior shot may have slightly different color casts. Set a custom white balance using a gray card at the start of each session, or dial in the exact Kelvin value for your lights (typically 5000-5500K for daylight-balanced studio strobes). Lock it and do not touch it until your lighting changes.
Focal length: 85mm to 105mm. A short telephoto lens reduces barrel distortion that wider lenses introduce, keeping garment proportions accurate. Wide-angle lenses (below 50mm) stretch edges and make sleeves or hems look unnaturally wide. An 85mm prime or a 70-200mm zoom set around 100mm gives you a natural perspective with minimal distortion, which is critical when customers are judging fit from your images.
File format: RAW. Always shoot RAW. You need the full dynamic range and color data for precise white balance correction and exposure matching between composite layers. JPEG compression discards information you cannot recover later.
Lighting Setup for Clean Ghost Mannequin Shots
Even illumination is everything. Harsh shadows obscure fabric texture, create inconsistent tones between your exterior and interior shots, and make masking the mannequin far more difficult. Here is a reliable two-light setup that works for most photography mannequins and garment types:
Two softboxes at 45-degree angles. Position one large softbox (at least 60x90cm) on each side of the mannequin, angled inward at roughly 45 degrees. Place them slightly above the garment's midpoint and aim them downward at a gentle angle. This creates soft, wraparound light that fills shadows without flattening the garment's dimensionality.
Distance matters. Keep softboxes about 1 to 1.5 meters from the mannequin. Moving them closer creates softer light but increases falloff (brighter center, darker edges). Moving them farther away creates more even coverage but slightly harder shadows. Find the balance where the garment is evenly lit from collar to hem.
Optional: a third light or reflector behind the backdrop. If you are shooting against white seamless paper, a light aimed at the backdrop eliminates gray shadows and gives you a cleaner starting point for background removal. Alternatively, a large white foam board placed below and slightly in front of the mannequin bounces fill light into the lower portion of the garment, reducing under-shadow on hems and waistbands.
Avoid mixing light sources. If you use studio strobes, turn off overhead room lights and block window light. Mixed color temperatures create uneven color casts across the garment that are difficult to correct uniformly in post-production.
Choosing the Right Mannequin and Equipment
The mannequin itself is arguably the most important piece of equipment in this workflow. A standard retail display mannequin will not work. You need a form specifically designed for this technique, with removable sections that let you photograph garment interiors without removing the clothing entirely.
A faceless mannequin with detachable neck, arms, and torso sections is the standard choice. These forms, sometimes marketed as a female ghost mannequin or male equivalent, typically cost between $150 and $500. The removable pieces allow you to expose the inner collar, neckline, and waistband for your interior composite shots. When shopping for a ghost mannequin for sale, prioritize models with multiple detachable sections over cheaper single-piece forms.
Consider these factors when selecting your form:
- Gender and sizing: Match the mannequin to your primary product line. If you sell women's clothing in size 6-8, get a female form in that range. For menswear, a medium male torso covers most standard fits. Adjustable dress forms offer flexibility but can show seam lines through thin fabrics.
- Material: Fiberglass forms hold their shape permanently and photograph cleanly. Fabric-covered forms can leave texture impressions on lightweight garments.
- Color: White or light gray mannequins create less color contamination on light-colored garments. Avoid black forms unless you exclusively shoot dark clothing.
- Detachable sections: The more removable pieces, the more versatile your interior shots. At minimum, you need a removable neck piece. Ideally, arms, shoulders, and lower torso sections should also detach.
Beyond the photography mannequin itself, here is the complete equipment checklist for a professional ghost mannequin setup:
- DSLR or mirrorless camera with manual mode
- 85-105mm lens (prime or zoom)
- Sturdy tripod with a ball head or geared head
- Two softbox lights (60x90cm minimum) with stands
- White seamless paper backdrop (at least 2.7m wide)
- Ghost mannequin with removable sections
- Gray card for custom white balance
- Tethering cable and laptop (for real-time image review)
- Styling clips, pins, and fashion tape
- Steamer or iron for wrinkle removal
- Gaffer tape for marking floor positions
Tethering deserves special mention. Connecting your camera to a laptop via USB lets you review each shot at full resolution immediately after capture. You will catch focus issues, styling problems, and exposure drift before you move on to the next garment. When you are shooting dozens of items in a session, tethering prevents the painful discovery of unusable files hours later during editing. Software like Capture One or Lightroom's tethered capture mode displays images on screen within seconds of pressing the shutter.
With your settings locked, lighting dialed in, and equipment in place, the variable that changes most between shots is the garment itself. Different clothing categories demand different styling approaches and shooting angles to produce a convincing composite.
Skip the studio — generate ghost mannequin shots with AI →
Shooting Techniques by Garment Type
A blazer and a pair of jeans share almost nothing in common when it comes to how you photograph clothes on a mannequin. The neckline structure, the way fabric drapes, the interior details that need to be visible in the final composite — all of these shift dramatically depending on what is on the form. Treating every garment the same way is the fastest route to awkward composites and wasted reshoot time.
The approach that produces professional ghost mannequin clothing photography is garment-specific. Each category has its own pinning strategy, camera height, number of required shots, and interior angles. Here is how to handle the major clothing types you will encounter during a mannequin photoshoot.
Shooting Tops and Shirts for the Hollow-Man Look
Tops are the most common garment type in any clothing photography ghost mannequin workflow, and they are also where the technique's core challenge lives: the neckline. When you remove the mannequin's neck and upper chest in post-production, you need interior collar detail to fill that gap convincingly.
Styling tips for tops: Button or zip the garment fully. Use clips along the back to pull excess fabric taut without creating visible tension lines on the front. For lightweight fabrics like cotton tees or silk blouses, stuff tissue paper into the shoulder and upper chest area to prevent the garment from clinging flat against the mannequin. Pin sleeve cuffs at a consistent angle across all products — slightly bent looks more natural than ramrod straight.
Here is the step-by-step shooting sequence for shirts, blouses, and similar tops:
- Front exterior shot: Position your camera at chest height, centered on the garment. Ensure the full garment is in frame with even margins on all sides. This is your primary product image.
- Back exterior shot: Rotate the mannequin 180 degrees without moving the camera or lights. Capture the rear view with identical framing.
- Interior neckline shot: Remove the mannequin's neck piece to expose the inner collar and back neckline. Photograph this area while the garment remains on the form. For collared shirts, fold the collar open so the interior label area and inner collar band are clearly visible.
- Sleeve interior (if applicable): For garments with rolled or open cuffs, remove the mannequin's arm section and photograph the inside of the sleeve opening. This shot fills the gap where the mannequin's wrist was visible.
- Detail shots: Capture close-ups of buttons, stitching, or unique design elements at a 1:1 or near-macro distance.
The critical detail most people miss: keep your camera and lights in exactly the same position for every shot of the same garment. If you shift the tripod between the front shot and the interior shot, the perspective changes and your composite layers will not align cleanly.
Techniques for Bottoms, Outerwear, and Dresses
Bottoms (jeans, trousers, skirts): The challenge with bottoms is maintaining leg shape and capturing the waistband interior. When you learn how to photograph clothing on a mannequin for lower-body garments, camera height becomes the first adjustment. Drop your tripod so the lens sits at hip level rather than chest level. Shooting from too high creates a tapered, foreshortened look that misrepresents the garment's proportions.
- Front exterior shot: Camera at hip height. Clip the waistband to the mannequin's waist securely. For jeans and trousers, stuff tissue paper or foam into the legs to maintain a natural cylindrical shape rather than letting them hang flat.
- Back exterior shot: Rotate the mannequin. Pay attention to back pocket placement and ensure the rear waistband sits naturally.
- Waistband interior shot: Fold the waistband outward or remove the mannequin's upper torso section to expose the inner waistband, brand label, and top button closure. Photograph from slightly above, angling down into the opening.
- Hem detail (optional): For cropped pants or skirts with finished hems, capture the bottom edge from a low angle to show construction quality.
Outerwear (jackets, coats, blazers): These are the most complex garments to shoot because they have the most interior structure that buyers want to see. Lapels, collar construction, lining fabric, interior pockets — all of these details influence purchase decisions for outerwear.
- Front exterior shot: Camera at chest height. Button or zip the jacket closed. Use fashion tape on collar points to keep them sharp and symmetrical. Pin the back for a fitted silhouette.
- Back exterior shot: Rotate the mannequin. Check that the back vent or pleat sits naturally.
- Interior collar and lining shot: Remove the mannequin's neck and upper chest section. Open the jacket slightly to reveal the interior lining, inner collar, and brand label. This shot is critical for outerwear because the lining is often a selling point.
- Lapel detail shot: For blazers and sport coats, capture a three-quarter angle that shows the lapel roll and how the collar sits against the neck opening.
- Sleeve lining shot: Remove the arm section and photograph the interior cuff, especially if the jacket has contrasting lining or functional buttonholes.
Dresses: Dresses combine the challenges of tops and bottoms into a single garment. The neckline needs interior detail, the waist needs to show shape, and the skirt portion needs to drape naturally rather than cling to the mannequin's legs.
- Front exterior shot: Camera at mid-torso height (roughly waist level) to capture the full length without distortion. For longer dresses, you may need to step back or use a wider focal length — but stay at 85mm minimum to avoid proportion issues.
- Back exterior shot: Rotate the mannequin. Ensure the zipper or closure sits flat and the skirt falls evenly.
- Interior neckline shot: Same approach as tops. Remove the neck piece and capture the inner collar or neckline construction.
- Waist interior (for belted or structured dresses): If the dress has a defined waistband or interior boning, expose and photograph that construction.
- Hem and drape shot: For flowing or A-line dresses, capture a lower-angle shot that shows how the hem falls. This helps the composite look natural rather than stiff.
For dresses, pinning strategy matters more than with any other garment type. Use clips along the back to define the waist without creating unnatural pulling on the front. Let the skirt portion hang freely rather than pinning it tight — you want natural drape, not a vacuum-sealed look.
Multi-Shot Approaches for Complex Garments
The common misconception about how to photograph clothes on a mannequin is that you only need two images: one exterior, one interior. In reality, complex garments often require five to seven separate shots to produce a convincing final composite.
Here is why. Every area where the mannequin is visible through or around the garment needs to be filled with real garment detail in the final image. A blazer, for example, shows the mannequin at the neck, through the sleeve openings, and sometimes at the bottom hem. Each of those gaps requires its own interior photograph taken from the correct angle and under identical lighting.
A practical shot count by garment complexity:
| Garment Type | Minimum Shots | Recommended Shots | Interior Areas to Capture |
|---|---|---|---|
| Basic t-shirt | 3 | 4 | Inner neckline, sleeve openings |
| Button-down shirt | 3 | 5 | Inner collar, cuff interiors, back neckline |
| Blazer or jacket | 4 | 6-7 | Inner collar, lining, lapel roll, sleeve lining, hem |
| Jeans or trousers | 3 | 4 | Inner waistband, leg openings |
| Dress (structured) | 4 | 5-6 | Inner neckline, waist construction, hem drape |
The key principle: shoot more than you think you need. It takes seconds to capture an extra angle during the mannequin photoshoot, but it takes significant time to reshoot a single garment because you missed an interior detail. Build a shot list for each garment category and follow it consistently across your entire catalog.
One more practical tip that saves hours of frustration: number your interior shots to match your exterior shots in your file naming system. When you sit down to edit 50 garments, you do not want to guess which interior collar belongs to which shirt. A simple naming convention like SKU-001_front.raw, SKU-001_back.raw, SKU-001_interior-neck.raw keeps everything organized and speeds up your compositing workflow considerably.
Speaking of compositing — capturing all these angles is only half the equation. The real craft happens when you bring those separate exposures together into a single seamless image, and that editing process has its own set of techniques that determine whether your final result looks professional or obviously manipulated.

Post-Processing Workflow From Raw Files to Final Composite
You have a folder full of raw files — front shots, back shots, interior necklines, sleeve openings. Each one is sharp, properly exposed, and consistently lit. The real transformation happens here, in post-production, where those separate exposures become a single seamless product image. Ghost mannequin editing is equal parts technical precision and artistic judgment, and the workflow you follow determines whether your final composite looks invisible or obviously stitched together.
Whether you work in Photoshop, Affinity Photo, or GIMP, the fundamental logic is the same: isolate the garment, remove the mannequin, composite the interior details, and refine until the seams disappear. Let's walk through each stage.
Layer Masking and Clipping Path Fundamentals
Before you can remove a mannequin, you need to separate it from the garment with pixel-level accuracy. Two primary methods exist for this, and understanding when to use each one will save you significant time across a catalog.
Manual clipping paths (Pen Tool): This is the gold standard for ghost mannequin photo editing. You draw a vector path along the garment's edge using anchor points and Bezier curves. The result is a mathematically smooth selection that produces clean, hard edges — perfect for structured garments with defined outlines like blazers, collared shirts, and tailored trousers. Clipping paths are resolution-independent, meaning they stay sharp regardless of how much you scale the image later.
Channel-based selections: This method uses the contrast information in your image's color channels (Red, Green, or Blue) to generate a selection. You duplicate the channel with the strongest contrast between garment and background, then adjust levels to push it toward pure black and white. The result becomes a selection mask. Channel-based methods work faster than manual paths for garments with complex edges — think lace, knit textures, or frayed denim — where drawing a smooth path around every fiber would take hours.
In practice, most professionals use a hybrid approach. They draw a clipping path along smooth, well-defined edges (collar lines, hems, button plackets) and switch to channel-based or brush-refined masks for areas with soft or irregular boundaries (fuzzy knits, sheer fabrics, loose threads).
The critical principle underlying both methods: always work non-destructively. Use layer masks rather than erasing pixels directly. A layer mask hides portions of a layer without deleting them, so you can paint areas back in if your selection was slightly off. Erasing is permanent. Masking is forgiving. When you are compositing five or six layers for a complex garment, that flexibility is not optional — it is essential.
Compositing the Interior and Exterior Shots
This is where the ghost mannequin effects come together. You are combining your exterior garment shot (mannequin removed) with your interior detail shots (collar lining, sleeve openings, waistband) to create the hollow-man illusion. Here is the complete step-by-step editing sequence in ghost mannequin Photoshop workflows:
- Import and organize your layers. Open your front exterior shot as the base layer. Place your interior neckline shot, back detail shot, and any additional interior images as separate layers in the same document. Name each layer clearly (Front, Interior-Neck, Interior-Sleeve, Back).
- Create a clipping path around the exterior garment. Using the Pen Tool on your Front layer, draw a precise path along the garment's outer edge. Convert the path to a selection (right-click the path in the Paths panel and choose "Make Selection" with a 0.5px feather). Apply this as a layer mask to isolate the garment from the background and mannequin.
- Mask out remaining mannequin areas. With a soft brush on the layer mask, paint black over any mannequin sections still visible through the neckline, sleeve openings, or hem. You will see the layers beneath start to show through these gaps.
- Position and align interior layers. Select your Interior-Neck layer and use Free Transform (Ctrl+T / Cmd+T) to scale and position it so the inner collar aligns precisely with the neckline opening in your front shot. Match the shoulder seams and collar edges. Zoom to 200% or higher to check alignment at the pixel level.
- Mask the interior layers to fit. Add a layer mask to each interior layer and paint away everything except the portion that fills the gap left by the mannequin. The interior collar should only be visible through the neckline opening — not overlapping the front garment edge.
- Color match between layers. Your exterior and interior shots may have subtle differences in brightness or color temperature, even with locked white balance. Select the interior layer and use Curves or Levels (Ctrl+L / Cmd+L) to match its exposure to the front layer. Use Hue/Saturation to correct any color drift. Compare the fabric tone where the layers meet — if the interior collar looks warmer or cooler than the front, adjust until they blend seamlessly.
- Warp interior sections for realistic depth. Interior details were photographed flat or at a different angle than the exterior. Use Edit > Transform > Warp to add subtle curvature to the inner collar or sleeve opening, mimicking how fabric would naturally curve inward on a three-dimensional body.
- Add shadows for dimension. Create a new layer set to Multiply blending mode. Using a soft, low-opacity brush (10-20%) in dark gray or black, paint subtle shadows along the interior edges where the garment would naturally cast shade — under the collar, inside sleeve openings, and along the inner waistband. This step sells the illusion of depth.
- Refine all edges. Zoom to 100% and inspect every seam where layers meet. Use a small, soft brush on each layer mask to clean up any visible halos, hard lines, or misaligned edges. Apply a 0.3-0.5px Gaussian Blur to mask edges if they appear too sharp against the background.
- Flatten, crop, and export. Once all layers composite cleanly, flatten the image. Set your canvas to the required dimensions, center the garment, and export in your target format.
A practical tip that speeds up this entire process: before you start masking, set your background layer to solid black. Dark backgrounds reveal edge imperfections — halos, leftover mannequin pixels, incomplete masks — far more clearly than white. Switch to white only at the final stage to check for dark fringing.
Editing in Affinity Photo and GIMP Alternatives
Not everyone has an Adobe subscription, and you do not need one to produce professional invisible ghost mannequin photography. Both Affinity Photo and GIMP offer the core tools required for this workflow, though the interface and terminology differ.
Affinity Photo is the closest alternative to Photoshop for this type of work. It supports non-destructive layer masks, a Pen Tool for vector paths, and a full set of transform and warp tools. The workflow maps almost one-to-one with the Photoshop steps above. Key differences to note:
- Clipping paths are created using the Pen Tool in the same way, but you apply them as vector masks rather than converting from the Paths panel.
- The Warp tool lives under Layer > Transform, and it uses a mesh grid rather than Photoshop's anchor-point system.
- Color matching uses the same Curves and Levels adjustments, accessible through the Adjustments panel.
- Affinity supports PSD file import, so you can open Photoshop templates or receive files from collaborators without conversion issues.
- One-time purchase pricing (no subscription) makes it a strong choice for studios managing costs.
GIMP is free and open-source, which makes it accessible to anyone starting out with ghost mannequin editing. The core capabilities are present, but the interface requires more manual steps:
- Use the Paths Tool (GIMP's equivalent of the Pen Tool) to draw selections around the garment. Convert paths to selections via Select > From Path.
- Layer masks work similarly — right-click a layer and choose "Add Layer Mask" to apply your selection non-destructively.
- GIMP lacks a dedicated Warp transform. Instead, use Filters > Distorts > Curve Bend or the Cage Transform tool for reshaping interior sections. Neither is as intuitive as Photoshop's Warp, but both achieve the result with practice.
- Color matching uses Colors > Curves or Colors > Levels. The logic is identical to Photoshop, just located in different menus.
- GIMP's floating window layout can feel cluttered during complex compositing. Consider switching to single-window mode (Windows > Single-Window Mode) for a more organized workspace.
Regardless of which software you use, the quality of your ghost mannequin effects depends far more on your technique — precise paths, careful alignment, subtle shadow work — than on the specific application. A skilled editor in GIMP will outperform a careless one in Photoshop every time.
That said, even experienced editors run into problems. Seams that refuse to align, color shifts that appear out of nowhere, edges that look unnaturally sharp against the background — these issues are predictable, and each one has a specific cause and fix worth understanding before they derail your next batch.
Common Mistakes and How to Troubleshoot Them
Every ghost mannequin photo that looks effortless on a product page probably went through at least one round of troubleshooting. The compositing process involves aligning multiple exposures, matching colors across layers, and blending edges so seamlessly that the viewer never questions whether the image is real. When any of those steps goes slightly wrong, the result looks off — sometimes obviously, sometimes in a subtle way that just makes the garment feel "cheap" without the viewer knowing why.
The good news? These problems are predictable. The same mistakes show up in ghost mannequin images across studios of every skill level, and each one traces back to a specific cause with a clear fix.
Fixing Misaligned Seams and Color Shifts
Misalignment is the most common issue in composite product images, and it almost always originates during the shoot rather than in editing. When the garment shifts on the mannequin between your exterior and interior shots — even by a few millimeters — the shoulder seams, collar edges, and side seams will not line up when you stack the layers.
- Misaligned seams between composite layers
Cause: The garment moved on the mannequin between shots. This happens when you remove the neck piece for the interior shot and the fabric settles differently, or when you unbutton and re-button the garment. Moving the tripod between frames also introduces perspective shifts that make alignment impossible.
Fix: Use Edit > Transform > Warp to nudge the interior layer until seams match. Zoom to 200% and toggle the layer visibility on and off to check alignment at stitch level. For prevention, pin the garment securely before removing mannequin sections, and never move your tripod or camera between shots of the same item. - Color inconsistency between interior and exterior images
Cause: White balance drift is the usual culprit. If you left your camera on auto white balance, the color temperature may shift between frames as the mannequin's exposed surface area changes. Lighting inconsistency — a strobe misfiring at lower power, or ambient light creeping in — also creates exposure differences that read as color shifts in the final mannequin photo.
Fix: Select the interior layer and use a Curves adjustment (clipped to that layer only) to match its midtone brightness and color cast to the exterior. Sample the fabric color at a point where both layers overlap and adjust until the RGB values match within 3-5 points. For prevention, always shoot with a locked manual white balance and verify strobe output with a light meter between garment changes.
A useful diagnostic trick: temporarily set your composite to grayscale (Image > Mode > Grayscale, or a Black & White adjustment layer at the top of your stack). Color differences disappear, making it much easier to spot pure luminosity mismatches between layers. Fix the brightness first, then switch back to color and address any remaining hue or saturation drift.
Eliminating Visible Edges After Compositing
You have masked out the mannequin, positioned your interior layer, and everything looks aligned — but there is a hard line where the two layers meet. The edge looks cut out rather than continuous. This is the telltale sign of a ghost mannequin composite done without enough finesse in the masking stage.
- Hard, visible edges where layers meet
Cause: Insufficient feathering on your layer mask, or a clipping path that was drawn too tightly against the garment edge (cutting into the fabric rather than following its true boundary). Anti-aliasing differences between your selection method and the image resolution can also create a visible "step" along curved edges.
Fix: Select the layer mask and apply a 0.3-1px Gaussian Blur to soften the transition. Alternatively, use the Refine Edge (or Select and Mask) dialog to add a slight feather and shift the edge outward by 1-2 pixels. For areas where the edge cuts into the garment, paint white on the mask with a small soft brush to reveal the missing fabric pixels. - White or dark halos along garment edges
Cause: When you select the garment against a white background, the selection often includes a fringe of semi-transparent pixels that blend the garment color with the background color. These show up as a white glow (on dark garments) or a dark fringe (on light garments against a dark mannequin area).
Fix: Use Layer > Matting > Defringe (1-2 pixels) in Photoshop to replace fringe pixels with the color of neighboring opaque pixels. In Affinity Photo, use the Matte section in the Refine Selection dialog. In GIMP, shrink your selection by 1 pixel before applying the mask, then manually paint back any areas where the shrink removed actual garment detail.
One habit that prevents most edge problems: always draw your clipping path slightly outside the garment edge rather than directly on it. A path that sits 1 pixel outside the fabric boundary captures the full anti-aliased edge of the garment, which blends naturally against any background. A path drawn on or inside the edge clips into the fabric and creates that artificial cut-out look.
Avoiding Unnatural Shapes and Proportion Issues
Sometimes the composite is technically clean — no visible edges, colors match, seams align — but the garment still looks wrong. The collar floats at an impossible angle. The neckline opening is too wide or too narrow. The shoulders look broader than the torso. These issues stem from over-manipulation or poor source material.
- Unnatural neck and collar shapes
Cause: The interior collar shot was taken at a different angle than the exterior, or the editor warped the interior layer too aggressively to force a fit. Collars that curve inward too sharply or sit at an angle inconsistent with the garment's front create an uncanny-valley effect.
Fix: Reduce the warp intensity. The interior collar should curve gently inward, not fold dramatically. If the angle mismatch is severe, reshoot the interior at a camera height and angle that matches your exterior shot more closely. A good rule: the interior shot camera should be no more than 5-10 degrees different from the exterior shot angle. - Proportion distortion across the garment
Cause: Using Free Transform to scale interior layers without constraining proportions, or shooting with a lens focal length that differs between exterior and interior shots. Even switching from vertical to horizontal camera orientation between shots introduces subtle perspective differences that distort proportions when composited.
Fix: Always hold Shift (or enable Constrain Proportions) when scaling layers. If the distortion is baked into the source image, use Edit > Transform > Perspective to correct converging lines before attempting alignment. For prevention, keep your camera orientation, focal length, and distance to subject identical across all shots of the same garment. - Garment appearing too flat or too inflated
Cause: Shadow work that is either missing entirely (making the garment look like a flat cutout) or overdone (creating dark pools that suggest impossible depth). The interior composite needs subtle shadow gradients to sell the illusion of a three-dimensional hollow form.
Fix: Paint shadows on a separate Multiply layer at very low opacity (5-15%). Build up gradually rather than applying heavy shadow in one stroke. Reference real photographs of garments on bodies to see where shadows naturally fall — under the collar, along the inner side seams, and at the deepest point of the neckline opening.
Across all of these issues, one principle prevents the most damage: non-destructive editing. Every adjustment should live on its own layer or adjustment layer. Every mask should hide rather than erase. Every transform should be applied to a Smart Object so it can be re-edited without quality loss. When you work non-destructively, a mistake discovered three steps later costs you thirty seconds to fix rather than forcing you to start the entire composite from scratch.
Save your working files as PSD or TIFF with layers intact. Even after you export the final flattened image, keep the layered version archived. Clients request revisions. Platforms change their image specifications. A garment gets restocked in a new color and you need to match the original composite style exactly. Your layered file is your safety net for all of these scenarios.
Troubleshooting individual images is manageable. The real challenge emerges when you are producing ghost mannequin images for an entire catalog — dozens or hundreds of SKUs that all need to look like they came from the same shoot, edited by the same hand, to the same standard.
Let AI handle the masking and compositing →
Achieving Consistency When Shooting at Scale
Editing one ghost mannequin image to perfection is a craft. Editing five hundred to the same standard without any drift in quality, color, or framing? That is an operational challenge most studios underestimate until they are deep into a product catalog and realize image number 347 looks noticeably different from image number 12.
Consistency is what separates a professional product catalog from a patchwork of individually decent photos. When a shopper scrolls through your listings, every image should feel like it belongs to the same family — same lighting tone, same garment positioning, same background, same shadow depth. Research from Statista shows that 87% of consumers consider product photos a decisive factor in their buying decisions, and visual inconsistency erodes the trust that drives those conversions.
So how do you maintain that uniformity across hundreds or thousands of SKUs without burning out your editing team? It starts on set, long before anyone opens Photoshop.
Standardizing Your Shoot for Catalog Consistency
The cheapest way to achieve consistent ghost mannequin product photography is to eliminate variables during the shoot itself. Every decision you lock down on set is one less correction you need to make in post-production — and one less opportunity for drift to creep in.
Mark your floor positions. Use gaffer tape to mark exactly where the mannequin stands, where the tripod legs sit, and where each light stand goes. Between garments, nothing moves except the clothing on the form. If you are shooting high volume over multiple days, these marks ensure that Monday's session matches Friday's session perfectly.
Use a rail system for repeatable camera positioning. A camera rail or overhead track lets you slide the camera to the same distance and height for every shot without relying on memory or measurement. Studios processing large catalogs often invest in a fixed rail with marked stops for front, back, and detail positions. The upfront cost pays for itself in eliminated alignment issues during compositing.
Create and save lighting presets. If you use studio strobes with digital controls, save your power settings as named presets. Document the exact output (in watt-seconds or fractional stops) for each light, along with modifier type and distance from the mannequin. When a bulb gets replaced or a softbox gets bumped, you can restore your exact setup from the preset rather than eyeballing it.
Build a garment styling guide. Write a simple reference document — even a single printed page taped to the wall — that specifies how each garment category should be pinned, clipped, and positioned. Include details like: buttons fastened to which point, sleeve angle, collar position, clip placement on the back. When multiple people style garments across a long shoot day, this guide prevents the subtle variations that become obvious when images sit side by side on a product page.
Establish file naming conventions from day one. A consistent naming structure like SKU_view_sequence.raw (e.g., BLZ-4421_front_01.raw, BLZ-4421_interior-neck_02.raw) keeps your files organized and makes batch processing possible. Without it, you will waste hours matching interior shots to their corresponding exteriors when you sit down to edit.
Batch Processing and Automation Strategies
Even with a perfectly standardized shoot, the editing workload scales linearly with your catalog size. If each ghost mannequin composite takes 15-25 minutes of manual editing, a 500-SKU catalog represents 125 to 200 hours of post-production labor. At that volume, manual editing becomes a bottleneck that delays product launches and inflates costs.
This is where automation earns its place in the workflow. You cannot fully automate the creative judgment involved in compositing, but you can automate the repetitive mechanical steps that consume most of the time.
Photoshop Actions for repetitive steps: Record actions for tasks you perform identically on every image — background cleanup, canvas resizing, color profile conversion, sharpening, and export. A single action can chain together ten or more steps that would otherwise require manual clicks on every file. Combine actions with File > Automate > Batch to process entire folders unattended. As CreativePro demonstrates, Photoshop's AI-powered selection tools can now be recorded into actions, allowing automated subject detection and masking that runs across batches without manual intervention.
Lightroom or Capture One presets for RAW processing: Apply identical exposure correction, white balance fine-tuning, and lens profile corrections across your entire import in one click. Sync settings from a reference image to all files shot under the same conditions. This ensures every file enters the compositing stage with matched tone and color.
Scripting for advanced automation: For studios with technical resources, Photoshop's ExtendScript or Python-based automation (via libraries like Pillow or OpenCV) can handle tasks like automatic layer alignment, background replacement, and batch export to multiple formats and sizes simultaneously.
The limitation of all these approaches? They handle the mechanical work well, but the core compositing — aligning interior layers, refining masks around complex fabric edges, painting realistic shadows — still requires human judgment for each garment. That gap between what automation handles and what still needs a skilled editor is exactly where consistency breaks down at scale.
When to Outsource Ghost Mannequin Editing
At some point, the math stops working for purely in-house production. Industry analysis from RetouchingZone puts the initial cost of setting up an in-house ghost mannequin photography studio between $5,000 and $20,000, with ongoing staffing costs on top. For brands launching hundreds of new products per season, the choice becomes: hire more editors (expensive, slow to scale) or find external solutions that maintain quality without proportionally increasing headcount.
Three broad categories of external solutions exist, each with different trade-offs:
| Approach | Speed | Consistency | Cost per Image | Best For |
|---|---|---|---|---|
| AI-assisted services (e.g., Snappyit) | Minutes to hours | High (algorithmic uniformity) | Low | High-volume catalogs needing fast turnaround |
| Batch automation (Photoshop Actions + scripts) | Hours | Moderate (requires QA passes) | Low (labor cost only) | Studios with technical staff and predictable garment types |
| Manual outsourcing (freelancers or editing studios) | 24-72 hours | Variable (depends on provider) | $3-15 per image | Brands needing custom retouching with creative direction |
AI-powered ghost mannequin photography services like Snappyit address the consistency-at-scale problem directly. Because the processing is algorithmic rather than dependent on individual editors, the output maintains uniform quality whether you submit 10 images or 10,000. For fashion brands and online sellers who need conversion-ready hollow-man images without building or managing a full post-production pipeline, this approach eliminates the variability that creeps in when multiple human editors handle different portions of a catalog.
Many brands searching for a ghost mannequin photography service or typing "ghost mannequin photography near me" into search engines are really looking for a solution to this scaling problem rather than a local photographer. The shoot itself can happen anywhere — what matters is whether the post-production output is consistent, fast, and formatted correctly for their selling platforms.
A hybrid model often works best in practice. Handle the photography in-house (where you control styling, lighting, and garment presentation), then route the raw files to an external service for compositing and finishing. This gives you creative control over the source material while offloading the repetitive, time-intensive editing work to systems built specifically for volume.
The decision framework comes down to three questions:
- How many SKUs per month? Under 50, in-house manual editing is manageable. Between 50 and 500, batch automation and actions become necessary. Above 500, external services or AI-assisted tools become the practical choice.
- How tight are your deadlines? Seasonal launches with hard ship dates cannot absorb the turnaround time of manual editing at scale. Faster processing means faster time-to-market.
- How strict is your visual standard? If every image needs bespoke creative retouching, manual work is unavoidable. If your goal is clean, uniform mannequin product photography across a large catalog, automated and AI-assisted approaches deliver that uniformity more reliably than a rotating team of freelance editors.
Whatever path you choose, consistency only matters if the final images actually meet the technical requirements of the platforms where they will live. Export specifications vary dramatically between Amazon, Shopify, and social channels — and getting them wrong means your carefully composited images get rejected, compressed beyond recognition, or cropped in ways that cut off critical garment details.
Exporting and Delivering Platform-Ready Product Images
Your composite looks flawless in Photoshop. The mannequin is gone, the interior collar blends seamlessly, and the shadows sell the illusion of depth. But none of that matters if the exported file gets rejected by Amazon for being the wrong dimensions, loads so slowly on Shopify that shoppers bounce, or appears pixelated in an Instagram carousel. The final export stage is where technical precision meets platform reality — and where many otherwise excellent ghost mannequins end up looking mediocre because someone guessed at the specs instead of checking them.
Image Specs for Major Ecommerce Platforms
Every platform has its own requirements for dimensions, file format, background color, and file size. Getting these wrong does not just degrade quality — it can prevent your listings from going live entirely. Here is what each major channel expects from your invisible mannequin photography output:
| Platform | Minimum Dimensions | Recommended Dimensions | File Formats | Background | Max File Size |
|---|---|---|---|---|---|
| Amazon | 1000 x 1000 px | 1600 x 1600 px or larger | JPEG, PNG, TIFF | Pure white (RGB 255,255,255) | 10,000 px longest side |
| Shopify | 800 x 800 px | 2048 x 2048 px | JPEG, PNG, WebP | White or consistent brand color | 20 MB (under 3 MB ideal) |
| Google Shopping | 250 x 250 px (apparel) | 800 x 800 px or larger | JPEG, PNG, non-animated GIF | White or neutral | 16 MB |
| Instagram Shopping | 500 x 500 px | 1080 x 1080 px | JPEG, PNG | Any (consistent preferred) | 30 MB |
| 600 x 900 px | 1000 x 1500 px | JPEG, PNG | Any | 20 MB |
A few details worth highlighting. Amazon requires the product to fill at least 85% of the frame and prohibits watermarks, text overlays, or colored backgrounds on the main listing image. Squareshot's platform image guide confirms that Google Shopping penalizes blurry or low-resolution images, which can reduce your product's visibility in search feeds. For ghost clothing photography specifically, the 1600 x 1600 px minimum on Amazon ensures that zoom functionality works properly — shoppers can inspect fabric texture, stitching, and construction details up close.
The practical takeaway: always export your master file at the highest recommended resolution for your primary platform, then create downsized versions for secondary channels. Working from a single high-resolution master prevents quality loss from repeated resizing.
Compression and Format Best Practices
Choosing the right file format is not just a technical checkbox. It directly affects how fast your product pages load, how sharp your images appear on mobile screens, and how much storage your catalog consumes. Here is how the three main formats compare for ghost product photography output:
JPEG remains the default for most ecommerce platforms. It handles photographic content well, supports universal browser compatibility, and produces small file sizes at quality settings between 80-92%. For ghost mannequin composites on white backgrounds, JPEG at quality 85-90% delivers an excellent balance of detail and file size. Aim to keep product images under 300 KB for fast page loads without visible compression artifacts.
WebP is the performance-focused choice. According to Google's research, WebP files are 25% to 34% smaller than comparable JPEGs at equivalent visual quality. Shopify automatically serves WebP images to supported browsers, and all major modern browsers now handle the format natively. If your platform supports it, WebP is the strongest option for balancing image quality with page speed — particularly for mobile shoppers who account for the majority of ecommerce traffic.
PNG is best reserved for situations requiring transparency or when you need lossless quality for further editing downstream. PNG files are significantly larger than JPEG or WebP, so they are not ideal for production product pages. Use PNG for master archive files or when a platform specifically requires transparency support.
A practical compression workflow for catalog-scale output:
- Export your master composite as a full-resolution TIFF or PSD (lossless, for archiving)
- Create your primary product image as JPEG at 85-90% quality, sized to platform specs
- Generate a WebP version at equivalent quality for platforms that support it
- Produce thumbnail versions at 300 x 300 px or 500 x 500 px, compressed more aggressively (JPEG 75-80%)
- Batch process all exports using Photoshop Actions or a tool like ImageOptim to strip unnecessary metadata and shave additional bytes
One detail that catches people off guard: re-saving a JPEG introduces additional compression artifacts each time. Always export from your layered master file rather than opening an existing JPEG and re-exporting it. This preserves maximum quality across every version you create.
Building a Complete Product Photography Workflow
File naming might seem like a minor detail, but at catalog scale it becomes the backbone of your entire operation. A consistent naming convention supports SEO (search engines read filenames), simplifies catalog management, and makes batch processing possible.
Use descriptive, keyword-rich filenames that follow a predictable structure:
- brand-navy-wool-blazer-front-2048x2048.jpg (for the product page)
- brand-navy-wool-blazer-front-300x300.jpg (for the category thumbnail)
- brand-navy-wool-blazer-front-1080x1080.jpg (for Instagram Shopping)
This approach gives search engines context about the image content while keeping your file system navigable. Pair each image with descriptive alt text that naturally describes the garment — not stuffed with keywords, but genuinely useful for accessibility and image search visibility.
For brands producing content across multiple channels, the most efficient approach is creating all crops and aspect ratios from a single master file. Shoot and composite at the highest resolution your workflow supports (2048 x 2048 px minimum), then derive every platform-specific version from that master. Square crops for product grids. Vertical 2:3 crops for Pinterest. Landscape 16:9 crops for banner placements. Each version maintains consistent framing because it originates from the same source.
Looking at the broader picture, invisible mannequin photography is not a standalone task — it is one component of a complete product content strategy that includes lifestyle imagery, detail shots, size guides, and video. The brands that convert best treat their ghost mannequin composites as the foundational product view, then layer additional content types around it. The hollow-man image answers "what does this garment look like?" while on-model shots answer "how does it look worn?" and detail close-ups answer "what is the quality like?" Together, they build the complete visual story that replaces the in-store experience.
For brands that want conversion-ready images delivered in platform-specific formats without managing the full post-production pipeline, services like Snappyit handle the compositing and export in one step — outputting files sized and formatted for your specific selling channels. Whether you handle everything in-house or route your raw files to an external service, the principle stays the same: shoot once at maximum quality, composite with precision, and export strategically for every platform where your products live. That workflow turns ghost mannequin photography from a per-image task into a scalable system that grows with your catalog.
Ghost Mannequin Photography FAQs
What camera settings are best for ghost mannequin photography?
For sharp, composite-ready ghost mannequin images, shoot at f/8 to f/11 aperture for edge-to-edge sharpness, ISO 100-200 to minimize noise that interferes with masking, and set white balance manually using a gray card matched to your studio lights (typically 5000-5500K). Use an 85-105mm focal length to avoid barrel distortion, and always shoot in RAW format to preserve full color data for exposure matching between composite layers.
How many photos do you need for a ghost mannequin composite?
The number of shots depends on garment complexity. A basic t-shirt requires 3-4 images (front, back, and interior neckline), while a blazer or jacket may need 6-7 separate exposures covering the front exterior, back exterior, interior collar, lining, lapel roll, sleeve lining, and hem. Every area where the mannequin shows through the garment needs its own interior photograph taken from a matching angle under identical lighting conditions.
What is the difference between ghost mannequin and neck joint editing?
These terms are often used interchangeably but refer to different scopes of work. Neck joint editing is one specific step within the broader ghost mannequin workflow, focused on compositing the interior collar area into the gap left after removing the mannequin's neck. The full ghost mannequin effect covers the entire garment, including sleeves, hems, waistbands, and all visible interior areas, requiring multiple composite layers rather than just the neckline.
Can you do ghost mannequin editing without Photoshop?
Yes. Affinity Photo offers nearly identical functionality to Photoshop with non-destructive layer masks, a Pen Tool for vector paths, and warp tools, all for a one-time purchase price. GIMP is a free open-source option that handles clipping paths, layer masks, and compositing, though its interface requires more manual steps. Both alternatives produce professional results when paired with proper technique, precise selections, and careful shadow work.
How much does ghost mannequin photography cost per image?
Ghost mannequin images typically cost between $15 and $50 per image when factoring in shooting and editing time. This sits between flat lay photography ($5-15 per image) and on-model shoots ($50-200+ per image). At high volume, AI-assisted services like Snappyit can reduce per-image costs significantly while maintaining uniform quality across large catalogs, making the technique financially viable even for brands processing hundreds of SKUs per season.
Generate your first ghost mannequin in 90 seconds
You can absolutely build out the studio, dial in the camera settings above, and master the Photoshop compositing workflow — that path produces beautiful results, and many brands rely on it. But if you need conversion-ready hollow-man images today, without buying a faceless mannequin, two softboxes, or an Adobe subscription, Snappyit's AI ghost mannequin tool turns a flat-lay phone photo into a clean 3D composite in about 90 seconds. Same hollow-man look. No clipping paths, no warp tool, no reshoots. Free to try, no credit card.
Try the AI ghost mannequin generator →