Why Brands Are Replacing Photoshoots With AI Fashion Models
Imagine uploading a flat-lay photo of a new dress and, minutes later, downloading a polished on-model image ready for your Shopify listing. No studio booking, no model casting, no two-week wait for retouched files. That scenario is already the daily reality for thousands of ecommerce brands, and it explains why learning how to create AI fashion models has become one of the most practical skills in online retail.
The core problem is straightforward: traditional on-model photography is expensive, slow, and brutal to scale. A single fashion shoot day can run $2,750 or more once you factor in the photographer, a clothes model, hair and makeup, studio rental, and post-production. That quoted per-image rate of $40 quietly balloons to around $84 when you add retouching, shipping, and coordination time. For a mid-size brand managing 500 SKUs, annual photography costs can land between $125,000 and $250,000. DTC startups, Shopify sellers, and mid-market apparel companies feel this squeeze hardest because their catalogs grow faster than their budgets.
Speed compounds the cost issue. A typical product shoot cycle, from shipping samples to receiving final edits, stretches across 10 to 21 days. In fast-moving categories where being first to market matters, that timeline is a competitive liability. AI-powered workflows compress the same process to under an hour, and early adopters report up to an 85% reduction in production costs alongside a 4.2x faster time-to-market.
This guide gives you a complete, tool-agnostic process for going from a garment photo to a publish-ready on-model image. You will learn how the underlying technology works, how to prepare your product shots for the best results, how to choose between SaaS platforms and open-source pipelines, and how to quality-check every output before it hits your store.
What AI Fashion Models Actually Are
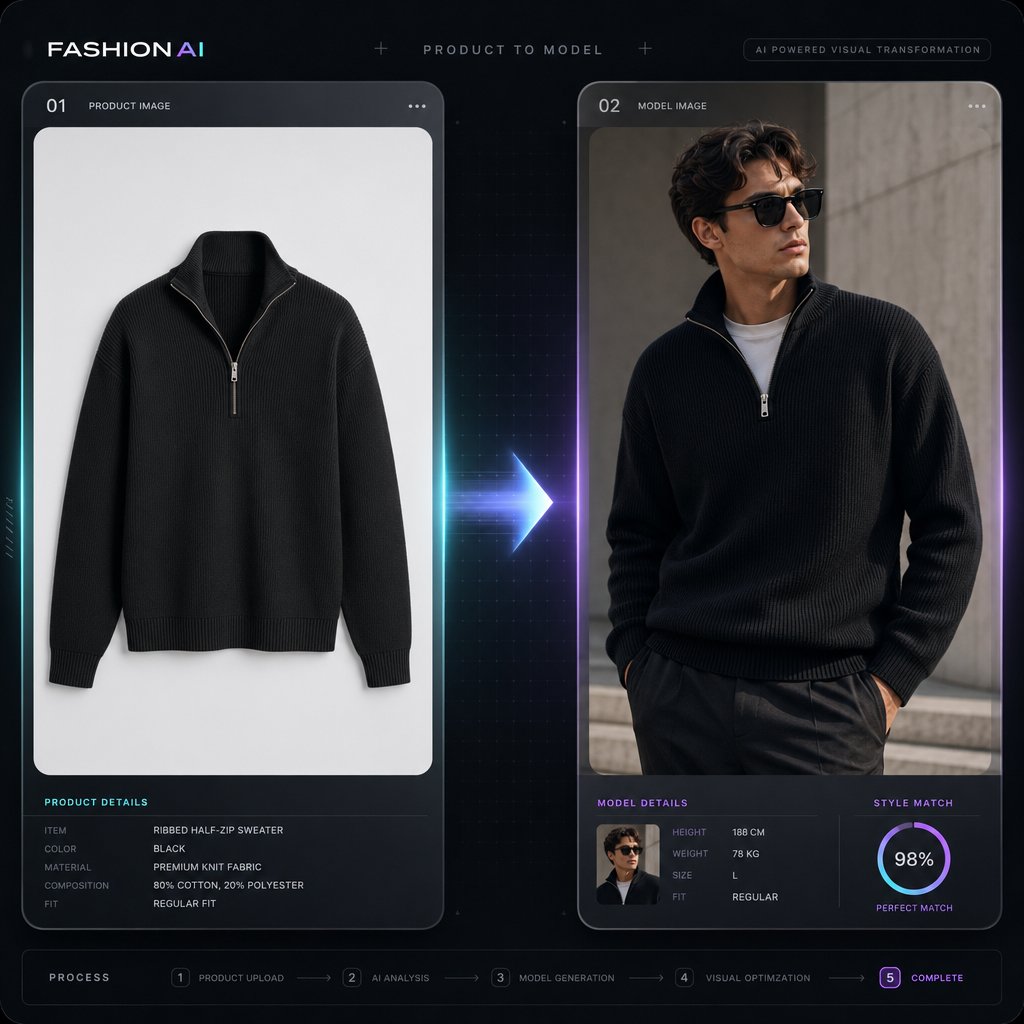
The term gets tangled up with related concepts, so a clear definition helps. An AI fashion model is a photorealistic, digitally generated human figure wearing a real garment, produced through generative AI rather than a physical photoshoot. You supply the clothing image; the AI generates the person, the pose, the lighting, and the scene around it. The garment stays real. The model is synthetic.
This is different from AI-designed clothing, where algorithms generate new garment concepts or textile patterns. It is also different from AI styling tools that recommend outfits or mix-and-match pieces from existing catalogs. When you search for ways to create AI fashion models, you are looking for the specific workflow that puts your actual product on a virtual human body and produces an image realistic enough to sell from. That is exactly what this guide covers.
Who This Guide Is For
The process looks different depending on your resources and goals. This guide is built for three distinct groups:
- Solo ecommerce sellers who need speed — you are listing products on Shopify, Etsy, or Amazon and need on-model shots without hiring a photographer for every drop.
- Brand teams who need visual consistency at scale — you manage hundreds or thousands of SKUs and need every product page to look like it came from the same shoot, across seasons and collections.
- Technical users who want control over the pipeline — you are comfortable with Python environments and GPU hardware and want to run open-source models for maximum flexibility and zero per-image cost.
Whether you prefer a drag-and-drop SaaS platform, a self-hosted diffusion pipeline, or a hybrid workflow that blends AI generation with manual retouching, every path is covered in the steps ahead. The first thing worth understanding is what actually happens under the hood when any of these tools turns your garment photo into a finished on-model image.
Step 1 – Understand How AI Fashion Model Generation Works
Every tool that places clothes on models uses one of two core methods, or a combination of both. You do not need a machine-learning degree to grasp them, but a working understanding helps you pick the right tool, feed it the right inputs, and troubleshoot when something looks off.
Diffusion Models and Virtual Try-On Pipelines
The first approach is diffusion-based image generation. Think of it this way: the AI starts with pure visual noise, like static on an old television screen. Over dozens of iterative steps, it removes that noise while being guided by your inputs, whether that is a text prompt, a garment photo, or both. Each step brings the image closer to a realistic result. The model has learned what clothing models look like from training on millions of fashion images, so it knows how fabric sits on shoulders, how denim creases at the knee, and how light wraps around a cotton sleeve. As Jay Alammar's visual walkthrough of Stable Diffusion explains, the process works in a compressed latent space rather than directly on pixels, which is what makes it fast enough for commercial use.
The second approach is a virtual try-on pipeline. Instead of generating an entirely new image from noise, this method takes two separate photos, one of a person and one of a garment, and composites them together. The system detects the person's body pose using skeleton mapping and segmentation, then warps the garment image so it conforms to that pose. The result is a photo where the original clothing item appears naturally draped on the reference body. Research into garment-specific dense pose mapping has made this warping step far more robust, even for difficult poses like crossed or raised arms.
Many commercial tools blend both methods. They might use a try-on warp to get the garment placement right, then run a diffusion pass to clean up seams, generate realistic skin, and unify the lighting across the final image.
Why the Technology Matters for Your Results
This is not just background theory. The method a tool uses directly shapes the kind of input it needs and the quality you can expect. A pure diffusion generator creates models in clothes from scratch, so it needs a clean garment image but is flexible about pose and scene. A warp-based try-on pipeline needs both a garment photo and a reference body, and its output quality depends heavily on how well the warping step handles your specific clothing model shape.
That distinction also helps you diagnose problems. Awkward fabric draping, where a sleeve bends unnaturally or a hemline floats away from the body, usually means the warping step struggled with the garment's geometry. Unrealistic skin texture or plastic-looking hands point to the diffusion model's training data or resolution limits. Mismatched lighting between the garment and the generated body means the two visual sources were not harmonized properly.
Knowing whether your tool uses try-on warping, full diffusion generation, or a hybrid of both tells you exactly what kind of input images it needs and what quality ceiling to expect from the output.
With that foundation in place, the single biggest factor separating good results from bad ones is not the AI itself. It is the garment image you feed into it.
Step 2 – Prepare Your Garment Images for AI Processing
Here is the uncomfortable truth about every AI clothing generator on the market: none of them can fix a bad input photo. You can use the most advanced diffusion model available, dial in the perfect pose, and select an ideal body type, but if your garment image is dark, wrinkled, or poorly cropped, the output will carry those flaws forward. Output quality is capped by input quality, full stop.
This step is the one most guides skip entirely, yet it is the single highest-leverage thing you can do to improve your results. A few minutes of preparation per garment image will save you hours of regeneration attempts and post-processing fixes down the line.
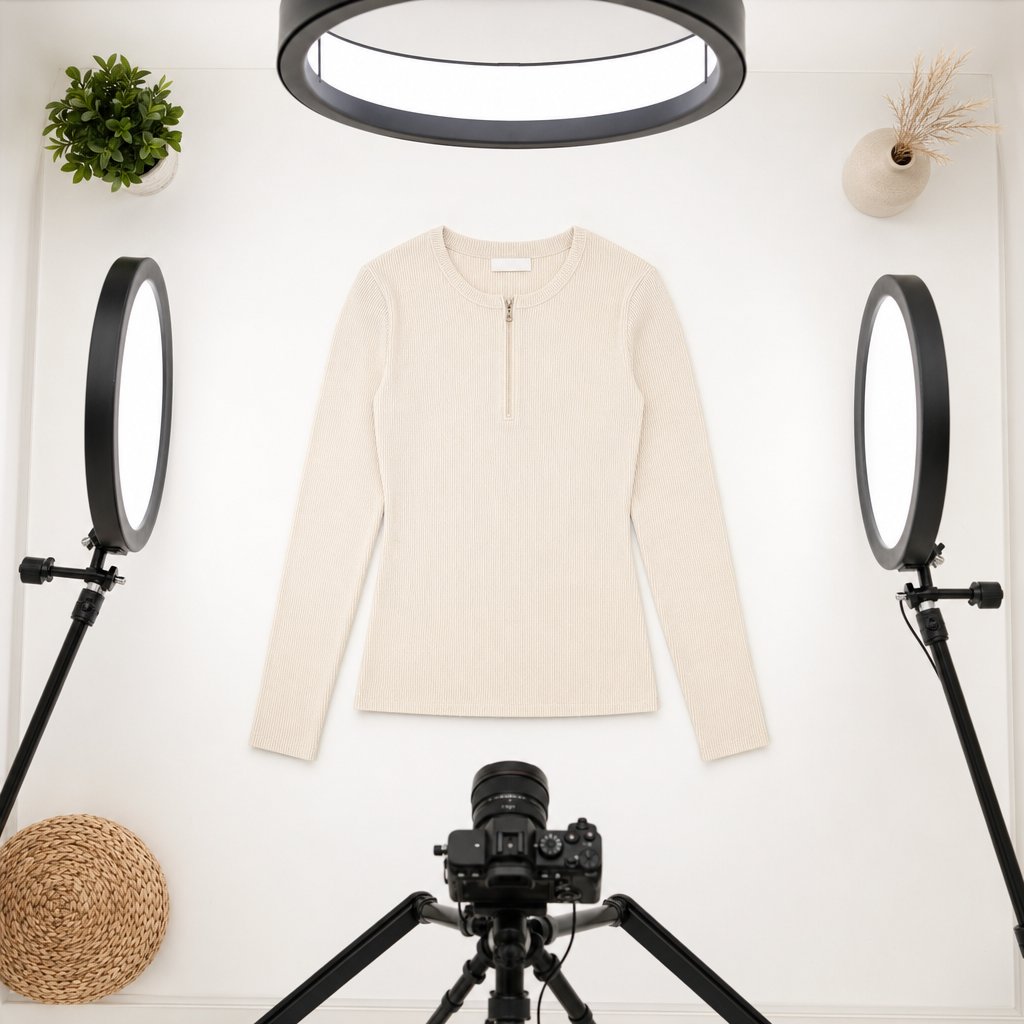
Garment Photography Requirements
When you define clothe imagery for AI processing, you are really defining the raw material the model has to work with. The AI needs to clearly see the garment's shape, texture, color, and construction details. Anything that obscures those elements, whether it is a shadow, a wrinkle, or a low-resolution file, becomes a source of artifacts in the final image.
Use the following specifications as your baseline. These apply regardless of whether you are feeding images into a SaaS platform, an open-source pipeline, or a hybrid workflow.
| Requirement | Recommended Spec | Why It Matters |
|---|---|---|
| Minimum Resolution | 1024 x 1024 px or higher | AI models downsample internally, so starting below this threshold produces soft, blurry fabric textures in the output. Higher resolution gives the generator more detail to preserve stitching, prints, and weave patterns. |
| Lighting | Even, diffused light with no harsh shadows | Strong directional shadows confuse the AI's understanding of garment shape. The generator may interpret a shadow as a design element or a fold, leading to unnatural draping on the final model. |
| Background | Solid white or transparent PNG | A clean background lets the AI isolate the garment instantly. Busy or colored backgrounds force extra segmentation work, which increases the chance of edge artifacts around collars, hems, and straps. |
| File Format | PNG preferred over JPEG | PNG is lossless, meaning it preserves every pixel of detail. JPEG compression introduces subtle blocky artifacts, especially in areas with fine texture or gradual color transitions, and those artifacts get amplified during generation. |
| Garment Positioning | Flat-lay, centered, with no folds obscuring design details | The AI needs to see the full silhouette and surface of the garment. Folded sleeves, bunched fabric, or off-center placement means the model has to guess what is hidden, and those guesses rarely look right. |
If you are shooting garments specifically for AI processing, a simple lightbox or a flat surface near a window with a white foam board for fill light is enough. You do not need a professional studio. You need consistency: same lighting angle, same background, same distance from the camera for every SKU.
Background Removal and Image Cleanup
Most AI generators expect an isolated garment sitting on a transparent or solid white background. If your product photos were shot on a colored backdrop, a mannequin, or a hanger against a wall, you will need to strip that background before uploading.
For a handful of images, free browser-based tools handle this well. Services like Remove.bg and similar AI-powered removers can process a single photo in seconds with surprisingly clean results for straightforward garment shapes. You upload the image, the tool identifies the subject, and you download a transparent PNG.
The math changes once your catalog grows. If you are processing more than a few dozen SKUs, doing this one image at a time becomes a bottleneck. Batch processing tools, whether free options or mid-tier paid services, let you upload entire folders and receive cleaned files back in minutes rather than hours. One ecommerce seller reported going from 40 manually edited images per day to 500 after switching to batch AI removal, cutting monthly editing costs from over $800 to nearly zero.
Regardless of which tool you use, the critical final step is inspecting the edges. Zoom in to 100% and check every cutout before it enters your AI fashion model pipeline. The areas that trip up background removal tools most often are:
- Collars and necklines — especially scooped or V-neck shapes where the background shows through curves
- Thin straps and spaghetti straps — the AI may clip these or leave halos of the original background color
- Sheer and semi-transparent fabrics — mesh panels, chiffon overlays, and lace sections often lose their translucency during removal, turning opaque or developing hard edges
- Fringes, tassels, and feathered hems — fine details at garment edges are the hardest for any removal algorithm to handle cleanly
Jagged cutouts in any of these areas become the most common source of visible artifacts in the final AI-generated image. A collar with a rough edge will produce a neckline that looks digitally pasted rather than naturally worn. A strap that was partially erased will vanish or distort on the generated model's shoulder.
Spending an extra 30 seconds per image on edge cleanup pays for itself many times over. If you spot consistent problems across a batch, the fix is almost always upstream: adjust your lighting to create more contrast between the garment edge and the background, or switch to a true white seamless backdrop so the removal tool has an easier job.
With clean, high-resolution, properly isolated garment images in hand, the next decision is which generation method fits your budget, technical comfort, and scale requirements.
Step 3 – Choose Between SaaS, Open-Source, and Hybrid Workflows
Budget, technical skill, and catalog size all point you toward a different path. There is no single best way to generate models with clothes from a flat-lay photo. There are three distinct approaches, each with real tradeoffs, and the right one depends entirely on your situation.
SaaS Platform Tools
This is the fastest route from garment image to finished on-model shot. You upload your prepared product photo, pick a model pose and body type, choose a background style, and the platform delivers a ready-to-use image. The entire process takes minutes, and you never touch a line of code or configure a GPU.
Commercial AI fashion model generator platforms typically charge on a per-image or monthly subscription basis, with effective costs ranging from roughly $0.10 to over $1.00 per image depending on the tool and plan tier. That per-image cost adds up across a large catalog, but for sellers listing a few dozen products or teams that need quick turnaround without technical overhead, the convenience often justifies the spend.
The tradeoff is control. Most SaaS tools give you a curated set of model options, poses, and backgrounds. You are working within the platform's boundaries. If you need a very specific lighting setup, an unusual pose, or a model appearance that is not in the library, you may hit a wall.
Open-Source and Self-Hosted Pipelines
Want full control over every parameter? The open-source route puts the entire generation pipeline on your own hardware. Research models like CatVTON, IDM-VTON, and OOTDiffusion are freely available on GitHub and Hugging Face, each taking a different architectural approach to virtual try-on. CatVTON, for example, uses a single compact network that can run on consumer GPUs with less than 8 GB of VRAM, while IDM-VTON leverages a dual-UNet architecture built on Stable Diffusion XL for richer fabric texture detail.
The barrier to entry is technical. You will need a dedicated GPU (NVIDIA cards with at least 8 GB VRAM are the practical minimum), a working Python environment, and enough comfort with command-line tools to install dependencies, manage model weights, and troubleshoot CUDA errors. Once that infrastructure is in place, though, every image you generate costs nothing beyond electricity. For a brand producing thousands of SKUs per season, that zero marginal cost is significant.
Keep in mind that many leading open-source try-on models, including CatVTON and IDM-VTON, are released under CC BY-NC-SA 4.0 licenses, which prohibit commercial use without a separate license. Verify the licensing terms before building a production workflow around any open-source model.
Hybrid Workflows Combining AI and Manual Editing
Most production teams end up here, whether they planned to or not. The hybrid approach uses an AI tool, SaaS or self-hosted, to generate the base ai clothing model image, then brings it into Photoshop or a similar editor for brand-specific refinements.
This middle path makes sense when your brand has strict visual standards that no generator nails in a single pass. You might use AI to place the garment on a model and set the overall composition, then manually adjust color grading to match your brand palette, clean up minor skin or shadow artifacts, swap in a lifestyle background, or crop to platform-specific dimensions. A hybrid workflow also lets you preserve the original product pixels while using generative AI only for the surrounding environment, an approach that keeps marketplace compliance algorithms happy.
The cost sits between the other two methods: you pay for the AI generation (or invest the setup time for open-source), then add a few minutes of manual editing per image. For teams that already have Photoshop in their pipeline, the incremental effort is small.
Which Path Fits Your Workflow?
Rather than guessing, use this comparison to match your constraints to the right method:
| Factor | SaaS Platforms | Open-Source / Self-Hosted | Hybrid (AI + Manual Editing) |
|---|---|---|---|
| Setup Time | Minutes (sign up and upload) | Hours to days (hardware, environment, model weights) | Varies (AI tool setup + editor configuration) |
| Cost Per Image | $0.10 – $1.10+ depending on platform | Near zero after initial hardware investment | AI generation cost + 5–15 min of editing labor |
| Technical Skill Required | None — browser-based interfaces | High — Python, GPU drivers, model configuration | Moderate — basic AI tool use + Photoshop proficiency |
| Customization Level | Limited to platform's model library and settings | Full — adjust any parameter, swap architectures, fine-tune | High — AI handles the base, manual editing handles the rest |
| Best For | Solo sellers, small teams, fast catalog launches | Technical teams, high-volume brands, R&D experimentation | Brand teams with strict visual standards, marketplace sellers needing compliance |
There is no wrong answer here. A solo Etsy seller listing 20 new products a month and a technical team managing 5,000 SKUs across multiple regions are solving fundamentally different problems. The table above helps you pick a starting point, but plenty of brands evolve from one method to another as their catalog and team grow.
Whichever path you choose, the next step is the same: evaluating specific tools within that category and setting up the one that fits your product type, output needs, and budget.
Step 4 – Select and Set Up Your AI Fashion Model Generator
Picking a method category narrows the field, but it does not pick your tool. A SaaS platform built for ai mannequin generator workflows handles very differently from one designed around lifestyle campaign imagery. The same goes for open-source checkpoints: a virtual try-on model optimized for tops will struggle with full-length dresses. Before you commit time or budget, run every candidate through a consistent evaluation framework.
Key Features to Evaluate in Any AI Fashion Model Tool
Not every generator serves every product type or business model. A marketplace listing thumbnail has different resolution demands than a homepage hero banner, and a 50-SKU boutique has different automation needs than a 5,000-SKU wholesaler. When you compare options, score each tool against these criteria:
- Supported garment types — Does it handle tops, bottoms, dresses, outerwear, and full outfits? Some tools excel at simple silhouettes but break down on layered or structured pieces like blazers and pleated skirts.
- Model diversity options — Look for a range of body types, ethnicities, ages, and poses. Your product images should reflect your actual customer base, and 75% of online shoppers rely on product photos when making purchase decisions, so representation matters commercially as well as ethically.
- Output resolution — Anything below 1024 x 1024 px will look soft on modern product pages. Tools offering 2K or 4K output give you room to crop, zoom, and repurpose across channels without quality loss.
- Batch processing capability — If your catalog exceeds a few dozen SKUs, generating images one at a time is not viable. Prioritize tools that support bulk uploads, CSV-driven workflows, or queue-based generation.
- API availability — Teams integrating AI generation into existing product listing pipelines need programmatic access. An API turns a manual upload-and-download loop into an automated step inside your CMS or PIM workflow.
- Pricing model — Per-image credits, monthly subscriptions, and free tiers each suit different scales. Watch for hidden costs: some platforms charge differently for higher resolutions or video output, and credit-based systems can be difficult to predict month to month.
If you are exploring ai models for clothing free, most commercial platforms offer limited trial credits or watermarked outputs so you can test quality before spending. Use those trials on your most challenging garment, not your easiest one. A tool that handles a plain white t-shirt well may fall apart on a patterned wrap dress, and you want to know that before committing.
Getting Started With a Platform Built for Fashion Imagery
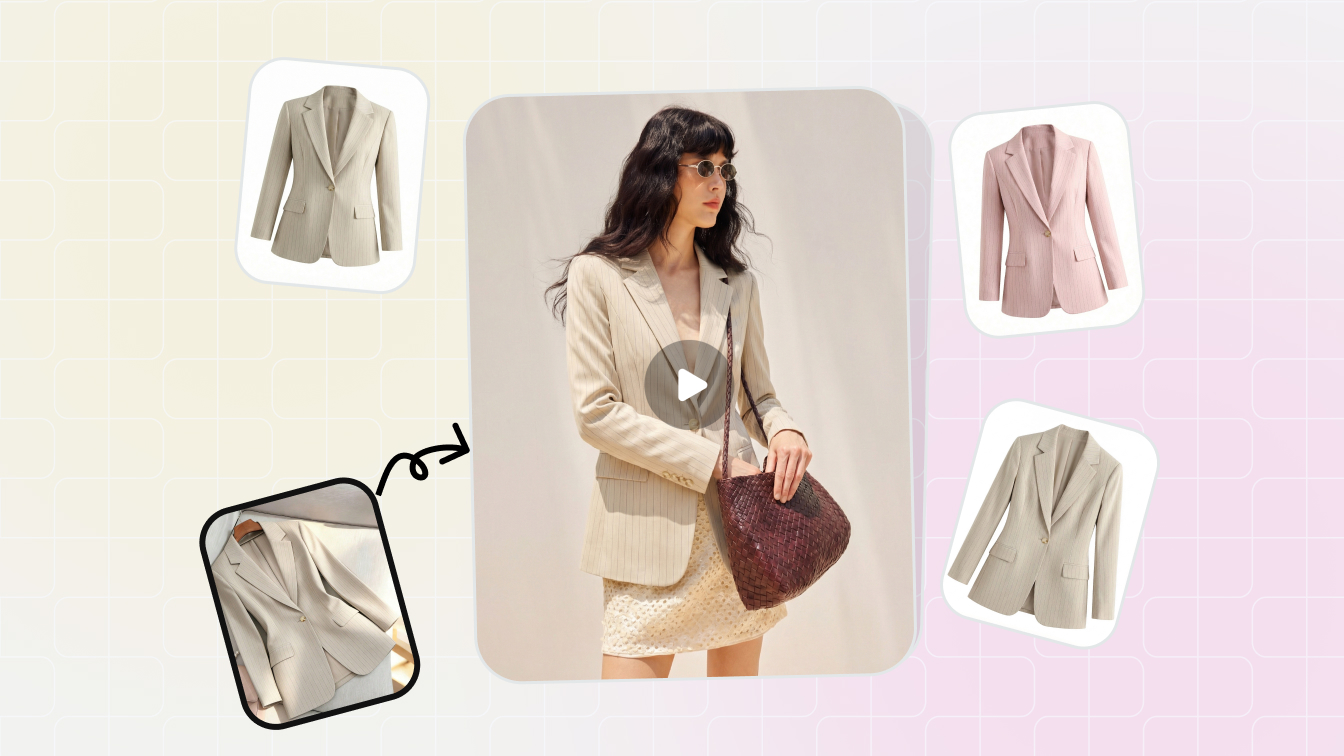
For readers who want the fastest path from a flat-lay photo to a polished on-model image, dedicated fashion AI platforms remove the guesswork. General-purpose image generators can produce impressive single outputs, but the intersection of ai and fashion demands garment-specific accuracy: correct fabric drape, preserved prints, and natural body-to-clothing interaction.
Snappyit's Fashion Model tool is built specifically for this use case. It targets apparel brands and online stores that need to turn flat garment photos into realistic model shots at scale, reduce production costs, and maintain visual consistency across product catalogs. For ecommerce teams that want results without configuring a Python environment or managing GPU infrastructure, it directly addresses the workflow this guide covers: upload a prepared garment image, select model attributes, and receive a publish-ready on-model photo.
That said, the right tool category depends on what you are optimizing for. Use the comparison below to match your priority to the strongest option:
| Tool Type | Best For | Key Strength |
|---|---|---|
| Dedicated Fashion AI Platform (e.g., Snappyit) | Ecommerce brands needing fast, consistent on-model imagery without technical setup | Purpose-built for garment-to-model conversion with catalog-scale consistency |
| General SaaS Photo Platforms | Teams that need fashion model generation alongside broader photo editing tools | Wider feature set covering background removal, enhancement, and lifestyle scenes |
| Open-Source Pipelines | Technical teams with GPU hardware who want full control and zero per-image cost | Complete customization of every generation parameter and model architecture |
| Hybrid Workflows | Brand teams with strict visual standards requiring manual post-production refinement | Combines AI speed with human-level creative control for brand-specific polish |
A practical approach is to shortlist one tool from your preferred category, run five to ten test generations using your most complex garments, and evaluate the output against the criteria list above. Pay close attention to how the tool handles fabric texture, print accuracy, and edge transitions between the garment and the generated model's skin. Those three areas reveal more about real-world performance than any feature page or demo video.
With a tool selected and your first test images looking solid, the real workflow begins: generating your first batch of on-model photos and learning how to troubleshoot the issues that inevitably surface in early runs.
Step 5 – Generate Your First AI Fashion Model Image
You have clean garment photos, a tool selected, and a general sense of how the technology works. This is where the process gets tangible. The actual generation workflow is surprisingly consistent across platforms, whether you are using a free ai fashion model generator, a paid SaaS tool, or a self-hosted pipeline. The buttons and menus differ, but the underlying sequence stays the same.
The Generation Workflow From Upload to Output
Think of this as a five-stage loop rather than a straight line. You will almost always circle back to refine something before landing on a final image, and that is completely normal. Here is the standard process that applies to virtually every tool on the market:
- Upload the prepared garment image. This is the flat-lay or ghost mannequin photo you cleaned up in Step 2. Make sure it is the background-removed PNG version, not the raw camera file. Most tools accept drag-and-drop uploads, and some support bulk uploads if you are processing an entire collection at once.
- Select or upload a model reference. Choose the pose, body type, ethnicity, and approximate age range for your generated model. SaaS platforms typically offer a curated library of model presets. Open-source pipelines let you supply your own reference image of a person in the exact pose you want. If you are selling globally, this is where you generate variations for different target markets — a practice that cross-border sellers use to match local aesthetic preferences without booking multiple models.
- Adjust generation settings. Set the output resolution (match it to your platform requirements — more on that in Step 7), choose a background style (studio white, lifestyle scene, or transparent), and specify how many variations you want per garment. Generating three to five variations per image is a good starting point. Some tools also let you write a text prompt to guide the output, such as specifying "outdoor urban setting" or "walking pose with natural arm swing." Clear, specific prompts consistently produce better results than vague ones — describing the garment accurately in your prompt (for example, "v-neck sleeveless dress" rather than just "dress") helps prevent the AI from adding unwanted collars, sleeves, or fabric details.
- Run the generation. Hit generate and wait. SaaS platforms typically return results in 10 to 60 seconds per image. Self-hosted pipelines vary depending on your GPU — a mid-range NVIDIA card might take 30 seconds to two minutes per variation. Batch runs queue up and process sequentially or in parallel depending on the tool.
- Review and select the best output from variations. This is the step most beginners underestimate. Do not expect the first result to be perfect. Experienced operators treat generation like a selection process: produce several options, pick the strongest one, and move on. A practiced workflow can push throughput to 80–120 SKUs per day including flat-lay photography, generation, and quality checks.
First-attempt perfection is rare, and chasing it wastes time. The faster approach is to generate multiple variations, select the best candidate, and handle minor imperfections in post-processing (covered in Step 6). Sellers who adopt this mindset consistently report faster turnaround and better final quality than those who try to get a single generation exactly right.
One question that comes up often from newcomers: do models get to keep the clothes in traditional shoots? Sometimes, depending on the contract. With AI-generated imagery, the question disappears entirely — there is no physical model, no wardrobe logistics, and no sample shipping. The garment stays in your warehouse while the AI handles the visual. It is one of those small operational details that adds up to significant savings when you are managing hundreds of SKUs per season.
Troubleshooting Common Generation Failures
Even with well-prepared inputs, you will hit issues in your first few batches. The good news is that most problems trace back to a small set of predictable causes, and the fixes are straightforward once you know where to look. Here are the failures you are most likely to encounter:
| Problem | Likely Cause | Fix |
|---|---|---|
| Unnatural fabric draping — sleeves bend oddly, hemlines float, or fabric appears stiff | The original garment image had visible folds, wrinkles, or bunched fabric that confused the warping algorithm | Re-photograph the garment fully smoothed out on a flat surface. Iron or steam out wrinkles before shooting. The AI interprets every crease as intentional geometry. |
| Misaligned garment placement — the neckline sits too high, a sleeve is shifted, or the garment appears off-center on the model's body | Poor segmentation caused by a busy or non-white background in the source image, or the garment was not centered in the frame | Re-run background removal and verify the garment is cleanly isolated with no residual background pixels. Re-center the garment in the image with equal padding on all sides. |
| Skin texture artifacts — plastic-looking skin, blurry hands, or distorted fingers on the generated model | Low-resolution input image forced the AI to upscale aggressively, or the tool's base model has known weaknesses with extremities | Ensure your input is at least 1024 x 1024 px. If hands still look wrong, choose a pose where hands are less prominent (at sides or behind the body). Some tools offer dedicated hand-fixing features. |
| Inconsistent lighting — the garment looks like it was shot under different light than the model's body and face | The original garment photo had mixed lighting (warm overhead plus cool side light) or strong directional shadows that clash with the AI's default studio lighting | Re-shoot the garment under even, diffused lighting with no color cast. If re-shooting is not possible, adjust the white balance and exposure of the garment image in a photo editor before uploading. |
| Extra clothing details — the AI adds collars, sleeves, or fabric that do not exist on the real garment | The text prompt or garment description was too vague, so the AI filled in details based on its training data | Use specific descriptive prompts that name the exact garment style: "sleeveless v-neck midi dress" rather than just "dress." Add unwanted elements to the negative prompt if the tool supports one. |
| Color shift — the garment color in the output does not match the original product photo | JPEG compression in the source image, or the generation model's color space handling altered hues during processing | Upload a PNG version of the garment image. If the shift persists, note the specific color difference and correct it in post-processing using a side-by-side comparison with the original photo. |
Notice a pattern in that table? Four of the six fixes point back to the input image, not the tool's settings. This is the single most important principle to internalize as you build your workflow:
If the output looks wrong, fix the input image first before adjusting tool settings. The garment photo is the foundation of every generation, and no amount of prompt engineering or parameter tuning compensates for a flawed source image.
A cross-border seller processing 200 new SKUs monthly shared their iteration approach: if the first generation looks off, they re-photograph the garment with the problem area more clearly visible, check the source photo's white balance, and regenerate. Two iterations typically produce a usable result. That feedback loop — generate, diagnose, fix the input, regenerate — is what separates teams that scale successfully from those who give up after a few disappointing outputs.
For anyone exploring an ai clothing brand generator for the first time, expect your first batch to require more iteration than your tenth. The learning curve is not about mastering complex software. It is about training your eye to spot which input problems cause which output failures, so you can fix issues upstream before they ever reach the generator.
A solid generated image is not the finish line, though. Raw AI output almost always benefits from a quality check and light post-processing before it is ready for your product page — and that refinement step is where good images become brand-ready ones.
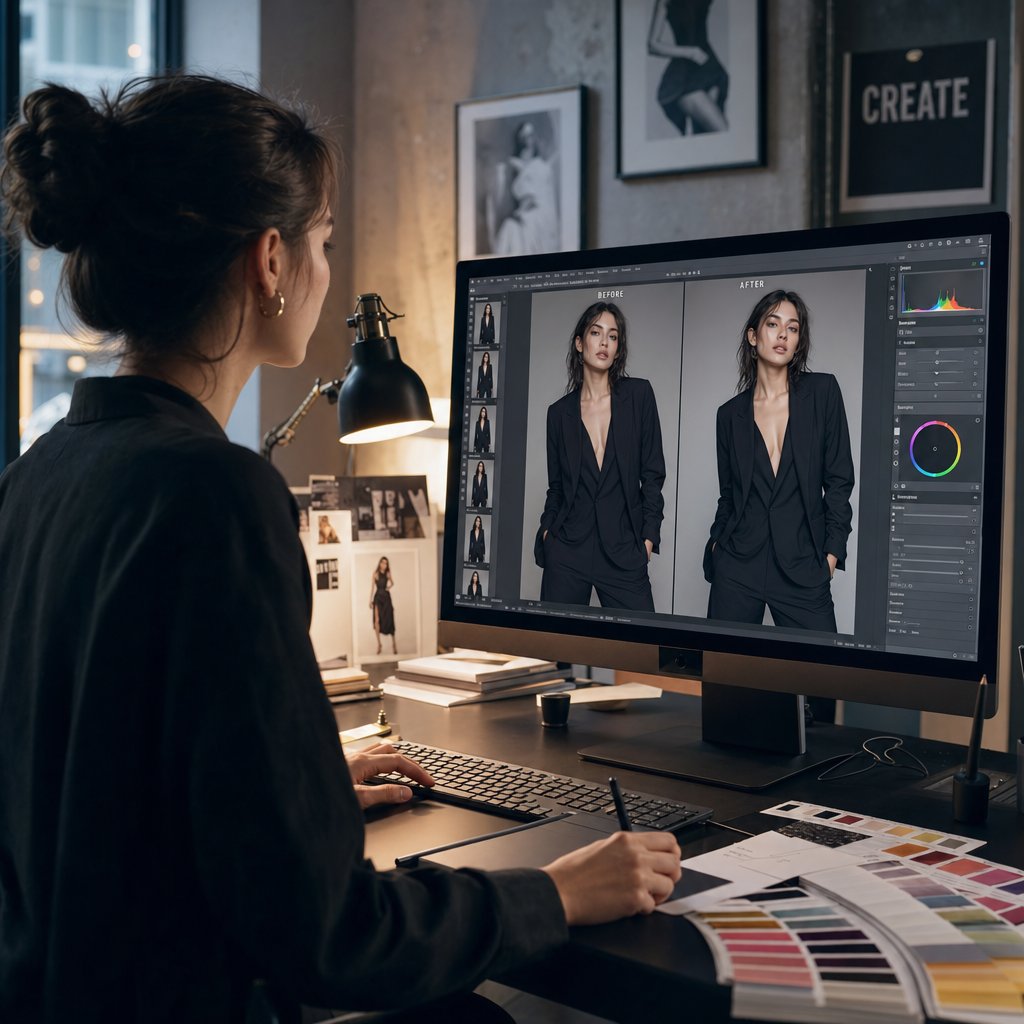
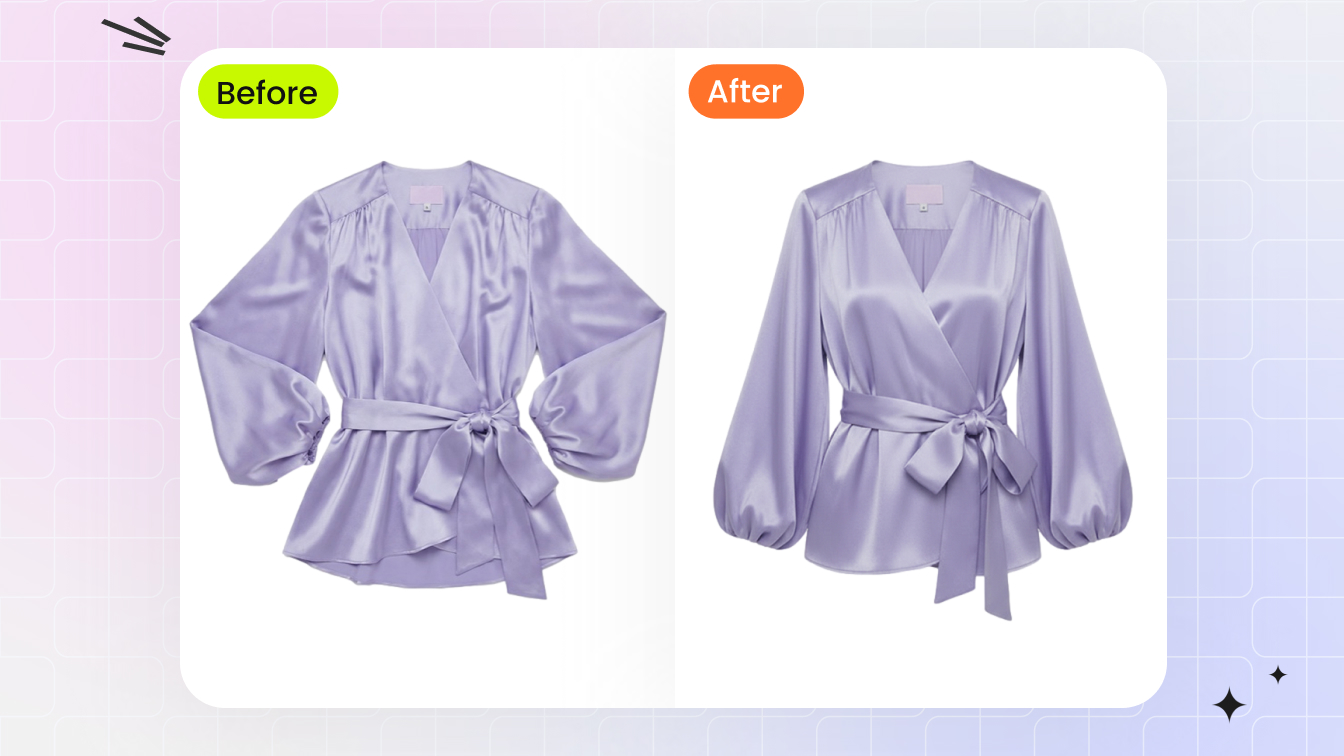
Step 6 – Post-Process and Quality-Check Every AI Clothes Model Image
A generated image that looks good at first glance can still fail on a product page. Subtle issues — a slightly off skin tone at the neckline, a color shift in the garment's fabric, an extra finger tucked behind a hip — are easy to miss in a thumbnail but obvious to a shopper zooming in before clicking "Add to Cart." Research on AI output validation shows that human detection accuracy for AI-generated image errors has dropped to just 29% with advanced models, meaning hyper-realistic surface quality routinely masks structural problems underneath. That is exactly why a deliberate quality check matters more than the generation step itself.
Quality Evaluation Checklist
Before any ai clothes model image leaves your editing queue, run it through this checklist. It applies regardless of which tool or method you used to generate it:
- Anatomical correctness — Check hands, fingers, neck, and shoulders first. These are the areas where generative AI fails most visibly. Count the fingers. Look for joints bending in impossible directions. Verify that the neck-to-shoulder line looks natural and that no limbs merge into the garment or disappear behind it.
- Fabric texture fidelity — Does the material in the generated image actually look like your real garment? A cotton tee should not have a satin sheen. A knit sweater should show visible stitch texture, not a smooth plastic surface. Open the original product photo side by side and compare weave, drape weight, and surface detail.
- Color accuracy — Place the AI output next to the original garment photo on the same screen. Even minor hue shifts matter: a "dusty rose" that renders as "salmon" will drive returns. Baymard Institute research found that 23% of shoppers abandon checkout when the product they receive looks different from the website photos, and color mismatch is one of the top triggers.
- Lighting consistency — The light falling on the model's skin should match the light on the garment. Watch for shadows that point in different directions, or a garment that appears flatly lit while the model's face has dramatic side lighting. Mismatched lighting is one of the fastest tells that an image is composited rather than photographed.
- Background cleanliness — Look for stray artifacts, halo edges around the model's silhouette, and any bleed-through from the generation process. Zoom to 100% on the edges where skin meets background and where garment meets skin.
- Overall realism at intended display size — View the image at the exact dimensions it will appear on your product page. An issue visible at full resolution may be invisible at 800 x 800 px, and vice versa. Judge the image at the size your customer will actually see it.
This is not a perfection test. It is a pass/fail gate. If the image clears every item on the list at its intended display size, it is ready for post-processing. If it fails on anatomical correctness or color accuracy, regenerate rather than trying to fix those issues manually — the time cost of hand-painting fingers or correcting a full-garment color shift almost always exceeds the cost of a fresh generation with a better input.
Retouching and Brand Alignment
Most AI outputs benefit from light post-processing, even the ones that pass the checklist cleanly. The goal is not pixel-level perfection from a single generation. It is a strong base image that needs minutes of finishing rather than the hours a traditional reshoot and retouching cycle would demand.
Common adjustments that bring a generated image from "good" to "brand-ready" include:
- Color correction to match your brand palette — Adjust white balance and saturation so the garment color aligns precisely with your original product photo. AI-powered color matching tools can automate this by using one image as a reference to recolor another, handling highlights, shadows, and even neon tones without the oversaturation artifacts that manual curves adjustments sometimes introduce.
- Minor skin smoothing or shadow cleanup — Light retouching around the neckline, arms, or any area where the AI composited skin against fabric. Keep it subtle. Shoppers respond better to natural-looking models for clothes than to heavily airbrushed ones.
- Cropping and resizing for platform-specific dimensions — Your Shopify listing, Amazon main image, and Instagram ad each need different aspect ratios and resolutions. Crop from the high-resolution output rather than upscaling a small file.
- Adding brand-consistent backgrounds or lifestyle settings — Swap a plain white background for a branded studio tone or a contextual lifestyle scene that matches your other product imagery. Consistency across your catalog matters more than any single image looking impressive on its own.
That last point deserves emphasis. Teams producing at scale — anyone managing more than a few dozen SKUs — should build a simple style guide for their AI-generated images. Document your background standard (exact hex codes or RGB values), your preferred model pose family, your color temperature target, and your retouching limits. Brands that enforce photography consistency see 3.4x higher checkout conversion rates than those with scattered visual standards, and that applies equally whether the images came from a studio or from a free ai model for clothing brand workflows. A one-page style guide keeps every image, whether generated today or six months from now, looking like it belongs to the same brand.
With quality-checked, retouched images in hand, the remaining challenge is getting them onto your actual product pages in a way that meets each platform's technical requirements and scales across your full catalog.
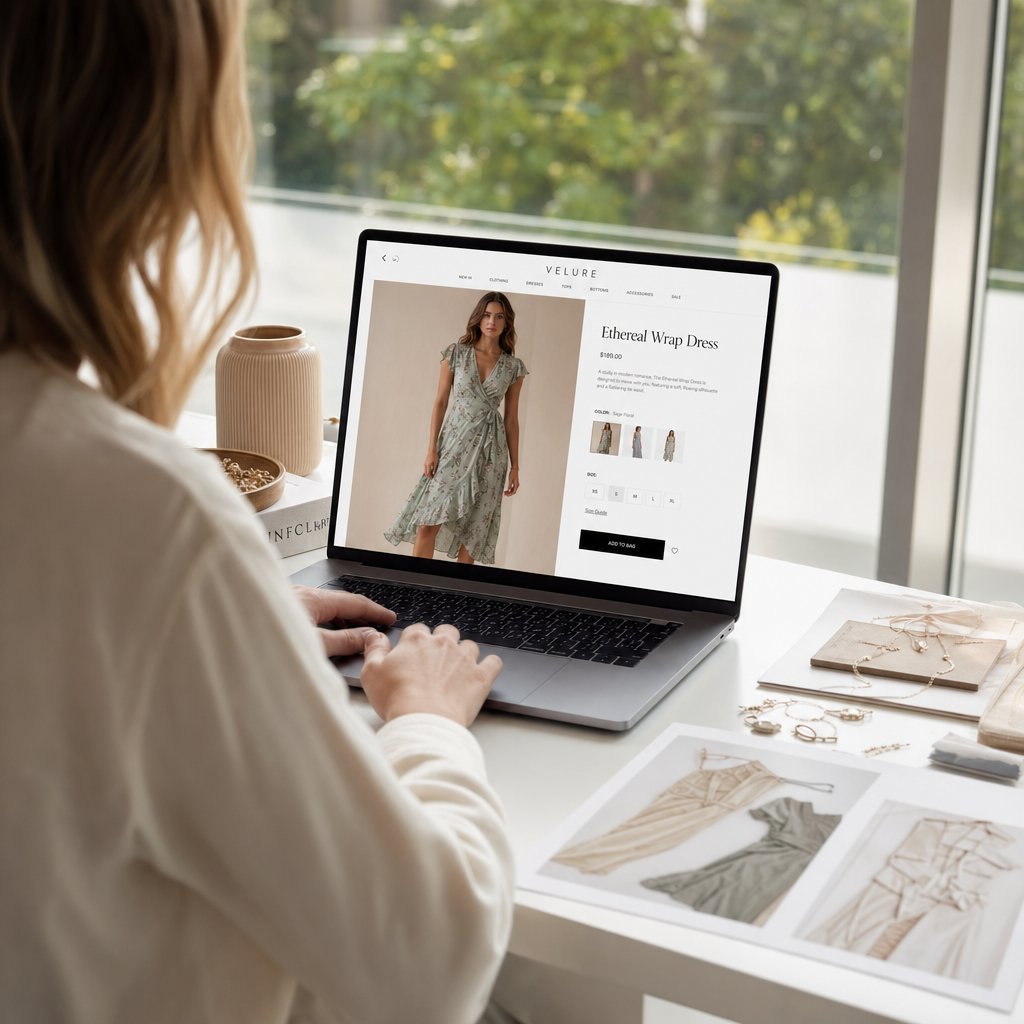
Step 7 – Publish AI Model Fashion Images to Your Ecommerce Store
A polished, quality-checked image sitting in a folder on your desktop is not selling anything. The gap between "finished AI output" and "live on a product page" is where many teams stall, especially when each ecommerce platform enforces its own image specifications. Your AI-generated clothing modeling photos need to meet the exact same technical standards as traditional photography — marketplaces do not grade on a curve just because the image came from a generative pipeline.
Platform-Specific Image Requirements
Every major marketplace and storefront has its own rules around image dimensions, file size, background color, and format. Upload an image that falls outside these specs and you risk rejected listings, suppressed search visibility, or product pages that simply look worse than your competitors'. Before publishing a single AI model fashion image, match your exports to the platform you are targeting.
| Platform | Recommended Image Size | Max File Size | Background Requirements | AI-Generated Image Disclosure |
|---|---|---|---|---|
| Amazon | 2000 x 2000 px (minimum 1000 px on longest side for zoom) | 10 MB | Pure white (RGB 255, 255, 255) for main image; lifestyle backgrounds allowed on secondary images | No explicit disclosure rule currently, but Seller Central image guidelines require images to accurately represent the product |
| Shopify | 2048 x 2048 px recommended; consistent aspect ratio across all product images | 20 MB | No strict background color rule; clean backgrounds and lifestyle images both accepted | No platform-level disclosure requirement; check local jurisdiction regulations |
| WooCommerce | 800 x 800 px minimum; 1200 x 1200 px or higher recommended for retina displays | Determined by hosting provider (typically 2–10 MB) | No enforced background standard; consistency across your catalog is the priority | No built-in disclosure mechanism; follows your store's own policies |
| Etsy | 2000 px on the shortest side; 4:3 or square aspect ratio preferred | 1 MB | No white background mandate; natural lighting and real-life settings encouraged | No formal AI disclosure policy currently, though Etsy's terms require honest representation of products |
A few things to notice in that table. Amazon's main image white background rule is non-negotiable — your AI-generated on-model shot needs to sit on pure RGB 255, 255, 255 or the listing risks suppression. Etsy's 1 MB file size cap is surprisingly tight, so you will need to compress your exports carefully without destroying fabric texture detail. Shopify gives you the most creative freedom, but that freedom means you are responsible for maintaining visual consistency yourself.
On the disclosure front, the landscape is evolving. No major marketplace currently mandates a label stating "this image was AI-generated," but several jurisdictions are moving toward transparency requirements for synthetic media. The safest approach is to ensure every image accurately represents the actual product a customer will receive — correct color, correct fit proportions, correct fabric appearance. An AI-generated image that misleads a buyer about the product itself creates the same return and trust problems regardless of whether disclosure is required.
Scaling AI Model Imagery Across Your Catalog
Publishing one or two AI-generated images is straightforward. Publishing 500 across an entire seasonal collection is a workflow problem. Brands with large catalogs need a repeatable system, not a one-off process, and three strategies make the difference between a smooth rollout and a chaotic one.
Batch processing by product category. Group your garments into logical batches — tops, bottoms, dresses, outerwear — and process each category as a unit. This lets you apply consistent generation settings (same pose family, same lighting style, same background) across every item in a group. Top-performing ecommerce brands process batches of 50 to 100 images at a time, which is large enough to be efficient but small enough to catch quality drift before it spreads across your entire catalog. If a batch produces consistently soft fabric textures or off-color outputs, you can recalibrate your settings before processing the next group rather than discovering the problem after 400 images are already exported.
Maintaining model consistency across product lines. Imagine a shopper browsing your store and seeing a different model body type, skin tone, and pose on every single product page. It feels disjointed, like flipping through catalogs from five different brands. The fix is simple: pick one or two AI model references and use them across your entire collection, or at minimum across each product category. This creates the visual cohesion of a single photoshoot day without ever booking a studio. For teams using Snappyit's Fashion Model tool, this kind of catalog-wide consistency is built into the workflow — the platform supports batch uploads and lets you lock in a specific model selection across hundreds of SKUs, directly reducing the per-item time investment and eliminating the visual fragmentation that hurts brand perception.
Integrating generation into your existing product listing workflow. The most efficient teams do not treat AI image generation as a separate project. They embed it into their standard listing pipeline: product data entry, garment photography, AI generation, quality check, upload. If your product information management (PIM) system or CMS supports API integrations, connecting your AI generation tool directly into that pipeline means new SKUs can flow from photography to published listing with minimal manual handoff. Fashion modeling apps and platforms with API access make this integration possible, turning what used to be a multi-day bottleneck into an automated step.
A mid-size Shopify apparel brand with 340 SKUs cut annual image production costs by 92% after implementing a batch processing workflow — dropping from roughly $18,000 per year to under $2,400 while improving consistency scores from 67% to 96%. Those numbers reflect the full image pipeline, not just AI model generation, but they illustrate what happens when batch processing, consistent settings, and automation replace manual one-at-a-time editing.
A/B test before you commit to a full catalog switch. This is the step that separates data-driven teams from those operating on gut instinct. Before replacing every product photo in your store with AI-generated model imagery, run a controlled test. Pick 10 to 20 of your highest-traffic products, swap in the AI-generated images on half of them, and measure the impact on click-through rate, add-to-cart rate, and conversion over at least two full weeks.
The data supports this approach. Baymard Institute research shows that 56% of shoppers' first action on a product page is exploring the images, and background and context changes alone can lift conversion rates by 10 to 30%. Label Emmaus, a French marketplace, saw a 56% conversion improvement for fashion products after switching to AI-optimized imagery. But results vary by category, price point, and audience. A lifestyle AI model image might outperform a flat-lay for casual wear but underperform for technical outerwear where detail shots matter more.
On Amazon, Manage Your Experiments lets Brand Registry sellers A/B test secondary images and A+ Content for free. On Shopify, tools like Shoplift or Intelligems offer full product page split testing starting around $74 per month. Even a simple before-and-after comparison using your store's built-in analytics can reveal whether AI-generated model images move the needle for your specific products.
The goal is not to prove that AI imagery works in general — the case studies already show that. The goal is to confirm it works for your catalog, your customers, and your price point before rolling it across every SKU. A two-week test on your top sellers gives you that confidence with minimal risk.
Publishing and scaling are operational challenges with clear solutions. The harder questions — the ones that carry real business risk if you get them wrong — involve the legal, ethical, and strategic decisions that sit underneath every AI-generated image on your store.
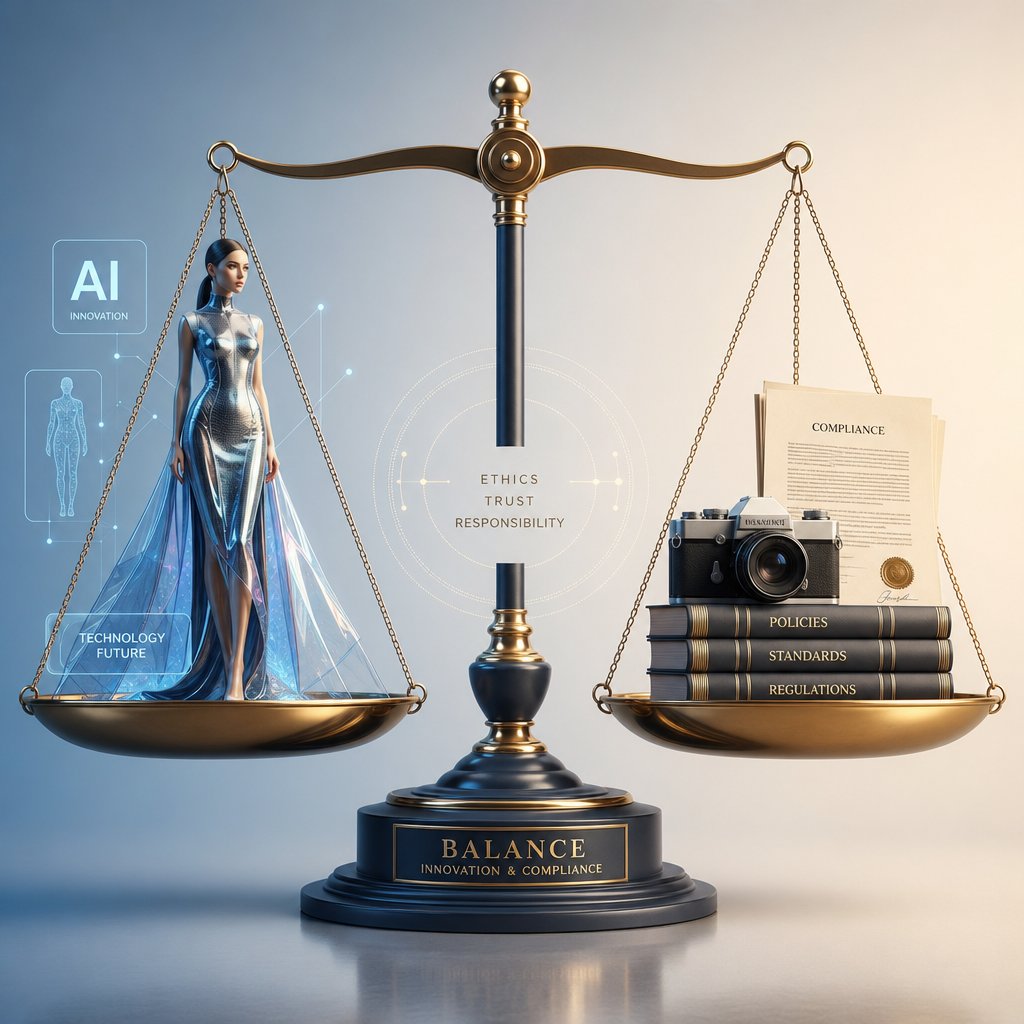
Step 8 – Navigate Legal, Ethical, and Decision-Making Considerations
Every step so far has focused on making AI-generated fashion imagery look right. This step is about making sure it is right — legally, ethically, and strategically. The regulatory landscape around synthetic media is shifting fast, and a brand that ignores these dimensions is not just cutting corners. It is accepting risk that could result in fines, pulled listings, or a consumer trust problem that no amount of retouching can fix.
Disclosure Requirements and Platform Policies
Should you tell your customers that the model in your product photo is AI-generated? The honest answer: it depends on where you sell and where your customers live, but the direction of travel is unmistakably toward mandatory transparency.
In the EU, Article 50 of the EU AI Act requires that deployers of AI systems — which includes brands publishing AI-generated content — disclose synthetic media to end users. Full transparency obligations take effect on August 2, 2026, and the European Commission's draft Code of Practice on AI-generated content points toward prominent, user-facing labels rather than metadata buried in file headers. Penalties for non-compliance reach up to 15 million euros or 3% of global annual turnover, whichever is higher. If you sell into the EU from anywhere in the world, these rules apply to you.
In the United States, there is no single federal AI disclosure law yet, but existing frameworks already create exposure. The FTC's Endorsement Guides and Section 5 of the FTC Act prohibit deceptive practices, and an AI-generated model image that misleads consumers about a product experience falls squarely within that scope. New York has gone further: Governor Hochul signed A8887-B into law, requiring conspicuous disclosure whenever an advertisement features a synthetic performer — a digitally created figure intended to appear human. That law will take effect on June 9, 2026, with civil penalties of $1,000 for a first violation and $5,000 for each subsequent one.
California adds another layer. AB 1836 expanded protections against unauthorized AI replicas of deceased individuals, while AB 2602 restricts contract provisions that allow digital replicas of living performers without specific safeguards. These are not consumer disclosure statutes, but they directly affect any workflow that involves real people's likenesses.
Consumer sentiment is moving even faster than the law. Gartner data shows that 68% of consumers frequently wonder whether the content they see is real, and 50% would prefer to buy from brands that avoid generative AI in consumer-facing content. Separately, Cint found that 63% of U.S. consumers believe brands have a duty to disclose AI use in advertising. Brands like Aerie and Le Creuset are already running "no AI" pledges as affirmative marketing positions, treating transparency as a competitive differentiator rather than a compliance burden.
The practical takeaway: check the current terms of service for every platform where you list products, review the disclosure laws in every jurisdiction where you advertise, and default to transparency when in doubt. Embedding C2PA provenance metadata in your AI-generated assets is a forward-looking step — major platforms including Google, Meta, and TikTok have already integrated Content Credentials functionality, and provenance signals are increasingly surfaced to users.
Intellectual Property and Model Rights
Who owns the image your AI tool just generated? The short answer is usually "you do" — most commercial platforms assign output rights to the user. The longer answer involves caveats that matter.
Under current U.S. copyright law, the Copyright Office has consistently denied registration to works that lack human creative input, including images generated entirely by AI from a user prompt. That means a purely AI-generated on-model photo may not be copyrightable, leaving you without the legal protection you would have with a traditional photograph. The more human creative involvement you add — composing the shot, retouching, combining AI output with original photography — the stronger your potential copyright claim becomes. This is one more reason the hybrid workflow covered in Step 3 has practical legal advantages beyond just visual quality.
On the input side, AI image generators trained on massive datasets of scraped images carry their own risk. If an AI-generated image reproduces substantial elements of a copyrighted work from its training data, it may be deemed infringing. The fair use defense exists but remains unsettled — the U.S. Copyright Office's own report concluded that some uses of copyrighted works for AI training will qualify as fair use and some will not. Courts are still working through this, and the outcome is far from certain.
Then there is the likeness question. AI-generated faces are synthetic, but they are not always unique. If a generated face closely resembles a real person — especially a recognizable public figure or even a black supermodels female icon with distinctive features — you could face right of publicity claims. The safest mitigation is to use tools that generate fully synthetic faces from learned distributions rather than blending or morphing from identifiable real photo datasets. Ask your tool provider how their model generates faces, and review their terms of service for any indemnification language around output-related IP claims. Most providers, including OpenAI, explicitly disclaim warranties of non-infringement for generated output, which means the liability sits with you.
For high-stakes commercial projects — hero campaigns, paid advertising, or images that will be widely distributed — consider these risk-reduction steps: choose platforms trained on licensed or public domain content, avoid prompts that reference specific real people or distinctive styles, add substantial human modifications to strengthen your copyright position, and maintain documentation of your prompts, inputs, and edits in case questions arise later.
When to Use Traditional Photography Instead
AI-generated fashion imagery is powerful, but it is not the right tool for every situation. Knowing when to reach for a camera instead of a generator is just as important as knowing how to create ai fashion models effectively. AI is not replacing photographers — it is replacing slow, expensive workflows that do not scale. The distinction matters, and these scenarios call for traditional photography or a hybrid approach:
- Luxury brands where tactile fabric detail is a key selling point — Cashmere, raw silk, hand-stitched leather, and other premium materials communicate value through texture. A hyper realistic mannequin or AI model can approximate the drape, but the micro-level surface detail that justifies a $400 price tag still photographs better than it generates. Luxury shoppers scrutinize fabric quality in images more closely than any other segment.
- Campaigns requiring specific celebrity or influencer association — If your marketing strategy depends on a recognizable face, a real person needs to be in the shot. AI cannot legally replicate a living influencer's likeness without navigating complex consent and contract requirements, and the authenticity of a real partnership carries brand equity that a synthetic face cannot.
- Products where fit accuracy is legally sensitive — Medical garments, compression wear, adaptive clothing, and any product where incorrect fit representation could cause harm or trigger regulatory scrutiny should be photographed on real bodies. The margin for error is too narrow and the consequences too serious to rely on AI's approximation of how fabric interacts with specific body geometries.
- Editorial content where creative direction demands a human photographer's eye — Mood, emotion, and storytelling are areas where traditional photography still outperforms AI. A homepage hero image meant to communicate brand identity, an outdoor lifestyle shoot with real environmental interaction, or a campaign built around movement and spontaneity benefits from a photographer's creative instincts and a real model's expressiveness.
- Initial brand launches where visual identity is still being established — If you have not yet defined your brand's visual language, starting with AI-generated imagery can lock you into a generic aesthetic. A foundational photoshoot establishes the look, lighting, and feel that your AI-generated catalog images can then match going forward.
The best ai image generator for clothing brand workflows handles the volume problem — hundreds of SKUs that need consistent, clean, on-model product shots at a fraction of traditional cost. Traditional photography handles the storytelling problem — the handful of images per season that need to make someone feel something. Most successful brands use both, allocating each to the job it does best.
That balanced approach — AI for scale, photography for story — is not a compromise. It is the workflow that gives you speed where speed matters and craft where craft matters. The brands getting this right are not choosing one over the other. They are choosing each for the right moment.
Frequently Asked Questions About Creating AI Fashion Models
1. How much does it cost to create AI fashion model images compared to traditional photography?
Traditional on-model photography runs approximately $2,750 or more per shoot day, with per-image costs reaching around $84 when you include retouching and coordination. AI fashion model generation through SaaS platforms typically costs between $0.10 and $1.10 per image, while self-hosted open-source pipelines have near-zero marginal cost after the initial GPU hardware investment. Early adopters report up to 85% reduction in production costs. Platforms like Snappyit's Fashion Model tool (https://snappyit.ai/fashion-model) are built specifically for apparel brands that want to scale on-model imagery without the overhead of traditional shoots.
2. What image quality do I need for AI fashion model generators to produce good results?
Your garment photos should be at least 1024 x 1024 pixels, shot under even diffused lighting with no harsh shadows, and saved as PNG files for lossless detail. The garment should be flat-laid and centered on a solid white or transparent background with no folds obscuring design details. Background removal is essential before uploading to most generators, and you should inspect edges carefully around collars, thin straps, and sheer fabrics since jagged cutouts become visible artifacts in the final output. Output quality is always capped by input quality regardless of which tool you use.
3. Are AI-generated fashion model images legal to use on ecommerce platforms?
Currently, no major marketplace explicitly bans AI-generated product imagery, but the legal landscape is evolving rapidly. The EU AI Act requires disclosure of synthetic media by August 2026, and New York's A8887-B law mandates conspicuous disclosure when ads feature synthetic performers. Amazon, Shopify, and Etsy all require images to accurately represent the product. The safest approach is to ensure color accuracy, correct fit proportions, and fabric fidelity in every AI-generated image, while monitoring platform terms of service and local disclosure regulations in your selling jurisdictions.
4. What is the difference between AI virtual try-on and AI fashion model generation?
AI virtual try-on pipelines take two existing images, a person photo and a garment photo, then warp and composite the clothing onto the reference body using pose estimation and segmentation. Full AI fashion model generation uses diffusion models to create an entirely new photorealistic human figure wearing your garment, starting from noise and iteratively refining the image. Many commercial tools combine both methods: using warping for accurate garment placement, then running a diffusion pass to unify lighting and generate realistic skin. Understanding which method your tool uses helps you diagnose output problems and choose the right input format.
5. Can I use AI fashion model generators for free?
Yes, there are free options across both SaaS and open-source paths. Most commercial platforms offer limited free trial credits or watermarked outputs so you can test quality before committing. Open-source models like CatVTON and IDM-VTON are freely available on GitHub and Hugging Face, though they require GPU hardware and Python proficiency to run. Note that many open-source try-on models use CC BY-NC-SA 4.0 licenses that prohibit commercial use without a separate agreement. For production ecommerce use at scale, dedicated platforms like Snappyit (https://snappyit.ai/fashion-model) offer purpose-built workflows that balance cost efficiency with commercial-ready output quality.