At a glance
Jewelry retouching services explained: metals, gemstones, marketplace specs, pricing, and how to pick the right partner.
| Need | What to do |
|---|---|
| Get oriented | Read the short summary, then use the checklist below. |
| Create a test image | Try Jewelry Retouch Free |
What Jewelry Retouching Services Are and Why They Matter
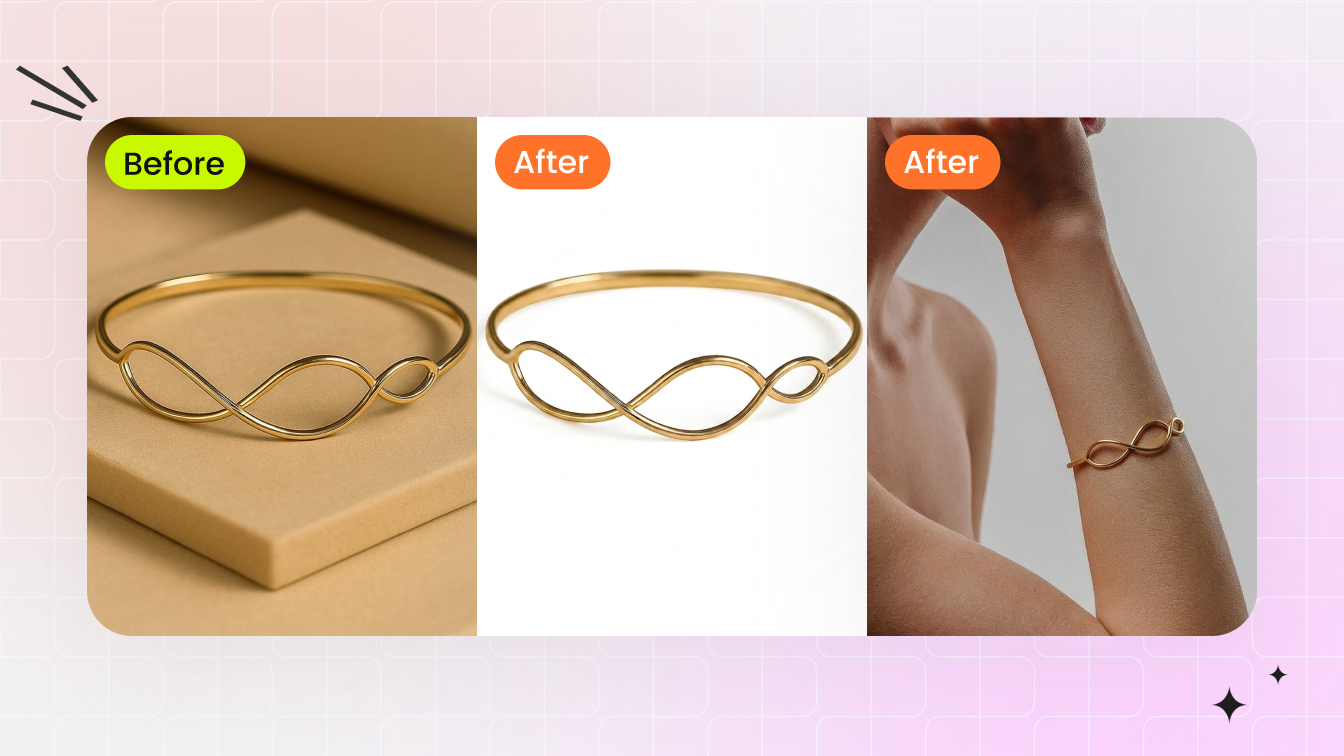
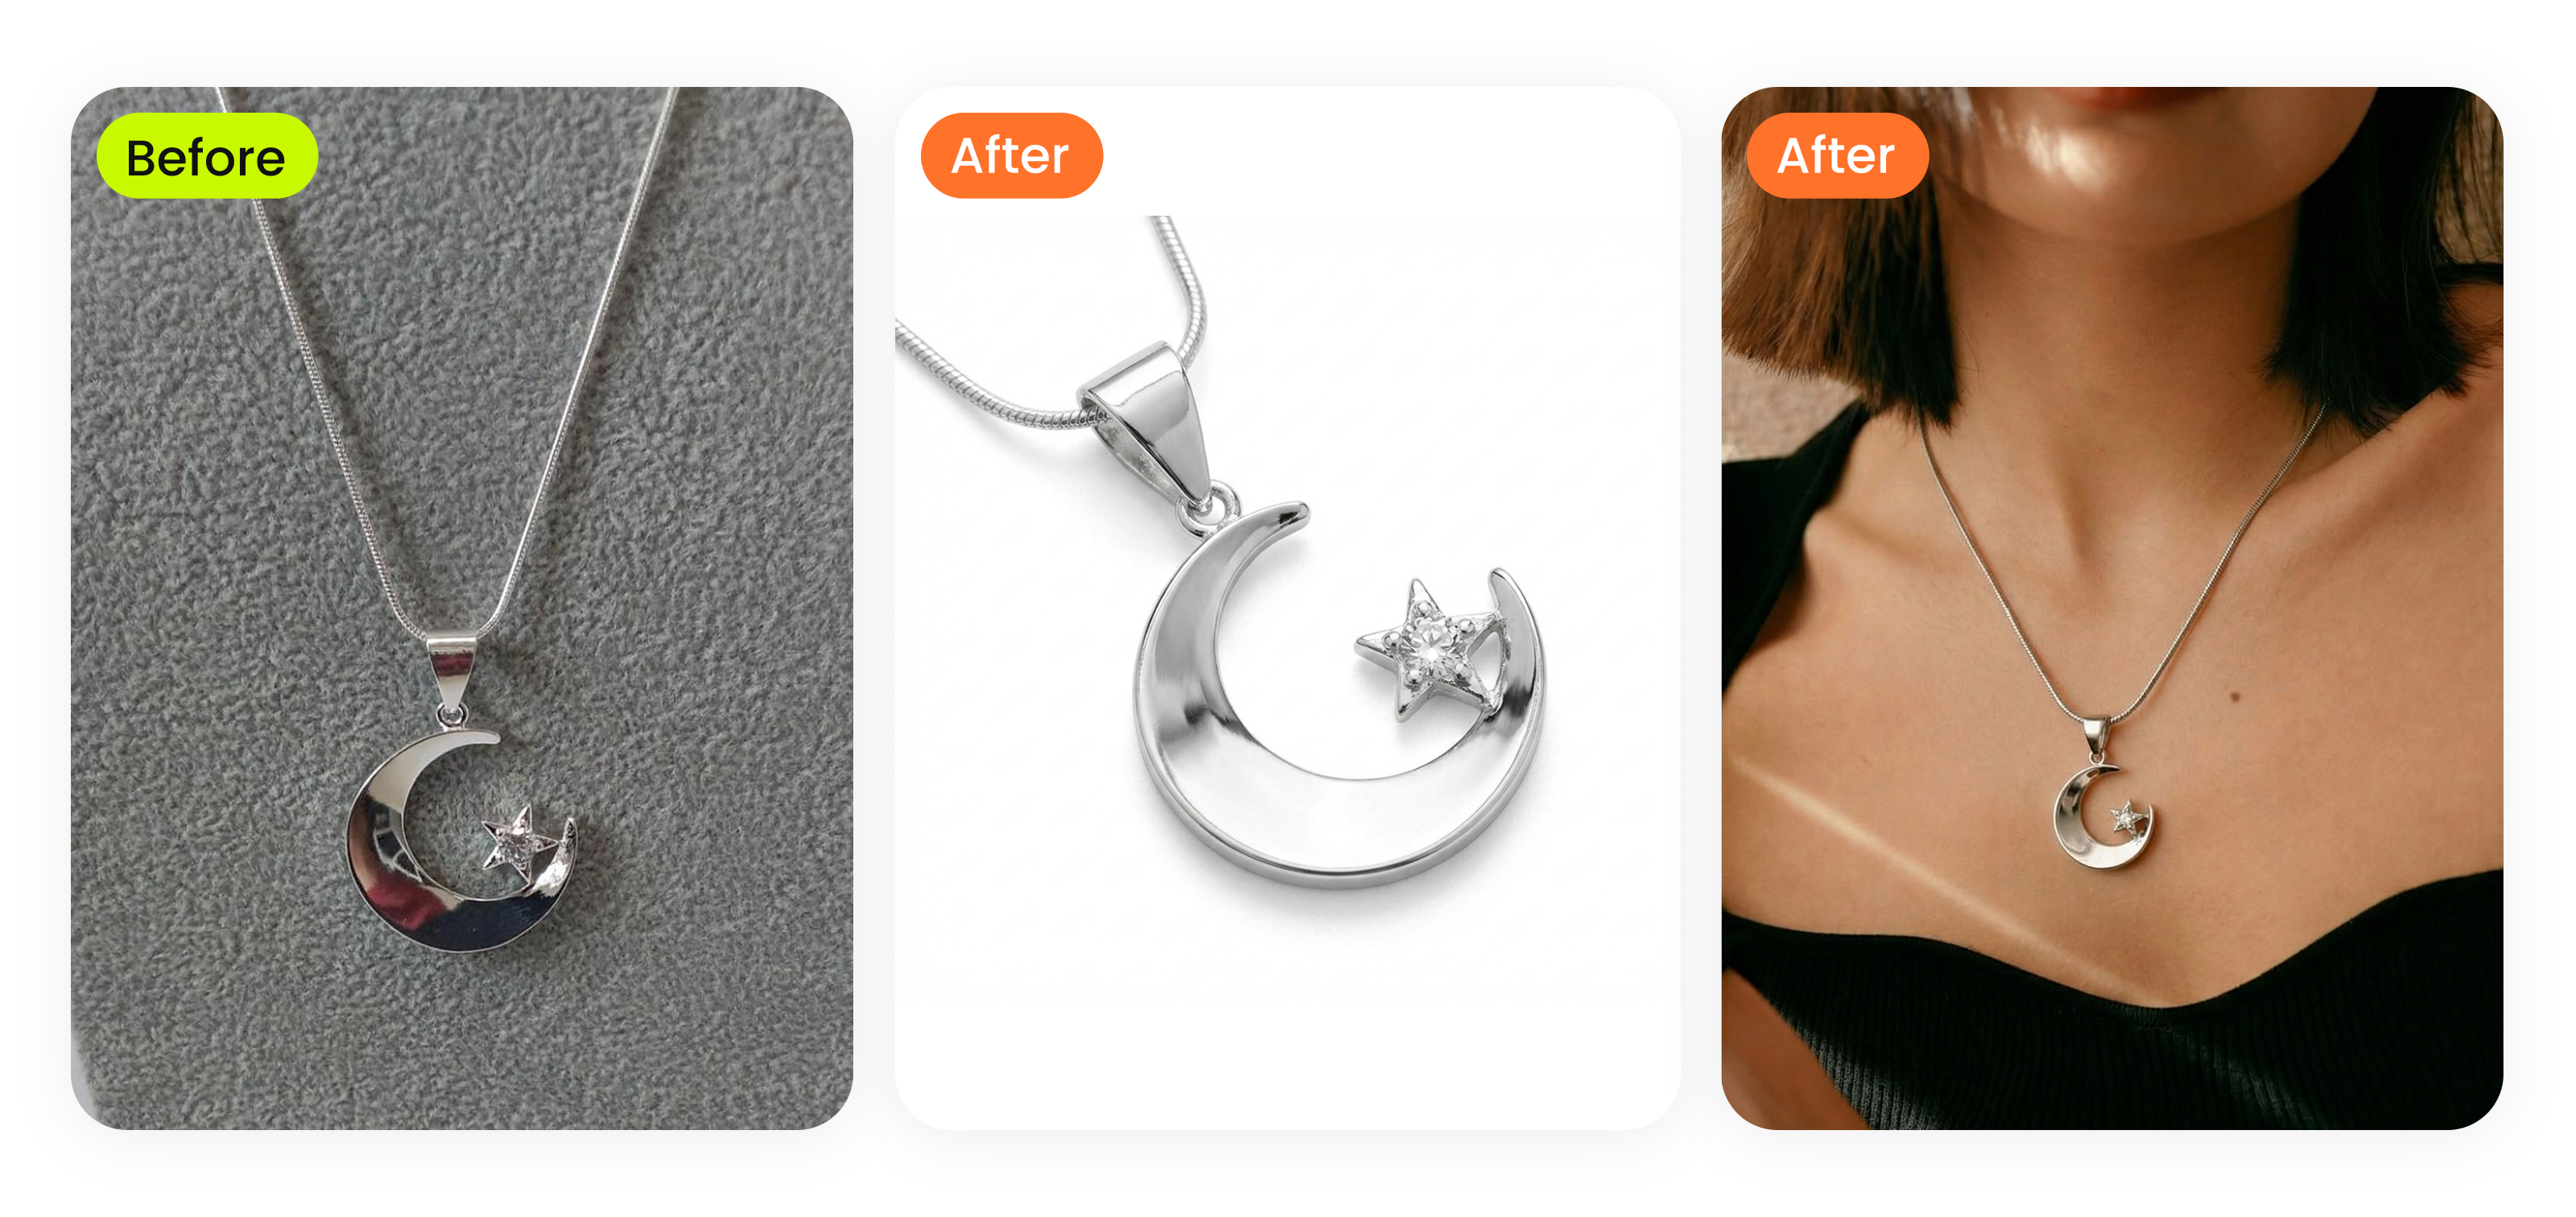
Imagine you photograph a stunning diamond ring. In person, it catches every flicker of light in the room. But when you look at the raw image on your screen, the metal looks dull, tiny dust particles cling to the band, and the gemstone sparkle you saw with your own eyes is nowhere to be found. That gap between what a piece of jewelry looks like in real life and how it appears in an unedited photo is exactly the problem jewelry retouching services solve.
Jewelry retouching is the post-production process of enhancing jewelry photographs to accurately represent a product's real-world appearance, covering everything from removing dust and surface scratches to perfecting metal reflections, correcting color, and restoring gemstone brilliance.
What Are Jewelry Retouching Services
At its core, this type of retouching is a specialized branch of product photo editing. A skilled retoucher works on the raw or high-resolution image to clean up imperfections the camera magnifies, balance lighting across reflective surfaces, and bring out the fine details that make each piece desirable. The process can be as straightforward as a background swap to pure white or as involved as high end jewelry retouching, where every facet of a diamond is individually refined for sparkle and fire.
Jewelry is one of the hardest product categories to photograph well. Metal reflects everything around it, gemstones refract light unpredictably, and macro lenses reveal flaws invisible to the naked eye. Even a professional studio setup produces raw files that need post-production work before they are ready for a product listing or a print catalog. That reality makes retouching not a luxury step but a standard part of the jewelry imaging pipeline.
Who Relies on Professional Jewelry Retouching
The short answer: anyone selling or marketing jewelry visually. Ecommerce sellers on Amazon, Etsy, and Shopify depend on polished product images to convert browsers into buyers. Independent designers and small jewelry brands use retouching to present their work at the same visual standard as established luxury houses. Photography studios that serve the jewelry industry build retouching into their delivery workflow, either handling it in-house or partnering with a dedicated jewelry retouching company. Even auction houses and insurance appraisers rely on accurately retouched images for documentation.
The stakes are high because online shoppers cannot pick up a ring or hold a necklace to the light. Research suggests that 93% of consumers cite visual appearance as the key deciding factor when purchasing online, and jewelry return rates drop significantly when product images accurately represent color, detail, and finish. For sellers exploring whether a free jewelry editing photo service or a full professional partnership is the right fit, understanding what retouching involves is the first step toward making that call.
This guide walks you through the core techniques professionals use, how different metals and gemstones demand unique approaches, what the end-to-end workflow looks like, and how to evaluate pricing, turnaround times, and potential retouching partners. Whether you are considering doing it yourself or outsourcing to specialists, you will have a clear picture of what goes into turning a flat jewelry photo into an image that actually sells.
Core Retouching Techniques Every Jewelry Image Needs
Knowing that jewelry photos need retouching is one thing. Understanding what actually happens to your image during that process is another. Most providers list their services as bullet points on a webpage without explaining what each technique does or why it matters. That leaves buyers guessing. Here is a closer look at the core techniques that transform a raw jewelry photograph into a polished, sale-ready asset.
Background Removal and Surface Cleanup
Almost every piece of jewellery image retouching starts with two foundational steps: isolating the product from its background and cleaning up surface-level flaws.
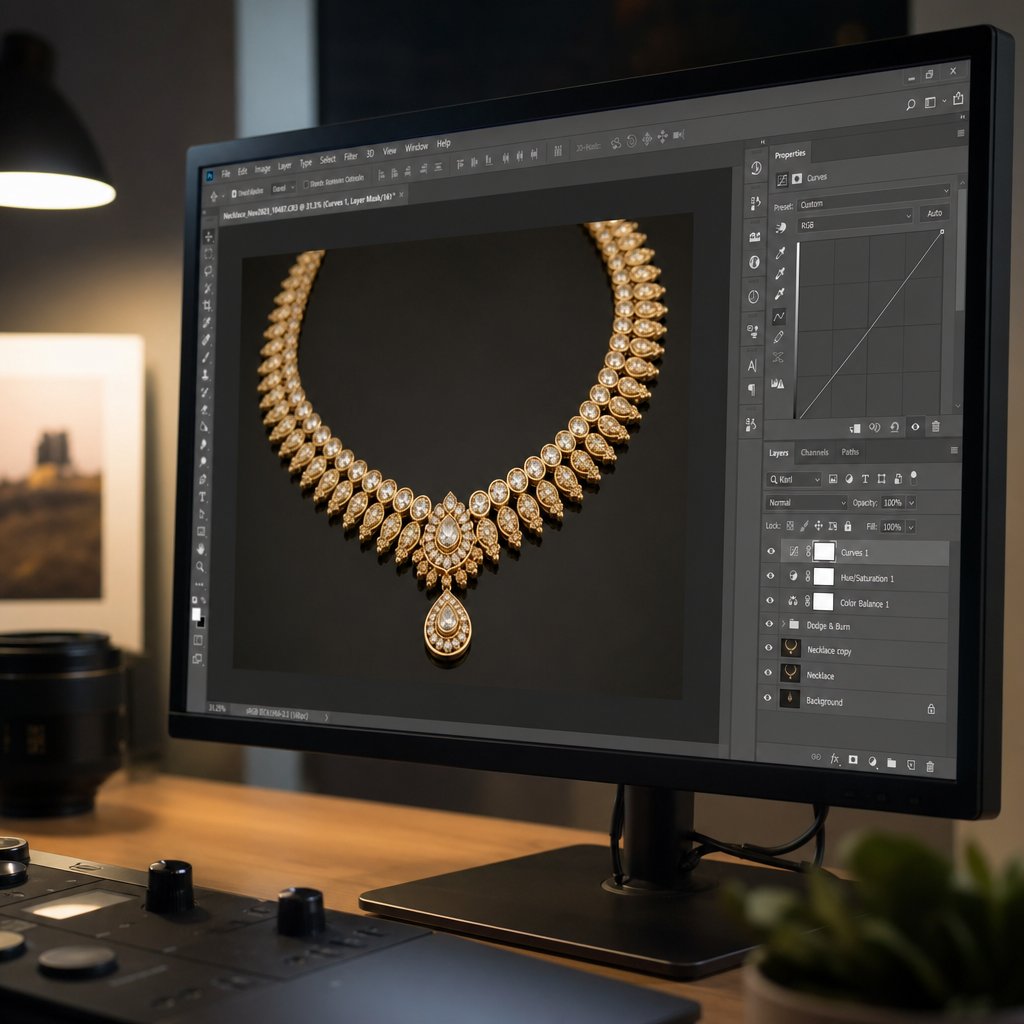
Background removal means separating the jewelry piece from whatever it was photographed on, whether that is a velvet tray, a model's hand, or a cluttered studio surface. Retouchers typically use the Pen Tool in Photoshop to draw a precise clipping path around the item, pixel by pixel. This manual approach produces cleaner edges than automated selection tools, especially around intricate shapes like prongs, chain links, and filigree details. Once isolated, the piece can be placed on a pure white background for ecommerce listings, a gradient for brand campaigns, or a lifestyle scene for social media.
Surface cleanup follows immediately. When you photograph jewelry at macro distances, the camera picks up every speck of dust, every fingerprint smudge, and every hairline scratch on the metal. These flaws are often invisible to the naked eye but glaringly obvious in a high-resolution product image. Retouchers zoom in to 200% or more and use tools like the Spot Healing Brush and Clone Stamp to remove each imperfection individually. The goal is a surface that looks clean and true to the actual piece, not artificially perfect.
Metal Polishing and Gemstone Enhancement
Metal and stone are the two visual pillars of any jewelry image, and each demands a distinct retouching approach.
Metal polishing in post-production is not about making gold or silver look like plastic. It is about smoothing out uneven tonal transitions while preserving the natural grain and texture of the surface. A technique called frequency separation is the industry standard here. It splits the image into two layers: one for color and tone, another for fine texture. The retoucher can then even out blotchy reflections on the tone layer without flattening the subtle surface detail on the texture layer. After that, Dodge and Burn tools, combined with Curves adjustment layers, are used to sculpt highlights and shadows manually. This gives the metal a three-dimensional, luminous quality that flat lighting alone cannot achieve.
Gemstone enhancement is where jewelry retouching gets especially nuanced. A diamond's appeal comes from its sparkle and fire, the way white light breaks into spectral colors inside the facets. Retouchers boost this by using Curves adjustment layers targeted to individual facets, increasing contrast where light naturally concentrates. The Dodge Tool with a soft brush adds controlled highlights to simulate the bright flash points a buyer would see in person. For colored stones, Hue/Saturation layers fine-tune the color to match the actual gem without oversaturating it into something unrealistic. The line between "enhanced" and "misleading" is thin, and skilled retouchers stay on the right side of it.
Beyond the piece itself, shadows and reflections ground the jewelry in physical space. A ring floating on a stark white background with no shadow looks like a clip-art sticker. A subtle drop shadow or a soft reflection beneath it tells the viewer's brain that this is a real, tangible object. Retouchers create these effects using gradient layers, opacity adjustments, and careful masking. Some projects call for a natural shadow that mimics the original studio lighting, while others need a mirror-like reflection for a sleek, editorial feel.
Sparkle and highlight additions are the finishing touches. Small lens flare effects or bright pinpoint highlights placed on gemstone facets and polished metal edges give the image that final pop. Done with restraint, these additions replicate the way jewelry catches light when you move it in your hand. Overdone, they make the piece look cartoonish. The difference comes down to the retoucher's experience and judgment.
Focus Stacking and Advanced Compositing
Here is a technique most buyers never hear about, even though it is critical to high-quality jewelry image retouching: focus stacking.
When you photograph a ring or pendant at macro distances, the depth of field becomes extremely shallow, sometimes just a few millimeters. That means only a tiny slice of the piece is in sharp focus at any given time. The front of a gemstone might be crisp while the band behind it dissolves into blur, or vice versa. A single exposure simply cannot render the entire piece sharp from front to back.
Focus stacking solves this by combining multiple exposures, each focused at a slightly different distance. A photographer might capture 20 to 50 frames of the same piece, shifting the focal point incrementally through each shot. Specialized software like Helicon Focus or Photoshop's Auto-Blend Layers then merges these frames into a single composite where everything is in focus.
The catch? Focus stacking introduces its own retouching challenges. Blending algorithms analyze contrast to determine which pixels are sharpest, but high-contrast jewelry surfaces can confuse them. Specular highlights on polished metal and bright facet reflections on diamonds sometimes cause the software to grab out-of-focus color fringes, a problem known as chromatic aberration amplification. The result is purple or green halos along sharp metallic edges in the final composite. Retouchers working with focus-stacked files need to correct these artifacts, either by defringing each frame before stacking or by using targeted Hue/Saturation masks on the merged file to neutralize the color halos without affecting the jewelry's natural tones.
Focus-stacked composites also require more careful alignment and edge cleanup than single-exposure images. Slight shifts between frames can create ghosting or double edges, particularly on fine details like chain links or pave settings. A retoucher handling these files spends additional time blending transition zones and ensuring every element looks seamlessly sharp.
Here is a summary of the core techniques covered above:
- Background removal and replacement - isolating the piece with precise clipping paths for clean placement on any background
- Dust and scratch cleanup - removing surface imperfections magnified by macro photography
- Metal polishing and smoothing - using frequency separation and Dodge/Burn to create natural, dimensional shine
- Gemstone color and brilliance enhancement - boosting facet contrast and color accuracy without oversaturation
- Reflection and shadow creation - adding realistic grounding effects so the piece looks tangible
- Sparkle and highlight addition - placing controlled bright points on facets and edges for visual impact
- Focus stacking compositing - merging multiple exposures for front-to-back sharpness and correcting stacking artifacts
Each of these techniques addresses a specific visual problem that raw jewelry photography cannot solve on its own. The real complexity, though, shows up when you factor in the material the piece is made from. Gold, silver, platinum, and different gemstone types each reflect and refract light in their own way, and that changes how every one of these techniques needs to be applied.
How Different Metals and Gemstones Require Unique Retouching
A polished gold bangle and a brushed silver cuff might sit side by side in the same display case, but they behave like completely different subjects under a camera. Gold absorbs and re-emits light with warm, saturated tones. Silver bounces it back in sharp, high-contrast flashes. Apply the same retouching settings to both, and at least one of them will look wrong. That is why jewelry photo retouching services treat every material as its own retouching brief.
Retouching Approaches for Different Metals
Each metal has a distinct light behavior that dictates how a retoucher handles highlights, shadows, and color balance.
Gold is the most forgiving to photograph but the easiest to ruin in post-production. Its warm yellow or rose tones sit in a narrow color range, and even a slight shift toward green or orange makes the piece look cheap. The retoucher's priority is preserving that warmth while smoothing out uneven reflections. Curves adjustments stay targeted to the red and green channels, and saturation edits are subtle, usually no more than a few points in either direction.
Silver is the opposite challenge. It reflects nearly everything around it, including the camera, the photographer's shirt, and the studio ceiling. Those reflections create harsh, blown-out highlights that lose all surface detail. Retouchers spend significant time recovering highlight information, often pulling data back from the RAW file's overexposed zones. Careful Dodge and Burn work then rebuilds the gradual tonal transitions that give silver its characteristic cool, liquid sheen.
Platinum sits between gold and silver in both color temperature and reflectivity. It has a cooler, more muted tone than white gold, with a subtler sheen that can easily be mistaken for silver if the retoucher is not paying attention. The key focus is maintaining that understated, slightly grayish-white character without letting it drift into the brighter, more reflective territory of sterling silver.
Rose gold introduces yet another variable. Its pink-copper undertone is trending in jewelry design, but cameras tend to either exaggerate the pink into something that looks artificial or flatten it into standard yellow gold. Accurate color grading here means working in narrow hue ranges to keep the blush tone authentic.
| Metal Type | Light Behavior | Key Retouching Focus | Common Pitfalls |
|---|---|---|---|
| Gold | Warm, saturated reflections with moderate contrast | Preserving warm tone accuracy; smooth tonal transitions | Color shifting toward green or orange; oversaturation |
| Silver | High reflectivity with sharp, bright highlights | Recovering blown-out highlights; rebuilding surface detail | Lost highlight detail; picking up environmental reflections |
| Platinum | Cool, muted sheen with subtle reflectivity | Maintaining understated gray-white character | Mistaken for silver; over-brightening kills the muted quality |
| Rose Gold | Warm pink-copper reflections in a narrow hue range | Accurate blush tone grading; preventing color drift | Exaggerated pink or flattened into standard yellow gold |
Gemstone-Specific Enhancement Techniques
If metals are about controlling reflections, gemstones are about controlling refraction, the way light bends and splits as it passes through a transparent or translucent material. Each stone type refracts light differently, and that difference shapes the entire enhancement approach.
Diamonds are all about sparkle and fire. Sparkle refers to the bright white flashes that appear when light reflects off a diamond's facets, while fire is the rainbow of spectral colors produced when white light disperses inside the stone. Retouchers enhance both by increasing contrast on individual facets using targeted Curves layers and placing precise highlight points with the Dodge Tool. The goal is to replicate the dynamic, eye-catching brilliance a buyer would see when tilting the stone under a light source. Overdoing it creates a "disco ball" effect that looks fake, so restraint matters.
Colored gemstones like rubies, emeralds, and sapphires demand accurate color grading above all else. A ruby that looks slightly orange on screen will trigger returns from buyers expecting a deep, true red. Retouchers use Hue/Saturation and Selective Color adjustment layers to dial in the exact hue, and they cross-reference the retouched image against the physical stone or a calibrated reference photo. Saturation needs to be rich enough to convey the stone's depth without crossing into neon territory.
Organic gems, including pearls, opals, and amber, play by entirely different rules. Pearls have a soft, diffused luster called orient, a subtle iridescence that shifts across the surface. Heavy-handed contrast or sharpening destroys that quality. Retouchers work with low-opacity brush strokes and gentle luminosity adjustments to preserve the pearl's delicate glow. Opals present a similar challenge with their play-of-color, the shifting spectral patches that move across the stone's surface. Enhancing an opal means carefully boosting the visibility of those color patches without making them look painted on.
Category Challenges From Rings to Watches
Beyond material type, the category of jewelry itself introduces specific retouching hurdles that a generalist photo editor might overlook.
Rings demand absolute clarity in the setting area. Prongs, bezels, and pave settings are where the craftsmanship shows, and buyers zoom in on these details to assess quality. Retouchers sharpen prong edges, clean up any metal debris visible between small stones, and ensure the gallery (the underside structure of the setting) is clearly defined if visible in the shot.
Necklaces and chains test a retoucher's patience. Each individual link needs to read as a distinct, three-dimensional element. If the chain is even slightly out of focus or if the retoucher over-smooths the metal, the links blur together into a flat, ribbon-like shape. Maintaining link-by-link detail while keeping the overall piece cohesive is one of the more time-intensive tasks in jewelry retouching.
Bracelets share the chain-link challenge but add another: clasp visibility. The clasp is a functional detail buyers want to see clearly, especially for toggle, lobster claw, or magnetic closure styles. Retouchers often need to composite a separate clasp shot into the main image or selectively sharpen the clasp area to ensure it is not lost in the overall composition.
Watches bring a unique set of problems. The watch face is essentially a small mirror, reflecting studio lights, camera equipment, and anything else in the environment. Retouchers frequently rebuild the dial from scratch, compositing a clean face from multiple exposures or manually painting out reflections while preserving the legibility of indices, hands, and brand logos. The crystal surface above the dial also picks up glare that needs to be reduced without making the watch look like it has no glass at all.
These material and category differences are exactly why experienced jewelry retouching services ask detailed questions before starting a project. Knowing whether a batch contains mostly silver chains or platinum diamond rings changes the retouching plan, the time estimate, and the skill set required. That level of specificity also shapes the workflow a provider follows from the moment you submit your files to the moment you receive the finished images.
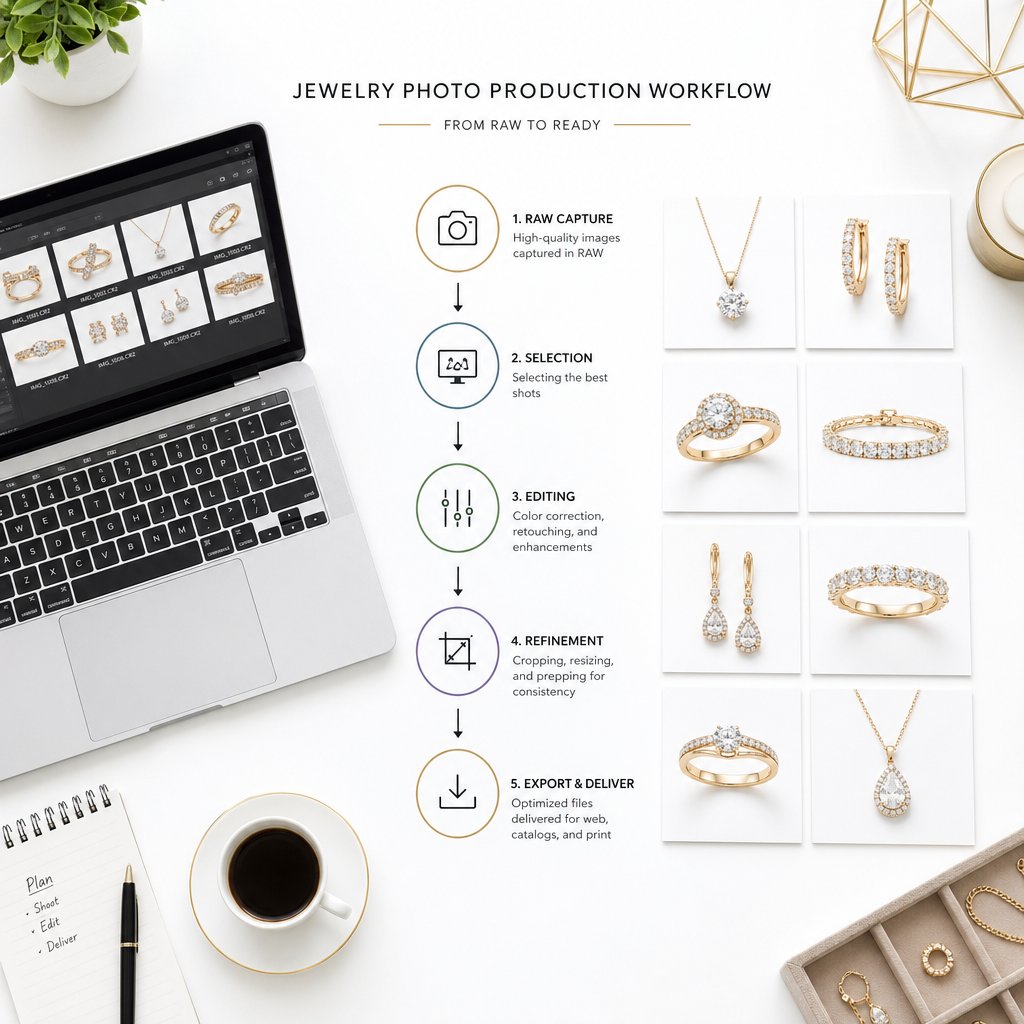
The End-to-End Jewelry Retouching Workflow Explained
Knowing what techniques exist and how materials affect the process is useful, but it does not answer the most practical question a first-time buyer has: what actually happens after I hand over my files? If you have never outsourced jewellery retouching before, the process can feel like a black box. Here is a clear, stage-by-stage look at what to expect from start to finish.
Submitting Images and Setting Expectations
Every project begins with a conversation. You reach out to a provider with a quote request, typically sharing a few sample images, the number of photos in your batch, and the level of retouching you need. Some providers offer a free test edit on one or two images so both sides can confirm the style and quality before committing to a full order. This trial step is worth taking. As any experienced retoucher will tell you, it always takes a few jobs for both parties to get used to each other's expectations and preferences.
During this initial stage, you will also discuss file format and resolution requirements. Most professional services accept RAW files as the preferred format because they contain the most color and exposure data to work with. High-resolution TIFF and JPEG files are also common submission formats, though RAW consistently produces the best results. File sizes add up quickly with jewelry macro photography, so providers typically use secure cloud transfer through platforms like Dropbox or Google Drive rather than email attachments.
Clear communication at this point saves time later. If a specific paint color on a display prop matters, share the color code. If certain reflections should stay in the image, mark them up. Quick notes scribbled onto proof images, a short screen recording walking through your preferences, or even a brief video call can prevent rounds of unnecessary revisions down the line.
From Raw File to Retouched Deliverable
Once files are submitted and expectations are aligned, the jewelry photo retouching production process follows a structured sequence. While every provider organizes their pipeline slightly differently, the core stages are consistent across the industry:
- File intake and organization — The provider catalogs your images, confirms the scope, and assigns them to retouchers with the right skill set for your jewelry type.
- Basic cleanup — Dust removal, scratch correction, and background removal or replacement. This is the foundation layer that every image goes through.
- Advanced enhancement — Metal polishing, gemstone brilliance boosting, shadow and reflection creation, color correction, and any focus-stacking compositing work. This stage is where the bulk of the creative retouching happens.
- Quality review — A senior retoucher or quality control editor reviews every image against the agreed-upon style guide, checking for consistency across the batch, color accuracy, and any missed imperfections.
- Proof delivery — You receive watermarked or low-resolution proofs for review before final files are rendered. This is your opportunity to flag anything that needs adjustment.
One detail worth noting: culling your images before submission makes a real difference. Sending only the frames you actually need, rather than an entire shoot's worth of outtakes, speeds up the process and keeps costs down. Retouchers spend significant time sorting through extra files to find the right exposures, so trimming the batch on your end is a simple way to streamline the whole workflow.
Revisions and Final Delivery
Revision policies vary, but most reputable providers include at least one round of revisions in their standard pricing. Some offer two or three rounds for more complex jewellery photo editing projects. The key is knowing the policy upfront. Ask how many revision rounds are included, whether there is a per-image limit on changes, and what the turnaround looks like for revision requests versus the initial delivery.
When reviewing proofs, be specific. Vague feedback like "make it look better" sends the retoucher guessing. Targeted notes like "reduce the warmth on the gold band by about 10%" or "sharpen the prong detail on image 7" lead to faster, more accurate corrections. A proper debrief after each project, even a short one noting what you liked and what missed the mark, strengthens the working relationship over time and reduces revisions on future batches.
Final files are typically delivered in the formats your sales channels require: high-resolution TIFF or PSD files for print and archival use, optimized JPEG or PNG files for web and ecommerce listings. Many providers also deliver images pre-cropped and sized to specific platform dimensions if you request it during the initial briefing.
The entire cycle, from submission to final delivery, usually runs 24 to 48 hours for standard orders, with rush options available for tighter deadlines. Larger batches naturally take longer, and complex editorial work may extend the timeline further. Understanding this workflow removes the uncertainty from outsourcing and lets you plan your product launches and catalog updates with realistic timelines in hand. The next question most sellers face is whether this process is worth the investment compared to handling retouching themselves.
DIY Jewelry Photo Editing vs Professional Outsourcing
You understand the workflow. You know what techniques are involved. The natural follow-up question is whether you should handle jewelry photo editing yourself or pay someone else to do it. The answer depends on three things: your skill level, the volume of images you produce, and the quality standard your sales channels demand. Getting honest about all three saves you from either overspending on services you do not need or burning hours on results that still look amateur.
What DIY Jewelry Retouching Actually Requires
Retouching jewelry is not the same as adjusting a vacation photo or brightening a headshot. The reflective, refractive nature of metals and gemstones makes this one of the most technically demanding categories in product photography editing. Before committing to the DIY route, here is what you are signing up for.
Software is the starting point. Adobe Photoshop is the industry standard for detailed jewelry work, and there is no real shortcut around it. Lightroom handles batch tonal adjustments well, but it lacks the pixel-level control you need for tasks like clipping paths, frequency separation on metal surfaces, or compositing focus-stacked frames. Capture One is a strong alternative for RAW processing and tethered shooting, though most retouchers still move into Photoshop for the heavy lifting. A current Creative Cloud subscription runs around $55 per month for the full Photography plan, and that is before you factor in any specialized plugins for focus stacking or sharpening.
Software alone does not get you far without the right skills. Jewelry-specific retouching demands proficiency in techniques like frequency separation for smoothing metal tones without destroying surface texture, manual Dodge and Burn for sculpting three-dimensional highlights, precise pen tool work for clipping paths around intricate shapes, and targeted color correction using Curves and Selective Color layers. On top of that, you need a working understanding of color management: calibrating your monitor with a hardware colorimeter, working within the correct ICC color profiles, and soft-proofing your edits so the colors you see on screen match what buyers see on their devices. Professional editors use calibrated monitors and color profiles as a baseline, not an optional extra.
Then there is the time factor. If you are new to jewelry retouching, expect to spend 45 minutes to well over an hour on a single image, even for mid-level cleanup and enhancement. A professional retoucher with jewelry-specific experience typically handles the same image in 15 to 30 minutes, and complex luxury pieces can still take 30 to 60 minutes even for seasoned editors. Multiply that gap across a batch of 20 or 50 images, and the time cost of doing it yourself adds up fast.
When Outsourcing Becomes the Smarter Investment
For a seller listing a handful of pieces per month, DIY retouching can work, especially if you enjoy the process and are willing to invest in learning. But there is a tipping point where the math shifts decisively toward outsourcing.
Picture this: you are editing 15 images per week in-house, spending an average of 50 minutes per image. That is roughly 12.5 hours a week on retouching alone. At even a modest valuation of your time, that weekly cost exceeds what a professional jewelry retouching service would charge for the same batch. Basic edits like background removal typically run $1 to $3 per image, while mid-level color correction and cleanup fall in the $2 to $6 range. A 15-image batch at mid-level retouching might cost $30 to $90, far less than the value of 12 hours of your time redirected toward product sourcing, marketing, or customer service.
Cost is only part of the equation. Outsourcing also shifts the burden of software licenses, hardware, and infrastructure to the service provider, which is especially relevant for smaller businesses that cannot justify investing in calibrated monitors, high-performance workstations, and ongoing Photoshop subscriptions solely for retouching. You also gain access to consistency at scale. When one person edits all your images, style drift is inevitable as fatigue sets in. A dedicated team uses standardized style guides and batch workflows to keep every image uniform across your catalog.
The volume threshold varies by business, but a practical rule of thumb: once you are regularly editing more than 10 to 15 images per week, outsourcing almost always delivers better results at a lower effective cost. For seasonal spikes, like a holiday collection launch or a catalog refresh, the case is even stronger. Trying to handle a sudden surge of 200 images in-house usually means either rushed, inconsistent edits or missed deadlines.
Matching Retouching Level to Your Use Case
Not every image needs the same depth of work. One of the most common mistakes sellers make is either over-investing in editorial-grade retouching for basic marketplace listings or under-investing in cheap cleanup for images that represent their brand. The key is matching the retouching level to where the image will live and what job it needs to do.
The quality spectrum breaks down into three practical tiers:
Basic retouching covers background removal to pure white, dust and scratch cleanup, and simple color correction. This level is designed for marketplace product listings on platforms like Amazon and Etsy, where compliance with image standards matters more than artistic flair. It gets the job done cleanly and affordably.
Mid-level retouching adds metal polishing, gemstone enhancement, shadow and reflection creation, and more refined color grading. This is the sweet spot for brand websites, Shopify storefronts, and social media content where your images need to look polished and consistent but do not require magazine-level perfection.
High-end editorial retouching is the top tier: meticulous, pixel-level work where every facet, every reflection, and every tonal transition is sculpted by hand. This level serves luxury campaigns, print catalogs, billboard advertising, and editorial features. Pricing for this tier can range from $10 to $50 per image, reflecting the hours of detailed work involved.
To figure out where you fall, ask yourself two questions. First, where will these images appear? A product thumbnail on a marketplace listing has different requirements than a hero banner on your homepage. Second, what is the price point of the jewelry? A $30 fashion ring and a $5,000 diamond engagement ring both deserve accurate representation, but the customer buying the $5,000 ring expects, and scrutinizes, a higher level of visual detail.
| Dimension | DIY Retouching | Professional Outsourcing |
|---|---|---|
| Skill Required | Advanced Photoshop proficiency, color management knowledge, jewelry-specific techniques | None on your end; the provider supplies the expertise |
| Time Per Image | 45-90 minutes for someone without specialized experience | 15-60 minutes handled by the provider, freeing your schedule entirely |
| Cost Structure | Software subscriptions, hardware investment, and the opportunity cost of your time | Per-image or volume-based pricing with no infrastructure overhead |
| Quality Ceiling | Limited by your personal skill level and available time | Scales from basic cleanup to high-end editorial depending on provider capability |
| Best For | Low-volume sellers (under 10 images/week) who enjoy hands-on editing | Growing brands, high-volume catalogs, seasonal launches, and anyone prioritizing consistency |
Whichever path you choose, the images still need to meet the specific requirements of the platform where they will be listed. Amazon, Etsy, and Shopify each enforce distinct image standards, and getting those details wrong can mean suppressed listings, poor zoom quality, or a storefront that looks inconsistent. That is a whole set of specifications worth understanding on its own.

Meeting Marketplace Image Standards for Jewelry Listings
Every retouched jewelry image eventually lands somewhere: a product listing, a storefront page, a search result thumbnail. And each of those destinations has its own rulebook. A beautifully polished photo of a sapphire pendant means nothing if it gets rejected by Amazon for a non-compliant background or looks blurry on Etsy because the resolution is too low for the platform's zoom feature. Jewellery photo retouching only delivers value when the final file actually meets the technical specs of the marketplace where it will live.
The tricky part? Amazon, Etsy, and Shopify each enforce different standards for backgrounds, resolution, file format, and image composition. Sellers listing across multiple platforms need every image tailored to each channel, not a one-size-fits-all export. Here is what each platform requires and why these details matter more than most sellers realize.
Amazon Jewelry Image Standards
Amazon is the strictest of the three when it comes to product imagery. Its product image requirements leave little room for creative interpretation, especially for main listing images.
The main image must sit on a pure white background with RGB color values of exactly 255, 255, 255. Not off-white, not light gray, not cream. Pure white. The product itself should fill at least 85% of the image frame, with no text, logos, watermarks, borders, or props that are not included with the product. For jewelry, this means no display busts, no velvet trays, and no decorative backgrounds in the primary photo.
On the technical side, Amazon requires a minimum of 500 pixels on the longest side but recommends at least 1,000 pixels to enable the zoom function that shoppers rely on to inspect fine details like prong settings and gemstone clarity. The maximum is 10,000 pixels on the longest side. Accepted file formats include JPEG (preferred), TIFF, PNG, and non-animated GIF. Images must be clear and non-pixelated with no jagged edges.
Getting any of these details wrong has real consequences. Non-compliant images can lead to suppressed listings, meaning your product disappears from search results entirely until a compliant main image is provided. For a jewelry seller running paid advertising to a listing, suppression does not just cost visibility; it wastes ad spend on a page shoppers can no longer find. Even if the listing stays live, images below 1,000 pixels disable the zoom feature, and jewelry buyers who cannot zoom in on a diamond's facets or a bracelet's clasp are far less likely to click "Add to Cart."
Etsy and Shopify Visual Requirements
Etsy takes a more relaxed approach than Amazon, but that flexibility comes with its own challenges. The platform recommends images at least 2,000 pixels wide on the shortest side, with a preferred aspect ratio of 4:3 or square. Supported formats include JPEG, PNG, and GIF. Unlike Amazon, Etsy does not mandate a pure white background for the primary image. Sellers can use natural, lifestyle-oriented settings, styled flat lays, or textured surfaces that reflect their brand aesthetic.
That creative freedom is a double-edged sword for jewelry image editing. A handmade silver ring photographed on a weathered wood surface can look charming and authentic, which resonates with Etsy's handmade-focused audience. But if the background competes with the jewelry for attention, or if the lighting creates color casts that shift the metal's tone, the image hurts more than it helps. Etsy shoppers still expect to see the product clearly, and cluttered or poorly lit lifestyle shots lead to the same trust erosion as a blurry studio photo on Amazon.
Shopify operates differently because it is not a marketplace with centralized rules. It is a platform where each store owner controls their own theme, layout, and image display settings. That said, most Shopify themes are optimized for consistent, square-crop product images at 2,048 x 2,048 pixels. Supported formats include JPEG, PNG, and WebP, with an emphasis on compressed file sizes for fast page loading. Shopify automatically generates multiple image sizes for thumbnails, product pages, and zoom views, so uploading at the recommended resolution ensures the image looks sharp at every scale.
The consistency factor is where Shopify sellers often stumble. When you control your own storefront, there is no automated compliance check rejecting non-standard images. A product grid where one ring is shot on white, another on gray, and a third on a lifestyle background creates a disjointed browsing experience that signals a lack of professionalism. For jewelry brands building a direct-to-consumer presence, visual consistency across every listing is just as important as meeting a minimum pixel count.
| Platform | Background | Minimum Resolution | File Format | Key Consideration |
|---|---|---|---|---|
| Amazon | Pure white (RGB 255, 255, 255) for main image | 500px minimum; 1,000px+ recommended for zoom | JPEG (preferred), TIFF, PNG, GIF | Non-compliant images trigger listing suppression from search |
| Etsy | White or natural/lifestyle backgrounds allowed | 2,000px on the shortest side | JPEG, PNG, GIF | Creative freedom requires discipline to keep the product as the focal point |
| Shopify | Seller-defined; consistency across listings is critical | 2,048 x 2,048px recommended | JPEG, PNG, WebP | No automated compliance checks; visual inconsistency erodes brand perception |
How Professional Services Deliver Platform-Ready Files
When you sell on one platform, formatting images is manageable. When you sell across two or three simultaneously, the workload multiplies. Each marketplace needs its own background treatment, resolution, crop ratio, and file format. Doing this manually for every image in a 50-piece collection is tedious and error-prone, exactly the kind of repetitive, detail-heavy task where mistakes slip through.
This is where a dedicated jewellery retouching service earns its value beyond just making images look good. Professional providers build marketplace compliance into their delivery workflow. You submit one set of retouched master files, and the service exports platform-specific versions: white-background JPEGs cropped to Amazon's specs, higher-resolution lifestyle variants for Etsy, and consistent square-crop WebP files optimized for Shopify page speed. Batch processing at this level ensures every image in your catalog hits the right technical marks without you manually resizing and re-exporting dozens of files.
Color consistency across listings is another area where scale matters. When a customer browses your storefront and sees the same gold necklace looking warm in one thumbnail and cool in another, it raises doubt about what the actual product looks like. Professional retouchers apply standardized color profiles and white-balance settings across entire batches, so every piece in a collection looks like it belongs together. For sellers who need this kind of marketplace-ready output at volume, solutions like Snappyit's Jewelry Retouch are built specifically around polishing jewelry imagery for ecommerce presentation, handling the formatting and consistency work that keeps listings compliant and visually cohesive across channels.
The cost of getting platform specs wrong goes beyond a single rejected image. Inconsistent storefronts erode buyer trust over time. Poor zoom quality on Amazon means shoppers cannot verify the details that justify a jewelry purchase. Suppressed listings mean lost revenue on products that are ready to ship but invisible to customers. These are not hypothetical risks; they are daily realities for sellers who treat image formatting as an afterthought rather than a core part of their product presentation strategy.
Platform compliance is a solvable problem, but it is also a recurring one. Every new product, every seasonal collection, and every catalog refresh brings another round of formatting requirements. That ongoing demand is one of the reasons pricing and turnaround expectations deserve their own careful look, especially for sellers planning around peak seasons and high-volume launches.
Pricing Factors and Turnaround Expectations for Jewelry Photo Editing Services
You know what your images need to look like. You know which platforms they need to fit. The question that usually comes next is the one most providers dance around: how much does this actually cost, and how long does it take?
Pricing for jewellery retouching services is not as opaque as it seems once you understand the variables behind the numbers. The wide range you will encounter, from under a dollar per image to $20 or more, is not random. It reflects real differences in what is being done to each file.
What Drives Jewelry Retouching Costs
A plain silver band on a white background is a fundamentally different job than an intricate multi-stone necklace with filigree detail and mixed metals. The first might take a retoucher ten minutes. The second could take an hour. That gap in complexity is the single biggest factor behind pricing variation.
Here are the key variables that shape what you will pay:
- Image complexity — A solitaire ring requires far less work than a chandelier earring with dozens of pave-set stones. More detail means more time, and time is what you are paying for.
- Level of retouching — Basic cleanup (dust removal, background swap) sits at the low end. Mid-level work adds metal polishing, gemstone enhancement, and shadow creation. High-end editorial retouching, where every facet and reflection is sculpted by hand, commands premium rates.
- Batch size — Larger orders almost always come with lower per-image costs because the provider can streamline setup and maintain workflow efficiency across a consistent set of images.
- Turnaround speed — Standard delivery versus rush delivery can shift the price significantly. Express timelines require retouchers to reprioritize their queue, and that flexibility costs extra.
- Included extras — Clipping paths, custom shadow creation, multiple background versions, and platform-specific exports are sometimes bundled in and sometimes priced as add-ons. Clarify this before committing.
As a rough benchmark, basic jewelry editing typically ranges from $0.29 to $2.50 per image, covering background removal and minor cleanup. Advanced retouching with color correction and shine enhancement falls in the $3.99 to $7.49 range, while high-end work involving diamond refinement and detailed metal polishing can run $7.50 to $15.00 per image. Complex projects requiring focus stacking composites or 3D rendering push beyond $20. These figures give you a starting framework, but treat any provider's advertised starting price as exactly that: a starting point. The final quote depends on your specific images.
Common Pricing Models and Volume Discounts
Beyond the per-image rate, the pricing model itself affects your total spend. Most jewellery photo editing service providers operate under one of a few standard structures.
Per-image pricing is the most common and the easiest to budget around. You pay a fixed rate for each photo based on the retouching tier you select. This works well for one-off projects or sellers with variable monthly volumes who do not want to commit to a recurring plan.
Tiered volume pricing rewards larger batches. Many providers offer discounts once you cross certain thresholds, with orders over 100 images often qualifying for 10% to 30% reductions compared to single-image rates. If you are launching a new collection with 200 SKUs, negotiating a volume rate before submitting the batch can meaningfully reduce your total cost.
Subscription or retainer models suit businesses with steady, ongoing retouching needs. You commit to a monthly plan covering a set number of images at a discounted per-image rate, often with priority turnaround and a dedicated retoucher who learns your brand's visual style over time. This model lowers cost and improves consistency, but it only makes sense if your volume is predictable enough to justify the commitment.
Custom project pricing applies to non-standard work like CGI jewelry rendering, ghost mannequin composites, or large-scale campaign shoots. These are quoted individually based on scope and complexity, and the range varies too widely to generalize.
One caution worth repeating: price alone is a poor indicator of quality. A provider advertising $0.50 per image may deliver acceptable background removals for marketplace listings, but that rate will not cover the kind of detailed metal polishing and gemstone enhancement that a brand website or print catalog demands. When retouching is cheap, corners get cut, whether through over-reliance on automated tools, over-smoothed textures, or skipped quality review steps. Always evaluate sample work alongside the quoted price.
Turnaround Times and Seasonal Planning
Speed matters, but realistic expectations matter more. Standard turnaround for most jewelry photo editing services falls in the 24 to 72 hour range for typical batch sizes. Rush delivery, usually defined as 6 to 12 hours, is available from many providers but often carries a surcharge of up to 50% per image. Larger batches naturally extend the timeline; a 500-image catalog order will not ship in the same window as a 10-image rush job, regardless of how much you are willing to pay.
Where sellers consistently run into trouble is seasonal planning. Holiday catalogs, new collection launches, Valentine's Day promotions, and end-of-year sale events all create predictable demand spikes. If you wait until two weeks before a launch to submit 300 images, you are competing with every other jewelry brand doing the same thing. Providers are at capacity, rush fees apply, and quality control gets compressed.
The smarter approach is building retouching into your production calendar the same way you schedule photography. If a collection launches in November, the photography should wrap by mid-September and retouching files should be submitted by early October. That buffer gives your provider time to deliver standard-turnaround work at standard rates, with room for a revision round before your go-live date. Sellers who plan this way consistently get better results at lower cost than those who treat retouching as a last-minute task.
Pricing and turnaround are important, but they only tell part of the story. What you spend on retouching is directly influenced by what you give the retoucher to work with. The quality of your source photography, from lighting and focus to color accuracy, determines how much post-production work each image actually needs.
How Photography Quality Shapes Jewelry Photo Retouching Service Results
A skilled retoucher can do remarkable things with a jewelry image. But there is a hard ceiling on what post-production can rescue, and that ceiling is set the moment the shutter clicks. Retouching is an enhancement process, not a reconstruction process. The better the raw material going in, the better the finished image coming out, and the less you pay to get there.
This relationship between capture quality and retouching outcome is something most sellers overlook. They assume that any problem in a photo can be "fixed in post." Some can. Many cannot. Understanding where that line falls helps you invest your effort in the right place and avoid paying a retoucher to fight problems that should never have existed in the first place.
What Retouching Can and Cannot Fix
Retouching excels at correcting the kinds of flaws that are cosmetic rather than structural. Dust specks on a ring band? Gone in seconds with a Spot Healing Brush. A slight warm color cast from tungsten studio lights? A white balance adjustment in Camera RAW neutralizes it across the entire batch. Uneven reflections on a polished gold surface? Frequency separation and Dodge/Burn work can smooth those out while preserving natural texture. Background distractions, minor scratches, dull gemstone facets, missing shadows: all solvable.
What retouching cannot fix are fundamental capture failures. If the image is badly out of focus, no amount of sharpening will recover genuine detail. Sharpening tools enhance existing edge contrast; they do not invent detail that was never recorded. Extreme motion blur from camera shake or a vibrating surface creates the same dead end. The pixel data simply is not there to work with.
Poor lighting is the most common culprit. When a jewelry piece is lit with small, direct light sources, the resulting harsh highlights blow out to pure white, destroying all surface detail in those areas. As jewelry photography specialists note, blown highlights on metals and gemstones are nearly impossible to recover. A retoucher can darken the surrounding area to reduce the visual impact, but the actual texture and tonal information in that blown zone is gone. Slightly underexposing by one-third to two-thirds of a stop during the shoot preserves highlight detail and gives the retoucher far more data to work with in post-production.
Badly composed shots present another limitation. If a ring is cropped so tightly that the prongs are cut off at the frame edge, no retoucher can fabricate what was never photographed. If a necklace is tangled or poorly arranged, the retoucher can clean up minor positioning issues but cannot realistically restructure the entire layout without it looking artificial.
The practical takeaway is straightforward: retouching amplifies quality. Hand a retoucher a well-lit, properly focused RAW file, and they will deliver a stunning result efficiently. Hand them a blurry, overexposed JPEG, and they will spend twice the time producing a mediocre outcome.
Better photography input leads to better retouching output and lower costs. Every dollar invested in improving your capture workflow saves multiples in post-production time and delivers a higher-quality final image.
Why Color Accuracy Reduces Returns
Of all the variables that connect photography to retouching, color accuracy has the most direct impact on your bottom line. When a customer orders a 14K rose gold bracelet and receives something that looks more like yellow gold in person, the return is almost guaranteed, and so is the lost trust.
This is not a niche concern. Research indicates that 22% of online retail returns happen because the product looks different in person than in the photo, and 58% of consumers say they will not buy again from a brand that misrepresents color even once. For jewelry, where the perceived value of a piece is tightly linked to the exact tone of its metal and the precise hue of its gemstones, color fidelity is not optional. It is a trust mechanism.
The problem starts earlier than most sellers think. Your camera sensor does not see color the way your eyes do. It captures data influenced by the color temperature of your lights, the tint of your background, even the color of the walls in your shooting space. Polished jewelry surfaces act like mirrors, picking up green reflections from nearby plants, warm casts from wooden tabletops, or cool shifts from fluorescent overhead lighting. If those color contaminations are baked into the source file, the retoucher has to correct them manually, and every correction introduces a small risk of drifting further from the true product color.
Color management on the editing side is equally critical. A retoucher working on an uncalibrated monitor might make gold look perfect on their screen while it appears orange on a customer's phone. Hardware calibration tools like the X-Rite i1Display or SpyderX measure the actual light output of a monitor and generate an ICC profile that standardizes its color rendering. Recommended calibration targets for jewelry work are a gamma of 2.2, a white point of 6500K (D65), and brightness between 100 and 120 cd/m². Without this baseline, every color decision the retoucher makes is essentially a guess.
The final link in the chain is the color space used for export. Jewellery photo retouching services that deliver files in Adobe RGB or ProPhoto RGB without converting to sRGB create a hidden problem: most web browsers and consumer devices default to sRGB rendering. An image exported in a wider color space without an embedded ICC profile can display with muted, shifted, or unpredictable colors depending on the viewer's device. For ecommerce, sRGB with an embedded ICC profile is the standard that keeps colors stable whether a customer is browsing on an iPhone in New York or a laptop in London.
Preparing Better Source Images for Retouching
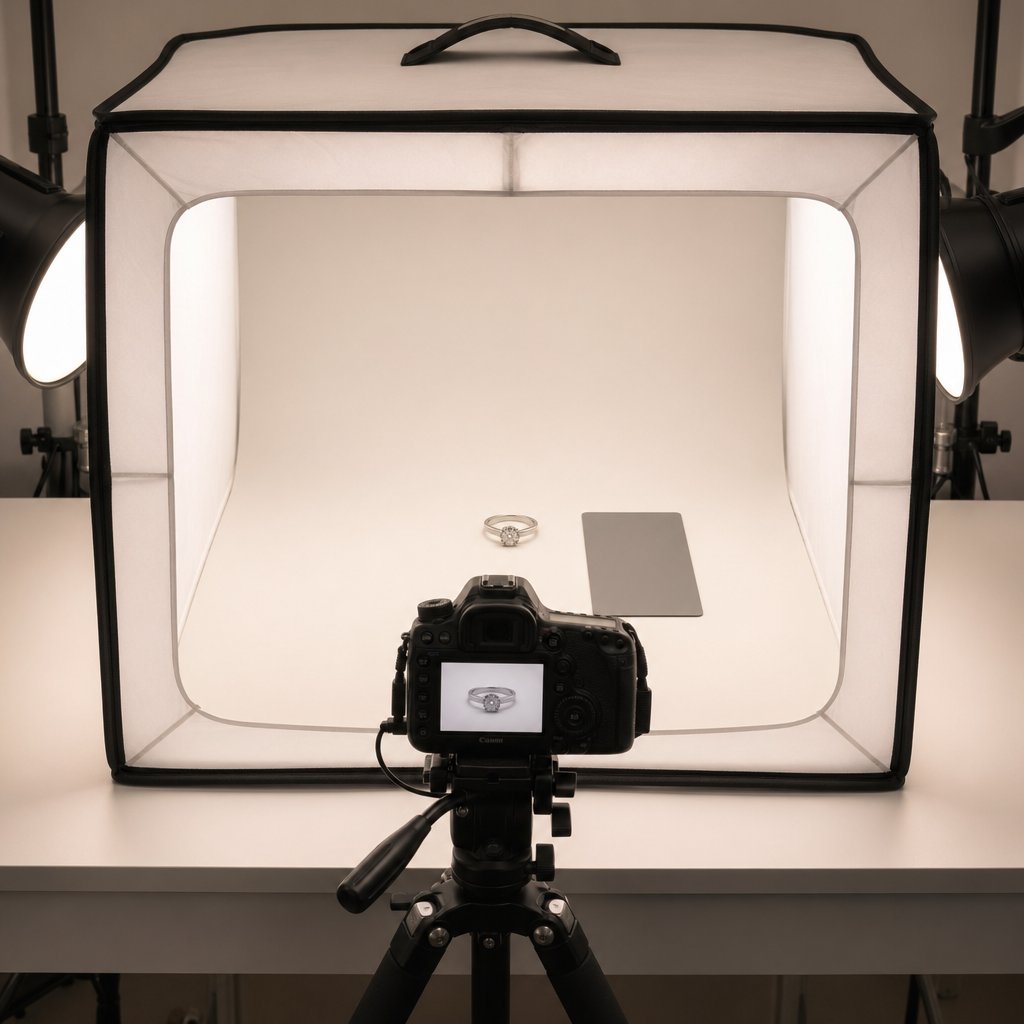
You do not need a $50,000 studio to give your retoucher good source material. A few deliberate choices during the shooting phase make a measurable difference in both the quality and cost of post-production.
Shoot in RAW format. RAW files preserve the full range of color and exposure data your camera sensor captures, giving the retoucher maximum flexibility for white balance correction, highlight recovery, and tonal adjustments. JPEGs compress and discard data at the moment of capture, permanently limiting what can be recovered later. This single choice is the highest-impact, lowest-effort improvement most sellers can make.
Use consistent, diffused lighting. Large softboxes or diffusion panels create smooth, even reflections on metal surfaces and reduce the harsh hotspots that blow out highlights. Shooting inside a controlled reflection environment, like a light tent or custom diffusion setup, minimizes unwanted reflections from the camera, studio walls, and the photographer. Consistent lighting across a shoot also means the retoucher can batch-process white balance and exposure corrections rather than adjusting each image individually.
Include a color reference card. Placing an 18% gray card or a full ColorChecker Passport next to the jewelry in at least one reference shot per lighting setup gives the retoucher an objective neutral point to calibrate white balance. This removes guesswork and ensures metals and gemstones are color-corrected against a known standard rather than the retoucher's subjective judgment. For gemstones especially, a ColorChecker Passport creates a custom camera profile that teaches the editing software how to render ruby reds, emerald greens, and sapphire blues accurately for that specific sensor and lighting combination.
Clean the jewelry before every shot. It sounds basic, but dust and fingerprints are dramatically magnified at macro distances. Using a microfiber cloth, anti-static brush, and cotton gloves before each exposure reduces the number of blemishes the retoucher needs to remove, directly cutting down per-image editing time.
Provide physical product references when possible. If you are outsourcing retouching to a team that does not have the actual piece in hand, sending a snapshot of the jewelry under natural daylight, or noting the specific metal alloy and gemstone type, helps the retoucher make informed color decisions rather than relying solely on what the studio image shows.
These steps are not about replacing professional retouching. They are about giving the retoucher a cleaner starting point so their time is spent on enhancement rather than damage control. A well-captured source file moves through the retouching pipeline faster, costs less per image, and produces a final result that more faithfully represents the actual product sitting in your inventory.
Photography and retouching are two halves of the same process. Getting the capture right reduces what needs to be fixed. Getting the retouching right ensures the final image meets your quality standard. The remaining piece of the puzzle is finding the right partner to handle that retouching consistently, especially as your catalog grows and the stakes of every product image increase.
Choosing the Right Jewelry Image Retouching Services Partner
Great source photography and a clear understanding of retouching techniques only get you so far if the team handling your files cannot deliver consistent, reliable results. Selecting a retouching partner is not like buying a commodity off a shelf. It is closer to hiring a specialist contractor: the relationship, communication, and fit matter as much as the technical skill. A wrong choice does not just waste money. It delays product launches, produces images that misrepresent your pieces, and forces you to start the search over again under pressure.
Whether you are a growing jewelry brand preparing your first outsourced batch or an established seller looking to switch providers, a structured evaluation process keeps you from making decisions based on price alone. Here is a practical framework for vetting candidates and building a partnership that holds up over time.
Key Criteria for Evaluating Retouching Providers
Not every photo editing company is equipped to handle jewelry. The reflective surfaces, tiny details, and color precision this category demands separate jewelry-focused retouchers from generalists who happen to list "product retouching" on their website. When you evaluate potential partners, these are the criteria that matter most:
- Portfolio relevance — Look for before-and-after samples that match your specific jewelry type. A provider with a portfolio full of apparel flat lays may be excellent at clothing, but that skill set does not automatically translate to editing diamond rings or pearl earrings. Ask to see work on the metals and gemstones you actually sell.
- Free test or sample edit — Providers who offer a complimentary trial on one or two of your images are signaling confidence in their quality. This step lets you judge their work on your actual products, not just curated portfolio pieces. A test project reduces risk and builds confidence before you commit to a larger batch.
- Communication responsiveness — Pay attention to how quickly and clearly a provider responds during the inquiry stage. If it takes three days to get a reply to your initial quote request, imagine the delays when you need a revision turned around before a product launch. Poor communication often leads to delays and mistakes that compound over time.
- Revision policy clarity — Know exactly how many revision rounds are included, what counts as a revision versus a new request, and what the turnaround looks like for corrections. Vague policies create friction the moment you need something adjusted.
- File security practices — Your product images are proprietary assets. Ask whether the provider uses secure file transfer, whether they have confidentiality agreements or NDAs in place, and how long they retain your files after delivery. This is especially important for unreleased collections or exclusive designs.
- Scalability — Your needs today might be 20 images a month. Six months from now, a new collection launch could mean 500 images in a single batch. A provider that struggles with volume will become a bottleneck exactly when you need them most. Ask how they handle large or sudden orders and whether their process changes at scale.
If you want to compare candidates side by side, send similar test images to more than one provider and evaluate the results against each other. Comparing editing quality, consistency, and turnaround on the same source files gives you an objective basis for your decision rather than relying on portfolio samples the provider hand-picked.
Red Flags and What to Avoid
Knowing what to look for is half the equation. Knowing what to walk away from is the other half.
The most common red flag is a provider that cannot show jewelry-specific work. If every sample in their portfolio is fashion, food, or real estate photography, they may not have the specialized experience to handle the unique challenges of jewelry photography retouching. Reflective metals and refractive gemstones require techniques that generalist retouchers rarely practice, and the learning curve shows up in your final images as over-smoothed textures, unnatural sparkle effects, or inaccurate metal tones.
Unclear pricing is another warning sign. If a provider quotes one rate during the inquiry phase and then adjusts it upward after receiving your files, citing "unexpected complexity," that is a process problem, not a one-time miscommunication. Reputable services ask enough questions upfront, or request sample images before quoting, to give you an accurate estimate that holds. A good company offers clear, transparent pricing, while a poor one relies on hidden or confusing fee structures.
No defined revision process is a third red flag. Every retouching project involves some back-and-forth, especially during the first few batches when both sides are calibrating expectations. A provider that treats revision requests as inconveniences, charges extra for minor corrections, or has no structured way to receive and implement feedback is not set up for a productive long-term relationship. Professional providers handle revisions politely and efficiently, and their response to feedback reflects their overall service standards.
Finally, be cautious with providers who promise unrealistically fast turnaround at rock-bottom prices. As the industry saying goes, you can have it fast, cheap, or good — pick two. A quote that sounds too good on both speed and cost usually means quality control is being skipped, and you will spend more time requesting corrections than you saved on the initial rate.
Building a Long-Term Retouching Partnership
The real value of a retouching partner does not show up in the first order. It shows up in the tenth, the twentieth, and the fiftieth. Over time, a dedicated partner learns your brand's visual language: the exact warmth you prefer on your gold pieces, the shadow style that matches your storefront aesthetic, the level of gemstone enhancement that looks polished without crossing into unrealistic territory. That accumulated knowledge translates into faster turnaround, fewer revisions, and a level of visual consistency across your catalog that would be nearly impossible to achieve by switching providers every few months.
Start the relationship before you need it urgently. Onboarding takes time. The provider needs to understand your style guide, your platform requirements, and your quality expectations. You need to learn their submission process, communication preferences, and revision workflow. Trying to compress all of that into a two-week window before a holiday catalog deadline is a recipe for frustration on both sides. Ideally, run a test batch during a low-pressure period so both parties can calibrate without the stress of a looming launch date.
For jewelry brands and online sellers who need consistent image quality at scale, solutions built specifically for ecommerce jewelry imagery can simplify this process. Snappyit's Jewelry Retouch, for example, is designed around the needs of sellers who require polished, visually cohesive product images across growing catalogs, addressing the scalability and consistency criteria that matter most as your business expands.
After each completed project, invest five minutes in a brief debrief. Note what worked, what missed the mark, and any adjustments for the next batch. This feedback loop is what transforms a transactional vendor relationship into a genuine partnership. Over time, the retoucher anticipates your preferences, catches issues before you flag them, and delivers files that need fewer and fewer corrections.
Choosing the right partner to edit jewelry photos is not a one-afternoon decision. It is an investment in the visual foundation of your brand. The sellers who treat it that way, who evaluate carefully, onboard thoughtfully, and communicate consistently, are the ones whose product images do what they are supposed to do: make a customer stop scrolling and start buying.
Frequently Asked Questions About Jewelry Retouching Services
1. How much do jewelry retouching services cost per image?
Jewelry retouching pricing depends on complexity, retouching level, batch size, and turnaround speed. Basic edits like background removal typically range from $0.29 to $2.50 per image. Mid-level retouching with color correction and metal polishing falls between $3.99 and $7.49. High-end editorial work involving detailed diamond refinement and focus stacking composites can run $7.50 to $20 or more per image. Volume discounts of 10% to 30% are common for orders exceeding 100 images, and subscription models offer lower per-image rates for businesses with steady monthly needs.
2. What is the difference between basic and high-end jewelry retouching?
Basic jewelry retouching covers background removal to pure white, dust and scratch cleanup, and simple color correction, making it suitable for marketplace listings on Amazon or Etsy. Mid-level retouching adds metal polishing, gemstone enhancement, shadow creation, and refined color grading for brand websites and Shopify stores. High-end editorial retouching involves pixel-level work where every facet, reflection, and tonal transition is sculpted by hand, serving luxury campaigns, print catalogs, and billboard advertising. The right level depends on where your images will appear and the price point of the jewelry being sold.
3. Can jewelry retouching fix blurry or poorly lit photos?
Jewelry retouching can correct cosmetic flaws like dust, scratches, color casts, uneven reflections, and dull gemstone facets. However, it cannot recover fundamental capture failures. Badly out-of-focus images lack the pixel data needed for genuine detail recovery, and extreme motion blur creates the same limitation. Blown-out highlights from harsh lighting destroy surface texture information permanently. Slightly underexposing during the shoot, using diffused lighting, and shooting in RAW format give retouchers maximum data to work with and produce significantly better final results at lower cost.
4. What image specs do Amazon, Etsy, and Shopify require for jewelry listings?
Amazon requires pure white backgrounds at RGB 255,255,255 with a minimum of 1,000 pixels on the longest side for zoom functionality, preferring JPEG format. Non-compliant images trigger listing suppression from search results. Etsy recommends at least 2,000 pixels on the shortest side and allows white or lifestyle backgrounds in JPEG, PNG, or GIF format. Shopify stores benefit from consistent square-crop images at 2,048 x 2,048 pixels in JPEG, PNG, or WebP format. Professional retouching services like Snappyit's Jewelry Retouch (https://snappyit.ai/jewelry-retouch) can batch-export platform-specific versions from a single set of master files.
5. When should I outsource jewelry photo retouching instead of doing it myself?
Outsourcing becomes more cost-effective once you regularly edit more than 10 to 15 images per week. DIY jewelry retouching requires advanced Photoshop proficiency, color management knowledge, calibrated hardware, and 45 to 90 minutes per image for someone without specialized experience. At that time investment, the weekly hours spent editing quickly exceed the financial cost of professional services. Outsourcing also provides access to consistent batch workflows, eliminates software and hardware overhead, and frees your time for revenue-generating activities like product sourcing and marketing.
Generate your first professionally retouched jewelry photo in 90 seconds
Skip the back-and-forth, the per-image fees, and the 24-72 hour turnaround. Snappyit AI Jewelry Retouch cleans dust, fixes color, polishes prongs, and outputs marketplace-ready images on a clean white background.
Try Snappyit AI Jewelry Retouch free →