At a glance
Ghost mannequin editing techniques: joints, pen tool workflows, layer compositing, common fixes, and AI scaling for catalogs.
| Need | What to do |
|---|---|
| Get oriented | Read the short summary, then use the checklist below. |
| Create a test image | Try Ghost Mannequin Free |
What Is Ghost Mannequin Editing and Why It Matters
Imagine browsing an online store and seeing a jacket that looks like it is floating in midair, perfectly shaped as if worn by an invisible person. That three-dimensional, hollow garment look does not happen by accident. It is the result of a post-production technique that has become essential for clothing brands selling online.
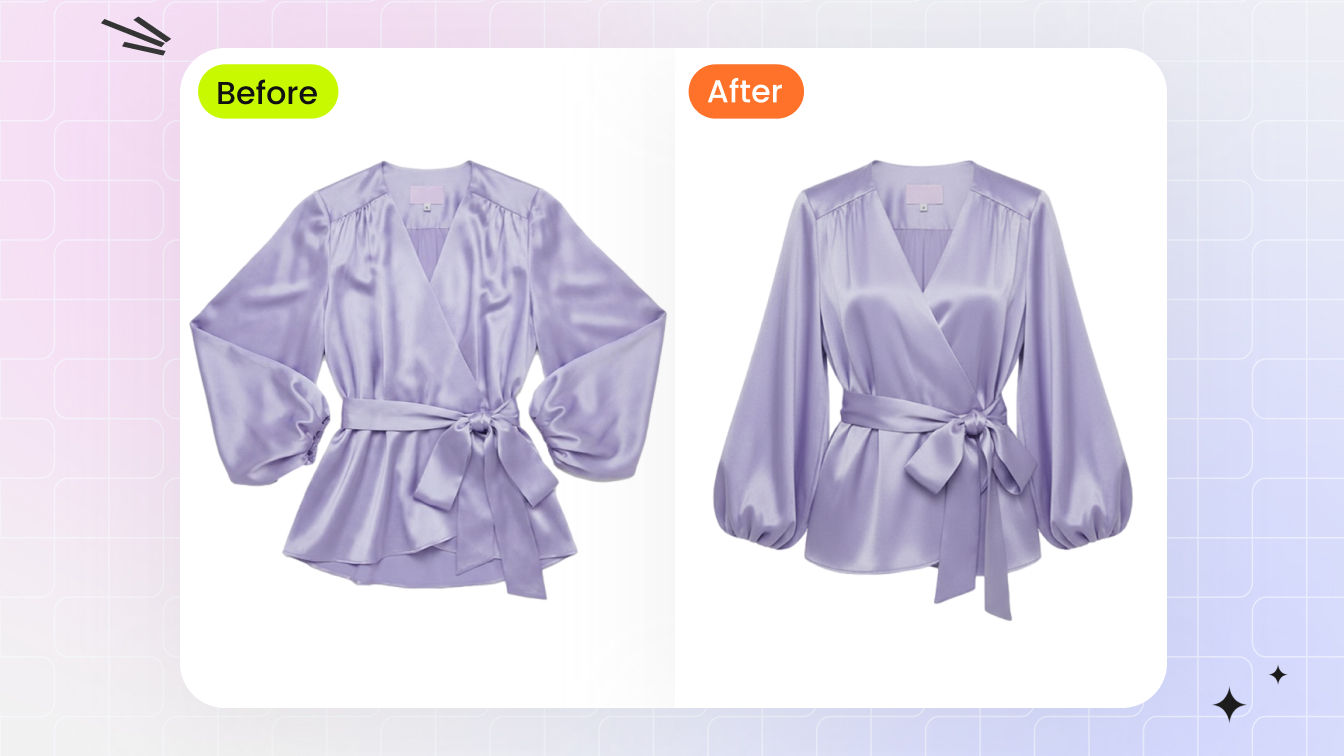
Ghost mannequin editing is a photo retouching process where a mannequin is digitally removed from product images, leaving a hollow, 3D garment appearance that showcases shape, fit, and interior construction without any visible support structure.
What Ghost Mannequin Editing Means
The ghost mannequin effect starts with photographing clothing on a physical form, then compositing multiple shots in post-production to erase the form entirely. The outer garment shot captures shape and drape. A separate interior shot reveals the collar, neckline, or waistband lining. These layers merge to create the invisible mannequin illusion, giving customers a clear sense of how the garment fits in three dimensions. You may encounter the spelling debate of mannequin vs manikin in industry discussions. Both refer to the same display form, though "mannequin" dominates in ghost mannequin photography contexts.
Why Ecommerce Brands Rely on This Technique
Flat lay photos strip away dimension. Model photography is expensive and inconsistent across large catalogs. Ghost mannequin editing splits the difference: you get a realistic sense of garment structure at a fraction of the cost of hiring models for every SKU. Brands like ASOS and Zara use this approach across thousands of products because it delivers visual consistency and scales efficiently.
The methods for achieving this effect range from manual Photoshop compositing with pen tool selections to AI-powered tools that automate mannequin removal in seconds. This guide walks through the full spectrum, covering joint types, file preparation, layer techniques, garment-specific workflows, common mistakes, and scaling strategies so you can produce flawless ghost mannequin images regardless of your skill level or catalog size.
Ghost Mannequin Types and When to Use Each
Not every garment hides the same areas when placed on a form. A button-down shirt conceals the inner collar and back neckline. A pair of trousers hides the waistband interior and crotch seam. A sleeveless dress leaves open armholes that need filling. Each scenario calls for a different compositing approach, and in professional editing, these approaches are categorized by joint type.
Understanding which joint type applies to your product determines how you photograph clothes on a mannequin and how many interior shots you need to capture. Choosing the right photography mannequins with removable parts also depends on this decision. Here is a breakdown of the four primary joint types used in ghost mannequin photography.
Neck Joint for Tops and Outerwear
The neck joint is the most common type you will encounter. It applies to any garment where the mannequin's neck and upper chest are visible through the collar opening: dress shirts, t-shirts, polo shirts, blazers, hoodies, and jackets. The editing goal is to reveal the inner collar, back neckline, and sometimes the upper back panel so the garment looks naturally hollow at the top.
To execute a neck joint, you need two shots at minimum. The first is the standard front-facing outer shot with the garment fully dressed on the mannequin. The second is an interior shot that exposes the inside of the collar and neckline area. Many photographers capture this by removing the mannequin's neck piece and photographing the garment's interior while it remains on the torso, or by flipping the collar area inside-out on a flat surface.
Bottom Joint for Pants and Skirts
The bottom joint restores the lower portions of a garment that the mannequin's base or legs obscure. Think of trousers where the inner waistband, crotch seam, and back yoke disappear behind the form. Skirts and dresses with detailed hemlines or inner linings also benefit from this technique. Without a bottom joint, these garments look incomplete, as if the lower edge simply vanishes into nothing.
Bottom joint editing requires a separate insert shot of the hidden lower area. For pants, this typically means photographing the inner waistband and crotch region draped or positioned separately. For skirts and dresses, you capture the hem and any inner lining detail. The insert is then composited beneath the outer layer to complete the garment's silhouette.
Sleeveless and Full Body Variations
Sleeveless joints handle tank tops, camisoles, and dresses with open armholes where the mannequin's shoulders or torso show through. The interior shot focuses on the armhole area and side panels, filling in the visible gaps left once the form is removed. This joint type is moderately complex because armhole curves require careful blending to look natural.
Full body composites combine multiple joint types into a single edit. A complete outfit, say a blazer over a dress, might need a neck joint at the top, sleeveless joints at the armholes, and a bottom joint at the hem. Full body work demands the most interior shots and the highest editing precision, but it produces the most impressive results for lookbook-style product pages.
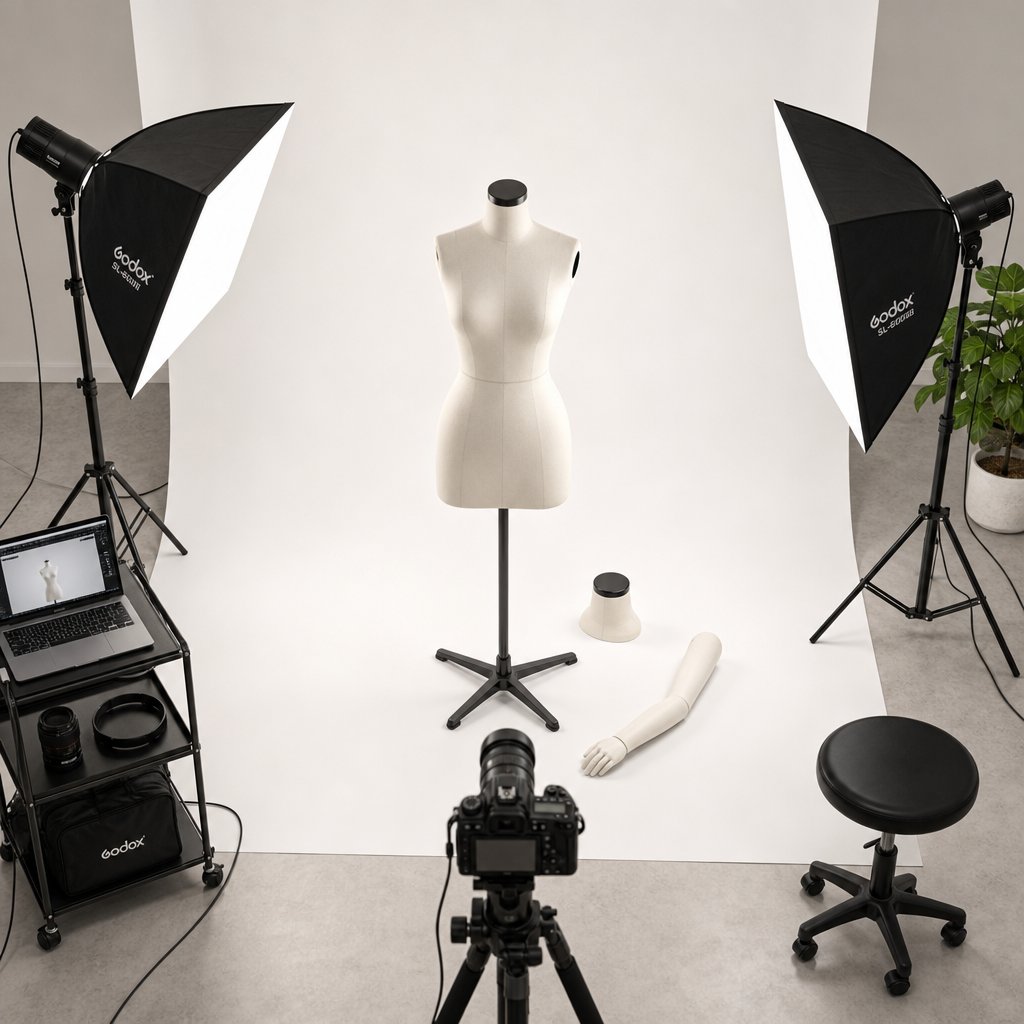
When selecting a mannequin for photography, look for forms with detachable neck, arm, and torso sections. These removable parts make it far easier to capture the interior angles each joint type requires without fully undressing the garment between shots.
| Joint Type | Best For | Required Shots | Complexity |
|---|---|---|---|
| Neck Joint | Shirts, tops, blazers, hoodies, jackets | Outer + inner collar/neckline | Low to moderate |
| Bottom Joint | Pants, skirts, longline coats, shorts | Outer + inner waistband/hem insert | Moderate |
| Sleeveless Joint | Tank tops, camisoles, sleeveless dresses | Outer + inner armhole/side panel | Moderate to high |
| Full Body | Complete outfits, layered looks, jumpsuits | Outer + multiple interior inserts (neck, arms, hem) | High |
Matching the correct joint type to your product category saves time during both the shoot and the edit. A simple crew-neck tee only needs a quick neck joint. A pair of tailored trousers demands a bottom joint with careful waistband alignment. Knowing these distinctions before you set up your camera means fewer reshoots and cleaner composites when you open your image editor.
Image Preparation and File Setup Before Editing
Knowing which joint type to use is only half the equation. The other half? Making sure your raw files are organized, color-consistent, and sized correctly before a single layer mask gets drawn. Skipping this step is like building furniture without measuring first. You end up with misaligned composites, color shifts between layers, and export headaches that eat into your editing time.
A solid pre-editing workflow prevents the most frustrating ghost mannequin editing problems at their source. Here is what to lock down before you open Photoshop.
Resolution and Color Profile Standards
Every ecommerce platform enforces minimum image dimensions, and falling short means rejected uploads or blurry product pages. Amazon requires at least 1000 pixels on the longest side, with 1600 pixels recommended for zoom functionality. Shopify works best at 2048 x 2048 pixels for square product photos. eBay sets a 500 x 500 pixel minimum but performs better at higher resolutions. Target asks for 1200 x 1200 pixels minimum.
Shoot at the highest resolution your camera supports. You can always downscale for specific marketplaces, but you cannot recover detail from an undersized mannequin photo. For most ghost mannequin images, capturing at 4000-6000 pixels on the long edge gives you enough room to crop, composite, and export to any platform without quality loss.
Color profiles matter just as much as pixel count. Shoot in Adobe RGB for maximum color gamut during editing, then convert to sRGB on export. Why? Most web browsers and ecommerce platforms display sRGB. If you edit in Adobe RGB and forget to convert, your garment colors will look muted or shifted on screen. Set your camera to Adobe RGB, edit in that space, and make sRGB conversion the final step before saving your marketplace files.
File Naming and Organization for Multi-Shot Composites
A single ghost mannequin photo requires at minimum two source files: the outer shot and the interior insert. Complex garments might need four or five. Multiply that across a 200-SKU catalog, and you are managing over a thousand images before editing even begins. Without a naming system, you will waste hours hunting for the right interior shot to match its outer counterpart.
Use a consistent naming convention that identifies the product, the angle, and the shot type at a glance. A structure like this works well:
- SKU_garment-type_outer-front (e.g., BLZ042_blazer_outer-front.ARW)
- SKU_garment-type_inner-neck (e.g., BLZ042_blazer_inner-neck.ARW)
- SKU_garment-type_outer-back (e.g., BLZ042_blazer_outer-back.ARW)
- SKU_garment-type_inner-hem (e.g., BLZ042_blazer_inner-hem.ARW)
Organize your folder structure by product, not by shot type. Each SKU gets its own folder containing all associated angles. This keeps compositing assets together and prevents the common mistake of pairing the wrong interior shot with an outer layer from a different garment in the same color.
Matching Color and Exposure Across Takes
Here is where many ghost mannequin composites fall apart invisibly. You shoot the outer garment at 10 AM under consistent studio lighting. Then you remove the mannequin's neck piece, reposition the garment, and capture the interior shot fifteen minutes later. The light shifted slightly. Your white balance drifted by 200 Kelvin. The exposure is a third of a stop brighter because the reflective mannequin surface is no longer bouncing light back onto the fabric.
These small differences become obvious once you layer the shots together. The inner collar looks warmer than the outer body. The neckline insert appears slightly overexposed against the surrounding fabric. The composite screams "edited" instead of looking seamless.
Color matching between composite layers is critical for believable results. As Peachpit's compositing guide emphasizes, if the color temperature is off between source images, the composite will obviously look fake. You should always adjust brightness and contrast first, then address color balance between your layers.
Prevent mismatches at the source by locking your camera settings between takes. Use manual white balance set to a fixed Kelvin value rather than auto. Keep ISO, aperture, and shutter speed identical for all shots of the same garment. If your lighting setup uses strobes, verify that power output has not shifted between the outer and inner captures.
For corrections that still need to happen in post, batch-apply base exposure and white balance adjustments in Lightroom or Capture One before moving files into Photoshop. Match the histogram profiles of your outer and inner shots so they share the same tonal range. This single step eliminates the most common source of visible seams in ghost mannequin composites.
Before you start cutting paths and building layer stacks, run through this pre-editing checklist:
- Verify all source files meet your target platform's minimum resolution requirements.
- Confirm camera color profile is set to Adobe RGB (convert to sRGB only on final export).
- Check that every SKU folder contains all required shots: outer front, inner insert(s), and back if needed.
- Compare white balance values across outer and inner shots for each garment. Correct any drift.
- Batch-adjust exposure so outer and inner layers share matching brightness and contrast levels.
- Rename any files that do not follow your naming convention before they enter the editing pipeline.
- Back up raw files to a separate drive before beginning destructive edits.
This preparation phase typically adds ten to fifteen minutes per batch, but it saves hours of pixel-level correction later. When your outer garment layer and inner insert already share the same color temperature, exposure, and resolution, the compositing stage becomes about precision masking rather than fighting mismatched source material. That distinction separates clean, professional ghost mannequin images from edits that never quite look right no matter how much time you spend refining edges.
The Pen Tool Workflow for Cutting Garments in Photoshop
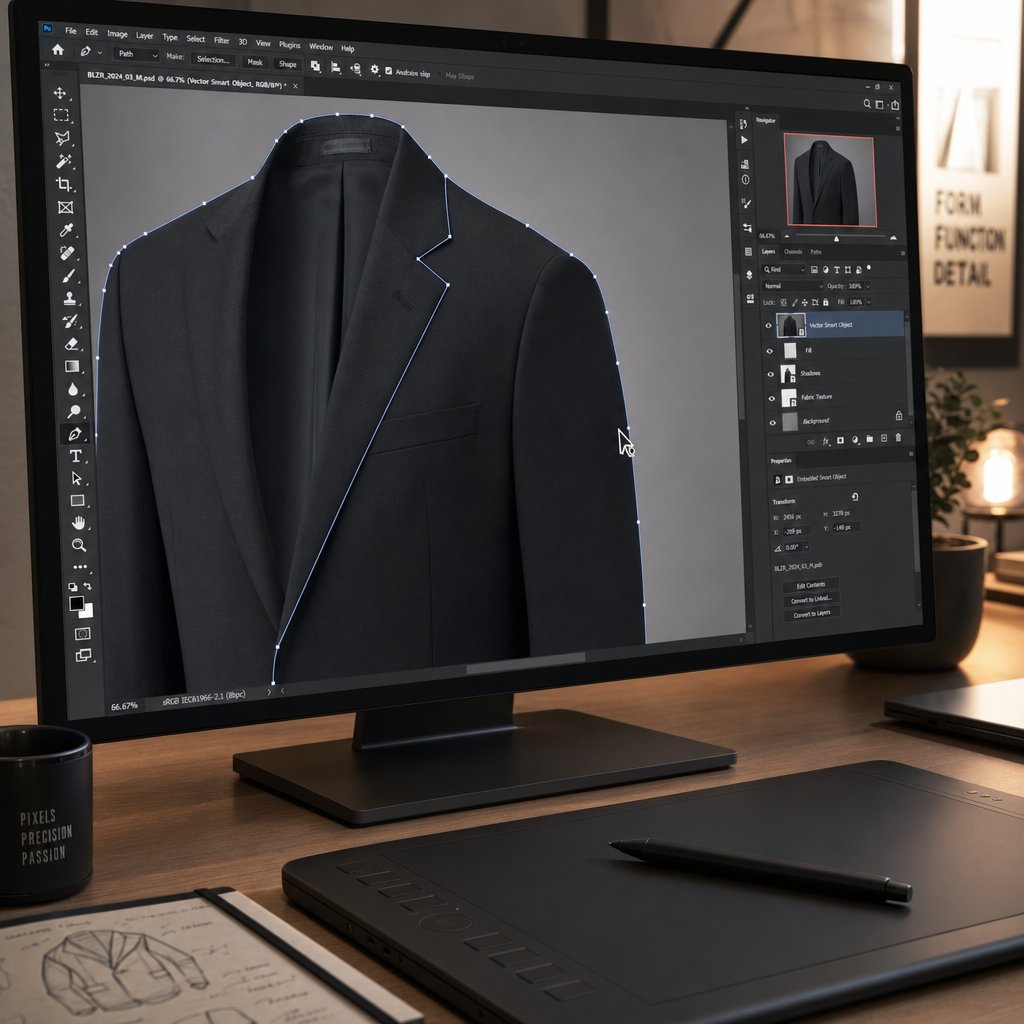
Your files are organized, color-matched, and ready to composite. The first real editing decision you face is how to separate the garment from the mannequin beneath it. In ghost mannequin Photoshop workflows, the pen tool remains the gold standard for this task. It produces vector-based paths that stay crisp at any zoom level, can be saved and reused, and give you complete control over every curve and corner of the garment edge.
Other selection methods exist, and they have their place. But for ghost mannequin photo editing where precision determines whether the final composite looks professional or obviously stitched together, the pen tool earns its reputation. Here is how to use it effectively.
Anchor Point Strategy for Clean Selections
The biggest mistake beginners make with the pen tool? Placing too many anchor points. Every extra point introduces a potential wobble in your path. The goal is to describe the garment's outline with the fewest points possible while still capturing its shape accurately.
Think of it this way: straight edges need almost nothing. A shirt's side seam running vertically might require just two anchor points, one at the top and one at the bottom. Gentle curves like a sleeve's outer edge need a few more, spaced evenly to let the Bezier handles do the shaping work. Tight curves around armholes, collar notches, or button plackets demand closer point spacing because the direction changes rapidly.
A practical rule of thumb:
- Straight edges: One anchor point every 2-4 inches of garment edge
- Gentle curves: One anchor point every 0.5-1 inch
- Tight curves and corners: One anchor point every 0.25-0.5 inch, with direction handles shortened or converted to corner points
Place your anchor points directly on the garment edge, not inside or outside it. Zoom to at least 200-300% so you can see exactly where fabric ends and mannequin begins. As PathFoto's clipping path guide recommends, zooming in up to 300% helps you precisely follow every curve and detail, especially on complex objects with intricate edges.
Work in a consistent direction around the garment, either clockwise or counterclockwise. This keeps your path predictable and makes it easier to close cleanly when you return to the starting point. When you reach the first anchor point again, you will see a small circle appear next to your cursor, indicating the path is ready to close.
Handling Collars and Cuffs and Complex Edges
Collars are where ghost mannequin effects live or die. The collar edge is the most visible transition point in a neck joint composite, and sloppy pathing here creates an obvious tell. For a dress shirt collar, you are dealing with sharp corners at the collar points, a gentle curve along the collar band, and potentially a gap where the collar stands away from the neck.
At sharp corners like collar points or lapel notches, convert your anchor point from a smooth curve to a corner point. In Photoshop, hold Alt (Option on Mac) and click the anchor point to break the handle connection. This lets you change direction abruptly without creating a rounded bulge where the fabric clearly has a crisp fold.
Cuffs present a similar challenge. The outer edge of a rolled cuff has a defined crease line that needs a sharp path transition, while the inner curve where the cuff wraps around follows a smooth arc. Alternate between smooth points and corner points as the fabric dictates.
Lace edges and semi-transparent fabrics require a different mindset entirely. You cannot path every individual lace scallop with the pen tool alone. Instead, path the general outer boundary of the lace, then refine the selection later using Select and Mask with edge detection. The pen tool gives you the broad shape; edge refinement tools handle the intricate transparency.
For handle manipulation on curves, remember two principles. First, the length of a direction handle controls how far the curve extends before bending. Longer handles create wider, more gradual curves. Shorter handles produce tighter arcs. Second, the angle of the handle determines the curve's direction at that point. Drag handles along the tangent line of the curve you are tracing, not toward the next anchor point.
Refining Selections With Feathering and Edge Detection
Once your pen tool path is complete, convert it to a selection (Ctrl+Enter on Windows, Cmd+Return on Mac). But a raw path-to-selection conversion produces a hard, pixel-sharp edge that rarely matches how fabric actually looks in a photograph. Real garment edges have a slight softness from depth of field, fabric texture, and anti-aliasing.
Apply a feather radius of 0.3 to 0.8 pixels for most garment edges. This subtle softening prevents the cut-out look that screams "edited." You can apply feathering during the Make Selection dialog or afterward through Select > Modify > Feather. For crisp fabrics like starched cotton or leather, stay at the lower end. For knits and soft jerseys, push toward 0.8 pixels.
When should you skip the pen tool entirely? The Quick Selection tool works well for garments photographed against high-contrast backgrounds where the color difference between fabric and mannequin is stark. It is fast but imprecise, best suited for initial rough selections that you plan to refine manually. Select and Mask (Ctrl+Alt+R) excels at handling hair-like fibers, fuzzy knit edges, and sheer fabrics where hard paths fail. Use it as a refinement pass after your initial pen tool or quick selection work.
The hybrid approach works best for most ghost mannequin photo editing scenarios: pen tool for the main garment body where edges are defined, then Select and Mask for problem areas like loose threads, fuzzy textures, or semi-transparent overlays.
Before moving on, save your completed path. Go to the Paths panel (Window > Paths), double-click the Work Path, and give it a descriptive name like "outer-garment-front." Saved paths are non-destructive. They persist in your PSD file indefinitely, letting you regenerate selections at any time without redrawing. If you need to adjust the composite later, perhaps after noticing a misalignment in the layer structure, your path is waiting exactly where you left it.
Layer Structure and Shadow Compositing for Ghost Mannequin Product Photography
Your garment is cleanly cut from the mannequin, and your saved path sits ready in the Paths panel. The next question is structural: how do you stack, name, and organize the layers so your composite holds together, remains editable, and can be replicated across hundreds of products? A messy layer stack is not just an inconvenience. It is the reason edits break down when you revisit a file weeks later or hand it off to another retoucher.
Professional clothing photography ghost mannequin workflows depend on a predictable, non-destructive layer architecture. Here is how to build one that scales.
Organizing Outer and Inner Layers for Non-Destructive Editing
Think of your layer stack as a sandwich. The background sits at the bottom. The inner insert layers go in the middle. The outer garment layer sits on top, masking everything beneath it except the areas where the mannequin used to be. This order ensures the outer garment always dominates visually while the inner pieces fill only the hollow spaces.
A standard ghost mannequin clothing photography layer stack looks like this, from top to bottom:
- Outer-Front — The main garment shot with mannequin masked out via layer mask
- Inner-Neck — The collar/neckline insert, positioned behind the outer layer
- Inner-Hem — The waistband or hem insert (if applicable)
- Back-Panel — The back view insert for full 3D depth (if applicable)
- Shadow — A dedicated layer for painted or generated shadows
- Background — Solid white or your target background color
The critical rule here: never use the Eraser tool on your garment layers. Erasing permanently destroys pixel data. Layer masks accomplish the same visual result while keeping every original pixel intact beneath the mask. If you need to reveal more of the inner layer, paint black on the outer layer's mask. Need to hide part of the inner insert? Paint black on its mask. Every adjustment stays reversible.
For garments you plan to resize or reposition later, convert your outer and inner layers to Smart Objects before applying transformations. Smart Objects preserve the original resolution regardless of how many times you scale, rotate, or warp the layer. This matters in ghost product photography when you need to nudge an inner collar piece into better alignment after initially placing it. Without Smart Objects, each transformation degrades pixel quality slightly, and those losses compound.
Shadow Creation That Grounds the Garment
A garment floating on pure white with no shadow looks detached from reality. Customers subconsciously register this as artificial, even if they cannot articulate why. Shadows anchor the product to a surface and add the dimensional cues that make ghost mannequin product photography feel tangible.
Three shadow approaches work for different contexts:
Drop shadows are the most common choice for clean ecommerce backgrounds. Create a new layer directly below your garment stack. Use a soft-edged brush at 15-30% opacity with a dark gray color (never pure black) to paint a subtle shadow beneath the garment's lowest edge. Apply a Gaussian Blur of 8-15 pixels to soften the shadow naturally. This technique works for catalog-style listings where uniformity across hundreds of images matters most.
Natural shadows replicate the soft, directional shadows your studio lighting originally created. If your original photograph captured a usable shadow before you removed the background, preserve it on a separate layer during your initial masking. Adjust its opacity to 20-40% so it reads as subtle depth rather than a heavy dark spot. Natural shadows suit lifestyle-oriented product pages where realism outweighs strict catalog consistency.
Cast shadows stretch to one side, simulating a directional light source. These add drama and dimension but require more skill to execute convincingly. Paint the shadow on a dedicated layer, transform it using Edit > Transform > Distort to angle it away from the garment, then reduce opacity and apply blur. Cast shadows work best for hero images or featured product shots rather than bulk catalog work.
Regardless of which type you choose, keep shadows on their own layer, separate from the garment layers. This lets you adjust shadow intensity, blur, and position independently without touching your composite. If a marketplace requires a pure white background with no shadows, you simply toggle the shadow layer off.
Building Reusable Templates for Repeated Garment Types
When you are editing 50 crew-neck t-shirts in the same style, rebuilding the layer stack from scratch each time wastes hours. Instead, save your completed composite as a template PSD with all layers intact, properly named, and organized into groups.
A recommended layer naming convention for template reuse:
- [ProductType]_outer-front — e.g., Tee_outer-front
- [ProductType]_inner-neck — e.g., Tee_inner-neck
- [ProductType]_shadow-base — e.g., Tee_shadow-base
- [ProductType]_bg — e.g., Tee_bg
- Group folders by function: "Garment Layers," "Shadows," "Background"
With consistent naming, Photoshop Actions can target specific layers by name. An action that adjusts shadow opacity on "shadow-base" will work across every template that follows the same convention. This is where layer discipline pays off at scale: your automation tools depend on predictable structure to function reliably.
Save templates for each garment category you edit regularly. A blazer template differs from a t-shirt template in the number of inner layers and shadow complexity. A pants template needs a bottom joint insert that tops never require. Maintaining separate templates per category means you start each new edit with the correct layer architecture already in place, reducing setup time to a simple drag-and-drop of new source images into existing layer positions.
The difference between a garment that looks professionally composited and one that looks pasted together often comes down to these structural decisions. Clean layer organization, non-destructive masks, and purposeful shadow work transform a technical edit into a convincing product image. But even with perfect layer structure, different garment types demand different compositing strategies, and that is where the real complexity begins.
How Editing Differs by Garment Type
A well-organized layer stack and clean pen tool paths get you far, but here is the reality: a tailored blazer and a chiffon maxi dress have almost nothing in common when it comes to compositing. The fabric behaves differently, the mannequin conceals different areas, and the number of interior shots you need changes dramatically. Treating every garment the same way during a mannequin photoshoot leads to inconsistent results and wasted editing time.
Each garment category brings its own set of challenges. Understanding these differences before you start editing means you can plan your mannequin photography sessions more efficiently and choose the right techniques for each product type.
Structured Garments Like Blazers and Jackets
Blazers, sport coats, and structured jackets are among the most demanding items in mannequin product photography. The reason? They have rigid construction elements that must look precise in the final composite. Shoulder pads create defined lines that cannot warp or shift during editing. Lapels fold at specific angles that reveal the inner lining beneath them. Collar stands hold their shape independently of the body underneath.
The editing challenge with structured garments centers on the shoulder-to-lapel transition. When you remove the mannequin, the area where the lapel folds back exposes a triangle of inner lining and sometimes the shirt beneath. This requires a dedicated interior shot that captures the lapel fold, the inner facing fabric, and the upper chest area in one clean frame. Many photographers need three or four interior shots for a single blazer: one for the neck and collar, one for the lapel fold, and potentially separate shots for each open cuff if the sleeves are unlined.
Fabric behavior works in your favor here. Structured garments hold their shape well, meaning your outer shot and inner shots align predictably. The stiff canvas and padding inside a blazer shoulder do not shift between takes the way a silk blouse would. This makes layer alignment straightforward, but it also means any misalignment is immediately obvious to the viewer because the rigid lines betray even a one-pixel offset.
Flowing Fabrics and Dresses
Dresses, blouses, and garments made from lightweight fabrics like chiffon, silk, or rayon present the opposite problem. These materials drape, fold, and shift constantly. The garment you photograph for the outer shot may settle differently by the time you capture the interior, creating alignment headaches during compositing.
Preserving natural drape is the primary goal with flowing fabrics. When you mask out the mannequin, the garment's silhouette should still look like gravity is acting on it. Overly sharp edges or geometric masking paths make soft fabrics look artificially stiff. Use slightly higher feathering values on your selections (0.6-1.0 pixels) and follow the fabric's natural fall rather than imposing clean geometric lines.
Semi-transparent fabrics add another layer of complexity. Sheer panels, mesh inserts, or lightweight cotton that lets the mannequin show through cannot be handled with a simple path-and-mask approach. You need to isolate the transparent area, remove the mannequin color showing through it, and replace it with the appropriate background while preserving the fabric's opacity and texture. This often involves channel-based selections or careful use of blending modes to separate the fabric from the form beneath it.
For a photoshoot mannequin session involving flowing garments, capture your interior shots immediately after the outer shot without removing the garment from the form. The less you disturb the fabric between takes, the better your layers will align in post-production.
Pants and Bottoms and Accessories
Pants, shorts, and skirts demand convincing waistband interiors. The mannequin's waist and hip area is completely hidden by the garment, and once removed, that entire zone needs filling with an interior shot that shows the inner waistband, brand label, and sometimes the fly construction. The crotch seam area is particularly tricky because it curves in three dimensions and must look natural from the front view.
For e commerce product photography involving bottoms, the bottom joint composite requires careful scaling. The interior waistband shot is often captured at a slightly different angle or distance than the outer shot, so you will need to transform it to match. Use Free Transform with Warp mode to bend the interior piece into alignment with the outer garment's waistline curve.
Accessories like bags, shoes, and hats follow entirely different composite logic. These items typically are not photographed on a traditional mannequin at all. Instead, they use props, stands, or stuffing that needs removal. A handbag might be propped open with tissue paper and a wire frame. Shoes sit on a transparent stand. The editing principles remain the same, selecting and masking the support structure, but the interior compositing step often disappears entirely. You are simply removing a prop rather than filling a hollow space.
| Garment Type | Composite Complexity | Required Shots | Key Editing Challenges |
|---|---|---|---|
| Blazers and Jackets | High | 3-4 (outer, inner collar, lapel fold, cuffs) | Shoulder alignment, lapel angle precision, rigid edge matching |
| Flowing Dresses and Blouses | Moderate to High | 2-3 (outer, inner neckline, hem lining) | Drape preservation, sheer fabric handling, alignment drift |
| Pants and Shorts | Moderate | 2-3 (outer, inner waistband, back yoke) | Waistband curvature, crotch seam realism, scaling inserts |
| T-Shirts and Knits | Low | 2 (outer, inner collar) | Soft edge feathering, fabric stretch consistency |
| Accessories (Bags, Shoes) | Low to Moderate | 1-2 (outer, alternate angle) | Prop removal, no interior composite needed, shadow realism |
The complexity rating in this table directly affects your per-image editing time. A simple t-shirt neck joint might take five minutes once you have a template. A fully lined blazer with open lapels and visible cuff interiors can take 25-30 minutes of careful compositing. Planning your mannequin photography workflow around these time differences helps you quote accurately, schedule realistically, and allocate the right level of attention to each product category.
Even with the right technique for each garment type, certain problems show up repeatedly across all categories. Visible seams, color drift, and proportion errors do not discriminate by fabric weight or garment structure, and recognizing these patterns is what separates competent editing from truly polished results.
Common Ghost Mannequin Editing Mistakes and Fixes
You can follow every step correctly, use the right joint type, organize your layers perfectly, and still end up with a composite that looks off. The frustrating part? These problems are often subtle. A slight color shift between layers, a seam that only appears at full zoom, a shadow that falls in the wrong direction. Customers may not consciously identify what is wrong, but they register the image as untrustworthy. In invisible mannequin photography, the goal is invisibility. Any artifact that draws attention to the edit undermines the entire purpose.
Here are the five most common mistakes that plague invisible ghost mannequin photography composites, along with the root cause and correction technique for each.
- Visible seams between composite layers — The inner collar or hem insert meets the outer garment layer, and a faint line appears at the junction. Fix: Use a soft brush at 10-20% opacity on the layer mask edge to gradually blend the transition. Zoom to 300% and paint along the seam with alternating black and white strokes until the boundary disappears.
- Color mismatch between layers — The inner neckline looks warmer or cooler than the surrounding fabric. Fix: Add a Curves or Hue/Saturation adjustment layer clipped to the inner insert. Sample the outer garment's color temperature and match the insert to it. Small shifts of 5-10 units on the blue/yellow channel usually resolve white balance drift.
- Proportion distortion from incorrect scaling — The inner piece looks too large or too small relative to the outer garment, making the collar opening or waistband appear stretched or pinched. Fix: Use Free Transform with reference points aligned to visible seams or stitching that appears in both layers. Match stitch spacing or fabric pattern repeats between the inner and outer shots to confirm correct scale.
- Unnatural shadows that reveal the edit — A shadow falls in a direction inconsistent with the rest of the image, or a dark halo appears where the mannequin used to be. Fix: Delete any residual mannequin shadow from the original shot. Rebuild shadows on a dedicated layer using a soft brush with 15-25% opacity, following the same light direction visible in fabric highlights and folds.
- Harsh edges from poor masking — The garment outline looks cut-and-pasted, with unnaturally sharp or jagged borders that real fabric never produces. Fix: Apply Select and Mask refinement with a feather of 0.5-1.0 pixels and shift the edge inward by 1-2 pixels. This pulls the mask boundary slightly inside the garment, eliminating fringe pixels from the mannequin or background.
Fixing Visible Seams Between Composite Layers
Seams are the most common giveaway in invisible mannequin product photography. They appear because the outer layer's mask edge and the inner layer's visible boundary do not blend smoothly. The root cause is almost always a mask that is too hard, a perfectly sharp line where the two layers meet.
The fix involves softening both sides of the junction. On the outer layer's mask, use a soft-edged brush at low opacity to feather the boundary inward by a few pixels. On the inner layer, do the same along its visible edge. The overlap zone where both layers partially show creates a gradual transition that mimics how fabric naturally folds into itself. If a faint brightness difference persists at the seam, add a Levels adjustment layer clipped to the inner piece and nudge the midtones until the luminosity matches.
Correcting Color Mismatches and White Balance Drift
Color drift happens when the outer and inner shots were captured under slightly different lighting conditions, even a few minutes apart in the same studio. The human eye adapts to these shifts in real time, but once you layer the images together, the difference becomes obvious. A navy blazer's collar insert might lean slightly purple while the body reads true blue.
The correction workflow starts with comparing histograms. Open the Info panel and sample identical fabric areas on both layers. If the RGB values diverge by more than 5-8 points on any channel, you have a mismatch worth correcting. Create a Curves adjustment layer clipped to the problem layer and adjust individual channels until the sampled values align. For batch work, record this correction as an Action so you can apply it across similar images without repeating the sampling process manually.
Eliminating Proportion Distortion and Unnatural Shadows
Proportion errors creep in when the inner insert was photographed at a different distance or focal length than the outer shot. The insert might be slightly larger or smaller than the space it needs to fill. Forcing it into position with Free Transform alone can stretch fabric texture unnaturally.
Instead, use visible reference points. Stitching lines, button spacing, or fabric pattern repeats that appear in both the outer and inner shots serve as alignment anchors. Scale the inner piece until these reference markers match their counterparts on the outer layer. If no clear reference exists, compare the width of the garment opening in both shots and scale proportionally.
Unnatural shadows typically result from leftover mannequin shadows that were not fully removed during masking. These residual dark areas sit in positions that contradict your newly created shadow layer, producing conflicting depth cues. The solution is straightforward: inspect the area immediately surrounding your garment edge at 200-300% zoom. Any dark fringe or gradient that does not match your intentional shadow layer needs to be masked out or cloned away before the composite can read as convincing.
These five mistakes account for the vast majority of quality issues in ghost mannequin composites. Catching them requires zooming in beyond what feels necessary and evaluating each junction point individually. The good news? Once you train your eye to spot these patterns, fixes take seconds rather than minutes. The real question becomes whether to invest that time per image manually or look for faster production methods, especially when your catalog grows beyond what careful hand-editing can sustain.
Manual Photoshop vs AI Tools vs Outsourcing
Catalog size changes everything. Editing five blazers by hand each week is manageable. Editing five hundred t-shirts before a seasonal drop? That is a fundamentally different problem. The technique stays the same, but the production method needs to match your volume, budget, and quality threshold. Three distinct approaches dominate ghost mannequin editing workflows today, and each occupies a different sweet spot on the cost-quality-speed spectrum.
AI-Powered Ghost Mannequin Tools
Ghost mannequin AI tools have matured rapidly. Platforms like Snappyit's Ghost Mannequin solution use machine learning models trained on fashion product imagery to detect mannequin structures, remove them, and reconstruct the hollow garment effect automatically. You upload a product shot, the AI identifies the form beneath the fabric, and outputs a composited image in minutes rather than the 20-45 minutes a manual edit demands.
The practical appeal is straightforward: you skip the pen tool paths, the layer stacking, and the seam blending entirely. For ecommerce operators processing high volumes of standard garments like tees, knitwear, and simple dresses, a ghost mannequin app powered by AI handles the bulk of catalog work at consistent quality. Industry testing shows AI workflows deliver roughly 85% faster processing compared to manual Photoshop methods, with most standard garments reaching publishable quality without manual intervention.
Where does AI fall short? Complex garments with unusual draping, multi-layer composites like open blazers with visible linings, or luxury items requiring pixel-perfect precision still benefit from human editing. The realistic expectation is that AI handles 80-90% of a typical catalog effectively, with the remaining items flagged for manual polish. If you have ever searched to build me a list of ai ghost-mannequin services, you will find the landscape growing quickly, but the key differentiator remains how well a tool handles edge cases and preserves fabric texture in the final output.
Manual Photoshop Editing Pros and Limitations
Manual editing in Photoshop remains the quality ceiling for ghost mannequin work. A skilled retoucher with the pen tool techniques covered earlier in this guide can produce flawless composites that no automated tool consistently matches on complex garments. Every edge, shadow, and color transition gets individual attention.
The trade-off is time and cost. Professional ghost mannequin image editing services charge $8-25 per image depending on complexity and turnaround requirements. A structured blazer requiring multiple interior composites can take 45-90 minutes of skilled labor. For a 200-SKU monthly catalog at $12 average per image, you are looking at $2,400 in direct editing costs before accounting for revisions or quality control passes.
Manual workflows make sense in two scenarios: small catalogs where per-image cost is absorbed easily, and premium products where brand standards demand absolute perfection. Luxury retailers and high-end fashion brands often maintain manual workflows for hero products while using faster methods for everyday catalog items.
Pros
- Highest possible quality ceiling with no algorithmic limitations
- Complete creative control over every composite detail
- Handles any garment complexity, including unusual constructions
Cons
- Time-intensive: 15-90 minutes per image depending on garment type
- Requires advanced Photoshop expertise and months of practice
- Scales linearly with labor, making large catalogs expensive
- Quality varies between editors, creating consistency challenges
Outsourcing to Professional Editing Services
Outsourcing ghost mannequin photography service work to dedicated editing studios offers a hands-off production model. Companies like Visuals Clipping and similar providers maintain teams of trained retouchers who handle the entire compositing pipeline. You upload raw files, specify your requirements, and receive finished images within 24-48 hours.
The economics shift depending on where the service operates. US-based studios charge $15-35 per hour for skilled retouchers. Offshore providers in South and Southeast Asia offer rates of $3-8 per image, making them attractive for volume work. The primary advantages of outsourcing include eliminating software costs, avoiding the management overhead of in-house staff, and accessing scalable capacity during peak seasons without permanent hiring commitments.
The downsides? Communication lag, style inconsistency across different editors handling your account, and less control over revision cycles. Turnaround times of 24-48 hours per batch mean you cannot react as quickly to urgent product launches. For photographers and brands who value creative control, the feedback loop required to maintain a consistent look across thousands of images can become its own time sink.
Outsourcing fits best for operators who lack internal editing expertise, need predictable per-image pricing, and can plan their production schedules around 1-2 day turnaround windows.
| Factor | AI Tools (e.g., Snappyit) | Manual Photoshop | Outsourced Services |
|---|---|---|---|
| Cost per Image (100 images/month) | Under $1 | $8-25 | $3-15 |
| Processing Time per Image | 3-5 minutes | 15-90 minutes | 24-48 hour batch turnaround |
| Quality (Standard Garments) | High | Highest | High |
| Quality (Complex Garments) | Moderate, may need touch-ups | Highest | High, varies by editor |
| Scalability | Near unlimited at flat rate | Linear to labor hours | Scalable with cost increase |
| Skill Required | Basic tool proficiency | Advanced Photoshop expertise | None (fully managed) |
| Consistency | Uniform across batches | Variable by editor | Moderate, depends on team |
| Best For | High-volume catalogs, fast turnaround | Premium products, complex garments | Hands-off production, no internal team |
Many operators searching for a photoroom ghost mannequin solution or evaluating an ai mannequin generator end up adopting a hybrid strategy rather than committing to a single method. The pattern that works for most mid-size ecommerce brands: run standard catalog items through AI tools like Snappyit for speed and cost efficiency, reserve manual Photoshop work for flagship products or garments the AI flags for review, and use outsourced services as overflow capacity during peak seasons.
The right choice depends on three variables: your monthly SKU volume, your quality threshold, and how much editing expertise exists on your team. At fewer than 50 images per month, manual editing or outsourcing both work without breaking the budget. Cross the 200-image mark, and the economics tilt decisively toward AI-assisted workflows. Beyond 500 monthly images, the cost and time savings of ghost mannequin AI tools become difficult to justify ignoring.
Whichever approach you choose for individual images, the real efficiency gains come from how you structure the production pipeline around it. Batch processing, template reuse, and export automation determine whether your chosen method actually scales or simply shifts the bottleneck from editing to file management.
Scaling Your Ghost Mannequin Workflow for Large Product Catalogs
Choosing the right editing method, whether AI, manual, or outsourced, solves the per-image problem. But a 500-SKU seasonal launch is not 500 individual problems. It is a pipeline problem. The bottleneck shifts from "how do I edit this garment" to "how do I move a thousand files from raw capture to marketplace-ready exports without losing quality, consistency, or my sanity." Batch processing transforms ghost mannequin for ecommerce work from a craft into a production system.
Whether you run a ghost mannequin photography studio handling client catalogs or manage product imagery in-house, the principles are the same: automate the repetitive, standardize the structure, and reserve human attention for decisions that actually require judgment.
Photoshop Actions and Template Files for Speed
Photoshop Actions record a sequence of editing steps and replay them with a single click. For mannequin photography for ecommerce workflows, this means capturing the repetitive tail end of every edit: flattening layers, resizing to platform dimensions, applying output sharpening, converting color profiles, and saving in the correct format. These steps are identical across every image in a batch, making them ideal candidates for automation.
The key to reliable Actions is consistent layer naming. An Action that targets a layer called "shadow-base" will fail silently if your file uses "Shadow" or "drop_shadow" instead. This is why the naming conventions from your template files matter beyond simple organization. They are the interface between your manual compositing work and your automated export pipeline.
Building effective Actions starts with identifying which steps repeat without variation. A typical ghost mannequin photographer's Action set might include:
- Flatten and Resize for Amazon — Merges visible layers, resizes to 2000x2000 pixels, converts to sRGB, saves as JPEG at quality level 10
- Flatten and Resize for Shopify — Merges visible layers, resizes to 2048x2048 pixels, converts to sRGB, saves as JPEG at quality level 11
- Export with Transparency — Hides background layer, merges garment layers, exports as PNG-24 for use in custom layouts
- Apply Output Sharpening — Runs Unsharp Mask at 50% amount, 1.0 pixel radius for web-resolution images
Template PSD files take this further. Instead of starting each edit from a blank canvas, you open a pre-built file with the correct layer structure, named groups, and placeholder masks already in position. Drag your new source images into the template, align them to the existing guides, and your compositing environment is ready in seconds rather than minutes. For a ghost mannequin photography studio processing dozens of similar garments daily, templates cut setup time by 60-70% per image.
Record your Actions on a template file so the layer names and structure match exactly. Then use File > Automate > Batch to run the Action across an entire folder of completed composites. Adobe's batch editing workflow references your source folder and a destination folder, applying the recorded steps to every file without manual intervention. Set the destination to a clearly labeled export folder, and your marketplace-ready images appear there automatically.
Export Optimization for Different Marketplaces
Each ecommerce platform enforces its own image specifications, and exporting a single version for all channels means you are either over-delivering file size or under-delivering resolution somewhere. A structured export pipeline produces platform-specific variants from your master composite in one pass.
Here is what the major platforms require for product images:
| Platform | Recommended Size | Max File Size | Preferred Format | Background |
|---|---|---|---|---|
| Amazon | 2000 x 2000 px | 10MB | JPEG | Pure white (RGB 255,255,255) |
| Shopify | 2048 x 2048 px | 20MB | JPEG (auto-converts to WebP) | Flexible |
| Walmart | 2000 x 2000 px | 5MB | JPEG or PNG | White preferred |
| Your Own Website | 1500-2500 px (long edge) | Varies | WebP for performance, JPEG fallback | Brand-specific |
Data from Onramp Funds' marketplace image standards guide confirms that Amazon requires pure white backgrounds with the product filling at least 85% of the frame, while Walmart enforces a 3:4 aspect ratio specifically for fashion items. These differences mean a single export preset cannot serve all channels.
File format choice affects both quality and page load speed:
- JPEG at quality 10-11 (out of 12) — Best balance of file size and visual quality for marketplace listings. Keeps most images under 500KB at 2000px dimensions.
- PNG-24 — Use when you need transparency (garment on no background for custom page layouts) or when the platform requires lossless quality. File sizes run 3-5x larger than JPEG.
- WebP — 25-35% smaller than equivalent JPEG at the same visual quality. Ideal for your own website where you control the format. Shopify auto-converts uploaded JPEGs to WebP for delivery, so you get this benefit without manual conversion there.
Build separate export Actions for each platform. Name them clearly: "Export_Amazon_2000px," "Export_Shopify_2048px," "Export_WebP_1500px." When a batch finishes compositing, run the appropriate Action set against your completed files folder. The result is a set of platform-specific subfolders, each containing correctly sized, formatted, and color-profiled images ready for upload.
When to Automate vs When to Use AI
Photoshop Actions automate the mechanical steps after compositing is done. They handle resizing, format conversion, sharpening, and file management brilliantly. What they cannot do is make creative decisions: detecting where the mannequin ends and the garment begins, reconstructing hollow interiors, or blending composite seams. Those tasks still require either human judgment or machine learning.
This is where the distinction between automation and AI matters for scaling decisions. A recommended batch processing workflow for high-volume catalogs looks like this:
- Organize raw files into per-SKU folders following your naming convention (outer, inner, back shots grouped together).
- Batch-apply base exposure and white balance corrections in Lightroom or Capture One across all source files.
- Composite each garment using your template PSD files, or route standard items through an AI tool for automated mannequin removal.
- Run quality control on completed composites, flagging any images with visible seams, color drift, or proportion issues.
- Apply platform-specific export Actions to the approved composites folder, generating marketplace-ready variants.
- Upload to each channel using bulk upload tools or direct API integrations.
Steps 1, 2, 5, and 6 are fully automatable with existing tools. Step 4 requires human eyes. Step 3 is where your production method choice, manual vs AI vs outsourced, plugs into the pipeline.
For teams processing more than 200 images monthly, even optimized Photoshop Actions hit a ceiling. You still need a human to open each file, perform the composite, and save it before the Action can handle export. The digital mannequin removal step remains the bottleneck regardless of how fast your export pipeline runs. This is precisely where AI-powered solutions change the economics.
Snappyit's Ghost Mannequin solution bypasses the manual compositing step entirely, accepting product photos and delivering finished ghost mannequin images without requiring template files, layer stacking, or pen tool work. For operators who find that even a well-optimized batch workflow cannot keep pace with their catalog growth, an ai mannequin tool like this replaces the slowest link in the chain rather than just speeding up the steps around it.
The concept of a virtual manikin, where software reconstructs the 3D garment appearance without any physical form in the final image, is no longer experimental. Photoroom's scaling research shows that automation reduces both cost and turnaround time by over 90% compared to manual editing at enterprise volumes, with businesses processing 50,000+ images annually saving between $499,000 and $1,000,000 by shifting from manual to automated workflows.
The practical decision framework is straightforward. If your monthly volume stays under 100 images, Photoshop Actions and templates give you enough speed without additional tooling costs. Between 100 and 500 images, a hybrid approach works: AI handles standard garments while you manually composite complex pieces. Above 500 monthly images, the time savings of routing everything through an AI-first pipeline and only pulling flagged items back for manual review becomes the only sustainable model. Your export Actions and template files still matter in a hybrid workflow. They standardize the final output regardless of whether the composite was built by hand or generated by an algorithm, ensuring every image that reaches your marketplace listings meets identical specifications.
Ghost Mannequin Editing FAQs
1. What is ghost mannequin editing and how does it work?
Ghost mannequin editing is a post-production technique where a mannequin is digitally removed from product photos, leaving a hollow, 3D garment appearance. The process involves photographing clothing on a form, capturing separate interior shots of hidden areas like collars or waistbands, then compositing these layers in Photoshop or AI tools to create the invisible mannequin illusion. This gives customers a clear sense of garment shape and fit without the distraction of a visible form or the expense of model photography.
2. What are the different types of ghost mannequin joints?
There are four primary joint types used in ghost mannequin photography. The neck joint is most common, used for tops and outerwear where the inner collar needs revealing. The bottom joint handles pants and skirts by restoring hidden waistband interiors. The sleeveless joint fills armhole gaps on tank tops and camisoles. Full body composites combine multiple joint types for complete outfits or layered looks, requiring the most interior shots and highest editing precision.
3. How much does ghost mannequin editing cost per image?
Costs vary significantly by method. AI-powered tools like Snappyit process images for under $1 each with 3-5 minute turnaround. Manual Photoshop editing by professional retouchers runs $8-25 per image depending on garment complexity. Outsourced editing services from offshore providers charge $3-8 per image with 24-48 hour batch turnaround, while US-based studios charge $15-35 per hour. Most mid-size brands adopt a hybrid approach, using AI for standard items and reserving manual work for complex garments.
4. Can AI tools replace manual Photoshop for ghost mannequin editing?
AI tools handle approximately 80-90% of a typical catalog effectively, delivering around 85% faster processing than manual methods. They excel at standard garments like t-shirts, knitwear, and simple dresses. However, complex items with unusual draping, multi-layer composites like open blazers with visible linings, or luxury products requiring pixel-perfect precision still benefit from human editing. The most efficient approach for growing catalogs is routing standard items through AI solutions like Snappyit while manually compositing only the flagged complex pieces.
5. What are the most common ghost mannequin editing mistakes?
The five most frequent mistakes are visible seams where composite layers meet, color mismatches from white balance drift between shots, proportion distortion from incorrect scaling of interior inserts, unnatural shadows that contradict the lighting direction, and harsh edges from poor masking. Most issues stem from inconsistent shooting conditions between outer and inner takes. Preventing them starts with locking camera settings between shots, matching exposure in raw processing before compositing, and using soft-edged layer masks with 0.3-0.8 pixel feathering rather than hard selections.
Generate your first AI ghost mannequin image in 90 seconds
Skip the Photoshop joint masking and 30-minute editing rounds. Snappyit AI Ghost Mannequin takes one flat-lay and outputs a clean, body-shaped catalog image in seconds.
Try Snappyit AI Ghost Mannequin free →