At a glance
Ghost mannequin online: DIY, editing services, and AI tools compared. Pick the method that fits your volume, budget, and skill level.
| Need | What to do |
|---|---|
| Get oriented | Read the short summary, then use the checklist below. |
| Create a test image | Try Ghost Mannequin Free |
What Ghost Mannequin Photography Is and Why It Exists
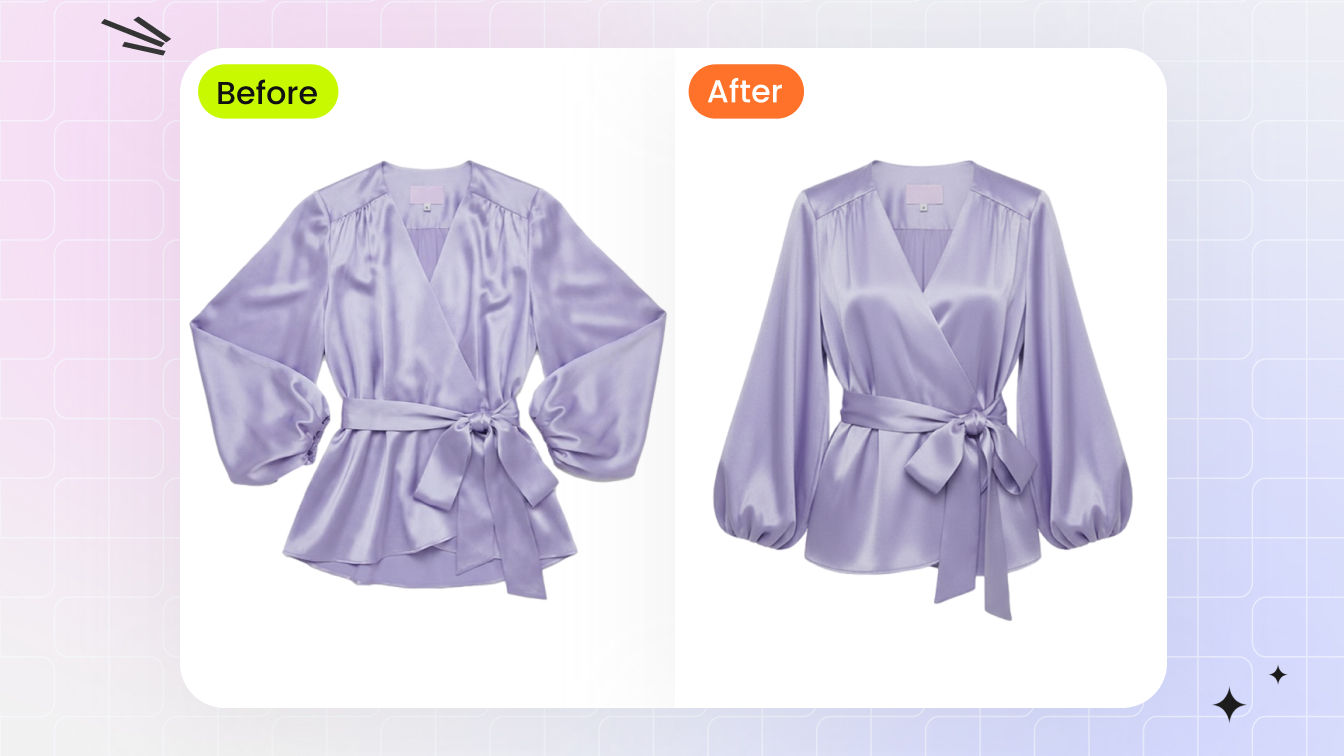
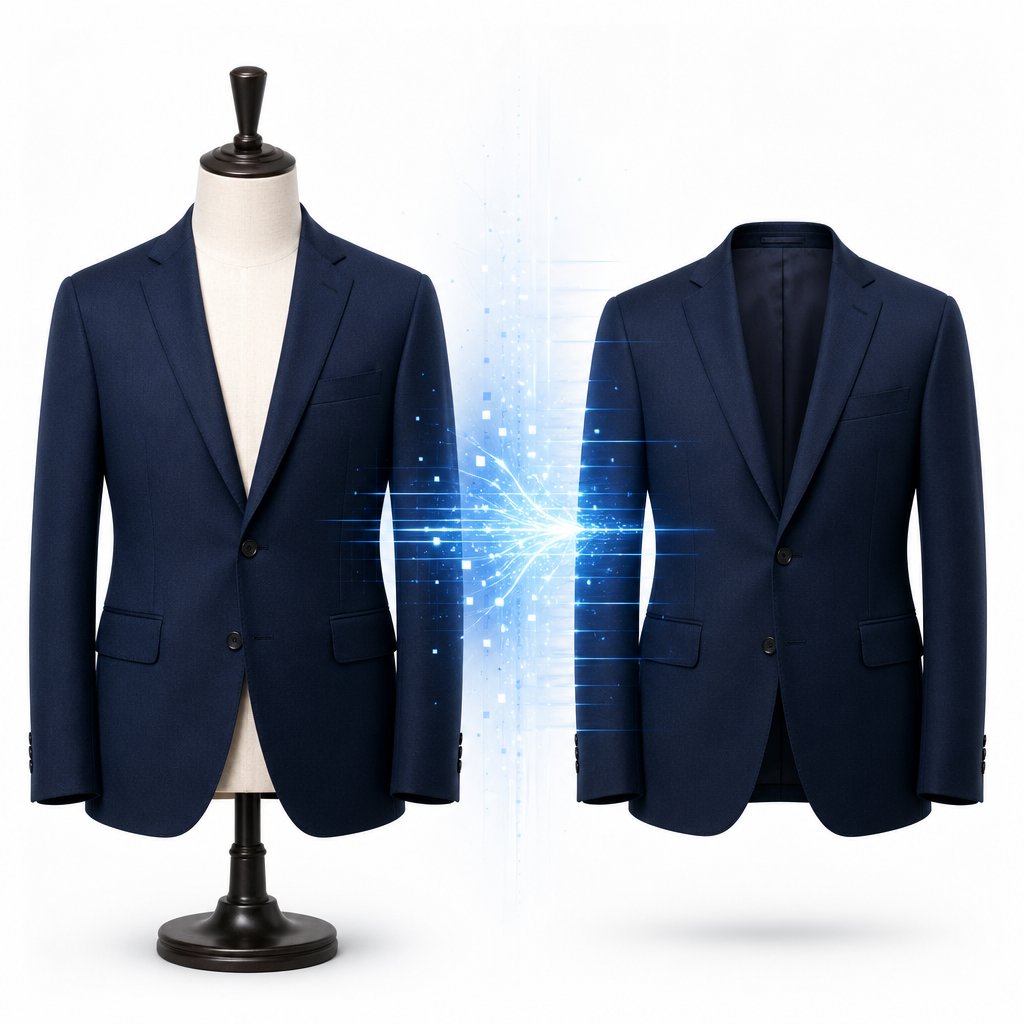
Imagine browsing an online clothing store and seeing a jacket that looks like it is floating in midair, perfectly shaped as if worn by an invisible person. No model, no mannequin, no hanger — just the garment holding its three-dimensional form. That is the ghost mannequin effect in action, and it has become one of the most widely used techniques in ecommerce product photography.
Ghost mannequin photography is the technique of photographing a garment on a mannequin and then digitally removing the mannequin in post-production so the clothing appears to hold its three-dimensional shape on its own, creating a hollow-man effect that highlights fit, structure, and drape.
What Ghost Mannequin Photography Means
Also called the invisible mannequin or neck joint technique, this method produces images where clothing looks realistic and lifelike without any visual distractions. The process involves capturing the garment on a physical mannequin, then photographing the interior sections separately, and finally compositing both shots together while erasing the mannequin entirely. The result is a clean, professional image that gives garments a 3D, dimensional appearance — as if they are being worn by an invisible person. Ghost mannequin photo editing services originally grew out of print catalog production, where brands needed a repeatable, cost-effective way to show garment fit and construction details across hundreds of SKUs without booking live models for every shoot.
Why Online Retailers Rely on the Invisible Mannequin Effect
When you shop in a physical store, you can touch the fabric, hold a shirt up to your body, and get a sense of how it drapes. Online shoppers have none of that. They rely entirely on images to judge whether a garment is worth buying. Flat lay shots can make clothing look lifeless, and hanger images rarely communicate shape or proportion. The ghost mannequin for ecommerce solves this gap by presenting clothing in a structured, human-like silhouette that helps customers visualize fit. This approach also creates a consistent aesthetic across an entire product catalog, which makes online stores look more polished and trustworthy. As product photography experts note, the mannequin ghost technique bridges the gap between online shopping and the in-store experience by helping buyers feel more confident about how an item will actually look and fit.
Three Paths to a Ghost Mannequin Image
Getting to that clean, hollow-man result is not a one-size-fits-all process. Sellers and brands typically choose from three main approaches. The first is DIY compositing — shooting the garment yourself and manually removing the mannequin in Photoshop, layer by layer. The second is outsourcing to a professional editing service that handles the post-production work for a per-image fee. The third, and increasingly popular, option is using AI-powered online tools that automate mannequin removal in seconds. Each method comes with its own trade-offs in cost, speed, skill requirements, and output quality — and picking the wrong one for your situation is where most sellers stumble. Understanding what each path actually involves is the first step toward making a smarter choice.
The Traditional Ghost Mannequin Editing Workflow Explained
So what does the manual process actually look like from start to finish? Before evaluating any shortcut — whether that is a professional editing service or an AI-powered tool — you need a clear picture of the ghost mannequin editing workflow those alternatives are designed to replace. Every step in this sequence directly affects the quality of the final image, and skipping or rushing any one of them is where most quality problems begin.
Shooting the Front and Interior Panels
The traditional ghost mannequin technique requires at least two separate photographs of the same garment: an outer shot on the mannequin and an interior shot that reveals the hidden areas behind the mannequin's neck and body. Here is the shooting sequence most professionals follow:
- Dress and style the mannequin. Steam or iron the garment thoroughly — wrinkles are the single fastest way to make a product photo look amateur, and they are far easier to fix with an iron than with Photoshop. Place the garment on the mannequin and use pins, clips, or double-sided tape along the back to pull excess fabric tight and create a clean, fitted silhouette. Button or zip everything up. Make sure collars sit symmetrically and sleeves fall at a consistent length.
- Photograph the front view. With your camera locked on a tripod at chest height, capture the garment straight on against a white or light gray seamless backdrop. Keep the framing consistent — the garment should be centered with even margins on all sides. Shoot in manual mode at f/8 to f/11 for edge-to-edge sharpness, ISO 100 for minimal noise, and a fixed white balance so colors stay accurate across every frame.
- Photograph the back view. Rotate the mannequin 180 degrees without moving the camera or lights. This gives you the rear angle using identical settings and framing.
- Capture the interior shot. This is the step many beginners forget, and it is what makes the composite possible. Remove the garment from the mannequin, then turn it inside-out or partially fold it to expose the inner collar, neckline, and waistband areas. Photograph these interior sections against the same background using the same lighting. Some photographers lay the garment on a foam board; others keep it on a partial mannequin with detachable neck and arm sections removed. Either way, this interior shot fills the gap where the mannequin's body used to be.
Without that interior photograph, your final image will have a visible hole where the mannequin was — and no amount of Photoshop skill can convincingly fill it from scratch.
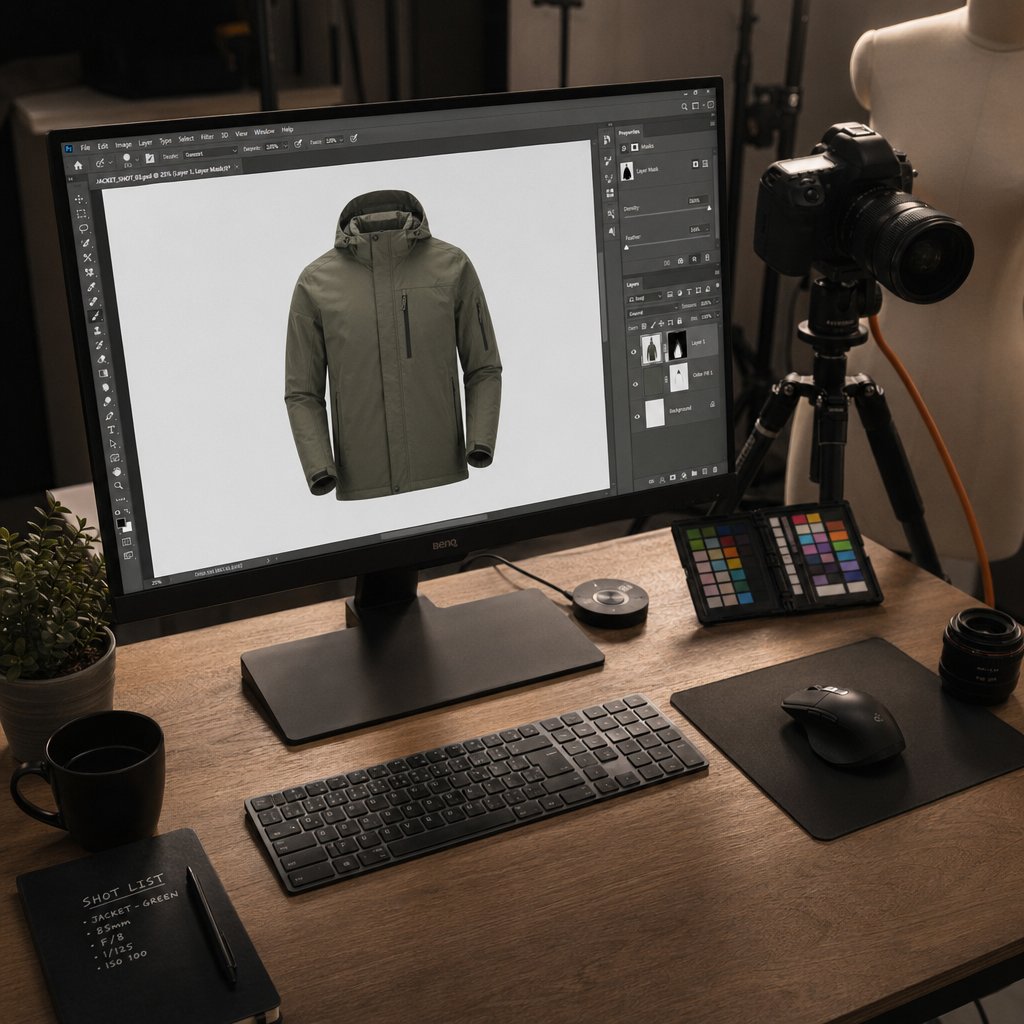
Compositing in Photoshop Step by Step
With your raw files in hand, the ghost mannequin photo editing process moves into Photoshop. Here is how the compositing typically works:
- Import and layer your files. Open the front-view mannequin shot as your base layer. Drag the interior shot in as a second layer above it. Lower the opacity of the interior layer to around 50% so you can align the collar and neckline areas precisely. If you shot on a tripod without moving the camera, the two images should line up almost perfectly.
- Mask out the mannequin. Switch to the front-view layer and use the Pen Tool for precision or the Quick Selection Tool for speed to select every visible part of the mannequin — neck, arms, torso, anything that is not the garment. Convert that selection into a layer mask. The mannequin disappears, leaving only the clothing and a hollow gap where the body was.
- Composite the interior fill. Switch to the interior layer and position it so the inner collar, neckline, or waistband fills the gap left by the removed mannequin. Mask out everything except the interior portion you need. Use a soft brush at 3 to 5 pixels on the mask edges to blend the interior shot seamlessly with the outer garment edge. This is the most detail-intensive part of the process — zoom in to 200 to 300% and take your time.
- Refine, shadow, and export. Flatten your layers and clean up any remaining mannequin artifacts around the collar, cuffs, and hem using the Clone Stamp or Content-Aware Fill. Add a subtle drop shadow beneath the garment to ground it and prevent the "floating in a void" look. Finally, color-correct if needed and export as both a high-resolution archive file and a web-optimized JPEG or WebP.
Time and Skill Requirements for Manual Editing
Here is the honest reality of ghost mannequin for photography done the traditional way: the compositing process requires intermediate-to-advanced Photoshop skills. You need to be comfortable with layer masks, the Pen Tool, edge refinement, and shadow simulation. A skilled editor can finish one image in roughly 15 to 30 minutes. Beginners often spend 30 to 60 minutes per garment, and complex items like layered jackets or garments with intricate collars push that time even higher.
Multiply those numbers across a catalog of 50, 100, or 500 SKUs, and the time investment becomes significant. Recording Photoshop actions for repetitive steps — background removal, shadow placement, export settings — can cut per-image time down to 5 to 10 minutes once you have a rhythm. But even with automation, the manual approach demands consistent attention to detail on every single frame.
That time and skill barrier is exactly why professional editing services and AI tools exist. The question is not whether the manual workflow produces great results — it does, when executed well. The question is whether it makes sense for your volume, your budget, and your team's capabilities. And answering that starts with knowing which garments are easiest to work with in the first place.
Which Garment Types Work Best with Ghost Mannequin Photography
Not every piece of clothing responds the same way when you place it on a mannequin and digitally erase the form underneath. Some garments practically do the work for you — they hold their shape, create clean edges, and composite beautifully. Others fight you at every step, collapsing, shifting, or producing artifacts that eat up your editing time. Knowing which category your products fall into before you start shooting saves hours of frustration and helps you decide whether the invisible mannequin approach is even the right call.
Garments That Produce the Cleanest Results
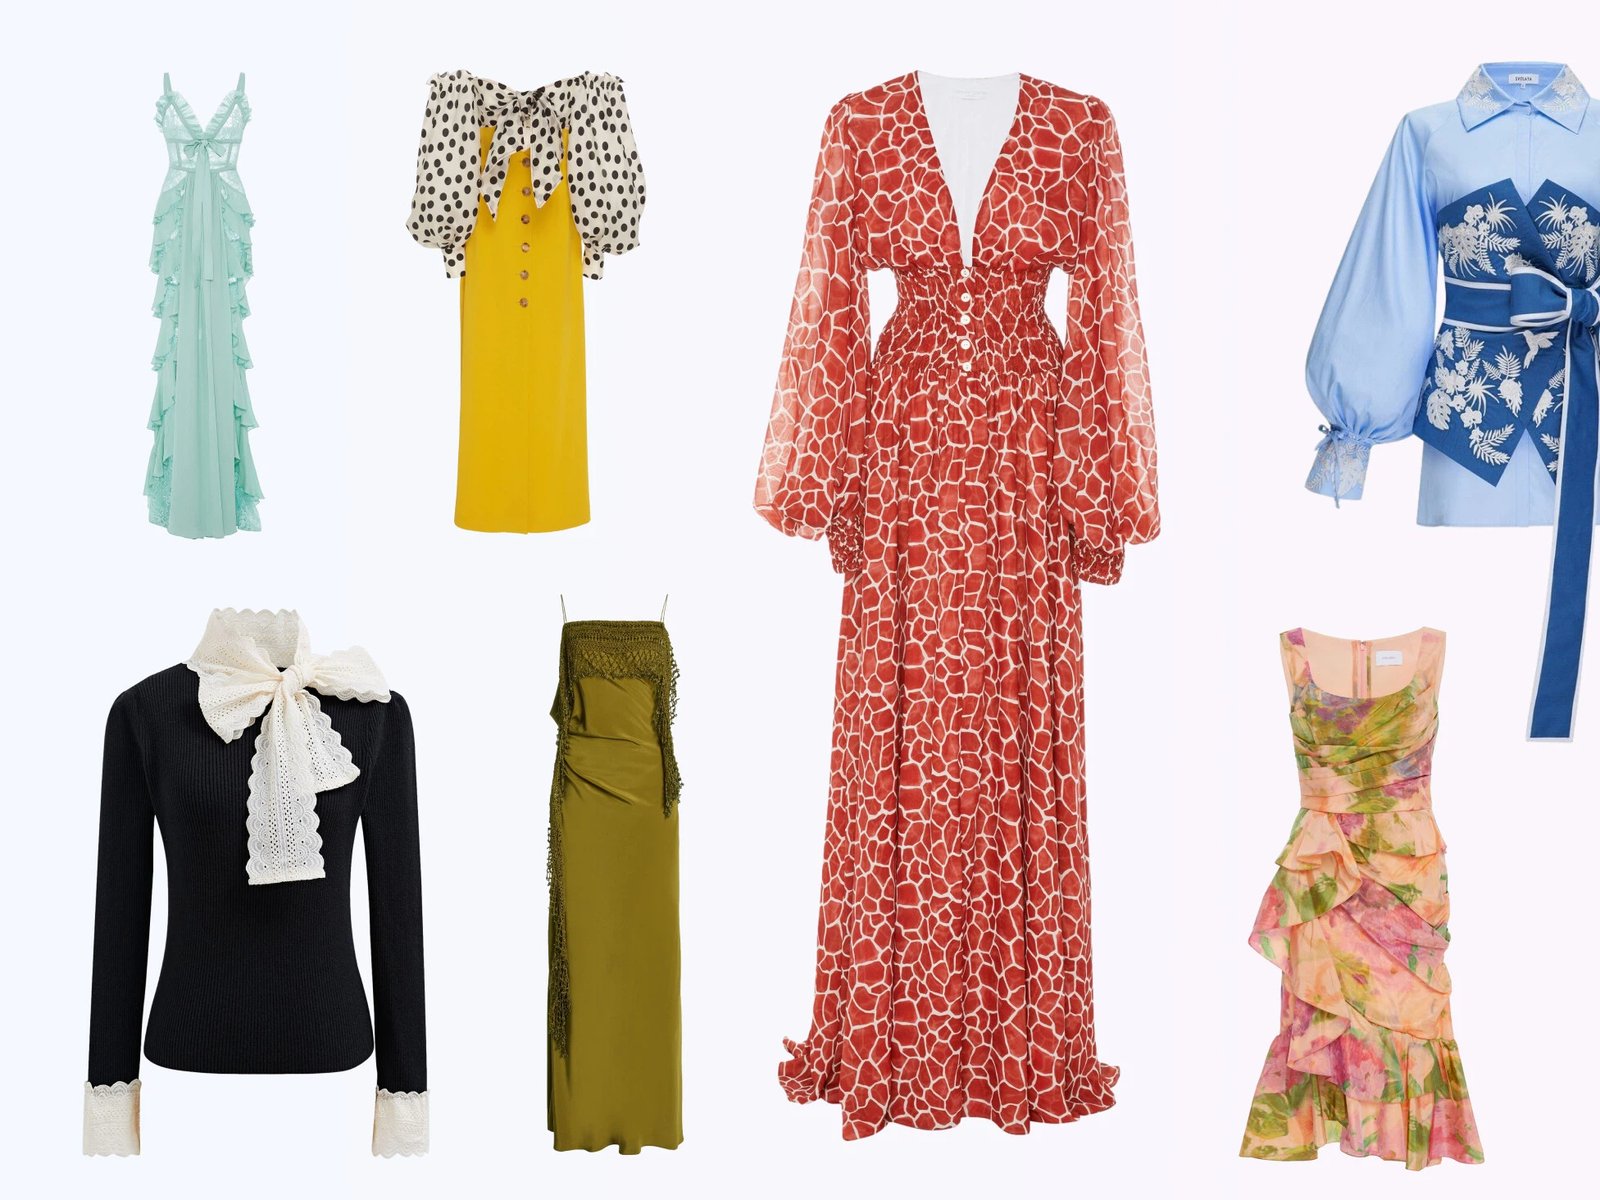
Structured tops are the sweet spot for mannequin product photography. Think blazers, suit jackets, button-down shirts, polo shirts, and outerwear with defined shoulders and collars. These garments hold their three-dimensional silhouette on the mannequin and maintain that shape convincingly after the form is removed. The fabric has enough body to stand on its own visually, and the clean lines around the collar and shoulders make masking straightforward.
Jeans, chinos, and tailored trousers also perform well. Denim and structured cotton hold their shape reliably, and the waistband creates a natural interior edge that composites cleanly — as long as you capture a solid interior shot of the waistband area. Structured dresses with defined bodices and heavier fabrics fall into this category too. If a garment looks good on a dress form in a retail store, it will likely photograph well for ghost mannequin images.
Challenging Fabrics and How to Handle Them
Lightweight and unstructured garments are where things get tricky. Silk blouses, chiffon tops, loose knit sweaters, and flowing maxi dresses tend to collapse or shift once the mannequin is removed digitally. The fabric does not have enough rigidity to maintain a convincing hollow-man silhouette on its own, so the final image can look deflated or unnatural.
You can still get usable results from these garments, but they demand more preparation. Extra pinning and clipping on the back of the mannequin helps create a tighter silhouette before you shoot. Knitted fabrics, for example, follow the form easily and create smooth contours, but that same flexibility means they can settle unevenly and lose definition around the shoulders and neckline if not carefully controlled. Technical fabrics used in activewear and swimwear introduce another challenge — reflective surfaces, coatings, and mesh panels react sharply to light and can appear overly shiny or distorted without precise lighting adjustments.
Post-production requirements shift based on fabric behavior too. Knits need subtle contour refinement that preserves their softness, while woven fabrics demand precision around seams and folds where shadows collect. The key takeaway: fabric weight, structure, and drape are the three variables that determine how much work a garment will require from shoot to final export.
When to Skip Ghost Mannequin and Use Another Method
Some products simply are not suited for this technique at all. Scarves, hats, belts, bags, and jewelry lack the body-shaped structure that makes the invisible mannequin effect work. Forcing these items onto a mannequin produces awkward results that look worse than a well-styled flat lay or prop shot. Flat lay photography is a stronger choice for accessories and lifestyle-oriented items, where creative arrangement and texture detail matter more than three-dimensional fit.
The table below breaks down suitability by garment category so you can quickly assess where your products land:
| Suitability Level | Garment Types | Why |
|---|---|---|
| Ideal | Blazers, suit jackets, button-down shirts, polo shirts, outerwear, structured dresses | Hold their shape on the mannequin; clean edges and collars composite easily |
| Moderate | Jeans, trousers, chinos, denim jackets, structured skirts | Work well overall but need careful interior waistband shots for a clean join |
| Challenging | Silk blouses, knit sweaters, chiffon tops, flowing dresses, activewear, swimwear | Fabric collapses or shifts; reflective or sheer materials require extra pinning, lighting control, and post-production refinement |
| Not Recommended | Scarves, hats, belts, bags, jewelry, socks | No body-shaped structure to create the hollow-man effect; flat lay or prop styling produces better results |
Matching your garment type to the right photography method is half the battle. The other half is making sure your shooting setup — lighting, background, camera settings, and garment prep — gives you the cleanest possible raw files to work with.
How to Photograph Clothes on a Mannequin for the Best Results
Your shooting setup is the foundation everything else builds on. It does not matter whether you plan to composite manually in Photoshop, send files to a professional editing service, or run them through an AI tool — if the raw photos are poorly lit, inconsistently framed, or full of wrinkles, the final ghost mannequin image will suffer. Garbage in, garbage out. The good news is that getting the technical side right is not complicated. It just requires discipline and a few deliberate choices before you press the shutter.
Lighting and Background Setup for Clean Edges
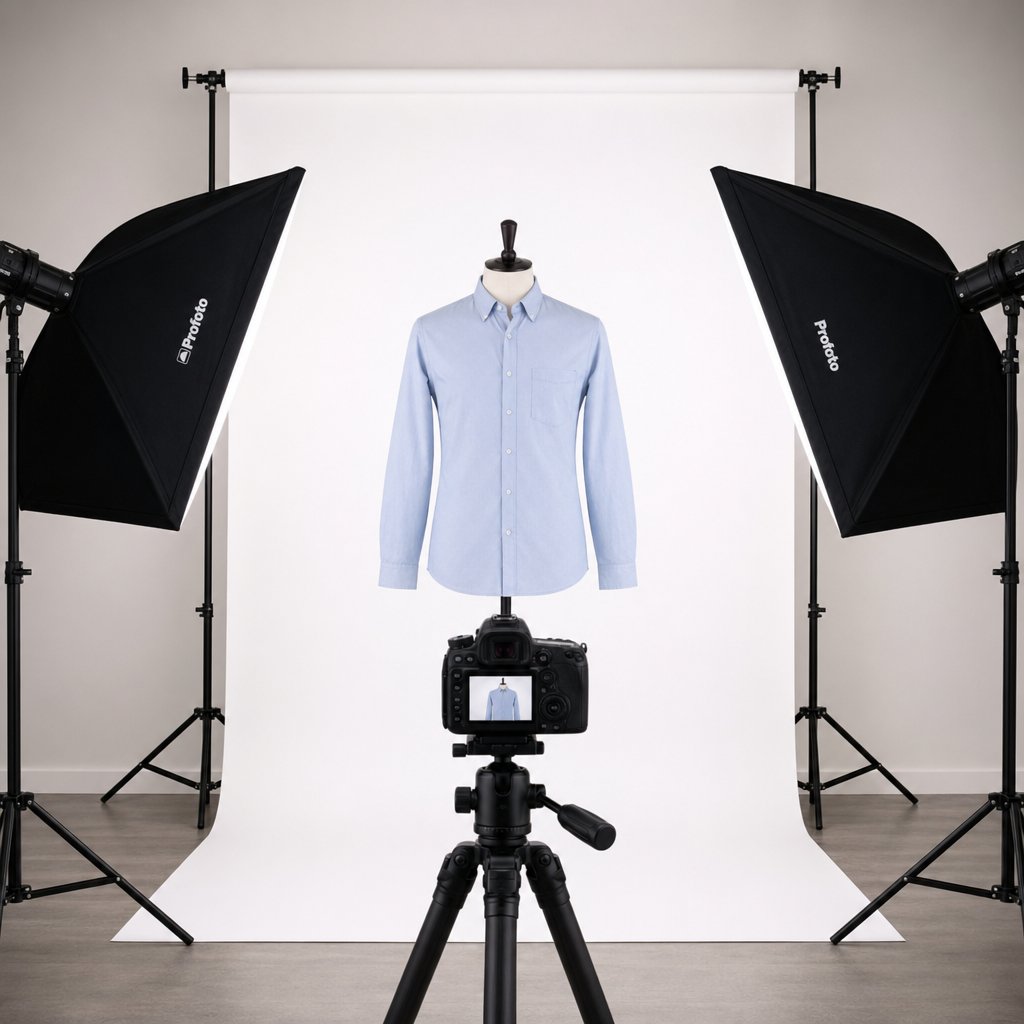
Lighting is the single biggest variable in how clean your mannequin removal will be. Harsh, uneven light creates strong shadows on the garment and along the mannequin's edges, which makes masking significantly harder — whether you are doing it by hand or relying on software to detect the boundary automatically.
The standard ghost mannequin lighting setup uses two softbox lights positioned at roughly 45-degree angles on either side of the mannequin. This creates even, diffused illumination that wraps around the garment without casting deep shadows on one side. Some photographers add a third light behind the backdrop to eliminate any shadow the mannequin casts on the seamless paper. The goal is not dramatic lighting — it is consistency and shadow control so that whites stay white and dark fabrics retain detail.
For the backdrop itself, a plain white seamless paper roll is the industry standard. White simplifies masking in post-production because the contrast between garment and background is clear and predictable. It also satisfies the image requirements of most major marketplaces — Amazon, Shopify stores, and eBay all prefer or require white backgrounds for primary product images. A light gray seamless works too, especially if you find pure white causes lens flare or blows out highlights on lighter garments. Just keep it consistent across your entire catalog. Switching between white and gray mid-shoot creates tonal mismatches that are tedious to correct later.
Camera Settings That Maximize Editing Flexibility
You do not need a top-of-the-line camera body to shoot great ghost mannequin photos. Any DSLR or mirrorless camera paired with a sharp lens in the 50mm to 85mm range will produce excellent results. What matters far more than the gear is how you configure it.
Shoot in full manual mode. Letting the camera make exposure decisions on its own introduces subtle variations between frames — a slightly brighter exposure here, a shifted white balance there — and those inconsistencies become visible problems when you are compositing the front and interior shots together. Here are the key settings to lock in:
- ISO 100 to 200. A low ISO preserves rich colors and eliminates the noise and grain that degrade fine fabric textures. Since your subject is stationary and you are using a tripod, there is no reason to push the ISO higher. As product photography guides recommend, keeping ISO between 100 and 400 prevents overexposure and maintains detail — and for ghost mannequin work, staying at the low end of that range is ideal.
- Aperture f/8 to f/11. This narrow aperture range delivers edge-to-edge sharpness across the entire garment. A wider aperture like f/2.8 would blur parts of the clothing, which defeats the purpose of showing construction details. A narrower aperture like f/16 or beyond can introduce diffraction softness on some lenses, so the f/8 to f/11 sweet spot gives you the best balance of sharpness and depth of field.
- Fixed white balance. Set a custom white balance using a gray card at the start of each session, or choose a preset that matches your lighting. Do not use auto white balance — it recalculates for every frame, which means your front shot and interior shot may have slightly different color temperatures. That mismatch creates obvious tonal shifts in the composite that are difficult to fix cleanly.
- Tripod at a fixed height. Mount your camera on a sturdy tripod at chest height, centered on the mannequin. Mark the tripod position on the floor with tape so it stays identical across every SKU. Consistent framing means every product appears at the same scale and position in the final image, which creates a polished, uniform look when customers browse your product grid.
One more ghost mannequin photography tip that pays dividends: always shoot in RAW format. RAW files capture the full dynamic range of your camera sensor, giving you maximum flexibility to adjust exposure, white balance, and color in post-production without degrading image quality. JPEGs compress and discard data at the moment of capture, which limits how much you can recover in editing. The file sizes are larger, but the editing headroom is worth it — especially when you need to match the tonal values of two separate shots in a composite.
Garment Preparation and Styling on the Mannequin
Even with perfect lighting and camera settings, a wrinkled or poorly styled garment will produce a mediocre image. Preparation is where many sellers cut corners, and it shows immediately in the final result.
Steam or press every garment before it goes on the mannequin. Every wrinkle, fold, or uneven cuff will show up amplified under studio lights, and fixing fabric creases in Photoshop is far more time-consuming than spending two minutes with a steamer. This is the single most impactful ghost mannequin photography tip you can follow — it costs almost nothing and dramatically improves output quality.
Here is a preparation checklist to run through before each shot:
- Pin and clip for a fitted silhouette. Use clips, pins, or double-sided fashion tape along the back of the mannequin to pull excess fabric tight. The garment should look like it fits the mannequin naturally, with no sagging, bunching, or excess material visible from the front. Pin for silhouette, not for speed — over-clipping creates tension lines, while under-clipping makes clothes droop.
- Tuck or remove tags and labels. Visible care labels, price tags, and hanging loops are distracting in a product image. Tuck them inside the garment or remove them entirely before shooting.
- Button, zip, and close everything. Fasten all buttons, zippers, and snaps. Roll sleeves to a consistent length across all products in the same category. Small inconsistencies in styling become glaringly obvious when images sit side by side on a product page.
- Stuff lightweight garments for volume. For thin fabrics like basic tees or blouses, place tissue paper inside the shoulder and chest area to give the garment more body. Without stuffing, lightweight materials cling to the mannequin and look deflated in the final image.
- Tape collar points. For dress shirts and blazers, use fashion tape to keep collar points sharp and symmetrical. This invisible fix saves significant editing time and produces a noticeably cleaner result.
- Use a mannequin with removable parts. A mannequin with detachable neck, arm, and torso sections — sometimes sold as a "ghost mannequin" or "invisible mannequin" — makes capturing interior shots dramatically easier. These typically cost between $150 and $500 and are a worthwhile investment if you shoot regularly.
Finally, think about your export pipeline. Shoot in RAW for editing, but export your finished images at the resolution and file format your target platform requires. Most ecommerce platforms display product images at 1,000 to 2,000 pixels on the longest side. Save a high-resolution TIFF or PNG for your archive and a web-optimized JPEG or WebP for upload. Getting these specs right from the start prevents the frustrating cycle of re-exporting and re-uploading when a marketplace rejects your files.
With your shooting fundamentals locked in, the real question becomes which editing path makes the most sense for your situation. The same raw photo can be processed three very different ways — and the cost, speed, and quality trade-offs between those methods are not as straightforward as most sellers assume.
Comparing Ghost Mannequin Methods Side by Side
A well-lit photo on a properly styled mannequin is only half the equation. The other half — how you actually remove that mannequin and produce a finished image — is where sellers make their most expensive mistakes. Some spend hours learning Photoshop compositing for a catalog of ten products. Others pay premium per-image rates to editing services when an automated tool would handle their straightforward t-shirts just fine. The mismatch between method and situation is the real problem, not the methods themselves.
Three distinct approaches dominate the ghost mannequin online landscape, and each one serves a different type of seller. Here is how they compare across the dimensions that actually matter: skill requirements, speed, cost, quality control, and scalability.
| Dimension | AI-Powered Online Tools | Professional Editing Services | DIY (Mannequin + Photoshop) |
|---|---|---|---|
| Skill Level Required | Beginner — upload and download | None — the service handles editing | Intermediate to advanced Photoshop |
| Time per Image | Under 1 minute | 12 to 72 hours turnaround | 15 to 30 minutes of hands-on editing |
| Cost per Image | Pennies to low single digits at volume | $0.30 to $6.00+ depending on complexity | Free (software cost only) but high labor time |
| Quality Control | Consistent output; occasional artifacts on complex garments | High quality but varies by editor and provider | Full creative control; quality depends on your skill |
| Scalability | Excellent — batch processing handles hundreds of images | Good for bulk orders; turnaround extends with volume | Poor — every image requires manual effort |
| Best For | High-volume sellers, lean teams, fast catalog launches | Brands needing premium retouching without in-house skills | Low-volume sellers with Photoshop experience |
The numbers in that table tell a clear story, but the real differences show up in how each method plays out day to day. Let's break them down.
AI-Powered Online Ghost Mannequin Tools
This is the fastest-growing category, and for good reason. A ghost mannequin AI tool works by accepting a single photo — either a mannequin shot or sometimes a flat lay — and using trained models to detect the mannequin, remove it, reconstruct the interior areas, and output a clean hollow-man image. The entire process takes seconds, not minutes or hours.
The appeal for ecommerce teams is obvious. You do not need Photoshop skills, you do not need to wait for a third-party editor, and you can process an entire seasonal catalog in the time it would take to manually composite a handful of images. Platforms like Snappyit's ghost mannequin tool are built specifically for this use case — converting flat apparel shots into polished ghost mannequin images with minimal manual effort, which makes them a practical ghost mannequin online tool for sellers who need speed and consistency at scale.
The trade-off is that AI tools are not infallible. Complex necklines, layered collars, and sheer fabrics can produce artifacts that need a quick manual touch-up. But for the vast majority of standard ecommerce garments — button-downs, t-shirts, jackets, jeans — the output is clean enough to upload directly. When you factor in the ghost mannequin service cost of alternatives, the per-image economics of AI tools become hard to ignore at any volume above a few dozen SKUs per month.
Professional Ghost Mannequin Editing Services
Outsourcing to a dedicated editing service has been the go-to approach for brands that want polished results without building in-house Photoshop expertise. You shoot the garment on a mannequin, capture the interior panels, and send the raw files to a team of professional retouchers who handle the compositing, edge refinement, shadow work, and color correction.
The quality ceiling here is high. Experienced retouchers can handle complex garments — think layered blazers, intricate lace collars, sheer overlays — with a level of precision that still exceeds what most automated tools deliver on difficult pieces. Industry pricing typically ranges from $0.30 to $0.90 per image for basic neck joints, $1.00 to $3.00 for mid-complexity edits, and $3.00 to $10.00 or more for advanced composites with multiple angles and detailed fabric work. Bulk orders of 500 or more images can bring per-image costs down by 25 to 35 percent through volume discounts.
The downsides are turnaround time and consistency. Standard delivery runs 24 to 72 hours, and rush services add 20 to 50 percent to the price. When a large batch gets distributed across multiple editors — which is common at high-volume providers — you can end up with subtle inconsistencies in shadow depth, edge sharpness, and collar reconstruction across your catalog. Communication challenges with external teams can also introduce revision cycles that extend timelines further. For brands with strict visual standards, this means building in time for quality checks and feedback rounds.
DIY Mannequin and Photoshop Compositing
The manual route is the original ghost mannequin method, and it still has a legitimate place — just not for everyone. If you already have intermediate Photoshop skills and you are processing a small number of SKUs, DIY compositing gives you complete creative control over every pixel. You decide exactly how the collar join looks, how the shadow falls, and how the final image is color-graded. No waiting on turnaround times, no per-image fees, no dependency on a third-party tool or service.
The math works in your favor when volume is low. A Photoshop subscription runs about $23 per month, and a decent modular mannequin costs $150 to $500 as a one-time investment. If you are editing five to fifteen images per month, the per-image cost is effectively just your time. But that time adds up fast. At 20 minutes per image, a 100-SKU catalog represents over 33 hours of editing — nearly a full work week spent on mannequin removal alone.
Scalability is where DIY falls apart. Setting up a full in-house production studio can run $5,000 to $20,000 when you factor in cameras, lighting, mannequins, computers, and software. Even with that investment, your throughput is capped by the number of skilled editors on your team. During peak seasons or product launches, the bottleneck becomes painful. You either fall behind on listings or sacrifice quality to keep up — neither of which helps your conversion rates.
The honest assessment: DIY is the right choice for sellers who enjoy the editing process, have the skills, and operate at low volume. It is the wrong choice for anyone trying to scale, and forcing it beyond its natural limits is one of the most common mistakes sellers make.
Each of these three methods can produce a professional ghost mannequin image. The difference is not in what they produce — it is in what they demand from you in time, money, and expertise to get there. And for sellers leaning toward the AI route, understanding exactly where these tools excel and where they still fall short is worth a closer look before committing.
AI Ghost Mannequin Tools
AI-powered ghost mannequin tools have moved from experimental novelty to genuine production workhorse in a short span of time. But "fast and affordable" does not automatically mean "perfect for every situation." If you are considering an ai mannequin generator for your product catalog, you need a clear-eyed view of what these tools actually do well, where they stumble, and what you can do to get the best possible output.
How AI Ghost Mannequin Generation Works
The underlying process is surprisingly straightforward from the user's perspective. You upload a single photo — typically a garment on a mannequin, though some platforms also accept flat lays or hanger shots — and the AI handles the rest. Behind the scenes, multiple computer vision techniques work in sequence. Semantic segmentation models first identify and isolate the garment from the mannequin form at the pixel level, distinguishing fabric edges from mannequin surfaces. Depth estimation algorithms then reconstruct how the garment would appear in three-dimensional space, understanding that a sleeve should billow slightly outward and a hem should fall with gravity rather than cling flat. Finally, inpainting networks fill the areas previously occupied by the mannequin's neck, arms, and torso, using context from surrounding fabric to maintain consistent texture, pattern alignment, and lighting.
The most advanced systems apply garment-specific training — they understand how silk drapes differently than denim, or how a knit collar should sit compared to a structured blazer lapel. The result is an image that looks like the clothing is being worn by an invisible person, not just a mannequin with a rough digital erasure. The entire cycle from upload to finished image typically completes in under 30 seconds.
Where AI Tools Excel Over Manual Editing
The practical advantages are hard to overstate for sellers operating at any real volume. Here is where AI consistently outperforms the traditional workflow:
Speed that changes your operations. A process that takes 15 to 30 minutes per image manually compresses to seconds. Retailers using AI mannequin removal tools report 73% faster image production compared to traditional retouching workflows. For a brand launching 50 new SKUs, that is the difference between a week of editing and an afternoon.
No Photoshop skills required. The entire process happens in a browser. A warehouse team member with zero retouching experience can snap a photo, upload it, and download a finished ghost mannequin image without ever opening Photoshop. This accessibility is a genuine game-changer for solo sellers and lean teams who cannot justify hiring a dedicated photo editor. If you have searched for an ai mannequin free trial to test the waters, most platforms offer exactly that — a low-commitment way to evaluate output quality before scaling up.
Mathematical consistency. Human retouchers introduce subtle variation. One editor draws a sharp collar line, another leaves a soft edge. One applies a heavy drop shadow, another keeps it light. When a batch of 500 images gets distributed across a dozen editors, the result is a product grid that looks subtly mismatched. AI applies the same processing logic to every single image, producing uniform shadow depth, edge treatment, and interior reconstruction across your entire catalog.
Cost structure that rewards volume. Traditional editing costs scale linearly — 500 images at $2 each is $1,000 every time. AI tools typically use credit-based or subscription pricing that drops the per-image cost to pennies at higher volumes. For mid-sized retailers managing 50,000+ product images annually, that difference represents tens of thousands of dollars in savings. Platforms like Snappyit's ghost mannequin tool are designed around this exact use case — giving ecommerce teams a way to process apparel images quickly without the overhead of traditional studio editing or per-image retouching fees.
Limitations and When Manual Touch-Up Is Still Needed
Here is where honesty matters more than hype. AI ghost mannequin tools are not magic, and pretending otherwise sets you up for disappointment. These are the real limitations you should expect:
- Complex necklines and layered collars. Garments with multiple collar layers, hood attachments, or asymmetric necklines are the most common trouble spot. The AI may misinterpret where one layer ends and another begins, producing visible seams or unnatural joins in the collar area.
- Sheer and highly reflective fabrics. Transparent materials like chiffon or organza confuse boundary detection because the AI cannot cleanly distinguish where the fabric ends and the mannequin begins. Similarly, highly reflective technical fabrics or sequined surfaces can produce edge artifacts where the mannequin's form bleeds through.
- Unnatural interior fills. When the AI reconstructs the area behind the removed mannequin — the inner collar, the inside of the neckline — it sometimes generates textures or folds that do not match the actual garment construction. The result looks close but not quite right, especially to a trained eye.
- Pattern misalignment. Striped, plaid, or heavily patterned garments occasionally show subtle pattern breaks where the inpainted area meets the original fabric. This is less noticeable on solid colors and small prints but can be obvious on bold geometric patterns.
- Loss of fine detail at edges. Delicate elements like lace trim, fringe, or raw-edge hems can get smoothed over or partially erased during processing. The AI prioritizes clean edges, which sometimes means sacrificing the intentional irregularity that gives these details their character.
Every one of these issues is fixable with a quick manual touch-up in Photoshop or a similar editor. The key word is "quick" — you are spending two to three minutes refining an AI output rather than 20 to 30 minutes building a composite from scratch. For most standard ecommerce garments, the output needs no correction at all. The artifacts tend to cluster around the edge cases: unusual constructions, difficult fabrics, and highly detailed trims.
One factor overrides everything else, though, regardless of which ai mannequin generator or platform you choose: source photo quality. A poorly lit, low-resolution input image will produce a poor result no matter how sophisticated the AI behind it is. The same tool that delivers a flawless output from a well-lit, high-resolution mannequin shot will struggle with a dim smartphone photo taken under mixed lighting. Consistent, diffused lighting and a clean white background are not optional extras — they are prerequisites. If you skipped the shooting fundamentals covered earlier in this article, go back and lock those in before evaluating any tool's output quality.
AI ghost mannequin tools are genuinely powerful, and for the majority of ecommerce apparel photography, they deliver results that are indistinguishable from professional manual editing. But they are a tool, not a miracle. Setting realistic expectations — knowing where they shine and where they need a human assist — is what separates sellers who use them effectively from those who get frustrated and abandon them after a handful of difficult garments. The real question is not whether AI can handle your images. It is whether your images are ready for the platforms where they will actually be listed.
Ghost Mannequin Image Requirements for Amazon, Shopify, and Etsy
Producing a clean ghost mannequin image is only useful if it actually meets the standards of the platform where you plan to sell. Every major ecommerce marketplace enforces its own set of image rules — background color, minimum resolution, file format, product framing — and violating them can get your listing suppressed, rejected, or buried in search results. The specifics vary more than most sellers realize, and a file that passes Amazon's checks might not be optimized for Shopify or Etsy.
Amazon Product Image Standards and Ghost Mannequin Compliance
Amazon has the strictest image requirements of any major marketplace, and for clothing sellers, those rules make ghost mannequin removal a necessity rather than a creative choice. Amazon's clothing image guidelines explicitly state that main images must not show a visible mannequin, hanger, or holder. The product must sit on a pure white background (RGB 255, 255, 255), and the garment needs to fill at least 85% of the total image area. No logos, watermarks, text, or borders are allowed on the main image. Images must also be at least 1,000 pixels on the longest side to activate the zoom feature that shoppers rely on.
Here is what that means in practice: if you photograph a jacket on a mannequin and upload it without removing the form, Amazon will reject or suppress the listing. A flat lay might technically pass the background requirement, but it rarely fills 85% of the frame convincingly and does not communicate the garment's shape the way a hollow-man image does. Ghost mannequin amazon product photography is not just a best practice — it is the most reliable way to meet every main image requirement simultaneously while still showing the garment in its best light.
Amazon also requires that every parent and child SKU has its own main image. If you sell a shirt in eight colors, that is eight separate ghost mannequin images, each on a pure white background, each filling the frame. Multiply that across a catalog of dozens or hundreds of styles, and you start to see why the editing method you choose — DIY, service, or AI — has such a direct impact on your operational capacity.
Shopify and Etsy Image Best Practices
Shopify does not enforce image rules the way Amazon does. There is no automated rejection system scanning your uploads. But that flexibility can be a trap. Without external guardrails, many Shopify store owners default to inconsistent product photography — mixing flat lays with mannequin shots, using different backgrounds across collections, and uploading images at wildly different resolutions. The result is a storefront that looks disjointed and unprofessional.
Shopify's own image guidelines recommend square product images at 2,048 x 2,048 pixels, with a maximum upload size of 20 MB. Images need to be at least 800 x 800 pixels for the zoom function to work. For ghost mannequin shopify product images, the practical advice is straightforward: pick one style — white background, consistent framing, uniform shadow treatment — and apply it across every SKU. Shopify's responsive design automatically resizes images for mobile and desktop, but giving it well-optimized source files creates a smoother shopping experience and faster page loads. Compressed formats like WebP or optimized JPEG keep file sizes manageable without sacrificing the detail shoppers expect when they zoom in on fabric texture or stitching.
Etsy takes a different approach entirely. The platform leans toward authenticity and craftsmanship, and its guidelines are the most flexible of the three. Etsy recommends images of at least 2,000 pixels on the shortest side with a 4:3 or square aspect ratio, and it supports JPEG, PNG, and GIF formats. There is no strict white-background mandate — many top Etsy sellers use styled lifestyle shots, textured backdrops, or natural lighting setups.
That said, ghost mannequin images consistently outperform casual flat lays on Etsy for apparel listings. When a shopper is scrolling through dozens of handmade dresses or vintage jackets, a clean hollow-man image with a white background stands out precisely because it looks more polished than the competition. It signals professionalism and attention to detail, which builds buyer confidence — especially for higher-priced items where trust is a bigger factor in the purchase decision. You do not need ghost mannequin images for every Etsy listing, but for structured garments where fit matters, they give you a measurable edge in click-through rate.
Exporting Ghost Mannequin Images to Meet Platform Specs
Getting the editing right and then exporting at the wrong resolution or file format is a frustrating mistake that is entirely preventable. Each platform has its own sweet spot for dimensions, file type, and file size — and those specs influence how your images display, how fast they load, and whether they pass automated quality checks.
The table below summarizes the ghost mannequin image requirements ecommerce sellers need to hit for the most common platforms:
| Platform | Minimum Dimensions | Recommended Dimensions | Background | Accepted Formats | Max File Size |
|---|---|---|---|---|---|
| Amazon | 1,000 x 1,000 px | 2,000 x 2,000 px or larger | Pure white (RGB 255, 255, 255) | JPEG, PNG, TIFF | 10 MB |
| Shopify | 800 x 800 px (for zoom) | 2,048 x 2,048 px | White recommended; flexible | JPEG, PNG, WebP | 20 MB |
| Etsy | 2,000 px shortest side | 2,000 x 2,000 px or larger | Flexible; white performs well for apparel | JPEG, PNG, GIF | 1 MB recommended |
| eBay | 500 x 500 px | 1,600 x 1,600 px | White or light solid for main image | JPEG, PNG, WebP | 12 MB |
A few practical export tips that apply across all platforms:
- Save two versions of every image. Keep a high-resolution archive file (TIFF or full-quality PNG) and export a separate web-optimized version for upload. The archive protects you if a platform changes its requirements or you need to crop and re-export later.
- Use sRGB color space. Most web browsers and marketplace platforms render images in sRGB. Exporting in Adobe RGB or ProPhoto RGB can cause colors to shift and look muted or oversaturated on screen — a common reason ghost mannequin images look different on your monitor than they do in a live listing.
- Compress without destroying detail. For JPEG exports, a quality setting of 80 to 85% strikes the right balance between file size and visual fidelity. WebP offers even better compression ratios at equivalent quality and is supported by Shopify and eBay. For Amazon, stick with JPEG or PNG since those are the safest accepted formats.
- Match aspect ratios to the platform grid. Square images (1:1) display most consistently across mobile and desktop on all four platforms. If your ghost mannequin image is taller than it is wide, add white canvas padding on the sides to create a square frame rather than letting the platform crop or letterbox your image unpredictably.
The broader trend across all ecommerce marketplaces is moving toward cleaner, more standardized product photography. Platforms are tightening image requirements, not loosening them, because consistent visuals improve buyer trust and reduce return rates. Sellers who invest in proper ghost mannequin workflows — and export those images to spec — are building a catalog that stays compliant as standards evolve, rather than scrambling to reshoot and re-edit every time a platform updates its rules.
Meeting platform specs gets your images accepted. But even a technically compliant image can look off if common editing mistakes slip through — and some of those mistakes are subtle enough that sellers do not notice them until customers start leaving negative reviews about misleading photos.
Common Ghost Mannequin Editing Mistakes and How to Fix Them
A ghost mannequin image can meet every platform spec, pass every automated quality check, and still look wrong to the human eye. The difference between a product photo that builds trust and one that quietly erodes it often comes down to a handful of editing errors — some obvious, some subtle enough that sellers miss them entirely until return rates start climbing. Whether you are compositing manually in Photoshop or reviewing output from an AI tool, these are the ghost mannequin editing mistakes that show up most often, along with practical ways to fix or prevent each one.
Visible Seams and Edge Artifacts
You have removed the mannequin, layered in the interior shot, and the image looks fine at a glance. Then you zoom in and see it: a thin, unnatural line running along the collar edge where the two layers meet, or a faint halo around the armhole where the masking was not quite precise enough. These visible seams are the most immediately noticeable ghost mannequin artifacts, and they signal to shoppers — consciously or not — that the image has been manipulated.
The root causes are almost always the same. Rushed masking with hard-edged selections leaves abrupt transitions between the garment and the removed background. Poor feathering around armholes and sleeve openings creates jagged boundaries, especially when the garment color is close to the mannequin color. Low-resolution source images make the problem worse because there simply are not enough pixels to create a smooth edge.
- Visible seam at the collar or armhole join — Fix by zooming to 200-300% and using a soft brush at 3-5 pixels on the layer mask edge. Feather the transition gradually rather than cutting a hard line. Photoshop's Refine Edge tool can also smooth jagged selections before you commit the mask.
- Halo or fringe around the garment outline — Fix by contracting your selection by 1-2 pixels before creating the mask. This pulls the edge inward just enough to eliminate the thin border of mannequin-colored pixels that causes the halo effect. For AI output, use the Clone Stamp or Healing Brush to paint over any residual fringe.
- Jagged edges on curved areas like shoulders and hems — Prevent by shooting at the highest resolution your camera supports and using the Pen Tool for curved selections instead of the Quick Selection Tool. High-resolution source files give you more pixel data to work with, which produces smoother curves after masking.
Unnatural Folds and Collar Join Problems
The neck and collar area is the single most common quality failure point in ghost mannequin photography. This is where the front garment shot and the interior fill shot meet, and even small misalignments create an image that looks artificially pasted together rather than naturally hollow. AI tools struggle here too — automated algorithms frequently produce pixelated boundaries and mismatched shadow gradients at the neck joint because they cannot accurately map the depth perspective of a hollow garment cavity.
A poor ghost mannequin neck join fix starts with understanding why it went wrong. If the interior shot was captured at a slightly different angle or camera height than the front shot, the collar curves will not align when you layer them together. The inner piece may sit too high, too low, or at a tilt that does not match the front collar line. Over-editing with the Liquify or Warp tools to force alignment often makes things worse by distorting the fabric texture.
- Misaligned neck or collar join — Prevent by shooting the interior and front shots from the exact same camera height and angle. Use a tripod and do not move it between takes. If alignment is off in post, use Puppet Warp with carefully placed anchor points along the seam to bend the interior piece into position without distorting the surrounding fabric.
- Flat or artificial-looking interior fill — Fix by adding depth with a Curves adjustment layer clipped to the interior collar layer. Pull down the midtones slightly to darken the fabric, mimicking the natural shadow inside a hollow garment. Apply a subtle Gaussian Blur to the adjustment layer's mask edge so the shadow transition looks gradual rather than abrupt.
- Unnatural fabric folds from poor styling — Prevent before you shoot. Steam the garment thoroughly, pin excess fabric on the back of the mannequin for a clean silhouette, and use fashion tape to keep collar points sharp and symmetrical. Folds caused by a garment that was not properly dressed on the mannequin are extremely difficult to fix convincingly in post-production.
- Uneven shoulders — Fix by using symmetry guides in Photoshop to compare left and right sides before exporting. Avoid heavy reshaping with the Liquify tool — if the shoulders look uneven, the problem is almost always in how the garment was pinned, not something that should be corrected digitally.
Lighting and Color Mismatches Between Shots
This mistake is sneaky because it often looks fine on the editor's calibrated monitor and then looks obviously wrong on a customer's phone screen. When the front shot and interior shot are captured under different lighting conditions — or with different white balance settings — the composite shows a tonal mismatch where the two layers meet. The interior collar area might appear warmer or cooler than the rest of the garment, or the shadow density inside the neckline might not match the ambient shadows on the front of the shirt.
Different white balance settings between shots are the most frequent culprit. If your camera is set to auto white balance, it recalculates color temperature for every frame. The front shot might render at 5200K while the interior shot lands at 5600K — a small numerical difference that produces a visible color shift in the composite. Multiple light sources or inconsistent shadow removal during editing compound the problem.
- Color temperature mismatch between front and interior layers — Prevent by setting a fixed white balance using a gray card at the start of your session and never switching to auto. If the mismatch already exists in your files, use a Curves or Levels adjustment layer clipped to the interior layer and adjust the individual color channels until the tones match the front garment visually.
- Inconsistent shadow density — Fix by matching exposure levels between the two layers before compositing. Use a black-and-white adjustment layer set to Luminosity blending mode as a temporary check — this strips out color and lets you compare tonal values objectively. Adjust exposure on the interior layer until highlights and shadows align with the front piece.
- Overall color inaccuracy across the finished image — Prevent by calibrating your monitor and comparing the final image against the physical garment under neutral light. Oversaturated or shifted colors mislead buyers and drive returns. Export in sRGB color space to ensure what you see on screen matches what customers see on theirs.
- Over-smoothing that destroys fabric texture — Fix by retouching only distracting creases rather than blurring the entire surface. Preserve the natural weave and texture of the fabric. A garment that looks plastic or unnaturally smooth signals heavy editing and reduces buyer confidence in the product's actual appearance.
Every one of these mistakes is preventable with the right shooting discipline, and every one is fixable if you catch it before uploading. The common thread is that most ghost mannequin artifacts trace back to inconsistencies introduced during the shoot — different angles, different lighting, different white balance — rather than failures in the editing software or AI tool itself. Lock in your shooting fundamentals, and the editing step becomes dramatically simpler regardless of which method you use.
Knowing what to watch for is one thing. Knowing which editing approach fits your specific business — your volume, your budget, your quality bar — is the final piece of the puzzle.
Choosing the Right Ghost Mannequin Method for Your Business
You have three viable paths to a finished ghost mannequin image. Each one works. Each one produces professional results when used correctly. And each one will waste your time and money if it does not match the way your business actually operates. The sellers who get this wrong are not choosing bad tools — they are choosing tools built for a different situation than theirs.
Rather than defaulting to whatever method you stumbled across first, run your decision through four variables. These are listed below in priority order, because the first two tend to eliminate at least one option immediately.
Key Variables That Shape Your Decision
- Product volume. How many SKUs do you need to photograph per week or month? This is the single most decisive factor. A seller listing five new products a month faces a fundamentally different problem than a brand onboarding 200 new styles per season. Volume determines whether manual editing is sustainable, whether per-image service costs stay manageable, and whether the speed advantage of AI tools actually matters to your workflow.
- Budget. What is your per-image cost tolerance? DIY compositing costs almost nothing per image beyond your time — but your time has a dollar value too. Professional editing services charge $0.30 to $6.00+ per image depending on complexity, and those costs scale linearly with volume. AI tools compress per-image costs to pennies at scale but may require a subscription commitment. Factor in the hidden costs as well: studio setup for DIY, revision cycles for outsourced services, and occasional manual touch-ups for AI output.
- Technical skill level. Be honest about where your team sits on the spectrum from beginner to advanced. DIY Photoshop compositing demands intermediate-to-advanced retouching skills. Professional services require zero editing ability but need enough visual literacy to evaluate output quality and provide clear feedback. AI tools require no technical skill at all — if you can upload a file and click a button, you can produce a ghost mannequin image.
- Quality threshold. Are you aiming for marketplace-minimum compliance or premium brand-level imagery? A seller who needs clean white-background images that pass Amazon's automated checks has different standards than a fashion label building an aspirational brand identity where every shadow and fold is art-directed. Most AI tools and mid-tier editing services comfortably clear the marketplace-minimum bar. Premium retouching — the kind where a human editor fine-tunes every collar curve and shadow gradient — still requires either strong DIY skills or a high-end editing service.
Matching Your Scale to the Right Method
Those four variables play out differently depending on where you sit as a business. Here is how the decision typically shakes out for three common seller profiles.
Small-scale seller (5 to 20 SKUs per month). Imagine you run an Etsy shop or a small Shopify store, listing a handful of new garments each month. Your budget is tight, and you are doing most of the work yourself. If you already have Photoshop skills, DIY compositing is the best ghost mannequin method for small business at this scale — the per-image cost is essentially free, and the time investment is manageable at low volume. If you do not have editing skills and do not want to learn, an AI tool gives you professional-looking results without the learning curve. Professional editing services work too, but the per-image fees add up quickly when margins are thin on a small catalog.
Mid-size ecommerce operation (50 to 200 SKUs per month). You are running a growing brand with regular product drops and possibly selling across multiple platforms. DIY editing is no longer realistic — at 20 minutes per image, 100 SKUs represents over 33 hours of manual compositing every month. This is the volume range where choosing ghost mannequin service or DIY becomes a clear either-or decision, and most mid-size sellers land on either a professional editing service or an AI tool. If your garments are mostly standard construction — button-downs, tees, jackets, jeans — AI handles the bulk efficiently, and you can route the occasional complex piece to a human editor. If your catalog leans heavily toward difficult fabrics or intricate designs, a reliable editing service with consistent quality may be worth the higher per-image cost.
High-volume brand (200+ SKUs per month or seasonal surges of 500+). At this scale, the ghost mannequin workflow for high volume needs to be fast, consistent, and cost-efficient simultaneously. Professional editing services can handle the volume, but turnaround times stretch during peak seasons, and distributing large batches across multiple editors introduces the consistency problems discussed earlier. AI tools are purpose-built for this scenario — batch processing hundreds of images in minutes rather than days, with uniform output quality across every frame. The per-image cost advantage compounds dramatically at high volume. Most brands at this tier use AI as their primary production tool and keep a professional retoucher on call for the small percentage of garments that need manual refinement.
The pattern is straightforward: as volume increases, the balance tips steadily from manual methods toward automated ones. But no matter where you land on that spectrum, the best method is the one that matches your current scale and can grow with you. A solo seller who plans to scale should not invest months mastering a DIY workflow that will become a bottleneck the moment the business grows. A high-volume brand should not be paying premium per-image rates for routine edits that an AI tool handles in seconds.
Why Source Photo Quality Matters More Than Any Tool
Here is the one truth that cuts across every method, every tool, and every price point: the quality of your source photograph is the single biggest factor in the quality of your final ghost mannequin image. No amount of Photoshop skill, no editing service however talented, and no AI model however advanced can fully compensate for a poorly lit, low-resolution, or badly styled input photo.
A well-lit garment on a clean white background, shot at high resolution with consistent white balance and proper styling, will produce a strong result whether you composite it yourself, send it to a service, or run it through an AI platform. A dim smartphone photo taken under mixed overhead lighting with a wrinkled garment on a cluttered background will produce a mediocre result no matter what you do with it afterward. Up to 75% of online shoppers consider product image quality the most decisive factor in their purchasing decisions, and 22% of returns happen because items look different in person than they did on screen. Those numbers make the case clearly: investing in your shooting setup pays dividends that no editing method can replicate on its own.
If you take one thing from this entire article, let it be this: get the photo right first. Steam the garment. Set up even, diffused lighting. Lock your camera on a tripod with manual settings. Shoot in RAW. Then choose whichever editing path fits your volume, your budget, and your skill level. The method matters far less than the input you feed it.
Ghost Mannequin Online: Frequently Asked Questions
1. What is ghost mannequin photography and how does it work?
Ghost mannequin photography involves photographing a garment on a physical mannequin, then capturing interior shots of the neckline and waistband separately. In post-production, the mannequin is digitally removed and the interior shots are composited in to fill the gaps, creating a hollow-man effect where the clothing appears to hold its three-dimensional shape on its own. This technique is essential for ecommerce because it communicates garment fit, drape, and proportion without the cost of live models or the flatness of lay-down shots.
2. How much does ghost mannequin editing cost per image?
Costs vary significantly by method. DIY Photoshop compositing is free beyond software and equipment costs but requires 15 to 30 minutes of skilled labor per image. Professional editing services typically charge $0.30 to $0.90 for basic neck joints, $1.00 to $3.00 for mid-complexity edits, and $3.00 to $10.00 for advanced composites. AI-powered online tools like Snappyit's ghost mannequin tool (snappyit.ai/ghost-mannequin) reduce per-image costs to pennies at volume through subscription or credit-based pricing, making them the most cost-effective option for sellers processing more than a few dozen SKUs per month.
3. Can AI tools replace manual ghost mannequin editing completely?
For the majority of standard ecommerce garments like button-downs, t-shirts, jackets, and jeans, AI ghost mannequin tools produce output that is indistinguishable from professional manual editing and can be uploaded directly. However, AI still struggles with complex necklines, layered collars, sheer fabrics, and bold geometric patterns, occasionally producing artifacts that need a quick two-to-three-minute manual touch-up. Source photo quality is the biggest factor in AI output quality, so well-lit, high-resolution images on a white background are essential for clean results.
4. Does Amazon require ghost mannequin images for clothing listings?
Amazon does not use the term ghost mannequin in its guidelines, but its rules effectively mandate the technique for apparel sellers. Main product images must show the garment on a pure white background (RGB 255, 255, 255) with no visible mannequin, hanger, or holder, and the product must fill at least 85% of the frame. Since flat lays rarely meet the framing requirement and mannequins are explicitly prohibited in main images, ghost mannequin removal is the most reliable way to satisfy all of Amazon's clothing image standards simultaneously.
5. Which garment types work best with ghost mannequin photography?
Structured garments produce the cleanest results because they hold their three-dimensional shape after the mannequin is removed. Blazers, suit jackets, button-down shirts, polo shirts, and outerwear are ideal candidates. Jeans and tailored trousers also work well with careful interior waistband shots. Lightweight or unstructured fabrics like silk, chiffon, and loose knits are more challenging and require extra pinning and post-production refinement. Accessories such as scarves, hats, and bags are not suited for this technique and perform better with flat lay or prop styling.
Generate your first ghost mannequin image in 90 seconds
Skip the 30-minute Photoshop joint masking and the $5-per-image agency fees. Snappyit AI Ghost Mannequin takes one flat-lay and outputs a clean, body-shaped catalog image in seconds.
Try Snappyit AI Ghost Mannequin free →