What Ghost Mannequin Product Photography Is and Why It Works
Imagine browsing an online clothing store where every garment looks like it is being worn by an invisible person. The shirt has shape. The jacket has shoulders. The dress has drape. Yet there is no model, no mannequin, and no distractions. That is ghost mannequin product photography in action, and it is the reason most professional apparel catalogs look so clean and consistent.
Defining the Ghost Mannequin Effect
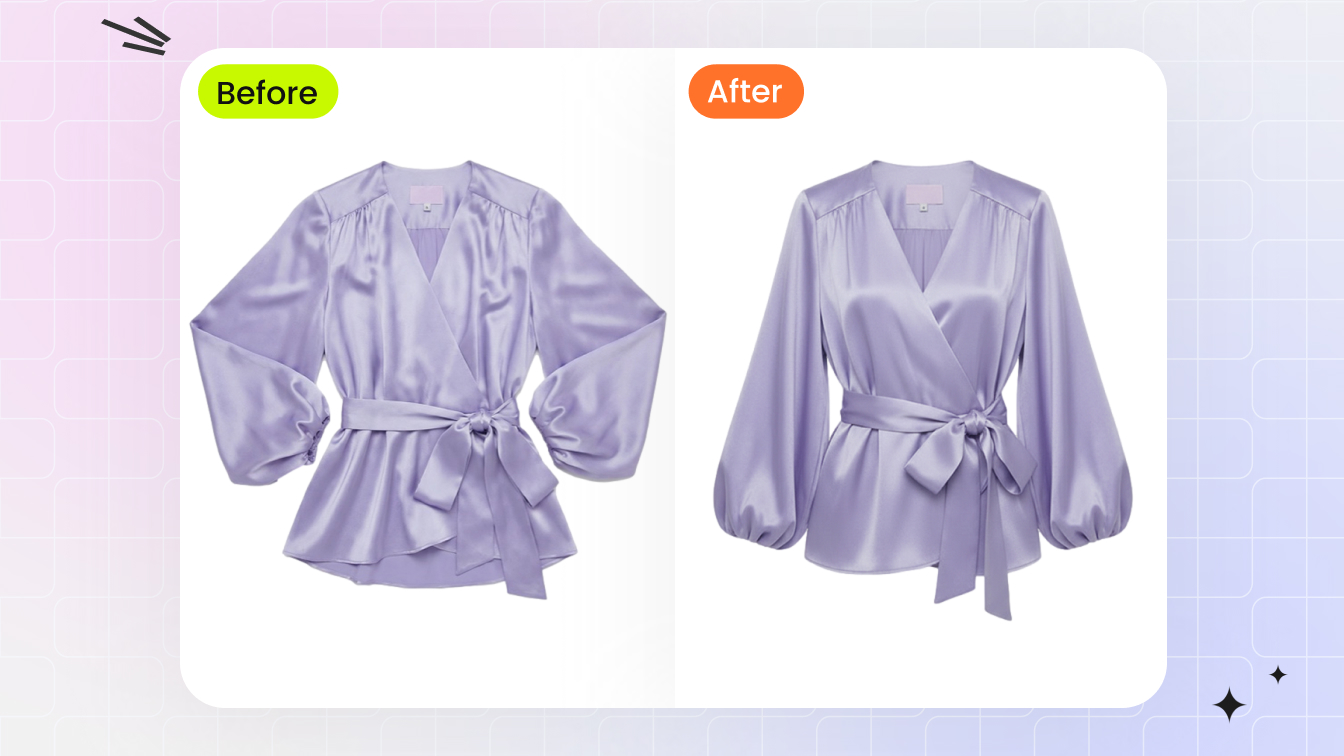
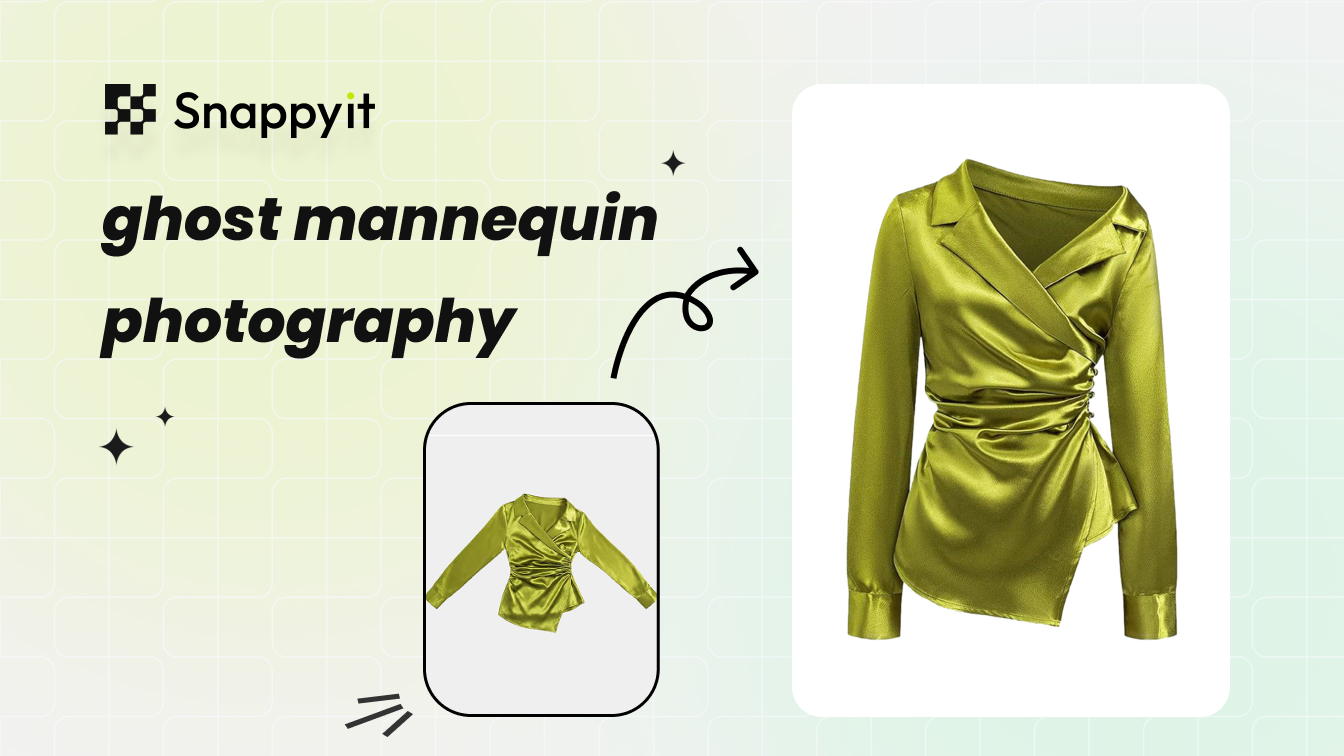
Ghost mannequin photography is a product photography technique where clothing is photographed on a mannequin, then the mannequin is digitally removed in post-production to create a three-dimensional, hollow-body image that shows the garment's shape, fit, and construction details without any visible form or model.
You will also hear this called the invisible mannequin technique or the "hollow man" effect. The core idea is simple: dress a mannequin, photograph the garment from the front, capture the interior neckline or waistband separately, then composite the two shots together while erasing every trace of the form underneath. The result is a floating, lifelike garment that lets shoppers focus entirely on the product.
Early versions of this technique relied on painstaking physical removal and airbrushing in the darkroom. Today, digital compositing in tools like Photoshop has made the ghost mannequin effect faster and far more precise, turning what was once a specialist studio trick into a standard e-commerce workflow.
Why This Technique Became the E-Commerce Standard
Online shoppers cannot touch fabric or try anything on. All they have are your images. Ghost mannequin photography bridges that gap by showing three-dimensional shape and fit at a fraction of the cost of on-model shoots. Brands like ASOS, Zara, and H&M rely on ghost mannequins across thousands of SKUs because the approach delivers several clear advantages:
- A professional, consistent look across every product listing
- Visible construction details such as interior labels, necklines, and stitching
- Significantly lower cost per image compared to hiring models for each garment
- Faster production turnaround that scales with large catalogs
That combination of quality, consistency, and efficiency is exactly why ghost mannequin photography has become the default for apparel e-commerce worldwide.
What This Guide Covers
This article consolidates everything you need to produce professional ghost mannequin images into a single resource. You will find a head-to-head comparison of major clothing photography methods, a full equipment guide organized by budget tier, step-by-step shooting and post-production workflows, garment-specific advice for tricky fabrics and product types, scaling strategies for high-volume catalogs, a troubleshooting reference for common mistakes, and guidance on choosing between DIY, studio, and AI-powered approaches. Whether you are photographing your first product or refining a studio operation, every section is built to be actionable.
The right equipment, of course, is where it all starts.
Ghost Mannequin vs. Flat Lay vs. On-Model vs. AI Photography
Before investing in any gear, it helps to step back and ask a more fundamental question: is ghost mannequin photography actually the right method for your products? The answer depends on what you sell, how much you can spend per image, and the visual story your brand needs to tell. Five major approaches dominate clothing product photography right now, and each one earns its place in different situations.
Ghost Mannequin vs. Flat Lay vs. On-Model Shoots
Ghost clothing photography excels at one thing above all else: showing a garment's three-dimensional shape and fit without any visual distractions. The hollow-body result communicates structure, silhouette, and construction details like necklines and seams. It sits at a moderate cost point, requires intermediate editing skills, and delivers the kind of catalog-wide consistency that marketplace algorithms and shoppers both reward. For structured items such as blazers, button-downs, and tailored dresses, it is hard to beat.
Flat lay photography takes the opposite approach. You arrange the garment on a flat surface and shoot from directly above. The setup is fast, the cost is low, and almost anyone can produce decent results with a smartphone and natural light. It works beautifully for accessories, casual basics, and social media content where a curated aesthetic matters more than showing precise fit. The tradeoff? You lose dimensionality entirely. A flat lay cannot communicate how a jacket drapes across the shoulders or how a dress cinches at the waist. If you are wondering how to take pictures of clothes without mannequin setups, flat lay is the most accessible starting point, but it comes with real limitations for garments where shape is a selling point.
On-model photography is the most powerful method for creating an emotional connection. Seeing clothes on a real person answers questions about fit, movement, and drape that no other technique can fully replicate. It is also the most expensive option by a wide margin. Between model fees, stylist costs, location scouting, and longer post-production timelines, a single on-model shoot can cost several times more per image than a mannequin photoshoot. Maintaining visual consistency across hundreds of SKUs becomes a logistical challenge too, since lighting, poses, and even skin tones shift between sessions.
Where 3D Rendering and AI-Generated Images Fit In
Two newer alternatives are gaining traction, though neither has fully replaced traditional mannequin photography for most apparel brands.
3D rendering gives you total creative control. Once a garment is modeled as a digital asset, you can place it in any environment, adjust lighting infinitely, and produce unlimited angles without a single physical photo. The catch is the upfront investment. Creating an accurate 3D model of a garment, complete with realistic fabric physics and texture mapping, requires specialized software and skilled 3D artists. For brands with large, fast-rotating catalogs, the per-SKU cost of asset creation often makes this impractical unless the same digital assets serve multiple purposes like virtual try-on or configurators.
AI-generated imagery is improving at a remarkable pace. Some platforms can now take a simple product photo and generate realistic on-model or lifestyle images in seconds, with commercial photography costs dropping an average of 32% in recent years partly due to AI adoption. The speed advantage is undeniable. Yet AI still struggles with fine fabric details: the way light catches a satin weave, the texture of a cable knit, or the precise drape of a chiffon hem. For brands where material quality is a core selling point, ghost product photography with real camera captures still delivers more trustworthy results. AI works best as a complement, generating lifestyle and social media variations from a base image, rather than as a full replacement for detailed product shots.
Choosing the Right Method for Your Products
The table below puts all five methods side by side so you can match the right technique to your catalog, budget, and skill level.
| Technique | Best For | Relative Cost | Skill Level | Consistency | Limitations |
|---|---|---|---|---|---|
| Ghost Mannequin | Structured garments, catalog product pages, marketplaces | Moderate | Intermediate (shooting + compositing) | High across large catalogs | Requires post-production compositing; less effective for flowing or heavily draped items |
| Flat Lay | Accessories, casual basics, social media, email campaigns | Low | Beginner-friendly | High with a repeatable setup | No 3D shape; cannot show fit or drape accurately |
| On-Model | Lifestyle campaigns, homepage hero images, premium brands | High | Professional (models, stylists, retouching) | Difficult to maintain across sessions | Expensive per image; scheduling and logistics overhead |
| 3D Rendering | Configurators, virtual try-on, brands reusing digital assets | High upfront, low per-render | Advanced (3D modeling + rendering software) | Perfect once assets are built | Significant asset creation cost; fabric realism still evolving |
| AI-Generated | Social media variations, lifestyle mockups, rapid A/B testing | Low per image | Beginner (upload and generate) | Moderate; depends on platform quality | Fine fabric detail and texture accuracy still inconsistent |
Most successful e-commerce brands do not pick just one method. They use mannequin photography as the backbone for product detail pages, supplement with flat lays or AI-generated lifestyle shots for social channels, and reserve on-model shoots for hero campaigns or premium collections. The key is matching each technique to the job it does best.
Once you have settled on ghost mannequin as your primary catalog approach, the next decision is practical: what equipment do you actually need, and how much should you spend?
Essential Equipment for Ghost Mannequin Photography
The gap between amateur and professional ghost mannequin product photography rarely comes down to talent alone. More often, it comes down to choosing the right tools for the job and knowing which ones actually matter at each stage of growth. A DIY seller photographing 20 t-shirts for an Etsy shop does not need the same setup as a studio processing 500 SKUs a month for a fashion brand. What both need is a clear understanding of where to invest first and where to save.
This section breaks down every piece of equipment by category and budget tier so you can build a setup that matches your catalog size, skill level, and goals.
Mannequin Types and When to Use Each One
The photography mannequin you choose has a direct impact on how easy your shoots and edits will be. Not all mannequins are built for this technique, and picking the wrong type creates hours of unnecessary post-production work.
Four main types serve different purposes:
- Full-body mannequins cover head-to-toe garments like jumpsuits, full-length dresses, and coordinated outfit shots. They are the most versatile but also the bulkiest and most expensive. If you photograph a mix of tops, bottoms, and dresses, a full-body form with detachable limbs gives you the most flexibility.
- Torso forms handle shirts, jackets, blouses, and sweaters. When budget is limited, a torso-only mannequin for photography is the smartest starting point because upper-body garments make up the majority of most apparel catalogs. Look for one with a removable neck piece so you can capture interior collar shots without removing the garment entirely.
- Leg forms are necessary for pants, skirts, and shorts. These typically start at the waist and extend to the ankle or just below the knee. Without a dedicated leg form, lower-body garments sag and lose their natural silhouette.
- Detachable-limb mannequins are purpose-built for ghost mannequin photography. Arms, neck sections, and sometimes torso panels pop off individually, letting you photograph the garment's interior neckline, waistband, and sleeve openings while the rest of the form holds the garment in shape. These are essential for clean compositing and are the type most professional studios rely on.
When shopping for a ghost mannequin for sale, prioritize detachable parts over aesthetic finish. A matte white or light gray surface reflects less unwanted color onto the fabric, which saves time during editing. Photography mannequins designed specifically for this technique typically range from $150 to $500, and the investment pays for itself within a few dozen shoots compared to the editing headaches a cheap, solid-body form creates.
If your catalog includes both menswear and womenswear, you will likely need at least two forms. A female ghost mannequin with a contoured bust and narrower waist produces a natural silhouette for women's tops and dresses, while a broader-shouldered male form handles men's shirts and jackets without stretching or pinning issues.
Here is a quick reference for matching mannequin type to garment category:
- T-shirts, blouses, sweaters, jackets: Torso form or full-body with detachable arms
- Pants, shorts, skirts: Leg form or full-body lower half
- Dresses and jumpsuits: Full-body mannequin with detachable neck and arms
- Underwear and swimwear: Torso or brief form depending on coverage
Camera, Lens, and Tripod Essentials
You do not need the most expensive camera body on the market. Any modern DSLR or mirrorless camera with manual exposure control and the ability to shoot in RAW format will produce professional results. What matters far more is the lens you pair with it and the discipline of keeping the camera locked in position.
For focal length, aim for the 70-105mm range on a full-frame sensor, or the equivalent on a crop sensor (roughly 50-70mm). This range minimizes the barrel distortion that wider lenses introduce, which is critical when you need garments to look proportionally accurate. A 50mm prime lens is a popular budget-friendly option that works well on crop-sensor bodies, while an 85mm prime is the workhorse choice for full-frame shooters. If you prefer zoom flexibility, a 24-70mm or 70-200mm zoom set to the longer end of its range covers most ghost mannequin for photography scenarios without swapping lenses.
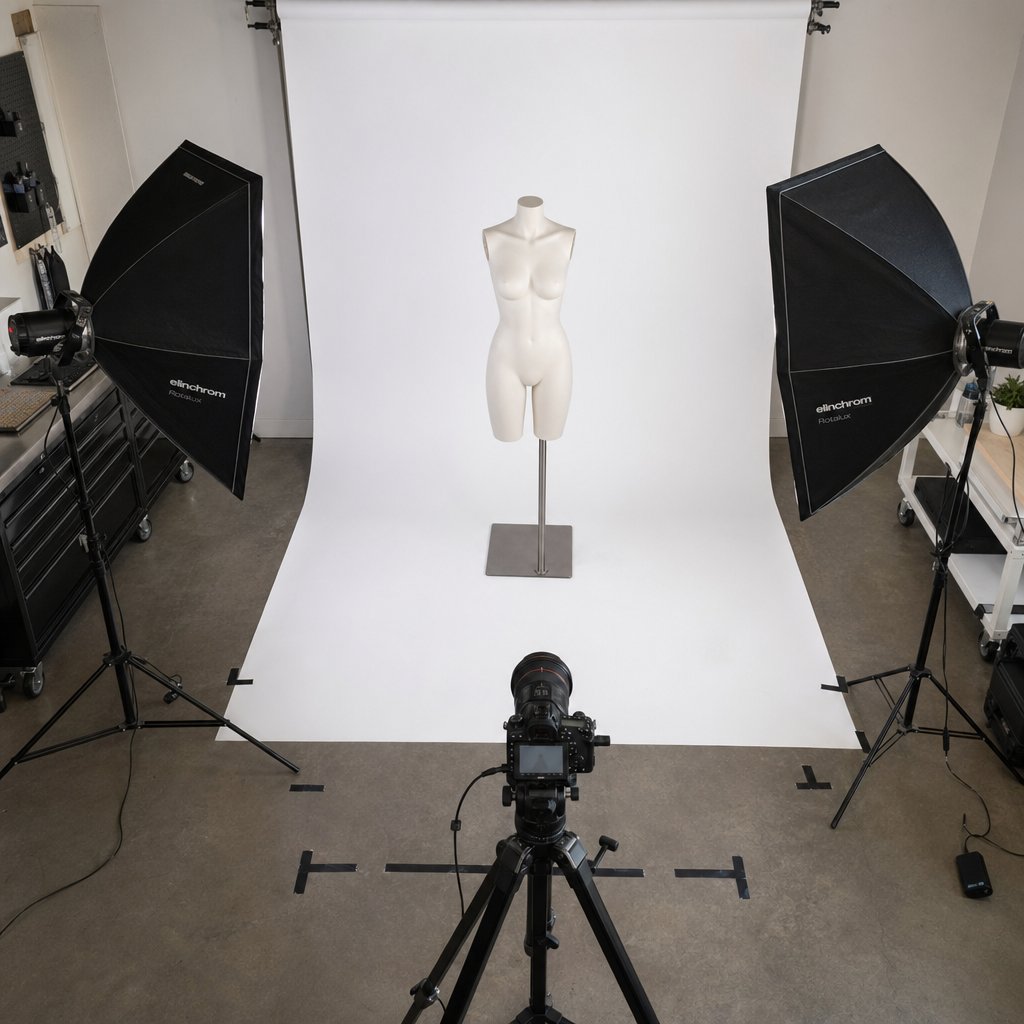
A sturdy tripod is non-negotiable. The entire compositing process depends on your exterior and interior shots aligning precisely, and even a slight shift in camera position between frames creates misalignment that is tedious to fix in post. Mark your tripod leg positions on the floor with tape so you can replicate the exact setup across multiple shooting sessions.
Tethered shooting, where your camera feeds a live preview to a laptop or monitor, is one of the most underrated upgrades for this workflow. Reviewing images at full size on a screen lets you catch focus issues, wrinkles, and styling problems immediately rather than discovering them hours later during editing. Most major camera brands support tethering through software like Capture One or Adobe Lightroom.
Lighting Setup and Backdrop Selection
Lighting is where ghost mannequin images either look polished or fall apart. The goal is soft, even illumination that reveals fabric texture and color without creating harsh shadows or blown-out highlights.
A proven starting setup uses two softbox lights positioned at approximately 45-degree angles on either side of the mannequin. This classic two-light arrangement wraps the garment in diffused light and minimizes shadows along the sides. Set both lights to the same power output for even illumination, or use a slight 2:1 ratio with the key light (the main light source) slightly stronger than the fill light for subtle dimensionality.
For color temperature, stick with 5500K daylight-balanced bulbs or strobes. This matches natural daylight and produces the most accurate fabric colors, which is critical for reducing returns caused by color mismatches between screen and reality. Mixing color temperatures, like combining a warm tungsten overhead with cool daylight softboxes, introduces color casts that are difficult to correct consistently across a large catalog.
An optional third light placed behind the mannequin and aimed at the backdrop helps eliminate background shadows and creates a clean edge separation between the garment and the white sweep. This backlight is especially useful for dark-colored garments that can blend into shadow areas.
For backdrops, seamless white paper rolls are the industry standard. They provide a clean, wrinkle-free surface that simplifies background removal during editing. A 9-foot-wide roll accommodates full-body mannequins with room to spare. Gray seamless paper is a versatile alternative: it is easier on the eyes during long shooting sessions and can be pushed to white or darkened in post-production depending on the look you want.
The table below organizes recommended equipment by budget tier so you can build a setup that fits your current needs and upgrade as your catalog grows.
| Tier | Mannequin | Camera / Lens | Lighting | Approximate Investment Range |
|---|---|---|---|---|
| Starter | Foam torso form or basic plastic torso ($40-$80) | Smartphone with manual mode or entry-level DSLR with 50mm prime lens | Two LED panel lights or desk lamps diffused with white fabric | $150 - $400 |
| Mid-Range | Detachable-limb torso mannequin, white or gray finish ($150-$300) | Mid-range DSLR or mirrorless camera with 50mm or 85mm prime lens | Two softbox lights (continuous or strobe) at 5500K, reflector panel | $800 - $1,500 |
| Professional | Full-body detachable mannequin plus separate leg form, female ghost mannequin and male form ($400-$800 total) | Full-frame mirrorless camera with 70-105mm lens, tethering cable and software | Two studio strobes with large softboxes, backlight for edge separation, gray card for color calibration | $2,500 - $5,000+ |
A starter kit gets you shooting within a day. A mid-range setup handles most catalog needs with room for consistent, repeatable results. A professional rig is built for volume, speed, and the kind of image quality that premium brands demand.
Regardless of which tier you start at, one principle stays constant: the best equipment in the world cannot compensate for a poorly prepared garment or a sloppy shooting process. How you dress the mannequin, dial in your camera settings, and capture each angle matters just as much as the gear itself.
How to Photograph Clothing on a Mannequin Step by Step
Great gear sitting idle on a studio shelf does not produce great images. The difference between a polished mannequin photo and an amateur one almost always traces back to what happens before and during the shoot, not after. Preparation, camera discipline, and a methodical approach to capturing every angle are what make post-production fast and the final result convincing.
This section walks through the complete shooting process, from steaming the first garment to clicking the last shutter, so you know exactly how to photograph clothing on a mannequin with repeatable, professional results.
Preparing the Garment and Dressing the Mannequin
Every minute you spend on garment prep saves you several minutes in editing. Wrinkles, lint, and sloppy styling are the fastest way to make product images look unprofessional, and they are far easier to fix with an iron than with a clone stamp tool.
Start by steaming or ironing each piece thoroughly. Budget roughly five to ten minutes per garment, paying close attention to collars, cuffs, plackets, and hems where creases tend to settle during storage. A handheld garment steamer is faster than an iron for most fabrics and carries less risk of scorching delicate materials. Once the garment is wrinkle-free, run a lint roller over the entire surface to remove dust, loose threads, and stray fibers that the camera will pick up in sharp detail.
Dressing the mannequin is where styling instincts come into play. Button or zip the garment fully, then step back and evaluate the silhouette from the camera's perspective. Excess fabric at the back is normal since most garments are not cut to fit a rigid form perfectly. Use clips, pins, or fashion tape along the back seam to pull the fabric taut and create a clean, tailored front profile. The goal is a natural-looking fit, not a skin-tight stretch that distorts the garment's true proportions.
For lightweight tops and blouses, stuff tissue paper or small foam pads into the shoulder and chest areas to give the garment volume. Sleeves benefit from the same treatment: a rolled piece of tissue paper inside each sleeve prevents them from collapsing flat against the mannequin's sides. Collars should be positioned symmetrically, and if you are shooting a dress shirt or blazer, use double-sided fashion tape to keep collar points sharp and even. These small details compound across a catalog and are what separate a photoshoot mannequin setup that looks professional from one that looks rushed.
Camera Settings and Shooting the Exterior Shot
With the garment styled and the mannequin in position, it is time to lock in your camera settings. Consistency is the priority here. Every image in your catalog should share the same exposure, white balance, and depth of field so the final product pages look cohesive.
Use manual mode exclusively. Auto settings shift between frames as the camera reacts to different fabric colors and reflectivity, creating inconsistencies that are tedious to correct later. Here are the starting-point settings that work for most studio lighting setups:
- Aperture: f/8 to f/11. This range provides enough depth of field to keep the entire garment sharp from front buttons to back seams, without diffraction softening that can appear at very small apertures like f/16 or beyond.
- ISO: 100 to 200. Keep it as low as your lighting allows. Lower ISO means less digital noise and cleaner detail in fabric textures.
- Shutter speed: Adjust to match your lighting output. With studio strobes, this is typically your camera's flash sync speed (often 1/125s or 1/160s). With continuous LED lights, you may need a slower shutter, which is another reason the tripod is non-negotiable.
- White balance: Set manually to match your light source, typically around 5500K for daylight-balanced studio lights. Never use auto white balance during a catalog shoot, as it will drift between garments and create color mismatches across your product listings.
If you are shooting tethered to a laptop or monitor, review each image at full size before moving on. Check for focus accuracy, styling issues like a crooked collar or a visible pin, and any lighting hotspots on reflective buttons or zippers. Catching these problems in real time is far more efficient than discovering them during editing.
Follow this step-by-step sequence for each garment:
- Position the dressed mannequin at the marked floor spot, centered on the backdrop.
- Confirm the camera is level on the tripod and framed so the garment fills roughly 80% of the frame with even margins on all sides.
- Take a test shot and review it on the tethered monitor or camera LCD at full zoom to verify focus, exposure, and styling.
- Capture the front view as your primary exterior shot.
- Rotate the mannequin 180 degrees without moving the camera or lights, and capture the back view.
- If your catalog includes three-quarter angles, rotate the mannequin approximately 30 to 45 degrees from center and capture the additional perspective.
- Shoot any macro detail shots of buttons, stitching, fabric texture, or labels while the garment is still styled on the form.
Resist the urge to move the camera between angles. Rotate the mannequin instead. Keeping the camera locked in position ensures consistent framing and perspective across every shot, which matters both for catalog uniformity and for the compositing step that comes next.
Capturing the Interior and Detail Shots
This is the step that separates a complete ghost mannequin image from one that looks like a garment with a hole where the neck should be. The interior shot captures the areas hidden by the mannequin's body, typically the inside of the collar, the inner neckline, and for pants or skirts, the inner waistband. Without it, the final composite has no depth at the neckline and the illusion falls apart.
The process is straightforward but demands precision. Remove the mannequin's neck piece or upper torso section, whichever parts are blocking the garment's interior. If your mannequin has detachable components, this is as simple as popping off the neck segment while the garment stays in place on the remaining form. If you are working with a solid mannequin, you will need to partially remove the garment, flip it inside-out, and place it back on the form so the interior collar and neckline face the camera.
The critical rule: do not move the camera or tripod. The exterior and interior shots must align precisely during compositing, and even a small shift in camera position or focal length creates misalignment that is difficult and time-consuming to fix. Keep the same focal length, the same aperture, and the same lighting. The only thing that changes is the mannequin configuration and the portion of the garment that is visible.
For tops and jackets, you typically need one interior shot showing the inner collar and neckline area. For pants and skirts, capture the inner waistband. Full-length dresses may require both a neckline interior shot and a hemline interior shot, depending on how much of the garment's inside you want visible in the final image.
Once you have your exterior shots and your interior shots for a garment, you have everything the editing pipeline needs to produce a clean, professional mannequin photo with that convincing hollow-body depth. The quality of these raw captures, the precision of your alignment, the accuracy of your color, and the care you put into styling, directly determines how smooth or how painful the post-production process will be.
The Post-Production Editing Pipeline from Raw to Final Image
Careful shooting gets you clean raw files. Editing is where those files become the polished, hollow-body images that actually go live on your product pages. This is also where most ghost mannequin workflows either shine or fall apart. The compositing, color work, and retouching steps demand more technical skill than anything that happens on set, and rushing through them is the fastest way to undermine all the preparation you put into the shoot.
The full ghost mannequin editing pipeline moves through three distinct phases: raw processing, mannequin removal with layer compositing, and final retouching with export. Each phase builds on the one before it, so cutting corners early creates problems that compound downstream.
Raw Processing and Color Correction
Start by importing your raw files into Lightroom Classic or Capture One. Both applications handle raw processing non-destructively, meaning your original files stay untouched while you apply adjustments on top. This is important because you will likely revisit these settings as your catalog grows and your brand's visual standards evolve.
Your first task is setting a consistent white balance across every image in the batch. If you shot with a gray card or a known neutral reference, use the eyedropper tool to click on that reference point and lock in an accurate color temperature. For daylight-balanced studio lights at 5500K, you will typically land somewhere between 5200K and 5800K depending on your specific bulbs and modifiers. The key is that every garment in the catalog shares the same white balance baseline so your product pages look unified rather than shifting warm and cool from one listing to the next.
After white balance, adjust exposure so the backdrop reads as clean white without blowing out garment highlights. For most studio shots on white seamless paper, a slight positive exposure bump of +0.3 to +0.5 stops combined with pulling the highlights slider down keeps the background bright while preserving fabric detail. Then fine-tune shadows, contrast, and clarity to bring out texture without over-sharpening.
Color accuracy is not just an aesthetic preference in e-commerce. It directly affects return rates. When a customer orders a navy blazer and receives something that looks closer to black, that return costs you shipping, restocking time, and trust. Pay close attention to how your raw processor renders saturated colors like reds and blues, which are notorious for shifting between camera sensors and screens. Use the HSL panel to nudge individual color channels until the on-screen image matches the physical garment under neutral light.
Once you have dialed in adjustments for one image, batch-apply those settings across every shot taken under the same lighting conditions. In Lightroom, select all similar images, choose your corrected frame as the primary, and sync settings. This single step can process dozens of images in seconds rather than minutes, which is essential when you are working through a catalog of hundreds of SKUs. Double-check a handful of images after syncing, especially garments in very different colors, since a dark black hoodie and a white linen shirt may need individual exposure tweaks even under identical lighting.
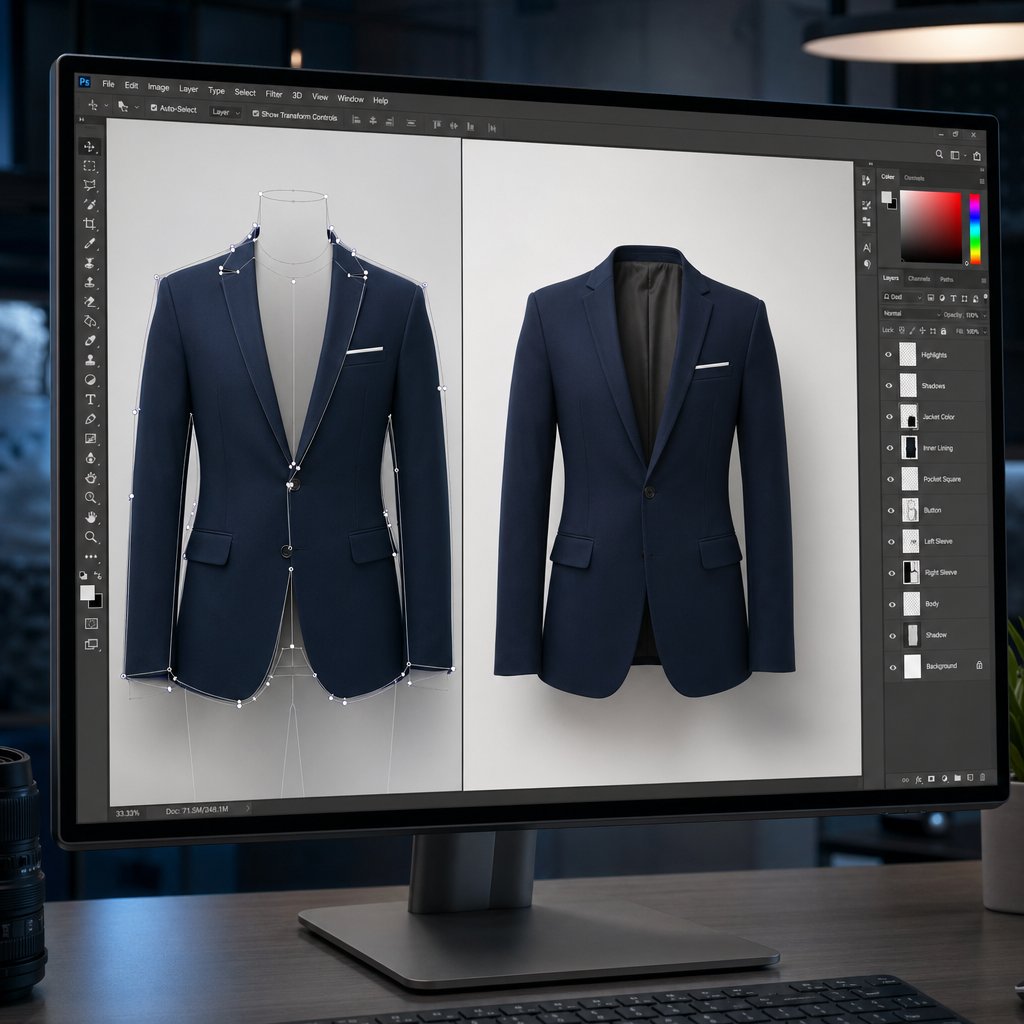
Mannequin Removal and Layer Masking
This is the core of ghost mannequin editing and the step that produces the actual hollow-body effect. You are combining two separate exposures, the exterior shot and the interior neckline or waistband shot, into a single composite where the mannequin disappears and the garment appears to float with visible depth.
Open both the exterior and interior shots as layers in your editing application. Ghost mannequin Photoshop workflows are the most common, but Affinity Photo and GIMP both support the same layer-based compositing approach. In Photoshop, place the exterior shot as the top layer and the interior shot as the bottom layer.
Begin by isolating the garment on the exterior layer. The Pen Tool remains the gold standard for precision here. Trace the garment's outer edge carefully, following the contour of shoulders, sleeves, hem, and sides. For clean fabrics with well-defined edges, Photoshop's Select Subject or Object Selection tool can give you a fast starting mask that you then refine manually. Avoid relying entirely on automated selection for the final result. AI-driven tools speed up the rough pass, but they tend to miss subtle details along fuzzy knit edges, loose threads, or semi-transparent fabrics.
Once you have a clean selection of the garment on the exterior layer, convert it to a layer mask. The mannequin behind the garment disappears, revealing the interior shot on the layer beneath. This is where alignment becomes critical. If your camera stayed locked on the tripod between shots, the two layers should register almost perfectly. If there is a slight shift, use Edit > Auto-Align Layers in Photoshop to correct it before you start blending.
Refine the transition zone where the exterior garment edge meets the interior shot. The neckline area is the most visible seam in any ghost mannequin photo, so zoom in to 100% or closer and work through it carefully. Use a soft-edged brush on the layer mask to blend the two exposures where they overlap, paying attention to:
- Seam alignment along the collar and neckline, ensuring stitching lines match between layers
- Color and brightness continuity, since even small exposure differences between the two shots create a visible line at the composite edge
- Edge softness, feathering the mask just enough to avoid a hard cutout look without blurring garment detail
For pants and skirts, the same process applies at the waistband. For full-length dresses, you may need to composite three layers: the exterior, the interior neckline, and the interior hemline. Each additional layer adds complexity, so keeping your shooting process disciplined with a locked tripod and consistent lighting pays dividends here.
Shadow Creation, Final Retouching, and Export
A garment floating on a pure white background with no shadow looks pasted in, not photographed. Adding a subtle shadow grounds the image and gives it the visual weight that makes shoppers perceive it as a real, three-dimensional product rather than a digital cutout.
The most natural approach is a soft drop shadow directly beneath the garment. Create a new layer below the composited garment, use a large, soft brush set to black at low opacity (5-15%), and paint a gentle shadow along the bottom hem. Build it up gradually with multiple passes rather than one heavy stroke. The shadow should be darkest directly under the garment and fade to nothing within a short distance. Avoid using Photoshop's automated Drop Shadow layer style for this. It produces a uniform offset shadow that looks artificial on clothing.
With the shadow in place, zoom through the entire image at 100% and clean up any remaining artifacts. Common issues at this stage include small remnants of the mannequin visible through semi-transparent fabric, slight color mismatches at the composite seam, and stray pixels along the garment edge. Use the Clone Stamp or Healing Brush for spot corrections, and revisit the layer mask if larger areas need adjustment.
Color shifts across different fabric types are one of the trickiest retouching challenges. Dark fabrics like black and navy absorb studio light and tend to lose shadow detail, making them look flat. Pulling up the shadows slider or using a targeted Curves adjustment on just the dark areas recovers that detail without washing out the rest of the image. White and pastel fabrics have the opposite problem: they reflect so much light that highlights blow out and texture disappears. Pulling highlights down and adding a touch of contrast restores the weave and surface detail that shoppers want to see when they zoom in. Highly saturated fabrics, especially reds and magentas, are prone to channel clipping where one color channel maxes out and the fabric looks unnaturally vivid. Check your histogram for individual RGB channels and use selective color adjustments to bring these back into a printable, accurate range.
These ghost mannequin effects, from the hollow-body composite to the grounded shadow and fabric-accurate color, are what transform a raw studio capture into an image mannequin that looks ready for a professional product page. Achieving them consistently across an entire catalog is what separates polished e-commerce brands from the rest.
Here is the complete sequential editing pipeline from import to final export:
- Import raw files into Lightroom or Capture One and organize by garment or SKU.
- Set white balance using a gray card reference or manual temperature adjustment.
- Adjust exposure, highlights, shadows, and contrast for accurate tonal range.
- Batch-sync corrections across all images shot under the same lighting conditions.
- Open the exterior and interior shots as layers in Photoshop, Affinity Photo, or GIMP.
- Isolate the garment on the exterior layer using the Pen Tool or refined selection tools.
- Convert the selection to a layer mask, revealing the interior shot beneath.
- Align layers precisely and blend the composite seam with a soft-edged brush on the mask.
- Create a natural drop shadow on a separate layer beneath the garment.
- Clean up artifacts, correct fabric-specific color shifts, and perform final retouching.
- Flatten the image and export as JPEG in sRGB color space at 80-90% quality for web use, sized to meet your platform's minimum resolution requirements.
For export, sRGB is the correct color space for any image destined for web display. Exporting in Adobe RGB or ProPhoto RGB causes colors to look muted or shifted on browsers and devices that do not support those wider gamuts. Resolution should meet or exceed your marketplace's minimum, typically 1000 pixels on the longest side for Amazon and 2048 pixels square for high-resolution zoom on Shopify. File size matters too: aim for images under 500KB where possible to keep page load times fast without visible compression artifacts. A JPEG quality setting between 80 and 90 hits that balance for most ghost mannequin photos.
A disciplined editing pipeline produces consistent results image after image. But consistency gets tested when the products themselves vary wildly, from structured blazers that practically edit themselves to sheer fabrics and flowing dresses that demand entirely different handling on the mannequin and in post.
Garment-Specific Techniques for Different Products and Fabrics
A tailored blazer and a sheer chiffon blouse both end up as hollow-body images on your product page, but the path to getting them there could not be more different. The blazer practically holds its own shape on the mannequin. The chiffon reveals every contour of the form underneath and fights you at every stage of masking. Treating every garment the same way during shooting and editing is one of the most common reasons ghost mannequin clothing photography looks inconsistent across a catalog.
This section breaks down the specific challenges and techniques for different product categories and fabric types so you can adapt your approach based on what is actually on the mannequin, not just follow a one-size-fits-all checklist.
Tops, Jackets, and Structured Garments
If you are new to clothing photography ghost mannequin workflows, structured upper-body garments are the best place to start. Blazers, sport coats, denim jackets, and tailored shirts hold their shape on a mannequin with minimal intervention, which means less styling time and cleaner composites.
Collar and lapel positioning is the first thing shoppers notice. For blazers and suit jackets, fold the lapels to their natural resting position and use a small piece of double-sided fashion tape on the underside to keep them symmetrical. Collar points on dress shirts should be taped down flat and even. An asymmetric collar is one of those subtle details that registers as "something looks off" to a shopper even if they cannot pinpoint why.
Sleeves on structured jackets usually hold their shape well, but lighter-weight tops like cotton button-downs and knit sweaters tend to collapse against the mannequin's sides. Roll a piece of tissue paper or a thin foam insert into each sleeve to give it a natural, slightly rounded profile. The sleeve should look like an arm could be inside it, not like it has been vacuum-sealed to the form.
Buttons and zippers deserve deliberate attention. Photograph jackets buttoned or zipped to the position a customer would most likely wear them. For a two-button blazer, fasten the top button and leave the bottom open. For a full-zip hoodie, zip it about three-quarters of the way up. These small styling choices communicate how the garment is meant to be worn and help shoppers visualize themselves in it. If a zipper pull catches light and creates a distracting specular highlight, angle it slightly downward or apply a tiny piece of matte tape to dull the reflection.
Pants, Skirts, and Dresses
Lower-body garments introduce challenges that tops do not. The biggest decision is whether to use a dedicated leg form or a full-body mannequin. Leg forms are more affordable and easier to store, but they only cover waist to ankle. If your catalog includes both tops and bottoms, a full-body mannequin with detachable upper and lower sections gives you the most flexibility without doubling your equipment.
Waistband styling makes or breaks the silhouette of pants and skirts. Pin the waistband at the back to create a smooth, fitted front profile, and make sure the waist sits at the mannequin's natural waistline rather than riding up or sagging down. For pants, stuff the legs lightly with tissue paper to maintain a natural drape without creating an overstuffed look. Creases along the front of dress pants should be steamed into a crisp, centered line before the garment goes on the form.
Full-length dresses add compositing complexity because they span the entire mannequin. You will typically need both a neckline interior shot and a hemline interior shot to fill in the hollow areas at the top and bottom of the garment. That means three or more exposures to composite instead of two, and each additional layer increases the chance of alignment issues. Keeping the camera absolutely locked on the tripod between every shot is even more critical here than it is for a simple top.
A-line skirts and flared dresses present a unique styling challenge: the fabric wants to hang straight down rather than flare outward on a static mannequin. Use small clips or pins at the interior hem to spread the fabric into its natural silhouette, or place a thin wire hoop inside the hem to hold the shape. Remove or retouch any visible clips during editing.
Non-Apparel Products and Difficult Fabrics
Mannequin product photography extends well beyond shirts and pants. Hats displayed on head forms, handbags propped on bust forms, shoes positioned on foot lasts, and scarves draped over neck busts all benefit from the same invisible mannequin product photography principle: show the product's three-dimensional shape, then remove the form in post. The compositing logic is identical. You isolate the product, mask out the form, and add a shadow to ground the image.
For accessories, the main adjustment is choosing the right display form. A polystyrene head form works for hats and beanies. A simple T-shaped stand or a small bust form holds scarves and necklaces in a natural drape. Handbags often look best on a small pedestal or arm form that shows the bag's profile and strap drop. The key is selecting a form that gives the product shape without adding so much visual clutter that the masking process becomes unnecessarily complex.
Fabric type is where invisible mannequin product photography gets genuinely difficult, regardless of the garment category. Different materials interact with light, mannequin surfaces, and editing tools in very different ways. Here are the fabric-specific tips that will save you the most time:
- Sheer and semi-transparent fabrics (chiffon, organza, mesh): The mannequin shows through the fabric, making clean masking extremely difficult. Use a mannequin that closely matches your backdrop color, ideally white on white, so the form blends into the background rather than creating a visible shape beneath the garment. Increase your key light intensity slightly to wash out the mannequin's shadow through the fabric. In post, you may need to manually paint out mannequin contours on a layer mask rather than relying on automated selection tools.
- Reflective and high-gloss fabrics (leather, vinyl, patent, satin): These materials pick up specular highlights from your studio lights and can reflect the mannequin's surface color. Position your softboxes slightly farther from the mannequin than usual to soften the highlights, and use larger light modifiers to spread the reflection across a wider area. A polarizing filter on your lens can reduce surface glare on leather and vinyl, though it will also cut your exposure by one to two stops.
- Knits and stretch fabrics (jersey, ribbed knits, spandex blends): These materials stretch and conform to the mannequin differently than they would on a human body. A tight-fitting knit top may cling to the mannequin's rigid contours and look unnaturally stiff. Pin the garment loosely rather than pulling it taut, and use tissue paper to create a softer, more rounded shape beneath the fabric. During editing, pay attention to the garment's edges. Stretched knits often show a slightly wavy or uneven outline that benefits from gentle liquify adjustments to smooth the silhouette.
- Dark fabrics (black, charcoal, deep navy): These absorb light and lose shadow detail, making the garment look like a flat, featureless shape. Increase your fill light or add a reflector panel on the shadow side to open up the dark areas. In post, use a targeted curves or levels adjustment to lift shadow detail without washing out the overall exposure.
- White and pastel fabrics: The opposite problem. These reflect so much light that highlights blow out and fabric texture disappears, especially against a white backdrop where the garment edges can blend into the background. Pull your exposure down slightly compared to mid-tone garments, and use the highlights slider in your raw processor to recover detail. A light gray backdrop can make edge separation easier during masking.
- Patterned and printed fabrics (stripes, plaids, florals): Patterns must align correctly at seams and across the composite boundary between exterior and interior shots. Misaligned stripes at the neckline composite seam are immediately noticeable. Take extra care during shooting to keep the garment positioned identically between the exterior and interior captures, and zoom in during editing to verify pattern continuity at every blend point.
Every fabric type rewards a slightly different combination of lighting adjustment, mannequin preparation, and editing technique. Building a short reference card for your most common fabric categories, taped to the studio wall where you can glance at it between setups, keeps your workflow efficient without relying on memory alone.
Handling individual garments well is one thing. Maintaining that same level of quality and consistency across an entire catalog of hundreds or thousands of SKUs is an entirely different challenge, and it requires a systematic approach to workflow, templates, and platform-specific formatting.
Scaling Your Workflow for High-Volume Product Catalogs
Photographing and editing a single garment well is a skill. Doing it 500 times with identical quality is a system. As your catalog grows, the techniques covered in previous sections need to be wrapped in a repeatable framework that any team member can follow on any shooting day without the results drifting. A professional ghost mannequin photography studio does not rely on memory or instinct for consistency. It relies on templates, presets, and documented standards that remove guesswork from every stage of production.
Building a Repeatable Studio Workflow
Start by turning your physical studio into a template. Mark the mannequin's base position on the floor with gaffer tape so it lands in the exact same spot every session. Do the same for your tripod legs and each light stand. These floor marks eliminate the most common source of shot-to-shot variation: subtle shifts in camera-to-subject distance and lighting angle that accumulate across dozens of garments.
Save your lighting power settings as a written preset, either on a card taped to your light stand or in a digital note your team can reference. If you use studio strobes with digital displays, photograph the readout so there is no ambiguity about ratios when someone else sets up the next session. For camera settings, tethered capture software like Capture One or Lightroom lets you overlay a reference grid or a semi-transparent guide image on the live view. This overlay shows exactly where the garment's shoulders, hem, and center line should fall in the frame, making it easy to position each piece identically without eyeballing it.
On the post-production side, batch processing is what keeps mannequin photography for ecommerce viable at scale. Build a base Lightroom or Capture One preset that includes your standard white balance, exposure correction, contrast curve, and sharpening values. Apply it to every new import as a starting point, then make per-garment tweaks only where fabric color or exposure demands it. Industry workflow analyses show that brands managing 500 or more SKUs spend an average of 47 minutes per product on imaging tasks. Batch-applied presets and templated shooting cut that time significantly by eliminating redundant decisions.
Maintaining Consistency Across Your Entire Catalog
Catalog-level consistency is what separates a brand that looks professional from one that looks like a collection of random product shots stitched together. When a shopper clicks from a shirt to a jacket to a pair of pants, the lighting, shadows, positioning, and color treatment should feel seamless. That visual cohesion builds trust and keeps attention on the products rather than on jarring style shifts between pages.
Three areas deserve the most attention: shadow presentation, color accuracy, and garment positioning. Shadows should fall in the same direction and at the same intensity across every ghost mannequin image in your catalog. If one product has a soft drop shadow and the next has a hard directional shadow, the inconsistency registers immediately, even to casual browsers. Color consistency is trickier because different fabric dyes respond differently under the same lighting. A batch-synced white balance gets you close, but saturated reds, deep navies, and bright whites almost always need individual fine-tuning to match reality. Positioning consistency means every garment sits at the same vertical center point in the frame, with the same margin of white space around it, so your product grid looks organized rather than scattered.
Use this checklist before publishing any batch of images:
- Shadow direction and softness — Verify every image uses the same shadow style, angle, and opacity.
- White balance and color accuracy — Compare on-screen colors to the physical garment under neutral light. Spot-check at least one garment per fabric color group.
- Garment centering and framing — Confirm the product sits at the same vertical position with consistent margins on all sides.
- Background uniformity — Check that the white background reads as pure white (RGB 255, 255, 255) edge to edge, with no gray gradients or uneven tones.
- Crop ratio and file dimensions — Every image in the batch should share the same pixel dimensions and aspect ratio.
- Retouching completeness — Scan for leftover mannequin artifacts, visible pins, dust spots, or composite seam lines.
Running through this list adds a few minutes per batch but catches the kind of inconsistencies that erode brand perception over time. Comparative platform studies have found that product pages with consistent, high-quality imagery see conversion rates up to 94% higher than pages with inconsistent visuals. That number alone justifies treating consistency as a production requirement, not an afterthought.
Meeting Marketplace Image Requirements
Even perfectly consistent ghost mannequin images can get rejected or buried if they do not meet the specific technical requirements of the platform where you sell. Each major marketplace enforces its own rules for background color, minimum resolution, file format, and aspect ratio, and violating them can result in suppressed listings or outright removal.
The table below summarizes the key specifications for the platforms most ghost mannequin for ecommerce sellers use. Bookmark it as a quick reference when exporting final files.
| Platform | Background Requirement | Minimum Resolution | Recommended Aspect Ratio |
|---|---|---|---|
| Amazon | Pure white (RGB 255, 255, 255) | 1000 x 1000 px (1600 x 1600 px recommended for zoom) | 1:1 (square) |
| Shopify | White or brand-consistent neutral | 2048 x 2048 px recommended | 1:1 (square) for product grids |
| Google Shopping | White or neutral (no transparency) | 250 x 250 px for apparel (800 x 800 px recommended) | 1:1 preferred |
| eBay | White or light neutral preferred | 500 x 500 px minimum (1600 px on longest side recommended) | 1:1 (square) |
| Etsy | No strict requirement, white recommended for apparel | 2000 px on shortest side recommended | 4:3 or 1:1 |
A few practical notes: Amazon is the strictest. Its algorithm checks for pure white backgrounds, and listings with off-white or gray tones can be suppressed without warning. If your backdrop is not hitting RGB 255, 255, 255 after editing, use a levels adjustment to push it there while protecting the garment's edge detail. Shopify gives you more creative freedom since you control the theme, but square crops remain the safest default because they display cleanly across grid layouts and mobile screens. Google Shopping penalizes blurry or undersized images, so always export at or above the recommended resolution even if the minimum is lower.
Build platform-specific export presets in Photoshop or Lightroom so you can output the correct dimensions, color profile, and file size for each channel in a single action. When you are processing hundreds of images per season, manually resizing and re-exporting for each marketplace is a time sink that automation eliminates entirely.
A streamlined, consistent, platform-ready catalog is the operational foundation. The remaining question is what happens when things go wrong, because even the most disciplined workflow runs into alignment failures, lighting mismatches, and fabrics that refuse to cooperate.
Common Mistakes in Invisible Mannequin Photography and How to Fix Them
You followed every step. The garment was steamed, the mannequin was dressed, the camera was locked on the tripod, and the lighting looked even. Then you opened the files in Photoshop, started compositing, and something looked wrong. The neckline seam does not line up. The shadow under the collar goes one direction on the exterior shot and another on the interior. The black fabric looks like a shapeless void. Sound familiar?
These problems are not signs that you did everything wrong. They are the normal friction points of invisible ghost mannequin photography, and every photographer, from first-timers to seasoned studio operators, runs into them. The difference between an amateur result and a professional one is knowing how to diagnose each issue and fix it efficiently rather than guessing your way through hours of retouching. This section covers the most common failures and gives you specific, actionable solutions for each one.
Misaligned Seams and Compositing Artifacts
Misalignment between the exterior and interior shots is the single most frequent editing failure in this workflow. When the two layers do not register correctly, you get visible seam lines at the neckline, collar stitching that jumps sideways between the composite layers, and an overall mannequin picture that looks like two different photos awkwardly stitched together rather than one seamless image.
The root cause is almost always camera movement between shots. Even a small bump to the tripod, a slight zoom adjustment, or a shift in the mannequin's position on the stand creates enough offset to make the composite seam obvious. The fix starts on set, not in post-production. Keep the camera locked on the tripod at the exact same height, angle, and focal length for both the exterior and interior captures. Mark the mannequin's base position with tape so it returns to the same spot after you remove or reconfigure parts for the interior shot.
When misalignment has already happened and you are working with the files you have, Photoshop's Edit > Auto-Align Layers feature is your best fallback. Select both layers, run the auto-align command, and let the software attempt to match overlapping details. This works well for minor shifts of a few pixels but struggles with larger offsets or shots taken at slightly different focal lengths. For cases where auto-align cannot fully correct the problem, use Edit > Free Transform to manually nudge, rotate, or scale the interior layer until the seam lines match. Drop the layer opacity to 50% so you can see both layers simultaneously while adjusting.
Even with good alignment, compositing artifacts can appear along the blend zone. Jagged edges where the mask transitions between layers, visible hard lines at the collar seam, or ghostly remnants of the mannequin's neck peeking through are all common. Zoom in to at least 200% and work the mask edge with a small, soft-edged brush. Feather the transition just enough to eliminate the hard line without blurring garment detail. If stitching lines or pattern elements like stripes do not align at the seam, use the Clone Stamp tool at low opacity to bridge the gap and restore visual continuity.
Lighting Inconsistencies and Shadow Problems
Uneven lighting between your two exposures is the second most common issue, and it is especially frustrating because it can be invisible on the camera's small LCD screen and only become obvious once you start compositing at full resolution. When the exterior shot and the interior shot have different brightness levels, the composite seam shows as a visible tonal shift, a brighter or darker band where the two layers meet.
This happens for a few reasons. If you are using continuous lights, even a slight change in the mannequin's configuration between shots can alter how light bounces off the form and onto the garment. If you are using strobes, inconsistent flash output between pops creates exposure variation. And if someone accidentally bumped a light stand between the exterior and interior captures, the entire lighting ratio shifts.
The fix during shooting is straightforward: do not touch the lights between shots. Leave every light at the same power, position, and angle for both the exterior and interior captures. If you are using strobes, fire a few test pops before each shot to confirm consistent output. Check your histogram on the camera or tethered monitor after each capture to verify that exposure values are holding steady.
When you are already in post and the damage is done, use Curves or Levels adjustments on the interior layer to match its brightness and contrast to the exterior layer before you start masking. Apply the adjustment as a clipped adjustment layer so it only affects the interior shot without altering the rest of the composite. Match the midtone brightness first, then fine-tune highlights and shadows until the two layers look like they were shot under identical conditions.
Shadow direction is a subtler problem that often goes unnoticed until the final image is placed alongside other products in a catalog grid. If the mannequin shifted position between shots, or if a light was accidentally angled differently, the shadow on the interior portion may fall in a slightly different direction than the shadow on the exterior. The result is a mannequin picture where the lighting feels contradictory, as if two different suns are illuminating the same garment. The solution is to remove the original shadows from both layers entirely during masking, then rebuild a single, unified shadow on a separate layer beneath the composited garment. This gives you full control over direction, softness, and intensity, and it guarantees consistency across every image in the catalog.
Color Shifts Across Fabric Types and When Not to Use Ghost Mannequin
Identical lighting does not mean identical results across every fabric. Dark fabrics absorb light and lose shadow detail, making a charcoal blazer look like a flat, featureless silhouette. White and pastel fabrics reflect so much light that highlights blow out and surface texture vanishes. Saturated colors like red, cobalt blue, and emerald green are prone to channel clipping, where one RGB channel maxes out and the fabric looks artificially vivid on screen even though it appears normal to the naked eye.
The practical fix is to adjust exposure compensation on a per-fabric basis rather than locking one exposure setting for the entire shoot. For dark garments, open up your exposure by +0.3 to +0.7 stops or increase your fill light to recover shadow detail. For white garments, pull exposure down by -0.3 to -0.5 stops and rely on your raw processor's highlights slider to recover any remaining blown areas. For highly saturated fabrics, check the individual RGB channels in your histogram after each shot. If any single channel is clipping, reduce exposure slightly or desaturate that channel in post using the HSL panel.
Monitor calibration matters here too. Color inaccuracy is one of the top reasons for e-commerce returns, and an uncalibrated monitor can make a navy garment look perfectly accurate on your screen while it appears purple on a customer's device. Calibrate your editing monitor monthly with a hardware colorimeter, and always compare your on-screen colors to the physical garment under neutral daylight or a 5500K reference light before exporting.
Finally, it is worth being honest about when the mannequin ghost approach is not the right choice at all. Not every product benefits from this technique, and forcing it where it does not fit wastes time and produces underwhelming results. Here are the situations where a different method serves you better:
- Heavily draped or flowing garments — Items like maxi skirts with cascading layers, capes, or loose kimonos rely on movement and gravity for their visual appeal. A static mannequin cannot replicate the way these garments move on a body, and the resulting image often looks stiff and lifeless. On-model photography or styled flat lays communicate the drape and flow far more effectively.
- Lifestyle-driven brand aesthetics — If your brand identity is built around a specific mood, setting, or lifestyle rather than pure product detail, ghost mannequin images may feel too clinical. Brands that sell through storytelling and aspiration typically get more value from on-model or environmental photography that places the garment in context.
- Extremely sheer or unstructured fabrics — Garments made entirely of mesh, lace, or ultra-lightweight chiffon reveal the mannequin so completely that masking becomes impractical. The editing time required to remove every trace of the form through transparent fabric often exceeds the time it would take to shoot the garment using an alternative method like a hanger with the background removed or a carefully styled flat lay.
- Accessories and small items where flat lay excels — Scarves, belts, socks, and similar accessories often communicate better when laid flat with complementary props than when forced onto a form. The three-dimensional benefit of invisible mannequin photography adds little value for items that do not have a complex shape or fit to showcase.
- Products requiring movement or action context — Activewear, dancewear, and performance gear often need to show stretch, flexibility, or motion. A frozen mannequin pose cannot convey how a yoga pant moves during a lunge or how a running jacket fits mid-stride. On-model action shots serve these categories far better.
Knowing when to use this technique and when to set it aside is just as valuable as mastering the technique itself. The goal is always the image that best serves the customer's decision-making process, not the image that fits a single workflow.
With the technical and creative challenges addressed, the remaining decision is operational: should you handle this entire process in-house, outsource parts of it, or explore AI-powered alternatives that are reshaping how brands produce these images at scale?
Choosing the Right Ghost Mannequin Workflow for Your Brand
You know how to shoot, edit, and troubleshoot ghost mannequin product photography. The techniques are clear. The real question now is operational: who actually does the work? A solo seller pinning garments at a kitchen table faces a completely different calculus than a mid-size fashion brand processing 300 new SKUs every season. The right workflow is not about which option sounds best in theory. It is about which one matches your volume, budget, and team's capabilities right now, with room to evolve as your catalog grows.
DIY vs. Studio vs. Outsourced Post-Production
Three traditional paths have dominated this space for years, and each one trades off cost, speed, and control in different ways. A fourth option, AI-powered services, has emerged as a serious contender that collapses the post-production bottleneck entirely. Here is how they compare in practice.
Full DIY means you handle everything: equipment purchase, garment styling, shooting, mannequin removal, compositing, retouching, and export. The per-image cost is the lowest of any approach because you are only paying for gear and your own time. The tradeoff is steep. Learning to composite cleanly takes practice, and the hours add up fast. A beginner might spend 30 to 45 minutes editing a single image that a skilled retoucher finishes in ten. For a small catalog of a few dozen products, that time investment is manageable. For anything larger, it becomes a bottleneck that slows your entire product launch cycle. DIY is the right starting point if you are building skills, testing a new product line, or operating on a tight startup budget where every dollar matters more than every hour.
Hiring a ghost mannequin photographer or booking a professional studio gives you the highest image quality with the least personal effort. A dedicated ghost mannequin photography studio handles styling, shooting, editing, and delivery as a turnkey service. You send garments, they send back finished images. The quality ceiling is high, and turnaround for small batches can be fast. The cost, however, reflects all that expertise and overhead. Industry pricing for professional ghost mannequin edits ranges from $0.50 to $2 per image for standard composites, climbing to $8 to $15 per image for complex garments. Factor in the photography itself, and a full-service studio shoot can run $25 to $75 per finished image for straightforward white-background work. For brands that need premium results on a limited number of hero products, or those searching for a ghost mannequin photography service near their location for hands-on collaboration, studio partnerships deliver. For high-volume catalogs, the per-image math gets expensive quickly.
Shooting in-house while outsourcing the editing is the middle ground many growing brands land on. You control the shooting environment, garment styling, and creative direction, then send raw files to a specialized editing team that handles mannequin removal, compositing, and retouching. This hybrid approach keeps your per-image editing cost low, typically in the $0.50 to $5 range depending on complexity, while letting you maintain the shooting consistency that comes from owning your studio setup. The main risk is turnaround time. Outsourced editing providers handle bulk orders efficiently, but urgent small batches may take longer than doing it yourself. Communication overhead is real too: conveying your exact retouching standards to an external team requires clear style guides and a feedback loop that takes time to establish.
The table below puts all four approaches side by side so you can see where each one fits.
| Approach | Cost Per Image Range | Turnaround | Skill Required | Best For |
|---|---|---|---|---|
| AI-Powered Service | $1 - $5 | Minutes to hours | Low (upload and receive) | Growing brands needing speed and consistency at scale |
| Full DIY | $0 - $5 (gear amortized) | 30 - 60 min per image | High (shooting + compositing + retouching) | Small catalogs under 50 SKUs, skill-building phase |
| In-House Shoot + Outsourced Editing | $0.50 - $8 | 24 - 72 hours for editing | Moderate (shooting only) | Mid-size brands with regular product launches |
| Full-Service Studio | $25 - $75+ | 3 - 10 business days | None (turnkey service) | Premium brands, complex garments, hero product shoots |
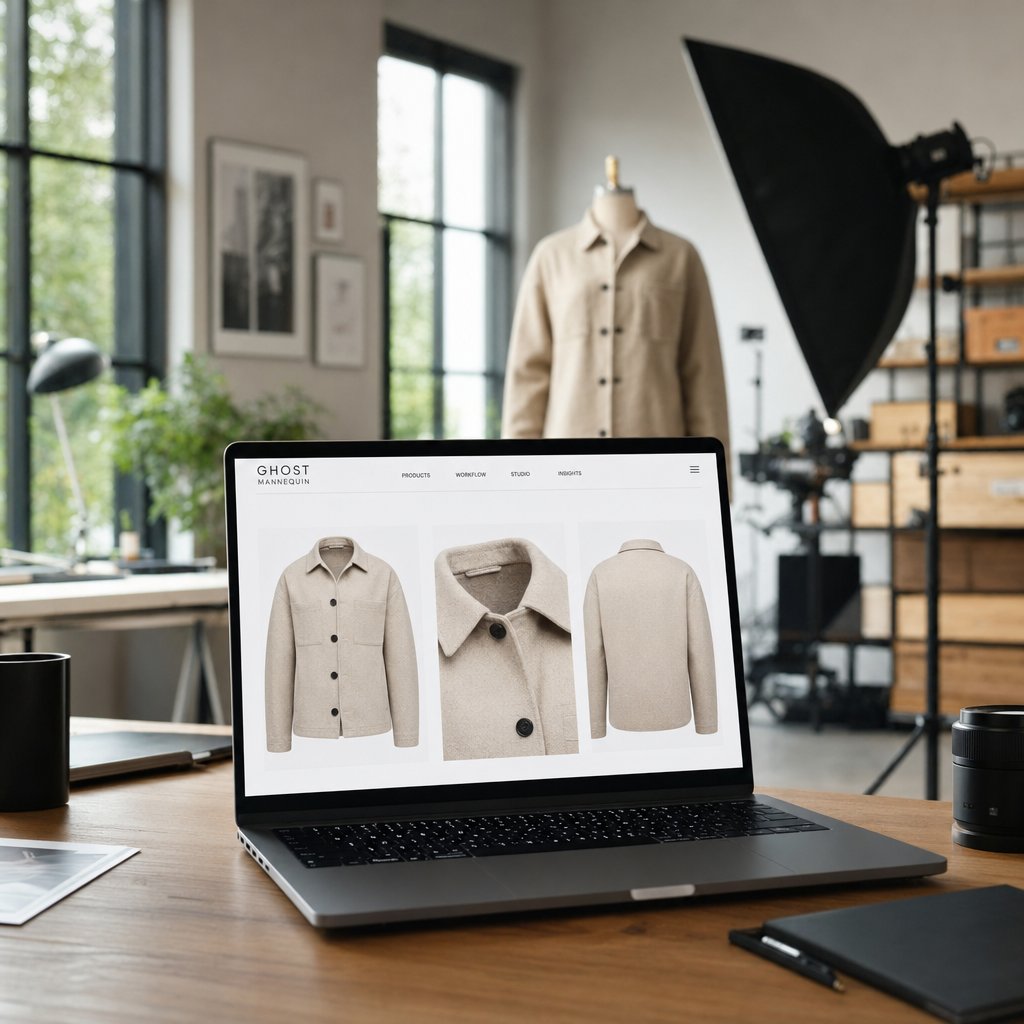
How AI-Powered Tools Are Changing the Workflow
The most time-consuming part of ghost mannequin product photography has never been the shooting. It is the editing. Mannequin removal, layer compositing, seam blending, shadow creation, and color correction across hundreds of images is where hours turn into days and budgets balloon. AI-powered ghost mannequin services are targeting exactly this bottleneck, and the results are reshaping how brands think about production timelines.
Instead of manually tracing garment edges with the Pen Tool and blending composite layers by hand, AI services accept your raw studio shots and return finished hollow-body images with the mannequin removed, interior shots composited, and shadows added. The editing steps that might take a skilled retoucher 15 to 30 minutes per image can be processed in a fraction of that time.
Snappyit's Ghost Mannequin service is a concrete example of this shift. Built specifically for fashion brands, studios, and online sellers, it handles mannequin removal and compositing through AI, delivering clean hollow-man product images without requiring deep Photoshop expertise on your end. For sellers who have the shooting side dialed in but dread the editing queue, or for teams that lack a dedicated retoucher, a service like this collapses the post-production timeline from days to hours. The practical value is clearest for brands managing frequent product drops where speed to listing directly impacts revenue.
That said, AI-powered editing is not a universal replacement for every scenario. Complex garments with multiple composite layers, sheer fabrics that require careful manual masking, and premium brands with highly specific retouching standards may still benefit from human-driven post-production for their most demanding products. The strength of AI services is handling the high-volume, repeatable work that follows a consistent pattern, freeing up human attention for the edge cases that genuinely need it.
Matching the Right Approach to Your Brand's Needs
The decision framework is simpler than it might seem. Three variables drive it: catalog size, budget, and how fast you need images live on your product pages.
If you are running a small catalog under 50 SKUs and have more time than money, full DIY gives you control and builds skills you will use regardless of how your business scales. Invest in a mid-range equipment setup, learn the compositing workflow, and treat the first few dozen products as your training ground. The per-image cost is negligible once you own the gear, and the hands-on experience makes you a better buyer of outside services later if you choose to outsource.
For growing brands with hundreds of products and regular seasonal launches, AI-assisted workflows offer the best balance of speed, consistency, and cost. You maintain control over the shooting process in your own studio, then hand off the editing to an AI service that delivers consistent results without the turnaround delays or communication overhead of traditional outsourcing. This is where the math tips decisively: the time saved on editing across 200 or 500 images per season compounds into weeks of recovered productivity that you can redirect toward marketing, merchandising, or product development.
Premium brands with complex garments, high-end fabrics, and exacting visual standards may still want studio-level control over every pixel. A dedicated ghost mannequin photography service or an in-house retouching team ensures that every composite seam, every shadow gradient, and every color nuance meets the brand's exact specifications. The cost per image is higher, but for brands where image quality is inseparable from brand equity, that investment protects the perception of value that justifies premium pricing.
Many brands end up combining approaches as they grow. A common evolution looks like this: start DIY to learn the craft and prove the concept, shift to an AI-powered service as volume increases and speed becomes critical, and reserve full-service studio work for flagship products or campaign imagery where the extra polish justifies the premium. The approaches are not mutually exclusive. They are tools in a toolkit, and the smartest operators pick the right one for each job.
The best ghost mannequin workflow is the one that produces consistent, high-quality images at a pace and cost your business can sustain as your catalog grows.
Ghost mannequin product photography is not a single technique. It is a system that spans equipment selection, shooting discipline, post-production precision, and operational decision-making. The brands that get the most value from it are the ones that treat it as exactly that: a system designed to scale, not a one-time project to check off a list.
Ghost Mannequin Product Photography FAQs
1. What is ghost mannequin photography and how does it work?
Ghost mannequin photography is a technique where clothing is photographed on a mannequin, then the form is digitally removed in post-production. The process involves capturing an exterior shot of the garment on the mannequin and a separate interior shot showing the neckline or waistband. These two images are composited together in Photoshop or similar software using layer masking, creating a three-dimensional hollow-body effect that shows the garment's shape, fit, and construction details without any visible form or model.
2. What equipment do I need to start ghost mannequin photography?
At minimum, you need a detachable-limb mannequin (torso form for tops or leg form for pants), a camera with manual exposure control that shoots RAW files, a lens in the 70-105mm range for minimal distortion, a sturdy tripod, two softbox lights positioned at 45-degree angles with 5500K daylight-balanced bulbs, and a white seamless paper backdrop. A starter setup runs approximately $150 to $400, while a professional rig with full-body mannequins, full-frame camera, and studio strobes ranges from $2,500 to $5,000.
3. How do I remove the mannequin in Photoshop?
Open both your exterior and interior shots as layers, with the exterior on top. Use the Pen Tool to trace the garment's outline on the exterior layer and convert the selection to a layer mask, which hides the mannequin and reveals the interior shot beneath. Align both layers precisely using Auto-Align Layers if needed, then blend the composite seam at the neckline using a soft-edged brush on the mask. Finally, add a drop shadow on a separate layer beneath the garment to ground the image and make it look natural.
4. How much does ghost mannequin photography cost per image?
Costs vary significantly by approach. Full DIY costs effectively $0 to $5 per image once equipment is amortized, but requires 30 to 60 minutes of your time per image. AI-powered services like Snappyit range from $1 to $5 per image with turnaround in minutes to hours. Outsourcing just the editing runs $0.50 to $8 per image with 24 to 72 hour turnaround. Full-service studio photography costs $25 to $75 or more per finished image but requires no skill on your part.
5. Can I use ghost mannequin photography for all types of clothing?
Ghost mannequin works best for structured garments like blazers, button-down shirts, tailored dresses, and pants that hold their shape on a form. It is less effective for heavily draped or flowing garments that rely on movement for their visual appeal, extremely sheer fabrics like chiffon or mesh that reveal the mannequin underneath, and activewear that needs to show stretch or motion. For these categories, on-model photography, styled flat lays, or hanger shots typically produce better results.