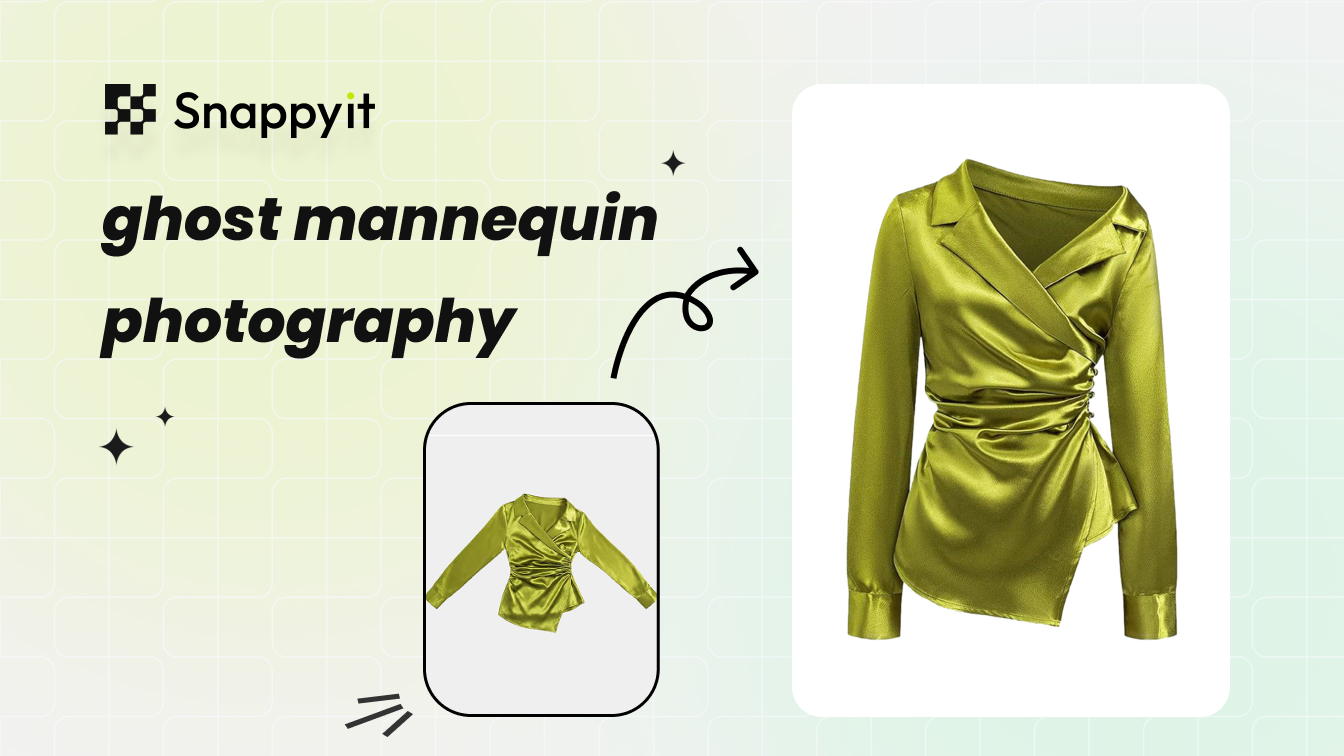
At a glance
Flat lay pants tutorial — wrinkle removal, leg positioning, styling per pant type, hidden tools, and shot variants for e-commerce vs social.
| Need | What to do |
|---|---|
| Get oriented | Read the short summary, then use the checklist below. |
| Create a test image | Try Flat Lay Photo Free |
Why Pants Need Their Own Flat Lay Method
Most clothing photography guides treat pants as an afterthought. You get a full page on styling a shirt, a detailed breakdown for dresses, and then a single line that says something like "repeat for bottoms." That advice falls apart the moment you try to lay a pair of wide-leg trousers on a table and watch the fabric pool into a shapeless blob.
If you are new to the concept, here is the short version. Flat lay photography means arranging a garment on a surface and shooting it from directly above. The technique produces clean, distraction-free images that have become a staple of e-commerce and social media content. Simple enough in theory, but pants push the method to its limits.
Why Pants Are the Hardest Garment to Flat Lay
Pants fight you in ways other garments do not. They are heavy, especially denim. They are stiff at the waistband and fly. And they have bilateral symmetry, meaning two separate legs that need to read as one cohesive silhouette rather than two disconnected tubes. Add variables like rise height, leg width, hem style, and fabric weight, and you are dealing with a garment that demands specific, deliberate handling at every step.
A top drapes from the shoulders and mostly cooperates. A pair of palazzo pants or raw-selvedge jeans? Those require a completely different playbook. Generic lay flat photography tips simply do not account for the structural complexity that bottoms bring to the table.
A great pants flat lay makes the garment look like it has a body inside it without a body being there.
What You Will Learn in This Guide
This guide is built for anyone photographing flat lays of pants, whether you are shooting product listings, styled social content, or catalog imagery at home. Each step covers a specific challenge: surface setup, garment prep, the foundation lay, type-specific adjustments, fabric behavior, hidden styling tricks, lighting, and context-driven shooting. By the end, you will have a repeatable method that works across every pant style in your inventory.
The first thing you need before touching a single pair of pants is the right workspace and the right tools, and that is exactly where we start.
Step 1: Set Up Your Surface and Gather Your Flat Lay Photography Equipment
A clean, well-prepared workspace does more for your final image than any amount of post-production. Before you pick up a single pair of pants, the surface beneath them and the tools beside you need to be ready. Skipping this step is the fastest way to end up with flat lay pics that look rushed, uneven, or impossible to color-correct later.
Choosing the Right Shooting Surface and Background
You need a surface large enough to fit the full garment with breathing room on all sides. For most pants, that means at least a 4-by-4-foot area. A sturdy table works well for waist-height shooting, but the floor is perfectly fine and actually gives you more space to spread wider silhouettes like palazzo or bootcut styles. The key requirement is that the surface is flat, stable, and completely clear of clutter.
Surface color and texture directly shape the mood and usability of your image. Here is how the most common backgrounds break down:
- White or light gray — the default for e-commerce and product listings. These backgrounds keep the focus entirely on the garment, make color-matching easier, and meet the image requirements of most online marketplaces.
- Natural wood — adds warmth and a lifestyle feel without competing with the garment. Works especially well for casual pieces like jeans and chinos.
- Textured linen or fabric — creates depth and visual interest for social media flat lays, but can introduce unwanted patterns in close-up detail shots.
- Colored paper or poster board — useful for seasonal campaigns or brand-specific palettes, though you will need to watch for color cast reflecting onto lighter fabrics.
If you are shooting for a catalog or online store, consistency matters more than creativity. Pick one background and stick with it across every SKU. A product listing where one pair of jeans sits on white and the next on wood looks disjointed and undermines buyer confidence. As Orbitvu's flat lay guide notes, uniformly colored backgrounds keep the viewer's attention on the product and prevent distractions that pull focus from the details.
Essential Tools and Why Each One Matters
Imagine you have steamed your pants perfectly, laid them on the surface, and then realized you need to walk across the room for a pin. By the time you get back, the fabric has already started settling into new creases. Having every tool within arm's reach eliminates that problem. Here is what you need and why each item earns its spot:
- Camera or smartphone with overhead capability — your capture device. Modern smartphones produce catalog-quality results for most product photography flat lay work, especially when paired with a stable mount.
- Tripod or overhead rig — keeps the camera perfectly level and perpendicular to the surface, which prevents the perspective distortion that makes one leg look longer than the other. A tripod with a horizontal arm or a C-stand works best for true top-down shooting.
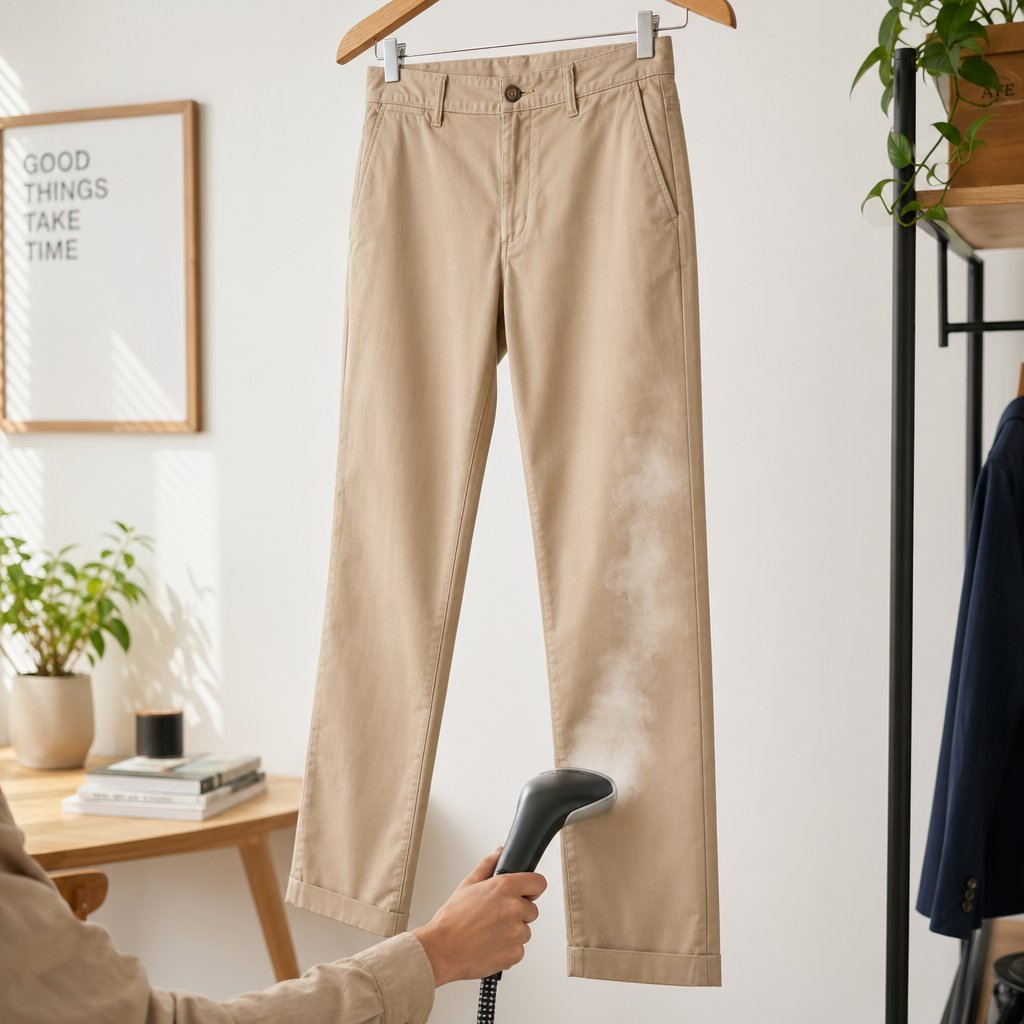
- Garment steamer — removes wrinkles without pressing new creases into the fabric. Steamers are faster and gentler than irons for most pant fabrics, and you can use them right at the shooting surface.
- Lint roller — catches dust, pet hair, and fiber debris that the camera will magnify. One quick pass right before shooting saves significant retouching time.
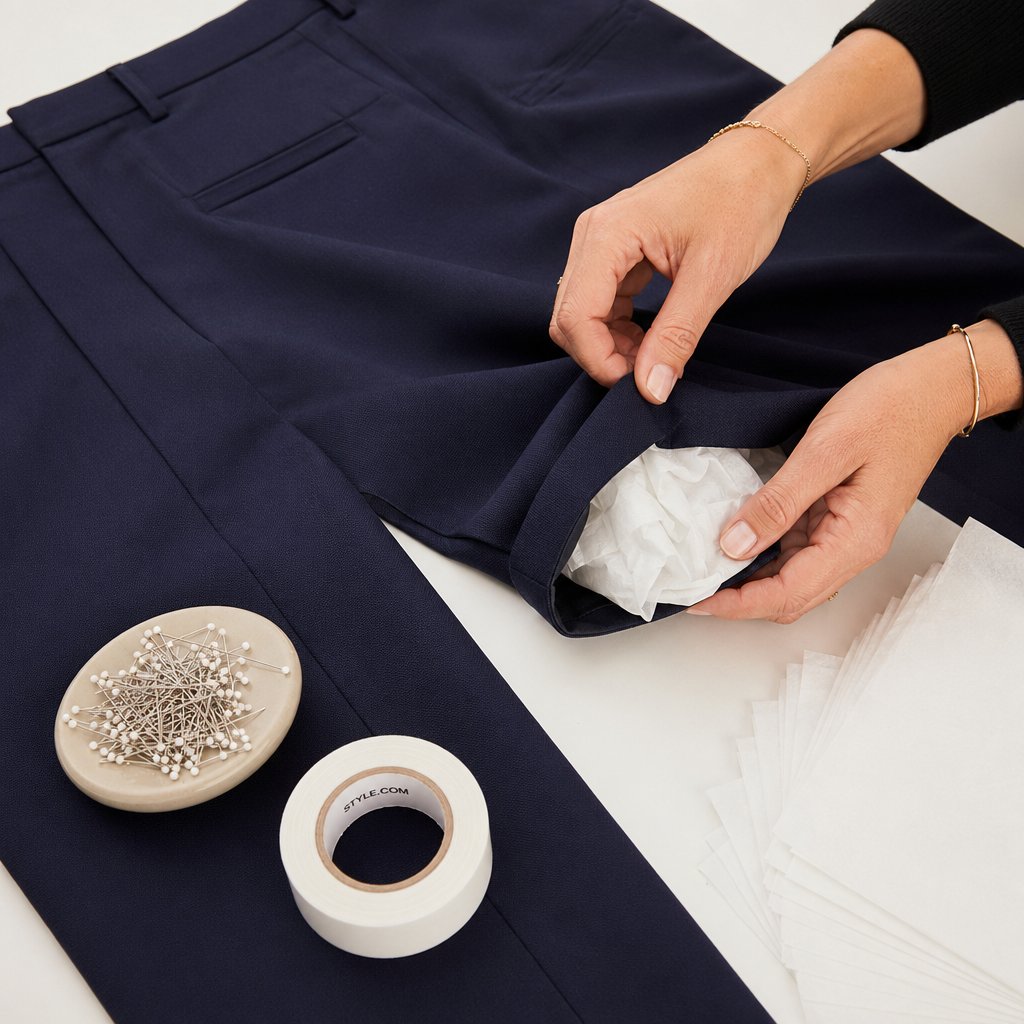
- Double-sided tape — holds hems, cuffs, and waistband edges in place without being visible from above. Essential for bootcut and flared styles that tend to shift.
- Straight pins — lets you tuck and secure fabric from behind the garment to shape the silhouette. Pins give you precise control that tape alone cannot match.
- Tissue paper — stuffed lightly inside each leg, tissue creates gentle volume that prevents the flat, deflated look. It mimics the subtle shape a body would give the fabric.
- Thin cardboard inserts — slides inside dress pants or chinos to maintain a crisp, pressed silhouette. Cardboard holds structure better than tissue for stiffer fabrics.
You do not need expensive or specialized gear to produce professional flat lays. A smartphone, a basic tripod, and the styling tools listed above will handle the vast majority of shoots. The real difference comes from knowing how to use each item at the right moment, and that starts with preparing the pants themselves.
Step 2: Prepare and Inspect Your Pants Before the Flat Lay
Every wrinkle, stray thread, and unzipped fly will show up in your final image. In flat lay photography clothing shoots, the camera is positioned directly overhead with nowhere to hide imperfections. That is why garment prep is the single biggest factor separating polished product shots from ones that look like you pulled the pants straight out of a shipping bag. Spend a few focused minutes here, and you will save yourself hours of retouching later.
Steam, Press, and Inspect Before You Shoot
Wrinkles are the enemy of a clean flat lay. Even a small crease across the thigh catches light differently than the surrounding fabric, creating a visual distraction that pulls the viewer's eye away from the garment's actual design. Under overhead lighting, those creases cast tiny shadows that make the pants look worn or poorly made, regardless of their real quality.
A garment steamer is the fastest and safest way to handle this. Hang the pants on a sturdy hanger and steam from the waistband down, letting gravity pull the fabric taut as the steam relaxes the fibers. This top-down approach works with gravity rather than against it, so wrinkles release more easily and the fabric drapes naturally. For thicker materials like denim or wool, professional stylists recommend passing slowly with the nozzle pressed firmly against the fabric to fully relax the fibers. Lighter fabrics like silk or thin cotton need a quicker, more distant pass to avoid water spots.
Once the pants are wrinkle-free, run through a quick inspection checklist before they touch the shooting surface:
- Lint roll both sides — dust and pet hair are invisible to the naked eye but pop in high-resolution images.
- Trim loose threads — a single dangling thread near a seam reads as a defect, not a detail.
- Button, snap, and zip the fly — an open fly causes the waistband to splay outward, distorting the natural silhouette.
- Fasten any hook-and-bar closures — this keeps the waistband sitting flat and symmetrical, which is critical for how to take photos of clothes that look true to fit.
- Check pockets — flatten front pockets from the inside so they do not create bumps, and tuck any pocket lining that peeks out at the hem.
This entire process takes under five minutes per garment. Treat it as non-negotiable. In product photography apparel work, the garment needs to look brand-new and retail-ready in every single frame.
How Pant Rise and Hem Style Affect Your Layout
Here is something most flat lay clothing photography guides skip entirely: the rise and hem of your pants dictate where the garment should sit on the surface and how much space to leave above and below it. Get this wrong, and the proportions feel off even if you cannot immediately pinpoint why.
Pant rise refers to the distance from the crotch seam to the top of the waistband. It controls how much of the viewer's imagined torso exists above the frame. A high-rise pant suggests a longer torso and a more structured, tailored look. A low-rise pant implies a casual, hip-slung fit. When you place a high-rise pair too low on your surface, the garment looks stubby and compressed. Position a low-rise pair too high, and you waste negative space that makes the layout feel empty and unbalanced.
| Rise Type | Visual Effect | Positioning Tip |
|---|---|---|
| High-rise | Elongates the torso, reads as structured and polished | Place higher on the surface with minimal space above the waistband to emphasize the long rise line |
| Mid-rise | Neutral and versatile, suits most styling contexts | Center vertically on the surface with balanced space above and below |
| Low-rise | Casual and relaxed, suggests a hip-slung fit | Position slightly lower to reflect the natural wear point and avoid excess empty space above |
Hem style matters just as much because it defines the visual endpoint of the garment. A tapered ankle creates a clean, narrow finish that naturally draws the eye inward. A bootcut flare does the opposite, widening at the bottom and demanding more horizontal space. Cuffed hems add a visible horizontal line that shortens the perceived leg length, so you may want to leave a bit more room below them. Raw hems with visible selvedge or fraying edges carry texture that reads as a design detail, but only if the hem is laid perfectly flat so the camera captures it clearly.
Each of these endpoints needs deliberate placement when you position the legs in the next step. A flared hem crammed against the edge of your frame looks cropped by accident, while a tapered ankle floating in too much empty space loses its visual punch. Knowing your rise and hem combination before you start laying the garment down gives you a clear target for spacing and proportion, so the actual positioning goes faster and looks more intentional.
Step 3: Master the Foundation Lay and Leg Positioning
Rise and hem style tell you where the pants belong on the surface. The foundation lay is how you actually get them there, flat, smooth, and shaped like someone is wearing them. This is the core technique behind any successful flat lay product photography shoot, and getting it right means the difference between a garment that looks alive and one that looks like it was tossed onto a table.
The Foundation Lay and Smoothing Technique
Start by placing the pants face-up on your surface with the fly centered on the vertical axis of your frame. Think of the zipper or button closure as your center line. Everything else, both legs, both side seams, the waistband, should be symmetrical around that point. If the fly drifts left or right, the entire garment will look crooked from above, even if the shift is only half an inch.
With the pants centered, lay your palms flat on the waistband and begin smoothing downward in long, firm strokes toward the hems. Work from the center outward, pushing any trapped air ahead of your hands and off the edges of the fabric. This is the single most important motion in the entire process, and the direction matters more than you might expect.
Always smooth waistband-to-hem, never hem-to-waistband.
Why? When you smooth upward from the hems, you push air back toward the waistband where it gets trapped under the heavier, stiffer fabric around the fly and pockets. That trapped air creates subtle bubbles and lifts that the camera picks up as uneven shadows. Smoothing downward lets gravity and your hand pressure work together, guiding air out through the open hem edges where it escapes naturally. You will notice the fabric settles flatter and stays put longer when you follow this direction consistently.
Make two or three passes per leg. On the first pass, focus on the outer seam and the front panel. On the second, smooth along the inseam and inner thigh. If you are working with heavier fabric like denim, press a little harder and move a little slower. Lighter materials like cotton twill or linen respond to a gentler touch. The goal is a completely flat surface with no air pockets, no bunching at the crotch, and no ripples along the side seams.
Parallel Legs vs. Angled Legs and When to Use Each
Once the fabric is smooth, you need to decide how the legs sit relative to each other. This choice shapes the entire mood of the image, and it depends on what you are shooting for.
The default position for most clothing product photography is parallel legs. Separate the legs so they sit roughly hip-width apart, with the inseams just barely not touching. You want enough space between them that the viewer reads two distinct legs, but not so much that the pants look like they have been split apart. When the inseams are too close, the silhouette collapses into a single flat shape and loses all sense of dimension. When they are too far apart, the garment stops looking like one piece of clothing and starts looking like two disconnected tubes.
Parallel positioning works best for clean e-commerce shots, catalog listings, and any context where the product needs to look consistent and straightforward. It is the safest, most universally flattering option for a product flat lay.
The angled-leg variation introduces movement. Bend one leg slightly at the knee, shifting the lower half of that leg inward or outward by just a few inches. This creates a subtle walking silhouette that suggests a body in motion. The technique works because our brains are wired to recognize human posture. Even a small bend at the knee triggers the perception of a relaxed, natural stance, which makes the garment feel more wearable and less like a stiff cutout.
Leg width changes how much effort each position requires. Slim and skinny cuts hold their shape easily in both parallel and angled positions because the narrow leg opening keeps the fabric taut. Wide-leg and palazzo styles are a different story. Their generous hems tend to pool and spread when you angle a leg, so you will need to carefully fold the excess fabric underneath or use pins from behind to maintain a controlled silhouette. For very wide legs, parallel positioning is often the more practical choice unless you are willing to spend extra time sculpting the bend.
Here are the three main leg-position options and when each one earns its place in your lay flat clothing photography workflow:
- Parallel — both legs straight and evenly spaced, ideal for product listings and catalog shots where consistency across multiple SKUs matters most.
- Single-bend — one leg bent slightly at the knee, best for lifestyle and social media content where you want the pants to suggest movement and a relaxed, worn-in feel.
- Crossed — one ankle crossed loosely over the other, used sparingly for editorial or styled flat lays where a casual, laid-back attitude fits the brand story.
Whichever position you choose, step back and check the overall silhouette before reaching for the camera. The pants should look like they belong on a person, balanced, proportional, and grounded on the surface. If something feels off, it usually comes down to one leg sitting slightly higher or wider than the other. Small adjustments at this stage save you from reshooting later.
With the foundation lay locked in, the real nuance begins. Different pant types, from rigid denim to elastic joggers to flowing palazzo cuts, each respond to this base technique in their own way and need targeted adjustments to look their best.
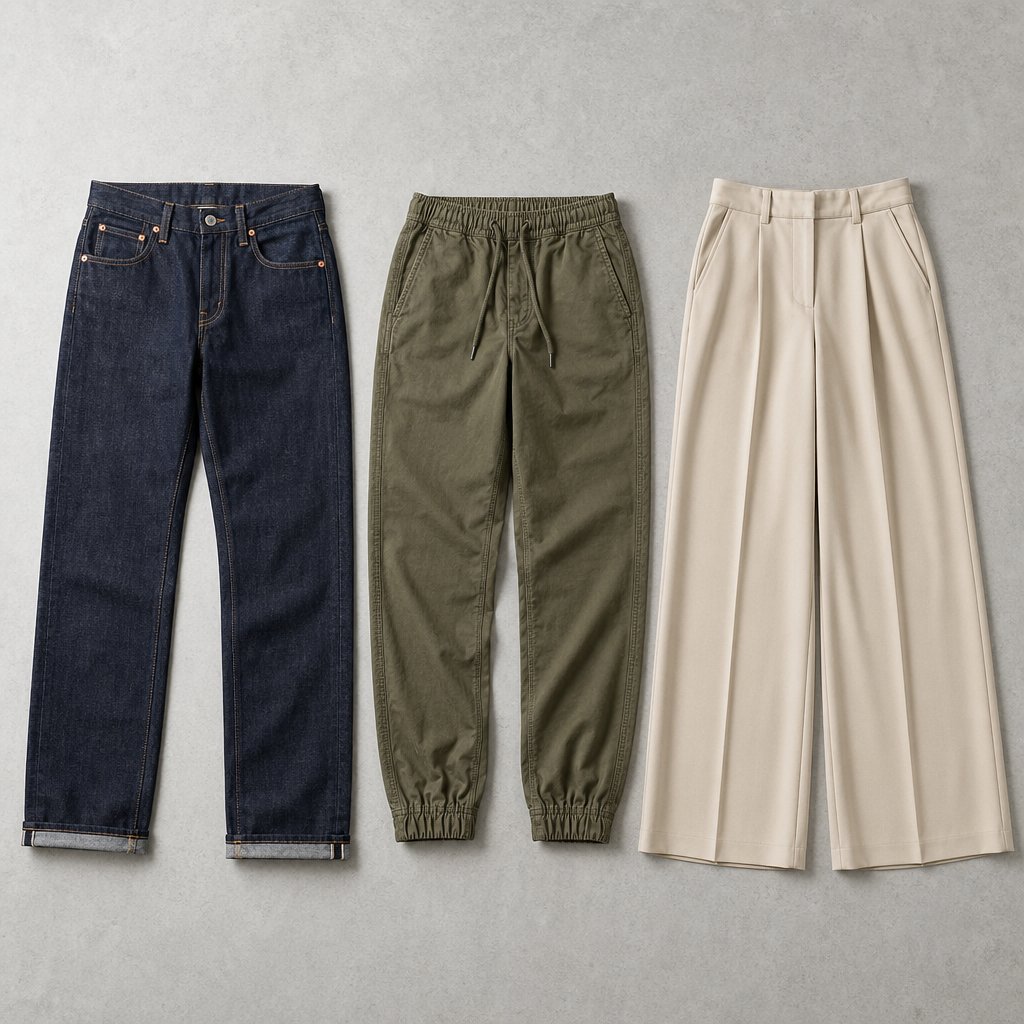
Step 4: Adapt Your Flat Lay Approach by Pant Type
The foundation lay gives you a reliable starting point, but applying it identically to every pair of pants in your inventory is a recipe for frustration. A pair of raw selvedge jeans and a pair of silk palazzo pants have almost nothing in common structurally. Their weight, stiffness, stretch, and silhouette all demand different handling. This is the gap most flat lay photo guides leave wide open: they teach one technique and expect it to work everywhere. It does not.
Each pant type has a signature challenge, a specific behavior that will undermine your image if you do not address it directly. The adjustments below build on the smoothing and positioning techniques from the previous step, so you are not starting from scratch. You are fine-tuning.
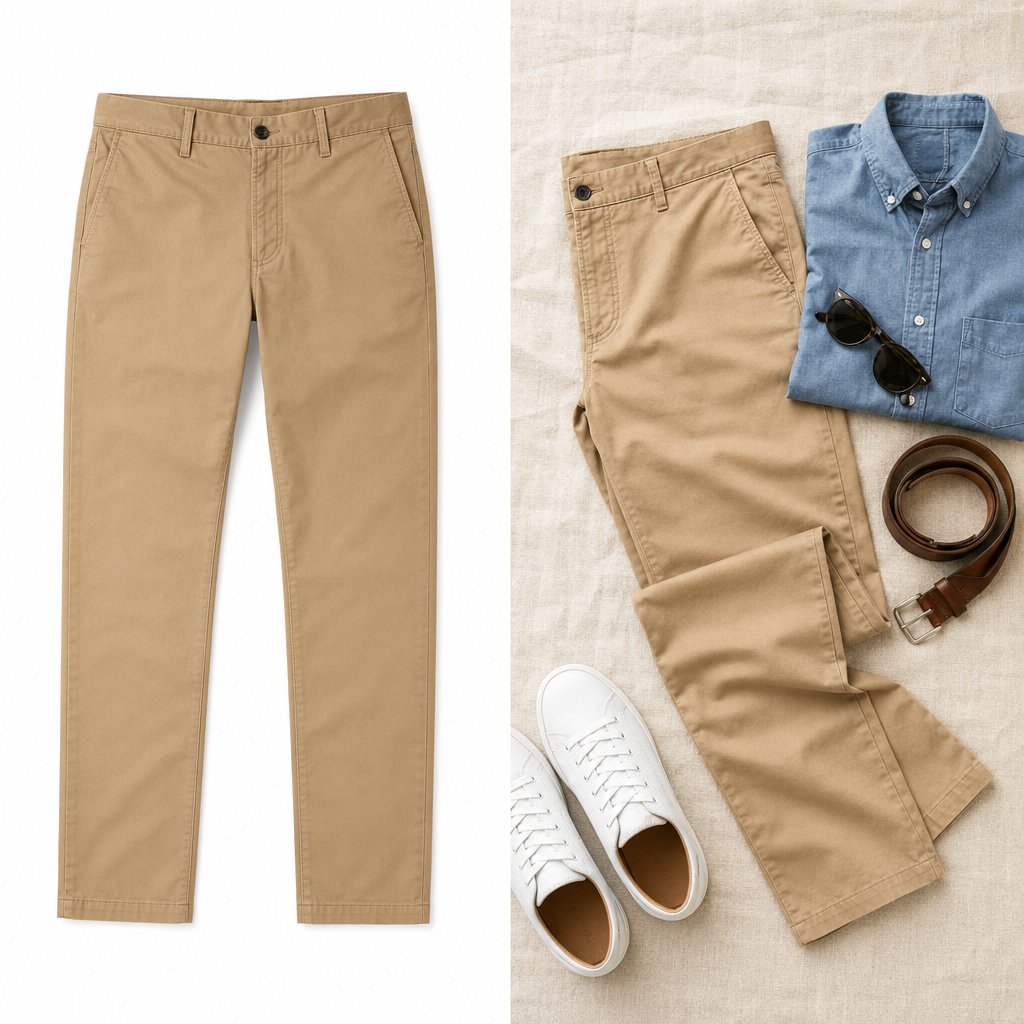
Jeans, Chinos, and Structured Pants
Jeans are the most forgiving pant type to flat lay in some ways and the least forgiving in others. Heavier denim, especially rigid or raw varieties, holds its shape well once you position it. The fabric stays where you put it, and the legs maintain a clean silhouette without much fussing. That structural weight is a real advantage for clothing photography at home, where you may not have a full arsenal of pins and supports.
The tradeoff is that denim shows every crease. A single unintentional fold across the thigh will catch overhead light and create a hard shadow line that screams "this was not styled." The fix is to commit to your placement early. Smooth the jeans into position using the waistband-to-hem technique, and resist the urge to lift and reposition repeatedly. Each time you pick up heavy denim and set it back down, you risk introducing new creases that were not there before.
To add depth and dimension, create one controlled fold behind the leg closest to the camera's dominant light source. Tuck a small amount of fabric underneath at the knee, just enough to suggest the natural bend of a relaxed stance. This single fold mimics how jeans actually look on a body and prevents the flat, paper-cutout effect that plagues overly smoothed denim shots.
Chinos and dress pants share a structured silhouette with jeans but behave very differently on the surface. Lighter cotton twill and wool blends wrinkle fast once they cool after steaming, so speed matters. Have your surface and framing ready before you steam, then move the pants directly from the hanger to the shooting area. Slide thin cardboard inserts inside each leg to maintain a crisp, pressed look. The cardboard acts as an internal skeleton, holding the front and back panels apart just enough to prevent the deflated appearance that lightweight trousers develop within minutes of lying flat. For dress pants with a center crease, align that crease with the outer edge of each leg so it reads as a deliberate design detail rather than an accidental fold.
Joggers, Shorts, and Stretch Fabrics
Joggers and sweatpants introduce a problem you will not encounter with structured pants: elastic. The ribbed cuffs at the ankles naturally bunch and gather, which is exactly how they are designed to look on a body. On a flat surface, though, that bunching reads as sloppiness rather than style.
The solution is to gently pull each cuff downward until the elastic stretches just enough to show the tapered silhouette of the leg. You are not trying to eliminate the gathering entirely, just control it so the taper is visible and intentional. Once you have the cuffs where you want them, pin them from behind the fabric so the pins are invisible from above. Two pins per cuff, one on each side, are usually enough to hold the shape through the shoot. The same approach works for the elastic waistband: smooth it flat, pull it gently to its natural width, and pin from behind if it wants to curl inward.
Shorts present a completely different framing challenge. With a shorter inseam, the waistband and hip area dominate the composition. If you center shorts vertically the same way you would full-length pants, you end up with too much empty space below the hems and the garment looks lost in the frame. Position shorts slightly higher on the surface and angle the hem openings gently outward, as if the legs are relaxed and slightly spread. This creates a wider base that fills the frame more naturally and gives the viewer a clear sense of the leg opening width, which is one of the key details shoppers evaluate when buying shorts online.
Leggings and other stretch fabrics cling to whatever surface they touch, which makes repositioning tricky. Dragging leggings across a background distorts the fabric and can leave visible stretch marks or pull the waistband out of alignment. Instead, lift the entire garment off the surface each time you need to adjust, reposition it in the air, and set it back down cleanly. Work in sections: place the waistband first, smooth downward to the knees, then handle the lower legs and ankles as a separate pass. The fabric's stretch means it will conform to the surface quickly, so you have a narrow window to get the placement right before it settles.
Wide-Leg, Palazzo, and Flowy Silhouettes
Wide-leg pants and palazzo styles are where flat product photography gets genuinely difficult. The whole point of these garments is their volume and movement, two qualities that disappear the moment fabric meets a flat surface. Without intervention, the legs collapse inward and the hems pool into shapeless puddles that hide the garment's true silhouette.
Start by spreading each hem to its full intended width. You want the viewer to see the maximum leg opening, because that dramatic width is the defining feature of the style. Use your hands to fan the fabric outward from the knee down, creating a smooth, gradual flare from the hip to the hem. If the fabric keeps sliding back inward, place a thin layer of tissue paper underneath each leg. The tissue creates just enough friction and lift to hold the fabric in position without adding visible bulk. For very lightweight materials like chiffon or rayon, you may need tissue along the entire length of each leg, not just at the hems.
Avoid the temptation to over-smooth palazzo pants into a rigid, flat shape. A small amount of natural drape and soft folds actually helps these styles look authentic. The goal is controlled flow, not stiff perfection. Let the fabric settle for a moment after positioning, then selectively smooth only the areas where wrinkles look unintentional. Leave the gentle waves that suggest movement and volume.
Here is a quick-reference breakdown of the key challenge and recommended technique for each pant type:
| Pant Type | Key Challenge | Recommended Technique |
|---|---|---|
| Jeans (rigid denim) | Shows every crease; heavy fabric resists repositioning | Commit to placement early; use one controlled fold behind the knee for depth |
| Dress pants and chinos | Lightweight twill wrinkles quickly after steaming | Work fast; use thin cardboard inserts inside each leg for structure |
| Joggers and sweatpants | Elastic cuffs and waistband bunch on a flat surface | Pull cuffs gently downward to reveal the taper; pin from behind |
| Shorts | Short inseam lets the waistband dominate the frame | Position higher on the surface; angle hems outward to fill the composition |
| Wide-leg and palazzo | Hems collapse inward, hiding the garment's volume | Spread hems to full width; use tissue paper underneath to hold the flare |
| Leggings | Stretch fabric clings and distorts when dragged | Lift and reposition rather than sliding; place in sections from waistband down |
Matching your technique to the specific pant type gets you most of the way to a professional result. But even within the same category, a pair of heavyweight raw denim and a pair of lightweight stretch denim behave very differently under your hands. That difference comes down to fabric weight and texture, and it is the next variable you need to account for.
Step 5: Adjust for Fabric Weight and Texture
Pant type tells you what silhouette to aim for. Fabric tells you how the garment will actually behave once it hits the surface. Two pairs of wide-leg trousers can demand completely different handling if one is cut from heavyweight denim and the other from fluid rayon. Ignoring this variable is why so many flat lay photos end up looking slightly off despite perfect positioning: the technique was right for the style but wrong for the material.
Fabric weight, drape, and surface texture each influence how pants settle, hold shape, and respond to smoothing. Understanding these behaviors lets you anticipate problems before they show up in your viewfinder and adapt on the fly, even with blended fabrics you have never shot before.
Heavy Fabrics and How to Control Stiffness
Stiff, heavy materials like denim, canvas, and thick wool share one trait: they resist being told what to do. That stubbornness is actually useful in flat lay apparel photography because these fabrics hold their position once placed. The catch is that repositioning them introduces new creases every time you lift and reset. Commit to your placement early and make your smoothing passes count on the first try.
Denim is the most common heavy fabric you will encounter. It holds folds well, which is great for creating that controlled knee bend behind one leg. It also means any accidental fold becomes a permanent feature of your shot. Work deliberately, smooth once from waistband to hem, and leave it alone.
Cotton twill, the fabric behind most chinos and casual trousers, sits in the middle of the weight spectrum. It cooperates during positioning but creases fast once it cools after steaming. You will notice wrinkles forming within minutes, so have your camera ready and shoot quickly. Cardboard inserts help maintain crispness while you work.
Wool is thick and springy, and it has an annoying habit of lifting off the surface at natural bend points like the knees. The fabric's memory wants to return to a curved shape. Counter this with hidden weights, small flat objects placed behind the fabric at stress points, or pin the fabric from underneath at the knee and mid-thigh to hold it flush against the surface.
Linen occupies a unique space. Wrinkles are part of its character, and over-smoothing linen pants makes them look like a different fabric entirely. The key is control: create a few intentional, parallel creases that run in the direction of the leg, then smooth everything else flat. This preserves the linen aesthetic while keeping the image from looking like the pants were pulled from the bottom of a suitcase.
Lightweight and Slippery Fabrics That Fight Back
If heavy fabrics are stubborn, lightweight and slippery fabrics are uncooperative in the opposite direction. They shift, slide, and refuse to stay where you put them. Satin, silk, and synthetic blends are particularly notorious for this, behaving on a flat surface much the same way they behave on a cutting table: they try to escape.
Polyester and synthetics are the most common offenders. Their smooth surface has almost no friction against typical shooting backgrounds, so the legs drift apart or slide out of position between adjustments. The fix is simple: swap to a lightly textured background like linen or canvas, or place a thin non-slip mat underneath the garment. The added grip keeps the fabric in place without being visible in the final image.
Silk and satin introduce a second problem beyond slipperiness. Their reflective surfaces bounce light unevenly, creating hot spots and bright streaks that distract from the garment's shape. You cannot solve this with positioning alone. Pair your fabric prep with diffused, even lighting, and check your test shots for glare before committing to the full shoot. Repositioning satin pants to fix a hot spot often creates a new one somewhere else, so getting the light right first saves significant time.
The table below gives you a quick-reference chart for the most common fabrics. For blended materials, identify which component dominates the hand feel and lean toward that fabric's adjustment.
| Fabric | Behavior on Surface | Adjustment |
|---|---|---|
| Denim | Heavy and stiff; holds position but locks in accidental creases | Commit to placement on the first pass; avoid lifting and resetting |
| Cotton twill | Medium weight; creases quickly after steaming cools | Work fast; use cardboard inserts to maintain structure |
| Linen | Wrinkles naturally and rapidly on any surface | Create intentional parallel creases along the leg; smooth all other areas |
| Wool | Springy and thick; lifts off the surface at the knees | Pin from behind at stress points or use hidden flat weights |
| Polyester / synthetics | Slippery; slides out of position on smooth backgrounds | Use a textured background or place a non-slip mat underneath |
| Silk / satin | Slippery and reflective; creates hot spots under direct light | Add surface friction and pair with diffused, even lighting |
Fabric behavior is the hidden variable that separates competent flat lay photos from truly professional ones. Once you can read how a material wants to move and preempt its tendencies, the positioning and smoothing steps become faster and more intuitive. The garment cooperates because you are working with its nature instead of against it.
Getting the fabric to lie correctly is half the battle. The other half is making it look like it belongs on a body, and that is where invisible styling tricks come in.
Step 6: Use Hidden Styling Tricks for a Professional Finish
Fabric that lies flat and stays in position is a solid start, but it is not the finish line. A pair of pants that simply sits on a surface still looks like exactly that: fabric on a table. The difference between a competent flat lay and one that stops a shopper mid-scroll comes down to a handful of invisible interventions that give the garment shape, depth, and the suggestion of a human form. These are the tricks stylists use on every fashion product shoot, and none of them should be visible in the final frame.
Every styling intervention should be invisible in the final image. If the viewer can see the trick, the trick failed.
Pinning, Taping, and Hidden Structural Supports
Think of these techniques as the scaffolding behind a finished building. They hold everything in place, but the audience only sees the result. The following six methods are listed in order of impact, from the one you will use on nearly every shoot to the more advanced options reserved for editorial and lifestyle work.
- Tissue paper for shape — This is the single most useful trick for anyone learning how to photograph clothes in a flat lay format. Stuff a thin, even layer of tissue inside each leg to create gentle volume that lifts the fabric just enough to prevent the deflated, vacuum-sealed look. The tissue mimics the subtle roundness a body gives the garment without adding visible bulk. Start with one sheet per leg and add more only if the fabric still looks flat.
- Pinning from behind — Flip the waistband's back panel up slightly, fold a small tuck of fabric, and pin it so the front silhouette narrows to a natural-looking waist. This single adjustment transforms the shape from a wide, boxy rectangle into something that suggests a fitted, worn silhouette. Use flat-head pins and keep them at least an inch from any edge that might peek into the frame.
- Cardboard inserts for structure — Slide thin cardboard panels inside dress pants, chinos, or any trouser with a pressed crease. The cardboard holds the front and back panels apart, maintaining a crisp silhouette that tissue alone cannot achieve on stiffer fabrics. Cut the panels slightly narrower than the leg opening so they do not press against the seams and create visible ridges.
- Taping hems — Bootcut, flared, and wide-leg hems have a habit of drifting inward or curling under between shots. A small strip of double-sided tape on the underside of each hem holds it at the exact width you set, without any visible intervention from above. This is especially useful during longer flat lay fashion photography sessions where you are shooting multiple angles or styled variations of the same garment.
- Creating natural-looking creases — Fold one leg slightly behind the other at the knee, tucking just a half-inch of fabric underneath. This creates a soft shadow line that suggests depth and a relaxed stance. The trick works because it mimics how fabric actually falls on a body: one leg always sits slightly forward, breaking the perfect symmetry that makes flat lays look artificial. Your brain reads the asymmetry as natural posture, even in a top-down image.
- Controlled draping for movement — Pull one hem slightly forward, roughly an inch past the other, to create the illusion of a mid-stride pose. This is the most advanced technique on the list because it is easy to overdo. Too much offset and the pants look crooked rather than dynamic. The sweet spot is subtle enough that the viewer feels movement without consciously noticing the hems are uneven.
Creating Depth, Movement, and a Worn-In Feel
Notice that the last three techniques on that list are not about holding fabric in place. They are about breaking perfection on purpose. A flat lay that is too symmetrical, too smooth, and too precise actually works against you. It reads as sterile rather than aspirational. Shoppers want to imagine wearing the pants, and nobody stands with both legs perfectly parallel and every crease ironed into oblivion.
The knee fold, the offset hem, and even a slight twist at the hip all introduce controlled imperfection. They create the tiny visual cues our brains associate with a real person in a relaxed pose. Combined with the structural supports underneath, tissue, pins, cardboard, and tape, you get a garment that looks effortlessly natural while being meticulously engineered from behind.
A good test before you pick up the camera: step back and squint at the layout. If the pants look like they could belong on a mannequin frozen mid-step, you have nailed it. If they look like a pressed garment in a store window, add one more small imperfection, a gentle fold, a slight hem offset, until the stiffness breaks.
With the garment shaped and styled, the next variable that will make or break your image has nothing to do with the pants themselves. It is the light falling on them and the angle from which you capture it.
Step 7: Light the Scene and Position Your Camera for Clothes Photography
A perfectly styled pair of pants can still fall apart in the final image if the light hitting it is uneven or the camera is tilted even slightly off-center. Lighting and camera angle are where technique meets physics, and pants are particularly unforgiving here. Their broad, flat surface area acts like a canvas that amplifies every shadow, hot spot, and color shift your setup introduces. Get the light and angle right, and the garment looks exactly the way it did when you stepped back and squinted at it. Get them wrong, and no amount of post-production will fully recover the shot.
Natural Light vs. Studio Light for Pants Flat Lays
Flat lay photography demands even, diffused light that falls across the entire garment without creating hard shadows or bright spots. Pants are especially sensitive to this because their large, unbroken surface area makes any inconsistency immediately visible. A shadow cutting across one thigh will make the fabric look like two different colors, and a hot spot on a satin waistband will blow out the detail you spent ten minutes styling.
Two setups handle this reliably:
Natural window light with a reflector. Position your shooting surface parallel to a large window so soft daylight washes across the pants from one side. Place a white foam board or reflector on the opposite side to bounce light back into the shadows. This creates gentle, even illumination that works beautifully for cotton, denim, and matte fabrics. The tradeoff is consistency. Cloud cover, time of day, and season all shift the color temperature and intensity, which means your first shot at 10 a.m. may not match your last shot at 2 p.m. For small batches, this is manageable. For larger catalogs, it becomes a real problem.
Two-softbox studio setup. Place one softbox on each side of the surface at roughly 45-degree angles, both slightly above the plane of the garment. Diffusion panels on each light soften the output so no single direction dominates. This arrangement gives you repeatable results regardless of weather or time, which is why professional apparel studios rely on it for high-volume shoots. It also handles reflective fabrics like polyester and satin far better than a single light source, because the dual angles cancel out the worst hot spots instead of concentrating them.
Direct flash and harsh overhead light are the two fastest ways to ruin a pants flat lay. Flash creates specular highlights on any fabric with even a slight sheen, and a single bare bulb directly above casts hard shadows along every fold and seam. If your only overhead option is a harsh fixture, hang a diffusion panel or even a white bedsheet between the light and the garment. The diffused output spreads evenly and eliminates the sharp shadow edges that make layflat photography look amateur.
Here are three common lighting mistakes and how to fix them:
- Mixed color temperatures — combining warm tungsten room lights with cool daylight from a window creates an uneven color cast across the garment. Fix: turn off all ambient room lights and commit to a single light source or matched pair.
- One-sided shadows with no fill — lighting from only one direction without a reflector leaves the far side of the pants noticeably darker. Fix: add a white bounce card or second light on the shadow side to even out the exposure.
- Hot spots on reflective fabrics — satin, coated denim, and synthetic blends reflect concentrated light as bright streaks that obscure fabric detail. Fix: increase the distance between the light and the surface, add diffusion material, or switch to two angled softboxes that spread the reflection across a wider area.
Camera Angle, Height, and Avoiding Distortion
The camera needs to be directly overhead, perpendicular to the surface, with the lens pointing straight down. This is non-negotiable for pants. Even a five-degree tilt introduces perspective distortion that makes the leg closer to the camera look wider and shorter while the far leg stretches and narrows. On a top like a t-shirt, that distortion might go unnoticed. On pants, where bilateral symmetry is the entire visual foundation, it is immediately obvious and impossible to fully correct in editing.
Use a tripod with a horizontal boom arm, a C-stand, or a ceiling-mounted rig to lock the camera in position. If you are working with a tripod, extend the center column and angle the head so the lens faces directly down, then check alignment by looking at the live view grid overlay. The waistband and both hems should be parallel to the top and bottom edges of your frame. If they are not, the camera is tilted.
When it comes to gear, modern smartphones produce catalog-quality results for most e-commerce clothes photography. Their wide-angle lenses introduce slight barrel distortion at the edges, but shooting from a higher position and cropping in post minimizes this. A dedicated camera with a 50mm lens eliminates the distortion entirely and gives you more control over exposure, but it is not a requirement for strong results. The overhead mount matters more than the camera body. A phone clamped to a stable boom arm will outperform an expensive DSLR held freehand every time.
Shoot a test frame before styling the final garment. Check for even lighting across the full surface, confirm the camera is level, and verify that both legs appear the same length and width. Fixing these variables with an empty or test garment laid flat takes two minutes. Discovering them after a full styling session costs you the entire setup.
For teams shooting large product catalogs, maintaining consistent lighting and color accuracy across dozens or hundreds of SKUs is one of the hardest parts of scaling production. Lighting shifts between sessions, backgrounds age, and color drift creeps in over time. AI-powered tools like Snappyit's flat lay solution help studio teams and fashion sellers maintain uniform garment presentation and accurate color across entire collections, even when shooting conditions vary between sessions. It is a practical workflow option for online brands that need to process high volumes without reshooting every time the light changes.
With your lighting locked in and your camera perfectly overhead, the final piece is knowing how to shoot the same pair of pants for different contexts, because an e-commerce listing, a social media post, and a detail shot each demand a different approach to framing and styling.
Step 8: Shoot for E-Commerce, Social Media, and Detail Layouts
Your pants are steamed, styled, lit, and framed. The technique is the same up to this point regardless of where the image ends up. But the moment you press the shutter, context takes over. A product listing on your online store, a styled outfit post on Instagram, and a close-up detail shot for a size guide each serve a different purpose, reach a different viewer mindset, and require a different approach to composition and styling. Shooting all three the same way is like writing a product description, a social caption, and a spec sheet in the same voice. It technically works, but none of them land as well as they could.
Clean E-Commerce Shots That Convert
E-commerce flat lay clothes photography has one job: show the product clearly enough that a shopper feels confident clicking "add to cart." Everything in the frame should serve that goal, and anything that does not should be removed.
That means a single garment on a clean, neutral background with consistent framing across every SKU in your catalog. White or light gray is the standard because it meets marketplace image requirements, keeps color rendering accurate, and lets the garment do all the talking. Position the pants centered in the frame with even margins on all four sides. The waistband and hems should sit at roughly the same distance from the top and bottom edges, creating a balanced composition that looks intentional rather than hastily cropped.
Styling should be minimal. Use the structural supports from earlier, tissue paper, pins, cardboard inserts, to give the pants shape, but skip the angled-leg poses and offset hems. Parallel legs with a clean silhouette are the standard for product listings because they allow shoppers to evaluate the cut, rise, and leg width without any stylistic interpretation getting in the way. Consistency matters more than creativity here. When a customer scrolls through a collection page and every pair of pants is framed, lit, and positioned identically, it signals professionalism and builds trust. When one pair sits on white, the next on wood, and a third is angled differently, the catalog feels disjointed, and that inconsistency erodes buyer confidence even if the individual images look fine on their own.
Shoot front and back views at minimum. For pants with distinctive design elements, add a third angle: a three-quarter view that captures the side seam, pocket placement, and any branding details along the hip. Professional studios typically recommend three to five angles per SKU for a complete product page, and those extra frames directly reduce return rates by giving shoppers a fuller picture of what they are buying.
Styled Outfit Flat Lays for Social Media
Social media flat lays flip the priority. The pants are still the star, but they are no longer alone on stage. You are building a scene, pairing the pants with complementary pieces like shoes, a top, a belt, sunglasses, or a watch to create a complete outfit that tells a story. This is where flat lay photography ideas really open up, and where your brand's personality comes through.
The key to a strong styled composition is spatial balance. Place the pants as the largest item in the frame, occupying roughly 40 to 50 percent of the visible area. This anchors the layout and makes it immediately clear what the post is about. Arrange supporting items around the pants in a loose grid or organic scatter, depending on your brand's aesthetic. A clean grid works for minimalist brands. A more relaxed, overlapping arrangement suits lifestyle and streetwear labels.
Keep the pants as the visual anchor by giving them the most central position and the most surface area. Supporting pieces should complement, not compete. A common mistake is overcrowding the frame with too many accessories, which dilutes the focus and makes the image feel cluttered rather than curated. Stick to three or four supporting items at most, and make sure each one adds context. A pair of white sneakers next to slim chinos suggests a weekend look. Leather loafers and a folded blazer next to the same chinos tell a completely different story. The props define the narrative, so choose them deliberately.
Color palette matters more in styled shots than in product photography. Keep your props within two or three complementary tones to maintain cohesion. A bright red bag next to neutral trousers can work as a deliberate pop of color, but three or four competing accent colors will make the layout feel chaotic. When photographing clothes for social content, the composition should feel effortless, like someone casually arranged their outfit on a bed. The reality, of course, is that every item is placed with precision.
Detail Shots and Trend-Specific Layouts
Detail shots serve the customers who need tactile reassurance before buying online. They want to see the weave of the fabric, the quality of the stitching, the weight of the hardware, and the texture of a wash or finish. These close-up images bridge the gap between a screen and the in-store experience of touching a garment, and they are especially important for higher-priced pants where craftsmanship justifies the cost.
For detail layouts, you have two approaches. The first is a dedicated close-up: zoom in on a single feature like pocket stitching, a branded rivet, a zipper pull, or the selvedge edge of a cuff. Use the same flat photography lighting setup as your full-garment shots to keep color and tone consistent, but move the camera closer or switch to a macro-capable lens. The second approach is a comparison layout: place multiple sizes or colorways side by side on the same background so shoppers can see the range at a glance. Keep spacing even between each item and maintain identical positioning so the eye can compare without distraction.
Seasonal and trend-specific details need their own handling. Cargo pants, for example, have oversized pockets that are a primary selling point. Lay the pants with the cargo pockets facing up and slightly open, using a small piece of tissue inside each pocket to give them dimension. The pockets should look functional and structured, not flat and deflated.
Distressed jeans with rips and abrasion require careful positioning so the distressing reads as intentional design rather than accidental damage. Smooth the fabric around each rip so the edges lay cleanly, and make sure the threads across any knee holes are spread evenly rather than bunched to one side. If the rips reveal skin-toned fabric underneath, that layer should be visible and flat, reinforcing that the distressing is a deliberate construction detail.
Embroidery, screen prints, and patterned fabrics benefit from being photographed on a contrasting background that makes the detail pop. A dark embroidered motif on black pants, for instance, nearly disappears on a white background shot from full distance. A closer crop with slightly angled lighting that catches the raised thread texture brings the design to life. The same principle applies to tonal prints and subtle textures: move in close enough that the detail fills at least a third of the frame, and adjust your light angle to create just enough shadow to reveal the surface dimension.
Here is a comparison of how each shooting context shapes your decisions:
| Context | Background Choice | Styling Level | Goal |
|---|---|---|---|
| E-commerce product listing | White or light gray for marketplace compliance and color accuracy | Minimal: structural supports only, parallel legs, no props | Show the garment clearly so shoppers can evaluate cut, color, and fit |
| Social media and lifestyle | Textured linen, wood, or on-brand colored surfaces | High: styled with complementary clothing, shoes, and accessories | Tell a story, inspire outfit ideas, and drive engagement |
| Detail and comparison shots | Neutral or contrasting surface that highlights the specific feature | Focused: close crops on stitching, hardware, fabric texture, or colorways | Provide tactile reassurance and highlight craftsmanship or design details |
Shooting across all three contexts from a single session is entirely doable if you plan the sequence. Start with the clean e-commerce shots while the garment is freshly styled and the background is bare. Then add props and supporting pieces for the social media compositions. Finish with detail close-ups, which are the most forgiving of minor fabric settling since you are cropping in tight anyway. This order protects your most demanding shots, the product listings, from any wear or shifting that accumulates over the session.
Teams scaling across multiple contexts and large SKU counts often find that maintaining visual consistency becomes the bottleneck. Lighting shifts between sessions, color drifts across batches, and styling standards vary between photographers. For fashion sellers and online brands working at that volume, tools like Snappyit's flat lay solution help maintain presentation quality and color accuracy without slowing down production, keeping every image aligned whether it was shot on Monday morning or Friday afternoon.
Flat laying pants well is a skill that compounds. The first pair takes time. By the tenth, you will move through the steps, surface prep, garment inspection, foundation lay, type-specific adjustments, fabric handling, hidden styling, lighting, and context-driven shooting, almost on instinct. Every pair you shoot sharpens your eye for what looks right and what needs one more small adjustment. The technique is learnable, the tools are accessible, and the results show up directly in cleaner images, fewer reshoots, and products that look as good on screen as they do in person.
Frequently Asked Questions About Flat Laying Pants
1. How do you flat lay pants without wrinkles showing up in photos?
Start by steaming the pants while they hang vertically so gravity helps release wrinkles. Once on the shooting surface, smooth the fabric using long strokes from the waistband down toward the hems. Never smooth upward, as this traps air bubbles under the heavier waistband fabric. Work quickly after steaming since lighter fabrics like cotton twill begin creasing again within minutes. For persistent problem areas, use thin cardboard inserts inside each leg to hold the panels apart and maintain a crisp, pressed appearance throughout the shoot.
2. What is the best background for flat lay pants photography?
White or light gray backgrounds are the most versatile choice, especially for e-commerce product listings where color accuracy and marketplace compliance matter. Natural wood surfaces work well for casual pieces like jeans and add warmth without competing with the garment. Textured linen creates visual interest for social media content. The most important rule is consistency: if you are shooting for a catalog or online store, use the same background across every SKU so the collection looks cohesive and professional to shoppers browsing your listings.
3. How do you make flat lay pants look like someone is wearing them?
The key is combining hidden structural supports with controlled imperfection. Stuff thin tissue paper inside each leg to create gentle volume that mimics a body's shape. Pin a small tuck of fabric behind the waistband so the front silhouette narrows naturally. Then break the symmetry slightly by folding one leg behind the other at the knee to suggest a relaxed stance, or pull one hem slightly forward to create a mid-stride illusion. These interventions should be completely invisible from the camera's overhead angle while giving the garment a natural, worn-in feel.
4. What camera angle should you use for flat lay pants photography?
The camera must be positioned directly overhead, perpendicular to the shooting surface, with the lens pointing straight down. Even a five-degree tilt introduces perspective distortion that makes one leg appear wider or longer than the other. Use a tripod with a horizontal boom arm or a C-stand to lock the camera in place. Check alignment using your camera's grid overlay to confirm the waistband and hems are parallel to the frame edges. Modern smartphones on stable overhead mounts produce catalog-quality results for most use cases.
5. How do you flat lay wide-leg or palazzo pants without them looking shapeless?
Wide-leg and palazzo styles lose their defining volume on a flat surface because the fabric collapses inward. Spread each hem to its full intended width by fanning the fabric outward from the knee down. Place thin tissue paper underneath each leg to create friction and subtle lift that holds the flare in position. Avoid over-smoothing these styles into rigid flatness. Allow gentle waves and soft folds to remain, as they suggest the movement and drape that make these silhouettes appealing. The goal is controlled flow rather than stiff perfection.