At a glance
Swap faces in pictures without the cut-and-paste look — step-by-step methods with AI tools, Photoshop, and mobile apps.
| Need | What to do |
|---|---|
| Get oriented | Read the short summary, then use the checklist below. |
| Create a test image | Try Face Swap Free |
What Makes a Convincing Face Swap
You have seen them everywhere: face swap pictures that look like someone glued a magazine cutout onto a photograph. Then there are the ones you scroll past without a second thought because they look completely natural. The gap between those two results is not luck. It comes down to three factors: choosing the right source photos, picking the right method for the job, and refining the output so lighting, skin tone, and edges all agree with each other.
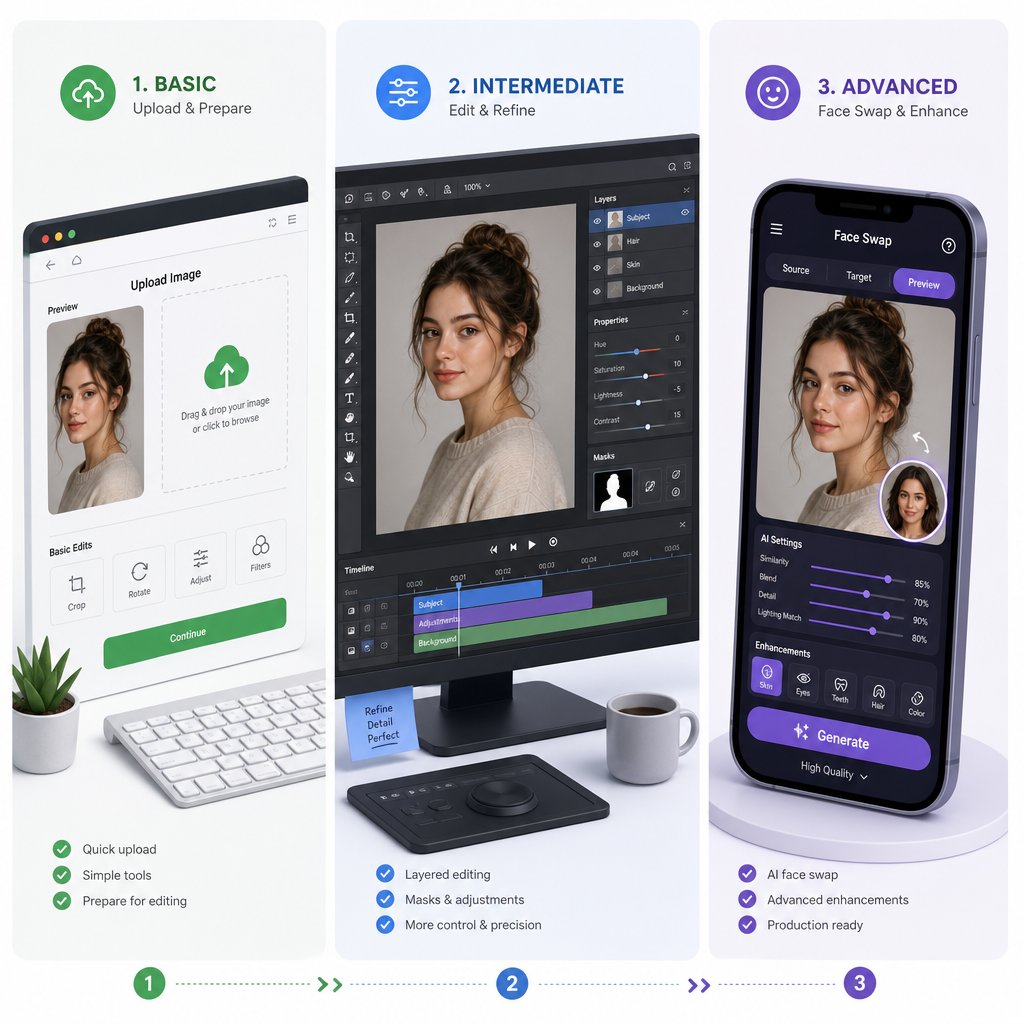
This guide walks through three distinct approaches to help you learn how to swap faces in pictures at a professional level. AI-powered online tools handle the heavy lifting automatically and work best for speed. Photoshop gives you pixel-level manual control when precision matters. Mobile apps let you how to face swap directly from your phone for quick social content. Jump to whichever method fits your skill level and timeline.
Face Swap vs Head Swap vs Expression Transfer
Most people use "face swap" as a catch-all term, but there are actually three distinct techniques, and picking the wrong one is a common reason results look off.
- Face-only overlay — Replaces the eyes, nose, and mouth area while keeping the original hair and jawline intact. Best for group photos where someone blinked or looked away.
- Full head replacement (headswap) — Replaces the entire head including hair, jawline, and ear outline, then blends the neck transition. Necessary when hairstyles differ significantly between source and target or when the face angle demands it.
- Expression and feature transfer (face morphing) — Transfers specific expressions or features from one face to another without replacing the entire identity. Research into facial expression morphing shows this technique uses landmark detection and triangulation to blend expressions while preserving the original person's identity. Think of it as a face to face morph rather than a full replacement.
Understanding which type you actually need prevents hours of frustration. A head swap requires different source material and tools than a simple face morph, and forcing one technique where another belongs is exactly how you end up with that obvious cut-and-paste look.
Who This Guide Is For
Whether you are a social media creator looking for quick comedic content, a photographer fixing a group shot, or a designer building composite images for a campaign, the steps ahead cover your use case. Each method section is self-contained so you can skip straight to the workflow that matches your tools and deadline.
The quality difference starts before you ever open an editing tool, though. It starts with the photos you choose to work with.
Step 1. Select and Prepare Your Source Photos
Most failed face swap photos share the same root cause: the source images were never compatible to begin with. No tool, whether AI or manual, can convincingly insert a face into a picture when the lighting, angle, or resolution between the two images conflicts. Spending two minutes on photo selection saves twenty minutes of frustrating post-processing later.
Four Criteria for Matching Source Photos
Before you photo swap faces or open any editing software, evaluate your source and target pictures of faces against these four criteria, listed here in priority order:
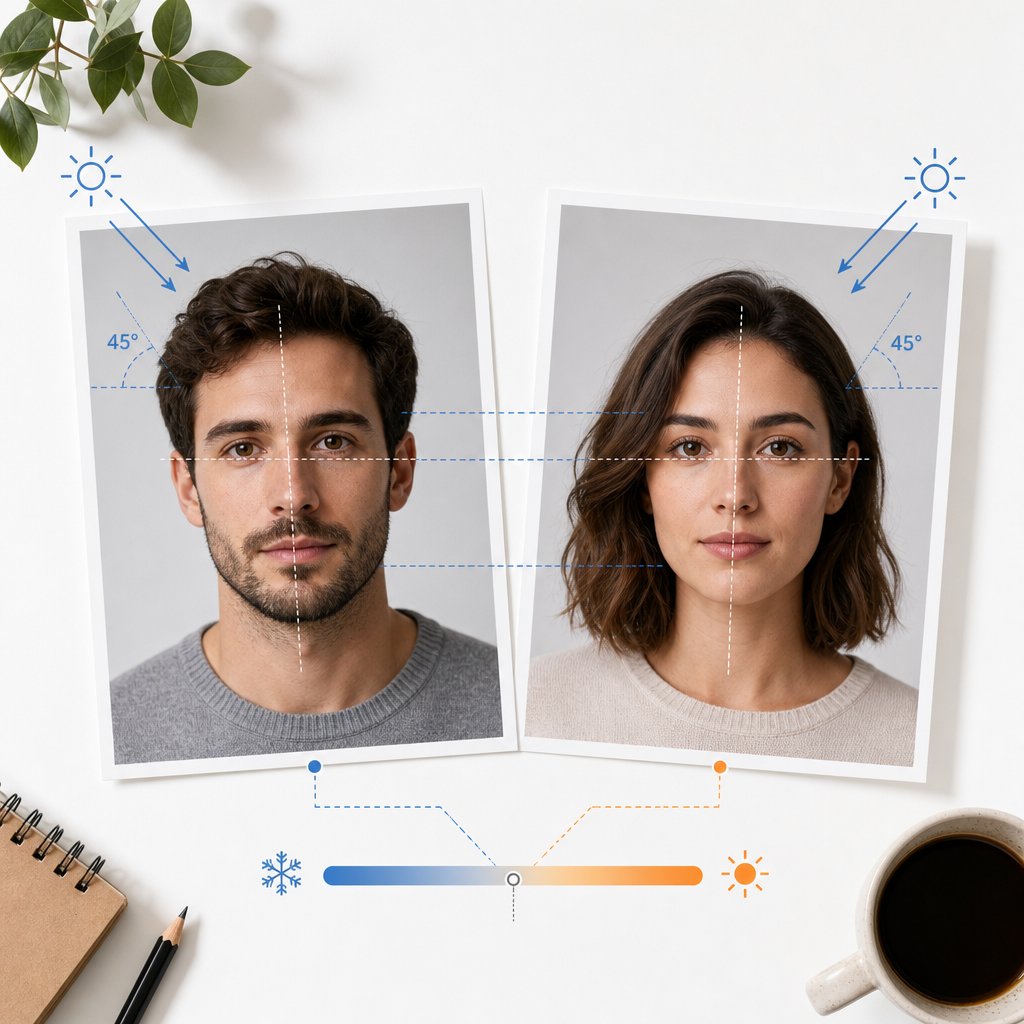
- Lighting direction — Both images should have light coming from the same side. A face lit from the left will never sit naturally on a body lit from the right, no matter how much blending you apply.
- Face angle (within 15 degrees) — The head tilt and rotation in your source face photo must closely match the target. Anything beyond a 15-degree difference creates visible warping when you try to align features.
- Matching resolution — A 400px face pasted onto a 4000px image produces an obvious blurry patch. Both images should share a comparable pixel density in the face region.
- Compatible skin tone range — Skin tones do not need to be identical, but they should fall within a correctable range. Extreme differences (very pale source on a deeply tanned target) require heavy color manipulation that often looks artificial.
When you understand how to insert a picture into another picture convincingly, you realize the magic happens in the matching stage, not the editing stage.
Adjusting Exposure and Color Temperature
Even well-matched photos usually need minor corrections before the swap. Compare the brightness of both faces side by side. If one face photo appears darker or warmer than the other, adjust exposure and color temperature first using Levels, Curves, or the Camera Raw Filter in Photoshop. The goal is to bring both images into the same tonal neighborhood so the swap starts from a unified baseline. A slightly warm source face dropped onto a cool-toned target immediately reads as fake, so correcting color temperature before the swap is far easier than fixing it after.
File Format and Resolution Guidelines
How you handle files during the process matters more than most people expect. Follow these guidelines when learning how to add a photo to another photo for a seamless composite:
| Stage | Recommended Format | Reason |
|---|---|---|
| Source and working files | PNG (lossless) | Preserves full quality through multiple edits without compression artifacts |
| Final export for web/social | JPEG (80-90% quality) | Smaller file size with acceptable quality loss for screen viewing |
| Final export for print | TIFF or PNG | No compression artifacts at large print sizes |
For minimum resolution, aim for at least 1500px on the longest side for social media use and 3000px or higher for print. The face region specifically should be no smaller than 500px wide to retain enough detail for realistic blending.
With properly matched and prepared source images in hand, the actual swap process becomes dramatically easier regardless of which tool you choose to execute it.
Step 2. Swap Faces Using AI-Powered Online Tools
Properly matched source photos eliminate most of the guesswork, but the tool you use to execute the swap determines how much manual work remains. AI-powered face swap platforms handle alignment, skin tone correction, and edge blending in seconds, making them the fastest path to realistic results if you do not have Photoshop experience or simply need to move quickly.
The landscape ranges from browser-based tools that require zero installation to desktop applications offering granular control over every parameter. For most people learning how to swap faces in pictures, an online AI tool delivers polished output with minimal effort.
How AI Face Detection and Landmark Mapping Works
When you upload a photo to an AI face swap tool, the software does not simply cut and paste pixels. It runs a multi-step process that mimics what a skilled retoucher would do manually, just in a fraction of the time.
The AI first identifies the face within the image by detecting a set of facial landmarks — typically 60 to 200+ reference points covering eye corners, lip curves, jawline edges, nose bridges, and subtle contour details. These landmarks create a geometric map of the face's structure, allowing the system to understand not just where the face is, but how it is shaped, angled, and lit.
From there, the AI performs several operations simultaneously:
- 3D face reconstruction — Estimates the three-dimensional contours of both source and target faces so the replacement aligns correctly in perspective.
- Expression matching — Adjusts the source face to mirror the target's expression, preventing that frozen or mismatched look.
- Skin tone and lighting adaptation — Recalculates color values so the swapped face matches the target image's lighting direction and warmth.
- Edge blending — Softens the boundary between the swapped region and the surrounding skin, hair, and background to eliminate visible seams.
Modern tools use deep learning models, primarily Generative Adversarial Networks (GANs) and diffusion models, trained on massive datasets of faces. The generator network creates the composite while a discriminator network evaluates whether the result looks authentic, pushing quality higher with each iteration. This is why results from current AI tools look dramatically more convincing than the basic face swap apps from just a few years ago.
Step-by-Step AI Face Swap Walkthrough
Regardless of which platform you choose, the core workflow for an AI face swap follows the same pattern. Here is what the process looks like from start to finish:
- Upload your target photo — This is the image you want the final result to be based on (the body, background, and scene stay intact).
- Upload your source face — This is the face you want placed onto the target. A clear, front-facing shot with even lighting produces the cleanest results.
- Let the AI detect and map faces — The tool identifies facial landmarks in both images and calculates how to align the source face onto the target's geometry.
- Review the preview — Most platforms show a preview before final rendering. Check for obvious issues around the jawline, hairline, and neck area.
- Download the result — Export in the highest resolution available. Some tools offer PNG output for lossless quality, while others default to JPEG.
The entire process typically takes under 30 seconds on a good platform. Some tools also support face swap video workflows and can apply the same logic frame by frame across a video clip, though processing time increases significantly for motion content. A few platforms even handle gif face swap requests, letting you create short animated loops with swapped faces for social media.
Comparing AI Face Swap Platforms
The market for AI face swap tools has expanded rapidly, and not all platforms deliver the same quality. Some excel at photo realism, others specialize in face swap gif and video content, and a few focus purely on speed and simplicity for social creators. Here is how the leading options compare:
| Tool | Ease of Use | Output Quality | Best Use Case |
|---|---|---|---|
| Snappyit | Very easy — browser-based, no install | High — polished blending and skin tone match | Social creators and marketers needing fast, share-ready results |
| Remaker AI | Simple interface | Very good — strong realism in photos | Single-face photo swaps requiring natural skin texture |
| Reface | App-based, template-driven | Good — strongest in video | Short-form video content and animated GIF swaps |
| Pica AI | Straightforward | Very good — handles groups well | Multi-face swaps in group photos |
| Pixlr AI face swap | Moderate — part of a larger editor | Good | Users already in the Pixlr ecosystem wanting quick edits |
| Canva face swap | Very intuitive — drag and drop | Moderate | Designers combining face swaps with graphic layouts |
For social creators, digital marketers, and online sellers who need attention-grabbing visuals without a learning curve, Snappyit stands out as a strong browser-based option. You upload two images, the AI handles landmark detection and blending, and you download a polished result ready for posting. No software installation, no account setup friction, and no Photoshop skills required.
Tools like Pixlr and Canva offer face swap features embedded within broader editing suites, which works well if you are already designing in those environments. Deepswap and similar platforms lean toward video and animated content, making them better suited for creators producing reels or short clips. Kirkify face swap and comparable niche tools serve specific creative communities with themed templates and stylized outputs.
The key tradeoff across all these platforms is control versus convenience. Browser-based AI tools give you speed and simplicity but limited ability to fine-tune individual parameters. Desktop applications and full editors like Photoshop offer pixel-level precision but demand more time and skill. For the majority of face swap pictures destined for social feeds, marketing campaigns, or quick creative projects, the AI route delivers results that are realistic enough to fool casual viewers without requiring any design background.
That said, AI tools have limits. Extreme face angles, unusual lighting setups, or high-resolution commercial work sometimes produce artifacts that only manual editing can resolve. When that level of control becomes necessary, a layer-based approach in Photoshop gives you the precision to fix what AI cannot.
Step 3. Swap Faces Manually in Photoshop
AI tools handle most casual face swap needs, but certain situations demand the precision only manual editing provides. Professional headshots, commercial photography with strict brand guidelines, or images where extreme angles and unusual lighting cause AI artifacts all benefit from a hands-on Photoshop face swap workflow. When you need to control every pixel of the transition, layers, masks, and blending commands give you that authority.
Learning how to swap faces in Photoshop follows a logical sequence: isolate the source face, position it over the target, refine the edges, and blend the tones. The entire process can take as little as five minutes once you internalize the shortcuts.
Selecting and Isolating the Source Face
Open both images in Photoshop. On the source image (the face you want to transplant), grab the Lasso tool (shortcut: L) and draw a loose selection around the face. Include the eyebrows, nose, mouth, and enough surrounding skin to give yourself blending room, but avoid selecting ears, hairline edges, or the neck. Precision here is less important than you might think because the layer mask handles cleanup later.
With the selection active, press Ctrl+C (Windows) or Cmd+C (Mac) to copy, then switch to your target document and press Ctrl+V / Cmd+V to paste. The face appears on its own layer, ready for positioning.
Aligning Features with Free Transform
This step is where most beginners rush and most results fall apart. You need the source face to sit precisely over the target's features so that eyes, nose, and mouth line up naturally.
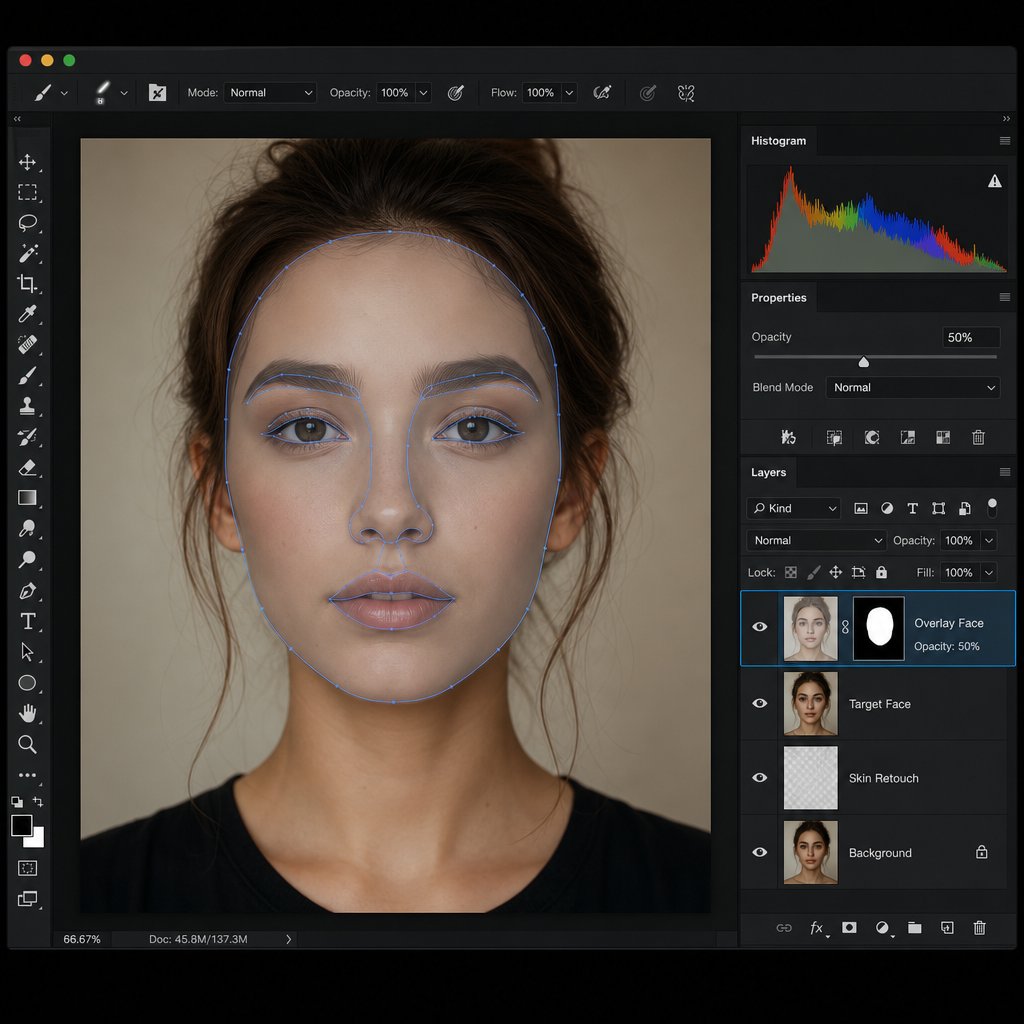
- Select the pasted face layer and press Ctrl+T / Cmd+T to activate Free Transform.
- Drop the layer opacity to 50% in the Layers panel so you can see both faces simultaneously.
- Align the inner corners of the eyes as your primary anchor point. Drag the Reference Point to one eye corner for precise rotation.
- Hold Alt (Windows) or Option (Mac) and drag a corner handle to scale proportionally from the center.
- If the head tilt differs slightly, rotate the layer until the eye line matches. For more complex adjustments, right-click inside the transform box and select Warp to push individual sections into alignment.
- Press Enter to commit the transformation, then restore opacity to 100%.
The goal is not a perfect overlap of every feature. You want the eyes and mouth positioned close enough that the blend looks anatomically correct. A slight size mismatch is fixable; a rotational mismatch is not.
Layer Masks and Auto-Blend for Seamless Edges
With the face aligned, you need to remove the hard edges and unify skin tones. Here is the workflow that makes a face swap in Photoshop look seamless rather than pasted:
- Click the Layer Mask icon at the bottom of the Layers panel to add a white mask to the face layer.
- Set your foreground color to black, select the Brush tool (shortcut: B), and use a soft-edged brush at 100% hardness reduced to about 80% opacity.
- Paint over areas of the face layer that should not appear: jaw edges, forehead boundary, and anywhere the original hairline needs to show through. This hides those pixels without permanently deleting them.
- Once the mask looks clean, right-click the mask thumbnail and choose Apply Layer Mask.
- Hold Ctrl / Cmd and click the face layer thumbnail to load its shape as a selection.
- Go to Select > Modify > Contract and enter 5 pixels. This shrinks the selection slightly inward.
- Click the target body layer, then press Backspace (Windows) or Delete (Mac) to remove the underlying face area, creating a clean hole for the new face to fill.
- Select both layers by Shift-clicking, then go to Edit > Auto-Blend Layers. Check Seamless Tones and Colors and Content-Aware Fill Transparent Areas, then click OK.
Auto-Blend was originally designed to stitch panoramas, but it works remarkably well to swap face Photoshop composites by matching luminosity and color across the seam. The result is a unified skin tone transition that would take significant manual Curves work to replicate by hand.
If you need to photoshop switch faces between two people in the same group photo, repeat this process for each face on separate layers before flattening. Keep each swap isolated so you can adjust individual blends without affecting the others.
For situations where Auto-Blend leaves minor artifacts, a soft eraser on the merged layer or a gentle Gaussian Blur (0.3 to 0.5 px) along the seam cleans up remaining inconsistencies. These micro-refinements are what separate a competent how to face swap in Photoshop result from a truly invisible one, and the next section covers those finishing techniques in detail.
Step 4. Swap Faces Using Mobile Apps
Photoshop delivers unmatched precision, but it also requires a desktop, a subscription, and a learning curve. If you want to swap faces on a picture you just took at dinner and share it before the moment passes, a mobile face switch app gets you from camera roll to social post in under a minute without transferring files anywhere.
Mobile Face Swap Workflow on iPhone and Android
The best face swap app options follow a nearly identical workflow regardless of platform. Here is what the typical process looks like on your phone:
- Open the app and select your photo — Either choose an existing image from your gallery or capture a new one directly within the app's camera.
- Let the AI detect faces — The app automatically identifies all faces in the image and highlights them with selection markers.
- Choose which faces to swap — Tap the faces you want to exchange, or upload a separate source face from another photo. Apps like FaceApp let you how to face swap on FaceApp by simply tapping two detected faces in the same image.
- Review and adjust — Most apps show a real-time preview. Some offer basic sliders for blending intensity or skin tone correction.
- Save or share — Export to your camera roll or push directly to a social platform.
If you are wondering how to swap faces on iPhone specifically, apps like YouCam Video and Reface are optimized for iOS neural processing, which means faster rendering and smoother face swap live previews during recording. Android users get comparable results from FaceMagic and B612, which leverage device GPU acceleration for real-time processing.
One limitation worth noting: mobile processing power cannot match desktop tools for high-resolution images or batch work. A face swap iPhone workflow handles social-resolution images well, but 4K composites or multi-image projects will hit performance walls on most devices.
Sharing Directly to Social Platforms
The real advantage of mobile apps is the direct pipeline to social sharing. Many apps integrate natively with Instagram Stories, TikTok, and Snapchat, letting you post swapped content without saving and re-uploading. You can even switch faces Snapchat-style using its built-in lens for real-time AR swaps during video calls or Stories, though the output stays within Snapchat's ecosystem.
When evaluating which app fits your workflow, look for these features:
- Native social sharing — Direct export to Instagram, TikTok, or Snapchat without intermediate save steps
- Real-time preview — See the swap before committing, especially important for video content
- Multi-face detection — Handles group photos without requiring you to swap one face at a time
- No watermark on exports — Free tiers often add branding; check before posting professional content
- Offline processing — Some apps process locally on-device, which is faster and avoids uploading personal photos to external servers
A good face swap app balances output quality with speed and privacy. Template-based apps like Reface and FaceMagic excel at viral meme content, while general-purpose editors like YouCam Perfect and Photoleap give you more control over the final result alongside other editing tools.
Mobile apps get you 80% of the way to a convincing result with minimal effort. The remaining 20% — edge refinement, shadow correction, texture matching — is where dedicated blending techniques make the difference between a fun social post and a truly seamless composite.

Step 5. Blend and Refine for Realistic Results
Whether you used an AI tool, Photoshop, or a mobile app to blend swap your face onto a target image, the raw output almost always needs refinement. The difference between a face merge that fools the eye and one that screams "edited" comes down to five specific finishing techniques. Even the best AI-generated composites benefit from manual touch-ups in these areas because algorithms optimize for speed, not perfection.
Think of it this way: the swap itself is only 60% of the work. The remaining 40% is convincing the viewer's brain that the lighting, texture, and edges all belong to the same photograph. Here are the five techniques that get you there.
Edge Feathering and Boundary Softening
The most obvious giveaway in amateur face swap pictures is a hard, visible seam where the swapped region meets the original skin. Your eye catches it instantly because real skin does not have pixel-sharp boundaries. Edge feathering dissolves that transition into a gradual blend.
In Photoshop, select the layer mask on your face layer and go to Properties > Feather. Start with a value between 3 and 8 pixels depending on image resolution. For a 3000px image, 5-6px feather creates a natural falloff without making the face look ghostly. If you already applied the mask, use Select > Modify > Feather on a new selection and repaint the boundary.
For finer control, switch to the Brush tool with these settings: Hardness at 0%, Opacity at 30-40%, and Flow at 50%. Paint black on the layer mask along the boundary in short, overlapping strokes. This builds up a soft transition gradually rather than creating a uniform blur. Focus especially on the forehead-to-hairline transition and the jawline-to-neck area, where skin meets different textures.
If you are using an app to blend faces together and the output shows a visible ring around the swapped area, re-importing the result into a desktop editor for a quick feather pass takes under a minute and dramatically improves realism.
Color Matching and Shadow Reconstruction
Unified skin tone is what makes a face combiner result look like a single photograph rather than two images stitched together. Even when source photos are well-matched, subtle differences in warmth, saturation, and luminosity persist after the swap.
Create a Curves Adjustment Layer clipped to the face layer (Ctrl+Alt+G / Cmd+Option+G). Use the individual Red, Green, and Blue channels to nudge the swapped face's color toward the target. A common correction: if the face looks slightly too warm compared to the body, pull down the Red channel midtones by 3-5 points and push the Blue channel up by 2-3 points. Sample the target skin with the Eyedropper tool to get exact RGB values, then adjust until the numbers are within 5-10 points of each other.
For saturation mismatches, add a Hue/Saturation Adjustment Layer (also clipped) and reduce or boost saturation by small increments. Rarely will you need more than +/- 15 on the saturation slider.
Shadow reconstruction is the step most people skip entirely, and it is the reason their combine faces composites look flat. When you photoshop a face onto a picture, the original shadows along the jaw, under the nose, and at the hairline get disrupted. You need to paint them back.
Create a new layer set to Multiply blending mode. Select a soft brush at 5-10% opacity and sample a dark skin tone from the target image's existing shadows. Paint gently along the jawline where the face meets the neck, under the chin, and along the temples where the hairline casts a natural shadow. Build up density gradually. Three to four passes at low opacity look far more natural than one heavy stroke.
Texture Consistency and Hair Overlap Fixes
Imagine you photoshop a picture onto a picture and the face region looks perfectly smooth while the rest of the image has visible grain or noise. That mismatch is subtle but your brain registers it as wrong. Texture consistency means making the swapped face share the same surface quality as the surrounding image.
Zoom to 100% and compare the grain structure of the swapped face against the target skin. If the target has visible noise (common in photos shot at high ISO), add matching grain to the face layer. Go to Filter > Noise > Add Noise and use these settings: Amount between 1.5% and 4% depending on how grainy the target is, Distribution set to Gaussian, and Monochromatic checked. This prevents colored speckles that would look artificial.
Hair overlap is the final challenge in any face merger workflow. When the target image has hair falling across the forehead or cheeks, you need those strands to appear in front of the swapped face, not behind it. The fix uses layer masks with precision brushwork:
- On the face layer mask, select a hard-edged brush (Hardness 85-95%) at a very small size (2-5px).
- Set the brush opacity to 100% and paint black along individual hair strands that should overlap the face.
- For wispy or semi-transparent hair, drop opacity to 40-60% and paint in single strokes to create a natural see-through effect.
- If the original hair is too complex to mask manually, use Select > Select and Mask with the Refine Hair tool on the background layer to generate a precise hair selection, then apply it as a mask above the face layer.
The table below summarizes each technique with specific tool configurations and the scenarios where each matters most:
| Technique | Tool / Setting | When to Apply |
|---|---|---|
| Edge feathering | Layer Mask + Brush (0% Hardness, 30-40% Opacity) or Properties > Feather 3-8px | Every swap — always the first refinement step |
| Color matching | Curves Adjustment Layer (clipped) — adjust R/G/B channels individually | When skin tones differ between source and target, even slightly |
| Shadow reconstruction | New layer (Multiply mode) + Soft Brush at 5-10% Opacity, sampled dark skin tone | When jawline, hairline, or nose shadows look flat or missing |
| Texture consistency | Filter > Noise > Add Noise (1.5-4%, Gaussian, Monochromatic) | When the target image has visible grain or the face looks too smooth |
| Hair overlap | Layer Mask + Hard Brush (85-95% Hardness, 2-5px size) or Refine Hair tool | When hair strands cross over the face region in the target image |
These five techniques work together as a system. Edge feathering removes the obvious seam, color matching unifies the palette, shadow reconstruction adds dimensional realism, texture consistency eliminates the "too clean" look, and hair overlap handling preserves the natural layering of the original photo. Apply them in this order for the most efficient workflow.
Even with careful refinement, certain problems persist that require targeted fixes rather than general blending. Lighting mismatches, proportion distortions, and resolution conflicts each have specific causes and specific solutions.
Step 6. Fix Common Face Swap Problems
Blending techniques handle the general refinement, but what about the specific failures that still look wrong even after you feather edges and match colors? Every person who has tried to replace face in photo composites has hit at least one of these six problems. Each has a distinct cause and a targeted fix that goes beyond general blending.
The table below maps each issue to its root cause and the precise correction. Use it as a diagnostic reference whenever your result looks off but you cannot pinpoint why.
| Problem | Cause | Fix |
|---|---|---|
| Lighting mismatch — face looks lit from a different direction than the body | Source photo had light coming from the opposite side or at a different intensity than the target | Add a Levels or Curves adjustment clipped to the face layer. Darken the side that should be in shadow and brighten the highlight side to match the target's light direction |
| Skin tone discrepancy — face appears too warm, too cool, or a different hue than the neck and body | Different white balance settings or lighting color temperature between the two source images | Use Color Balance or Selective Color adjustment (clipped). Shift midtones toward the target's undertone. For severe shifts, use a Hue/Saturation layer targeting Reds and Yellows specifically |
| Visible seams or unnatural edges — a hard line where the swapped face meets the original skin | Feather radius too small, or the mask edge was painted with too hard a brush | Increase feather radius to 6-10px. Then use a soft eraser (0% Hardness, 40% Opacity) on the mask boundary, focusing on the jawline and forehead transitions |
| Hair overlap creating halos — a bright or dark ring appears around the hairline | The mask cuts through hair strands, leaving remnants of the original background or face edge visible | Create a new layer above the face. Sample nearby hair color and paint individual strands using a 1-3px brush at 80-100% Opacity to cover the halo. Use a Clipping Mask to keep strokes contained |
| Mismatched facial proportions — the uncanny valley effect where something feels wrong but is hard to identify | Source face is wider, longer, or differently proportioned than the target, and scaling alone cannot resolve the structural difference | Use Filter > Liquify or Edit > Transform > Warp to subtly adjust feature spacing. Push the jawline inward or outward by 2-4%, narrow or widen the eye distance, or adjust the forehead height. Small moves only — anything beyond 5% distortion becomes visible |
| Resolution mismatch — the swapped face looks blurry or soft compared to the surrounding image | Source face was lower resolution than the target image, or heavy compression destroyed detail before the swap | Apply Filter > Sharpen > Unsharp Mask (Amount: 80-120%, Radius: 0.8-1.2px, Threshold: 2-4 levels) to the face layer only. If sharpening introduces artifacts, source a higher-resolution image instead |
Fixing Lighting and Skin Tone Mismatches
Lighting direction is the single fastest way to spot a fake composite. As testing across hundreds of face swaps has shown, a face lit from the left placed onto a body lit from the right looks immediately wrong regardless of how well the edges blend. Your brain processes light direction subconsciously, and any conflict triggers the "something is off" response before you can even articulate why.
When you need to how to change face in photo composites where the lighting does not match, the fix is directional dodging and burning on the face layer. Create a new layer set to Overlay, fill it with 50% gray, and clip it to the face. Paint with white (5-10% Opacity) on the side that should catch light, and paint with black on the side that should fall into shadow. This reshapes the perceived light direction without altering the underlying skin texture.
Skin tone discrepancy is the second most common issue when you replace face in picture composites. The human eye is remarkably sensitive to skin color inconsistencies — even a 5-point difference in warmth between the face and neck reads as artificial. The Selective Color adjustment gives you the most surgical control here. Target the Reds channel and shift Cyan/Yellow sliders by small increments (1-3%) until the face and body share the same undertone. This approach, similar to techniques used for correcting AI skin undertone shifts, lets you adjust hue without affecting luminosity or saturation.
Eliminating Visible Seams and Halos
Visible seams happen when the mask boundary is too sharp or when there is a color jump at the edge of the swapped region. If you already feathered the mask and the seam persists, the issue is usually a luminosity difference right at the boundary rather than a hardness problem. Zoom to 200% along the jawline and check whether the pixels on the face side are brighter or darker than the pixels on the body side. A quick fix: select a 10px strip along the seam using the Marquee tool, apply a 2px Gaussian Blur, then use Curves to nudge that strip's brightness until it matches both sides.
Halos around the hairline are trickier because hair is semi-transparent. When you change face on picture composites, the mask often cannot cleanly separate fine hair from the face edge, leaving a bright or dark fringe. The solution is not to fix the mask — it is to paint over the halo on a separate layer. Sample the hair color from a nearby clean area, select a 1-3px brush, and paint short strokes that follow the natural hair direction. This covers the fringe without disturbing the face blend beneath it.
Solving Proportion and Resolution Issues
The uncanny valley effect in face swaps usually traces back to proportional mismatch. You scaled the face to fit, the eyes line up, the mouth is in the right spot, but the overall shape feels wrong. This happens because faces vary in width-to-height ratio, and simple uniform scaling cannot correct structural differences.
Liquify is your tool here. Open it with Ctrl+Shift+X / Cmd+Shift+X and use the Forward Warp tool with a large brush (slightly wider than the face) at low pressure (10-20). Push the jawline inward or outward by tiny amounts. Adjust the forehead height if needed. The key rule: never move any feature more than 3-5% from its current position. Beyond that threshold, distortion becomes visible and you are better off sourcing a different photo.
Resolution mismatch is the one problem you cannot fully fix in post. If you are trying to how to add a face to a picture and the source face is 200px wide while the target image is 4000px across, no amount of sharpening will create detail that does not exist. Unsharp Mask can recover mild softness, but for severe resolution gaps, the only real solution is finding a higher-resolution source image. As a general rule, the source face should be at least 70% of the pixel width of the face area in the target image. Anything below that produces a noticeably softer patch that gives away the photo replace face edit.
These six fixes cover the vast majority of face swap failures. But technical execution is only part of the equation — knowing how to swap a face in a photo responsibly matters just as much, especially when the result is convincing enough to mislead viewers.
Step 7. Follow Ethical Guidelines and Protect Privacy
A convincing face swap is a technical achievement. A responsible one requires something extra: consideration for the people whose faces you are using and the viewers who will see the result. The same deepfake ai tool capabilities that let you fix a group photo or create a funny meme can also deceive, harass, or violate someone's rights if used carelessly. The line between creative fun and genuine harm is thinner than most people realize.
If the person whose face you are using would not enthusiastically approve of the final image and where you plan to share it, do not post it.
Consent and Disclosure for Social Media
The simplest ethical rule is also the most frequently ignored: get permission before swapping someone's face into an image you plan to share publicly. This applies whether you are using a deepfake app for a quick joke or spending an hour in Photoshop on a polished composite. The person whose likeness appears in the final image has a right to know how their face is being used.
For casual content shared among friends in a private group chat, implied consent often exists within the social context. But the moment you post to a public feed, the stakes change. A face swap that seems harmless to you might embarrass the subject, misrepresent their appearance, or place them in a context they would never choose for themselves.
Disclosure matters just as much as consent. When you share face-swapped content on social media, label it clearly. A simple caption noting the image is edited prevents viewers from mistaking it for reality. This is especially important as AI tools make results increasingly convincing — what looks obviously fake to you as the creator may fool casual scrollers completely. Platforms like Instagram and TikTok are increasingly flagging AI-generated content, and research from the University of Arkansas emphasizes that labeling altered content is essential for maintaining trust in digital media. Transparent disclosure protects both the subject and your own credibility.
Privacy Risks of Uploading Photos to AI Tools
Every time you upload a photo to an ai face swap video online free tool or any browser-based platform, you are sending personal biometric data to a third-party server. Before you drag that image into an upload field, consider what happens to it after processing.
Key questions to evaluate before uploading:
- Data retention — Does the platform delete your uploaded images immediately after processing, or does it store them? Some services retain images for days, weeks, or indefinitely.
- Model training — Are uploaded photos used to train the platform's AI models? Proton's research on AI image scraping documents how personal photos end up in training datasets without users realizing it. Once your face is part of a model, there is no practical way to remove it.
- Third-party sharing — Does the platform share uploaded content with partners, advertisers, or data brokers?
- Encryption — Are images encrypted during upload and storage, or are they accessible to platform employees?
When using a multiple face swap online free tool, you are often uploading several people's faces simultaneously, multiplying the privacy exposure. If the photos include children, colleagues, or anyone who has not explicitly agreed to have their biometric data processed by a third-party AI system, reconsider whether a cloud-based tool is appropriate. Desktop applications that process locally on your machine avoid this issue entirely, though they typically require more technical setup.
Read the privacy policy before uploading. If a platform's terms are vague about data retention or silent on model training, treat that as a red flag rather than an oversight.
Legal Boundaries for Commercial Use
Using someone's face in commercial content without permission is not just ethically questionable — it can be illegal. The right of publicity, recognized in most U.S. states and many international jurisdictions, grants individuals control over commercial use of their name, image, and likeness. Using a deepfake generator to place a celebrity's face on your product advertisement, or swapping a colleague's face into marketing material without written consent, exposes you to legal liability for both economic and dignitary damages.
The legal landscape is evolving rapidly. The U.S. TAKE IT DOWN Act criminalizes the knowing publication of intimate AI-generated images and requires platforms to remove them within 48 hours of receiving notice from the victim. Similar legislation exists or is pending across the EU, UK, and Australia. Even non-intimate deepfakes face increasing legal scrutiny — a face swap used to misrepresent someone's political views or professional endorsements can trigger defamation claims regardless of whether money changed hands.
For commercial projects, the safest path is straightforward:
- Use only faces you have explicit written permission to use
- Document consent with model releases that specify how the likeness will be used
- Never use a fakeface or synthetic likeness derived from a real person's photos without their agreement
- If creating content for a brand or client, confirm that all faces in the composite are either licensed stock, AI-generated from scratch, or covered by signed releases
The technology to create convincing face swaps is now accessible to anyone with a browser. The responsibility to use it ethically has not changed. Technical skill determines whether your swap looks real — ethical judgment determines whether it should exist at all.
With both the technical workflow and ethical boundaries clear, the final question is practical: which method should you actually use for your specific project?
Choosing the Right Face Swap Method for Your Project
Every method covered in this guide produces convincing results under the right conditions. The real question is not which tool is best overall — it is which tool is best for what you are trying to accomplish right now. Your use case, deadline, and comfort level with editing software should drive the decision, not habit or brand loyalty.
Matching Methods to Use Cases
How do you put a face on another picture when you have five minutes before a post goes live? You reach for an AI tool. How do i put a face on another picture when the image is destined for a billboard? You open Photoshop. The table below maps common scenarios to the approach that delivers the best result with the least friction.
| Use Case | Recommended Approach | Skill Level | Time Required |
|---|---|---|---|
| Social media content, memes, marketing visuals | AI tool — Snappyit or similar browser-based platform | Beginner | Under 1 minute |
| Fixing group photos (blinks, bad expressions) | Photoshop — layer masks and Auto-Blend | Intermediate | 10-30 minutes |
| Creative art projects and composites | Combination — AI for initial swap, Photoshop for refinement | Intermediate to advanced | 30-60 minutes |
| Professional headshots and commercial photography | Full manual editing with careful blending and retouching | Advanced | 1-2 hours |
| Quick phone-based swaps for Stories or Reels | Mobile app (Reface, FaceApp, or native Snapchat lens) | Beginner | Under 30 seconds |
If you are a social creator, digital marketer, or online seller asking how to put my face on another picture for a campaign or content piece, Snappyit handles the entire workflow in a browser without requiring any design background. Upload two images, let the AI process the swap, and download a share-ready result. That speed-to-quality ratio makes it the logical default for the majority of how to face swap pictures tasks that end up on social feeds.
For photographers fixing a group shot where someone blinked, the precision of Photoshop's layer masks justifies the extra time. You need to swap one face while preserving exact lighting, depth of field, and background continuity — details that matter at print resolution. Creative composites often benefit from a hybrid approach: use an AI tool to generate the initial swap quickly, then bring the result into Photoshop for shadow reconstruction, texture matching, and edge refinement.
Speed vs Quality vs Control Tradeoffs
Every method sits somewhere on a triangle between these three factors. You can optimize for two, but rarely all three simultaneously.
- AI tools maximize speed and quality but sacrifice granular control. You cannot adjust individual blending parameters or fix specific artifacts without exporting to another editor.
- Photoshop maximizes quality and control but demands time and skill. The learning curve is real, and a 30-minute workflow is only fast once you have internalized the shortcuts.
- Mobile apps maximize speed and accessibility but cap out on quality. They work perfectly for social-resolution output but struggle with high-resolution or complex composites.
The honest answer to how do i swap faces on pictures without the obvious cut-and-paste look is this: pick the method that matches your output requirements, not the one that sounds most impressive. A well-executed AI swap shared at the right moment beats a technically perfect Photoshop composite that took so long you missed the cultural window.
Start with the approach that fits your current project. As your needs grow more complex — higher resolution, trickier angles, commercial stakes — layer in the manual techniques from earlier sections. The skills compound. Someone who understands how to swap faces on a photo using AI and also knows how to switch faces in a photo manually in Photoshop can tackle any scenario that comes up, choosing speed when speed matters and precision when the output demands it.
Frequently Asked Questions About Face Swapping
1. What is the easiest way to swap faces in pictures?
Browser-based AI tools like Snappyit offer the fastest path to realistic face swaps. You upload a source face and a target photo, the AI automatically detects facial landmarks, aligns features, matches skin tones, and blends edges in under 30 seconds. No software installation or design skills are needed, making this approach ideal for social media creators and marketers who need polished results quickly.
2. How do I make a face swap look realistic and not fake?
Realistic face swaps depend on three factors: matching source photos with similar lighting direction and face angle (within 15 degrees), using the right tool for your skill level, and applying post-processing refinements. Key finishing techniques include edge feathering to soften boundaries, color matching with Curves adjustments, shadow reconstruction along the jawline, adding grain to match the target photo's texture, and painting hair strands over the swapped region to preserve natural layering.
3. Can I swap faces in Photoshop without it looking obvious?
Yes. The Photoshop workflow involves selecting the source face with the Lasso tool, pasting it onto the target image, aligning features at 50% opacity using Free Transform, applying a layer mask for edge cleanup, and running Auto-Blend Layers to unify skin tones. The key steps most people skip are contracting the selection by 5 pixels before blending and reconstructing shadows along the jawline and hairline on a separate Multiply layer.
4. Is it legal to swap someone's face into a photo?
It depends on context and jurisdiction. For private, non-commercial use among friends, face swaps are generally permissible. However, using someone's likeness in commercial content without written consent can violate right-of-publicity laws. Publishing intimate or misleading deepfake images is increasingly criminalized under laws like the U.S. TAKE IT DOWN Act. Always get permission before sharing face-swapped images publicly, and label edited content clearly on social media.
5. What is the difference between a face swap and a head swap?
A face swap replaces only the central facial features (eyes, nose, mouth) while keeping the original hair and jawline intact. A head swap replaces the entire head including hair, ears, and jawline, then blends the neck transition. Head swaps are necessary when hairstyles differ significantly between source and target or when the face angle requires replacing the full head structure to avoid distortion. Expression transfer is a third option that morphs specific features without replacing identity.
Generate your first natural-looking face swap in 90 seconds
Want a face swap that actually looks real? Snappyit AI Face Swap matches lighting, skin tone, and angle automatically — no Photoshop manual work, no cut-and-paste seams.
Try Snappyit AI Face Swap free →