At a glance
Product photography for ecommerce, explained: shot types, camera settings, lighting, editing, platform image specs, and the DIY vs studio vs AI cost math.
| Need | What to do |
|---|---|
| Get oriented | Read the short summary, then use the checklist below. |
| Create a test image | Try Product Photo Editor Free |
Why Product Photography Makes or Breaks Online Sales
Product photography for ecommerce is the process of creating images that accurately represent physical goods for online sale, giving shoppers the visual information they need to buy with confidence. It encompasses everything from camera settings and lighting to post-production editing and platform-specific optimization. When done well, it replaces the in-store experience of picking up, examining, and evaluating a product before committing to a purchase.
What Is Ecommerce Product Photography
Imagine walking into a store where every item sits behind frosted glass. You can see shapes and colors, but you can't touch anything, turn it over, or check the details. That's essentially what online shopping feels like when product images fall short. Ecommerce product photography bridges that gap by delivering visual clarity that builds trust and drives action.
For online shoppers, product images are the only substitute for physical interaction. Research from Baymard Institute shows that 56% of shoppers' first action on a product page is to explore the images, before reading titles, descriptions, or scrolling down.
This behavior makes sense. In a physical store, you'd pick the product up. Online, the image carries that entire responsibility. The quality of that single visual shapes whether a shopper trusts your listing, how much they believe the product is worth, and whether they click "add to cart" or scroll past to the next listing. Product photography for online stores isn't just about making things look pretty. It's about communicating product value through pixels.
Why Product Images Drive Purchase Decisions
The connection between image quality and buyer confidence is backed by hard data. In Salsify's 2025 Consumer Research Report, 77% of shoppers said high-quality product images and videos are important to their purchase decisions. That's not a soft preference. It's a direct line between your visuals and your revenue.
Professional ecommerce product photography also reduces one of online retail's most expensive problems: returns. Data from the NRF/Happy Returns 2024 report puts the overall retail return rate at 16.9% of annual sales — roughly $890 billion in returned merchandise in the US alone — with online return rates running about 21% higher than overall rates. A significant portion traces back to mismatched expectations, and product images are a major driver. In the same Salsify research, 71% of consumers said they had returned a product because it didn't match the online listing.
On marketplaces where identical products compete side by side, image quality becomes even more measurable. A Cornell Tech study of eBay listings found that better photo quality made otherwise identical items measurably more likely to sell, with category-specific lifts as high as 25% for handbags and 17% for shoes. Across thousands of listings, those percentages compound into meaningful revenue differences.
This is why e-commerce photography deserves to be treated as a business investment rather than a creative exercise. Every dollar spent on better visuals directly reduces return costs, increases conversion rates, and builds the kind of brand trust that keeps customers coming back. Research from Tilburg University reinforces this point: visual merchandising strategies work best when they align with the consumer's decision-making context, and the effects are strongest for higher-priced products where buyer uncertainty peaks.
This guide covers the full ecommerce photography workflow, from choosing the right equipment and camera settings to lighting setups, post-production editing, and platform-specific image optimization. Whether you're shooting your first product or scaling a catalog of thousands, you'll find actionable guidance for every stage of the process.
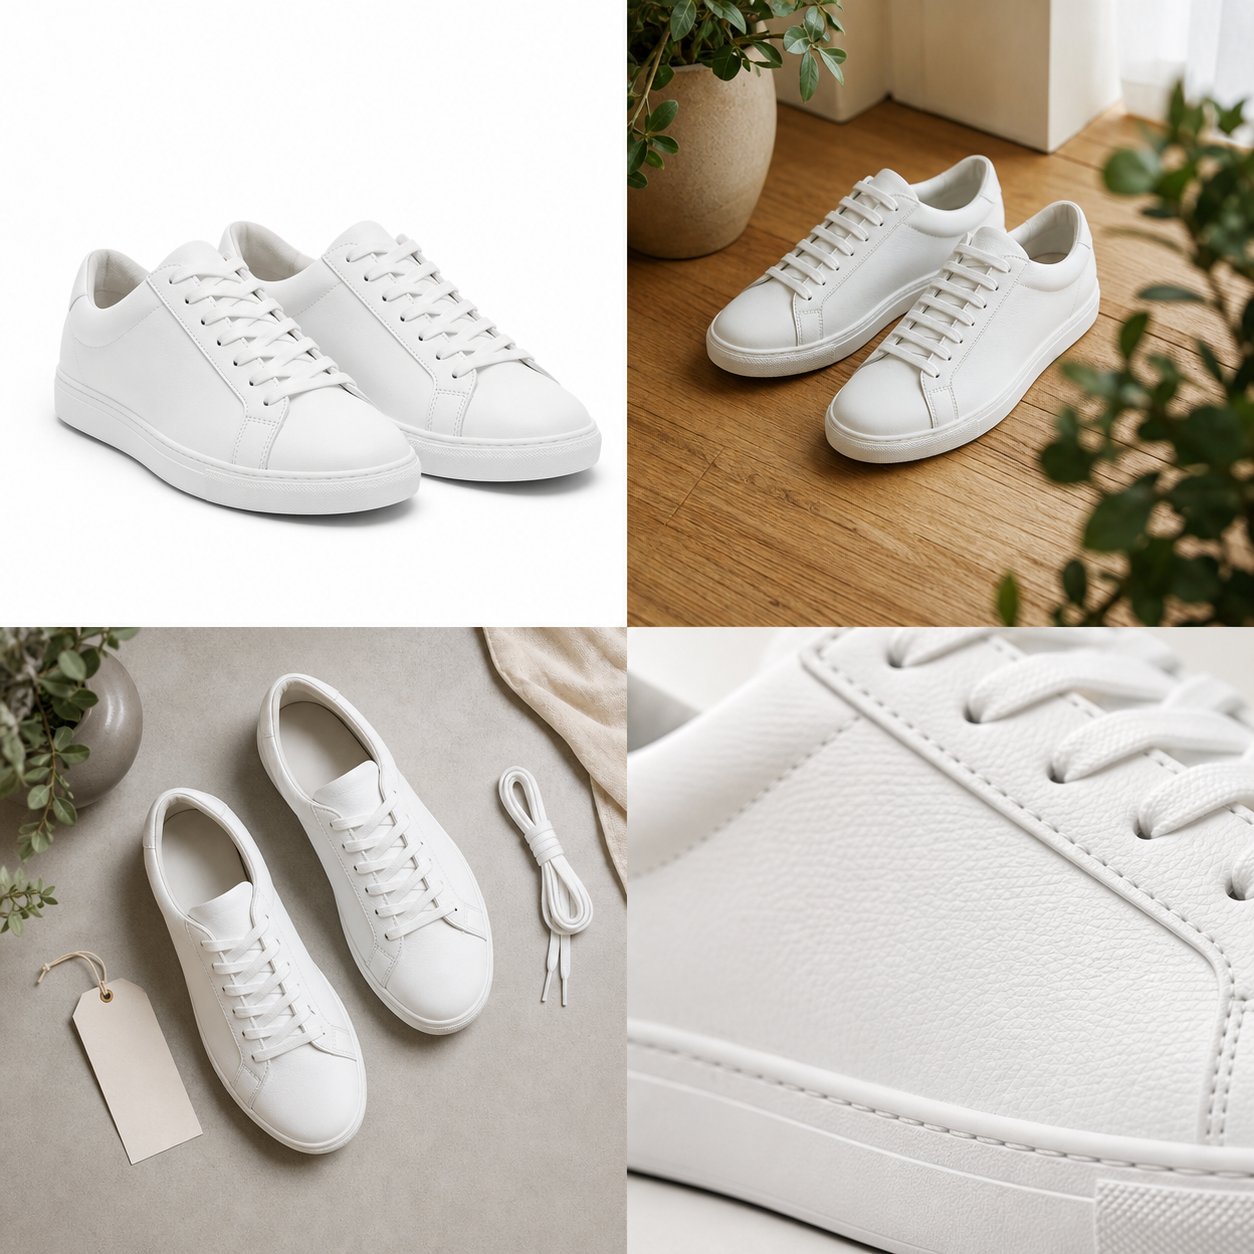
Essential Types of Product Photography Every Seller Needs
A single image can't answer every question a shopper has. They want to see what the product looks like up close, how it fits in real life, and what it looks like from the back. That's why successful product listings rely on a strategic mix of types of product photography, each serving a distinct role in moving the buyer from curiosity to checkout.
White Background and Packshot Photography
The packshot, a clean product image on a pure white or neutral background, is the foundation of every ecommerce listing. It strips away distractions and puts full focus on the item itself: its shape, color, proportions, and design details. Marketplaces like Amazon require a white background for primary listing images, with the product filling at least 85% of the frame. Walmart and Target follow similar rules; eBay accepts white or light solid backgrounds.
Think of the packshot as your product's ID photo. It establishes visual clarity and catalog consistency across hundreds or thousands of SKUs. Even if you sell exclusively through your own Shopify store, starting with a clean ecommerce packshot gives buyers the objective baseline they need before exploring more styled visuals.
Lifestyle and Contextual Shots
Where packshots communicate facts, lifestyle photography communicates feeling. These images show your product in use, whether that's a candle burning on a nightstand, a jacket worn on a rainy sidewalk, or a pair of headphones mid-commute. The goal is emotional resonance: helping the buyer picture themselves using the item in their own life.
Lifestyle imagery is especially powerful on social media and in email marketing, where scroll-stopping visuals outperform sterile catalog shots. Product photography with models adds another layer by demonstrating fit, scale, and real-world context. For apparel brands in particular, choosing the right models for product photography can make the difference between a listing that feels aspirational and one that feels generic. These images aren't required by marketplaces, but they consistently drive higher engagement and stronger add-to-cart rates as secondary listing images.
Specialized Shot Types for Different Goals
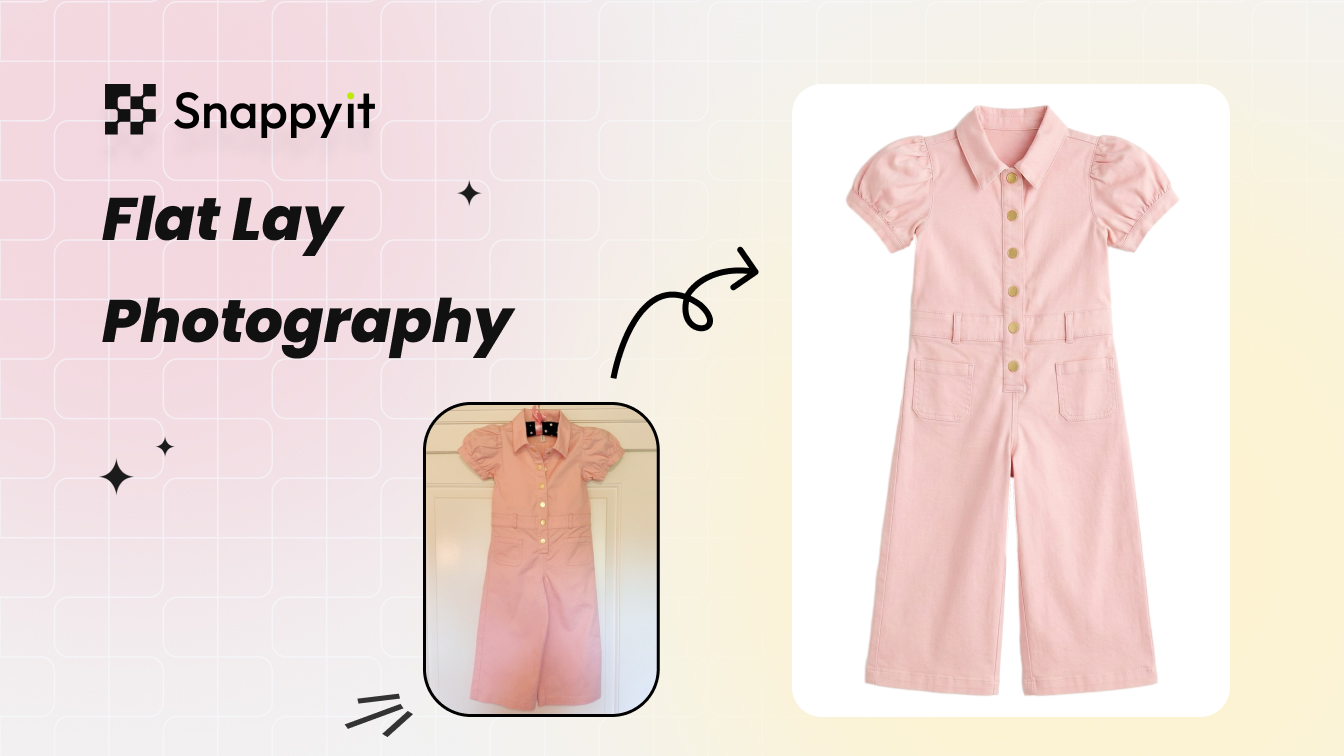
Beyond packshots and lifestyle images, several specialized product photography shots serve targeted purposes depending on your product category and selling channels. A 3/4-angle shot, for example, reveals depth and dimension that a straight-on front view can't. Macro detail shots answer material and quality questions. And for ecommerce apparel photography, the ghost mannequin technique gives garments a natural, three-dimensional shape without the cost of hiring a model for every SKU.
Here's a quick-reference list of the most common types and when to use them:
- White background shot - Clean, distraction-free primary listing image required by most marketplaces.
- Lifestyle shot - Product shown in use within a relatable environment to build emotional connection.
- Flat lay - Products arranged on a surface and shot from directly above; ideal for accessories, bundled items, and social media content.
- Ghost mannequin - Clothing photographed on a mannequin that's later removed in editing, showing garment shape and fit at scale.
- 360-degree spin - A sequence of images letting buyers rotate the product interactively; effective for footwear, electronics, and furniture.
- Detail/macro shot - Tight close-ups highlighting texture, stitching, material quality, or small components.
- Scale shot - Product shown next to a common reference object or human hand to communicate real-world size.
- Group shot - Multiple products in one frame to showcase a collection, bundle, or color range.
- Packaging shot - Captures the unboxing experience and brand presentation, signaling quality before purchase.
No single type covers every buyer question. High-converting listings typically combine at least three to four of these formats: a clean packshot for the hero image, lifestyle context for emotional pull, detail shots for quality reassurance, and an angle or scale shot to fill in dimensional gaps. The specific mix depends on your product category, but the principle stays the same. Give your shopper enough visual evidence to buy without hesitation.
Of course, knowing which shots you need is only half the equation. Getting those images sharp, well-lit, and color-accurate comes down to the gear you're working with and the settings you dial in.
Camera Settings and Equipment That Deliver Sharp Results
Choosing the right shot type is a strategic decision. Executing it with tack-sharp focus and accurate color is a technical one. The gap between a product image that looks "fine" and one that builds instant buyer confidence often comes down to camera selection, lens pairing, and a handful of critical settings dialed in before you press the shutter.
Camera and Lens Selection for Product Shoots
You don't need the most expensive digital camera for product photography to get professional results. What you need is a camera that gives you manual control over exposure settings and pairs well with a lens suited to your product size. Here's an honest breakdown of the three main options.
Smartphones. Modern flagship phones from Apple, Samsung, and Google produce images that rival older DSLRs in resolution and color accuracy. If you're taking product photos for a small catalog, operating on a tight budget, or just starting out, your phone is a legitimate tool. The limitations show up in low-light performance, depth-of-field control, and the inability to shoot RAW on some models. But for well-lit tabletop products, a recent smartphone paired with a small tripod mount delivers surprisingly clean results.
Mirrorless cameras. These are the current sweet spot for most ecommerce sellers who've outgrown their phone. Mirrorless bodies are lighter than DSLRs, offer real-time exposure preview through the electronic viewfinder, and support the same interchangeable lens systems. They shoot RAW natively, giving you far more editing flexibility in post-production. Models from Sony, Canon, Nikon, and Fujifilm all have capable entry-level options in the $600 to $1,200 range.
DSLRs. Still excellent cameras, especially if you already own one. The optical viewfinder and robust lens ecosystem remain advantages. For dedicated product work, though, mirrorless has largely overtaken DSLRs in new purchases due to size, autofocus speed, and live exposure simulation. If you have a DSLR with good glass, there's no reason to replace it.
The best camera for product photos is ultimately the one that gives you manual control and pairs with the right lens for your products. Lens choice shapes image quality more than the camera body itself. As photography experts note, the lens is the translator between your subject and the sensor, responsible for sharpness, color fidelity, depth of field, and distortion control.
For focal length, match the lens to what you're shooting:
- Small items (jewelry, cosmetics, watches) - A 90mm to 100mm macro lens captures fine details at close range without distortion. The Sony FE 90mm f/2.8 and Canon EF 100mm f/2.8L are popular choices.
- Medium items (shoes, electronics, handbags) - An 85mm prime or a 50mm prime lens provides natural perspective and strong subject isolation. The Nikon AF-S 50mm f/1.8G is an affordable option that delivers sharp results.
- Large items (furniture, luggage, appliances) - A 24-70mm zoom lens lets you frame larger products without needing excessive distance. The Canon EF 24-70mm f/2.8L handles both wider shots and tighter crops in a single lens.
- Versatile all-rounder - A 50mm prime lens mimics natural human perspective and works for a wide range of product sizes. It's affordable, sharp, and compact enough for small studio spaces.
Settings by Product Category
Knowing which settings to dial in for different product types eliminates guesswork during your ecommerce photoshoot. The table below provides starting-point recommendations organized by category. These aren't rigid rules. They're reliable baselines you can adjust once you see how your specific lighting and product respond.
| Product Type | Aperture | ISO | Shutter Speed | White Balance |
|---|---|---|---|---|
| Jewelry & Watches | f/11 - f/16 | 100 - 200 | 1/125s or slower (tripod) | 5500K (daylight) or custom |
| Clothing & Apparel | f/8 - f/11 | 100 - 400 | 1/160s | 5500K - 6000K |
| Electronics | f/8 - f/11 | 100 - 200 | 1/125s | 5000K - 5500K |
| Food & Beverage | f/2.8 - f/5.6 | 200 - 400 | 1/200s | 5500K (daylight) or match ambient |
| Cosmetics & Skincare | f/8 - f/13 | 100 - 200 | 1/125s or slower (tripod) | 5500K with grey card calibration |
A few principles hold true across every category:
- Keep ISO as low as possible. Lower ISO means less digital noise and cleaner detail. ISO 100 is ideal when you have adequate lighting and a tripod.
- Use a narrow aperture for full product sharpness. Apertures between f/8 and f/11 typically hit the sharpest point of most lenses. Go narrower (f/16+) only when you need extreme depth of field for very close macro work.
- Set white balance manually. Auto white balance shifts between frames, creating inconsistency across your catalog. Set it to match your light source, or use a grey card for precision.
- Shoot in RAW format. RAW files preserve full color and exposure data, giving you far more correction latitude in editing than compressed JPEG files.
Smartphone-specific adjustments: If you're taking product photos with a phone, switch to Pro or Manual mode (available on most Android devices and through apps like Halide on iPhone). Lock your white balance, set ISO manually, and use the 1x or 2x optical lens rather than digital zoom. Enable the timer or use a Bluetooth shutter release to avoid shake when tapping the screen. These small adjustments bring smartphone output noticeably closer to dedicated camera results for online store product photography.
Tripod and Stabilization Essentials
Consistency is the invisible quality that separates a professional-looking catalog from a visually scattered one. When every product image shares the same angle, framing, and sharpness, your store page looks cohesive and intentional. A tripod makes that possible.
Beyond consistency, a tripod unlocks slower shutter speeds without blur. That means you can shoot at ISO 100 with a narrow aperture even in moderate lighting, producing the cleanest possible file. Hand-holding at f/11 in a softbox setup almost always forces a compromise: either raise ISO (adding noise) or slow the shutter enough to risk motion blur.
For catalogue photography involving dozens or hundreds of SKUs, stabilization also enables batch shooting efficiency. Once your camera is locked in position and your lighting is set, you can swap products in and out of the scene with minimal adjustment between shots. This repeatable workflow is one of the best practices for batching large catalog product shoots because it eliminates the need to reframe, refocus, and re-meter for every single item.
You don't need an expensive tripod. A sturdy aluminum model with a ball head in the $30 to $80 range handles tabletop product work well. If you're using a smartphone, a small tabletop tripod with a phone clamp adapter does the job. The critical factor isn't price; it's simply having the camera in a fixed, repeatable position.
Sharp images and locked-in settings get you halfway to professional results. The other half depends on what's happening on the other side of the lens: how light falls on your product and what sits behind it.
Create studio-quality product photos with AI →
Lighting and Background Setups for Professional Results
Lighting and background are the two variables that separate amateur snapshots from good product photography. You can own the sharpest lens on the market, but if light falls unevenly across your product or the background clashes with your item's colors, the image won't convert. Getting these two elements right gives you a foundation that makes editing faster, consistency easier, and buyer trust stronger.
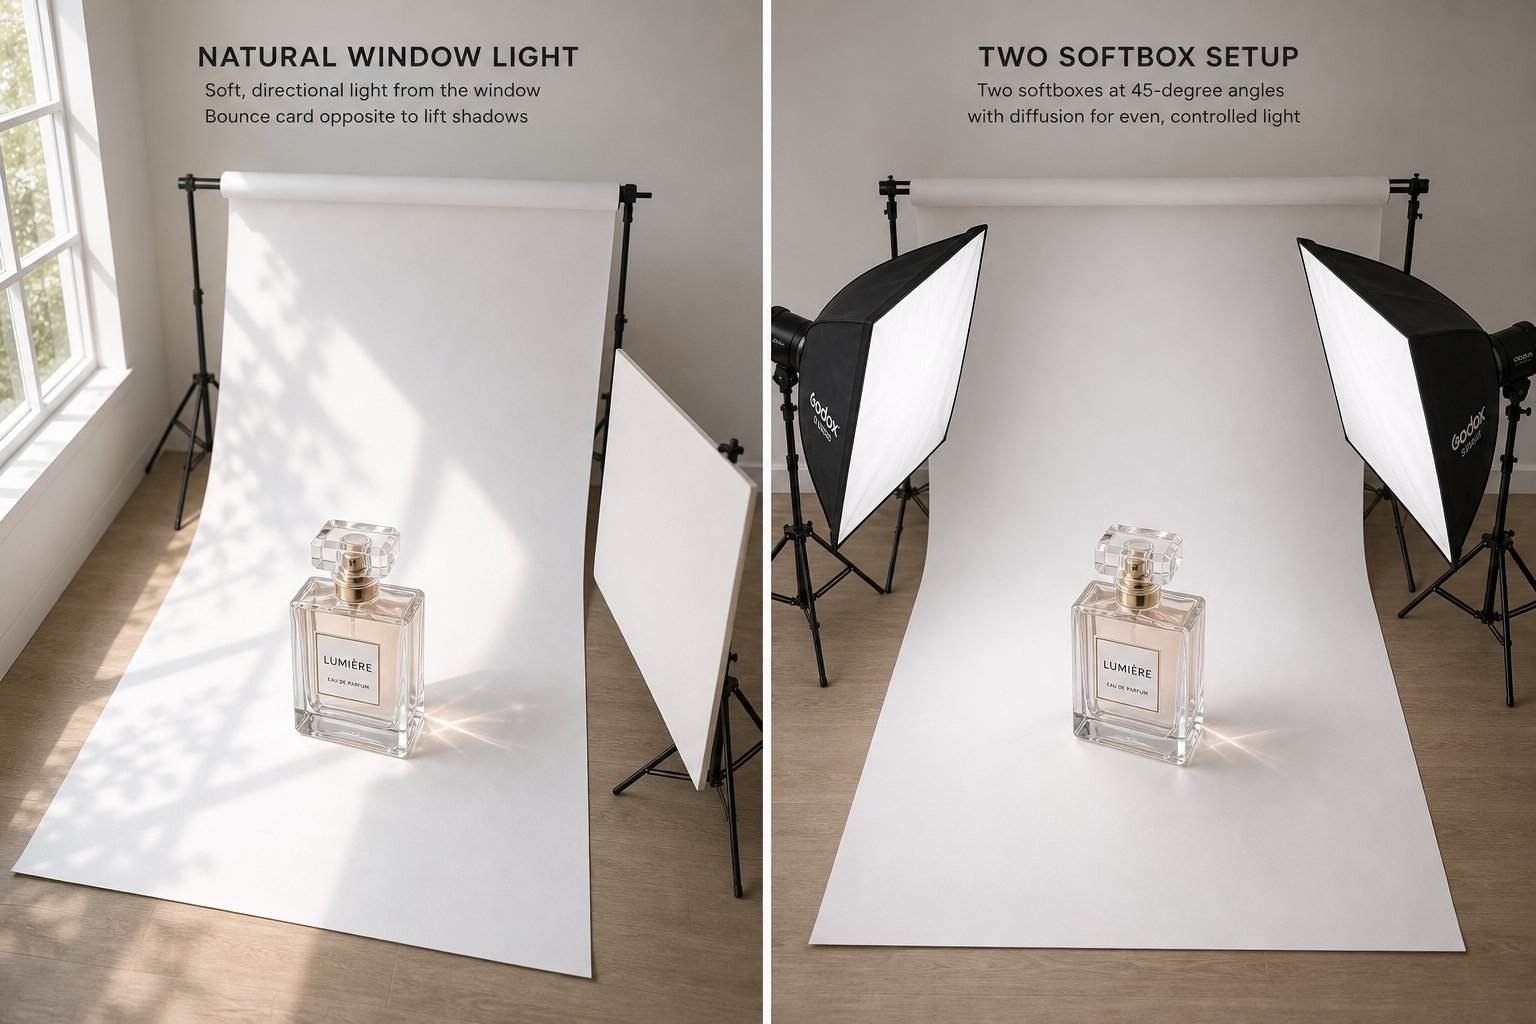
Natural vs Artificial Lighting Setups
Your lighting choice depends on your budget, product type, and how much control you need over the final result. Here's how the three main approaches stack up.
Window lighting (beginner). A large window with indirect sunlight produces soft, diffused light that works beautifully for small to medium products. Place your product near the window and position a white foam board on the opposite side to bounce light back into the shadows. Shoot during morning or late afternoon when the light is even and warm. The downsides? You're at the mercy of weather and time of day, and results can shift noticeably between frames if clouds roll through.
Continuous LED lighting (intermediate). LED panels and softbox kits give you repeatable, controllable light that doesn't change mid-shoot. A two-light setup with diffusion panels eliminates harsh shadows and lets you shoot at any hour. For most sellers stepping up from natural light, a pair of LED softboxes in the 5500K daylight range delivers consistent results without a steep learning curve. This is the setup that scales well for large product photography sessions involving dozens of SKUs in a single day.
Strobe and flash setups (advanced). Strobes fire a brief, powerful burst of light that freezes motion and produces extremely clean files at ISO 100. They outperform continuous lighting in raw power, which matters when you need to shoot at f/11 or narrower without raising ISO. The tradeoff is complexity: you'll need triggers, modeling lights to preview your look, and more time dialing in ratios between multiple heads. For high-volume studios and complex setups, strobes remain the professional standard.
Regardless of which route you choose, positioning your lights at 45-degree angles to the product is a reliable starting point. It creates gentle shadows that add dimension without obscuring details.
Choosing the Right Background Color
The most common background colors for ecommerce product photography are pure white, neutral gray, and black, each serving a different purpose depending on your platform requirements and product aesthetics.
- Pure white (#FFFFFF) - Required by Amazon, Walmart, and most major marketplaces for primary listing images. Creates zero distraction and simplifies background removal in post-production. Best for: electronics, toys, household goods, and any marketplace-first listing.
- Neutral gray (18% gray) - Ideal for products that are themselves white or very light-colored, where a pure white background causes the edges to disappear. Also useful for lifestyle-adjacent catalog shots. Best for: white sneakers, light cosmetics packaging, clear glassware.
- Black - Adds drama and premium positioning for luxury and high-contrast products. Best for: jewelry, watches, dark electronics, perfume bottles.
- Colored or branded backgrounds - Work well for DTC Shopify stores, social media content, and brand campaigns where visual identity matters more than marketplace compliance. Best for: lifestyle brands, seasonal promotions, Instagram-first product launches.
If you sell on multiple platforms, start with a white sweep for your primary shots and add styled backgrounds as supplementary images. A simple roll of white seamless paper or a foam board is inexpensive and gets the job done for small and medium products.
Controlling Reflections and Shadows
Reflective and transparent products, think glass, polished metal, glossy electronics, and jewelry, introduce a challenge that flat matte surfaces don't. Light bounces off these materials unpredictably, creating hot spots, unwanted mirror effects, and distracting glare.
A few practical techniques solve most of these issues:
- Diffuse aggressively. Place a softbox, photography umbrella, or sheer white fabric between your light source and the product to scatter rays into a broad, even glow rather than a concentrated beam.
- Use a light tent. For small reflective items like jewelry and watches, an enclosed diffusion tent wraps soft light around the product from all sides, virtually eliminating harsh reflections.
- Try side or back lighting. Moving your light source to the side or behind the product shifts reflections to the edges where they're less visible. This technique is especially effective for electronics product photography, where glossy screens and metal housings pick up every front-facing light source.
- Add a polarizing filter. A circular polarizer on your lens cuts reflected glare at the optical level, giving you cleaner files without extra post-production work. You can pick one up for as little as $30.
- Apply dulling spray. For extremely stubborn reflections on non-porous surfaces, a temporary matte dulling spray reduces shine during the shoot and wipes clean afterward.
Transparent products like glass bottles and clear containers benefit from backlighting, which illuminates the product from behind to highlight transparency and liquid color. Place a light behind a translucent white backdrop so the product glows without direct light hitting its front surface.
When reflections and shadows are under control, you'll spend far less time fixing problems in post-production. And that editing stage, where you turn raw captures into polished, platform-ready assets, is where catalog consistency truly comes together.
Post-Production Editing That Keeps Products Looking Accurate
A well-lit, sharp capture is only raw material. The editing stage is where individual photos become a cohesive, trustworthy catalog. Yet ecommerce product photo editing isn't about making products look better than they are. It's about making them look exactly as they are, consistently, across every SKU and every platform. Knowing how to edit product photos with a structured workflow prevents the two most expensive outcomes in online retail: customer returns from mismatched expectations and inconsistent listings that erode brand credibility.
Color Correction and White Balance Adjustment
Color inaccuracy is one of the fastest ways to lose buyer trust. When a customer orders a navy jacket that arrives looking closer to black, or a blush lipstick that reads more coral on screen, the return costs you shipping, restocking labor, and a potential negative review. Industry data suggests 22% of online returns stem from visual mismatch between what was shown and what arrived. Color correction directly addresses this.
Start with white balance. If you shot in RAW (and you should have), your editing software lets you adjust color temperature after the fact without quality loss. Look for a neutral reference point in the frame, like a gray card you placed in the shot, and set that as your white balance anchor. This single step eliminates the warm or cool color casts that creep in from mixed lighting environments.
From there, fine-tune these settings to match the product's real appearance:
- Temperature and tint - Correct any remaining color cast until whites look neutral and the product matches its physical counterpart.
- Exposure and brightness - Ensure the product isn't artificially darkened or blown out. Middle tones should read cleanly.
- Saturation and vibrance - Resist the temptation to boost. Match real-life saturation rather than enhancing for visual pop. Over-saturated images sell clicks but generate returns.
- Highlight and shadow recovery - Pull detail back into bright spots and lift shadow areas so no product features disappear into darkness.
For catalogs with multiple colorways of the same item, cross-variant alignment is critical. All angles within a single SKU should share identical tonal values, and different color variants should display accurate relative differences. When a shopper compares the "Forest Green" version next to "Sage" in your listing, those colors need to read as distinctly and accurately as they would on a shelf.
Background Removal and Cleanup Techniques
Most marketplaces require a pure white background for the primary ecommerce product image, which means you'll spend significant editing time isolating products from whatever backdrop you shot against. The approach depends on your volume and complexity.
Manual selection tools. For simple shapes with clean edges, the magnetic lasso or quick selection tool in Photoshop handles the job efficiently. This works well for boxy items like electronics, books, or packaged goods where edges are predictable and straight.
Pen tool paths. When you need pixel-perfect edges, especially on curved or complex products like shoes, jewelry, or textured fabrics, the pen tool creates precise clipping paths. It's slower, but the control is unmatched. Professional retouching services rely heavily on this technique for clean, natural-looking cutouts that hold up at any zoom level.
AI-assisted background removal. Automated tools have improved dramatically. Software like Adobe's "Remove Background" feature, standalone tools, and batch-processing platforms can isolate products in seconds rather than minutes. For high-volume catalogs, AI-driven segmentation handles the bulk of the work while human editors review and refine edge cases, especially around fine details like hair, translucent materials, or complex product outlines.
Once the product is isolated, clean up the surrounding area. Remove dust spots, stray fibers, and any artifacts from the shooting surface. Then place the product on your target background, whether that's pure white for Amazon or a branded color for your own store.
Batch editing for large catalogs. When you're processing hundreds or thousands of images, editing one file at a time isn't sustainable. Best practices for editing product photos at scale involve grouping images by lighting environment, product category, or shoot session, then applying base corrections across the entire batch before moving into individual refinements. This approach keeps consistency locked in early and prevents drift across large sets. Export presets further streamline the process by applying the same file format, resolution, compression, and color space settings to every output automatically.
Retouching Without Misrepresenting Products
Here's where learning how to make product pictures look professional in Photoshop meets ethical responsibility. The goal of retouching is presentation, not fabrication. You're removing distractions that the camera introduced, not altering the product itself.
Acceptable retouching includes:
- Removing dust, fingerprints, and minor surface blemishes that aren't part of the actual product
- Softening harsh shadows created by your lighting setup
- Cleaning up background imperfections and seams
- Correcting minor lens distortion that warps product shape
- Reducing reflections that obscure product details
Problematic retouching includes:
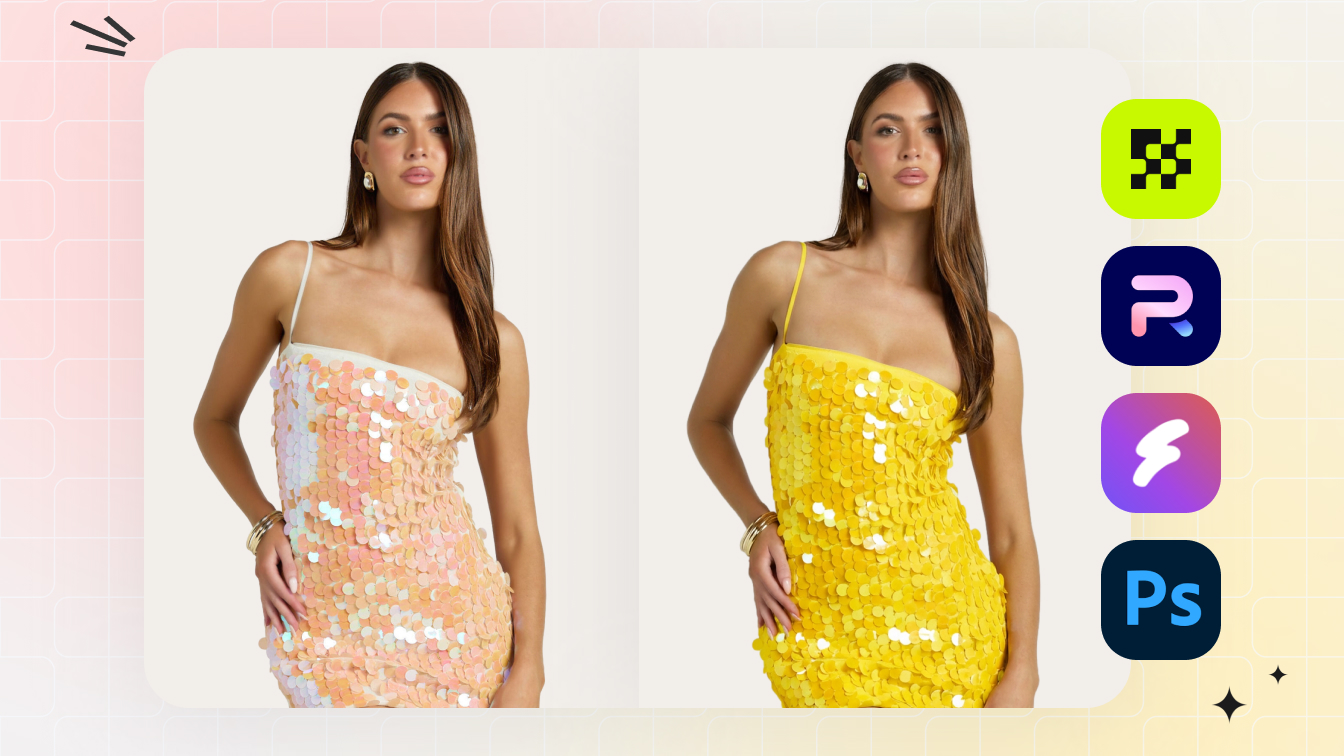
- Changing the product's actual color to something more visually appealing
- Removing visible stitching flaws, dents, or scratches that exist on the real product
- Altering proportions or shape beyond correcting lens distortion
- Smoothing textures to the point where material quality can't be assessed
The line is straightforward: if a customer received the product and noticed a difference from your image, you've crossed it. Professional e commerce product photo editing enhances clarity and removes photographic artifacts, it doesn't transform the product into something it isn't.
Here's the complete post-production workflow from import through final export, structured to maintain consistency across your entire catalog:
- Import and organize - Transfer RAW files into your editing software. Name files with SKU, variant, and angle identifiers so nothing gets mismatched downstream.
- Cull and select - Review all captures and flag the strongest frame for each angle. Remove out-of-focus shots, misfires, and frames with lighting errors before editing begins.
- Apply base corrections in batch - Group images by lighting setup or shoot session. Apply lens correction, exposure normalization, and white balance alignment across the group simultaneously.
- Isolate and remove background - Extract the product using pen tool paths, AI segmentation, or selection tools depending on complexity and volume. Place on target background.
- Retouch and refine - Remove dust, surface defects, and photographic artifacts. Soften or correct shadows. Preserve the product's authentic texture and shape throughout.
- Color correct and align variants - Match color across all angles of a single SKU. Align color variants side by side to confirm accurate relative differences between options.
- Crop, resize, and format - Apply consistent framing with standardized margins. Resize to platform-specific dimensions. Export in the correct file format and compression level for each destination channel.
Consistency across a full catalog comes from treating this workflow as a system, not a series of creative choices. When every image passes through the same pipeline with the same standards, your store page looks intentional and trustworthy. Shoppers may not consciously notice consistency, but they absolutely notice its absence.
With your images edited and export-ready, the final variable is making sure those files actually meet the technical requirements of wherever you're publishing them. Every platform enforces its own rules around dimensions, file size, format, and background standards, and a single failed upload can stall an entire product launch.
Platform Image Requirements and Web Optimization
You've shot your products, edited them to look accurate and consistent, and exported clean final files. But here's the frustrating reality: an image that looks perfect on your monitor can get rejected, suppressed, or degraded the moment you upload it to a marketplace that expects different specifications. Each platform enforces its own rules around dimensions, file formats, background color, and file size. Missing even one requirement can delay a product launch or bury your listing in search results.
This section gives you a quick-reference resource for the major selling platforms so you can format your ecommerce product images correctly the first time, without trial-and-error uploads.
Amazon Image Requirements and Best Practices
Amazon's image policies are among the strictest of any marketplace. The primary listing image (the one shoppers see in search results) must follow rigid rules:
- Background: Pure white only (RGB 255, 255, 255). No gradients, no lifestyle settings, no colored backdrops.
- Product fill: The product must occupy at least 85% of the image frame.
- Minimum dimensions: 1,000px on the longest side, which is enough to enable zoom. Amazon recommends 1,600px or larger on the longest side for the best zoom quality.
- File formats: JPEG, PNG, TIFF, or GIF (non-animated).
- Prohibited elements: No text, logos, watermarks, badges, or props in the main image.
Secondary images offer more flexibility. You can include lifestyle shots, infographics with feature callouts, scale comparisons, and detail close-ups. Amazon displays up to six images plus one video per listing, and top-performing listings typically use all available slots. Think of your image sequence as a visual sales pitch: the main ecommerce photo establishes the product clearly, while secondary images answer questions about size, features, materials, and real-world use.
Common mistakes that trigger suppression include low-resolution uploads, promotional text on the main image, excessive cropping, and placeholder graphics instead of actual product photography. If your listing suddenly loses visibility, check your images against these requirements first.
Shopify, Etsy, and eBay Specifications
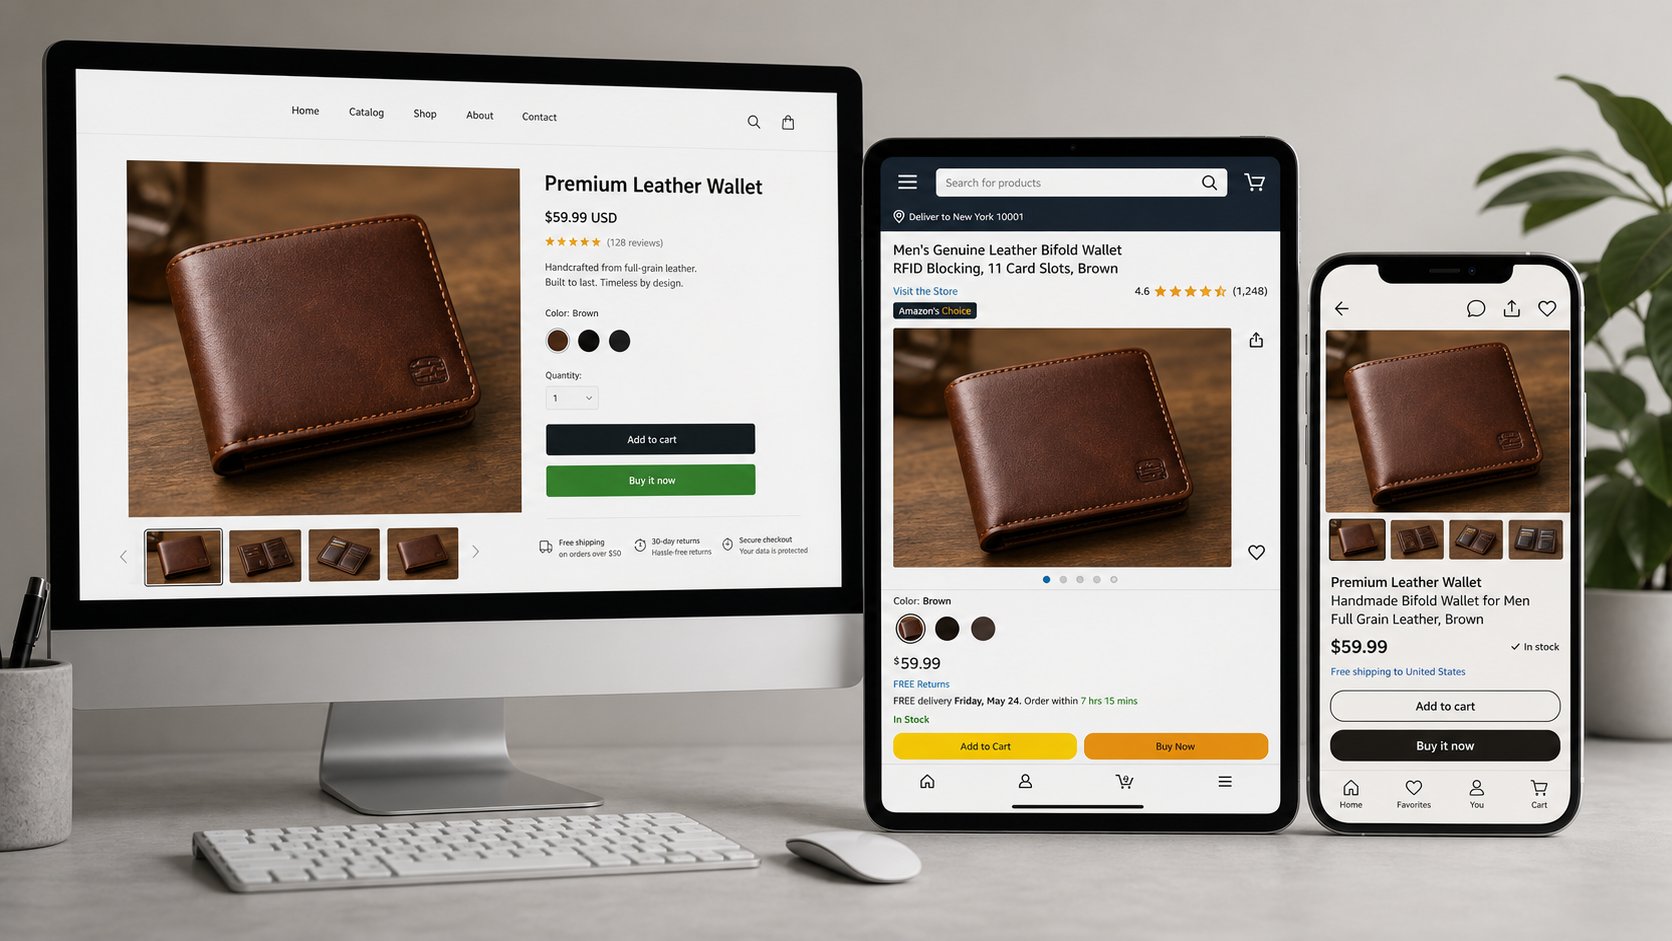
Shopify gives sellers the most creative freedom since you control your own storefront. That said, consistency still matters for page load speed and visual coherence across your catalog. Shopify recommends square images at 2048 x 2048 pixels for optimal display across all themes. JPEG and PNG are the preferred formats, and compressed files load faster without noticeable quality loss at web viewing sizes. Since Shopify stores function as your own ecommerce photography website, you set the visual standard rather than following marketplace mandates.
Etsy leans into visual storytelling. Listings support up to 10 images, and Etsy recommends a minimum of 2000px on the shortest side. The platform favors a 4:3 or 1:1 aspect ratio, and accepts JPEG, PNG, and GIF formats. Natural lighting and contextual imagery tend to perform well here because Etsy buyers expect handmade and artisanal aesthetics. Your ecommerce product photos should feel authentic rather than overly polished.
eBay requires a minimum of 500px on the longest side, but recommends 1,600px for optimal zoom performance. The primary image should use a white or light-colored background with the product occupying most of the frame. eBay accepts JPEG, PNG, and GIF files up to 12MB. Listings with high-quality images are measurably more likely to sell, making properly formatted product images a direct revenue lever for your ecommerce site.
Here's a consolidated comparison table you can bookmark for quick reference when preparing uploads:
| Platform | Minimum Dimensions | Recommended Dimensions | Background Rules | File Formats | Max File Size |
|---|---|---|---|---|---|
| Amazon | 1,000px (longest side) | 1,600px+ for best zoom quality | Pure white (RGB 255,255,255) required for main image | JPEG, PNG, TIFF, GIF | 10MB |
| Shopify | No strict minimum | 2,048 x 2,048px (square) | No requirement; consistency recommended | JPEG, PNG | 20MB |
| Etsy | No strict minimum (2,000px shortest side recommended) | 2,000px+ at 4:3 or 1:1 | No strict rule; clean, uncluttered preferred | JPEG, PNG, GIF | ~20MB |
| eBay | 500px (longest side) | 1,600px+ for zoom | White or light solid color for main image | JPEG, PNG, GIF | 12MB |
| Walmart | 1,000 x 1,000px | 2,000px+ recommended | Pure white required for main image | JPEG, PNG | ~5MB |
A practical approach: shoot and edit at the highest resolution your workflow supports, then export platform-specific versions from that master file. This way, a single edited ecommerce image can serve Amazon, your Shopify store, and social channels without re-editing from scratch each time.
Image SEO and Web Performance Optimization
Getting your product images for ecommerce website pages to rank in Google Images and load quickly for shoppers involves a different set of decisions than platform compliance. Here, you're balancing visual quality against page speed, and pairing files with metadata that search engines can read.
File format selection. Each format serves a different purpose:
- JPEG - Best for standard product images for ecommerce with complex color gradients and photographic detail. Offers the smallest file sizes at acceptable quality. Use for the majority of your catalog images.
- PNG - Supports transparency (useful for product cutouts overlaid on custom backgrounds) and lossless compression. Files are significantly larger than JPEG, so use selectively where transparency is needed.
- WebP - Google's format delivers 25-35% smaller files than JPEG at equivalent visual quality. Supported by all modern browsers. If your platform supports WebP, it's the strongest choice for web performance without sacrificing image clarity.
Compression strategy. The goal is finding the lowest file size that still looks sharp at your display dimensions. For most product photography, JPEG compression between 70-85% quality produces files that look clean to the human eye while loading significantly faster than uncompressed exports. WebP at quality 75-80 typically matches JPEG at 85 with a smaller footprint. Run your hero images through a visual comparison at different compression levels before committing to a blanket setting.
Alt text best practices. Every ecommerce image on your site needs descriptive alt text that tells search engines (and screen readers) what the image shows. Write alt text that's specific and includes natural product descriptors:
- Weak: "product photo"
- Better: "black leather crossbody bag with gold hardware, front view on white background"
Include your product name, key attributes (color, material, size), and the shot type. Avoid keyword stuffing. Alt text that reads like a spam list hurts accessibility and can trigger search penalties.
File naming. Rename files with descriptive, hyphenated names before uploading. A file named black-leather-crossbody-bag-front.jpg signals relevance to search crawlers far more effectively than IMG_4392.jpg. This small habit compounds across hundreds of product pages.
Lazy loading and responsive images. If you manage your own storefront, implement lazy loading so images below the fold only load when a visitor scrolls to them. Serve different image sizes based on viewport width using srcset attributes. A shopper on a phone doesn't need a 2048px file intended for desktop zoom. These performance optimizations improve Core Web Vitals scores, which Google uses as a ranking signal.
Image optimization sits at the intersection of SEO and conversion. Faster pages keep shoppers engaged longer, and properly tagged images bring free traffic through Google Image search. When your product images for ecommerce site pages are both technically compliant and performance-optimized, you're capturing value at every stage of the funnel, from discovery through purchase.
Even with perfect platform specs and optimized files, though, your images still need to look right. The most common quality problems, color inaccuracy, inconsistent lighting, and soft focus, often survive the editing stage unnoticed until customers start leaving reviews that mention the disconnect.
Common Product Photography Mistakes and How to Fix Them
You've invested in decent equipment, set up your lighting, and edited your files. Yet something still feels off when you view your product listings alongside competitors. The images look inconsistent, slightly blurry, or just not quite trustworthy. Most quality issues in product photography don't come from bad gear. They come from a handful of repeatable mistakes that are surprisingly easy to fix once you know what to look for.
If you're figuring out how to take pictures for ecommerce and your results aren't matching your expectations, chances are one of the following problems is the culprit.
Color Inaccuracy and White Balance Issues
Color mismatch is the single most return-generating visual problem in online retail. When the product on screen reads differently than the product in hand, customers feel misled, even when the seller had no intention to deceive. Research from Invesp indicates that at least 30% of products ordered online are returned, and color discrepancy ranks among the top reasons cited in post-return surveys.
The root cause is almost always incorrect white balance. Your camera's auto white balance shifts between frames depending on ambient light conditions, giving the same product a warm orange cast in one shot and a cool blue tint in the next. Under mixed lighting sources, like a window combined with an overhead fluorescent, the problem compounds.
How to fix it:
- Set white balance manually. Use a gray card at the start of every shoot session. Hold it in the same lighting as your product, take a reference shot, and set your custom white balance from that frame. Every image in the session will now share the same neutral baseline.
- Calibrate your monitor. An uncalibrated display can show colors inaccurately even when your files are correct. A hardware calibration device ensures what you see during editing matches what customers see on their screens.
- Edit in sRGB. This is the standard color space for web display. If you edit in a wider gamut like Adobe RGB and forget to convert on export, colors can shift unpredictably across different browsers and devices.
- Proof on mobile. Most online shopping happens on phones. After editing, check your images on a mobile screen under normal room lighting. If the color reads differently than on your calibrated desktop monitor, adjust until both views align.
A practical validation step: place all images for one SKU side by side and compare background neutrality and surface finish. If the background shifts from warm to cool across angles, your white balance drifted between shots.
Inconsistent Lighting and Composition Across Listings
Open a product category page on any store. When lighting intensity, shadow direction, and product positioning jump around from listing to listing, the entire page feels disjointed. That inconsistency signals carelessness to shoppers, even if each individual image looks acceptable in isolation.
Visual consistency builds brand trust the same way a clean, well-organized physical store does. You notice it when it's absent, not when it's present. When learning how to photograph products for website listings, consistency deserves as much attention as image quality itself.
Common consistency failures include:
- Different shadow directions because the light source moved between sessions
- Products at varying scales within the same category, making a small item look the same size as a large one
- Mismatched background tones caused by shooting on different days with different ambient light
- Framing that shifts between centered, left-weighted, and top-heavy across SKUs
The fix is systematic rather than creative. Create a repeatable setup you can return to for every product in a category:
- Mark your light positions. Use tape on the floor or table to mark exactly where your lights, reflectors, and diffusers sit. When you return for the next batch, recreate the same geometry.
- Lock camera position. Leave your tripod in the same spot and at the same height for all products in a category. Note the angle and focal length so you can replicate it weeks later.
- Use category templates. Define framing rules per product type: how much margin around the product, where the baseline sits, and what aspect ratio to crop to. Apply these rules uniformly.
- Batch by lighting environment. Shoot all products that share a category or lighting setup in the same session rather than mixing categories throughout the day.
This template-based approach is how professional studios maintain visual coherence across catalogs with hundreds or thousands of SKUs. It takes a few extra minutes of setup documentation upfront but saves hours of corrective editing later.
Focus and Sharpness Problems
Soft images destroy perceived product quality. When texture, stitching, and fine details look smeared instead of crisp, shoppers subconsciously downgrade the product's value. As one practical benchmark: zoom to 100% on stitching, edges, or typography in your image. If detail smears, reshoot or reprocess.
Three causes account for nearly all sharpness problems in product photography:
Camera shake. Even slight hand movement during exposure produces a subtle blur that's invisible on a small preview but obvious at full resolution. The fix is a tripod, always. If you're hand-holding at shutter speeds below 1/125s, you're gambling with sharpness on every frame.
Incorrect aperture selection. Shooting wide open (f/2.8 or lower) gives you a paper-thin depth of field where only a sliver of the product is sharp. For most product photography, apertures between f/8 and f/11 keep the entire item in focus. Go too narrow (f/22+), and diffraction softens the image again. Stay in the sweet spot.
Autofocus errors. Your camera's autofocus system might lock onto the wrong plane, especially with reflective or low-contrast products. If your images are consistently sharp but on the wrong part of the product, switch to manual focus or use single-point autofocus targeted at the most important product detail.
Here's a scannable reference of the most common product photography mistakes with their solutions, covering how to take better product photos without starting over from scratch:
- Color shifts between images - Set manual white balance using a gray card; edit in sRGB; proof on mobile before publishing.
- Inconsistent backgrounds - Shoot all products in the same session when possible; use tape marks to replicate setups; apply identical background processing in editing.
- Soft or blurry focus - Use a tripod; shoot between f/8 and f/11; switch to manual focus for tricky subjects.
- Harsh shadows or hot spots - Diffuse your light source; move lights to 45-degree angles; add a fill card on the shadow side.
- Over-retouching - Compare edited files against the raw frame; if natural texture disappears, you've gone too far.
- Inconsistent product scale - Create size templates per category; verify related SKUs side by side before uploading.
- Poor thumbnail legibility - Shrink your hero image to 100px. If the product outline doesn't pop instantly, reframe the shot tighter.
- Noise and compression artifacts - Keep ISO at 100-200; export at quality settings that avoid banding; avoid heavy upscaling of small files.
The underlying product picture tips here are simple: document your setup, control your variables, and validate your output at full resolution before uploading. Knowing how to take a good product photo isn't about talent. It's about eliminating the variables that introduce error.
Most of these fixes cost nothing beyond awareness and discipline. But if you keep running into the same problems despite troubleshooting, it might be time to evaluate whether your current production approach, whether that's DIY, outsourced, or somewhere in between, actually matches your catalog's demands and your business goals.
DIY vs Professional vs AI-Powered Product Photography
Fixing individual image problems is one thing. Choosing the right production method for your entire catalog is a fundamentally different decision, one that affects your budget, timeline, and visual quality ceiling for every product you sell. The question isn't simply "what looks best." It's which approach matches your catalog size, product complexity, and growth stage without bleeding resources you can't afford to lose.
Three paths exist: shooting it yourself, hiring ecommerce photographers or a studio, and using AI-powered platforms that generate professional visuals from a single source photo. Each has a clear sweet spot, and the smartest sellers often combine more than one.
When DIY Photography Makes Sense
DIY works when the math favors your time over your money. If you're running a small catalog of under 20 to 30 simple products, your upfront equipment cost stays low (roughly $60 to $140 all-in for a basic lighting, backdrop, and tripod setup), and per-image costs drop to $1 to $5 once you've absorbed that initial investment. You're also building a skill that improves with every shoot.
DIY is practical when:
- Your products are visually simple: flat surfaces, matte finishes, predictable shapes.
- Your budget can't justify outsourcing, and you have time to invest in learning.
- You need content quickly for social media, seasonal updates, or test listings.
- You enjoy the creative process and want full control over your brand's visual direction.
The hidden cost is time. As an illustrative estimate, shooting and editing a 50-product catalog can take 15 to 20 hours once you account for setup, capture, culling, and post-production. If you're also the founder handling sales, fulfillment, and marketing, those hours come at a steep opportunity cost. Scaling beyond 20 SKUs is where DIY starts to strain, because consistency degrades as sessions stretch across different days, lighting conditions, and energy levels.
Hiring Professional Studios and Photographers
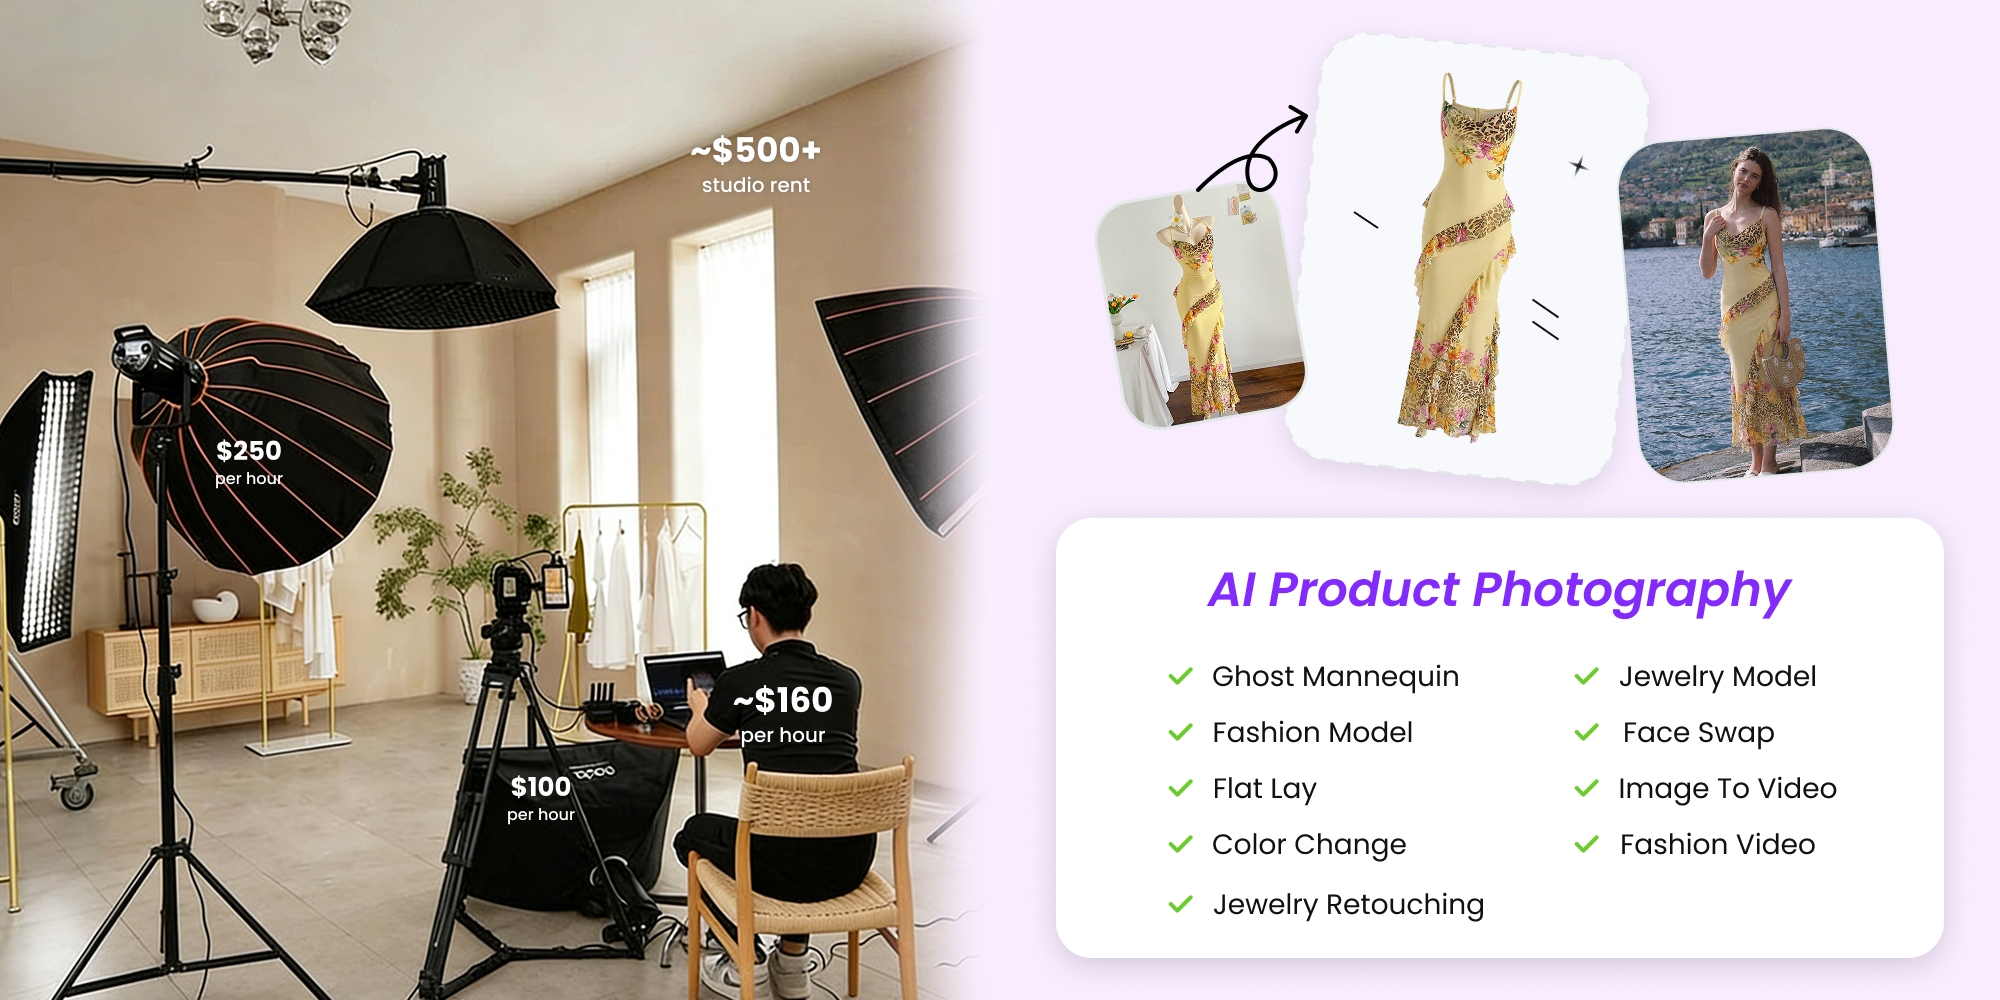
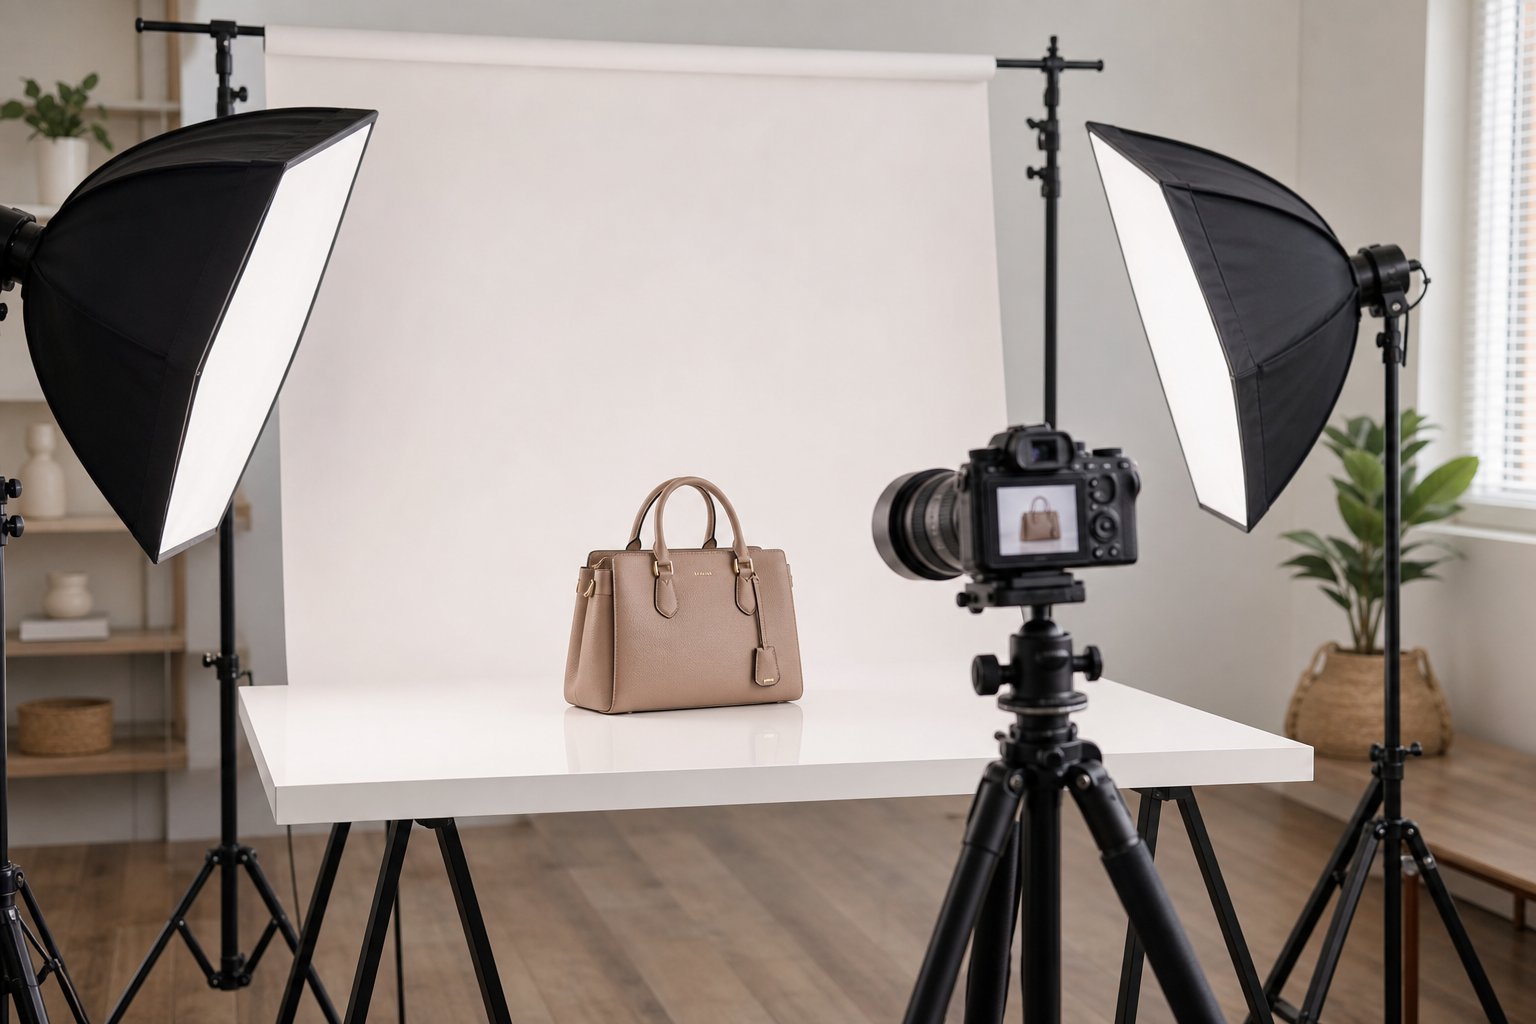
Professional ecommerce photography delivers the highest quality ceiling. A dedicated ecommerce product photography studio brings controlled lighting, expert composition, professional retouching workflows, and the ability to handle challenging products like reflective surfaces, transparent materials, and complex textile draping.
Studio pricing typically runs $25 to $50 per image for basic white-background shots and $100 to $500 for lifestyle or on-model photography. A 50-product catalog needing four angles each can easily reach $5,000 to $10,000 for basic shots alone. Add lifestyle imagery or model work, and costs climb past $15,000.
Hiring a photographer ecommerce specialist makes sense when:
- You sell premium or luxury products where image quality directly signals product value.
- Your products involve complex textures, reflections, or transparency that DIY setups struggle with.
- You're launching a brand and need flagship imagery that establishes market positioning.
- Catalog volume is high enough to justify day-rate bookings where per-image cost drops.
The trade-offs are real. Scheduling takes time, turnaround runs days to weeks, and frequent catalog updates mean rebooking sessions. For sellers searching for "ecommerce product photography services near me" or "e-commerce photography near me", local availability and pricing vary widely by market, and geographic convenience doesn't guarantee quality fit for your product category.
AI-Powered Photography Solutions
AI tools have fundamentally shifted the economics of commercial ecommerce photography. Where studios charge $25 to $500 per image, AI platforms deliver results for well under a dollar per image — Snappyit's plans, for example, work out to $0.49 to $0.72 per image — a cost reduction of over 97 percent. The AI image editing tools market was valued at $5.12 billion in 2024 and is projected to reach $39.7 billion by 2030, reflecting how rapidly sellers are adopting these platforms for production use.
The concept is straightforward. You provide one clean source photo of your product, and the AI generates multiple professional scenes around it: white backgrounds for marketplace compliance, lifestyle contexts, on-model presentations, and styled compositions. What used to require a studio booking, a model hire, and a week of turnaround now happens in minutes.
Platforms like Snappyit enable ecommerce sellers and small online brands to generate studio-quality product images without traditional photo shoots, making professional visuals accessible regardless of budget or technical skill. This matters particularly for growing brands that need virtual product photography across multiple listing styles but can't justify the cost of repeated studio sessions for every new SKU or seasonal refresh.
AI-powered photography works especially well when:
- You need multiple scene variations per product (lifestyle, on-model, seasonal) without separate shoots.
- Your catalog updates frequently and studio turnaround times create bottlenecks.
- Budget constraints make $25+ per image unsustainable across hundreds of SKUs.
- You want consistent visual quality locked across your entire catalog without manual retouching drift.
The caveat: AI tools still need a decent source image. You're not eliminating photography entirely. You're eliminating the expensive, time-consuming production layer that surrounds it. One well-lit photo becomes multiple marketplace-ready variations.
Here's how the three approaches compare across the factors that matter most for your decision:
| Factor | AI-Powered Platforms | DIY Photography | Professional Studio |
|---|---|---|---|
| Cost per image | $0.49 - $0.72 | $1 - $5 (after setup) | $25 - $500+ |
| Quality level | High (consistent, marketplace-ready) | Variable (skill-dependent) | Highest (expert execution) |
| Speed | Minutes per image | 15 - 30 min per product | Days to weeks turnaround |
| Scalability | Excellent (hundreds of SKUs with consistent output) | Limited (time becomes bottleneck past 20-30 products) | Moderate (requires rebooking for updates) |
| Best suited for | Growing brands, frequent catalog updates, multi-scene needs, budget-conscious sellers at any volume | Small catalogs, simple products, social content, sellers building skills | Premium brands, complex products, brand launches, luxury positioning |
For many sellers, the answer isn't choosing one path exclusively. A hybrid approach often delivers the best return: DIY for quick social content, AI platforms for scalable catalog imagery and scene variations, and professional studio sessions reserved for flagship products or complex items that demand hands-on expertise. The key is matching each product's importance and complexity to the production method that delivers appropriate quality at sustainable cost.
Whichever path you choose, the decision shouldn't be static. Your photography approach should evolve alongside your catalog size, revenue, and brand ambitions, which is exactly what a solid implementation plan accounts for from day one.
Your Action Plan for Better Product Visuals Starting Now
Knowing what great e commerce product photography looks like and actually producing it are separated by one thing: a clear plan that connects your current resources to your immediate next steps. You don't need to overhaul everything at once. You need a sequence of decisions that moves you from where you are today to measurably better product visuals this week.
Building Your Product Photography Workflow
Every successful product photography workflow comes down to four decisions made in sequence. Get these right, and everything else follows logically.
1. Choose your production method. Based on your catalog size, product complexity, and budget, decide whether you're shooting DIY, using an AI platform, or booking a professional. Most sellers under 50 SKUs start with DIY or AI-generated imagery. If you're above 100 SKUs with frequent updates, AI platforms deliver the consistency and speed that manual shooting can't sustain.
2. Define your shot list by product category. Don't shoot randomly. Before you pick up a camera or upload a source photo, decide which image types each product needs. A simple rule: every listing gets a clean white-background hero, at least one additional angle, and one lifestyle or context shot. Products with size ambiguity need a scale reference. Products with texture or material detail need a macro close-up.
3. Lock in your editing pipeline. Whether you're batch-processing in Lightroom, running files through AI background removal, or outsourcing retouching, define the steps once and apply them uniformly. Consistency comes from process, not from individual creative judgment on each file.
4. Match output to platform specs. Before exporting a single final image, confirm the dimension, format, and background requirements for every channel where you sell. Export master files at maximum resolution, then create platform-specific derivatives. One shoot, multiple outputs, zero re-work.
This four-step framework works whether your budget is $50 or $5,000. The equipment changes, the production method changes, but the decision sequence stays the same. A seller using a smartphone and a $40 lightbox follows the same logic as a brand booking a full studio day. The difference is scale, not structure.
Scaling Your Visual Content Strategy
Product photography for online store success isn't a one-time project. It's an evolving capability that should grow alongside your business. The images that worked when you had 10 products won't serve you at 200. The manual workflow that felt manageable at launch becomes a bottleneck when you're adding new SKUs weekly or refreshing seasonal listings across multiple channels.
Think of your visual content strategy in phases:
- Phase 1: Foundation. Basic equipment, simple white-background shots, manual editing. You're learning the craft and building a visual baseline for your store. This is where most sellers start, and it's perfectly adequate for early traction.
- Phase 2: Systematization. Repeatable setups, batch processing, documented lighting positions, and category-specific shot templates. Your output becomes consistent without requiring creative decisions on every frame.
- Phase 3: Scaling. AI-assisted production or professional partnerships handle volume while you focus on strategy. Platforms like Snappyit bridge this gap for growing brands that need professional imagery at scale without committing to full studio infrastructure. One source photo becomes multiple marketplace-ready variations, lifestyle scenes, and seasonal refreshes, all produced in minutes rather than days.
The sellers who grow fastest visually are the ones who treat each phase as a stepping stone rather than a permanent state. Starting with a phone and a foam board reflector isn't settling. It's building the visual judgment and workflow discipline that makes every future upgrade more effective.
Product photography is not a one-time task you check off a launch list. It is a conversion optimization lever you refine continuously, and every incremental improvement in visual quality compounds into measurable revenue gains over time.
Your online storefront photography shapes first impressions, drives click-through rates, reduces returns, and builds the trust that turns one-time buyers into repeat customers. Whether you're shooting your first product today or scaling a catalog of thousands with AI-assisted workflows, the principles covered in this guide give you the framework to produce visuals that stop the scroll instead of blending into it. Pick one improvement from this guide, implement it on your next five listings, and measure the difference. That's how better e-commerce product photography starts: not with a massive overhaul, but with a single deliberate step forward.
Ready to upgrade your listings without a studio? Turn one clean source photo into marketplace-ready product images in minutes. Try Snappyit free →
Frequently Asked Questions About Product Photography for Ecommerce
What camera settings should I use for ecommerce product photography?
For most product categories, shoot between f/8 and f/11 aperture for full sharpness, keep ISO at 100-200 to minimize noise, and use a shutter speed around 1/125s with a tripod. Set white balance manually to 5500K (daylight) or use a gray card for precision. Jewelry benefits from narrower apertures (f/11-f/16) for deeper depth of field, while food photography works better at wider apertures (f/2.8-f/5.6) for selective focus. Always shoot in RAW format for maximum editing flexibility in post-production.
How many product images do I need per listing to maximize conversions?
High-converting listings typically use at least 3-4 image types per product: a clean white-background hero shot for marketplace compliance, a lifestyle or contextual image showing the product in use, a detail or macro close-up highlighting material quality, and an angle or scale shot communicating real-world dimensions. Platforms like Amazon display up to 6 images plus 1 video per listing, and top sellers use all available slots. The specific mix depends on your product category, but covering multiple visual angles addresses the different buyer questions that drive purchase confidence.
What are the image size requirements for Amazon, Shopify, and Etsy?
Amazon requires a minimum of 1,000px on the longest side, which is enough to enable zoom, and recommends 1,600px or larger for the best zoom quality, with a mandatory pure white (RGB 255,255,255) background for the main image. Shopify recommends square images at 2,048 x 2,048px with no strict background requirement. Etsy recommends a minimum of 2,000px on the shortest side in 4:3 or 1:1 aspect ratio, accepting JPEG, PNG, and GIF formats. eBay requires at least 500px but recommends 1,600px for zoom functionality. The best practice is to shoot and edit at maximum resolution, then export platform-specific versions from that master file.
Is AI product photography good enough for professional ecommerce listings?
AI-powered photography platforms now produce marketplace-ready results at a fraction of traditional costs, typically $0.49-$0.72 per image compared to $25-$500 for studio photography. These tools take a single clean source photo and generate multiple professional scenes including white backgrounds, lifestyle contexts, and styled compositions. Platforms like Snappyit enable sellers to create studio-quality visuals without traditional photo shoots. AI works especially well for growing brands needing multiple scene variations per product, frequent catalog updates, and consistent quality across hundreds of SKUs. The key requirement is starting with one well-lit source image.
How can I reduce product returns caused by inaccurate product photos?
Color inaccuracy is the leading visual cause of returns, with research showing 22% of online returns stem from visual mismatch between listing images and actual products. To reduce this, set white balance manually using a gray card at every shoot session, calibrate your monitor with a hardware device, edit and export in sRGB color space (the web standard), and proof final images on a mobile screen under normal lighting. Avoid over-saturating colors for visual pop, as this sells clicks but generates returns. Compare all images for one SKU side by side to ensure consistent color representation across angles.
Great listings start with great images — and they're easier to produce than ever inside Snappyit's wider AI product photography workflow.