Why Removing Product Backgrounds Is Essential for Online Sellers
Picture a buyer thumb-flicking through a category page stacked with near-identical products. Two listings sit side by side: one shows the item floating clean against crisp white, the other shows it parked on a cluttered kitchen counter. The buyer's eye lands on the clean one before their brain even finishes processing the page. That reflex fires millions of times a day across marketplaces, and it quietly decides which of your listings earns a tap and which gets passed over.
The backdrop behind your product isn't decoration — it's a credibility cue. A study by Szulc and Musielak (2022) reported that 68% of shoppers gravitate toward products shot in clean, uncluttered settings, and that noisy backgrounds actively dampen the urge to buy. Stripping the background and dropping in a plain, consistent one removes everything that competes with the item itself for the buyer's limited attention.

Why Product Backgrounds Make or Break Ecommerce Sales
The data is hard to argue with. The Salsify 2025 Consumer Research Report found that 77% of shoppers rate high-quality imagery as important to what they decide to buy. On eBay, listings with sharper photos sell roughly 4.5% more often, and handbags specifically jump about 25%. Scaled across a store running 500 active listings, that edge converts into dozens of extra orders a month — purely because the photos read as professional rather than amateur.
Marketplaces back this up with policy, not just preference. Amazon insists on a pure white background at RGB 255, 255, 255 for every main image, and listings that ignore the rule simply vanish from search. Shopify merchants lean on uniform product shots to keep a catalog looking cohesive across themes. Etsy hands sellers more room to be creative, yet even there a tidy frame out-clicks a busy one.
Online, a shopper can't pick your product up and turn it over. The listing photo is the nearest thing to holding it, and how good that photo looks directly steers how much they trust you and how much they'll pay.
Skip this and the cost shows up in your numbers: suppressed listings on Amazon, lower search rank on eBay, fatter bounce rates on a standalone Shopify storefront. In the resale world especially, image quality has shifted from a creative nicety into what operators now treat as a core part of running the business.
What This Guide Covers for Sellers at Every Level
This pillar takes you end to end through producing listing-ready images, whether you shoot handmade goods on a phone for Etsy or run hundreds of SKUs as a full-time photographer. You'll see how AI removal actually segments a photo, what each major platform demands for specs and compliance, how to set up a shot so automated tools succeed, and which removal approach matches your monthly volume and budget. We then cover export formats, the most common cutout problems and their fixes, and the finishing edits that turn a bare transparent cutout into a polished listing image. The aim is a single repeatable routine you can run on every product, starting with your next one.
How AI Background Removal Technology Actually Works
Drag a photo in, hit a button, and the background is gone in seconds — but what fills the gap between that click and the transparent PNG that lands in your downloads folder? Knowing the mechanics pays off three ways: you'll shoot images the software handles more easily, spot why a cutout failed faster, and pick the right tool for your trickiest products.
Under the hood, every AI background removal tool is answering the same question for each pixel: foreground subject, or background? It arrives at the answer by combining two methods — edge detection and semantic segmentation — that cover each other's blind spots.
Edge Detection and Semantic Segmentation Explained Simply
Edge detection hunts for the spots where pixel values flip abruptly — the seam where your product stops and the surround begins. The algorithm watches for sharp jumps in color, brightness, or texture. A dark leather wallet on a pale tabletop draws a crisp, easy line. A beige candle on a cream cloth barely registers a boundary at all.
Semantic segmentation works on a different level. Instead of merely chasing borders, it labels every pixel as either subject or background. Neural networks trained on millions of photos have learned what objects look like as whole concepts, so when a sneaker comes through, the model doesn't just trail a color edge — it knows "shoe," and assigns those pixels to the foreground even where a white sole melts into a white surface.
The Cloudflare engineering team frames the difference neatly: salient-object detection produces a soft mask in which each pixel gets a value from 0 (fully transparent) to 255 (fully opaque), scaled by how confidently it reads as foreground. That per-pixel grading is exactly what lets today's tools cope with feathered edges, soft shadows, and gradual fades far better than the old color-key methods that bluntly deleted anything matching a target hue.
Why should a seller care? Because once you grasp that the model is chasing contrast and recognizable shapes, you can light and stage your products to hand it precisely that. That single insight often separates a one-click clean cut from twenty minutes of fiddling with messy edges by hand.
Why Certain Products Challenge AI Algorithms
These models learn from datasets of thousands of hand-labeled images. Cloudflare benchmarked their segmentation against sets like DIS5K, which packs in a huge spread of objects and scene complexity. Their results echo what sellers run into daily: the busier the image, the more compute it eats and the lower the accuracy it returns.
Some traits make the algorithm's life easy; others sow the ambiguity that swallows detail or mistraces an edge. Here's roughly where the line falls:
- Strong product-to-background contrast: a dark item on a light surface hands the AI an obvious outline to follow, which yields the cleanest automatic results.
- Solid, opaque materials: matte plastic, wood, or dense fabric give any tool a firm, unambiguous boundary to work with.
- Simple silhouettes: a mug or a phone case, with smooth continuous outlines, is far kinder than a jagged, complex shape.
- Reflective and glossy surfaces: chrome, mirrors, and polished metal bounce the room back at the lens, blurring where the product ends and its surroundings begin.
- Translucent or transparent materials: glass bottles, sheer fabrics, and gemstones let the backdrop bleed through, so no clean keep-or-cut line exists to draw.
- Fine, intricate detail: chain links, lace, bicycle spokes, and weaves are riddled with tiny gaps holding background between foreground threads, which weaker models fill in wrongly.
- Product color matching the backdrop: white-on-white kills the contrast edge detection relies on, forcing the model to lean entirely on shape recognition.
Cloudflare's tests dramatized that last case: faced with a gray T-shirt on dark flooring, several models flagged only the printed logo as the subject and dropped the rest of the shirt. Only their top-tier model (BiRefNet) reconstructed the full garment, by checking fine cues against the wider structure of the frame.
AI vs Manual Selection Under the Hood
The old manual route in software like Photoshop puts a human in the loop at every step. The pen tool has you plant anchor points along the edge to build a precise vector path. The magic wand grabs touching regions of similar color. Select and Mask pairs automatic edge-finding with refinement brushes you steer. Cutting a transparent background by hand in Adobe means you are the judgment deciding which pixels survive.
That hands-on control covers every edge case a machine fumbles — wispy hair, filigree metal, stacked transparent layers — but it bleeds time. Seasoned retouchers report 7 to 12 minutes on a standard product image with manual paths, and 30 to 45 minutes on something fiddly like fine jewelry or lace-trimmed clothing.
AI inverts that math. A neural network chews through a typical product shot in 2 to 5 seconds and stays just as consistent on image 500 as on image 1. Browser-based removers all draw on the same segmentation tech to spare you the path work entirely. You trade away some edge-case control, but for the bulk of ordinary product photography the quality gap has shrunk to where most buyers couldn't pick the AI cut from a hand-traced one.
The takeaway is a division of labor: AI owns volume and consistency, manual tools own exceptions and creative work. The sharpest sellers run everything through AI first, then touch up only the slim minority that genuinely needs a human eye. Knowing in advance which of your products land in the "hard" bucket lets you plan that hybrid pass before you even open a tool. None of this matters, though, if the export misses the spec a marketplace enforces — a flawless cutout saved against the wrong rules still gets buried.
Background Requirements for Amazon, Etsy, Shopify and eBay
Every marketplace polices its own image rules, and a shot that sails through on Etsy can get an Amazon listing yanked out of search. Learning the exact numbers before you export spares you rejected uploads, redone work, and the dead days a listing spends invisible while you scramble to fix it.

Amazon's Pure White Background Mandate
Amazon runs the tightest ship on imagery. Each main listing photo has to sit on a pure white background measuring exactly RGB 255, 255, 255 — not off-white, not pale gray, not cream. For the hero image that shoppers meet in search, dead-white with zero color drift is the only acceptable option.
Color aside, Amazon wants at least 1000 pixels on the longest side to switch on zoom, with 2000 x 2000 recommended for the best experience, and the product itself filling no less than 85% of the frame. No text, logos, watermarks, borders, or props that don't ship with the item. JPEG is preferred, though TIFF, PNG, and non-animated GIF pass too, and the ceiling is 10,000 pixels on the longest side.
Miss the mark and the penalty is swift and silent: Amazon suppresses the listing from search until you supply a compliant main image. No flag, no email — just a quiet exit from results, which means no views and no orders. Across a few hundred ASINs, one stray non-compliant image can bleed revenue without you ever noticing the cause.
Etsy, Shopify and eBay Image Standards
Etsy heads the other direction. It actively rewards a styled look, so lifestyle and props aren't just tolerated, they're encouraged. Even so, images need to clear 2000 pixels wide, and Etsy crops thumbnails to a 4:3 landscape ratio in search — upload a tall portrait and it lops off the top and bottom, sometimes clipping the product. It takes JPG, GIF, and PNG up to 10 MB each.
Shopify plays by different logic because it's a storefront, not a marketplace, so there's no single background mandate. What matters here is internal consistency: when every product rides the same plain backdrop, the whole catalog looks deliberate and trustworthy. Most themes render images at a 1:1 square, the platform accepts JPEG, PNG, WebP, and GIF up to 20 MB, and 2048 x 2048 is the sweet spot for sharpness across screens.
eBay asks for a 500-pixel minimum on the longest side but advises 1600 for a clean display. Like Amazon, it bans text overlays, borders, and watermarks on product shots. eBay won't force pure white, yet listings with clean, distraction-free frames reliably win better placement and stronger engagement. Square (1:1) or landscape (4:3) tend to look most polished across its interface.
Platform-Specific Export Checklists
A side-by-side reference takes the guesswork out of the export step. Here's how the four big platforms line up:
| Platform | Minimum Dimensions | Recommended Dimensions | Aspect Ratio | File Formats | Max File Size | Background Rule |
|---|---|---|---|---|---|---|
| Amazon | 1000 x 1000 px | 2000 x 2000 px | 1:1 (Square) | JPEG (preferred), TIFF, PNG, GIF | 10,000 px longest side | Pure white (RGB 255,255,255) required for main image |
| Etsy | 2000 px wide | 2700 x 2025 px | 4:3 (Landscape) | JPG, PNG, GIF | 10 MB | Flexible; lifestyle and styled backgrounds allowed |
| Shopify | No strict minimum | 2048 x 2048 px | 1:1 (Square, theme-dependent) | JPEG, PNG, WebP, GIF | 20 MB | No mandate; consistency across catalog recommended |
| eBay | 500 px longest side | 1600 x 1600 px | 1:1 or 4:3 | JPEG, PNG, GIF | 12 MB | White or plain color background strongly recommended |
One pattern jumps out: every platform pays off clean, high-res imagery, but the exact bar for compliance swings widely. A white-background shot that satisfies Amazon's strict rule clears everyone else too, which makes it the safest default for selling across channels. Nail Amazon's spec first and adapting for Etsy or eBay is a quick crop or ratio tweak rather than a full reshoot.
Hitting these specs is only half the job, though. The quality of your removal hinges heavily on what happens before you ever open an editor — how you light, frame, and shoot the original decides whether the AI hands back a clean cut in seconds or leaves you nudging edges for minutes.
Preparing Product Photos Before Background Removal
Ten minutes of deliberate setup before you press the shutter can spare you an hour of cleanup afterward. Every working product photographer knows it, yet most sellers dive straight into shooting without weighing how those choices ripple into the removal step downstream — and pay for it in smeary edges, light spill, and software that can't cleanly tell product from backdrop.
The reassuring part: no pricey studio required. Whether you're a phone-only Etsy seller working off a kitchen table or a pro running a full product-photography rig, the same rules hold. Give both the camera and the software clear separation between subject and background, and everything after gets faster and cleaner.
Lighting and Contrast Tips for Cleaner Cutouts
Light does more than anything else to determine how cleanly a tool isolates your product. Soft, diffuse illumination spreads evenly across the item without the harsh shadows that confuse edge detection. Here's how to get there on any budget:
Lean on window light. Bright, indirect daylight through a window throws soft, even light for free. Set the product beside the window and prop a white bounce card on the far side to lift the shadows. It's an ideal setup for small goods like jewelry, cosmetics, and accessories.
Skip overhead-only lighting. A lone overhead bulb casts strong downward shadows that fuse with the product's base, blurring where the item stops and the surface starts. Side or 45-degree light carves more natural contrast along the edges.
Push the product away from the backdrop. Retouchers suggest 3 to 5 feet of gap between item and background. That distance cuts light wrap — the glow a bright backdrop throws forward, curling around the product's edges into halos that even capable tools wrestle with.
Pick a contrasting backdrop color. Shooting white on white erases the tonal contrast edge detection feeds on. Use medium gray behind light items and a lighter surface behind dark ones. Steer clear of saturated green or blue screens; the color spill stains edges and forces awkward corrections that leave the cut looking off.
Shooting Setup for Smartphone and Camera Users
A DSLR isn't a prerequisite for a clean professional shot. Phones at 12 megapixels or higher carry more than enough resolution for listings. The Pixelz smartphone photography guide notes that devices from the iPhone 8, Google Pixel 2, or Samsung Galaxy S8 onward all capture marketplace-grade quality.
Whatever you shoot on, a few habits move the needle hard:
- Lock the camera down. Use a tripod, a mini tripod, or even a book stack. Shake softens edges, and a soft edge can't be sharpened later. A sub-$10 Bluetooth remote kills the wobble from tapping the screen.
- Wipe the lens. Smudges and prints cast a soft haze over the whole frame, sapping the contrast AI depends on.
- Kill the flash and digital zoom. Phone flashes throw harsh, uneven light; digital zoom drops resolution without adding detail. Step closer instead.
- Set focus and exposure on the product. Tap the item in the camera app to anchor focus there, not the background, keeping the whole perimeter sharp.
- Stop down to f/8–f/11 on a DSLR or mirrorless. Shallow depth of field blurs edges, and a soft edge is gone for good. You can add background blur later; you can't rebuild lost edge sharpness.
- Fill at least 80% of the frame with the product. That maxes out the pixels landing on the item and shrinks the wasted background the AI has to wade through.
- Shoot at the highest quality the device offers. RAW banks the most detail for editing, but a high-quality JPEG is perfectly fine for web-only use.
For sellers publishing across several channels at once, consistency counts as much as raw quality. Lock the tripod, tape placement marks on the surface, and freeze the lighting between shots. Uniform angles and light build a cohesive product grid that earns trust.
Minimum Resolution for Web, Print and Social Media
How many pixels you need depends on where the image ends up. Shoot for the most demanding output first and you can always scale down later without losing anything. Here's a practical map:
| Output Use | Minimum Resolution | Recommended Resolution | Notes |
|---|---|---|---|
| Amazon / eBay listings | 1000 x 1000 px | 2000 x 2000 px | Enables zoom; meets marketplace requirements |
| Shopify / Etsy listings | 2000 px wide | 2048 x 2048 px | Renders sharply on retina displays |
| Social media posts | 1080 x 1080 px | 1200 x 1200 px | Platforms compress uploads; start slightly higher |
| Print catalogs (300 DPI) | 2400 x 3000 px (8x10") | 3600 x 3600 px or higher | Print demands significantly more pixels than web |
A classic misstep is shooting at web resolution, then needing the image for a print catalog or a wide banner months later. You can't conjure real detail after the fact. Capture at the highest resolution your gear allows and you'll always have headroom to crop, resize, or repurpose without it falling apart.
For phone shooters, that means the full-resolution mode in the camera app rather than any compressed setting. A 12-megapixel phone lands around 4000 x 3000 pixels — comfortably above every marketplace floor, with slack left over for cropping. Prep can feel like a detour when you're itching to list, but it compounds: cleaner source shots mean faster AI passes, fewer touch-ups, and a more professional finish. With that groundwork laid, the next call is which removal method matches your volume, budget, and quality bar.
Comparing AI Tools vs Photoshop vs Professional Services
You've got clean, well-lit source files in hand. The next decision sets how much time, money, and effort each cutout actually costs you: which removal method fits your situation? There's no universal winner. It hinges on how many images you handle monthly, how unforgiving your edge-quality needs are, and what your budget tolerates.

Three broad approaches split the market, each with real upside and honest limits. Here's how they stack against the things that actually move the needle for sellers:
| Method | Cost | Speed (Per Image) | Quality Ceiling | Learning Curve | Best For |
|---|---|---|---|---|---|
| Snappyit Free Background Remover | Free | 3-5 seconds | High (clean product edges) | None | Ecommerce sellers needing fast, free results without setup |
| Pixlr Background Remover | Free / Pro from $4.90/mo | 5-10 seconds | Good (standard products) | Low | Quick single-image edits with basic design tools |
| Adobe Express Background Remover | Free with Adobe account | 3-5 seconds | High | Low | Users already in the Adobe ecosystem |
| Canva BG Remover | Canva Pro ($12.99/mo) | 3-5 seconds | Good | Low | Designers working within Canva workflows |
| Pixelcut Background Remover | Free / Pro from $9.99/mo | 3-5 seconds | Good-High | Low | Mobile-first sellers and social media creators |
| Adobe Photoshop (Manual) | $22.99/mo (Creative Cloud) | 7-45 minutes | Flawless (with skill) | High | Complex products, pixel-perfect control |
| GIMP (Manual) | Free | 10-50 minutes | High (with skill) | High | Budget-conscious editors needing manual precision |
| Outsourced Clipping Path Service | $0.29 - $10+ per image | 6-24 hour turnaround | Flawless | None (you upload, they deliver) | High-volume catalogs (100+ images) needing consistent quality |
Free AI Tools for Quick Single and Batch Removal
If you list under 100 products a month and your items have firm, well-defined edges, a free AI tool gets the job done without a dollar spent or new software to learn. You upload, the AI peels the product off its background in seconds, and you pull down a clean transparent PNG or white-background file ready to drop into a listing.
Snappyit's free product background remover is a strong opening move for ecommerce sellers specifically because it's tuned for product cleanup rather than general design. No account, no watermark, and no per-image credit meter that quietly bills you once you pass a preview cap. On standard shots — boxed goods, electronics, kitchenware, accessories — the output lands marketplace-ready with no manual touch-up.
Other free options suit other rhythms. Pixlr's remover is handy when you want to cut a background and then keep retouching in the same browser tab; it's lightweight for the occasional job, though thin on dedicated ecommerce export features. Adobe Express, run through an Adobe account, gives full-resolution downloads and tight links to the rest of Creative Cloud. Canva's tool makes sense when your day already lives inside Canva Pro for marketing and social assets. And Pixelcut shines for mobile-first sellers building content straight from a phone.
The shared limit across every AI tool is the product list from earlier: translucent glass, fine chain, wispy fabric, and anything that color-matches its backdrop will hand back imperfect edges that need a manual pass.
Professional Software for Pixel-Perfect Control
When precision is non-negotiable, nothing rivals dedicated editing software for control. Photoshop's Select and Mask workspace, pen tool, and layer masks let a skilled editor master any edge case. Clear glass bottles, intricate lace, overlapping metalwork — if a human eye can find the boundary, a human hand can trace it in Photoshop.
The price is time and skill. Even practiced editors spend 7 to 12 minutes per standard image on manual paths, and complex pieces like jewelry or fine-detailed garments push past 30 minutes. The automated remover handles most routine work, but when its result falls short, the full Photoshop kit is the fallback that finishes the job.
For sellers who want that manual control without the subscription, GIMP is the free counterpart. Its fuzzy select, foreground select, and manual path tools all cut backgrounds, and while the interface is rougher and the learning curve steep, the quality ceiling rivals Photoshop for a patient editor. Pro software earns its keep on catalogs full of the products AI consistently struggles with — fine jewelry, thin-framed eyewear, or clothing with busy textures and patterns.
Outsourced Services for High-Volume Catalogs
Picture managing 500-plus SKUs that turn over each season. Processing all those images yourself — even with AI — is hours of uploading, downloading, checking, and fixing edge cases. Outsourced clipping-path services absorb the whole volume for you.
These shops staff trained editors who hand-trace each product with vector paths. Pricing runs from about $0.29 per image for simple shapes like boxes and bottles up to $4.99 or more for complex items such as bicycles, chain necklaces, or ornate metalwork. Turnaround is typically 24 hours standard, or 6 to 12 hours on a rush, with unlimited revisions from reputable providers.
The economics tip at scale. A seller running 1,000 basic product images a month pays roughly $290 to $750 for flawless, consistent results with zero personal editing time — often less than the hourly value of doing it yourself, especially once you weigh the consistency a dedicated production team holds to your brand guidelines.
Which Method Matches Your Situation
Here's a simple framework built on the three variables that matter most:
- Under 10 images a month, tight budget: reach for a free AI tool like Snappyit's remover. Speed plus zero cost makes it the obvious default for small operations.
- 10 to 100 images a month, mixed complexity: run the straightforward items through AI and keep Photoshop or GIMP handy for the 10-20% with fussy edges. This hybrid balances speed against quality.
- 100+ images a month, consistency required: outsource to a clipping-path service or invest in a paid batch tool. At this volume your time is the priciest input.
- Complex products at any volume: if your whole catalog is jewelry, glassware, or translucent goods, budget from the start for pro-software skill or outsourcing. AI alone won't deliver marketplace-ready cuts on these consistently.
The most efficient sellers don't marry a single method — they stack them. Push everything through a free AI tool first, flag the small slice that needs refinement, and route those to Photoshop or bundle them into an outsourced batch. That layered flow keeps both cost and time down while holding quality steady across the catalog. Whatever method you land on, the output is only as good as the format and export settings you apply next; a perfectly isolated product saved wrong still fails compliance or renders badly on a buyer's screen.
Choosing the Right File Format and Export Settings
You've shot, lit, and run the product through a remover. The cutout looks flawless on screen. Then you save it, upload it, and the transparent background turns solid black — or the crisp image crawls to load on mobile because the file weighs 8 MB. The format you pick at export decides whether your clean cut actually behaves the way you meant it to.
PNG vs JPEG vs WebP for Product Images
Each format plays a distinct role in an ecommerce pipeline, and the wrong pick either wrecks your transparency, bloats your file, or both. Here's how they compare for product photography specifically:
| Format | Transparency Support | Compression Type | Typical File Size (2000x2000 product image) | Best Use Case |
|---|---|---|---|---|
| PNG | Full alpha transparency | Lossless | 1-5 MB | Transparent cutouts, Amazon main images, layered composites |
| JPEG | None (flattens to solid color) | Lossy | 150-500 KB | Lifestyle images, social media posts, secondary listing photos with solid backgrounds |
| WebP | Full alpha transparency | Lossy or lossless | 100-400 KB | Shopify storefronts, web performance, modern browsers |
PNG is your default whenever transparency has to survive the save. It compresses losslessly, so no pixel data gets thrown away — at the cost of size, since a 2000 x 2000 transparent cutout typically runs 1 to 5 MB depending on how busy the image is. If you've gone to the trouble of a clean transparent cut, PNG is what protects it.
JPEG earns its place once the background is already locked as a solid color or a lifestyle scene. Its aggressive lossy compression yields files dramatically lighter than PNG. The dealbreaker: JPEG carries no transparency at all, so saving a transparent cutout as JPEG flattens the alpha channel to white or black depending on your software. It's far and away the most common export blunder sellers make.
WebP splits the difference for web use. It holds full alpha transparency like PNG but lands 25-35% smaller files than JPEG at matching visual quality. Shopify supports it natively and most modern browsers render it fine. The one caveat: some older marketplace upload systems still choke on WebP, so confirm support before batch-converting a whole catalog. And for iPhone shooters working from Apple's native HEIC, converting to PNG before editing preserves full quality and transparency support for the removal step.
Color Profiles and Transparency Handling
Getting the format right is only half of it. Color profiles govern how your product's colors actually render on a buyer's screen, and the wrong one can mute a vivid red or tilt your whites toward blue.
For web display the safe bet is sRGB. Digital Photography School's color-profile breakdown confirms sRGB roughly matches the gamut of most consumer screens, so your colors hold steady across phones, tablets, and laptops regardless of the device. If you retouch in Adobe RGB or ProPhoto RGB for a wider range, always convert to sRGB before the final export — skip that and the majority of viewers, whose browsers assume sRGB when no profile is embedded, get flat, washed-out images.
Embed the ICC profile in the exported file. It adds roughly 3-4 KB but guarantees color-managed browsers like Chrome, Firefox, and Safari read your colors exactly as intended. Without it, the browser guesses the color space, and that guess plays out inconsistently across devices. When you're working with a transparent background in Photoshop, verify the transparency before uploading: open the export in a separate viewer and look for the checkerboard pattern that signals real alpha. A solid white or black fill instead means the transparency was lost — usually because layers got flattened before saving or JPEG slipped in by accident.
Optimizing File Size Without Losing Quality
Upload limits and page-load speed both reward lean files. A product page heavy with unoptimized 5 MB PNGs sends mobile shoppers bouncing before the images even render. Image-optimization research shows properly compressed files can run up to 80% lighter than the originals with no visible drop in quality.
Practical moves that shrink the file while keeping the product crisp:
- For PNG: run tools like TinyPNG to apply indexed-color compression on limited-palette images. A product on plain white rarely needs the full 16.7-million-color range of 24-bit PNG, and dropping to 8-bit indexed color can cut size 50-70% when the product's tonal range is narrow.
- For JPEG: export at 80-85% quality rather than 100%. The visible difference is negligible on product shots, but size falls 40-60%. Below 75%, artifacts start creeping onto sharp edges and text.
- For WebP: use quality 80 for lossy compression with transparency, which lands roughly 25-35% lighter than equivalent JPEG while keeping the full alpha channel.
- Strip stray metadata: camera EXIF adds 10-50 KB per file. Listings don't need GPS coordinates or shutter speed, so clear the metadata before upload.
- Convert format when it fits: keep PNG when you need transparency, switch to JPEG or WebP once the background is final. A JPEG at quality 82 matches the look of a much heavier PNG when no transparency is in play.
A 30-second pre-upload check catches the errors that cause rejected uploads or degraded listings: open the file, confirm the background is either pure white (use a color picker to verify RGB 255, 255, 255) or transparent (look for the checkerboard), check the size is under the platform's cap, and preview it at the dimensions the marketplace will display. Clean exports in the right format get your images live — but what about when the cutout itself is the problem: white halos clinging to edges, lost detail on fine textures, or unnatural shadow artifacts? Those need targeted troubleshooting, not better export settings.
Troubleshooting Common Background Removal Problems
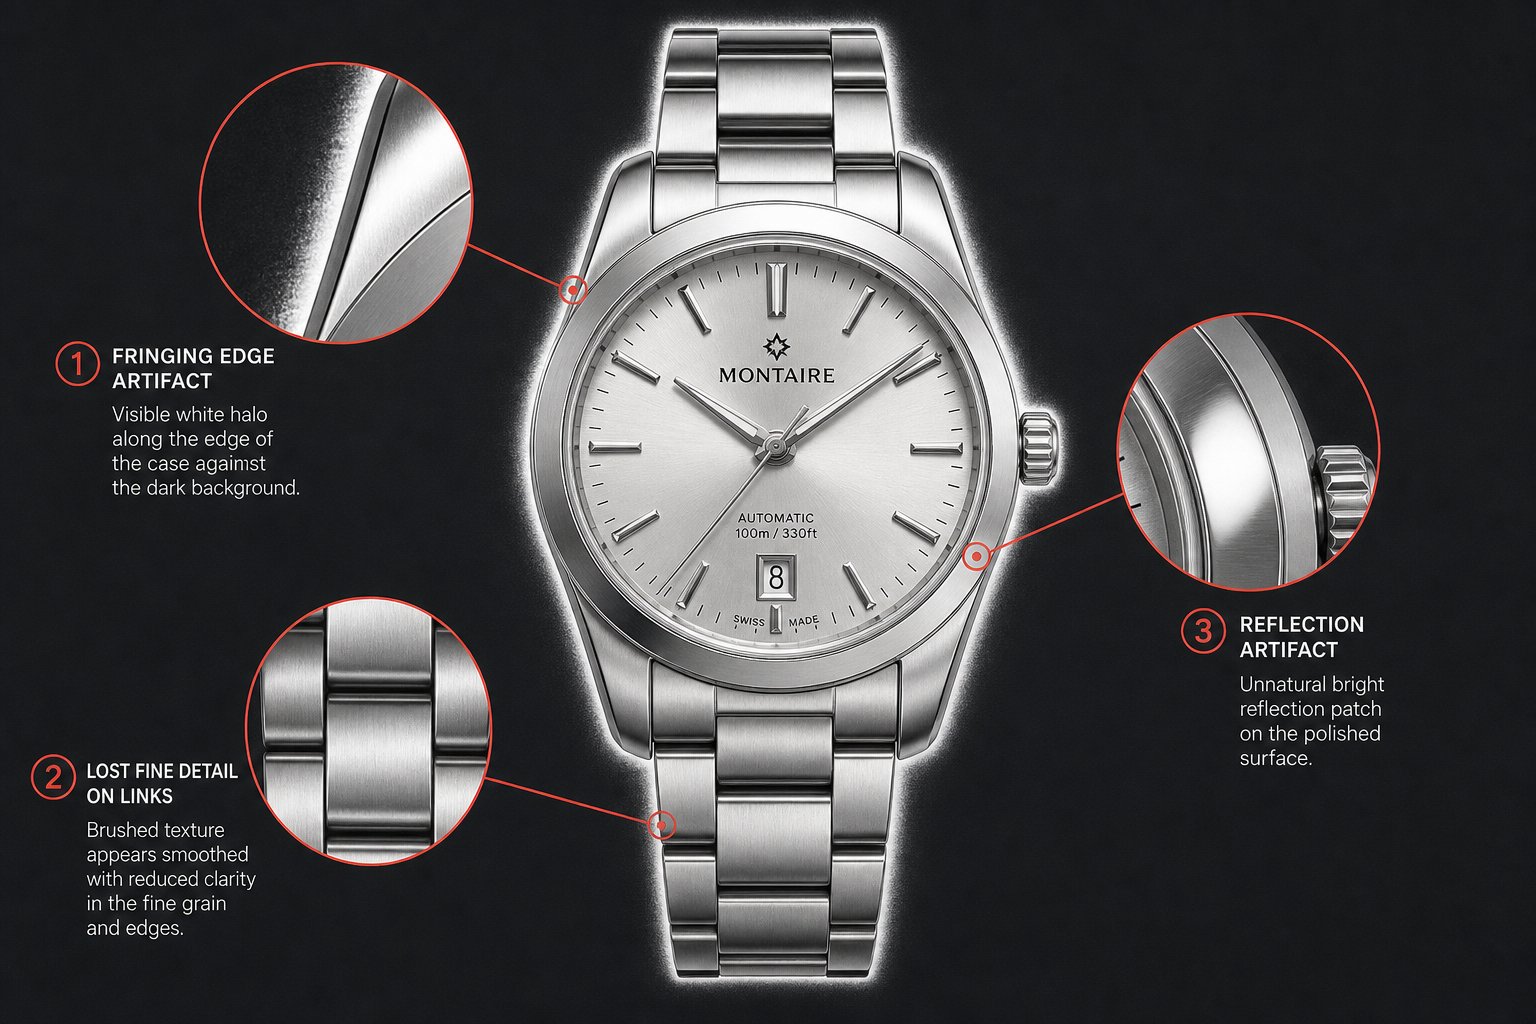
The cutout looks clean at a glance. Then you set it on a dark background and a ghostly white outline rings the whole product — or you zoom into that delicate chain and half the links have vanished. These failures aren't random. Each has a specific cause, a fast fix, and a way to stop it recurring.
Whether you used a free AI tool or extracted the background by hand in Photoshop, the same artifacts surface again and again. Diagnosing the root cause beats blindly re-running the removal, because the same image processed ten times reproduces the same flaw ten times until you address what created it.
Fixing White Halos and Edge Fringing
White halos top the list of complaints after a removal. The checkerboard confirms transparency, the product reads correctly, but the instant it lands on any colored background a thin bright outline clings to every edge.
- Diagnosis: a faint white or light border traces the product, obvious against medium or dark backgrounds and invisible against white.
- Cause: anti-aliasing. When the photo was captured, the camera blended edge pixels between the product color and the old background to smooth the transition. Those blended pixels are part-white, part-product, and the remover kept them because they hold some foreground information — but their white share now shows.
- Quick fix: in Photoshop, open Select and Mask and drag the Shift Edge slider left by 1-3 pixels to pull the mask boundary inward and trim those blended pixels. Or load the layer mask as a selection, choose Select > Modify > Contract by 1-2 pixels, invert, and fill with black on the mask — this clears the fringe without wrecking complex edges like hair or fabric.
- Prevention: shoot against a backdrop matching the final display background. Headed for white? Shoot on white and the anti-aliased pixels blend away. Planning multiple backgrounds? Shoot on medium gray, which fringes far more neutrally than white or color.
There's also a third route for halo-free edges: the Minimum filter. Select the layer mask, go to Filter > Other > Minimum, and set a 1-2 pixel radius. It pushes the whole mask edge inward with a live preview, so you watch the fringe disappear before committing, and you can apply it selectively with a lasso around just the problem zones.
Recovering Lost Fine Details and Textures
Fine elements — jewelry links, lace trim, knit and woven threads — sit in a brutal zone. They're full of tiny gaps where background pixels nest between foreground strands, and AI tools either pack those gaps solid or, worse, erase the thin strands entirely, leaving a product that looks drawn rather than photographed.
- Diagnosis: thin elements turn chunky, merged, or partly missing. Chain links fuse into blobs, lace holes vanish, mesh smears.
- Cause: the model's confidence threshold read those thin foreground pixels as background because background surrounded them on several sides. At the model's processing resolution, a one-pixel-wide link doesn't register as "foreground object" with enough certainty to survive.
- Quick fix: process at the image's full native resolution instead of letting the tool downscale — more pixels give thin elements more to work with. If detail still drops, use Photoshop's Select and Mask with the Refine Edge Brush painted right over the fine areas; its localized edge detection adapts to thin strands rather than applying one global threshold. On intricate items, channel-based isolation (picking the highest-contrast color channel and building a mask from it) often recovers details automation misses.
- Prevention: shoot fine-detail products at maximum resolution with the item filling at least 80% of the frame, so the algorithm has more data on those tiny elements. And use a strongly contrasting backdrop — dark gray or black behind silver chains, white behind dark ironwork.
Handling Translucent, Reflective and Similar-Color Products
Some products simply break the keep-or-cut assumption that every pixel is foreground or background. A glass bottle is both. A chrome faucet mirrors the studio so its surface reads as backdrop. A white mug on a white surface offers no contrast line at all. These are the hardest cases in removal, and understanding why sets realistic expectations.
- Diagnosis (translucent items): background shows through glass, sheer fabric, or resin; the tool either leaves the old backdrop visible through the product or renders the see-through areas solid and fake.
- Cause: standard removal treats pixels as binary, keep or delete, but translucent materials live on a gradient where some areas clearly show background and others show the material — there's no clean binary line to draw.
- Quick fix: after the automatic pass, hand-paint semi-transparency back onto the layer mask with a soft brush at 20-40% opacity to restore the see-through quality without dragging back the original backdrop. For bottles, duplicate the original layer, apply the removal mask, then lower the mask density on glass areas to let a controlled amount of the new background show through.
- Prevention: photograph translucent items on pure white. White light through glass simply brightens the product without staining it, and if it's going on white anyway, the see-through areas need no correction.
- Diagnosis (reflective surfaces): chrome, polished metal, or mirrored parts hold patches of the original background as reflected color inside the product.
- Cause: reflective surfaces capture and bounce back the surroundings, and edge detection can't separate the real product boundary from the reflected room that looks like part of the object.
- Quick fix: use the clone stamp on a clipped layer to paint over reflected color with nearby product tones — sample a clean stretch of the metal and brush over the reflection, keeping inside the mask boundary.
- Prevention: set a white or neutral-gray cyclorama far behind the product, diffuse the light from several angles to soften reflections, and add a polarizing filter to cut environmental glare off metal.
- Diagnosis (color-matching products): the tool eats into the product itself, leaving gaps or jagged chunks missing.
- Cause: when product and background share color and brightness, edge detection finds no boundary to trace and the semantic model has to lean entirely on shape, which fails when the silhouette is ambiguous or partly hidden.
- Quick fix: hand-paint the missing areas back onto the layer mask with a hard brush at 100% opacity, using the original image as your guide for where the true edge sits.
- Prevention: never shoot a product on a background matching its dominant color — white product wants a gray or black backdrop, dark product wants a lighter surface. You can swap backgrounds later, but you can't recover contrast you never captured.
One last gotcha: you remove the background cleanly, see the checkerboard confirming nothing's left behind, upload to a marketplace, and the image shows a solid color fill. That almost always means you saved as JPEG (which flattens transparency) or the platform rendered your PNG against its own default backdrop. Always check the live listing preview matches what you intended. Troubleshooting fixes one image at a time, but a truly polished listing needs more than a clean cut — natural shadows, catalog consistency, and lifestyle composites are what separate amateur shots from pages that convert.
Post-Removal Editing for Professional Product Images
A transparent cutout isn't a finished listing image — it's raw stock. Without grounding cues like shadows, consistent framing, and a deliberate background, the product floats in a sterile void that reads as lifeless. The gap between a product that looks pasted onto a page and one that looks shot in a studio comes down entirely to what you do after the background disappears.
Here's a complete finishing sequence that turns a bare cutout into a polished, listing-ready image:
- Drop the cutout onto your target background. Pure white for Amazon or a branded color for your Shopify store — set the final canvas first. To swap from transparent to a specific hex, add a solid fill layer beneath the product.
- Lay in a contact shadow. Paint a tight, dark shadow directly under the product's base with a soft brush at 5% flow on a Multiply layer to anchor it to the surface.
- Lay in a cast shadow. On a separate layer, paint a wider, softer shadow stretching away from your assumed light source, then apply Gaussian Blur at 8-15 pixels to mimic natural diffusion.
- Add a subtle reflection (optional). Duplicate the product layer, flip it vertically, drop opacity to 15-25%, and mask a gradient that fades the reflection to nothing within 30-40% of the product height — a premium glass-surface look that suits electronics and luxury goods.
- Crop and resize to platform spec. Center the product at 80-85% of the canvas and export at the dimensions your marketplace requires.
- Run a final check. Verify the background color with a picker (RGB 255, 255, 255 for Amazon), confirm no halos linger, and preview at thumbnail size to be sure the product reads clearly when small.
Adding Natural Shadows and Reflections
Shadows are what make a product look physically present instead of digitally hovering. A convincing shadow has two parts: the contact shadow (a tight, dark line where the object meets the surface) and the cast shadow (the broader, diffused shape thrown outward by the blocked light). Drop either one and viewers get an instant "bad Photoshop" reaction.
For high-volume editing, a gradient-mapping technique gives the most repeatable shadows. Duplicate the product layer, convert it to a Smart Object, desaturate to pure black, flip vertically, and use Perspective Warp to lay it flat. Then apply a black-to-white gradient on the layer mask so the shadow fades naturally as it stretches from the base, and finish with a 5-pixel Gaussian Blur. Because it borrows the product's own silhouette, the method adapts to any shape without hand-painting.
Batch Consistency for Large Product Catalogs
One polished image is within anyone's reach. Holding that polish across 200, 500, or 2,000 SKUs is where most sellers come unstuck. Consistency is among the toughest challenges in product photography: even within a single shoot, light, color, framing, and sharpness drift shot to shot, and when product photos don't match, the storefront feels disjointed and trust erodes.
The fix is templating the workflow. Build a master PSD with pre-set layers — background fill, shadow layers with blend modes already dialed in, and guides marking the placement zone. For each new product, drop the cutout in, tweak the shadow, export. That kills per-image decisions and guarantees uniform presentation. For hundreds of images, batch tools apply the same adjustments — exposure correction, color normalization, crop, resize — across a whole set at once. Volume-built platforms report the 1,000th image in a batch gets identical treatment to the first, eliminating the quality drift that creeps in when a human editor tires. Document a short style guide — shadow angle, background hex, crop margins, color temperature — and any tool or collaborator can keep the catalog cohesive no matter who runs the images.
Creating Lifestyle Composites From Transparent Cutouts
Marketplace main images demand clean white or plain backdrops, but social ads, email banners, and Etsy secondary shots benefit from context — a mug on a rustic desk, a serum bottle on marble. These lifestyle composites tell a story an isolated cutout can't.
Once you can change a background color in any editor, the same transparent cutout becomes endlessly reusable: a flat-lay for Instagram, a seasonal gradient for email, a branded solid for Pinterest. One shoot, one removal, unlimited outputs. To keep composites looking shot rather than pasted, match the light direction between product and scene — if the background light comes from the left, your product's shadow should fall right — adjust color temperature so the product matches the scene's warmth, and scale the product against objects already in the frame so it genuinely belongs. Starting from a clean cutout also unlocks A/B testing: export the same product on three background colors, run them as listing or ad variations, and let click data tell you which context converts. With that finishing in hand, the real gain comes from wiring every stage into one repeatable pipeline.
The Complete Product Image Workflow From Shoot to Listing
Individual techniques matter, but they only pay off when you connect them into a system you repeat on every product. A one-off great image is luck; a repeatable pipeline that produces marketplace-ready results on image 1 and image 500 alike is infrastructure — and it's what divides sellers who scale from sellers who stall.
Treat the work not as scattered tasks but as a five-stage production line where each stage feeds the next. Skip one and you spawn bottlenecks downstream that cost more to fix than getting it right the first time. The pipeline below holds whether you're shooting ten products a month off a kitchen table or refreshing seasonal catalogs with hundreds of SKUs.
The Five-Stage Product Image Pipeline
Every ecommerce image moves through the same core stages regardless of catalog size or destination:

- Prep and shoot. Set a contrasting solid backdrop, position light at 45 degrees for natural edge contrast, lock the camera down, and capture at full resolution. Work the pre-shoot list — clean lens, flash off, focus locked on the product, 80% frame fill — and batch similar products together to keep light and angles consistent across the session.
- Remove the background. Push your images through an AI tool for instant processing. Snappyit's free product background remover clears this stage for most standard products in seconds, returning clean transparent PNGs or white-background files ready for the next step. Flag the complex items — translucent glass, fine chains, reflective metals — for manual touch-up in Photoshop or GIMP rather than re-running them through automation again and again.
- Post-process and quality-check. Drop the cutouts into your master template, add contact and cast shadows on dedicated layers, and normalize color temperature across the batch with saved presets. Zoom to 100% on the edges and confirm no halos, lost detail, or artifacts remain. Fix problems now, not after upload.
- Export to platform spec. Export each image at the dimensions, format, and color profile its target marketplace demands — Amazon main images as 2000 x 2000 JPEG on pure white, Shopify as WebP for speed, Etsy secondaries as lifestyle composites at 2700 x 2025 — embedding sRGB and stripping spare metadata to keep files lean.
- Verify the upload. After uploading, preview every image live on the platform. Confirm the background renders right (no surprise fills on transparent areas), check that zoom works at full resolution, and inspect the thumbnail at small size. Catch upload errors before buyers do.
This mirrors what professional studios call a modern product photography workflow: prep, capture, post-production, and delivery, each stage holding checkpoints that stop errors cascading forward. Adding a dedicated verification stage at the end catches the platform-specific failures that generic photography workflows skip over.
Adapting the Workflow to Your Catalog Size
Not every seller needs the same process formality. A phone-only Etsy seller listing five candles a week operates in a different world than a wholesale brand refreshing 300 SKUs a season. The stages stay constant; the tools and time shift sharply.
Under 50 products a month (solo Etsy and marketplace sellers): keep it lean. Shoot near a window with a $15 poster-board backdrop, remove with a free AI tool like Snappyit, add shadows by hand in a free editor or skip them if your platform doesn't require white. Export straight to spec. Total time per product runs 5-10 minutes, shoot to upload, with no paid subscriptions needed.
50 to 200 products a month (growing small businesses): invest in a basic lighting kit and a permanent shooting station you never tear down. Build a template file with pre-set shadow layers and crop guides, batch removals in groups of 20-30, and lean on Lightroom or a batch editor presets for color normalization. This is where every minute spent on templating saves hours across the month, and documented style guides let any team member follow along.
200+ products a month (established brands and agencies): treat image production as manufacturing. Segment the workflow so different people handle capture, removal, retouching, and export in parallel rather than one person doing it all in sequence. Automated batch tools chew through repetitive work while human editors focus on the 10-15% that needs real attention. At this scale, outsourced removal services or dedicated AI batch platforms justify their cost on time savings alone, and the operation needs systematic asset management with clear naming, version control, and quality auditing.
Making Background Removal Part of Your Listing Routine
The sellers who struggle most with imagery are the ones who treat it as a special event rather than routine. They cram all photography into one overwhelming day, rush the editing, and upload whatever they've got — and reap inconsistent quality, missed requirements, and a backlog of products waiting on images.
A steadier approach treats editing as an ongoing rhythm, not a periodic crisis. Schedule shooting weekly even if only three products are new, process removals the same day while the shots are fresh and you remember which need extra care, and export and upload within 24 hours. That cadence keeps the pipeline flowing at a pace that never lets backlogs form.
The payoff of a consistent workflow compounds over time. Your first product takes 20 minutes shoot-to-listing because you're deciding at every step. By product 50 those decisions are pre-made: lighting fixed, template built, export settings saved, verification list memorized. The same flow that took 20 minutes now takes 5, and the output is better because you stripped out the variability of ad-hoc choices.
Build the system once and let it carry you. It doesn't take expensive tools or formal training — just a consistent process repeated until the repetition itself produces speed. Try Snappyit's free background remover →
Snappyit's free product background remover slots naturally into Stage 2 as a zero-cost, zero-learning-curve starting point built for ecommerce cleanup across Amazon, Shopify, Etsy, and eBay listings. Pair it with a simple post-processing template and you've got a complete system that scales from your first listing to your thousandth without breaking down.
The brands that scale treat visual content as infrastructure, not overhead. They build systems that hold consistent quality at any volume.
Every product you list is a chance to turn a browser into a buyer, and the difference between listings that sell and listings that stall often traces back to image quality and consistency — both outputs of your workflow rather than your individual editing skill. A few decisions sharpen the whole pipeline: whether you ultimately want a transparent cutout or a white backdrop is one worth getting right, and our breakdown of transparent PNG vs. white background product photos walks through when each wins. If you want the cutout to stay pixel-for-pixel sharp, see how to remove a background without losing quality; for Amazon's exact white-background process, follow making a white background for Amazon product photos; and jewelers can skip the manual route entirely with removing jewelry backgrounds without Photoshop. Want to weigh the no-cost options head to head? Compare the best free background removal tools for sellers. And once the goal grows beyond single cutouts into a fully systematized catalog — on-model imagery, recolored variants, short listing clips — Snappyit's AI product photography hub wires together every remaining stage of that production line.
Frequently Asked Questions About Removing Product Backgrounds
What is the best free tool to remove product backgrounds for ecommerce?
Snappyit's free background remover suits ecommerce sellers well: there's no account to create, no watermark, and it returns a clean transparent PNG or white-background image in a few seconds. It's reliable on everyday product shots — boxed goods, gadgets, accessories. For trickier subjects such as jewelry or glassware, plan on a quick manual touch-up in Photoshop or GIMP after the automatic pass.
Which exact background color must Amazon main listing images use?
Amazon's main listing images must sit on a pure white background at exactly RGB 255, 255, 255. The product has to fill at least 85% of the frame, and the file should be a minimum of 1000 pixels on its longest side, with 2000 x 2000 pixels recommended. Images that miss these rules get quietly pulled from search with no alert, so the listing earns zero views until you upload a compliant shot.
Why does my product image have a white halo after background removal?
A white halo comes from anti-aliasing. When the photo was taken, the camera mixed edge pixels between the product and the old background to soften the boundary, and those partly-white pixels stay behind after the cut, showing up against darker backdrops. In Photoshop, fix it with Select and Mask by dragging Shift Edge 1-3 pixels inward, or run Filter > Other > Minimum at 1-2 pixels on the layer mask. To avoid it, shoot on gray rather than white whenever the cutout will land on several different backgrounds.
Should I save product images as PNG or JPEG after removing the background?
Choose PNG whenever transparency has to survive — Amazon hero images or cutouts you'll drop onto new backgrounds later. Choose JPEG once the background is locked in as a solid color, since JPEG files are far smaller but carry no transparency at all. WebP gives you both transparency and a smaller size than PNG, which makes it a great fit for Shopify and modern browsers. Exporting a transparent cutout as JPEG is the most frequent mistake, because it flattens the alpha channel to white or black.
How do I prepare product photos so AI background removal works better?
Shoot against a solid backdrop that contrasts with the product, light it from roughly 45 degrees for crisp edge separation, and leave 3-5 feet between the item and the background to cut down on light wrap. Steady the camera on a tripod, switch off the flash, and capture at full resolution with the product filling at least 80% of the frame. That gives the AI the contrast and sharp edges it needs to cut cleanly on the first pass and slashes the manual cleanup that follows.