Does removing a background lose quality?
Short answer: no. Cutting out a background does not touch the resolution or sharpness of your subject. All a background remover does is decide which pixels become transparent and which stay. The pixels it keeps — your dress, your ring, the model's face — are the exact same pixels at the exact same resolution as your original upload. Nothing is repainted, nothing is regenerated, nothing is "AI photography." It is a stencil, not a redraw.
So when sellers tell us "my cutout came back smaller and softer," the cutout itself isn't the culprit. The quality loss happens somewhere else in the pipeline: the tool shrank the image (downscaled it) before handing it back, or re-compressed it on the way out. Those are two very different things, and once you can tell them apart you stop blaming the cutout and start fixing the actual leak.
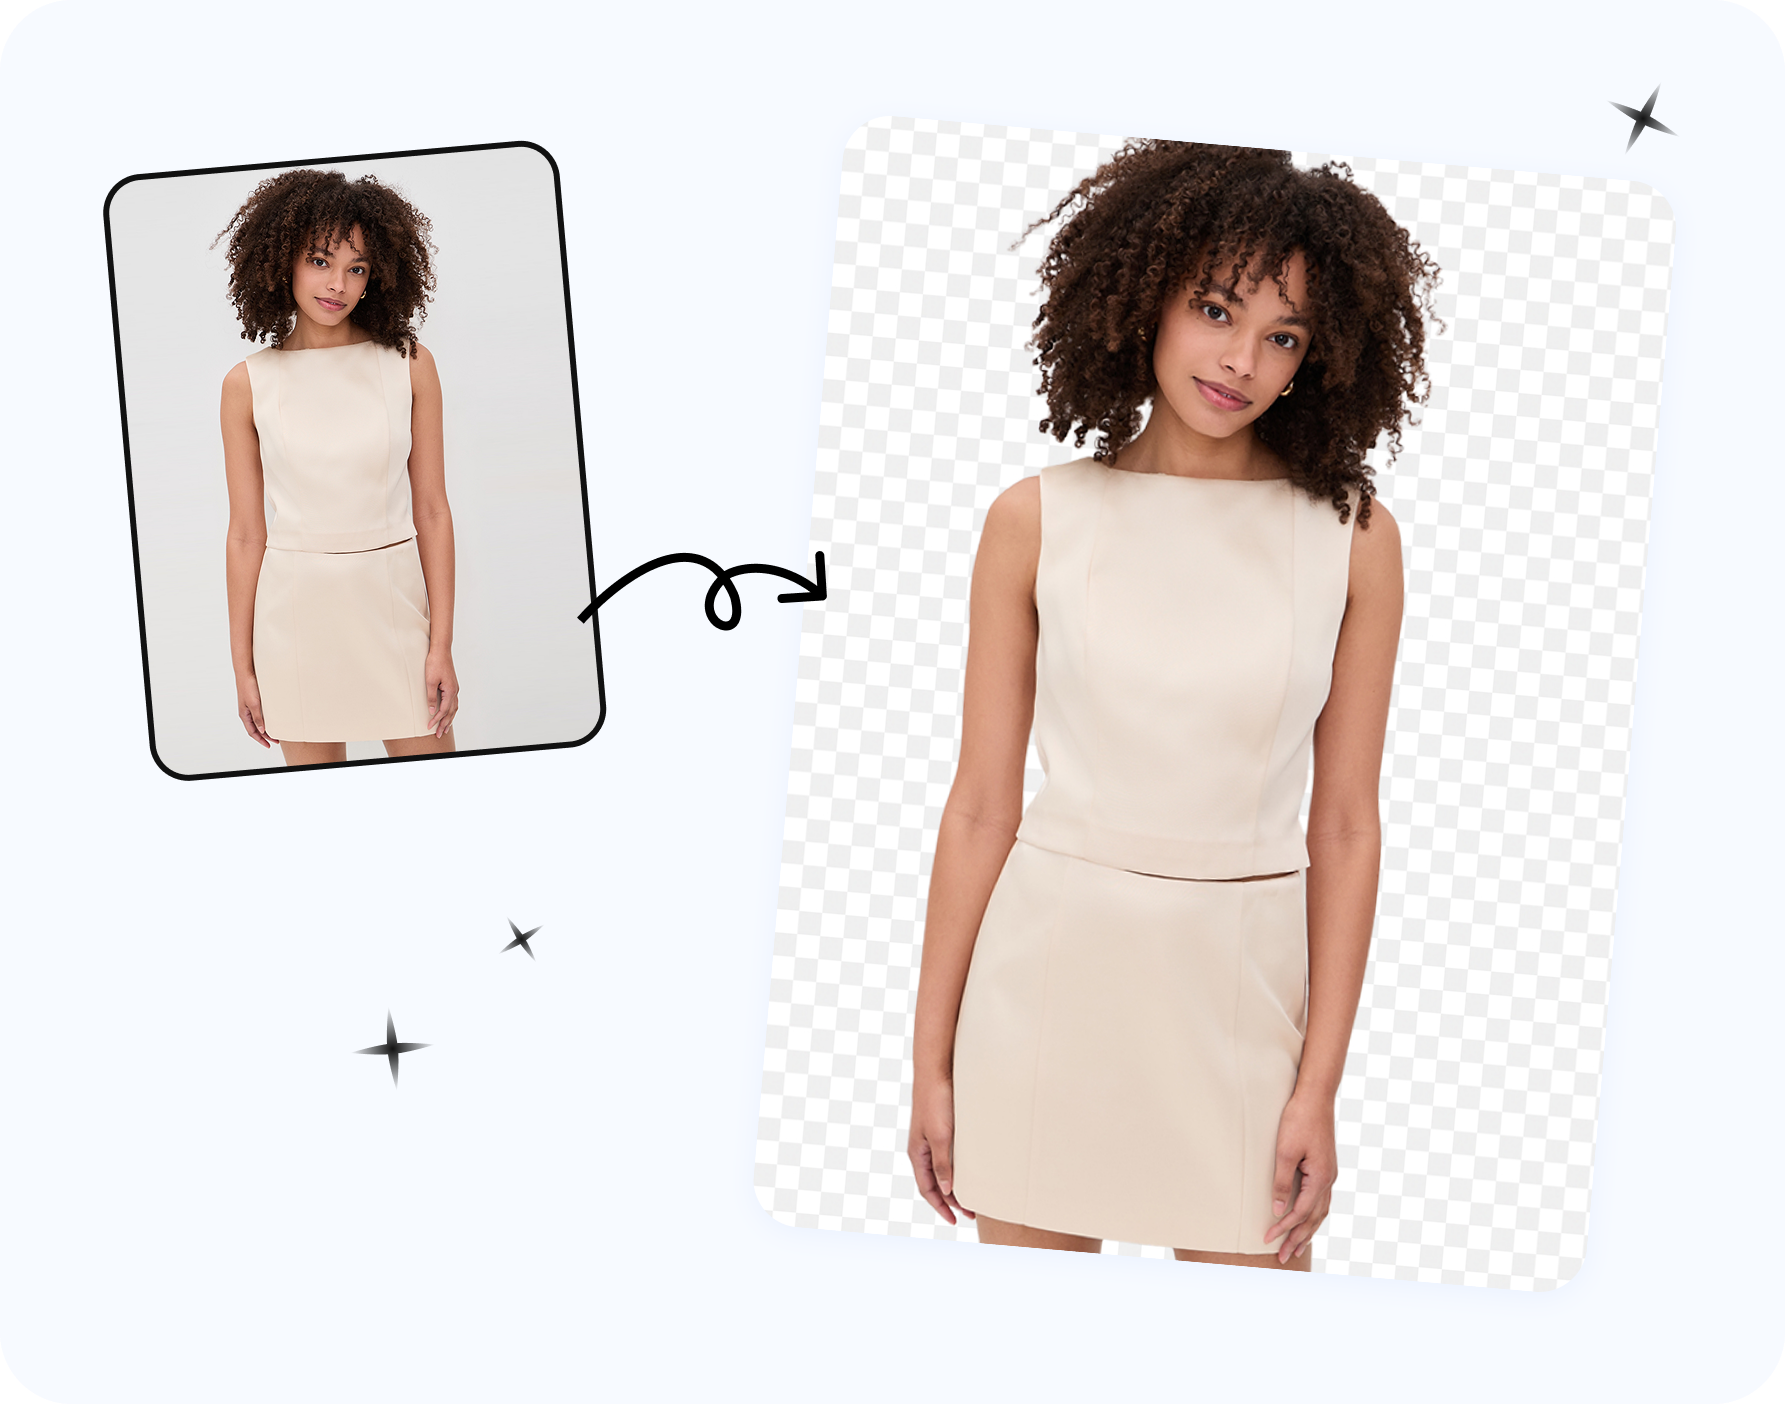
Look at the example above. The hair strands and shoulder edge on the "after" side are just as crisp as the "before" — because they are literally the same pixels with the background turned transparent. If your own result looks fuzzier than this, that's a downscaling problem, not a removal problem.
It helps to be precise about what "quality" even means here, because the word smuggles in three separate things that can each break independently: resolution (how many pixels of detail survive), edge cleanliness (whether hair and trim are cut accurately, with no halo), and compression integrity (whether the file was re-squeezed and degraded on export). A good cutout protects all three. A bad one usually fails the first while people assume it failed the second. The rest of this guide takes them one at a time so you can diagnose your own result in under a minute.
How AI Cutouts Actually Work (and Why Edges Soften)
To know what can go wrong, it helps to know what the tool is actually doing — and it is not making a clean yes/no scissor cut. Modern background removers predict an alpha matte: a grayscale mask the same size as your photo, where every pixel is assigned a transparency value. That value lives in an 8-bit alpha channel, which means 256 possible levels, from 0 (fully transparent) to 255 (fully opaque), with everything in between being partly see-through. A pixel that is 60% opaque shows 60% of the subject's color and lets 40% of whatever is behind it show through. This is why a cutout has soft, feathered edges rather than a hard binary border — it is the entire mechanism, not a glitch.
Three things follow from that, and all three are why edges can look "soft":
1. The matte is grayscale, not black-and-white
Because the mask stores 256 levels, the tool can represent a strand of hair that only partly covers a background pixel. That partial coverage is what makes hair, fur, and lace look natural instead of cut out with pinking shears. The trade-off is that "soft" is the correct, intended look for those regions.
2. Anti-aliasing is applied on purpose
Along any boundary, the tool deliberately renders pixels semi-transparent across roughly a two-pixel edge zone so curved and diagonal edges don't look jagged or staircased. So a little edge softness when you zoom to 400% is anti-aliasing doing its job — not damage. A cutout with a razor-hard, perfectly opaque edge would actually look worse against most backgrounds.
3. Halos and color fringing come from the original photo, not the cut
Here is the failure mode people actually notice. Every edge pixel in your source photo is a blend of the subject and the old background behind it. Photograph a yellow subject against a blue backdrop and the boundary pixels are a mix — green-tinted. Drop that cutout onto a white layout and those green-tinted pixels show up as a faint colored halo around the subject (this blending and the resulting fringe is documented in the USPTO matte patent and in the Photoshop Training Channel's "Removing Edge Halos Using Defringe"). The cutout didn't add the color; it was always there, hidden because the background matched it.
Good tools fix this with edge decontamination (also called color decontamination or defringe): they estimate the true foreground color of each mixed edge pixel and rebuild it, or they remove edge pixels whose color matches the old background using a color-difference heuristic. This is exactly why a cutout can look flawless on the tool's checkerboard transparency preview and then show a fringe the moment you place it on a colored product page — the fringe was always in the edge pixels; the checkerboard just hid it.
When the automatic matte over-cuts (eats a wisp of hair) or under-cuts (leaves a sliver of old background inside a chain link), the honest fix is to correct the matte by hand. Snappyit's manual KEEP / REMOVE / ERASE brush does exactly that: it edits the alpha values directly so you can rebuild hair, glass, or feathered edges the auto pass got wrong. None of this is AI re-photography or invented detail — it's standard alpha-matting and segmentation, applied to the pixels you uploaded.
Why free background removers downscale your image
Here is the uncomfortable part: a lot of "free" background removers downscale on purpose. The cutout engine is the expensive bit to build, so once a company has it, the easiest way to sell upgrades is to give the free tier a deliberately shrunken result and reserve the full-size file for a paid plan or a credit purchase.
The most cited example is remove.bg. Its free website download is capped at "Preview" quality — up to 0.25 megapixels, which remove.bg documents as 625×400 px, regardless of how large the file you uploaded was (per help.remove.bg's "What are image credits" and max-resolution articles). Full resolution — up to 50 MP, e.g. 5774×8660 — requires a paid credit. So you can feed it a sharp 12-megapixel photo and get back something smaller than a phone thumbnail. That's a perfectly legal business model, but if nobody tells you, you assume the cutout "ruined" your photo. It didn't. From a 12-megapixel photo, that 0.25 MP preview is about 2% of your pixels — roughly 98% of the detail is gone.
This is exactly why sellers search for a background remover no downscale or a background remover keep original resolution — they've been burned by a preview-sized file before. The fix isn't a better algorithm; it's a tool that doesn't gate resolution at all. Snappyit's free background remover hands back the full-size cutout because there is no paid tier to upsell you into — the whole tool is free, with full-resolution download, no watermark, no credits, and no sign-up.
To be fair, Snappyit is not the only free full-resolution option, and we'd rather you verify than take our word for it. Erase.bg offers free HD downloads at no charge, with output up to 10000×10000 px and a 25 MB file-size cap, and Adobe Express returns background removals with no watermark on free or paid plans — though its free background removal draws from a shared pool of around 25 generative AI credits per month, and Adobe has flagged it as a premium feature currently free only for a limited time, so free full-resolution access is not guaranteed to last. The point isn't that one tool is magic; it's that resolution should never be the lever a free tool holds hostage. So the first question to ask any remover is blunt: does the file I download match the dimensions of the file I uploaded? If it doesn't, the resolution is being withheld, and no amount of re-uploading will get it back.
Resolution vs DPI vs Print Size: What "Full Resolution" Actually Means
A surprising amount of "quality loss" panic comes from confusing three terms that mean different things. Let's pin them down, because once you understand them you'll know precisely what a background remover should and should not change.
- Resolution is the total pixel count, written as width × height (for example 4000×3000). This — and only this — is what holds detail. It is the single number a background remover should preserve.
- PPI (pixels per inch) describes a digital or screen image; DPI (dots per inch) describes ink dots on paper. For export prep they're used interchangeably, 1:1.
- Print size is how big the image lands on paper, and it's derived from the other two.
The insight that defuses most of the confusion: DPI/PPI is just a tag. It changes nothing about how many pixels your file contains — it only tells a printer how large to spread those pixels. The formula is simple:
| Pixels (long edge) | DPI tag | Prints at | What changed in the file |
|---|---|---|---|
| 3000 px | 300 DPI | 10 inches, crisp | Nothing — 3000 px |
| 3000 px | 72 DPI | ~41.7 inches, soft | Nothing — still 3000 px |
| 3000 px | 150 DPI | 20 inches | Nothing — still 3000 px |
Print size = pixels ÷ DPI. So 3000 px at 300 DPI prints 10 inches; the identical file flagged 72 DPI is the same file, just told to print larger and therefore softer. Nobody deleted detail by lowering the DPI tag — they only relabeled it.
Now split it by where the image is going:
- Marketplaces and screens (Amazon, Etsy, your Shopify store): DPI is completely irrelevant. Screens read raw pixels and ignore the DPI tag entirely. What matters is meeting the platform's pixel minimum.
- Print: 300 DPI is the standard at which individual pixels become invisible to the naked eye (per Printivity's "What resolution should I use for printing — 300 PPI"). Below that, prints start to look soft.
So when we say "full resolution," we mean something concrete and checkable: the output PNG or WebP has the exact same pixel width × height as your upload. Upload 4000×3000, get back 4000×3000. A tool that returns 625×400 from a 4000px upload didn't "lower the DPI" — it threw away about 98% of your pixels, and those pixels are gone for good.
PNG is lossless — so why does mine look worse?
PNG is a lossless format. Unlike JPEG, it doesn't throw away detail to save space, and it supports a real alpha (transparency) channel, which is why cutouts are saved as PNG in the first place. Save the same image as PNG ten times in a row and pixel ten is identical to pixel one. So if your PNG cutout looks soft, the softness was baked in before the file was written — the PNG just faithfully recorded a result that had already been shrunk or re-compressed upstream.
There are really only two ways a "lossless" PNG ends up looking worse than your source:
- The tool downscaled first. It rendered the cutout at, say, 500px wide, then saved that small canvas as a PNG. The PNG is lossless — of a tiny image.
- The original was a JPEG and the tool re-saved it as a low-quality JPEG mid-pipeline before exporting, stacking compression artifacts that then got frozen into the PNG.
That second one deserves a word, because JPEG degrades every single time it's saved — a phenomenon known as generation loss, or the "photocopier effect." Cloudinary's well-known explainer ("Why JPEG is like a photocopier") and degradation tests from ImageKit and Uploadcare put rough numbers on it: re-save a JPEG at quality 80 about five to ten times and the degradation becomes visibly noticeable; push to 20–30 re-save cycles and the image looks like it was photographed through frosted glass. Each save re-applies lossy compression to an already-compressed image, like photocopying a photocopy. The lesson: edit and archive in a lossless format (PNG or TIFF) and only export to JPEG once, at the very end.
This is what people are really after when they look for a free background remover no compression: not magic, just a tool that processes at full size and writes the PNG once, cleanly, without a quality slider quietly set to "preview." If you want the deeper trade-offs between keeping a cutout transparent versus flattening it onto white, our guide on transparent PNG vs. white-background product photos walks through when each one wins.
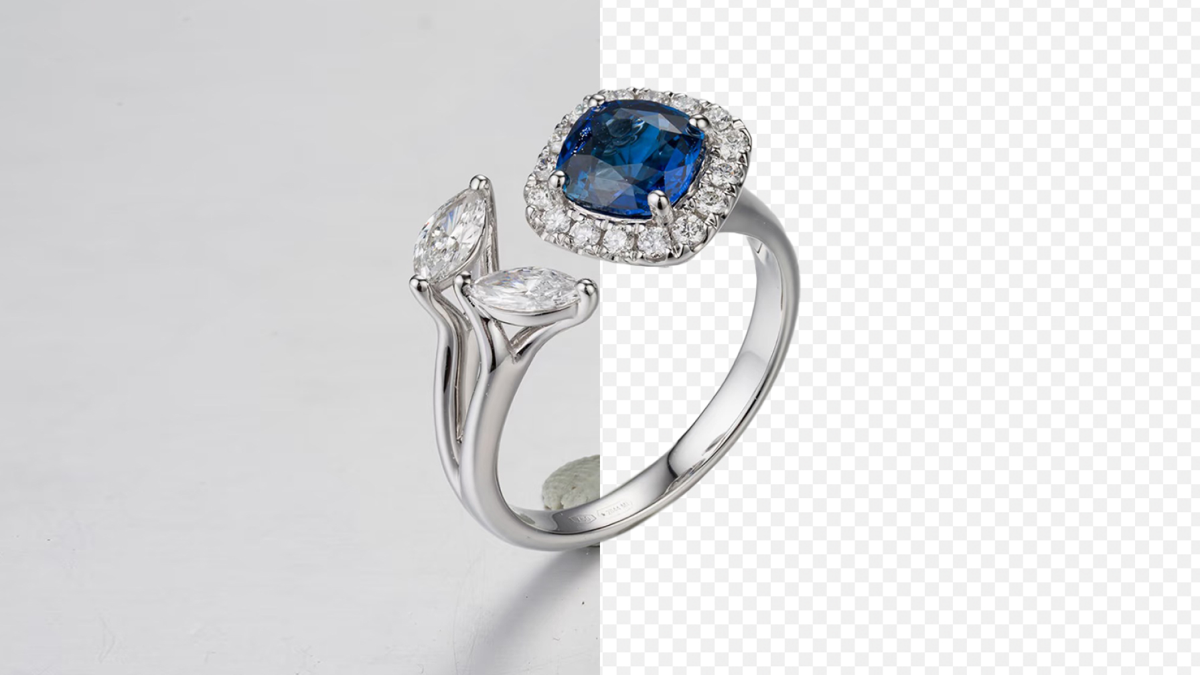
Zoom into a full-resolution PNG cutout like the one above and the stitching, texture, and edge stay crisp. A downscaled-then-upscaled file falls apart at this magnification — blocky edges, mushy detail, halos. The zoom test is the fastest way to catch a tool that quietly shrank your image.
PNG vs WebP vs JPG for Cutouts: Pick the Right Container
Once you have a clean cutout, the format you save it in decides whether the transparency survives at all. This trips up more sellers than the cutout itself, so here's the decision in plain terms.
| Format | Transparency? | Lossless? | Best for |
|---|---|---|---|
| JPG / JPEG | No — none, ever | No (lossy every save) | Final flattened image on a solid background |
| PNG (PNG-24) | Yes — full 8-bit alpha | Yes | Editing, archiving, master cutout |
| WebP | Yes — full 8-bit alpha | Lossy or lossless | Transparent web/product-page assets |
JPG/JPEG has no alpha channel in its specification — it literally cannot store transparency (per transparency guides at webp-to-png.tools and webp2jpg.co). Save a cutout as JPG and the transparent area is flattened to a solid fill, usually white or black, and that loss is permanent. Combine that with the generation-loss problem above and the rule is clear: never use JPG for a cutout you'll composite onto a layout. Reserve it for the final, already-flattened image — for example Amazon's white-background JPEG requirement, where a solid background is already back in place.
PNG-24 is lossless and carries the full 8-bit alpha channel — the same 256 levels of transparency that give you clean soft edges, hair, and drop shadows. It survives unlimited re-saves with zero degradation, which makes it the safe default for any cutout and the format you should keep as your master.
WebP supports the same 8-bit alpha as PNG but adds a trick neither PNG nor JPG can do: it can compress the photo lossily and the alpha channel lossily-or-losslessly, producing a transparent image at a fraction of a PNG's file size (per the PNG-vs-WebP alpha comparison at lovely-imgs.com and Elementor's WebP guide). That makes WebP ideal for live web and product pages where load speed matters.
Rule of thumb: edit and archive in PNG (lossless), ship transparent web assets as WebP (small and transparent), and export final solid-background marketplace images as JPG. One caveat — some older systems and a few marketplaces still won't accept WebP, so always keep a PNG master you can re-export from.
How to keep your original resolution
Keeping full resolution is mostly about choosing a tool that doesn't take it away, then checking the output. Run through this short checklist every time:
- Confirm full-size download. Compare the downloaded file's pixel dimensions to your upload. They should match. If you uploaded 3000×4000 and got back 1000×1333, the tool downscaled — find a background remover full size download free instead.
- Avoid tools that show a sharp preview but export a small file. The on-screen preview can look great while the actual download is a fraction of the size. Always judge by the saved file, not the browser canvas.
- Watch for the credit or watermark gate. If "HD" or "original quality" sits behind credits, a subscription, or removing a watermark, the free file is the shrunk one. No credit gate means no resolution gate.
- Save as PNG, not JPEG. PNG keeps the transparent edge clean and adds no compression. Only flatten to JPEG at the very end if a marketplace specifically requires a white background and a smaller file.
- Start from your highest-quality source. The cutout can only preserve what you feed it — upload the original, not a screenshot or a messaging-app copy that already got compressed.
- Convert to sRGB before upload. Images tagged Adobe RGB or ProPhoto RGB (or left untagged) look washed out and desaturated in browsers, because browsers assume sRGB and squash the wider gamut (per Tectalic's "Preparing Images for the Web: sRGB and Adobe RGB" and the ElitePX color-profiles guide). Convert to sRGB and embed the profile so your colors don't drift on the listing.
Do those things and the resolution question takes care of itself. The whole point of a no-gate tool is that "full quality" isn't a feature you unlock — it's just the default.
Get your full-size cutout free →
How to Verify Your Cutout Kept Full Resolution (60-Second Check)
Most "quality loss" is a silent downscale nobody checked for. So before you trust any tool — Snappyit included — run this quick verification. It takes under a minute and it's the single most useful habit in this whole guide.
- Note the original dimensions before you upload. On Windows, right-click the file > Properties > Details. On Mac, Get Info or Tools > Show Inspector in Preview. Any image-info viewer works. Record the width × height in pixels — say 4000×3000.
- Check the downloaded file the same way and confirm the pixels match. Crucial detail: check the actual file dimensions, not the on-screen preview size. This is the exact trap that fools people — many free tools display a crisp full-size preview while the downloadable file is a downscaled copy. remove.bg's free download, for instance, is capped at about 0.25 megapixels (~625×400) no matter how large you uploaded; full res needs a paid credit. If your downloaded file says 625×400 and you uploaded 4000×3000, you found the leak.
- Confirm the format actually has transparency. It should be a PNG or WebP, not a JPG with a white fill standing in for "transparent."
If the download came back small, resist the worst recovery move: do not upscale the tiny preview back to 4000px. Upscaling does not restore lost detail — it interpolates and invents pixels, baking softness in permanently (a basic resampling limit echoed by tools like LetsEnhance's 300 DPI converter and every print-resolution guide). You cannot add back information that was discarded. The only reliable path is to keep a full-resolution output from the start.
To be straight about where Snappyit fits: it returns the same pixel dimensions you uploaded, free, with no watermark and no credit — but you don't have to take that on faith. Verify it with the check above, and feel free to verify the free full-res alternatives the same way, including Adobe Express and Erase.bg, which also hand back full-resolution output at no charge. The habit matters more than the brand: always confirm the file, never the preview.
Full resolution also means cleaner edges
Resolution isn't only about sharpness when you zoom in — it directly affects how clean your edges can get. Tricky boundaries like flyaway hair, lace trim, fur, and fringe live in fine detail that only exists at full size. Refine those edges on a downscaled image and they turn to mush, because there simply aren't enough pixels left to separate strand from background. Remember the alpha matte from earlier: edge accuracy depends on having enough boundary pixels to assign those 256 transparency levels across. Shrink the canvas and you collapse a smooth two-pixel anti-aliased edge into a single hard pixel — the softness that looked natural becomes a blocky stair-step.
At full resolution you have room to clean up by hand. Snappyit gives you a manual KEEP / REMOVE / ERASE brush for exactly this: paint KEEP over a wisp of hair the automatic pass dropped, paint REMOVE over a bit of background that survived between someone's fingers or inside a chain link, and use ERASE to shave a halo off a hard edge — that defringe move from earlier, done by hand where the auto pass left a colored fringe. Because you're brushing on the full-size canvas, the corrections land on real detail instead of smearing a handful of oversized pixels.
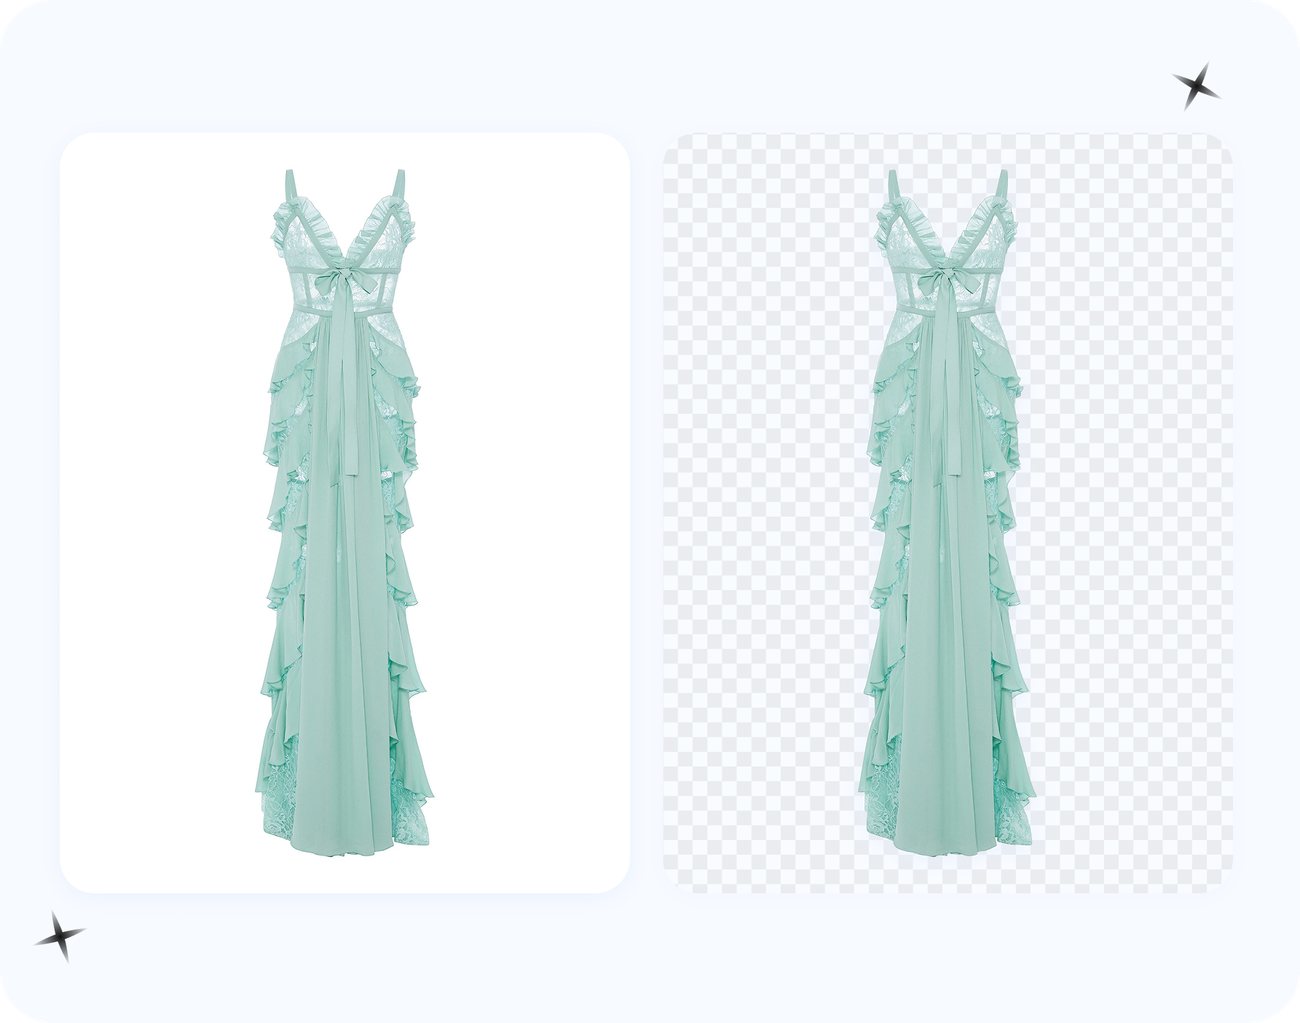
The example above shows hair and fabric edges held together cleanly after a quick brush pass. That kind of result is only possible when the image stays full size from upload to export — which, conveniently, is also what gives you a clean, watermark-free file. Our breakdown of a free background remover with no watermark and full resolution goes deeper on why those two things tend to come as a pair.
Remove a background without losing quality: step by step
Putting it all together, here's the workflow to remove a background without losing quality from start to finish:
- 1. Start with your best original. Upload the full-resolution source file — not a screenshot, not a re-saved JPEG, not a copy pulled from a chat app. Convert it to sRGB first so colors hold on the listing.
- 2. Run the automatic cutout. Let the tool isolate your subject. This step changes which pixels are transparent; it does not resize or repaint anything it keeps.
- 3. Brush-refine the tricky edges. Zoom into hair, lace, or fringe and use KEEP / REMOVE / ERASE to fix what the automatic pass missed — including any color halo around the subject. Full resolution means these corrections stay crisp.
- 4. Run the 60-second resolution check. Compare the downloaded file's actual pixel dimensions to your upload. If it shrank, the tool downscaled — switch to one that doesn't, and never upscale the preview to fake it back.
- 5. Export to the right container. Keep a full-resolution PNG as your master. Ship a WebP for transparent web assets, and flatten to JPEG only at the very end if a specific marketplace requires a solid background.
If you're prepping for Amazon specifically, line the export up to their rules while you're at it: at least 1000 px on the longest side (1600+ px recommended so zoom works), sRGB color mode, and a main image that's a JPEG on pure white (RGB 255,255,255) with the product filling at least 85% of the frame (per Amazon image requirements summarized by SellerSprite and Dresma). Note the sequence — you keep the cutout transparent and full-res right up until that final flatten-to-white-JPEG step.
Follow those steps and your subject comes out the other side at the same resolution it went in — transparent background, crisp edges, no watermark, no surprise preview-sized download. The cutout was never the thing hurting your quality; the downscaling was, and now you know how to spot it, verify it, and skip it.
Try the free background remover →
Preserving resolution matters most when it feeds the rest of your imagery — model renders, recolors, and zoomable hero shots. See how the full pipeline fits together on the AI product photography hub.
Frequently Asked Questions
Does removing a background reduce image quality?
It shouldn't. Cutting out a background only changes which pixels are transparent — the remaining pixels keep their original resolution. Quality loss comes from tools that downscale or re-compress the output, not from the cutout itself.
Why do free background removers downscale my image?
Many gate full resolution behind a paid plan, so the free download is a smaller preview. The cutout was computed at full size, but you're only given a reduced copy.
Is PNG lossless?
Yes. PNG uses lossless compression, so a transparent PNG keeps every pixel of the kept area. If your PNG looks soft, the tool downscaled or re-saved it — the format didn't.
How do I keep the original resolution when removing a background?
Use a remover that exports at the original pixel dimensions with no downscaling and no credit gate, then save as PNG. Snappyit returns the cutout at full resolution for free.
Does Snappyit compress or downscale my download?
No. Snappyit exports the cutout at full resolution as a clean PNG, with no downscaling, watermark or credits.
Does lowering the DPI reduce my image quality?
No — changing the DPI/PPI value alone does not touch a single pixel or reduce detail. DPI is just a tag that tells a printer how large to render your existing pixels (print size = pixels / DPI). A 3000-pixel-wide image is identical whether it's tagged 72 or 300 DPI; only its printed size changes (about 41 inches vs. 10 inches). Real quality loss happens when pixels are actually thrown away (downscaling/resampling), recompressed (re-saving JPG), or invented (upscaling). For screens and marketplaces, DPI is ignored entirely — only the raw pixel count matters.
Why does my cutout look perfect on the checkerboard preview but show a colored fringe on my real background?
Because the soft edge pixels of your subject are a blend of the subject's color and the ORIGINAL background's color. If you shot a yellow product on a blue surface, those edge pixels became slightly green. On a neutral checkerboard preview the tint is hard to see, but drop the cutout onto a white or contrasting layout and the green/colored halo shows. The fix is edge decontamination (defringe): rebuild or remove those mixed edge pixels so the boundary matches the subject's true color. With Snappyit you can also use the ERASE/REMOVE brush to clean a stubborn fringe by hand.
Is PNG or WebP better for a transparent product cutout?
Both keep transparency via the same 8-bit alpha channel, so edges stay clean in either. PNG is lossless — the best master/archive format and safe for unlimited re-saves. WebP keeps transparency too but compresses far smaller (it can apply lossy compression to the photo and the transparency), which is ideal for fast-loading web and product pages. Practical rule: keep a PNG master, publish web assets as WebP, and only export to JPG for the final flattened image once a solid background is back (JPG can't hold transparency at all).