At a glance
AI product photo errors — garbled labels, wrong garment details — and the 3 fixes that work: a product-trained model, a clear source photo, the right prompt.
| Need | What to do |
|---|---|
| Get oriented | Read the short summary, then use the checklist below. |
| Create a test image | Try Product Photo Editor Free |
AI image generation has changed how online sellers make listing photos. A flat-lay snapped on a phone can become a clean on-model shot in seconds, with no studio, no model, and no sample shipped. The speed is real and the savings are real. But anyone who has run a real catalog through a general-purpose generator has also seen the other side of it: the output that looks great at thumbnail size and falls apart the moment a buyer zooms in.
The failures cluster into two categories, and both are the kind that cost you sales. The first is text: brand names, ingredient panels, care labels, and packaging copy come back garbled — misspelled, scrambled, or made up entirely. The second is garment detail: the AI quietly invents a collar, changes the button count, mangles a print, or shifts the fit, so the image no longer matches the product in the box. Both undermine the one job a product photo has, which is to show the buyer exactly what they are buying. The good news is that these AI product photo errors are predictable, and once you understand why they happen, they are fixable. Let's name them precisely, explain the cause, and walk through the three fixes that work.
Error 1: Garbled labels, brand names & packaging text
The most obvious tell that an image came out of a generic AI generator is the text. Look closely at any label, tag, hangtag, or printed panel and you will often find letters that do not spell anything. A brand name turns into a near-miss anagram of itself. An ingredient list becomes a column of plausible-looking nonsense. A care instruction reads like it was run through three translation passes. Sometimes the model simply invents words that were never on the product at all.
This matters far more than it looks. A label is a trust signal. When a buyer sees a brand name spelled wrong on a tag, or a nutrition panel that dissolves into noise, the listing reads as fake, scammy, or careless — even if the underlying product is genuine. On marketplaces that police listing quality, garbled packaging text can get an image rejected outright. And for the buyer who orders anyway, the gap between the AI-generated label and the real one is a textbook reason for a return and a bad review.
Apparel sellers are not exempt just because their product is not a cereal box. Clothing carries plenty of text: the woven brand label at the collar, the size and care tag, screen-printed graphics, embroidered logos, and slogan tees where the wording is the product. A generic generator will happily reflow a band shirt's lettering into gibberish or smear a logo into an abstract blob. If text appears anywhere on the garment, it is at risk. And the question every seller ends up asking — why does AI get the text wrong? — has a blunt answer: it is not reading the words at all. More on that below.
Error 2: Wrong garment style & details
The second class of error is sneakier because the image still looks like a real, well-lit photo. Nothing is obviously broken — it is just not your product. In AI-generated product images of apparel, the model hallucinates attributes that are plausible for that kind of garment but wrong for the specific one you uploaded. The most common offenders:
Invented collars and necklines
A crew neck gains a hidden button placket; a plain tee sprouts a collar; a V-neck rounds itself off. The model defaults to whatever neckline it has seen most.
Wrong button count or closures
A five-button cardigan comes back with six or four. A zip becomes a row of buttons. Pocket flaps appear or vanish.
Mangled prints and patterns
A repeating floral drifts out of register, a logo distorts, stripes bend where they should run straight, and a sharp geometric print blurs into approximation.
Fabric and texture drift
A ribbed knit renders as smooth jersey; a matte cotton picks up a synthetic sheen; a chunky cable weave flattens into a printed-on impression of one.
- Altered fit and cut. A relaxed boxy tee gets nipped in at the waist; a cropped length grows; sleeves shorten or lengthen. The silhouette quietly changes.
Every one of these is the AI being confident and wrong. It is not copying your garment — it is generating a garment that matches the rough description it inferred from your photo. For a mood board that is fine. For a listing where the customer expects the item in the photo to arrive at their door, it is a direct line to "not as described." These wrong garment details are the quieter half of AI product photo errors, and because they look convincing, they slip into published listings far more often than the obvious text glitches do.
Why generic AI generators get it wrong
Almost every one of the AI product photo errors above shares one root cause: a general-purpose text-to-image model is not preserving your product — it is repainting the whole scene from scratch based on statistical likelihood. Understanding that one fact explains everything above, and it explains why AI-generated product images from these tools drift away from the real item.
First, on text. A generic generator does not read or transcribe letters. It treats writing as a visual texture — a region that should "look like text" — and predicts pixels accordingly. It has no internal rule that says the marks on this tag must spell an exact, fixed string. So it produces something with the shape and rhythm of writing but none of the correctness, which is why even a perfectly sharp source photo yields a garbled label. The model is rendering the appearance of text, not the text.
Second, on garment detail. The same model paints the image holistically, sampling from everything it learned about how clothing tends to look. It is not trained to lock the specific collar, button count, weave, or fit you uploaded; it is trained to generate plausible apparel. When your garment's real attributes are unusual or only partly visible in the source, the model fills the gap with its most likely guess — and a likely guess for "shirt" is not the same as a faithful copy of your shirt. There is no built-in concept of "this exact product must stay identical."
That is the difference that drives the fixes: a generic generator is built to create, while a product workflow needs a model built to preserve. Once you frame it that way, the three fixes are obvious — change the tool, improve the input, and constrain the output.
Fix 1: Use a model trained for product photos, not a generic AI
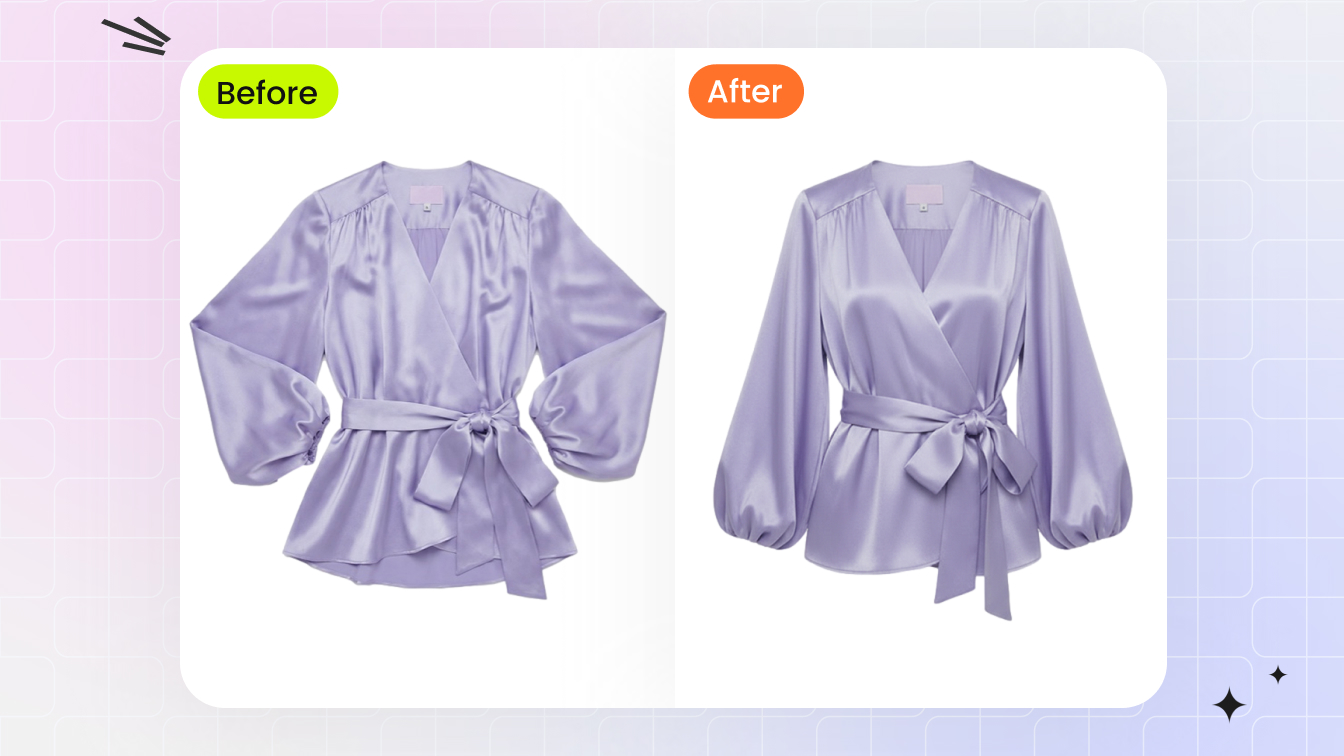
This is the single biggest lever, and it is worth doing first because it removes most errors before you touch anything else. A model purpose-trained on product and garment photography is built around a different goal than a general art generator. Instead of inventing a plausible scene, it is designed to take your real product as the fixed anchor and change only what you asked it to change — the background, the pose, the model, the color — while holding the garment's actual attributes and any real labels in place.
The practical effect is that the failure modes from the first two sections largely disappear. A product-trained model keeps the collar you uploaded, the buttons you uploaded, the print in register, the weave intact, and the brand label legible, because preservation is the design target rather than a happy accident. A generic generator can occasionally luck into an accurate result; a product-trained one is built to deliver it every time, across a whole catalog, with the consistency that listing work demands.
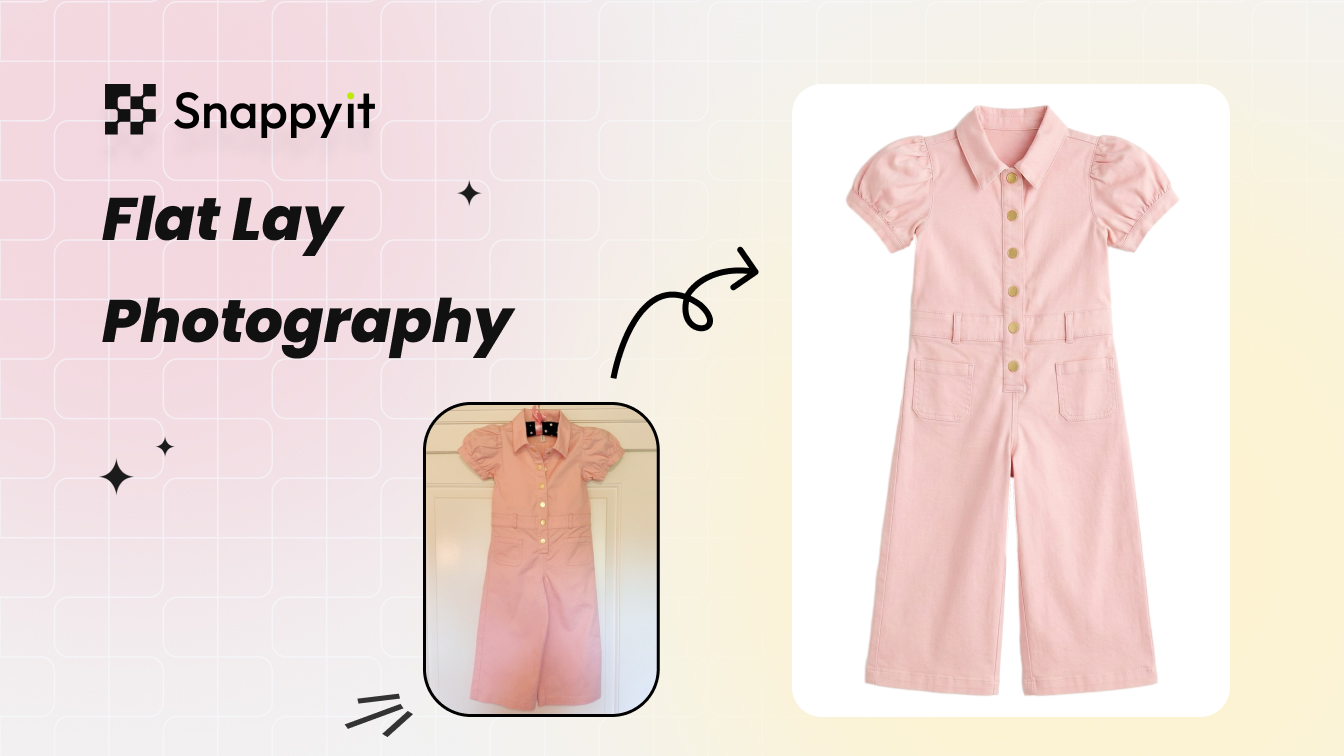
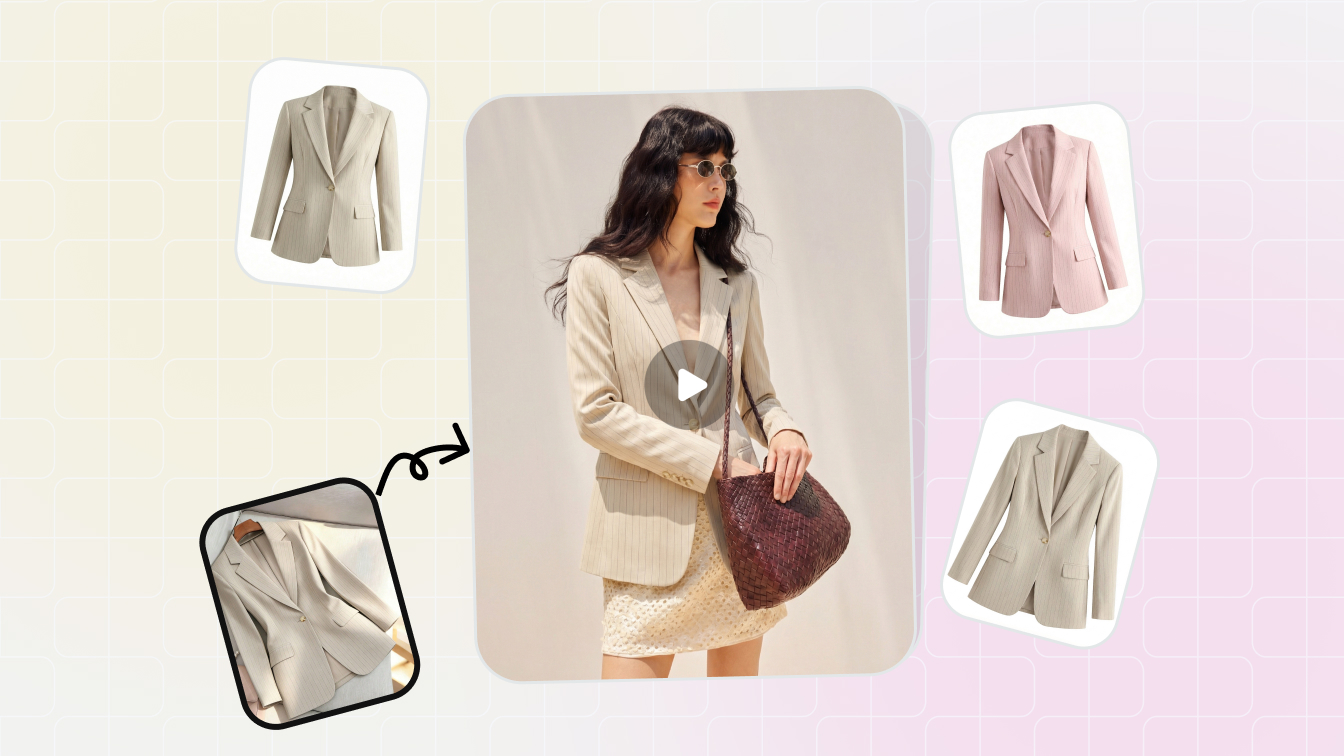
This is exactly the distinction Snappyit is built around. Tools like AI fashion model, ghost mannequin, and flat lay are trained for apparel specifically, so they place your real garment on a model or into a clean shot rather than reimagining it. If you are choosing where to spend effort, start here — no amount of prompting or source-photo polish will rescue a tool that was never meant to keep your product faithful.
See the difference for yourself
Upload one garment photo and check whether the details survive. Try a product-trained model free →
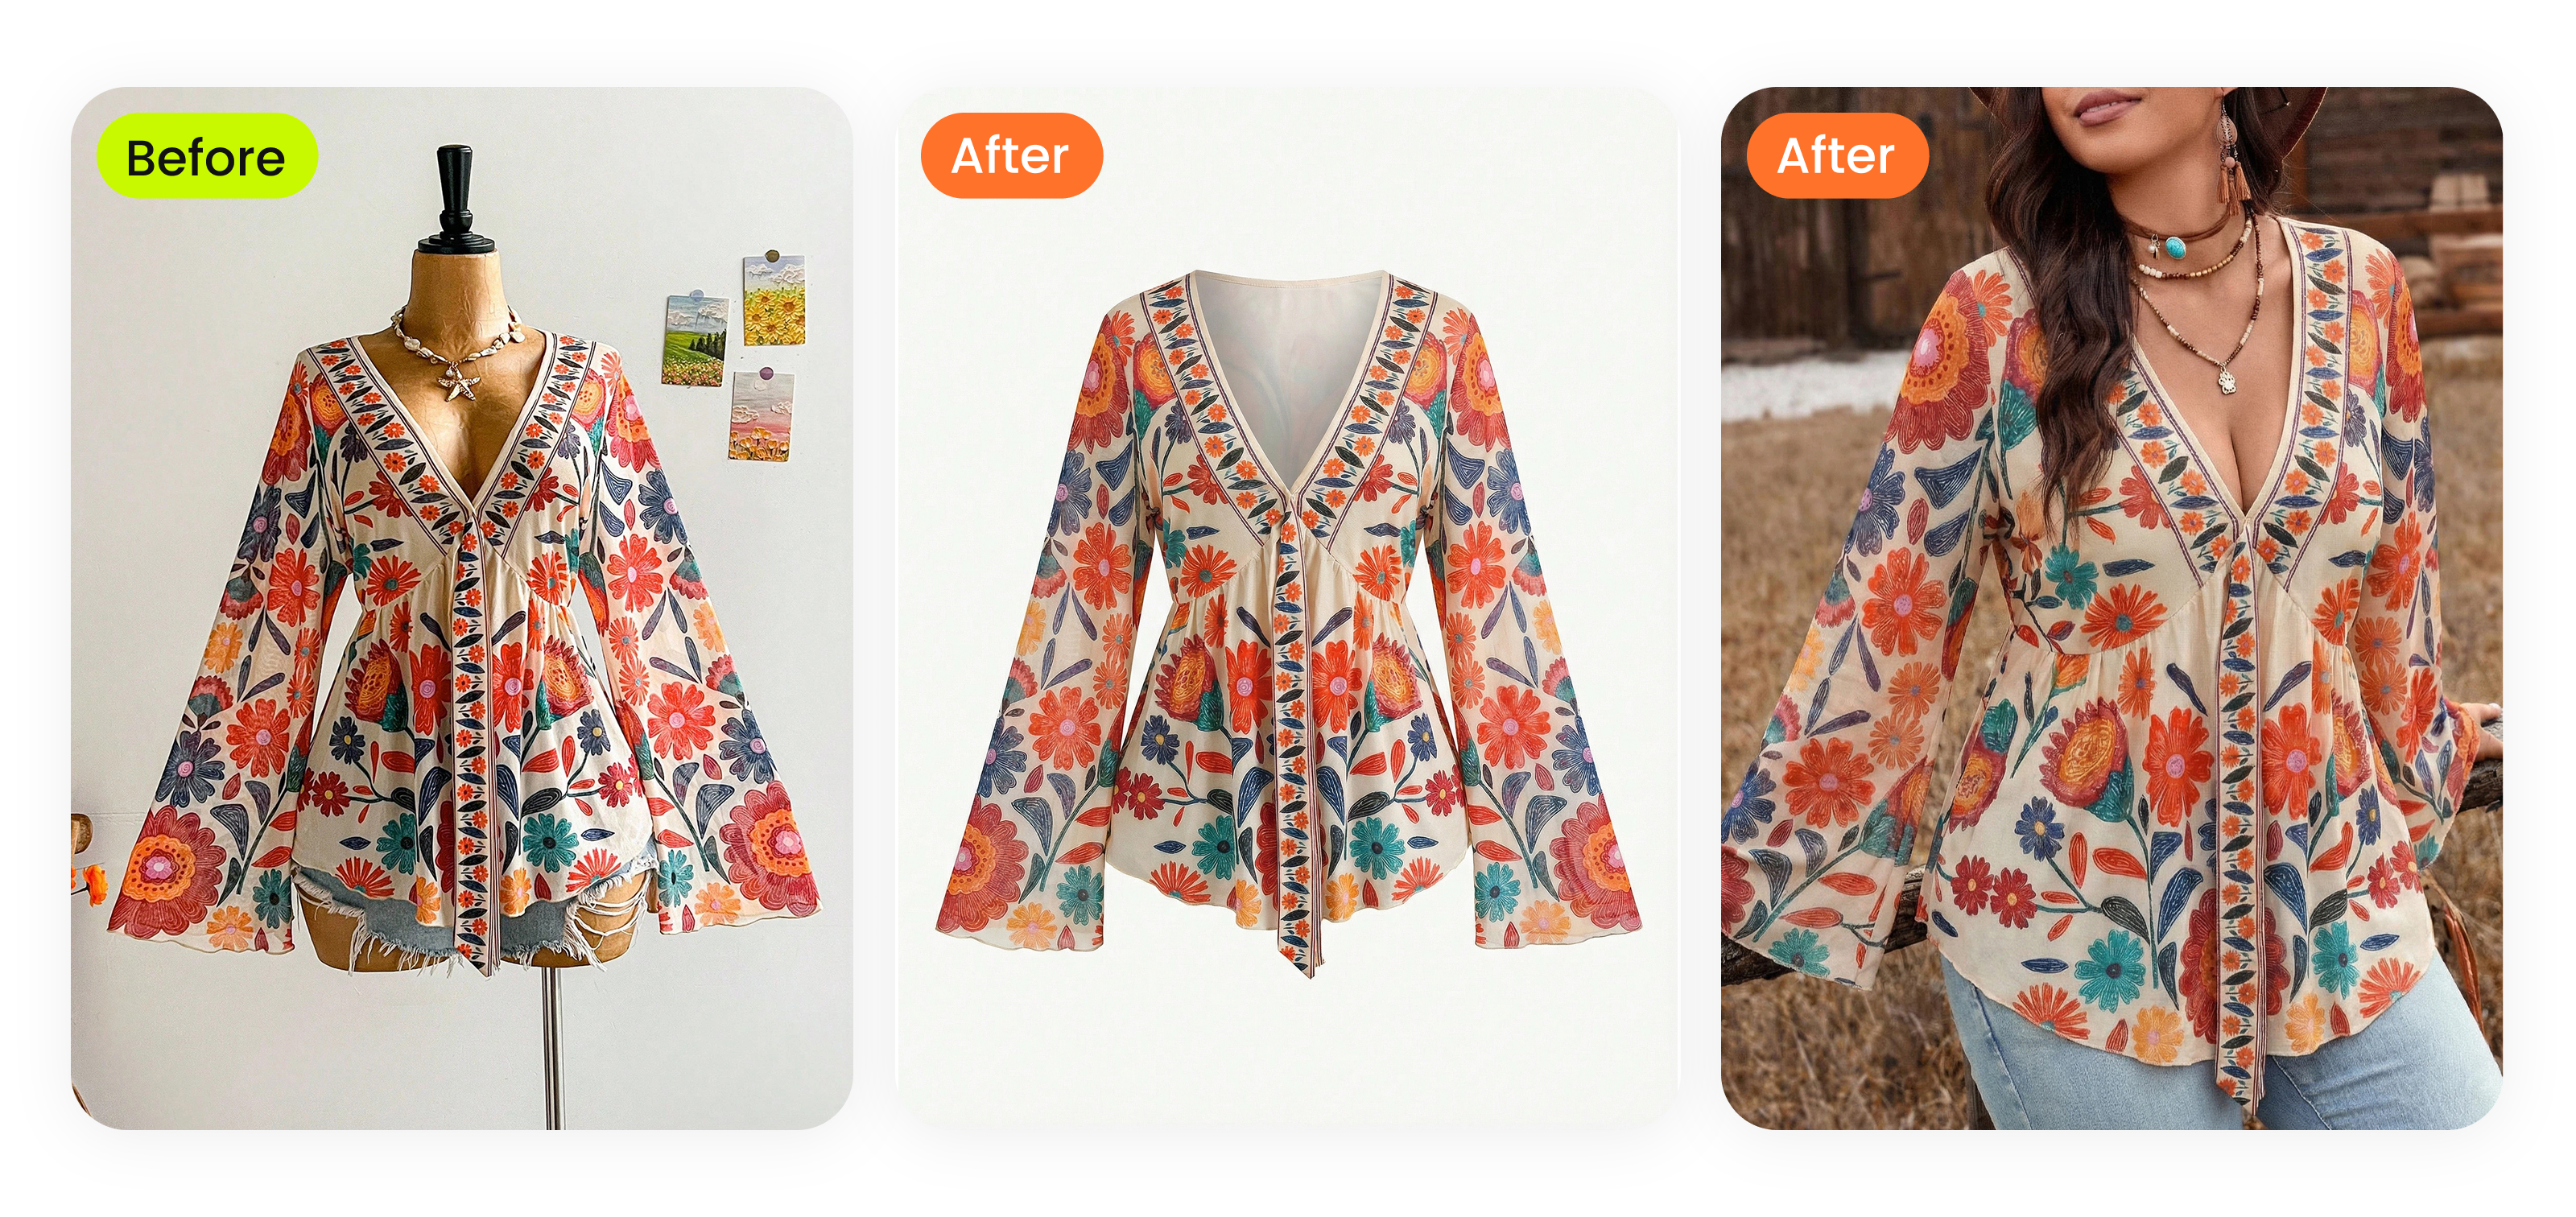
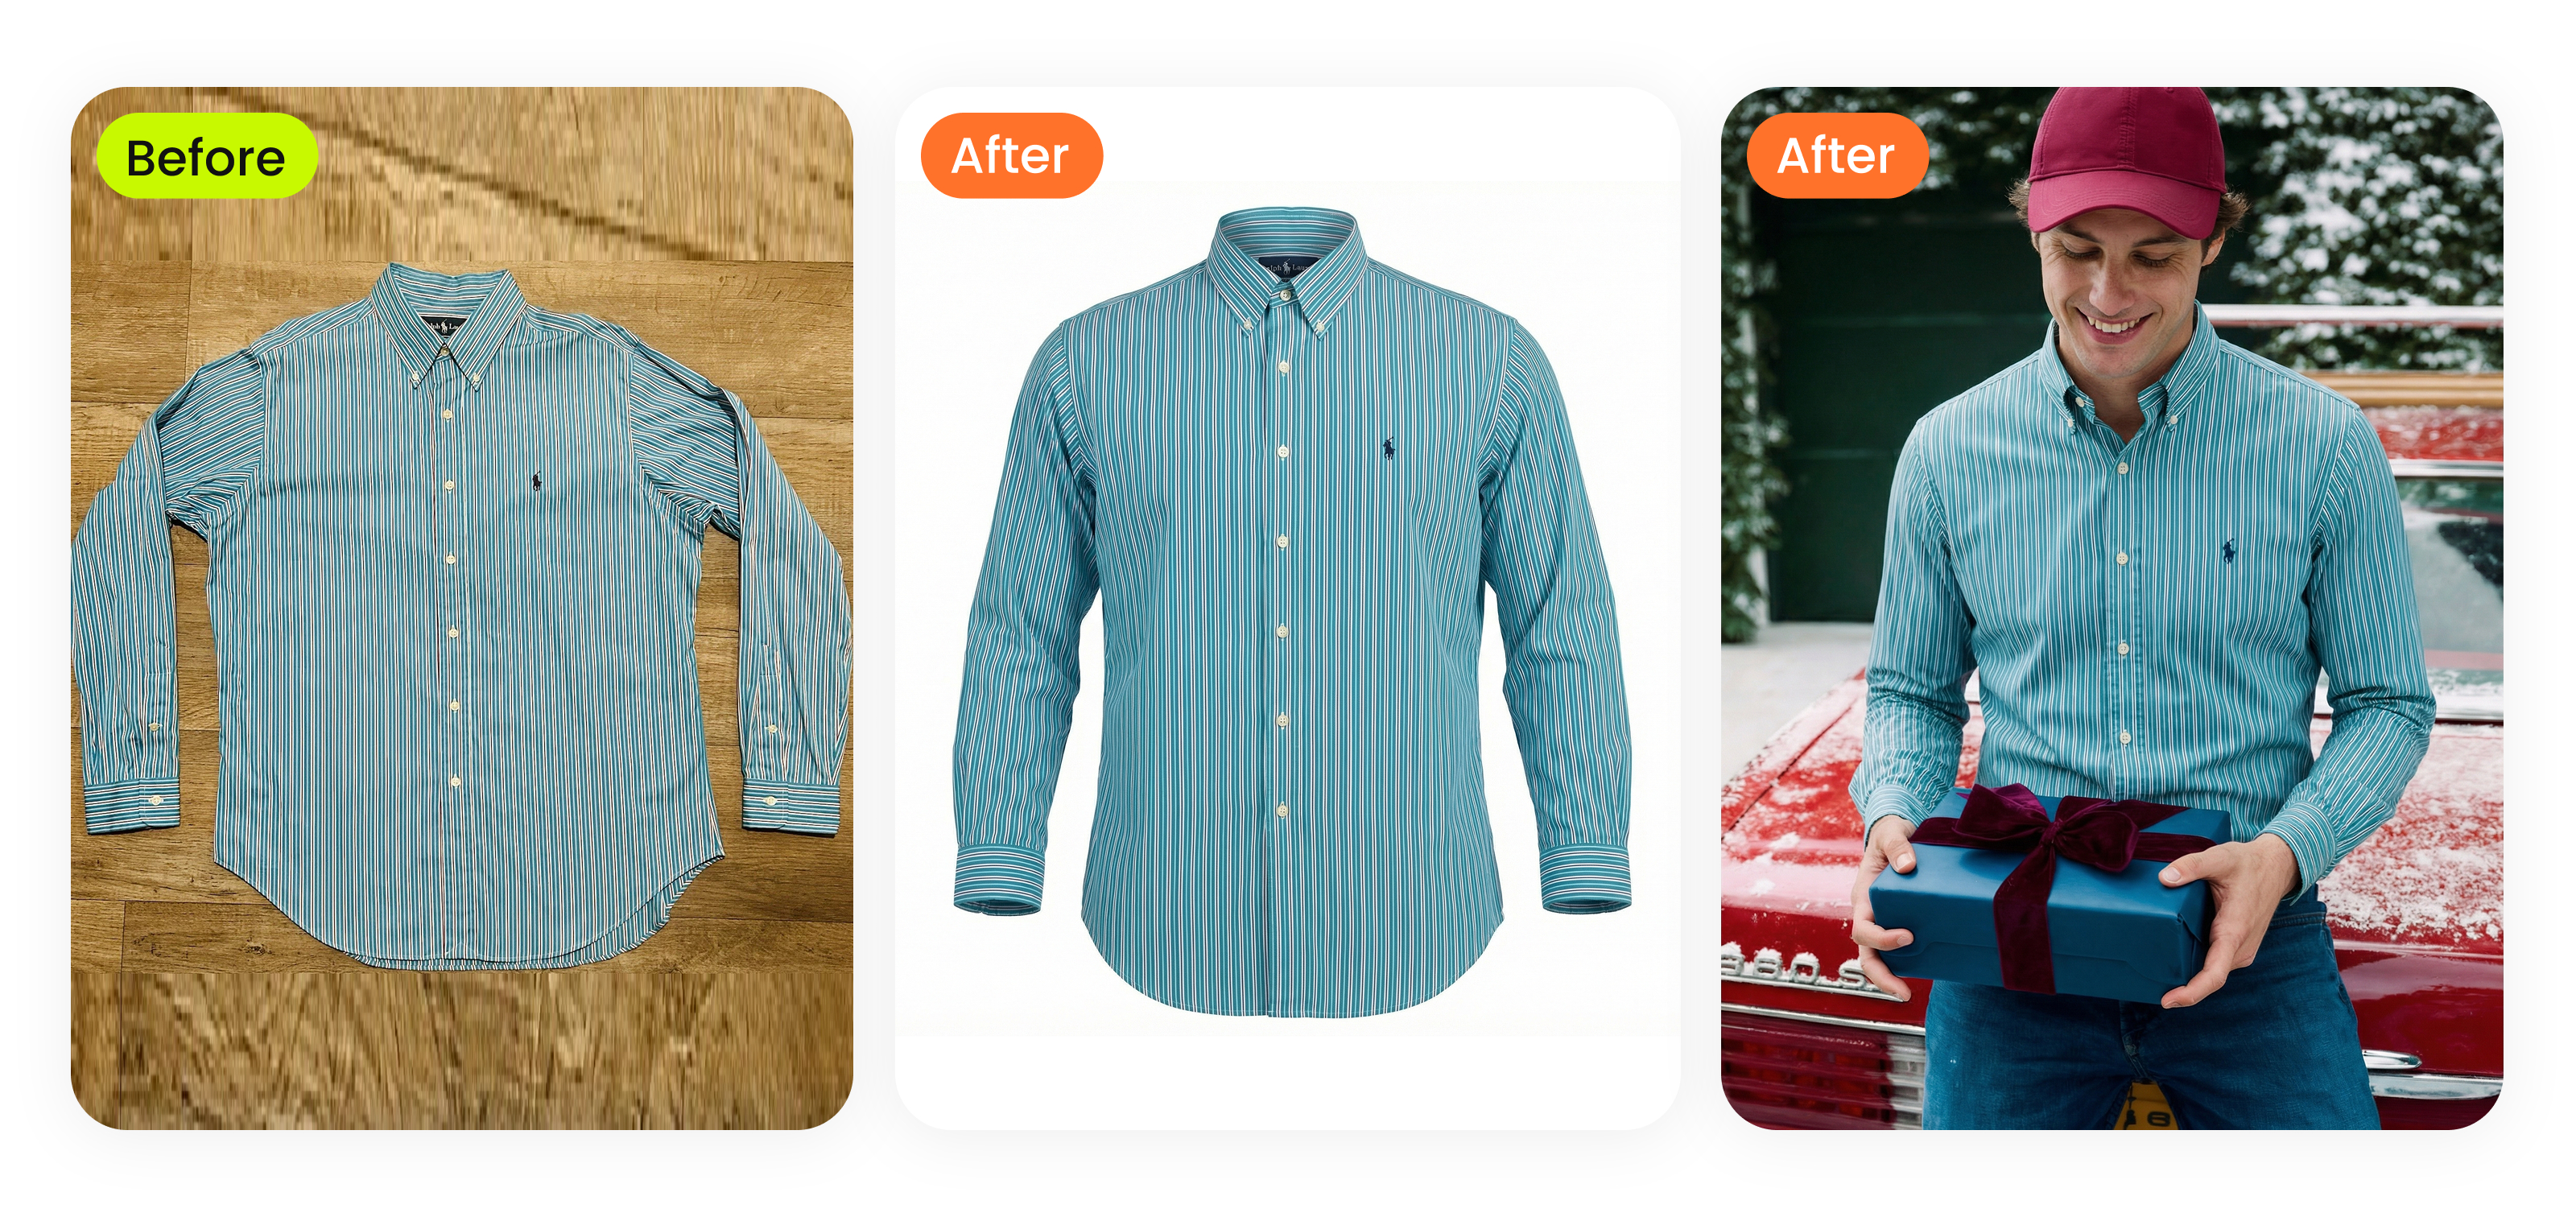
Here is one supplier flat-lay turned into a listing-ready on-model image with the garment's real shape, color, and detail preserved — not reinvented:
Source → clean product → on-model — every detail kept
Fix 2: Start with a clear, complete, high-res source photo
The second fix is about what you feed the model. AI can only preserve detail it can actually see — so a weak source photo forces even a good model to guess at the parts it cannot read, and guessing is precisely where errors come from. Garbage in, garbage out applies to images as literally as it does to data.
A source photo that gives the model real information to work from looks like this:
- Crop tight to the product. Fill the frame with the garment and cut out clutter, hands, hangers, and busy backgrounds. The less the model has to interpret around the product, the less it invents.
- Light it evenly. Flat, diffuse light with no harsh shadows or hotspot glare. Shadows hide detail and glare blows out texture — both push the model into filling gaps.
- Show the full garment. Capture the whole piece, not a partial crop. If the model cannot see the hem, the cuff, or the second sleeve, it will improvise them.
- Make labels readable. If a brand label, size tag, or printed graphic matters, get it sharp and in focus in the source. A legible input gives a product-trained model a real label to preserve instead of a blur to reconstruct.
- Shoot high resolution and in focus. Detail the model can resolve — the weave, the stitching, the print edges — is detail it can keep. A soft, low-res input throws that information away before generation even starts.
None of this requires a studio. A recent phone, a bright window, and a clean surface clear the bar. The point is simply that a better input measurably reduces wrong details and garbled text downstream. A clear source photo will not, on its own, make a generic generator spell a label correctly — that is a model problem, not an input problem — but paired with a product-trained model, a clean source is one of the biggest accuracy gains available to you. If your starting photos are messy, a quick pass through a flat lay cleanup before the main render is often worth the extra step.
Fix 3: Use prompts to steer and lock details
The third lever is the prompt — useful, but third for a reason. Once you are on a product-trained model with a clean source photo, the prompt is how you fine-tune the result and lock the attributes that matter most. It cannot turn a generic generator into a faithful one, but it can meaningfully sharpen a good tool's output and catch the occasional misread.
What an accuracy-focused prompt does:
- Names the garment type precisely. "Ribbed crew-neck cotton tee, relaxed fit" gives the model an anchor; "shirt" invites it to default to the average.
- States the exact color. A hex code or a precise named color ("forest green," not "green") beats a vague term and reduces the color drift that plagues recolors and renders.
- Describes the print or pattern. Call out a repeating floral, a horizontal stripe, a chest logo — whatever the model most needs to keep in register rather than blur.
- Specifies what to preserve. Explicitly tell the model to keep the collar, the button count, the weave, the label, and the fit unchanged. Framing it as preservation, not creation, is the whole game.
- Corrects misreads on a re-run. If the first output adds a collar or misreads a tag, re-generate with a direct correction ("plain crew neck, no collar; keep the printed text exactly as in the source"). Iteration is cheap.
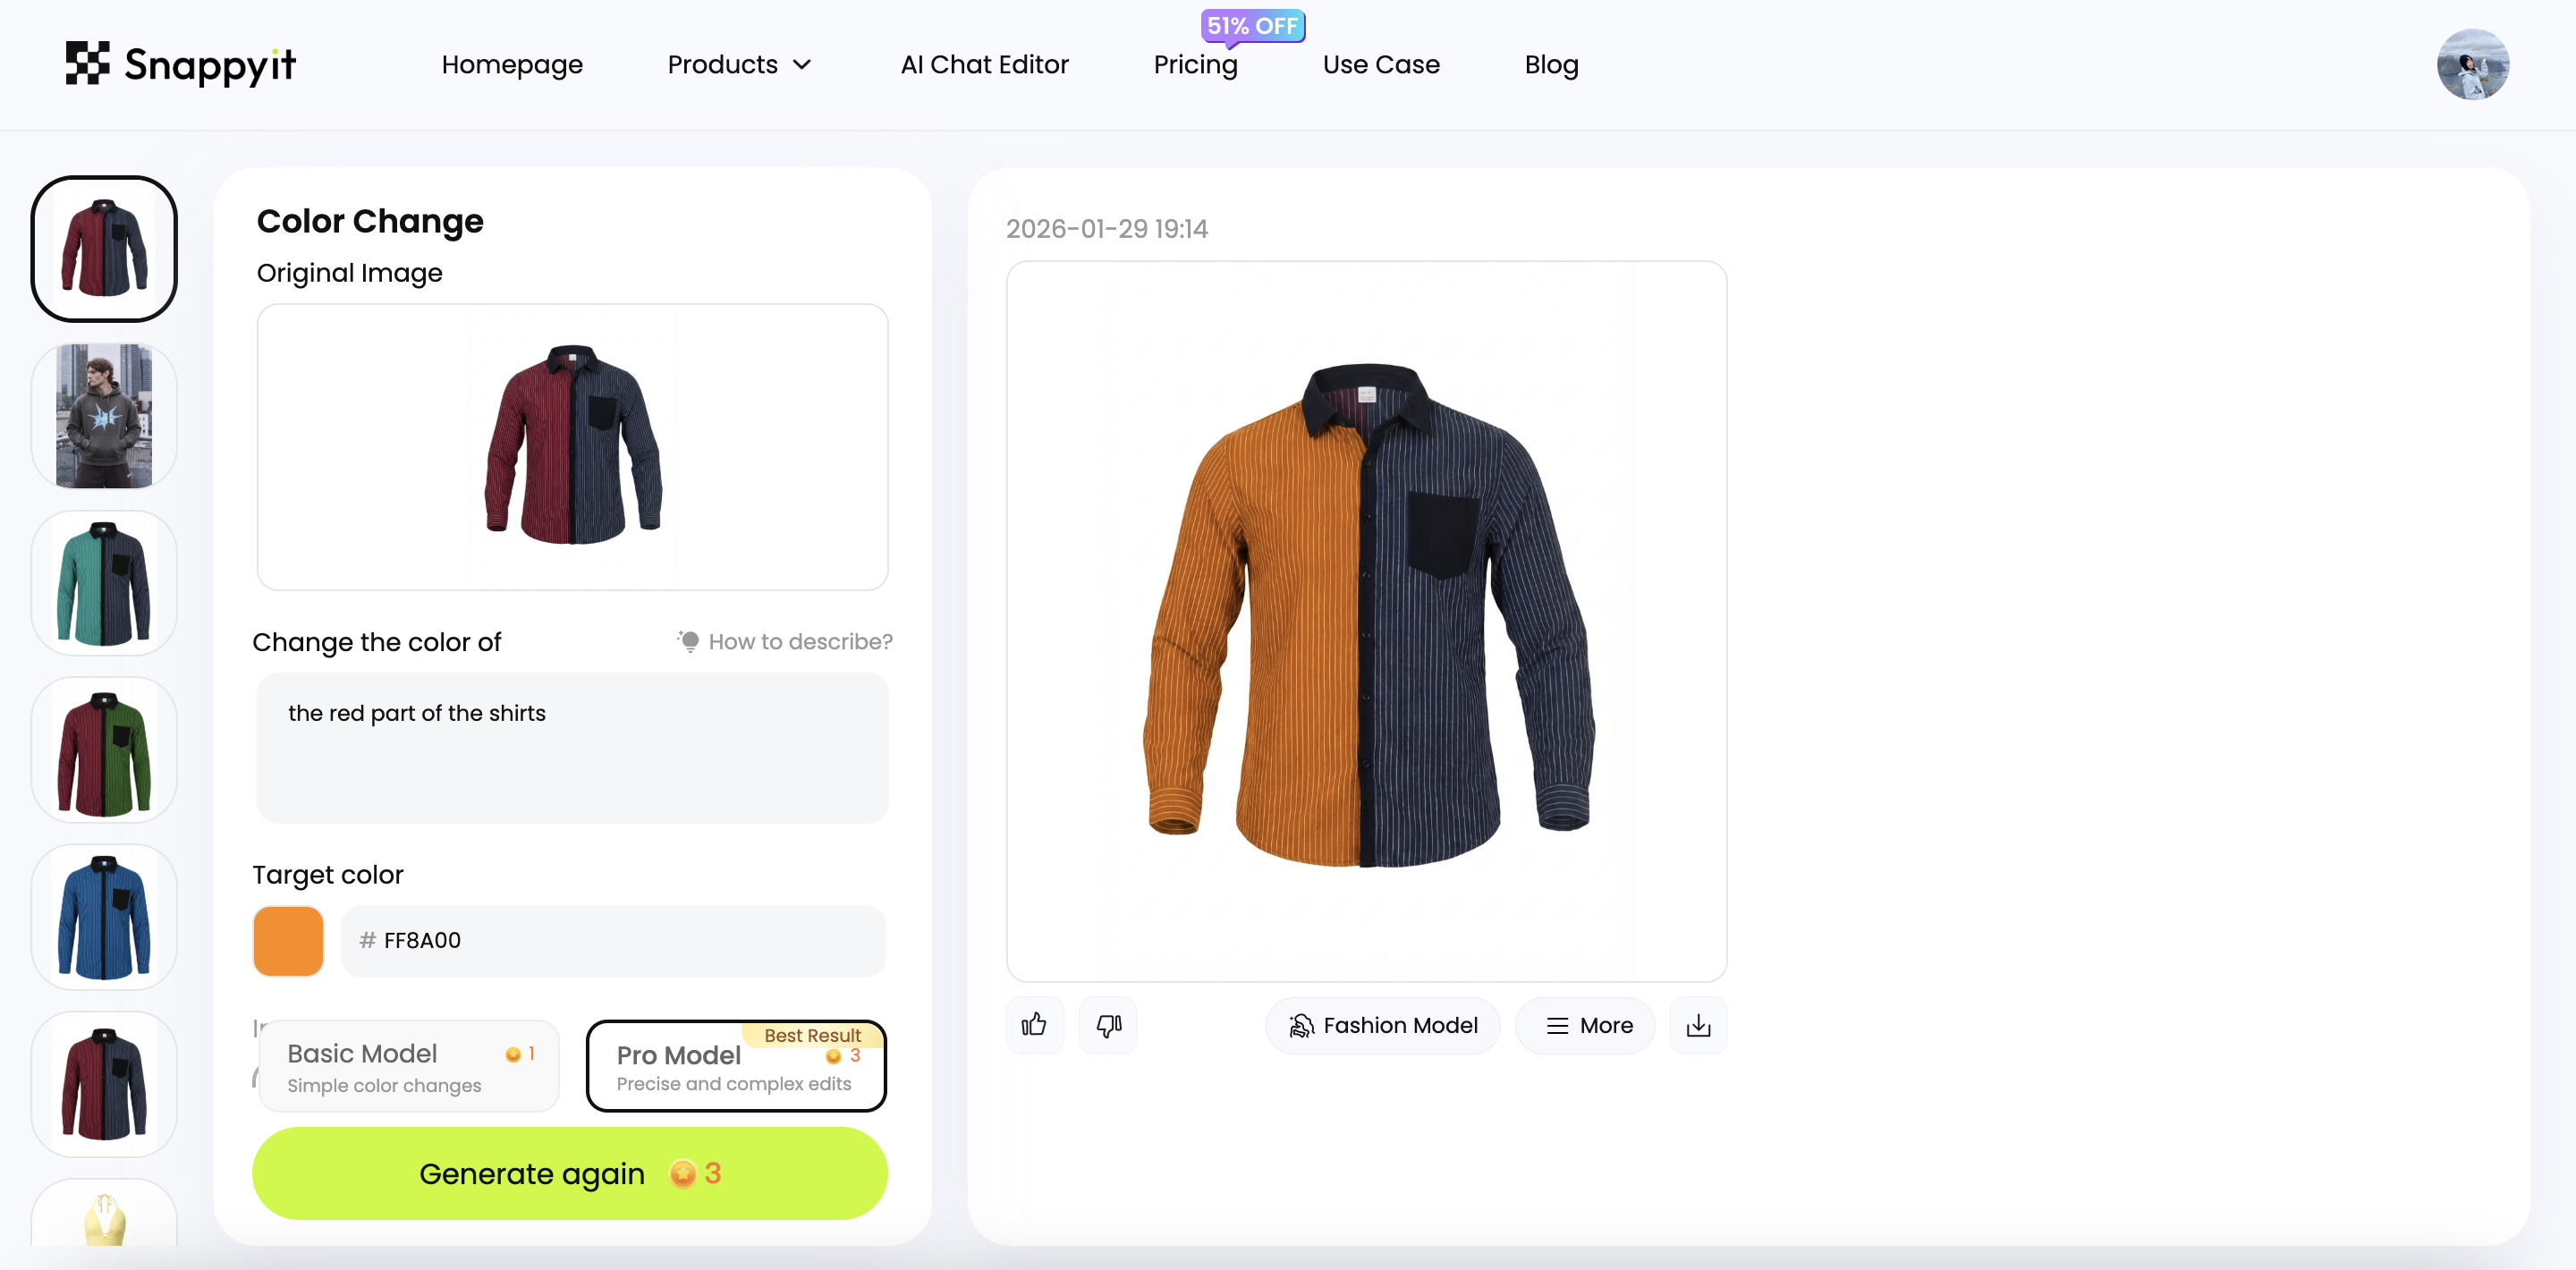
For color specifically, a tool with explicit color controls beats free-text prompting — color change lets you lock a target color directly instead of hoping the prompt lands. Treat the prompt as the final tuning pass on top of the two bigger fixes, not as a substitute for either.
An interface built for this exposes the right controls — a target color, an area to apply it to, and one-click variants — so the detail you care about is locked rather than left to chance:
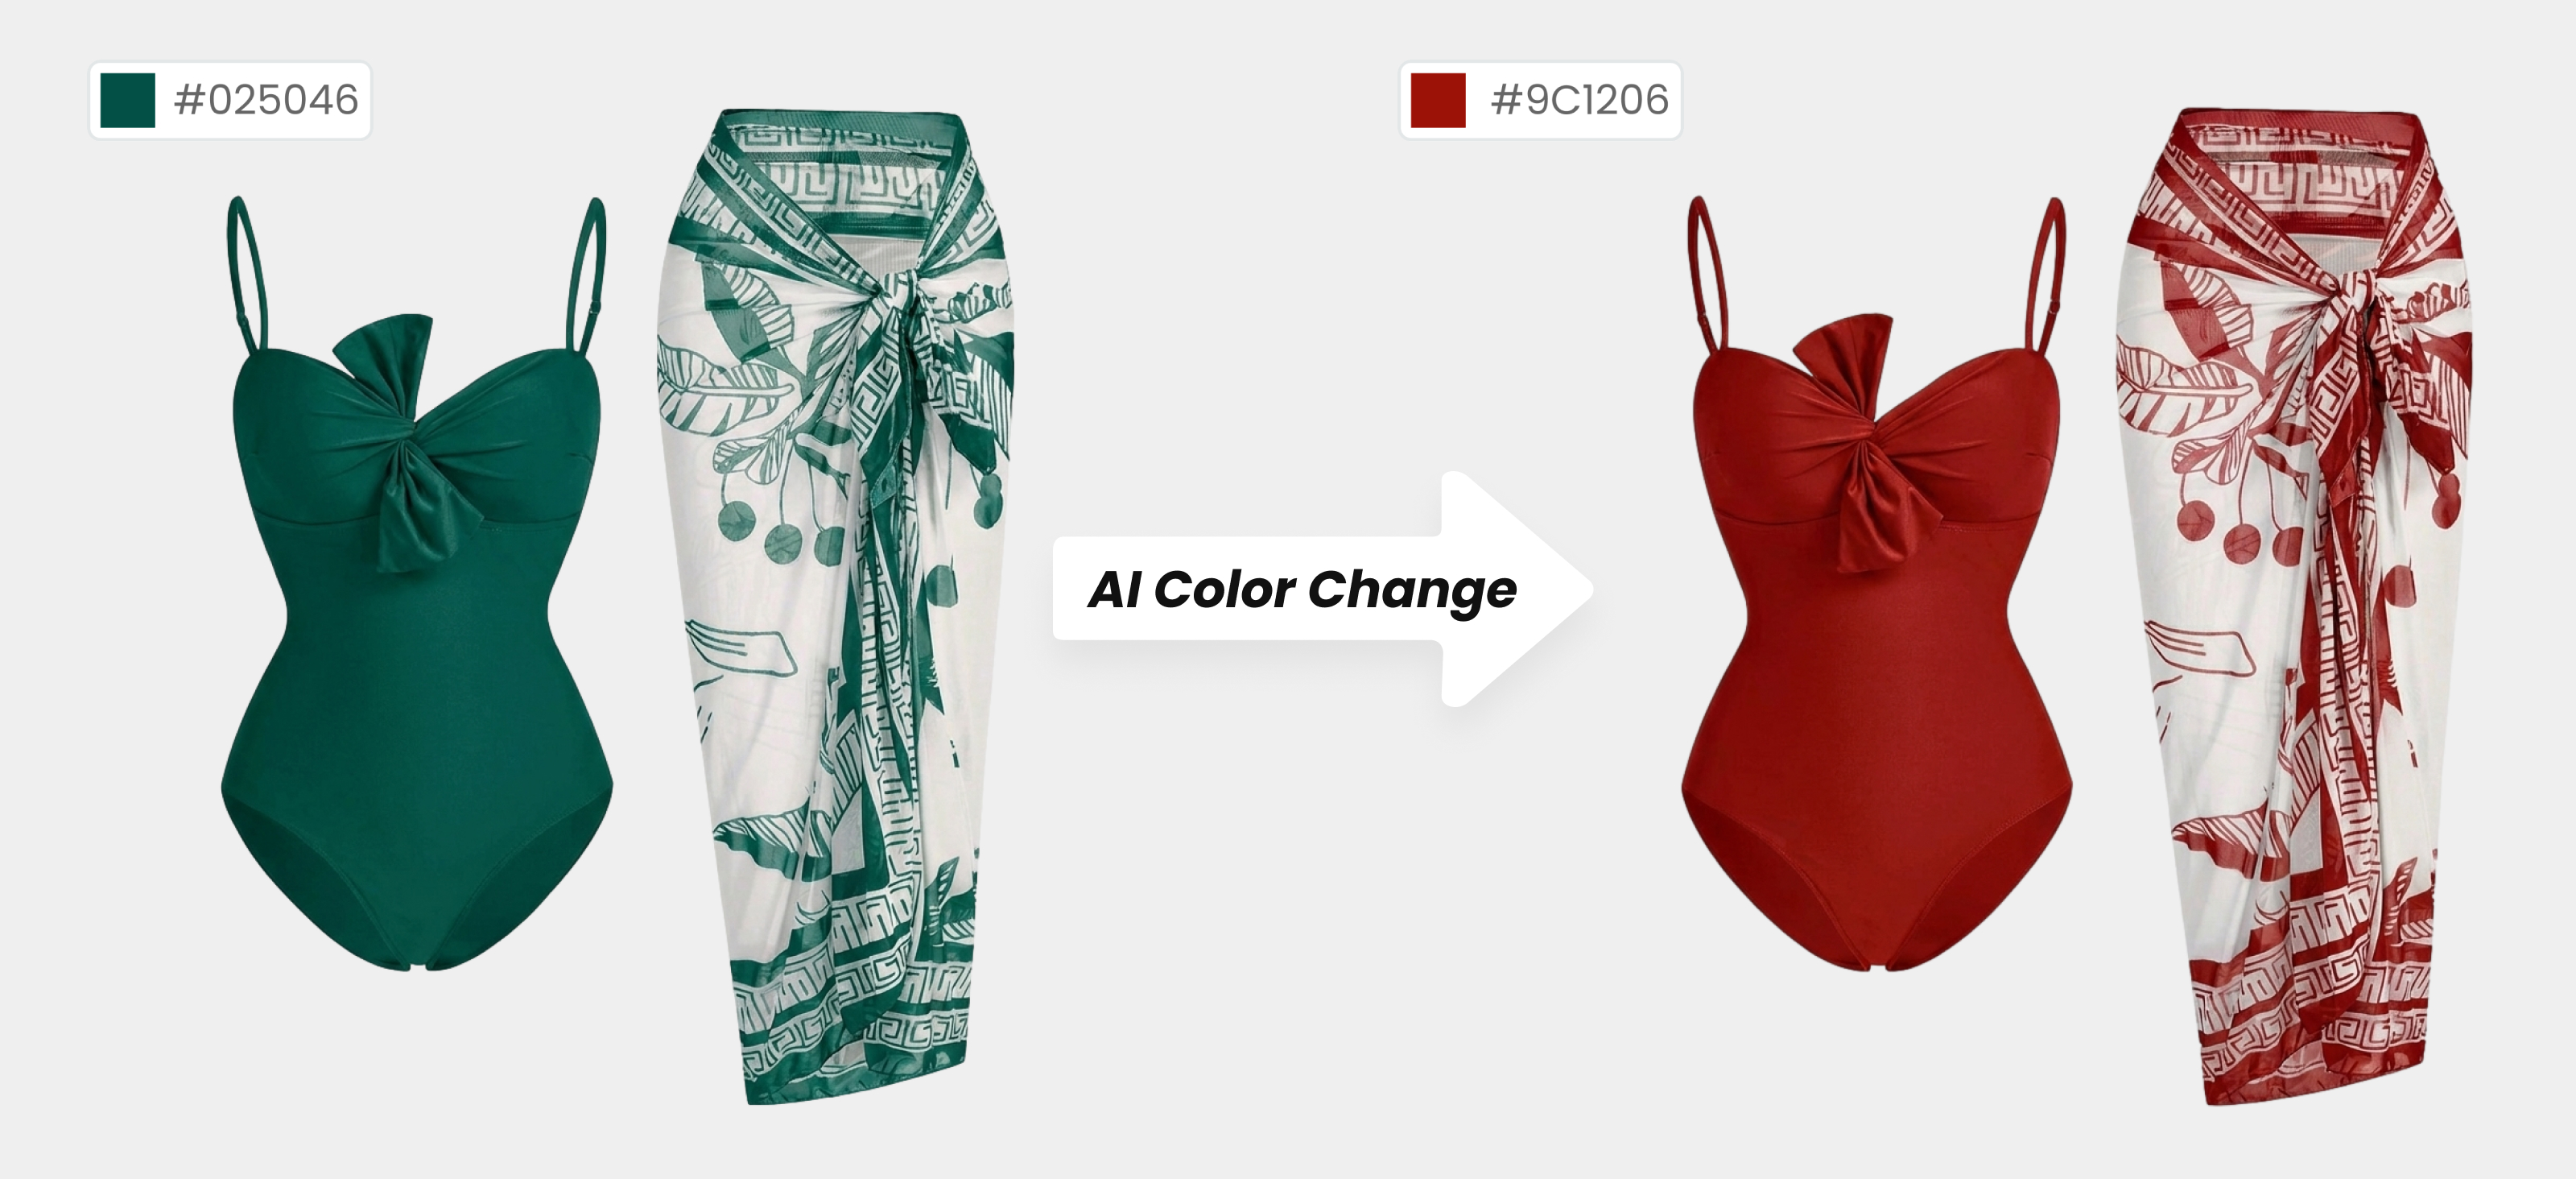
When the color is constrained this way, the rest of the garment survives the change. Notice the printed pattern, fabric drape, and shadows stay intact while only the color shifts — a faithful edit, not a repaint:
Before / after — color changed, detail preserved
Quick reference: error → fix
Here is the whole playbook in one view. Match the symptom you are seeing to the fix that addresses it — in nearly every case, the first move is the tool itself.
| Error you see | Root cause | Primary fix | Backup fix |
|---|---|---|---|
| Garbled brand name / misspelled label | Generic model renders the look of text, not real letters | Product-trained model that preserves the real label | Sharp, legible label in the source photo |
| Scrambled ingredient / care / packaging text | No concept that the string must stay exact | Product-trained model | Re-run with "keep printed text exactly as source" |
| Invented collar or neckline | Model defaults to the most common neckline it has seen | Product-trained model + "specify what to preserve" prompt | Clear front-on source showing the real neckline |
| Wrong button count / closures | Holistic repaint, not a faithful copy | Product-trained model | Prompt: state exact button count / closure type |
| Mangled print or pattern | Pattern regenerated, drifts out of register | Product-trained model + high-res source | Prompt: describe the print; re-run |
| Fabric / texture drift (ribbed → smooth) | Texture inferred, not preserved | Product-trained model | Tight, well-lit close source so the weave is visible |
| Altered fit / silhouette | Model generates a plausible cut, not yours | Product-trained model | Prompt: name the fit ("relaxed boxy, dropped shoulder") |
| Wrong color / color drift | Free-text color is imprecise | Dedicated color control (lock the target color) | Prompt with a hex code or precise named color |
How Snappyit keeps product details accurate
Snappyit is built for exactly the problem this article describes: turning a seller's real product photo into listing-ready images without reinventing the product along the way. The whole workflow is product-faithful by design — the models are trained on apparel and product photography, so your garment is the fixed anchor and the AI changes only the scene around it.
In practice that means one clean source photo can become a clean main shot, a worn shape, an on-model render, and color variants, with the same garment carried through each one:
- AI fashion model — place your real garment on a model with its collar, print, weave, and fit preserved, instead of generating a lookalike.
- Ghost mannequin — the marketplace-standard worn shape built from your flat lay, keeping the actual cut and detail of the piece.
- Flat lay — clean up a rough phone capture into an evenly lit overhead shot, which then doubles as a sharper input for every render that follows.
- Color change — lock a precise target color and generate every colorway from one photo, without the color drift free-text prompts cause.
Because every image runs through the same product-trained model, the output stays consistent across a whole drop — the same garment, the same fidelity, image after image. That is the difference between AI you can publish and AI you have to babysit. If you want the broader picture of how these tools fit together, the AI product photography guide walks through the full workflow, and the companion piece on product photography mistakes covers the shooting-stage errors that happen before AI ever enters the picture — a useful pair, since this article is about the AI-output errors and that one is about the capture. And if accuracy is the goal but budget is the question, the breakdown of clothing photography cost shows why the product-trained route wins on both at once.
Stop AI product photo errors on your own catalog
The fastest way to end AI product photo errors on your listings is to run your own garment through a product-trained model and check whether the details survive. Upload one photo, pick a tool — fashion model, ghost mannequin, flat lay, or color change — and judge the output the way a buyer would: does the label read, does the collar match, is the print in register, is the color right? When AI-generated product images keep the real garment intact, they are ready to publish.
Try Snappyit free → — free credits, no card required.
Frequently Asked Questions
Why does AI get product labels/text wrong?
Generic text-to-image AI does not read text the way you do. It treats letters as visual shapes and predicts pixels that look label-like rather than spelling out real words, so a brand name, ingredient list, or care tag comes back as plausible-looking gibberish — misspelled, scrambled, or invented. The model has no concept that those marks have to match an exact string; it is pattern-matching the appearance of writing, not transcribing it. That is why even a sharp, legible source photo can produce garbled labels in the output: the failure is in how the model handles text, not in your image. A model trained specifically on product photos avoids this because it is built to preserve the real label rather than regenerate it from scratch.
Why does AI change my clothing's details?
A generic generator paints the whole image at once from a statistical sense of what clothing usually looks like, so it fills in attributes that seem likely rather than copying the exact garment you uploaded. The result is hallucinated detail: it might add a collar that was not there, change the number of buttons, soften a sharp print into a blurry pattern, swap a ribbed knit for a smooth one, or subtly re-cut the fit. None of those are random — they are the model's best guess at a plausible garment — but plausible is not the same as accurate, and for a listing that has to match the item in the box, plausible-but-wrong is a return waiting to happen. Purpose-trained apparel models are designed to lock the source garment's real attributes instead of reinventing them.
How do I stop AI from changing product details?
Three things, in order of impact. First, use a model trained for product photography instead of a generic art generator — a product-trained model is built to keep the real garment and label, which removes most errors before you do anything else. Second, feed it a clear, complete, high-resolution source photo: crop tight to the product, light it evenly, and make sure the full garment and any label are sharp and readable, because the AI can only preserve what it can clearly see. Third, use the prompt to lock details — name the garment type, state the exact color, and tell the model what must be preserved rather than reinvented. Stack all three and the rate of wrong details drops dramatically.
Are AI product photos accurate enough to sell?
Yes, when you use the right tool and a good source photo. The accuracy gap is almost entirely between generic text-to-image generators, which reinvent the product, and purpose-trained product models, which preserve it. With a product-trained workflow, a clean source image, and a prompt that locks the key attributes, AI product photos are accurate enough for marketplace listings, catalog pages, and ads — and they are far more consistent across a large catalog than one-photo-at-a-time editing. The standard you are aiming for is simple: the buyer should receive exactly what the image showed. Always review label-heavy images and complex prints before publishing, but for the bulk of apparel listing work, a product-trained model clears that bar reliably.
Does a clearer source photo really help?
It helps a lot. AI can only preserve detail it can actually see, so a blurry, dim, cropped, or cluttered source photo forces the model to guess at the parts it cannot read — and guessing is exactly where errors come from. A tight crop, even lighting with no harsh shadows or glare, a sharp focus on the print or weave, and a fully visible label give the model real information to work from instead of gaps to invent. It is the classic garbage-in, garbage-out rule applied to images: a better input does not just look nicer, it measurably reduces wrong details and garbled text in the output. A clear source photo will not fix a generic generator's text problem on its own, but paired with a product-trained model it is one of the biggest levers you have.
Can prompts fix AI product photo errors?
Prompts help steer and lock details, but they are the third lever, not the first. A good prompt names the garment type, states the exact color (a hex code or a precise name beats 'blue'), describes the print or pattern, and explicitly tells the model which attributes to preserve rather than reinvent — and you can re-run with a correction when a misread slips through. That meaningfully reduces errors. But prompting cannot force a generic text-to-image model to spell a label correctly or to copy a garment it was never built to preserve; you are nudging a system that is still guessing. Prompts work best on top of the two bigger fixes: a product-trained model and a clear source photo. Get those right first, then use the prompt to fine-tune.