Ghost Mannequin Photo Editing for Ecommerce
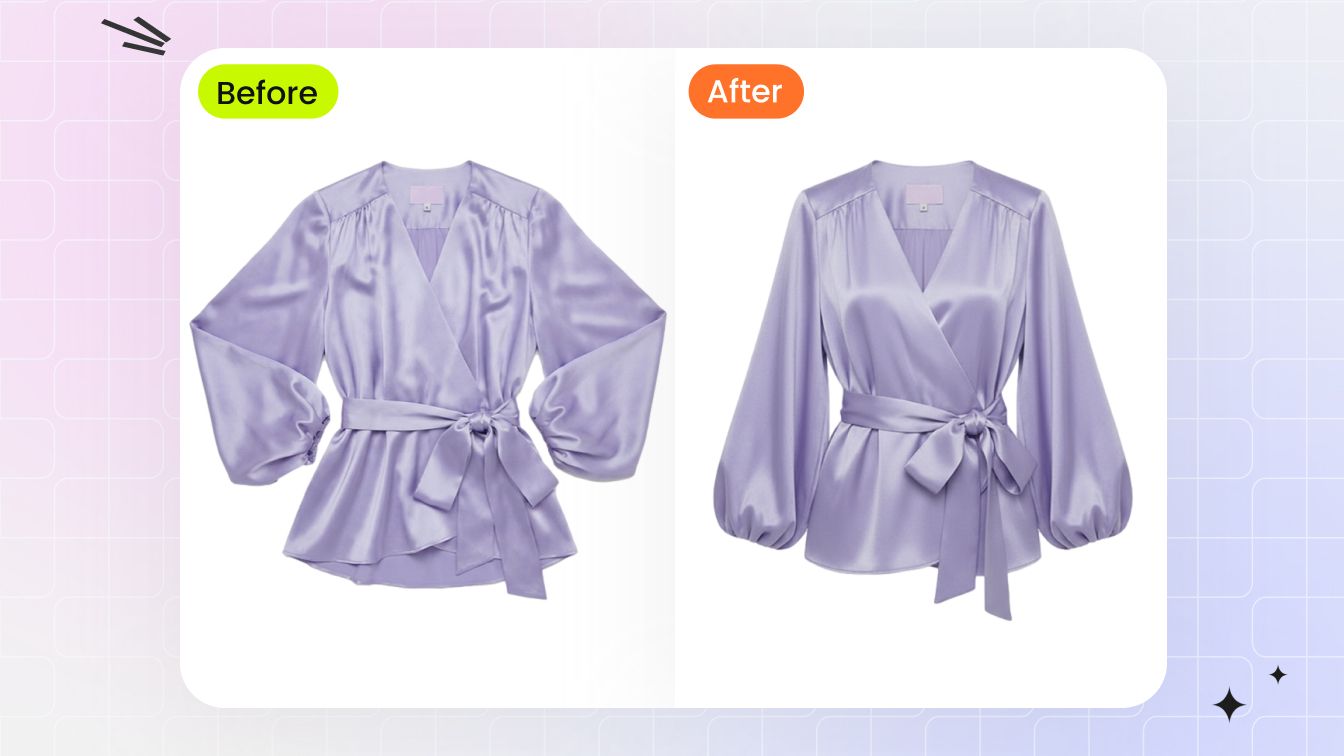
Ghost mannequin photo editing, also called the invisible mannequin or hollow man effect, shows a garment with a three-dimensional worn shape but no visible model or mannequin. In the traditional workflow, an editor combines a main mannequin photo with separate images of the neckline, sleeves, lining, or hem. An AI workflow can instead generate the worn shape from a clear flat-lay, hanger, or model photo.
For an ecommerce merchant, the goal is not simply a clean cutout. The result must help shoppers read the silhouette while preserving the SKU's real color, construction, pattern, fasteners, and proportions. Google Merchant Center's image guidance similarly requires product images to display the entire product accurately with minimal or no staging.[7]
Where the Invisible Mannequin Effect Helps an Apparel Store
A flat lay shows the complete design but often flattens the garment's volume. An on-model image answers fit and styling questions, yet changes in models and poses can make a large catalog harder to compare. A ghost mannequin view sits between the two: it gives shoppers a clearer read on shape while letting the store keep a repeatable crop and presentation across colorways and seasonal drops.
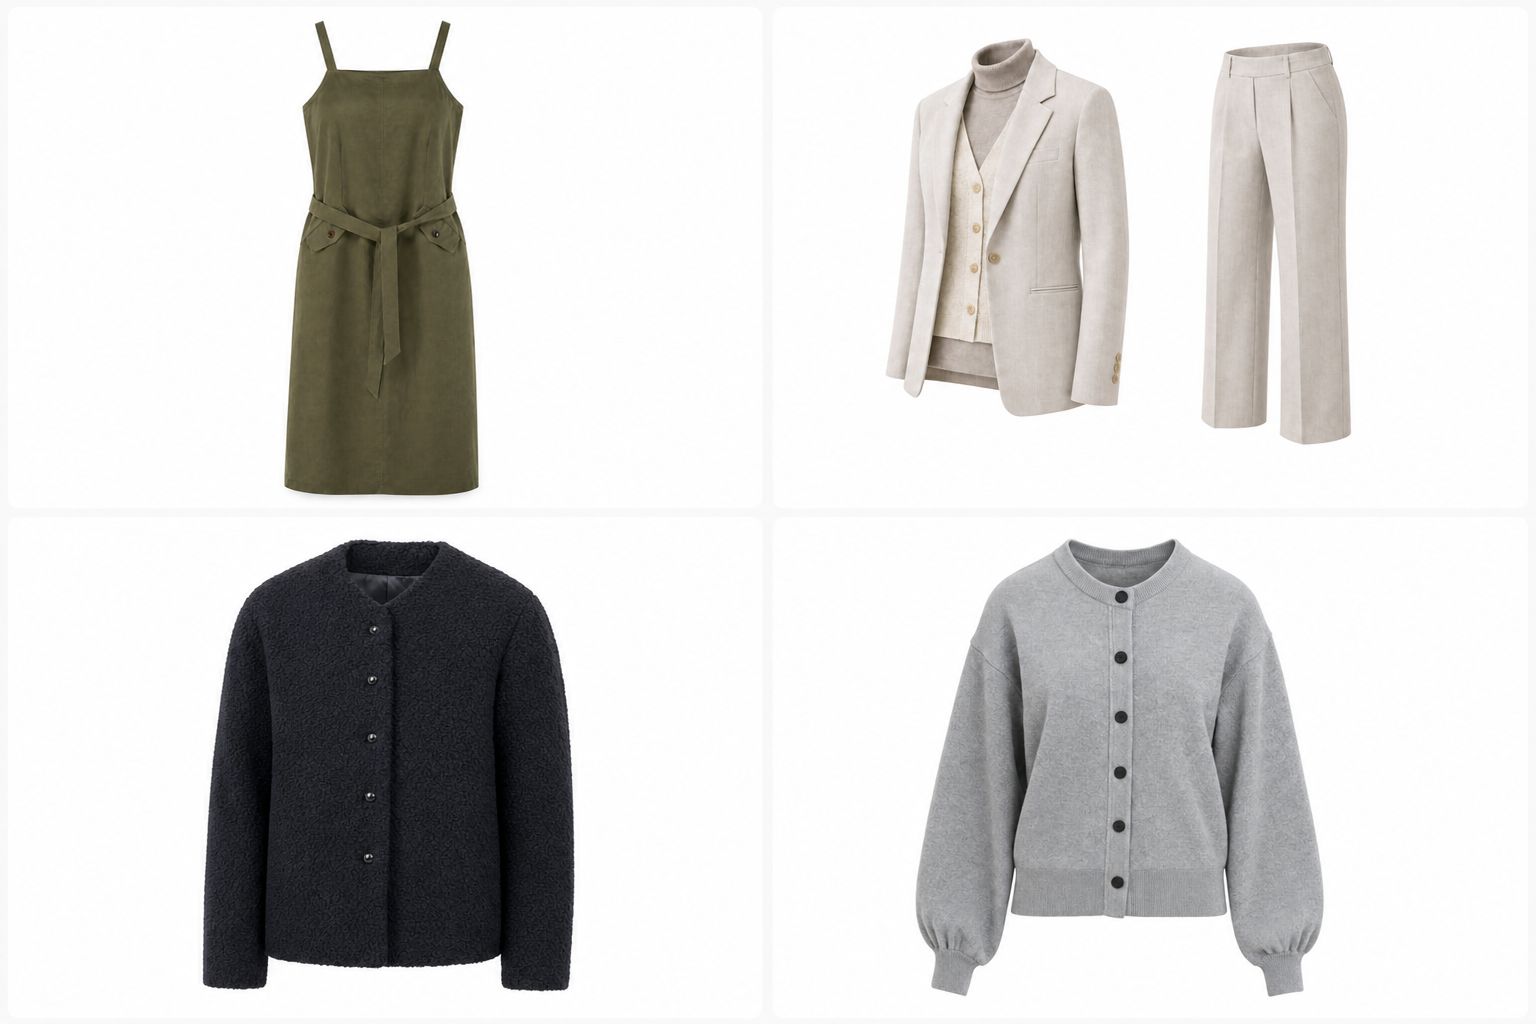
These reviewed outputs show a consistent hollow-body presentation across several silhouettes. They are useful visual evidence, but an output-only collage cannot prove exact product fidelity. Before publishing, compare each result with its source SKU and inspect seams, labels, buttons, texture, color, and proportions.
Manual vs AI Ghost Mannequin Editing
Choose the workflow by product risk and rework, not by the lowest headline price. Manual compositing gives an editor direct control over every mask and interior insert. AI removes several production steps, but the team must still review the generated garment against the product.
| Catalog situation | Recommended starting point | Reason |
|---|---|---|
| Simple tops, sweaters, or dresses with clear edges | Test AI on a representative SKU | Fast to generate and easy to compare with the source. |
| Logos, checks, stripes, dense prints, or branded labels | Manual edit or strict AI review | Small changes can make the listing inaccurate. |
| Sheer panels, reflective fabric, cutouts, or layered construction | Manual composite | The editor needs direct control over edges, transparency, and interior depth. |
| Large catalog with repeatable garment shapes | Hybrid workflow | Use AI for SKUs that pass consistently and send exceptions to a manual editor. |
Before committing a catalog, test one easy item, one dark garment, one patterned SKU, and one structured or layered piece. Record which images pass, how many retries they need, and how much review or repair follows. You will then know which products can stay in an AI queue and which should go straight to an editor.
Measure Cost per Publishable SKU, Not Cost per Attempt
A low generation or editing price does not show the full production cost. For each test SKU, record the number of source photos, generation attempts, editor minutes, reviewer minutes, corrections, and whether the final image was publishable. Divide the total spend by approved images rather than by files processed.
The result is a routing rule your team can actually use. A solid knit top might start with AI, while a checked blazer goes directly to manual editing. That is more useful than forcing every garment through the same workflow and discovering the true cost after the launch date slips.
Ghost Mannequin Joint Types and Source Photos
A “joint” is an area where an interior image is aligned with the main garment photo after the mannequin is masked out. The garment design determines how many source photos the editor needs.
Neck Joint Editing for Shirts, Tops, and Dresses
A neck joint fills the opening left by the mannequin's neck and upper torso. The usual source set is a front mannequin photo plus an interior shot showing the collar, label area, and inner neckline. The insert must match the opening's curve, scale, perspective, seam direction, and fabric grain.
Hem and Sleeve Joints for Ecommerce Apparel
A hem joint closes the lower opening of a top, jacket, or dress. A sleeve joint rebuilds the view into a cuff or arm opening. Capture the relevant interior from an angle that matches the main photo; if the garment shifts between shots, fabric folds and seam positions become harder to align.
Full Invisible Mannequin Composites
Blazers, hoodies, open jackets, and cutout garments may expose the neckline, sleeves, hood, lining, hem, and back in one image. Plan each visible opening before the shoot. Missing one insert can force an inaccurate reconstruction or an expensive reshoot.
How to Remove a Mannequin from a Clothing Photo
Removing a mannequin is not the same as removing a background. A background remover can isolate the pixels already visible, but a complete mannequin-removal edit must also rebuild the garment areas that the mannequin covered. For a shirt, that usually means the inner collar and label area; jackets, dresses, and open sleeves may also need cuffs, lining, hood, hem, or back inserts.
- Choose the main product frame. Start with the sharpest, straightest mannequin photo and keep it as the reference for shape, color, and product details.
- Collect the hidden-area shots. Use matching interior photographs for every opening that will remain visible after the mannequin disappears.
- Mask the garment and mannequin separately. Preserve fabric edges on editable masks instead of permanently erasing the source.
- Rebuild the openings. Align the collar, sleeve, lining, or hem inserts to the main frame, then match perspective, fabric grain, light, and color.
- Review the result as a product claim. Compare the finished image with the physical SKU or an approved source photo before export.
For simple, opaque garments, an AI workflow can create a mannequin-free draft from a flat-lay, hanger, or supported product photo. For sheer fabric, layered construction, dense patterns, logos, or unusual openings, a manual composite usually gives the merchant more control. Whichever route you choose, reject any result that changes the item a customer will receive.
How to Photograph Clothes for Ghost Mannequin Editing
Consistent source photos reduce masking, alignment, and color-correction time. Prepare one shot list per SKU and finish the set before changing the camera or lighting.
Prepare the Garment and Ecommerce Shot List
Steam the garment, remove lint and loose threads, and fasten buttons or zippers as they should appear in the listing. Straighten the collar, shoulders, sleeves, and hem. Then list the main front and back views plus every interior area the final image will expose.
A basic T-shirt may need only a neckline insert. A blazer may also need lapel, cuff, sleeve, lining, and lower-hem images. Check logos, labels, pockets, buttons, and pattern alignment before moving to the next SKU.
Lock the Camera, Lighting, and White Balance
Use the same lens, camera height, distance, exposure, and white balance for the main and interior shots. Locking the camera makes scale and perspective easier to match. Manual exposure and white balance also prevent the insert from becoming warmer, cooler, brighter, or darker than the outer garment.
A two-light setup is a practical starting point, but adjust it for the fabric. Soft reflections help glossy materials; dark or textured fabric may need more even fill. Review sharpness and every required opening before removing the garment from the set.
Ghost Mannequin Photo Editing in Photoshop: 5 Steps
Build each manual edit in the same order so another editor can review or revise the file. Keep one untouched source copy and place every related interior shot in the same working document.
1. Mask the Garment Without Erasing the Source
Select the garment and hide the mannequin with a layer mask. Firm edges often suit the Pen Tool, while soft, fuzzy, or fringed fabric may need a softer selection method. Adobe documents layer masks as an editable way to hide or reveal parts of a layer, which is safer than permanently deleting source pixels.[6]
Inspect the mask against temporary light and dark backgrounds. This exposes pale halos, leftover mannequin pixels, and missing fabric along the edge.
2. Add and Align the Neckline, Sleeve, and Hem Inserts
Place each interior image behind the main garment layer. Match the opening, seams, fabric grain, and depth. If the garment moved slightly between shots, make a small local warp adjustment rather than stretching the whole insert.
3. Clean Edges and Organize Editable Layers
Remove background gaps, hard cutout lines, broken seams, and repeated texture without flattening the garment's natural edge. Keep the main image, interior inserts, color adjustments, and shadow on separate, clearly named layers. This speeds up SKU revisions and prevents an editor from changing the wrong component.
4. Match Color Across the Composite
Use the approved product photo or physical sample as the color reference. Correct the insert until its exposure and color temperature match the adjoining outer fabric, while retaining natural highlights and folds.
| Reference lighting | Cool-gray lighting | Purple-tinted lighting |
|---|---|---|
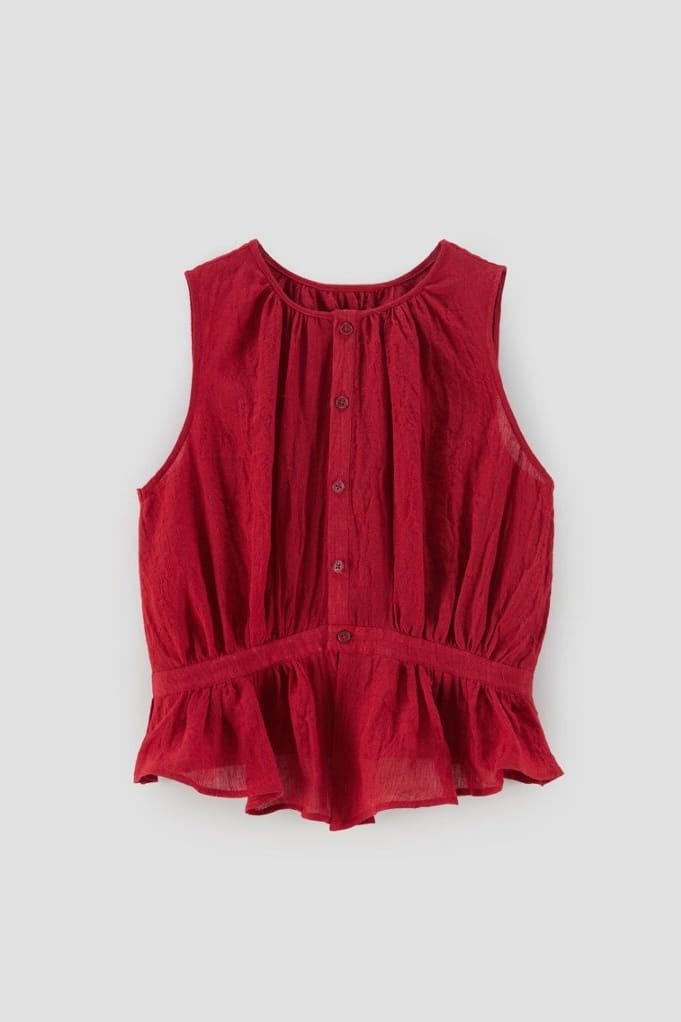 | 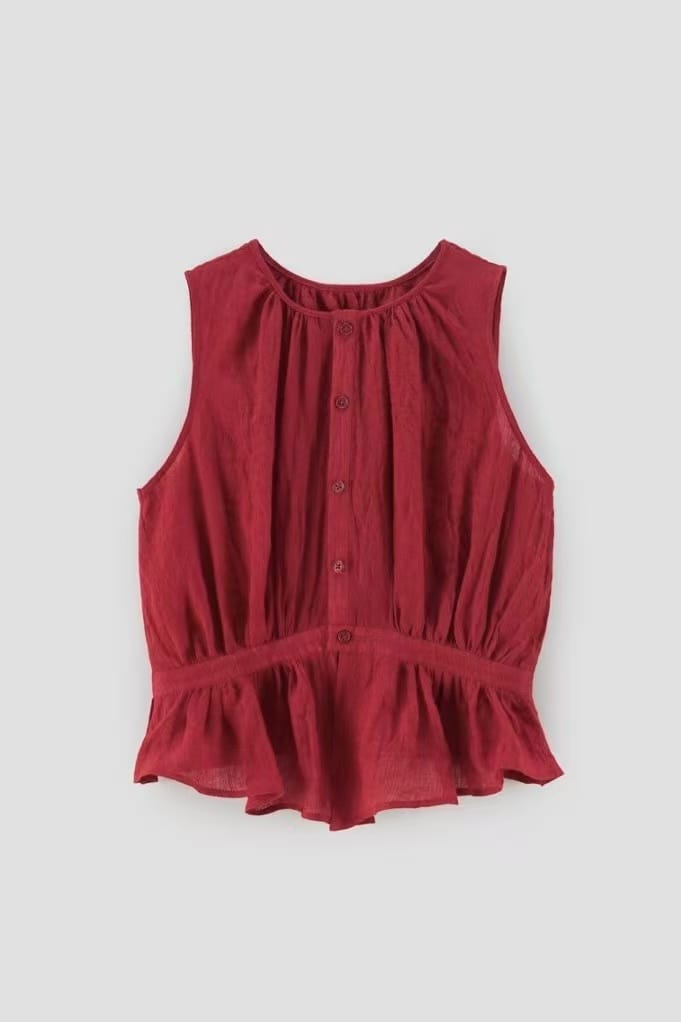 | 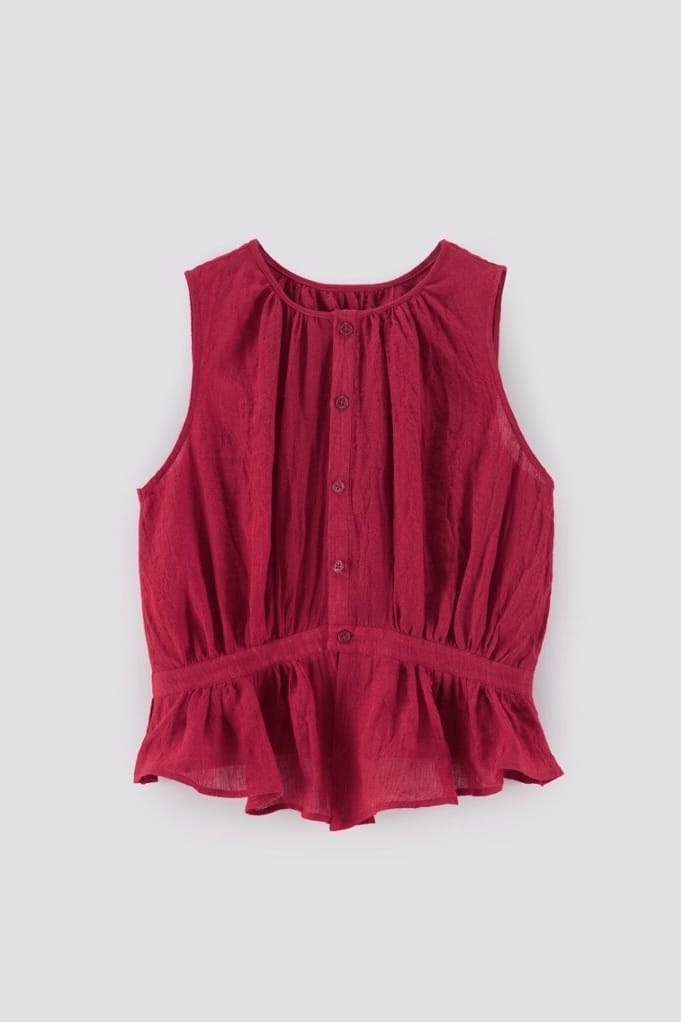 |
The same red top changes visibly across three lighting conditions. Matching exposure and white balance before compositing protects texture and reduces aggressive corrections later.
5. Add a Shadow Only When the Listing Needs It
A subtle shadow can add depth, but it should match the original light direction. Skip it when the marketplace or catalog style requires a plain background, or when the shadow makes the garment appear to float.
Ghost Mannequin Editing Mistakes and Quality Control
- Neckline or seams do not connect: realign the insert and apply a small local warp if needed.
- A light halo surrounds the garment: refine the mask and reduce excessive feathering.
- Interior fabric changes color: correct the insert against the approved product reference.
- Logo, buttons, pattern, sleeves, or proportions change: rebuild the area from the source or reject the result.
Use one merchant-facing quality-control pass: compare the final image with the real SKU, inspect edges at high zoom, view the whole product at listing size, and check the mobile thumbnail. Google Merchant Center's requirement to display the entire product accurately makes visual fidelity a publishing requirement, not a cosmetic preference.[7]
Batch Ghost Mannequin Editing for Ecommerce Catalogs
Automate only the steps that repeat across the catalog. Photoshop Actions can handle canvas size, background fill, file naming, color-profile conversion, sharpening, and export formatting.[1] Garment masks, insert alignment, and product-detail approval still need SKU-level review.
- Record finishing steps on duplicate files, never on the only source.
- Test the Action on light, dark, simple, and detailed garments.
- Approve a small batch before processing the full catalog.
Name files by product ID, view, and version, and separate source, editable, and final-export folders. For multi-editor teams, provide one approved example and a checklist covering background, crop, edge softness, shadow, file format, and required product checks.
Build a Catalog Approval Standard
Define what “approved” means before production starts. The checklist should cover silhouette, neckline depth, sleeve length, hem shape, closures, logo, label, pattern placement, texture, color, crop, background, and export format. Add marketplace-specific requirements only where they actually apply; do not force one channel's main-image rules onto every secondary image or storefront.
Assign clear states such as source received, editing, merchant review, correction requested, approved, and exported. Keep rejection reasons structured—for example color mismatch, missing detail, distorted shape, or edge artifact—so the team can see which garment categories create the most rework. Over several batches, those records are more useful than subjective claims that one workflow is always faster.
AI Ghost Mannequin Workflow and Verified Costs
An AI ghost mannequin generator can remove the mannequin shoot and manual interior composite when an acceptable flat-lay, hanger, or model photo already exists. With Snappyit, the basic workflow is upload, generate, compare with the SKU, and either approve, retry for a specific problem, or route the item to manual editing.[2]
If you are planning the full gallery rather than one product-only image, this AI product photography guide for ecommerce shows how model images, product views, detail shots, and original photography can each answer a different shopper question.
Set a retry limit before production starts. If a focused second attempt still changes a logo, pattern, closure, or construction detail, send the SKU to manual editing instead of spending more credits without a clear path to approval.
Verified Ghost Mannequin Photography and Editing Costs
Use these USD prices as dated scope examples, not as a bundled quote. They were checked on official provider pages on August 11, 2026, and cover different services. Your final cost can also include styling, shipping, complex joints, rush work, retries, review, corrections, and taxes.
| Cost factor | Dated published example | What merchants should budget separately |
|---|---|---|
| Product photography | Soona listed a base product photo at $39 each.[5] | Booking, shipping, styling, models, additional angles, and upgrades. |
| Manual ghost mannequin editing | Path listed ghost mannequin editing from $0.89 per image.[3] | Photography, complex joints, revisions, and rush delivery beyond the starting service. |
| Premium photo editing | Soona listed premium photo edits from $9 each.[5] | The exact scope and number of requested corrections. |
| AI generation | Snappyit uses credits; cost per approved image varies by plan, workflow, retries, and human review.[4] | Retries, review time, manual corrections, and rejected outputs. |
The Snappyit calculation uses the displayed subscription and one-time pack prices, rounded to the nearest cent. It excludes six free signup credits. Recheck the pricing page before budgeting a large batch because plans and credit rates can change.
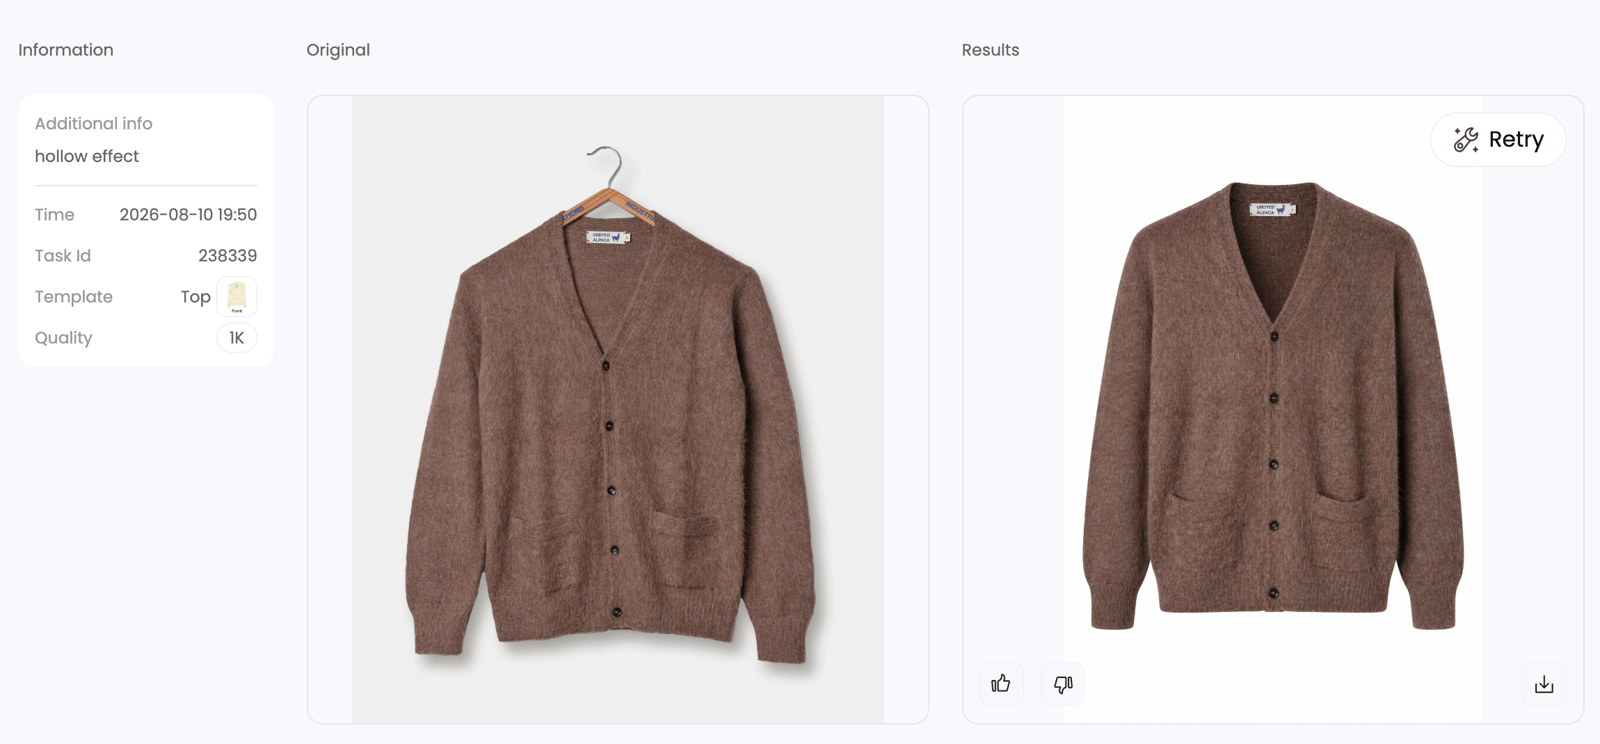
This matched pair lets a merchant inspect the same cardigan's neckline, buttons, knit texture, color, and proportions. It is stronger evidence than an output-only gallery, but the approved product photo or physical garment remains the final reference.
Ghost Mannequin Photo Editing FAQs
What is ghost mannequin photo editing for ecommerce?
Ghost mannequin photo editing removes the model or mannequin from an apparel photo, then composites hidden areas such as the inside neckline, sleeves, or hem back into the image. The result is a three-dimensional ecommerce product photo that shows garment shape and construction without a visible person, hanger, or display form.
What photos do you need for ghost mannequin editing?
A simple top usually needs one front-on-mannequin image and one interior neckline image. Jackets, hoodies, dresses, and open sleeves may also require separate photos of cuffs, lining, hood, hem, or back. Plan the ghost mannequin photography shot list around every interior area that must remain visible after compositing.
How much does professional ghost mannequin photo editing cost?
There is no universal per-image rate because photography, editing, and AI generation are different services. In the published examples checked on August 11, 2026, Soona listed product photos at $39 each and premium edits from $9, while Path listed ghost mannequin editing from $0.89 per image. Budget separately for photography, styling, shipping, complex joints, revisions, retries, merchant review, and taxes; see the dated cost comparison.
Is AI or Photoshop better for ghost mannequin product images?
AI ghost mannequin tools are efficient for clear, simple garments that pass a side-by-side SKU check. Photoshop is more predictable when exact logos, patterns, buttons, layers, sheer fabric, or construction details must be preserved. For catalog production, test AI on repeatable products and route complex or inaccurate results to a manual Photoshop workflow.
Can AI turn a flat lay into a ghost mannequin image?
Yes. An AI ghost mannequin generator can convert a clear flat-lay image into a shaped, mannequin-free product photo without a separate interior shot. Use an evenly lit source photo with the full garment, neckline, sleeves, hem, and important details visible, then compare the generated shape, color, texture, logos, and fasteners with the real SKU before publishing.
Which clothing products work best with invisible mannequin editing?
Shirts, simple tops, sweaters, dresses, and structured jackets with clear edges are the easiest products for invisible mannequin editing. Cutouts, sheer or reflective materials, heavy layering, dense prints, and multi-piece outfits usually need more source photos, manual compositing, or closer AI quality control. Choose the workflow according to the product-detail accuracy required by the listing.
What is the difference between a neck joint and a full ghost mannequin composite?
A neck joint rebuilds only the inside neckline, usually from one main garment photo and one interior insert. A full ghost mannequin composite reconstructs every exposed opening, which may include the neckline, sleeves, hood, hem, and back. Full composites therefore require more source images, masking, alignment, and retouching work.
How do you quality-check ghost mannequin photos for ecommerce?
Compare every ghost mannequin image with the physical garment or an approved source photo. Check silhouette, neckline, sleeves, hem, logo, fasteners, pattern placement, fabric texture, color, symmetry, and proportions at full size, normal product-page size, and mobile-thumbnail size. Reject any visually polished result that changes the product customers will receive.
Test a Ghost Mannequin Workflow on One SKU
Start with a representative garment and record the full cost: photography, editing or credits, retries, review time, and corrections. Approve the workflow only when the product details pass at full size, normal listing size, and mobile thumbnail size. Move complex exceptions to manual editing instead of spending more credits without a clear correction target.
Try Snappyit Ghost Mannequin free →
References
- Adobe Photoshop User Guide: Record an action. Updated October 30, 2025; accessed August 11, 2026.
- Snappyit: AI Ghost Mannequin Generator. Official product page; accessed August 11, 2026.
- Path: Photo editing pricing. Official page listing ghost mannequin editing from $0.89 per image; accessed August 11, 2026.
- Snappyit: Pricing. Official subscription and one-time credit-pack prices; accessed August 11, 2026.
- Soona: Product photography and video pricing. Official page listing product photos at $39 and premium photo edits from $9; accessed August 11, 2026.
- Adobe Photoshop User Guide: Mask layers. Official guidance on editable layer masks; accessed August 11, 2026.
- Google Merchant Center: Image link requirements and best practices. Official guidance requiring images to display the entire product accurately with minimal or no staging; accessed August 11, 2026.