Why most sellers skip the mannequin entirely
A used apparel mannequin runs $80–$300. A professional dress-form mannequin starts at $400. Even a basic torso form takes up a corner of a room you probably need for inventory or packing. Then there's the actual problem: one mannequin only fits one body type. Size large t-shirt drapes wrong on a size-medium form. The mannequin's shoulders are the wrong width. The waist nips where the garment hangs straight. By the time you've bought two mannequins to cover men's and women's, you've spent $600 and you still can't shoot a kids' tee.
The seven methods below cover every realistic scenario — from "I have one piece to list right now" to "I'm building a 100-SKU catalog this weekend." The right method depends on your category, your budget, and how many photos you need shipped this month.
| Method | Cost | Time per piece | Looks professional? |
|---|---|---|---|
| 1. Flat lay | $0 | 2 min | Casual, OK for some marketplaces |
| 2. Hanger | $5 (padded hanger) | 3 min | OK but generic |
| 3. Floor / wall pin | $0–$20 (pins, sticky tack) | 5 min | Better than hanger |
| 4. DIY dress form | $10–$30 (foam, stuffing) | 10 min | Improvised but workable |
| 5. Friend or self-model | $0 | 15 min + edit | Personal but inconsistent |
| 6. Post-production ghost mannequin (Photoshop) | $0 (subscription) + 20 min retouch | 30 min | Studio-grade, slow |
| 7. AI ghost mannequin from flat lay | $0–$1 per image | 60 seconds | Studio-grade, instant |
Method 1 — Flat lay (the 2-minute baseline)
Flat lay is the universal fallback. Lay the garment flat on a clean surface, smooth out wrinkles by hand, shoot top-down with even daylight. Phone camera is fine.
Setup. Floor, table, or a piece of foamboard works as a surface. Background color: neutral (white, light grey, or wood). For the cleanest catalog look, use a white sweep paper roll or white duvet cover. Light source: window with diffuser (a sheer curtain works) or a $30 LED panel. Phone position: directly above the garment, lens parallel to the surface — use a flat ceiling fixture as a guide.
What it shows. Color, pattern, overall silhouette, fabric texture if you get close enough.
What it hides. Fit, drape, how the garment actually sits on a body. This is the main reason buyers ask sellers for "can I see it on you?" — flat lay can't answer that.
Use it when. Casual marketplaces (Depop, Poshmark, Mercari) where buyers expect personal-style listings. Knits and structured pieces where flat lay actually shows shape well.
Method 2 — Hanger against a clean wall
Hanger photography is widely used by fashion brands and ecommerce stores for a reason: it shows the garment's natural drape better than flat lay, and the wall background reads as deliberate rather than improvised.
Setup. Padded wooden hanger (never wire — wire distorts shoulders and digs creases into the fabric). Plain wall, painted white or light grey. Side light (window 90° to the wall) for soft shadow that shows fabric texture. Avoid front-on flash — it kills the drape.
What it shows. Drape, length, shoulder line, neckline shape.
What it hides. How the garment shapes around a body — same problem as flat lay, but slightly mitigated.
Use it when. Resellers on Poshmark, Depop, Mercari, and eBay where the hanger shot is the platform-native convention.
Method 3 — Floor or wall pin (controlled drape)
For garments that need to show structure without a body — coats, suits, structured dresses, kimonos — pin or weight the piece on a wall or floor to control how it hangs.
Setup. Wall: use removable adhesive strips or T-pins (behind the garment, hidden from camera) to hold sleeves outstretched, lapels open, or hem flared. Floor: lay flat and use small weights at hidden points to maintain shape. Light source: large soft light from one side.
What it shows. True silhouette, lapel structure, button alignment, full length without sag.
What it hides. 3D shape — still a 2D representation, just more controlled.
Use it when. Vintage outerwear, structured tailoring, kimonos, robes, or anything that flops shapeless on a hanger.
Method 4 — DIY dress form (the $20 mannequin)
If you really need 3D shape on a budget, build a temporary form. Foam dress-form panels from a craft store run $10–$15. Or stuff an old T-shirt with bubble wrap or rolled fabric inside the garment you're shooting — the inner stuffing gives shape, the outer garment shows correctly.
Setup. Cardboard or foam torso shape covered with neutral fabric. Or: layer technique — undershirt stuffed with bubble wrap inside the outer garment, hidden from camera angle. Shoot front, back, and 3/4 if listing requires multiple angles.
What it shows. True 3D worn-shape, fit through the torso, sleeve and shoulder structure.
What it hides. The bottom of the garment if your form is half-length. Pant fit (this method doesn't work for pants).
Use it when. You have a few high-AOV pieces where 3D shape is mandatory and you can't justify the cost of a real mannequin.
Method 5 — Friend or self-model (free but inconsistent)
You can photograph clothes on your own body or a friend's for zero cost. The output reads as authentic and works for casual marketplaces, but consistency is hard — every garment has a different model, different lighting, different mood.
Setup. Plain wall or outdoor location. Self-timer + tripod for solo shots; phone-on-shelf for casual lifestyle. Same lighting and same wall for every piece if you want any consistency.
What it shows. Real-body fit, drape, styling context.
What it hides. Doesn't hide much, but it does change things — if your model is a size small and your inventory runs S-XL, the same piece in larger sizes looks different than the photo shows. This drives returns.
Use it when. Personal-brand resale (Depop, Poshmark closet sales) where the seller-as-model is the brand. Less suitable for multi-SKU stores aiming for catalog consistency.
Method 6 — Post-production ghost mannequin (Photoshop)
The studio-traditional way to get a ghost mannequin photo is to shoot the garment on a real mannequin, shoot the interior separately (collar lining, inside hem), then composite the two in Photoshop and mask out the mannequin. The output is a 3D-worn shape with the garment "floating" against a clean background.
Setup. Mannequin + studio lights + tripod camera. Photoshop subscription. 15–30 minutes of masking, compositing, and color-correcting per garment.
What it shows. Studio-grade catalog ghost mannequin — the standard for Amazon, Shopify brand stores, and high-volume ecommerce.
What it hides. Nothing — this is the gold standard for product-only catalog imagery.
Use it when. You have studio access, a real mannequin, and the volume to justify the time cost (or you outsource to a retoucher at $5–$20 per image). For a 100-SKU catalog, that's 25–50 hours or $500–$2,000 outsourced.
If you don't have a mannequin in the first place, this method's not for you — which brings us to the answer that's reshaped this category in 2026.
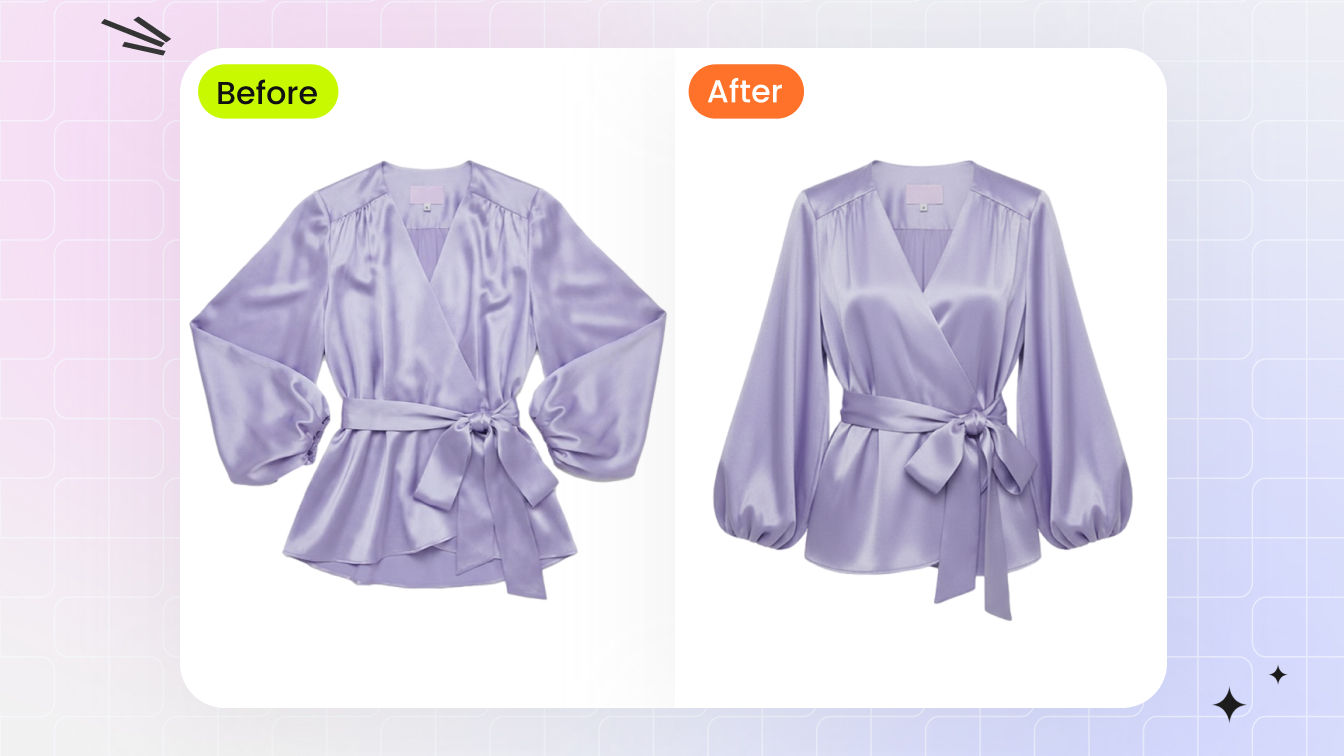
Method 7 — AI ghost mannequin from a single flat lay (★ recommended)
The newest method, and the one most marketplace sellers and Etsy makers default to in 2026 when they need to photograph clothes without a mannequin at scale: feed one flat lay phone photo into an AI ghost mannequin tool. The AI generates the 3D-worn shape — sleeves filled out, collar standing, hem hanging — with the garment isolated against a clean white background. No mannequin, no studio, no Photoshop.
How it works. Modern AI ghost mannequin tools (Snappyit, Photoroom, SellerPic, others) are trained on millions of garment pairs. You upload a flat lay, the AI infers the garment's true 3D shape, reconstructs the interior fill where a body would be, and outputs a catalog-ready image with the garment looking worn but no mannequin or model visible.
What it shows. True 3D worn shape, garment structure, fit through torso, sleeve and collar drape — the same dimensions a real mannequin would show.
What it hides. Nothing meaningful for apparel categories that the AI handles well (cotton tees, dresses, button-downs, hoodies, jackets, pants). Sheers and very structured outerwear still benefit from a real reference photo, but those are edge cases.
Use it when. You're listing on Etsy, eBay, Poshmark, Mercari, Depop, Vinted, Shopify, or Amazon (gallery slot, not main image for Amazon — see below). Any single-SKU to high-volume catalog where time-per-image is the bottleneck.
How to actually run an AI ghost mannequin pass
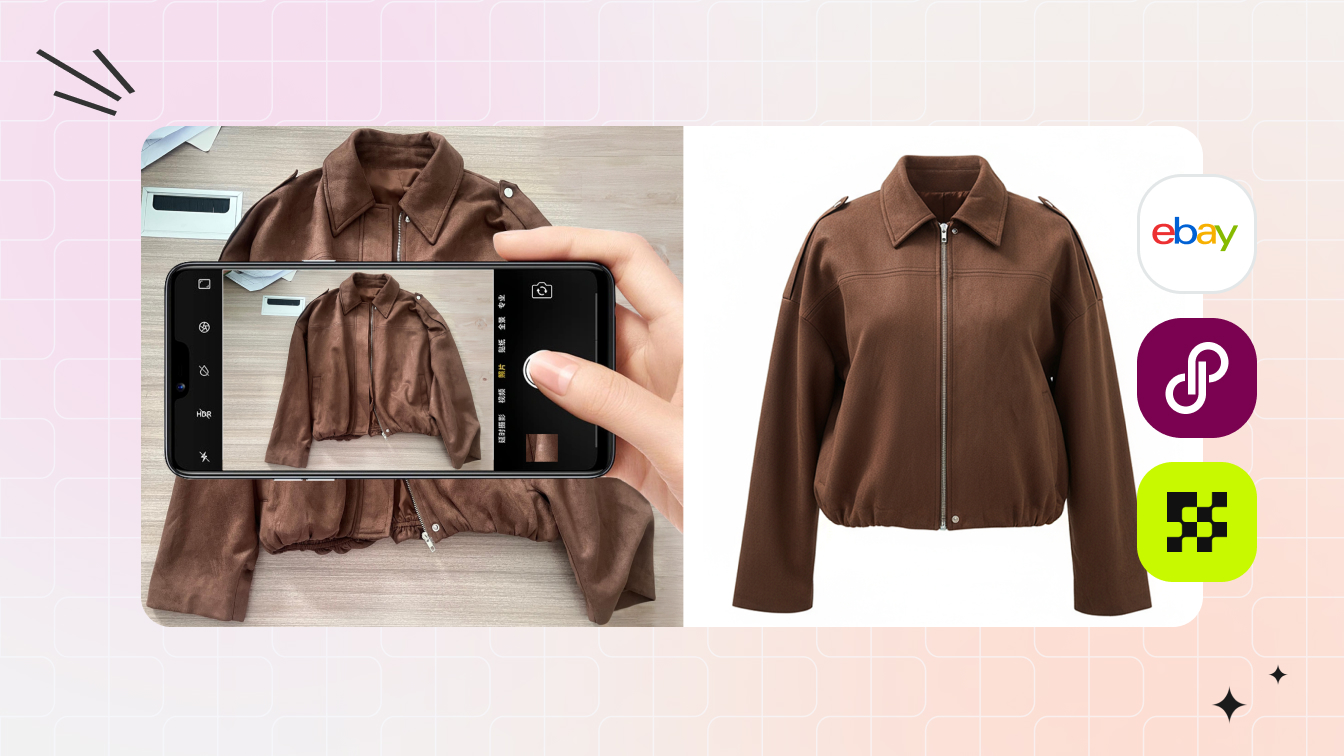
- Shoot one source flat lay. Garment on a clean surface, top-down, even daylight. Smooth wrinkles. Phone at 1500px+ on the long edge. Total time: 2 minutes.
- Upload to Snappyit Ghost Mannequin (or another AI tool in the same category). Pick the garment type if the tool asks (top, dress, pants, outerwear).
- Wait 60 seconds. The AI returns a 3D-worn ghost mannequin output with the garment on a clean white background.
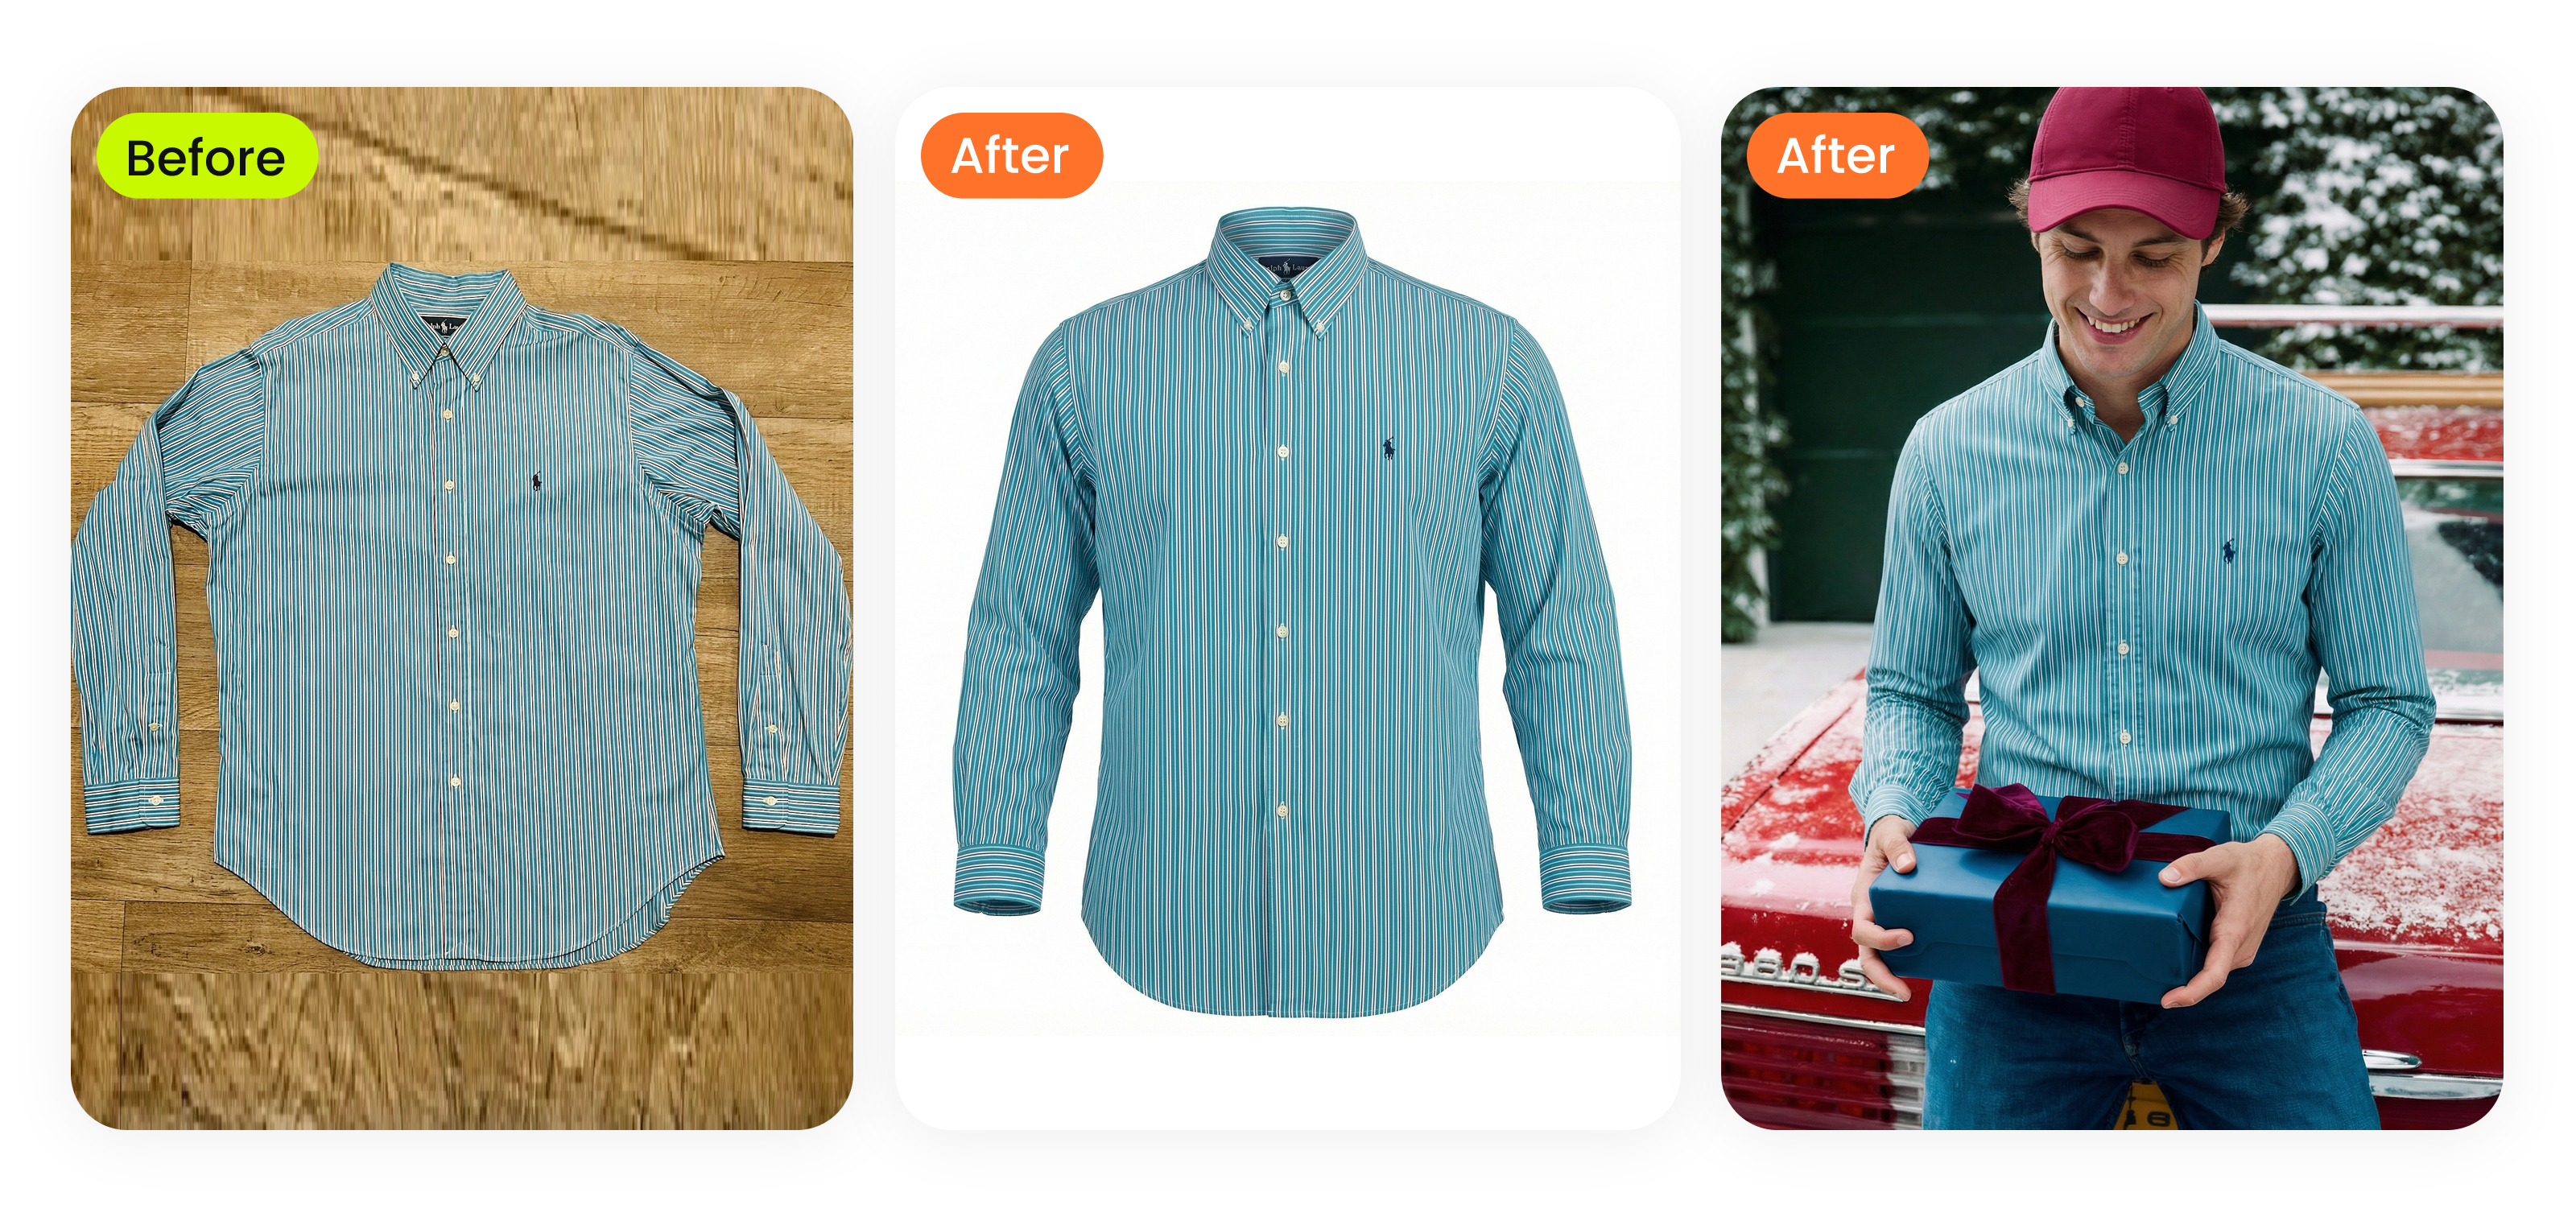
- Optional: generate an on-model variant. Same source photo, run through Snappyit AI Fashion Model for a lifestyle on-body render. Use the ghost mannequin as main image, on-model for gallery slot 2.
- Resize per marketplace. Use a free image resizer to crop the same image to Etsy 2700×2700, eBay 1600×1600, Poshmark 1500×1500, Amazon 2000×2000, etc.
Total time per piece: 4–5 minutes from phone-snap to listing-ready images. Compared to setting up a mannequin and tripod, that's a 5–10x speedup, and the output quality matches studio ghost mannequin photography for everything except sheers and unusually structured garments.
Skip the mannequin entirely. A single phone flat-lay becomes a catalog ghost mannequin image in 60 seconds. Try Snappyit Ghost Mannequin free →
What categories the AI handles best (and where it still struggles)
Two years of training data has narrowed the gap, but AI ghost mannequin output quality still varies by garment category. Knowing where the AI is strong saves you from listing photos that look obviously synthetic — and from wasting credits on garments that need a different method.
- Essentially solved: cotton tees, dresses, button-down shirts, hoodies, sweatshirts, jeans, chinos, blazers with a clear lapel line. Snappyit and the better AI ghost mannequin tools render these correctly from a single flat lay 95%+ of the time.
- Mostly good, sometimes needs a re-roll: heavy knits, cardigans, oversized sweaters, structured outerwear (puffer jackets, trench coats). Snappyit's template gallery lets you pick the garment type up front, which helps; even so, plan for one re-roll out of every five for these categories.
- Still hard: sheer fabrics, lace, mesh, fully transparent layers — the AI doesn't know what to put underneath. Pleated garments with complex 3D folds (smock dresses, accordion skirts) also remain hit-or-miss. For these, hanger photography with controlled light still beats AI ghost mannequin in 2026.
- Not a fit: shoes and bags need their own pipeline. They're 3D objects that don't drape — Snappyit's AI Fashion Model and Ghost Mannequin are tuned for garments, not accessories.
If you sell across all of these categories, the realistic workflow is AI ghost mannequin as the default and hanger or flat lay as the fallback for the 10–15% of pieces the AI doesn't render cleanly. That's still 85% time savings over photographing every piece without a mannequin manually.
Backgrounds and surfaces — what to shoot against when there's no mannequin
Without a mannequin to anchor the composition, the background becomes the visual frame. A messy background makes any garment look amateur; a clean one elevates even a phone snap to listing-quality. The four background types that work for any of the seven methods above:
- White sweep paper roll. 53-inch wide rolls of seamless paper run $20–$40 and last for hundreds of shoots. Drape the roll from a wall to the floor in one continuous curve. No visible horizon line, no shadow from the wall–floor seam, perfect for marketplace main image requirements. Best background for flat lay, hanger, floor pin, and DIY dress form.
- Plain wall, freshly painted. A white or neutral grey wall works almost as well as paper sweep for hanger shots. The cost is zero if you already own the wall. The tradeoff: a wall–floor seam shows in full-length shots, so this works best for tops, mid-length dresses, and accessories rather than floor-length pieces.
- Light-grey fabric or canvas. Better than white for darker garments (a black t-shirt on pure white reads harsh; on light grey it reads softer). $15–$30 for a 5×7 ft drop cloth from a hardware store.
- Textured neutral (wood, linen, concrete). Used by Etsy makers and Depop sellers who want a "lifestyle" feel rather than catalog-clinical. Wood works for jewelry and accessories; linen works for soft fabrics; concrete works for streetwear. Avoid busy patterns — they fight the garment.
Whatever surface you pick, commit to one per category and use it for every piece in that category. The fastest way to look amateur is to alternate three different backgrounds across the same product line. Consistency reads as a brand; inconsistency reads as a side hustle.
Phone camera settings that actually matter for clothing photos
Most clothing photography guides spend pages on DSLR settings that don't apply to phone users. In 2026, the realistic question is: what phone settings actually change how your photos look on Etsy or Poshmark? Five answers, in order of impact.
- Lock focus and exposure. Tap and hold on the garment in the phone camera viewfinder. The yellow box that appears keeps focus and brightness fixed even if your hand moves. Without this, every shot reads a slightly different brightness, and your listings look inconsistent.
- Turn off flash. Phone flash kills fabric texture and creates harsh shadows behind the garment. Use natural light or LED panel; never use flash for clothing photography. The single biggest amateur tell.
- Shoot at 1:1 aspect ratio if your marketplace requires square images (Etsy, Poshmark, most platforms). The phone camera lets you switch from 4:3 to 1:1 in the format menu — do this once, not every shot.
- Use the main lens, not the ultra-wide. Phone ultra-wide lenses distort proportions — sleeves look longer than they are, hems flare wider. The main lens (no zoom in, no zoom out) gives accurate proportions.
- Shoot at the highest resolution your phone offers. Etsy accepts photos up to 2700×2700 pixels and uses them at full size on desktop search results. A phone shooting at 1024×1024 looks blurry compared to a competitor's 2700×2700. Check that your phone is not down-sampling for storage savings.
None of these require any equipment beyond the phone you already own. The difference between an amateur-looking photo and a professional-looking phone photo is almost always one of these five settings, plus the lighting and background covered above.
Mistakes to avoid when photographing clothes without a mannequin
When you photograph clothes without a mannequin, the failure modes cluster into a predictable list. The most common patterns we see when sellers send "why isn't my Etsy converting" photos for review:
- Cluttered background. A laundry basket in the corner, a doorknob in frame, a power outlet on the wall. Buyers' eyes track to whatever is busiest in the photo. Crop tight or move the garment to a clean surface.
- Wrinkled garment. A 60-second steam or iron is the highest-ROI step in clothing photography. Wrinkles read as low-quality. If the garment is unsteamable (vintage rayon, structured tailoring), AI ghost mannequin tools can often clean wrinkles in post — but the cleanest output starts from a clean source.
- Wrong angle. Flat lay shot at an angle (not directly overhead) reads as careless. Hanger shot from below makes the hem flare out. Always shoot directly straight-on or directly top-down, lens parallel to the surface or wall.
- Inconsistent color across photos. Different lighting at different times of day shifts the white balance of every shot. Pick one window or one LED panel and use it for every piece in a listing batch.
- One photo per listing. Marketplaces let you upload 10+ photos for a reason — buyers look at all of them. A listing with one flat lay converts worse than one with a flat lay, a hanger shot, a detail shot, and an AI on-model render. Use the slots.
- Skipping the scale reference. "Is this a small or a large?" is the single most common buyer question that triggers an abandoned cart. A coin, a ruler, or a hand-held shot in one of the gallery slots resolves it.
- Editing too aggressively. Over-saturated colors make a navy blue dress photograph as royal blue and arrive returned for "wrong color." Keep edits subtle: light brightness boost, gentle contrast, leave saturation alone.
None of these mistakes are about gear. They're about discipline. A reseller with an iPhone and a clean wall who avoids these seven mistakes outperforms a reseller with a $2,000 DSLR who commits any three of them.
Side-by-side comparison: which method for which marketplace
You have seven ways to photograph clothes without a mannequin; you have one main listing image per marketplace. The matrix below pairs the two — pick your channel, get the right method.
| Marketplace | Best main image method | Best secondary image method |
|---|---|---|
| Etsy | AI ghost mannequin | AI on-model lifestyle |
| eBay | AI ghost mannequin | Hanger or AI on-model |
| Poshmark | Hanger or AI ghost mannequin | Self-model or flat lay |
| Depop | Self-model or hanger | Flat lay or AI ghost mannequin |
| Mercari | Hanger or flat lay | AI ghost mannequin |
| Amazon | AI ghost mannequin (white-bg, fills 85%) | AI on-model in gallery slots 2–7 |
| Shopify | AI ghost mannequin | AI on-model lifestyle |
| Vinted / Whatnot | Hanger or AI ghost mannequin | Self-model or flat lay |
Lighting that makes any method look better
Regardless of which of the seven methods you pick, lighting decides whether the output reads as professional or amateur. Two rules cover 90% of the cases.
- Use one large, soft light source. Window with sheer curtain, $30 LED softbox panel, or a piece of white foamboard bouncing direct sunlight. Avoid bare ceiling lights and on-phone flash — they create harsh shadows and wash out fabric color.
- Light from the side, not straight on. A 45° to 90° side angle creates the soft shadow that shows fabric texture and garment structure. Straight-on flash flattens everything.
For AI ghost mannequin and AI on-model methods, lighting matters less because the AI re-renders the image — but a clean, evenly-lit source photo still produces measurably better AI output than a flash-blasted phone snap.
FAQ
What is the easiest way to photograph clothes without a mannequin?
Flat lay is the easiest — lay the garment flat on a clean surface and shoot top-down with even daylight. It takes 2 minutes per piece and works for any apparel type. The downside is that flat lay doesn't show fit or drape. For a listing-ready 3D-worn look without buying a mannequin, run your flat lay through an AI ghost mannequin tool — it generates the 3D-worn shape in 60 seconds.
Can I take good product photos with just a phone and no studio?
Yes. Modern phone cameras (iPhone 12+, Pixel 6+, equivalent Android) deliver listing-quality images for marketplace photography when paired with natural window light and a clean backdrop. The phone is rarely the limit — the limit is consistent lighting and a clean background. A $30 LED softbox and a $15 white sweep paper roll closes the gap to studio for under $50.
What is a ghost mannequin photo, and can I make one without a real mannequin?
A ghost mannequin photo shows a garment with a 3D-worn shape but no visible mannequin or model — the clothing appears to hold its own form on a clean background. Traditionally this is achieved by photographing the garment on a mannequin and removing the mannequin in Photoshop. In 2026, AI tools generate the same effect from a single flat-lay phone photo without any mannequin needed at any stage.
Will marketplace platforms accept clothing photos without a mannequin?
Yes. Etsy, eBay, Poshmark, Mercari, Depop, Vinted, and Shopify all accept flat lay, hanger, ghost mannequin, and AI-generated on-model images. Amazon main image policy requires pure-white-background with the product filling 85 percent of the frame — flat lay and ghost mannequin both satisfy this; on-model goes into gallery slots 2 through 7.
Do AI ghost mannequin tools really work, or is the output obviously fake?
Modern AI ghost mannequin tools trained on millions of garment pairs produce results that are routinely indistinguishable from traditional studio ghost mannequin photography for apparel sellers on marketplaces. The strongest output comes from a clean source photo — flat surface, even light, plain background. Knits, structured outerwear, and sheer fabrics can still trip the AI; cotton tees, dresses, button-downs, hoodies, and pants are essentially solved categories.
Turn one flat lay into a catalog-ready ghost mannequin in 60 seconds
Snappyit takes a single phone photo of a garment laid flat and returns a 3D-worn ghost mannequin output ready for any marketplace listing. No mannequin, no studio, no Photoshop. Free starter credits.
Try Snappyit Ghost Mannequin free →