Why On-Model Jewelry Photography Outperforms Every Alternative
Imagine scrolling through an online jewelry store. You see a ring floating on a white background, perfectly lit, every facet gleaming. It looks beautiful, sure, but can you picture it on your hand? Do you know how it sits against your skin tone, how large the stone actually is, or whether it suits your style? Probably not. That disconnect is exactly why jewelry photography with model has become the standard for brands that want to convert browsers into buyers.
At its core, this discipline places real jewelry on a real person and photographs it in a way that makes the piece the undeniable focal point. The model provides context, scale, and human warmth, but the jewelry remains the hero of every single frame. That philosophy is the thread running through everything you'll read in this guide: skin supports the stone, never the other way around.
What Makes On-Model Jewelry Photography Different
Still-life product photography isolates a piece on a flat surface or inside a lightbox. Ghost mannequin shots simulate a worn look without a real body. CGI renders offer flexibility but often feel synthetic. Each method has its place, but none of them answer the question shoppers actually ask: "What does this look like on someone like me?"
Jewelry model photography bridges that gap. When a ring rests on a hand, a pendant falls against a collarbone, or a drop earring catches light beside a jawline, the viewer's brain stops evaluating a product and starts imagining an experience. Humans are wired to connect with faces, skin, and expressions, and that instinct makes model-based imagery feel familiar and trustworthy in ways a flat-lay never can.
Why Brands Are Shifting to Model-Based Jewelry Images
The shift is driven by measurable results. Online shoppers increasingly expect to see jewelry worn on real people before they commit to a purchase. When they can visualize fit and proportion, hesitation drops and confidence rises. One of the biggest pain points in online jewelry shopping is scale: how big is the pendant, how does the bracelet drape, will the earring suit my face shape? A jewelry photography model solves all of these questions in a single image.
Context-driven imagery that shows jewelry on a real person reduces return rates by helping customers visualize fit, proportion, and wearability, directly addressing the uncertainty that drives up to 15% of online jewelry returns for issues like incorrect sizing alone.
Jewelry brands selling online face a return rate as high as 15% on rings sent back for resizing, with one in five of those requiring a complete redesign. Much of that friction traces back to poor visual context on the product page. Model with jewellery photography gives shoppers the spatial cues they need, showing exactly how a piece sits, hangs, or wraps, so they buy with clarity instead of guesswork.
Beyond returns, there is the conversion side. On social media, images featuring people consistently outperform static product shots in engagement and click-through rates. Shoppers stop scrolling when they see a human element, and that pause is where purchase decisions begin. For ecommerce listings, editorial campaigns, and social content alike, on-model imagery does the heavy lifting that white-background shots simply cannot.
Getting these results, though, starts long before the camera fires. It starts with choosing the right model for the specific piece you are photographing.
How to Choose the Right Model for Each Jewelry Type
Casting a jewelry model is not the same as casting a fashion model. In fashion, the model's look drives the story. In a photoshoot jewellery brands rely on, the piece drives the story and the model's body becomes its stage. That means the selection process flips: instead of asking "who looks great on camera," you ask "whose physical features make this specific piece look its best?" Understanding how to choose a model for jewelry photography starts with that shift in thinking.
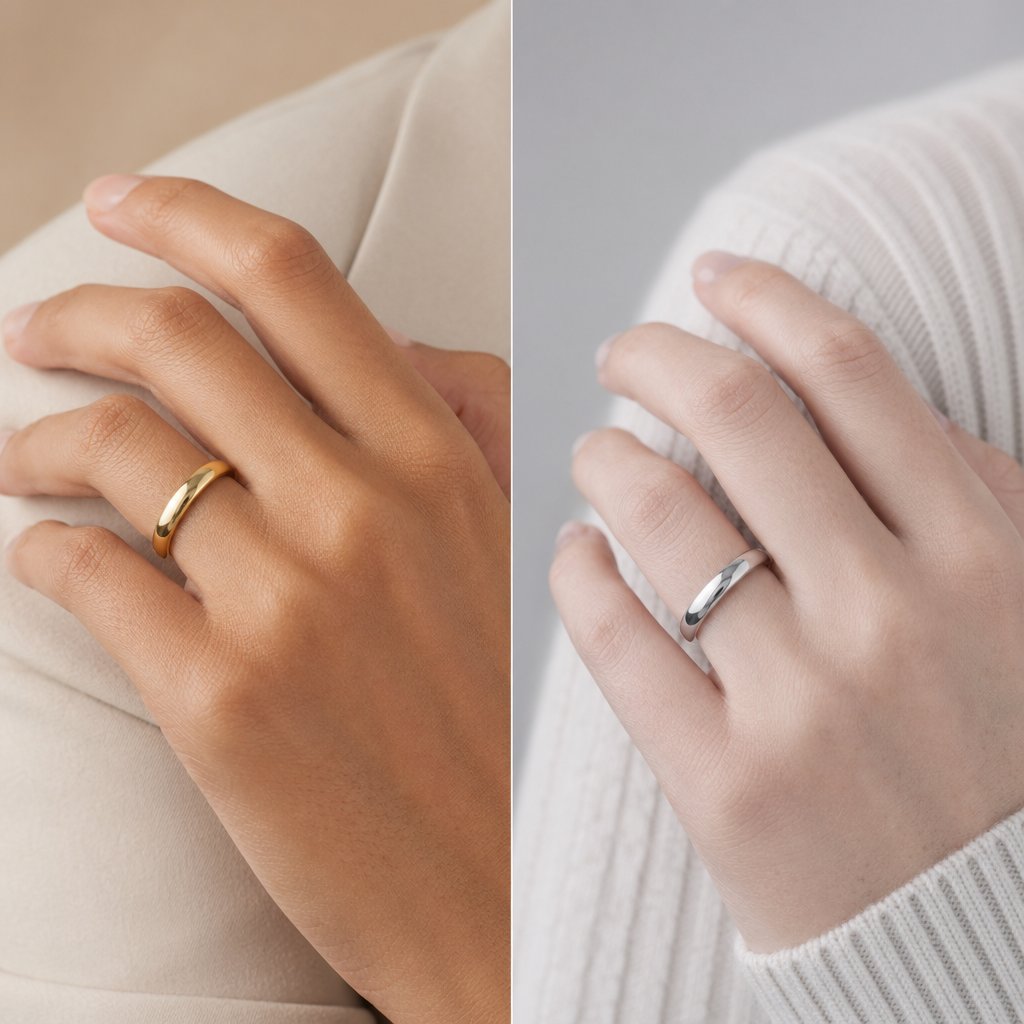
Matching Skin Tone to Metal Color
The interplay between skin undertone and metal color can make or break a shot. Warm undertones, those with golden or peachy hues beneath the surface, naturally harmonize with yellow gold and rose gold. The skin's dominant carotene pigment echoes the warmth of the metal, creating a cohesive, flattering glow. Cool undertones, where pink or bluish hues dominate, pair beautifully with silver, white gold, and platinum because the cooler hemoglobin pigment in the skin mirrors the metal's temperature.
These pairings are not rigid rules, though. They are starting points. A high-contrast combination, like a deep warm skin tone against bright white gold, can make the metal pop dramatically and draw the viewer's eye straight to the piece. A low-contrast pairing, such as fair cool skin with platinum, creates a softer, editorial tonal look where the jewelry feels almost woven into the model's presence. The choice depends on the mood you want: bold product focus or seamless lifestyle elegance.
Neutral undertones offer the most flexibility. Models with a balanced mix of warm and cool pigments can wear virtually any metal convincingly, making them versatile picks when you are shooting a mixed-metal collection in a single session.
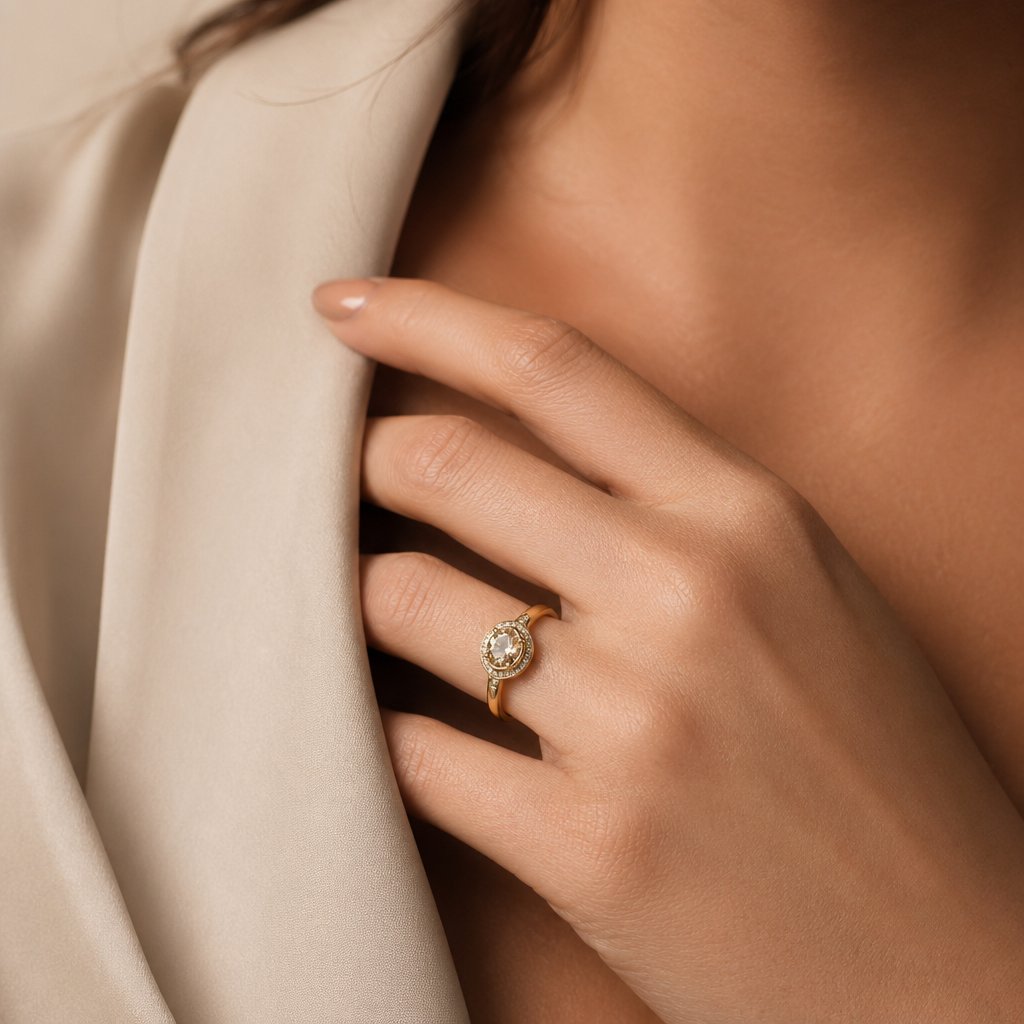
Hand Shape, Nail Presentation, and Ring Photography
Rings live and die by the hand that wears them. Hand models tend to have classically shaped hands with narrow, slender fingers and a smooth, even complexion. These proportions keep the ring as the visual anchor rather than letting knuckle texture or finger width compete for attention.
Nails matter just as much. Well-groomed, neutral-toned nails, think soft pinks, sheer nudes, or a clean natural finish, complement gemstones without clashing. A bold red or dark nail color can overpower a delicate stone, while overly long nails shift the focal point away from the ring entirely. If the campaign features colored gemstones, match the nail shade to a complementary or recessive tone so the stone stays dominant. Have the model moisturize hands thoroughly in the days leading up to the shoot, and keep cuticles tidy. Under studio lighting, every crack and dry patch becomes magnified.
Neck, Collarbone, and Ear Considerations for Statement Pieces
Necklaces and pendants need a canvas that gives them room to breathe. A longer neck and defined collarbone create natural visual lines that guide the eye downward toward the pendant. Shorter necks can work well for chokers and collar-length pieces, but a princess-length or opera-length necklace may bunch or lose its drape without enough vertical space.
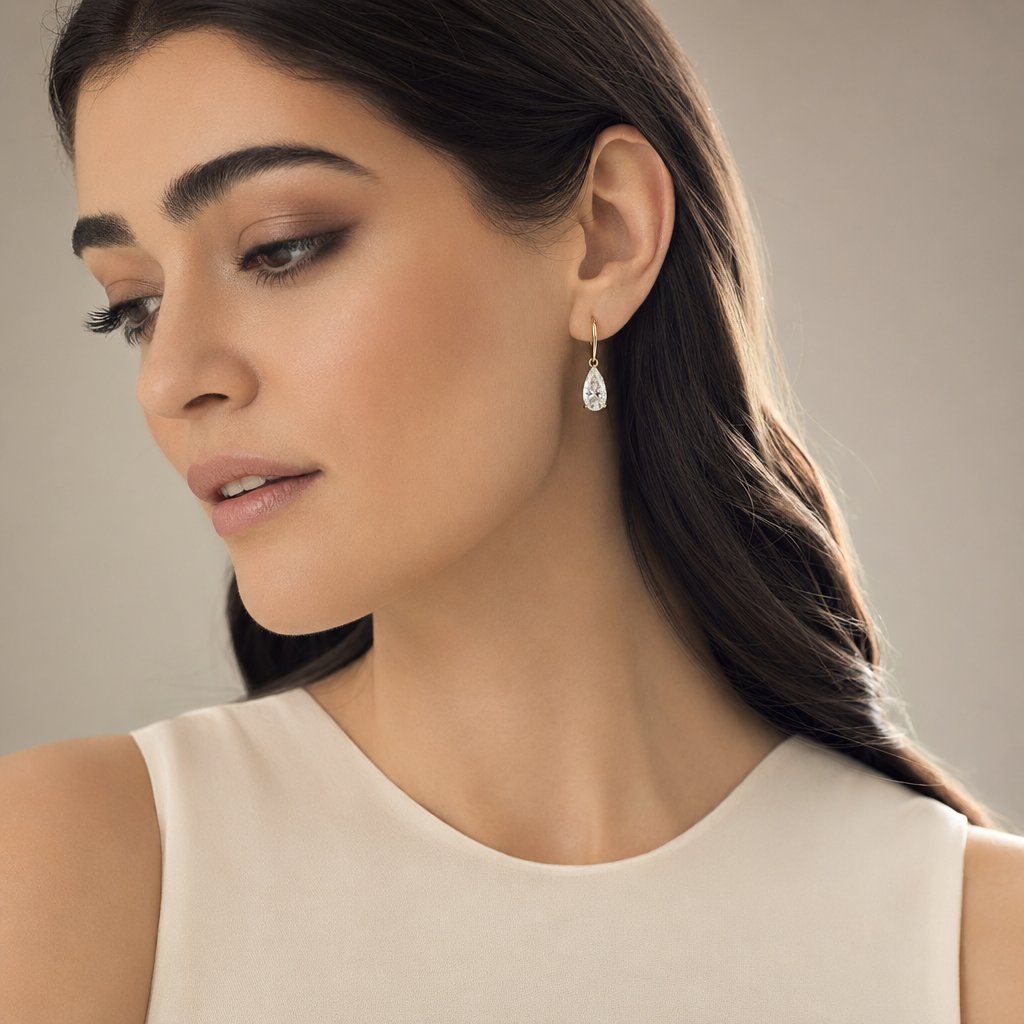
Earrings introduce their own variables. Drop and chandelier styles benefit from a model whose ears sit relatively close to the head, preventing the earring from angling outward and catching unflattering shadows. Hair styling is equally critical: pulling hair back or tucking it behind the ear ensures the earring is fully visible, while a loose wave framing the face can add editorial warmth as long as it does not obscure the piece. Ear shape also affects how studs and huggie hoops sit, so always do a quick test fit before committing to a model for close-up ear shots.
To keep your casting organized, here is a quick-reference checklist of what to evaluate for each jewelry type:
- Rings: Slender, well-proportioned fingers; smooth skin on hands; neutral, short-to-medium nail length; nail color that recedes behind the gemstone
- Necklaces and pendants: Longer neck with visible collarbone definition; even skin tone across the chest and decolletage; minimal freckling or blemishes in the necklace zone
- Earrings: Ears that sit close to the head; lobes large enough to support the earring style without stretching; hair that can be styled away from the ear cleanly
- Bracelets and bangles: Slim, defined wrists; smooth forearm skin; wrist circumference that allows the bracelet to sit without excessive sliding or pinching
Matching the right model to the right piece is half the battle. The other half is making sure the jewelry itself is camera-ready, because even the perfect casting cannot save a fingerprint-smudged ring under studio lights.
Preparing Jewelry Before the On-Model Photoshoot
A fingerprint invisible to the naked eye becomes a glaring smudge under a studio softbox. A thin film of skin oil on a polished gold band turns into a dull, milky streak the moment light hits it at the wrong angle. These tiny imperfections are the reason so many on-model jewelry images end up buried in hours of retouching, or worse, scrapped entirely. The truth about how to photograph jewellery well is that most of the work happens before the camera ever fires.
Jewelry photoshoot preparation tips rarely get the attention they deserve, yet preparation is the single biggest factor separating a smooth, efficient shoot from a frustrating one. Every minute you invest cleaning, sizing, and securing pieces on set saves five minutes in post-production and dramatically improves the raw image quality your camera captures.
Cleaning and Polishing Techniques by Metal and Stone Type
Start with the basics: a soft, lint-free microfiber cloth. This is your most-used tool for removing dust, light fingerprints, and surface oils from virtually any metal. Wipe each piece gently in straight lines rather than circular motions to avoid micro-scratches, especially on softer metals like gold.
Different metals and stones demand different care, though. Here is how to approach each:
- Gold and gold-plated pieces: Warm water with a few drops of mild dish soap works well for solid gold. Soak the piece for a few minutes, then use a baby toothbrush with extra-soft bristles to reach crevices around prong settings. Rinse thoroughly and pat dry. For gold-plated jewelry, skip the soaking entirely. Prolonged water exposure can lift the plating. Instead, dampen your microfiber cloth with the soapy solution and wipe gently.
- Silver and sterling silver: Silver tarnishes from exposure to air and moisture, so pieces stored for any length of time will likely need attention. A dedicated silver polishing cloth removes light tarnish quickly. For heavier buildup, a jeweler-grade silver cleaning solution or foam restores shine without the abrasiveness of DIY baking-soda pastes, which can scratch softer silver surfaces. Store cleaned silver pieces in anti-tarnish bags or pouches between the cleaning session and the shoot to prevent re-tarnishing.
- Platinum: Platinum is harder and more scratch-resistant than gold or silver, but it develops a patina over time. A warm soapy soak followed by a soft brush and thorough drying usually restores its luster. Avoid abrasive compounds unless you are working with a professional jeweler.
- Gemstones and diamonds: Diamonds can handle a gentle soapy soak, but porous stones like opals, turquoise, and pearls cannot. Pearls are especially fragile. Even water that is too warm can damage them, so wipe pearls with a barely damp, soft cloth and let them air dry completely. Avoid alcohol-based cleaners on any organic gem, as alcohol can dry out natural oils in gemstones, causing surface cracking over time.
One rule applies across every material: always clean jewelry with cotton gloves on, or handle pieces by their edges and clasps after cleaning. The natural oils on your fingertips will undo your work in seconds, and under studio lighting, those fresh prints show up with unforgiving clarity.
Temporary Sizing and Securing Pieces on the Model
Here is a scenario every jewelry photographer knows: the ring is a size 7, the model's finger is a size 5, and the piece spins freely with every hand movement. You cannot resize a client's inventory for a photoshoot, so you improvise.
Museum wax, the same putty used to secure objects in display cases, is the go-to fix. Roll a tiny ball, press it inside the band opposite the stone, and the ring grips the finger without leaving residue or appearing in frame. Clear tape loops wrapped inside the band work in a pinch, though they can shift during longer sessions. Temporary ring-size adjusters, small spiral plastic inserts that coil around the band's interior, offer a more stable solution for extended shoots and are reusable across multiple pieces.
Necklaces and pendants bring their own challenges. Clasps that slip or chains that twist can ruin a composition mid-frame. A small piece of double-sided fashion tape at the back of the neck keeps the clasp from migrating into the shot. For pendants that need to hang at a precise point on the chest, a tiny dab of eyelash glue on the model's skin holds the piece in place without damaging the metal.
Bracelets, especially bangles, tend to rotate so the decorative face drifts out of view. Museum wax on the inside of the bracelet at the wrist's narrowest point prevents rotation. For chain bracelets, a small safety pin hidden on the underside of the wrist can anchor the clasp and keep the focal element centered.
Earring backs are another common headache. Butterfly backs and friction posts can peek into frame during three-quarter or profile shots. Swap them for clear silicone backs whenever possible. They grip securely and virtually disappear on camera, even in tight close-ups.
Handling Delicate and Vintage Jewelry Safely
Antique and vintage pieces require extra caution. Older prong settings may be weakened by decades of wear, and stones in closed-back mountings can be damaged by moisture. As jewelry experts note, water can seep into closed-back rings and affect the appearance of the stones, so avoid any wet cleaning on these pieces entirely. A dry microfiber cloth and a soft brush are your safest options.
Transport fragile jewelry to set in individual padded compartments, never loose in a bag where pieces can scratch or tangle. Velvet-lined trays or small zippered pouches work well. On set, designate one person as the jewelry handler. This person is responsible for placing pieces on the model, removing them between setups, and returning them to their cases. Limiting how many hands touch the jewelry reduces the risk of drops, scratches, and oil transfer.
Heat is an underrated concern. Studio strobes generate less heat than continuous lights, but prolonged sessions under any lighting setup can warm metal enough to cause discomfort on skin and accelerate tarnishing on silver. Minimize the time jewelry spends on the model under lights. Place the piece just before shooting a series, then remove it during lighting adjustments or pose changes. This habit protects both the jewelry and the model's comfort.
To keep your preparation organized and thorough, follow this checklist in order before every on-model shoot:
- Inspect each piece for loose stones, weakened prongs, or damaged clasps and set aside anything that needs repair.
- Clean every piece using the appropriate method for its metal and stone type.
- Polish with a microfiber cloth and store cleaned pieces in anti-tarnish bags or padded compartments.
- Test-fit each piece on the model or a sizing reference, and prepare museum wax, tape loops, or temporary sizers for anything that does not fit snugly.
- Gather securing supplies: fashion tape, eyelash glue, clear silicone earring backs, and safety pins for bracelets.
- Designate a jewelry handler who will place, adjust, and remove pieces throughout the session.
- Set up a clean, padded staging area on set where pieces rest between shots, away from direct light and heat.
With every piece cleaned, fitted, and secured, the physical foundation of your shoot is solid. The next challenge is entirely visual: how to pose the model and position the camera so each jewelry type gets the framing, angle, and focal distance it deserves.
Posing and Camera Angles Organized by Jewelry Type
A cleaned, perfectly fitted ring on the wrong hand position looks just as bad as a smudged one on the right pose. Preparation gets the jewelry camera-ready, but posing and angle selection determine whether the final image actually sells the piece. The challenge is that a technique that flatters a pendant will completely fail for a bracelet. Jewelry photography poses and angles need to be planned around the specific category you are shooting, not applied as a one-size-fits-all formula.
Here is how to approach each type individually, with the tips for photographing jewelry that keep the piece as the undeniable focal point in every frame.
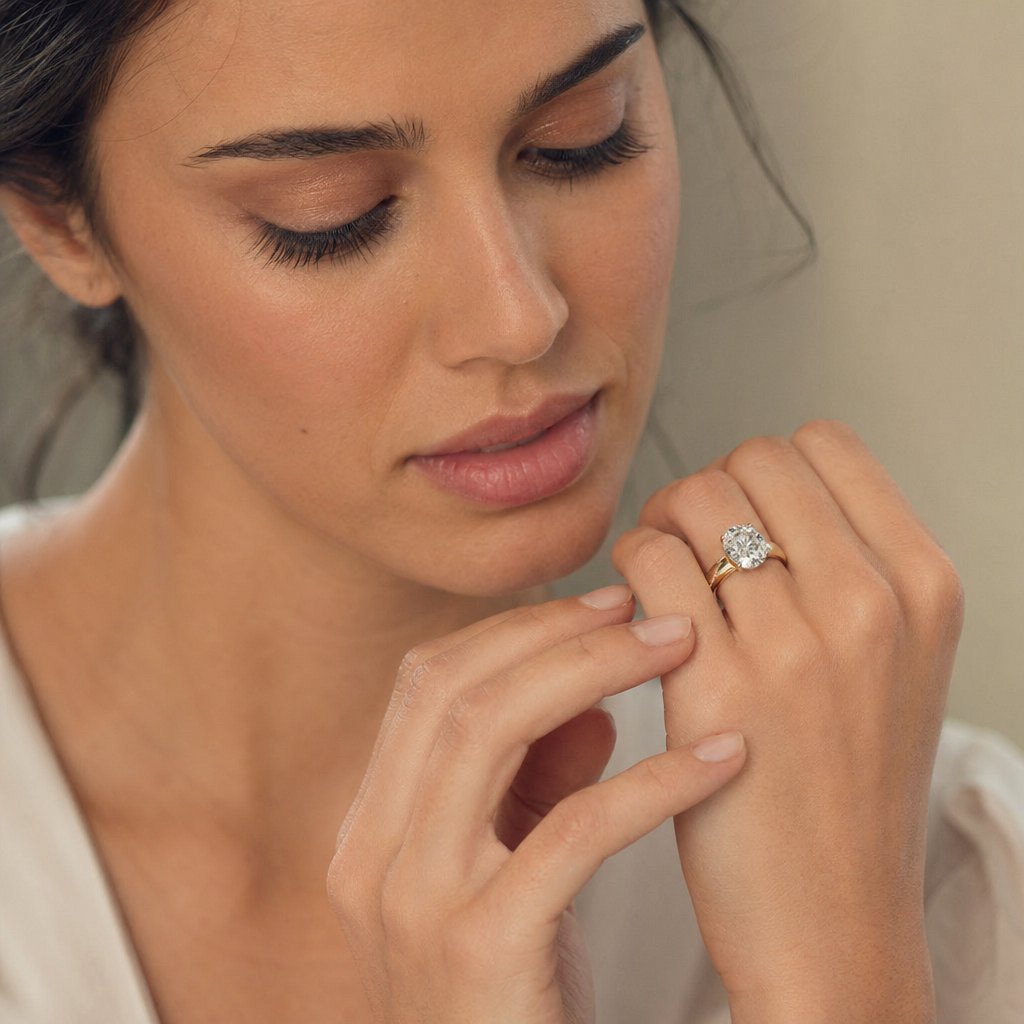
Ring Photography Poses and Angles
Rings occupy a tiny area of the frame, so every detail in the hand's position matters. Three poses consistently deliver strong results: the model's hand resting gently on the collarbone, fingers lightly touching the cheek or jawline, and fingers spread naturally on a flat surface like a table or the model's own knee. Each pose gives the ring a different context. The collarbone rest adds elegance and draws the eye downward. The face touch creates intimacy. The surface spread offers a clean, editorial look where the ring commands attention against a simple backdrop.
For camera angles, a 45-degree overhead angle works beautifully for solitaire engagement rings because it captures the stone's face and the band's profile in a single frame, similar to the classic three-quarter angle that reveals all key details at once. Straight-on shots at hand level are better for showcasing band details, engravings, or side-set stones. To isolate the ring hand while keeping the model's presence felt, shoot at a focal length between 85mm and 105mm. This range compresses the background just enough to soften the model's body into context without erasing her entirely.
Necklace and Pendant Framing on the Model
Clothing neckline is your invisible compositional tool here. A V-neck or off-the-shoulder top creates leading lines that funnel the viewer's gaze straight to the pendant. Crew necks and high collars compete with shorter necklaces and can crowd the frame, so save those for longer, opera-length chains where the pendant falls well below the neckline.
Shoot slightly below chin level, angling the camera upward just a few degrees. This perspective elongates the neck and gives the pendant visual breathing room against the chest. For layered necklace styling, stagger chain lengths by at least two inches between layers and keep the model's torso relatively still. Too much movement causes layers to tangle or overlap, creating visual clutter that no amount of retouching fixes cleanly. A focal length of 50mm to 85mm captures the full necklace-to-neckline composition without the barrel distortion that wider lenses introduce.
Earring Visibility and Hair Styling Coordination
Earrings disappear faster than any other jewelry type in a photograph. Hair, shadows, and the model's jawline all conspire to hide them. The simplest fix is pulling hair back into a low bun or tucking it behind the ear on the featured side. But a loose wave framing the opposite side of the face can add editorial warmth and depth, as long as it does not cross over and obscure the earring.
For drop and chandelier earrings, ask the model for a three-quarter face turn toward the key light. This angle catches the earring's full length in profile and lets light travel through any translucent stones. Studs and huggie hoops that sit close to the lobe need a different approach: shoot tighter, at 100mm to 105mm, and position a small reflector just below the ear to bounce light upward into the piece. Without that fill, lobe-hugging styles fall into the shadow cast by the jawline and lose all their detail.
Bracelet and Anklet Movement and Wrist Positioning
Bracelets are the most motion-dependent jewelry type. A stiff, straight arm makes a bracelet look like a static prop. A slight bend at the wrist, with the hand relaxed and fingers gently curved, lets the bracelet drape naturally and shows how it moves with the body. Ask the model to slowly rotate her wrist or lift her hand toward her shoulder between frames. These micro-movements create variation in how the bracelet catches light without shifting it out of the focal plane.
Bangles present a specific challenge: they slide. Gravity pulls them toward the elbow the moment the arm lifts, so angle the wrist slightly downward to keep bangles grouped near the hand where they belong. For chain bracelets, a wrist angled toward the camera at roughly 30 degrees makes the clasp and charm the closest point to the lens, naturally drawing focus. Shoot at 85mm to 100mm to maintain a flattering compression that keeps the wrist and bracelet sharp while softening the arm behind them.
Jewellery creative photography comes down to matching the right pose and angle to the right piece. Here is a quick-reference summary to keep on set:
| Jewelry Type | Recommended Pose | Camera Angle | Focal Length Range |
|---|---|---|---|
| Rings | Hand on collarbone, touching face, or fingers spread on a surface | 45-degree overhead for solitaires; straight-on for band details | 85mm – 105mm |
| Necklaces / Pendants | Model with relaxed shoulders, chin slightly lifted, minimal torso movement | Slightly below chin level, angled upward | 50mm – 85mm |
| Earrings | Three-quarter face turn toward key light; hair pulled back on featured side | Eye level to slightly above; tight framing for studs | 100mm – 105mm |
| Bracelets / Bangles | Relaxed wrist bend, slow rotation, wrist angled toward camera | Straight-on at wrist level; 30-degree wrist tilt toward lens | 85mm – 100mm |
Nailing the pose and angle gets the composition right, but composition alone does not make jewelry sparkle. That comes down to how you light reflective metal and refractive gemstones when they are sitting on human skin, a surface that introduces its own color casts and unpredictable reflections.
Lighting Setups That Make Jewelry Shine on Skin
Lighting a ring on a white background is straightforward. Lighting that same ring on a human hand is a completely different problem. Skin introduces variables that a tabletop setup never has to deal with: warm color casts that shift metal tones, oily reflections on polished surfaces, and the constant challenge of keeping skin flattering while making the jewelry pop. A professional jewelry photography lighting setup has to serve two masters at once, and the balance between them is what separates amateur on-model results from images that actually sell.
Key Light Placement for Jewelry on a Model
Your key light does the heavy lifting. Position it at roughly 45 degrees above and to the side of the model, using a large softbox, ideally 24 inches or wider. A large softbox wraps light around curved metal surfaces while keeping skin tones even and flattering. The soft, diffused output minimizes the harsh specular hotspots that turn a polished gold band into a blown-out streak of white.
Here is where the nuance comes in. Moving the key light closer to the model softens metal reflections further, creating a gentle, even sheen across the jewelry. Pull it back a foot or two, and the light source becomes relatively smaller, which increases specular highlights on gemstone facets and brings out that coveted sparkle in diamonds and colored stones. Think of it as a sliding scale: closer for smooth metals, farther for faceted gems. When you are shooting a piece that combines both, like a diamond solitaire on a polished gold band, start at a middle distance and fine-tune from there based on your test shots.
Angle matters just as much as distance. If the softbox sits too far overhead, shadows pool under the model's chin and darken necklaces. Too far to the side, and one half of the jewelry falls into shadow while the other overexposes. The 45-degree sweet spot gives dimension to both the model's features and the three-dimensional form of the jewelry without creating harsh dividing lines between light and dark.
Fill Light and Reflector Positioning to Control Metal Reflections
A single key light leaves the opposite side of the jewelry in shadow, and on reflective metal, that shadow side often reads as a dark, unflattering stripe. A fill card or second softbox placed opposite the key solves this by bouncing light back into the shadow areas. The goal is not to eliminate shadows entirely, which would flatten the jewelry and make it look two-dimensional, but to lift them just enough that detail remains visible in the metal's darker zones.
The critical distinction for on-model work is positioning the fill relative to the jewelry piece, not just the model. In portrait photography, you place the fill to flatter the face. In jewelry photography with a model, you place it to control what the metal reflects. Polished silver and platinum act like tiny mirrors: they reflect whatever is in front of them. A white fill card positioned at the jewelry's level creates a clean, bright reflection in the metal surface. A silver reflector at the same position adds a crisper, more intense fill that can make diamonds and gemstones appear brighter and more sparkly than a white card alone.
Keep the fill about one to one-and-a-half stops dimmer than the key. This ratio preserves the sense of depth and directionality in the light while preventing the flat, shadowless look that screams "overlit." If you are using a reflector instead of a powered fill light, simply move it closer or farther from the jewelry to control its intensity.
Budget-Friendly vs Professional Jewelry Photography Lighting Setup
Not every shoot demands a four-light studio rig. If you are learning how to take good pictures of jewelry with a model for the first time, a two-light starter setup delivers surprisingly strong results. As you scale up to commercial campaigns or high-volume ecommerce, a four-light professional configuration gives you the control to handle any piece and any skin tone without compromise.
Here is a side-by-side comparison of both setups:
| Component | Budget Setup (2 Lights) | Professional Setup (4 Lights) |
|---|---|---|
| Key Light | Single LED panel (bi-color, adjustable) with a 24" softbox | Studio strobe (300W+) with a 36" softbox or octabox |
| Key Light Position | 45 degrees above and to the side of the model | 45 degrees above and to the side, feathered slightly past the model |
| Key Light Purpose | Primary illumination for both skin and jewelry | Primary illumination with precise power control for balancing skin and metal |
| Fill | White foam board reflector opposite the key light | Second strobe at low power (1–1.5 stops below key) with a medium softbox |
| Fill Position | Angled at jewelry height on the shadow side | Opposite the key, adjusted to jewelry height, feathered to avoid flattening skin |
| Fill Purpose | Bounce light into metal shadows; add clean reflections to polished surfaces | Controlled shadow lift with independent power adjustment for precise metal-reflection management |
| Accent / Hair Light | Not included | Small strobe or LED with a grid, positioned behind and above the model |
| Accent Purpose | — | Separates the model from the background; adds rim highlight to earrings and necklace edges |
| Background Light | Not included (use a neutral backdrop close to the key light's spill) | LED panel or gelled strobe aimed at the backdrop |
| Background Purpose | — | Controls background tone independently; prevents color casts from bouncing onto jewelry |
The budget setup works well for ring close-ups, single-piece bracelet shots, and simple necklace compositions where the background is minimal. You will notice its limits when shooting earrings that need rim separation from the model's hair, or when a colored backdrop starts casting unwanted hues onto reflective metal. That is where the professional setup earns its keep: each light handles one job, so you can adjust metal reflections, skin exposure, background tone, and edge separation independently without one change cascading into everything else.
Whichever setup you choose, the lighting only works if your camera settings are dialed in to match. Reflective jewelry on a moving model demands specific aperture, shutter speed, and lens choices that differ sharply from static product photography, and getting those wrong can undo even the most carefully built light rig.
Camera Settings for Sharp Jewelry on a Moving Model
You have built the perfect light rig, posed the model beautifully, and the pendant is catching a gorgeous highlight. Then you review the image on the back of the camera and the chain is tack-sharp but the clasp is a soft blur. Or the gemstone sparkles, but the model shifted mid-frame and the whole image has a faint ghosting you cannot fix in post. These are not lighting problems. They are camera-settings problems, and they are the fastest way to waste an entire shoot day.
Static product photography on a tripod is forgiving. You lock focus, stop down to f/16, drop the shutter to half a second, and the piece is razor-sharp edge to edge. A living, breathing model changes every variable. She shifts weight, tilts her head, breathes. The best camera settings for jewelry photography in a studio lightbox do not translate directly to on-model work. Here is how to adapt.
Aperture Choices for Isolating Jewelry vs Showing Context
Aperture controls depth of field, and depth of field controls what your viewer sees as sharp versus soft. In on-model jewelry photography, that choice is creative, not just technical. It depends entirely on what you are shooting and what story the image needs to tell.
When you want to isolate a ring on a hand with creamy, out-of-focus skin behind it, open up to f/2.8 or f/4. This narrow depth of field turns the model's body into a soft, warm backdrop and pins all visual attention on the ring. It works beautifully for hero shots on social media or editorial spreads where mood matters more than product detail. The tradeoff is thin: at f/2.8 on a macro or short-telephoto lens, your plane of sharp focus may be only a few millimeters deep. If the model's hand shifts even slightly, the stone stays sharp but the band goes soft, or vice versa.
For ecommerce product pages where customers need to evaluate the entire piece, stop down to f/8 through f/11. This range keeps a full necklace and the model's neckline in sharp focus while still offering enough background separation to avoid a flat, snapshot look. Studio tests by jewellery photographer Li Gao show that pushing further to f/13 produces the sharpest depth of field across an entire jewelry piece on a model, capturing both the front facet and the band in crisp detail at 85mm.
How does aperture choice shift across jewelry types? Consider these practical guidelines:
- Rings at close range (85mm–105mm): f/2.8–f/4 for dreamy isolation shots; f/8–f/13 for full-detail ecommerce images where the entire setting needs to be sharp
- Necklaces and pendants (50mm–85mm): f/8–f/11 to hold the chain, pendant, and neckline in focus simultaneously
- Earrings at tight framing (100mm–105mm): f/5.6–f/8 balances earring sharpness with a gently blurred jawline that keeps the composition clean
- Bracelets at mid-distance (85mm–100mm): f/8–f/11 to capture the full circumference of the bracelet as it wraps the wrist
The pattern is straightforward: the closer you are to the piece and the more detail the customer needs, the higher your f-stop should go. Just be aware that pushing past f/16 on most lenses introduces diffraction, a subtle softening across the entire frame that defeats the purpose of stopping down in the first place.
Shutter Speed and ISO for Models in Motion
A model is never truly still. Even holding a pose, she breathes, micro-adjusts her balance, and shifts her fingers. These tiny movements are invisible to your eye but devastating at macro distances where a millimeter of motion equals a millimeter of blur.
Start with a minimum shutter speed of 1/200s when the model is shifting between poses or making deliberate hand movements. For relatively static poses where the model is holding position, you can drop to 1/125s, but treat that as your floor. Anything slower and you are gambling on the model's ability to freeze, a bet you will lose more often than you win.
Your lighting type dictates how shutter speed and ISO interact:
- Studio strobes: The flash duration, often 1/1000s or faster, effectively freezes motion regardless of your shutter speed setting. You can set the shutter to your camera's sync speed (typically 1/160s to 1/250s) and keep ISO at its native base, usually ISO 100 to ISO 200, for the cleanest possible files. This is the ideal scenario for on-model jewelry work because it gives you motion-freezing power and noise-free images simultaneously.
- Continuous LED lighting: Without the motion-freezing burst of a strobe, you rely entirely on shutter speed to stop movement. At f/8 to f/11 under continuous lights, you may need to push ISO to 400 or even 800 to maintain 1/200s. Modern full-frame sensors handle ISO 400 with virtually no visible noise, and many mirrorless bodies stay clean up to ISO 800. Beyond that, grain starts creeping into the smooth metal surfaces where it is most noticeable.
- Natural window light: The most unpredictable scenario. Light intensity changes with cloud cover and time of day, so you are constantly adjusting. Position the model close to a large north-facing window for the most consistent, soft illumination. Even so, expect to push ISO to 800 or higher to maintain a safe shutter speed, especially on overcast days. The tradeoff between noise and motion blur is real here: a slightly grainy image is always more usable than a blurry one, so prioritize shutter speed over low ISO when you are forced to choose.
One practical habit that saves countless frames: shoot in short bursts of three to five images per pose rather than single shots. The model's micro-movements mean at least one frame in the burst will catch the jewelry at peak sharpness, even if the others are fractionally soft. Review the burst on your camera's LCD at full zoom before moving to the next pose. This chimping habit catches focus misses early, before you have moved on and lost the setup.
Lens Selection and Focal Length Recommendations
The lens you choose shapes how the jewelry looks in the frame just as much as your aperture and shutter speed. Different focal lengths serve different purposes, and using the wrong one introduces distortions that no amount of post-processing can fully correct.
A dedicated macro lens, typically 90mm to 105mm, is essential for tight ring detail shots and earring close-ups. Macro lenses achieve true 1:1 magnification, capturing the jewelry at life size on the sensor. A 100mm f/2.8 macro is the industry workhorse for a reason: it provides a comfortable working distance of about 12 inches from the piece, so you are not casting shadows over the jewelry or crowding the model. The 100mm focal length also compresses perspective slightly, which flatters both the jewelry and the model's features.
For half-body necklace compositions and broader lifestyle framing, an 85mm to 105mm portrait lens strikes the right balance. These lenses keep the model's proportions natural while providing enough background compression to separate the subject from the backdrop. An 85mm f/1.4 or f/1.8 doubles as a beautiful isolation tool when you open it up for shallow depth-of-field hero shots, then stops down cleanly to f/8 or f/11 for sharper product work.
A 50mm lens can work for full-body or environmental shots where the jewelry is part of a broader lifestyle scene, but be cautious. At closer distances, 50mm begins to introduce subtle perspective distortion that widens the model's features nearest the lens. For jewelry-focused framing, you will almost always get better results stepping back with an 85mm than stepping closer with a 50mm.
What about wide-angle lenses? Avoid them for on-model jewelry work. Anything below 50mm exaggerates the size of whatever is closest to the camera and shrinks everything behind it. A bracelet shot at 35mm will make the model's hand look disproportionately large while the bracelet itself warps along its curve. The distortion undermines the accurate sense of scale that is the entire point of photographing jewelry on a person.
Here is a quick-reference starting point you can tape to your light stand:
- Studio strobe setup: ISO 100, f/11, 1/200s, 100mm macro for detail shots or 85mm for half-body compositions
- Continuous LED setup: ISO 200–400, f/8, 1/200s, 85mm–105mm depending on framing distance
- Natural window light: ISO 400–800, f/5.6–f/8, 1/200s minimum, 85mm–105mm, position model within two feet of the window
These are starting points, not absolutes. Every piece, every model, and every lighting environment will ask you to adjust. The key is knowing which dial to turn and why, so your adjustments are deliberate rather than random.
Dialing in sharp technical settings captures the jewelry in detail, but detail alone does not sell the piece. The real skill gap between amateur and professional on-model results lives in something no camera setting can fix: how you direct the model so the viewer's eye lands on the jewelry first, every single time.
Directing the Model to Keep Jewelry as the Hero
Sharp focus, beautiful light, perfect pose, and the viewer's eye still goes straight to the model's face. Sound familiar? This is the single most common failure in on-model jewelry photography, and no amount of technical skill behind the camera can fix it. The solution lives in front of the lens: how you direct a model for jewelry photos determines whether the piece sells itself or gets lost in a portrait.
A professional jewelry photographer does not just tell the model to "hold still and look pretty." Every instruction, from where the eyes land to how a wrist tilts, is engineered to route the viewer's attention toward the product. That directing skill is what separates a jewelry image that converts from one that simply looks nice.
Guiding Gaze and Expression to Support the Jewelry
The human eye is hardwired to follow another person's gaze. When a model looks directly into the camera, the viewer locks onto her eyes and the jewelry becomes a secondary detail in a portrait. When she glances downward at a ring on her finger, the viewer's eye follows that same path and lands on the stone. That one shift in eye direction can completely reframe what the image is about.
Use this instinct deliberately. For a pendant, ask the model to drop her chin slightly and let her gaze drift toward the necklace. For earrings, a subtle head tilt with eyes cast to the side draws attention along the jawline and right to the piece. Ring shots benefit from the model looking at her own hand with a soft, relaxed expression, as if she is admiring the piece in a quiet moment. The expression should stay understated: a slight smile, a calm gaze, nothing dramatic. Heavy emotion pulls focus back to the face.
There is one exception. Lifestyle branding shots, the kind used for social media campaigns or brand storytelling, sometimes benefit from a direct-to-camera gaze. In these images, the goal is aspiration and identity, not pure product evaluation. The model's confidence becomes part of the message, and the jewelry reinforces who she is. But for product-focused ecommerce where the customer needs to evaluate the piece itself, redirect the gaze away from the lens and toward the jewelry every time.
Hand Placement and Micro-Movements That Highlight the Piece
Hands are your most powerful directing tool because they physically interact with the jewelry. A model lightly touching a pendant with her fingertips tells the viewer exactly where to look. Turning a ring slowly with the opposite hand creates a natural gesture that frames the piece between two points of contact. Brushing hair behind the ear to reveal an earring mimics a real-life motion that feels authentic while serving a purely compositional purpose: clearing the sightline to the product.
These gestures need to be small and slow. A sweeping arm movement shifts the bracelet out of the focal plane and introduces motion blur. A dramatic hair toss obscures the earring for half the burst. Instead, direct the model to make micro-movements: a quarter-inch rotation of the wrist, a fingertip sliding along a chain, a gentle tuck of a single strand of hair. Between frames, these tiny adjustments create natural variation in how the jewelry catches light and sits against the skin, giving you a range of options without ever losing the piece from sharp focus.
One practical trick that works well on set: ask the model to "reset" to a neutral position after every three to five frames, then repeat the gesture from the beginning. This gives you multiple clean starting points and prevents the gradual drift that happens when a model holds or repeats a movement too many times in a row. Each reset produces a fresh, natural version of the same gesture.
Body Angles That Frame Rather Than Distract
The model's body is a frame within the frame. Used well, it directs attention inward toward the jewelry. Used poorly, it competes for the viewer's eye or creates visual tension that pulls focus away from the piece.
For necklace shots, a slight shoulder turn toward the camera creates depth and dimension in the collarbone area, giving the pendant a three-dimensional stage instead of a flat plane. The turn should be subtle, roughly 15 to 20 degrees off square. More than that and the far shoulder disappears, making the composition feel unbalanced. For bracelet and bangle images, angling the wrist toward the camera so the bracelet becomes the closest element to the lens naturally makes it the focal point. The arm behind it falls into softer focus, reinforcing the hierarchy.
What you want to avoid is any pose where the model's body language overpowers the jewelry. Crossed arms bury bracelets. Hands on hips turn a ring shot into a fashion pose. A strong contrapposto stance with dramatic weight shift draws the eye to the model's silhouette, not the delicate chain around her neck. Simplify. The quieter the body, the louder the jewelry speaks. Keeping poses that put emphasis on the jewelry rather than the model's face or figure is what prevents the image from becoming a portrait with accessories.
Every pose should answer one question: where does the viewer look first? If the answer is anything other than the jewelry, adjust the model's gaze, hands, or body angle until the piece reclaims the frame.
This principle is the single most useful thing you can internalize as a photographer or creative director on a jewelry shoot. Print it, tape it to your monitor, repeat it before every setup. It applies to every jewelry type, every model, and every shooting scenario you will encounter.
Strong direction gets the viewer's eye to the right place in the raw image. Keeping it there through the final deliverable is the job of post-processing, where the unique challenge of editing human skin and reflective metal in the same frame demands a workflow built specifically for on-model jewelry.
Post-Processing Workflow for On-Model Jewelry Images
Here is the problem nobody warns you about: the moment you open an on-model jewelry image in Photoshop, you are staring at two surfaces that behave in completely opposite ways. Skin is organic, warm, and matte. Metal is manufactured, reflective, and precise. Gemstones refract light internally in ways neither skin nor metal does. Every global adjustment you make to flatter one surface risks degrading the other. Smooth the skin too aggressively and gold shifts toward a muddy yellow. Sharpen the gemstone and the pores on the model's hand turn into craters. A reliable jewelry photo retouching workflow treats these surfaces as separate editing targets from the very first step, not as an afterthought.
If you have been searching for jewellery photography near me or a jewelry photography Los Angeles studio that handles retouching in-house, understanding this workflow helps you evaluate their quality and communicate what you need. And if you retouch your own images, this sequence saves hours of back-and-forth corrections by getting the order right the first time.
Skin Retouching Without Altering Metal Color Accuracy
The instinct is to start with skin. It is the largest surface in the frame, and blemishes jump out immediately on a calibrated monitor. But here is the catch: most skin-retouching techniques affect the entire image unless you isolate them. A global frequency separation pass, where you split the image into a texture layer and a color layer, shifts metal tones if the jewelry is not masked out first.
Start by creating a precise mask around every piece of jewelry in the frame. Use the pen tool or a refined edge selection to trace the outline of rings, chains, pendants, and earrings. This mask stays active throughout your entire retouching session, protecting metal and stone color accuracy while you work freely on skin.
With the jewelry masked, apply frequency separation to the skin areas only. The low-frequency layer handles color and tone, letting you even out blotchiness, redness around ring fingers, and uneven tan lines across the decolletage. The high-frequency layer holds texture, where you use the healing brush and clone stamp to remove blemishes, stray hairs, and dry skin patches without smearing pore detail into a plastic-looking finish.
Why does this order matter so much? Global skin-smoothing filters, the kind that blur the low-frequency layer across the entire image, push gold tones toward flat yellow and shift silver toward a cool, bluish cast. These color shifts are subtle on screen but obvious in print and on high-resolution product pages. By masking the jewelry before touching skin, you eliminate the problem entirely rather than trying to correct it later.
Selective Sharpening on Gemstones and Metal Details
Sharpening is where on-model jewelry retouching diverges most dramatically from standard portrait editing. In a portrait, you sharpen eyes and lips. In a jewelry image, you sharpen facets, prongs, and engraved details while keeping skin texture natural and unexaggerated.
Luminosity masks are the most effective tool for this. As photographer Tony Kuyper explains, luminosity masks select specific tonal ranges in an image, allowing you to apply sharpening only where it is needed while concealing the light-side halos that make over-sharpened images look crunchy. For jewelry, a Darks-series luminosity mask reveals the sharpened dark edges of metal and gemstone facets, the edges your eye perceives as crisp detail, while hiding the bright halos that would otherwise bloom across polished surfaces.
The practical approach: duplicate your flattened image layer, apply a high-pass sharpening filter at a radius of 1 to 3 pixels depending on resolution, set the blend mode to Overlay, and then add a luminosity mask that restricts the effect to the jewelry's tonal range. You can also use a manual selection based on your earlier jewelry mask, painting white on the layer mask over gemstones and metal details while leaving skin areas black. Either method keeps the sharpening surgical.
Skin-oil reflections on polished metal are the other challenge at this stage. Even with thorough pre-shoot cleaning, body heat and natural oils create faint, milky patches on gold and platinum surfaces during a session. Use the clone stamp tool at 15 to 25 percent opacity, sampling from a clean area of the same metal surface, and paint over the oily reflection in multiple light passes. Low opacity is critical. A single full-opacity stamp replaces the reflection with an obvious cloned patch. Multiple soft passes blend the correction invisibly into the surrounding metal tone.
Color Correction for Mixed Surfaces and Consistent Output
White balance is deceptively tricky when warm skin and cool metal share the same frame. Set your white balance to flatter the model's skin and silver jewelry may drift toward blue. Correct for the silver and the skin turns orange. The solution is selective color correction applied independently to each surface.
In Photoshop, use a Hue/Saturation adjustment layer with the jewelry mask loaded as a selection. Adjust the metal tones, pulling yellow out of gold if it has gone too warm, or adding a touch of warmth back into platinum if it reads too clinical. Then invert the mask and create a second adjustment layer for skin, correcting any redness or sallowness without touching the jewelry. This two-layer approach lets you dial each surface to its accurate color independently, which is exactly what professional jewelry retouching services do to ensure that gemstone colors remain faithful to the natural appearance of the stone while skin stays flattering.
For brands producing high-volume catalogs, this per-image workflow adds up fast. Every shot requires masking, frequency separation, selective sharpening, and independent color correction. That is where AI-powered tools are changing the math. Platforms like Snappyit's jewelry model page can streamline or even replace large portions of this workflow by generating polished on-model visuals directly, handling the skin-to-metal color consistency automatically without manual masking or layer-by-layer correction. For teams that need consistent, high-volume output across dozens or hundreds of SKUs, this kind of tool reduces the retouching burden from hours per image to minutes, freeing up creative energy for the hero shots that still benefit from a human retoucher's eye.
Regardless of whether you retouch manually or leverage AI-assisted tools, the sequence matters. Here is the recommended workflow order from raw file to final deliverable:
- Import the raw file and apply global exposure and white-balance corrections in your raw converter, getting the image into a neutral starting point.
- Open in Photoshop and create a precise mask isolating all jewelry pieces from skin and background.
- Perform frequency separation on skin areas only, evening out color and removing blemishes while preserving natural texture.
- Clean up skin-oil reflections on metal surfaces using the clone stamp at low opacity.
- Apply selective sharpening to gemstones and metal details using luminosity masks or manual selections on a duplicate layer.
- Run independent color correction: one adjustment layer for jewelry tones, one for skin tones, each controlled by the jewelry mask.
- Add any final creative adjustments such as subtle vignetting, background cleanup, or shadow enhancement to add depth.
- Review the image at 100 percent zoom, checking for halo artifacts around sharpened edges, color shifts at mask boundaries, and any remaining blemishes.
- Export at the required resolution and color profile for the target platform, whether that is sRGB for web or Adobe RGB for print.
This nine-step sequence handles the dual-surface challenge methodically, ensuring that every correction targets the right material without bleeding into the wrong one. Follow it consistently and your output stays accurate across an entire collection, whether you are delivering five images or five hundred.
A solid retouching workflow rescues imperfect captures and polishes good ones into great ones. But the most efficient shoot is one that needs minimal rescue in the first place. The mistakes that create the heaviest retouching burden are predictable, repeatable, and entirely avoidable, if you know what to watch for before and during the session.
Common Mistakes in On-Model Jewelry Photography and How to Fix Them
Every technique covered in this guide exists because someone learned it the hard way. Even an experienced photographer for jewellery campaigns can fall into patterns that quietly sabotage results, especially when the pressure of a live session pushes preparation and intention to the back burner. Knowing the most common jewelry photography mistakes before you step on set is worth more than fixing them in post after the fact.
Letting the Model Overpower the Jewelry
This is the mistake that inspired the title of this entire article. A bold red lip, a dramatic smoky eye, a patterned blouse, an intense expression — any one of these can hijack the viewer's attention and turn a jewelry image into a portrait with accessories. The fix is ruthless simplicity. Keep makeup neutral and skin-focused. Choose solid, muted clothing that recedes behind the piece. Direct the model's expression and gaze toward the jewelry, not the camera. If you review a frame and your eye goes to the model's face before the necklace, something in the styling needs to be dialed back.
Ignoring Reflections and Color Casts from Skin
Polished metal is a mirror. It reflects everything near it, including the model's skin. On a long shoot, body heat accelerates tarnishing on silver pieces, and natural skin oils leave milky patches on gold and platinum that become glaringly obvious under studio lighting. As jewelry care experts note, sweat and oil coat metal surfaces and cause a hazy appearance if not cleaned regularly. Mitigate this by wiping pieces with a microfiber cloth every 15 to 20 minutes during the session, and keep the jewelry handler ready to re-clean between setups. On the lighting side, position your fill card at jewelry height rather than face height to control what the metal reflects, a technique covered earlier in this guide that solves most unwanted color-cast issues before they reach your memory card.
Skipping Test Shots and Relying on Post-Production Fixes
"We'll fix it in post" is the most expensive sentence in photography. Chimping, reviewing images on the LCD after every few frames, catches focus misses, lighting shifts, and jewelry that has rotated out of position before those problems ruin an entire series. Zoom to 100 percent on the camera's screen and check the jewelry specifically, not just the model's face. A frame where the model looks great but the ring is soft is a wasted frame. Build a rhythm: shoot a burst of three to five images, review at full zoom, adjust, and repeat. This habit adds seconds per setup and saves hours of retouching or reshooting later.
Overcomplicating the Setup When Simpler Solutions Exist
Brands often assume that professional on-model jewelry photo tips require a four-light studio, a full hair-and-makeup team, and a day-long production. Sometimes they do. But for many ecommerce catalogs and social campaigns, the results a brand actually needs can be achieved far more efficiently. A two-light setup with a well-directed model and clean preparation produces strong images for a fraction of the cost. And for teams that need consistent, high-volume on-model visuals without the overhead of traditional production, platforms like Snappyit's jewelry model page offer an alternative path entirely, generating polished model-based imagery that handles the complexity of skin-to-metal rendering automatically. The point is not that studio shoots are unnecessary. It is that matching your production method to your actual output needs prevents wasted budget and time.
Here is a scannable checklist of every common mistake with a one-line fix you can reference on set:
- Model overpowers the jewelry: Simplify makeup, clothing, and expression until the piece is the first thing your eye hits.
- Skin-oil reflections on metal: Wipe every piece with a microfiber cloth every 15 to 20 minutes during the shoot.
- Warm color casts from skin onto silver or platinum: Position the fill reflector at jewelry height and use selective white balance in post.
- Tarnishing during long sessions: Minimize time jewelry spends on the model under lights and store pieces in anti-tarnish pouches between setups.
- Soft focus on the jewelry: Chimp at 100 percent zoom after every burst and re-focus before moving to the next pose.
- Ring spinning on the model's finger: Use museum wax or a temporary ring-size adjuster inside the band.
- Earrings hidden by hair or jaw shadow: Pull hair back on the featured side and add a small reflector below the ear.
- Necklace clasp migrating into frame: Secure it with a small piece of double-sided fashion tape at the back of the neck.
- Bracelet rotating so the decorative face disappears: Apply museum wax on the inside at the wrist's narrowest point.
- Over-retouching skin and shifting metal tones: Mask all jewelry before applying any skin corrections.
- Overcomplicating production for catalog-level output: Match your method to your needs, whether that is a streamlined two-light setup or an AI-powered platform that generates on-model visuals directly.
Every one of these mistakes traces back to the same root cause: losing sight of the principle that the jewelry is the hero. Keep that philosophy at the center of your model selection, preparation, posing, lighting, camera settings, direction, and retouching, and the results take care of themselves. The stone should always outshine the skin, never the other way around.
Frequently Asked Questions About Jewelry Photography With Models
1. How do you photograph jewelry on a model without the model overpowering the piece?
The key is directing the model's gaze toward the jewelry rather than the camera, using neutral makeup and muted clothing, and keeping poses simple. When the model glances at a ring or tilts her chin toward a pendant, the viewer's eye naturally follows that path to the piece. Every element of styling, from nail color to expression intensity, should recede behind the jewelry so it remains the undeniable focal point in the frame.
2. What camera settings work best for on-model jewelry photography?
For studio strobe setups, start at ISO 100, f/8 to f/11, and 1/200s shutter speed with an 85mm to 105mm lens. Use f/2.8 to f/4 when you want shallow depth of field to isolate a ring, and stop down to f/8 to f/13 for ecommerce shots where the entire piece needs to be sharp. Always maintain at least 1/200s shutter speed to freeze the model's micro-movements, and shoot in short bursts of three to five frames to ensure at least one image catches peak sharpness.
3. How do you choose the right model for jewelry photography?
Selection is based on physical compatibility with the specific piece, not conventional attractiveness. Match skin undertone to metal color: warm tones complement gold and rose gold, while cool tones suit silver and platinum. For rings, prioritize slender fingers with neutral, short nails. Necklaces need a longer neck with defined collarbones. Earrings require ears that sit close to the head and hair that styles away cleanly. Always test-fit pieces on the model before committing to a full session.
4. What lighting setup is recommended for jewelry photography with a model?
A large softbox positioned at 45 degrees above and to the side of the model serves as the key light, wrapping light around curved metal while keeping skin flattering. Add a white fill card or second softbox opposite the key at jewelry height to control what polished metal reflects. Keep fill about one to one-and-a-half stops dimmer than the key to preserve depth. For professional work, add a gridded accent light behind the model for edge separation and a background light to prevent color casts bouncing onto reflective surfaces.
5. Can AI tools replace traditional on-model jewelry photography?
AI-powered platforms like Snappyit's jewelry model tool can streamline or replace portions of the traditional workflow, particularly for high-volume catalog work where brands need consistent on-model visuals across hundreds of SKUs. These tools handle skin-to-metal color consistency automatically and reduce retouching time from hours to minutes per image. Traditional shoots still offer maximum creative control for hero shots and editorial campaigns, but AI solutions provide an efficient alternative for teams that need professional results without the overhead of full production setups.