Why most new online clothing brands die in year one
Most online clothing brands that fail in their first 12 months don't fail because the designs were bad or the founders didn't work hard. They fail for four reasons, in order of frequency.
- No validated demand. The founder loved the idea, but never confirmed that 50 strangers would actually pay for it. The first production run sits in a garage for two years.
- Cash crunch from inventory. First MOQ from a manufacturer was 200 units across 4 colors and 4 sizes — 3,200 garments total — and the founder ran out of marketing budget before the catalog photos were even done.
- Amateur visuals. Product photos shot at home on a hanger, with bedsheet backgrounds and phone-flash lighting. Conversion rate sub-1% on the launch store. Shoppers click away because the brand looks unserious next to Shein and AliExpress.
- Channel sprawl. The founder launched on Shopify, Etsy, Amazon, Poshmark, Depop, Instagram, and TikTok Shop in week one, and every channel got 1/7th of the attention it needed.
The playbook below addresses each of these failure modes explicitly. Skim the table of contents and read the section that matches where you are in the journey — or read it linearly if you haven't started yet.
Step 1 — Pick a specific person to dress, not a "market"
"Women aged 25–40 who like fashion" is not a niche. "Women under 5'4" who can't find pants that fit because every brand cuts to a 5'7" standard" is a niche. "Vintage racing-team merch for car enthusiasts under 35" is a niche. The first description gets you nowhere; the second tells you exactly who your customer is, what they search for, and what they complain about online.
The validation test most experienced operators run: pick 50 people in the target group (friends, friends-of-friends, people active in relevant subreddits or Discord servers) and tell them what you're making and ask if they would pay $X for it. If you can't get even 5 genuine "yes" replies — not "that's cool, good luck" but actual "I'd buy that, when can I" — the idea needs more work. Don't push past this gate. The next 200 hours of your life depend on getting it right.
Step 2 — Pick your production model
There are four production paths, and the right one depends on your capital, design control needs, and how fast you want to iterate.
| Model | Upfront cost | Best for | Tradeoff |
|---|---|---|---|
| Print-on-demand (Printful, Printify, Gelato) | $0–$500 | Validating designs in market; graphic tees, hoodies, accessories | Thin margins, generic blanks, slower shipping |
| Dropshipping (suppliers ship for you) | $200–$1,000 | Trend-jumping, fast catalog rotation | No brand control over product quality |
| Hand production (you make it) | $500–$3,000 | Slow fashion, made-to-order, vintage rework | Doesn't scale past 50–100 units/month |
| Private-label manufacturing (factory does it) | $3,000–$10,000 | Real fashion brand with fit and fabric control | Inventory risk, MOQ, 60–90 day lead times |
For most first-time founders, start with print-on-demand or hand production for the first 6–12 months. POD lets you list 20 designs for the cost of one private-label sample run — and the design that gets a repeat buyer is the one worth pouring real capital into. Don't commit $8,000 to a manufacturer until you have an actual signal.
Step 3 — Source garments or designs
If you went POD, this step is design files — vector graphics, typography, prints — uploaded to your POD partner. Tools: Canva for non-designers, Figma for prosumer, Adobe Illustrator if you're already comfortable.
If you went private-label, you need a manufacturer. The pathways most US/EU founders use:
- Alibaba for first samples — search by garment category, filter to Trade Assurance suppliers, message 10 and order samples from the 3 that respond clearly. Sample cost $30–$80 per garment.
- Faire wholesale for ready-made blanks you can private-label with hangtags and labels.
- Domestic factories via Maker's Row or Sewport — higher cost per unit, faster turnaround, easier for small-batch (50–200 units).
- Sourcing agents for $500–$2,000 retainer per collection if you don't want to manage 12 suppliers yourself.
Always order samples before placing the production order. Always. The Instagram photo on the supplier's listing is not what you'll receive.
Step 4 — Brand identity that doesn't scream "first-time founder"
A clothing brand's identity isn't just a logo — it's a recognizable system: typography, color palette, label / hangtag design, photography style, voice. Most new founders spend two weeks on a logo and zero time on the rest, then wonder why their store doesn't feel like a brand.
The visual system is only the tactical half. The strategic half — positioning, brand story, and the founder mindset that holds it together — is where most first-timers stall, and it's worth reading widely on. An online magazine for women entrepreneurs like Womenlines covers brand-building and the founder journey in depth.
The minimum identity kit for launch:
- Wordmark or logomark. One typeface, one weight. Don't iterate forever — pick one and ship.
- Two-color palette. A neutral and an accent. Apply consistently across site, packaging, and social.
- One photography style. Choose: studio catalog, lifestyle outdoor, editorial moody, or product-only. Apply across every product image. This is where most brands lose — they mix three styles and look amateur.
- Hangtag and label. Even POD brands can add a custom tag for $0.50 per unit. Customers feel the brand the moment they open the package.
If you can't afford a designer, Canva templates with a single typeface and a two-color palette will get you 80% of the way there. The remaining 20% comes from consistency, which costs nothing.
Step 5 — Build your visual catalog without a $5,000 photoshoot
This is the step that breaks most new brands. A real fashion photoshoot — studio, lighting, model, makeup, hair, stylist, photographer, editing — runs $2,000–$5,000 per collection. Most first-time founders don't have that budget, so they either skip catalog photos entirely (and convert at 0.5%) or shoot at home (and look amateur). Neither works.
In 2026, the realistic third option is AI-generated catalog imagery. The workflow:
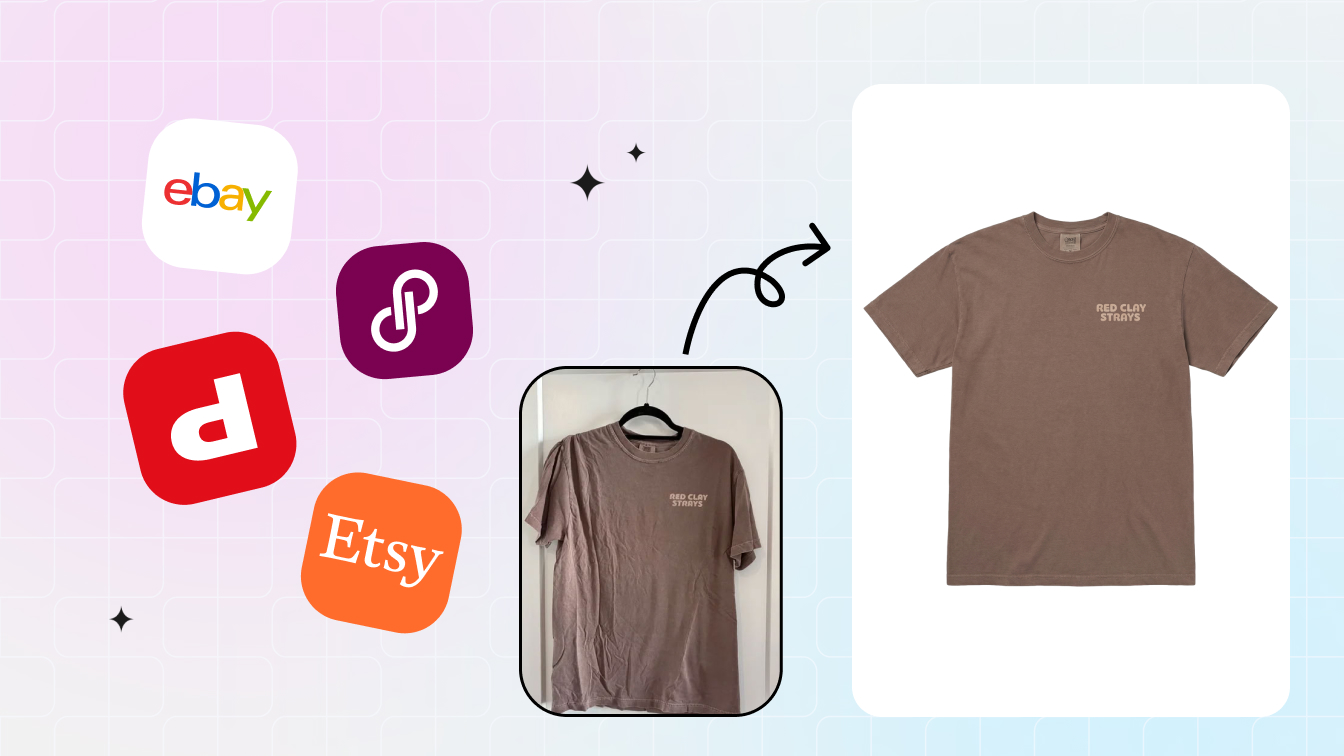
- Shoot one source photo per SKU. Lay the garment flat on a clean surface in natural window light, or hang on a padded hanger against a plain wall. Phone camera, 1:1 ratio, 1500px+ on the long edge. Total time: 5 minutes per garment.
- Generate a ghost mannequin output. The garment renders as a 3D worn shape with no visible model. This is your main listing image. Snappyit Ghost Mannequin takes 60 seconds.
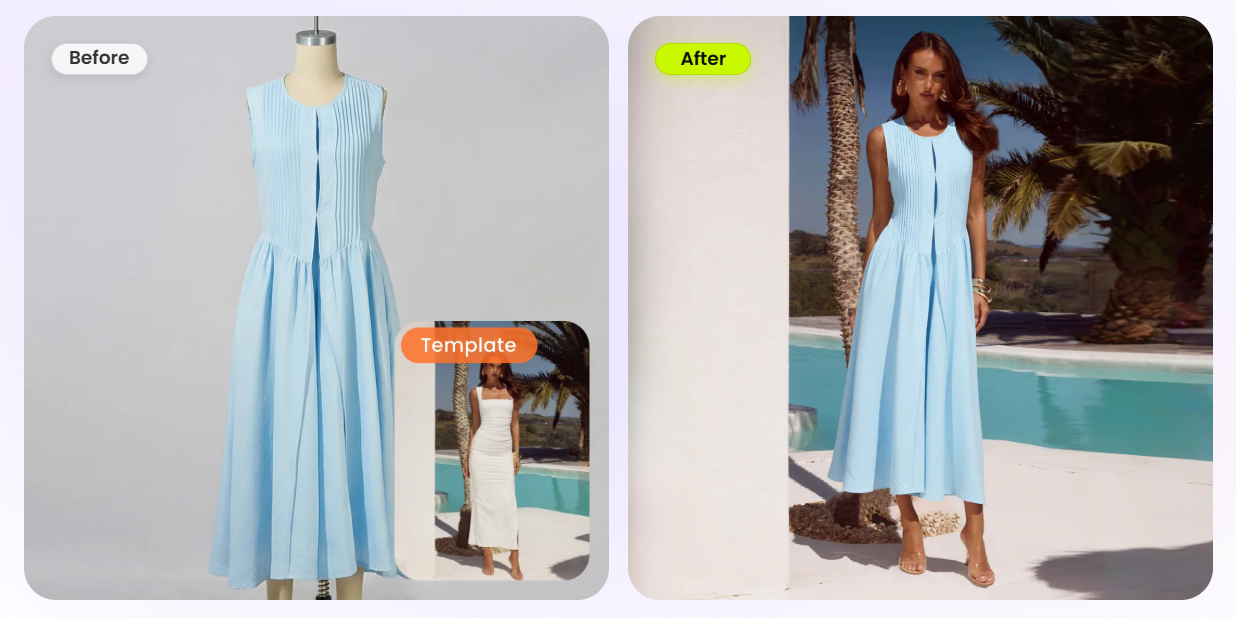
- Generate an AI on-model lifestyle render. Same source photo, dropped onto an AI fashion model in a scene matching your brand voice. Snappyit AI Fashion Model handles this.
- Generate color variants. If you sell the same SKU in 4 colors, recolor from one source rather than shooting four times. Snappyit Color Change preserves fabric texture across colorways.
End-to-end cost: under $20 per garment, completed in an afternoon. The output is competitive with studio-shot images for marketplace and Shopify listings. The traditional photoshoot is still the gold standard for editorial campaigns and lookbooks — but for catalog imagery, the AI workflow ships first.
Try it on your own sample. Upload one flat-lay phone photo and Snappyit returns a ghost mannequin output, a lifestyle on-model version, and color variants. Try Snappyit free →

Step 6 — Price for survival, not for vanity
The standard apparel pricing formula:
Retail price = (Cost of Goods × 4) + shipping markupIf a hoodie costs you $18 to make and ship to a fulfillment center, retail at $72–$80. The 4x markup is not greed — it covers returns, marketing acquisition cost, platform fees, payment processing, and the founder's labor.
POD businesses operate on tighter margins (1.5x–2x markup is typical) because the COGS includes the POD partner's margin already. A $14 print-on-demand tee retails at $24–$28, leaving roughly $5–$8 of operating margin per unit. Math has to work after fees and ad spend.
Marketplace fees to plan around in 2026:
- Etsy: 6.5% transaction + $0.20 listing + payment processing
- eBay: ~13.6% final-value fee (clothing) + insertion fee after 250 free listings
- Shopify: 2.9% + $0.30 payment processing + $39+/month plan
- Poshmark: $2.95 flat under $15, 20% above $15
- Amazon: 17% referral fee on apparel + $0.99/unit or $39.99/month Pro plan
Use the marketplace fee calculator to verify the math on your category and platform before you list.
Step 7 — Pick one sales channel for launch
The biggest mistake new brands make is launching on five channels at once. Pick one. Master one. Add a second only after the first is consistently profitable.
| Channel | Best for | Time to first sale | Brand control |
|---|---|---|---|
| Shopify | Building a brand with email list, custom site | 30–90 days (needs marketing) | Full |
| Etsy | Handmade, vintage, niche aesthetic | 14–30 days (search-driven) | Medium |
| Poshmark / Depop | Resale, vintage, gen-Z aesthetic | 7–14 days (social-driven) | Low |
| Amazon | High-volume basics, established price-point category | 60–120 days (review-driven) | Low |
| TikTok Shop / Instagram | Trend-driven, content-led brands | 14–60 days (content-driven) | Medium |
Shopify is the right launch channel for almost any brand that wants to be a brand. The exception: if you're handmade and aesthetic-led, Etsy gets you to first sale faster, then you migrate the email list to Shopify later. Don't skip the email list — it's the only customer relationship you actually own.
Step 8 — Launch sequence that actually moves units
The brands that launch successfully in 2026 do not rely on paid advertising alone. They build an audience before inventory. The goal is to have a community waiting for your product, not to spend money finding customers after the fact.
The 6-week launch sequence:
- Week -6 to -4. Post 3x/week on Instagram, TikTok, or whichever platform your customer lives on. Show samples, behind-the-scenes, the founder story. Build a 200–500 follower base.
- Week -3. Open an email signup with an early-access promise. Aim for 100–300 signups.
- Week -2. Send sample units to 5–10 micro-influencers in your niche (under 50k followers — they convert better than mega-influencers for a new brand).
- Week -1. Email the list a 24-hour early-access window with a small discount. This is where 60% of launch revenue comes from.
- Week 0 — public launch. Open to all, run a small paid ad budget ($30–$100/day) to validate creative.
- Week +1 to +4. Email new buyers a survey: how did you find us, what almost stopped you from buying. This data shapes month two.
Step 9 — Scale checklist: what to add at $1k, $10k, $100k monthly revenue
Different revenue tiers require different operations. Don't add infrastructure you don't need yet, and don't avoid it when you do.
At $1k/month — validation phase
- Add Klaviyo or Shopify Email for abandoned-cart sequences
- Add a second product variant if one SKU is selling consistently
- Document your photo workflow so a freelancer can run it
At $10k/month — small-business phase
- Switch from POD to small-batch private-label on bestsellers (margins improve from 30% to 55%+)
- Add a fulfillment partner (ShipBob, ShipMonk) so you stop packing boxes
- Hire a part-time customer service VA — $400–$800/month
- Run a returns audit. If >25%, fix fit and photo issues before scaling ads
At $100k/month — real-business phase
- Hire a full-time operations or marketing lead
- Negotiate net-30 payment terms with manufacturers
- Add Shopify Plus or Shopify B2B for wholesale
- Consider a virtual try-on widget on the product page — at this volume, conversion lift pays for the tool
The tool stack a 2026 clothing brand actually needs
Most "how to start a clothing brand" guides skip the tool list, then new founders spend three weeks Googling for each individual piece. The realistic 2026 stack for a one-person clothing brand at launch:
- Store: Shopify ($39/mo Basic). Etsy is the alternative if you're handmade-first, but plan to move to Shopify within 12 months once you have a repeat-buyer pattern.
- Design: Canva ($13/mo Pro) or Figma (free for solo). Don't pay for Adobe Creative Cloud until you outgrow Canva — most clothing brands never do.
- Product photos: Snappyit for AI ghost mannequin + on-model lifestyle. A clothing brand without polished photos doesn't convert; this is the line item you cannot skip.
- Email: Shopify Email (free up to 10k sends/mo) or Klaviyo ($35/mo). Email drives 25–40% of mature clothing brand revenue — start the list day one.
- Accounting: Wave (free) or QuickBooks Self-Employed ($15/mo). Track every receipt from month one; tax season is brutal without it.
- Shipping: Pirate Ship (free, real USPS rates) for under 200 orders/month. ShipStation ($10/mo) once you scale.
- Returns: Loop Returns ($29/mo) or built-in Shopify returns. Don't fake it with email — clothing brands live and die on the returns experience.
- Customer service: Gorgias ($10/mo) once you hit 50+ orders/mo. Before that, Shopify Inbox is enough.
- Analytics: Shopify's built-in dashboard plus Google Analytics 4 (free). Don't pay for Triple Whale or Hyros until you're spending $5k+/mo on paid ads.
Total monthly tool cost at launch: roughly $50–$120/month depending on traffic. The line item that surprises most new clothing brand founders is the photography tool — they expected to do it themselves with a phone and end up paying a freelance retoucher $200/month, when an AI tool runs $20–$40/month for the same output. Budget for it explicitly.
Common pitfalls in the first 90 days
The clothing brand failure modes that don't appear in books because they happen quietly in week 4 to week 12, after launch energy fades but before real revenue starts:
Pitfall 1 — Re-shooting photos every week
A founder takes the launch photos, sees them on the live store, decides they look amateur, and re-shoots. Then re-shoots again. The store updates every Sunday and never quite ships. The fix: commit to a photo workflow on day one and run every garment through it identically. AI ghost mannequin + AI on-model gives you a consistent look without the temptation to perfect each shot manually.
Pitfall 2 — Discounting before you have data
Sales are slow in week 4, so the founder runs a 40% off everything sale. The sale moves units but trains your audience to wait for discounts and tanks your margin. The fix: hold price for the first 90 days unless you have a specific scarcity reason (closing a colorway, end-of-season). Use email signup discounts instead of public sales.
Pitfall 3 — Adding new SKUs before old ones sell
The clothing brand founder gets bored of the launch line and designs new pieces. Week 6 has 30 SKUs, none of which has 5+ sales. The fix: don't add a SKU until the bestseller has at least 10 sales. Concentrate inventory, not spread it.
Pitfall 4 — Skipping the email list
Marketplaces own their customers. Even if you're on Shopify, you're paying Meta to find people and you don't keep the connection unless you build an email list. The fix: pop-up on the storefront, signup-on-checkout, post-purchase email sequence. Day-one infrastructure for any clothing brand serious about year two.
Pitfall 5 — Buying ads before product-market fit
$500/day in Meta ads before you've made 10 organic sales is how clothing brand founders go broke. The fix: don't run paid ads until you have 50+ organic sales and a 2%+ store conversion rate. Until then, paid ads just buy expensive data you can't act on.
Pitfall 6 — Not tracking unit economics
Revenue looks good, but the founder hasn't subtracted COGS, shipping, fees, refunds, and ad spend. Six months in, they realize they've been losing $3 per unit. The fix: build a per-unit spreadsheet in week 1 and update it every Sunday. Revenue minus everything = profit. If profit is negative, you don't have a clothing brand yet — you have a hobby with overhead.
Step 10 — Mistakes to avoid in your first 12 months
- Don't launch on 5 channels at once. Pick one. Add a second only after the first is consistently profitable.
- Don't commit to MOQ before you have signal. Wait until you have 50+ repeat buyers on POD before moving to manufacturing.
- Don't ignore the photo problem. Even great designs convert poorly with bad photos. Budget for AI-generated catalog imagery or hire a freelance shoot.
- Don't price for vanity. Match the price point of your category leaders for your first 100 sales, then adjust based on real margin.
- Don't skip the email list. Marketplaces own their customers. Your email list is the only audience you can talk to without paying for permission.
- Don't quit your day job until you have 6 months of runway. Apparel businesses are seasonal and cash-flow lumpy.
Legal and tax checklist before you take the first order
Before you take a single order, four legal pieces need to be in place. Skipping any of them costs more later than doing them properly upfront — and three of the four are under $300 total.
- Business entity. LLC in the US is the standard ($50–$500 state filing, varies). Sole proprietorship works for hobby revenue (under ~$5k/yr); above that, switch to LLC for liability protection. UK: sole trader fine to start, Ltd Co. above £30k. EU: varies by country, single-member LLC equivalents are common.
- EIN / tax ID. Free from the IRS in 5 minutes if you're US-based. Required to open a business bank account, register with marketplaces, and apply to private-label manufacturers (most won't deal with sole-proprietor without a tax ID).
- Sales tax registration. Required in any US state where you have economic nexus — usually triggered by $100k in sales or 200 transactions per state per year. Shopify, Etsy, and Amazon handle marketplace facilitator collection in most states, but Shopify direct sales still require your registration. TaxJar or Avalara automates this once you scale.
- Trademark search. Before you spend $1,000+ on packaging and labels, search USPTO TESS (US) or WIPO (international) for your clothing brand name. If a registered trademark exists in apparel class 25, pick a different name. A cease-and-desist after launch is a six-figure problem.
Optional but worth setting up early: a separate business bank account (every credit union has free options), bookkeeping software (Wave is free, QuickBooks is $15/mo), and a virtual mailing address ($10/mo from iPostal1) so your home address isn't on your business filings. Total upfront legal cost for a US-based founder starting an online clothing brand: typically $250–$600.
FAQ
How much money do I need to start a clothing brand online?
Print-on-demand can launch for under $500 in total — domain, store, 5 sample designs, and a small ad budget. Private-label with manufacturing typically needs $3,000–$10,000 for a first run of 50–200 units across a small collection. Plan for 18 months of cash flow before the business pays its own bills.
Do I need to register a business before launching?
Yes for anything beyond hobby revenue. In the US, an LLC is the most common structure for small clothing brands — it separates personal and business liability, lets you open a business bank account, and is required for most wholesale supplier relationships. Sole proprietorship works for the first few months while you test, but switch to LLC before you take real inventory risk.
Print-on-demand vs private-label — which is better for a new brand?
Print-on-demand has lower upfront cost, near-zero inventory risk, and lets you validate designs in market — but unit economics are tight, you don't own the garment quality, and customer experience depends on your POD partner. Private-label costs more upfront but gives you better margins, real fabric and fit control, and brand differentiation. Start with POD to validate, switch to private-label once you have repeat buyers and a clear bestseller pattern.
How do I get professional product photos without a photoshoot?
Lay a sample garment flat in natural light, shoot a single overhead phone photo, then use an AI tool like Snappyit to generate ghost mannequin and on-model lifestyle versions. The end-to-end cost is under $20 per garment versus $200–$500 for a traditional photoshoot, and the output is competitive with studio-shot images for marketplace and Shopify listings.
Where should I sell my clothing brand online?
Start on a single channel — Shopify for full brand control, Etsy if you're handmade, or a marketplace like Poshmark or Depop if you're testing fast. Once you have a repeat-buyer pattern, add a second channel to diversify. The biggest mistake new brands make is launching on five channels at once and stretching their inventory and photo work thin across all of them.
Ship your launch catalog in a weekend, not a quarter
Snappyit takes one flat-lay phone photo and returns a ghost mannequin output, an AI on-model lifestyle render, and color variants in 90 seconds each. Build a 10–20 SKU launch catalog over a weekend instead of waiting six weeks for a studio shoot.