At a glance
Ghost mannequin photography shoots clothing on a mannequin, then edits it out so the garment looks hollow and 3D. Here's the full gear, shooting, and
| Need | What to do |
|---|---|
| Get oriented | Read the short summary, then use the checklist below. |
| Create a test image | Try Ghost Mannequin Free |
What ghost mannequin photography is
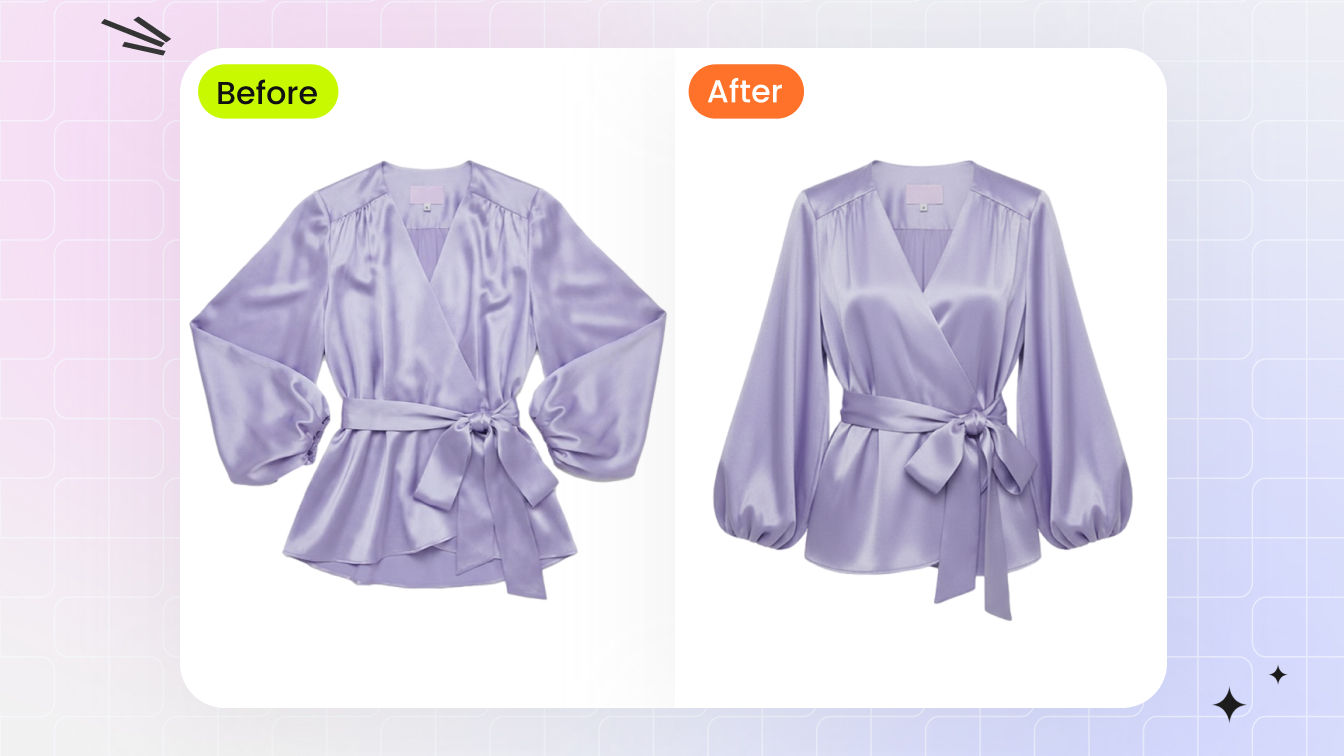
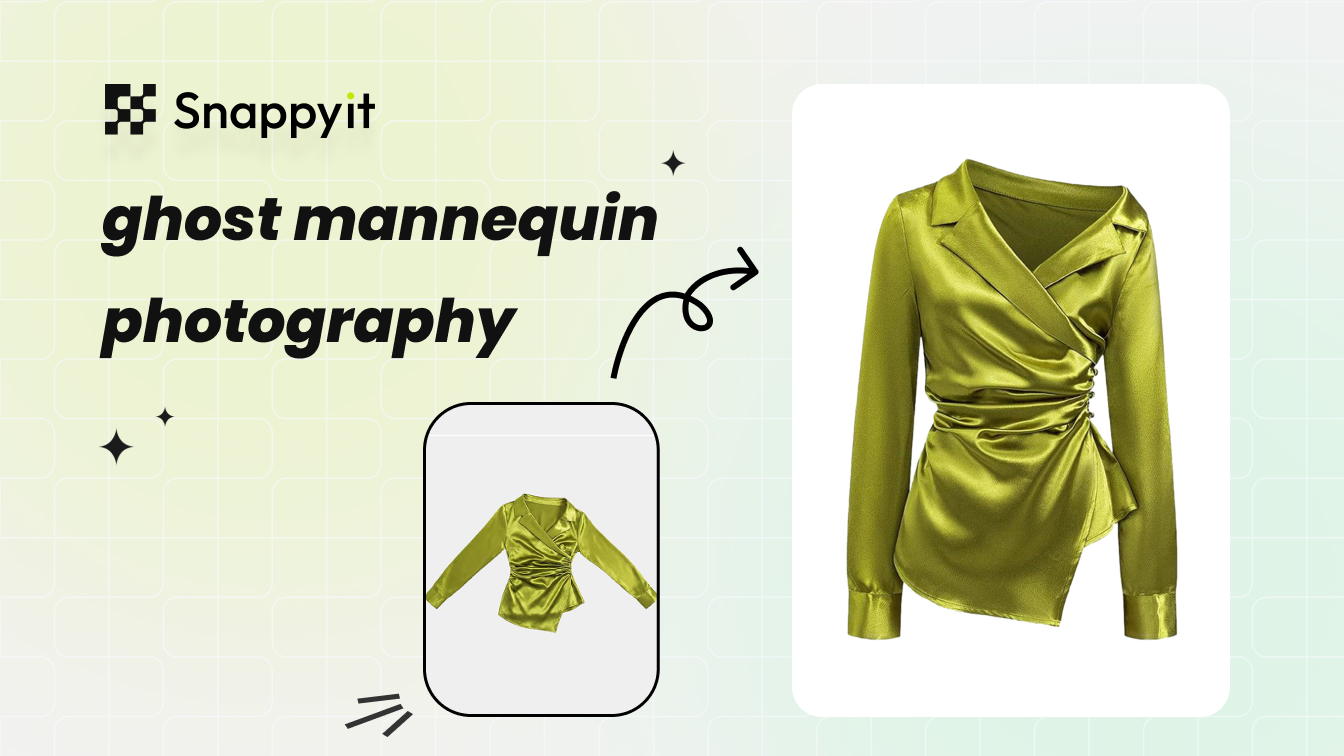
Ghost mannequin photography (also called the invisible mannequin method) is a technique where you photograph a garment on a mannequin, then edit the mannequin out in post-production. The finished image shows the clothing holding its natural shape and volume, hollow inside, as if floating in space.
Ghost mannequin photography is a product photography method where clothing is shot on a mannequin that is later removed during editing, creating a three-dimensional, hollow garment image with no visible support.
It started as simple neck-joint compositing, where photographers stitched a shot of the interior collar behind the front image to fill the gap left by the removed mannequin neck. The modern version uses multiple capture angles to produce fully hollow interiors that show the inner lining, collar construction, and waistband.
Browse any large apparel retailer and you'll see hundreds of product photos with the same clean, consistent look. That's almost always the ghost mannequin effect. High-street brands like ASOS and Zara lean on it across their catalogs for a few practical reasons:
- Consistent catalog imagery — every product gets the same framing, lighting, and presentation, which strengthens brand identity across the storefront.
- Faster turnaround — no model coordination, no makeup artists, no scheduling. Dress the mannequin, shoot, move on.
- Lower cost than on-model at scale — you skip model fees, hair, makeup, and styling entirely.
- Construction detail — interior linings, label placement, and collar structure are easy to showcase when you control the composite layers.
It isn't right for everything. Some garments genuinely look better on a live model or laid flat, so knowing where the technique fits matters as much as knowing how to execute it. The Snappyit ghost mannequin guide covers the same ground from a tooling angle if you want a reference alongside this one.
When to use it (and when not to)
Your choice of photography style is a strategic one. A $10 t-shirt and a tailored blazer shouldn't be shot the same way, because the method shapes how customers read fit, quality, and value. Here's how the four main apparel techniques compare.
| Technique | Dimensionality | Relative cost | Speed | Best for |
|---|---|---|---|---|
| Ghost mannequin | High — 3D floating effect with realistic fit | Moderate | Moderate — multi-shot capture plus compositing | Structured apparel: blazers, jackets, dresses, button-downs |
| Flat lay | Low — top-down, no depth | Low | Fast — single overhead shot | T-shirts, scarves, accessories, casual basics |
| On-model | Highest — real body, natural movement | High | Slow — booking, styling, hair and makeup | Lifestyle, fit demonstration, lookbooks |
| Hanger | Minimal — limited shape | Low | Fastest — hang and shoot | Internal use, quick marketplace listings |
Ghost mannequin hits the sweet spot for most standard catalogs. You get the three-dimensional realism flat lays and hangers can't manage, without the model fees, studio rental, and scheduling that on-model shoots pile on. Flat lay is fine when shape isn't the selling point, like accessories and casual knits headed for an Instagram grid, but it flattens structured garments that need depth to convert.
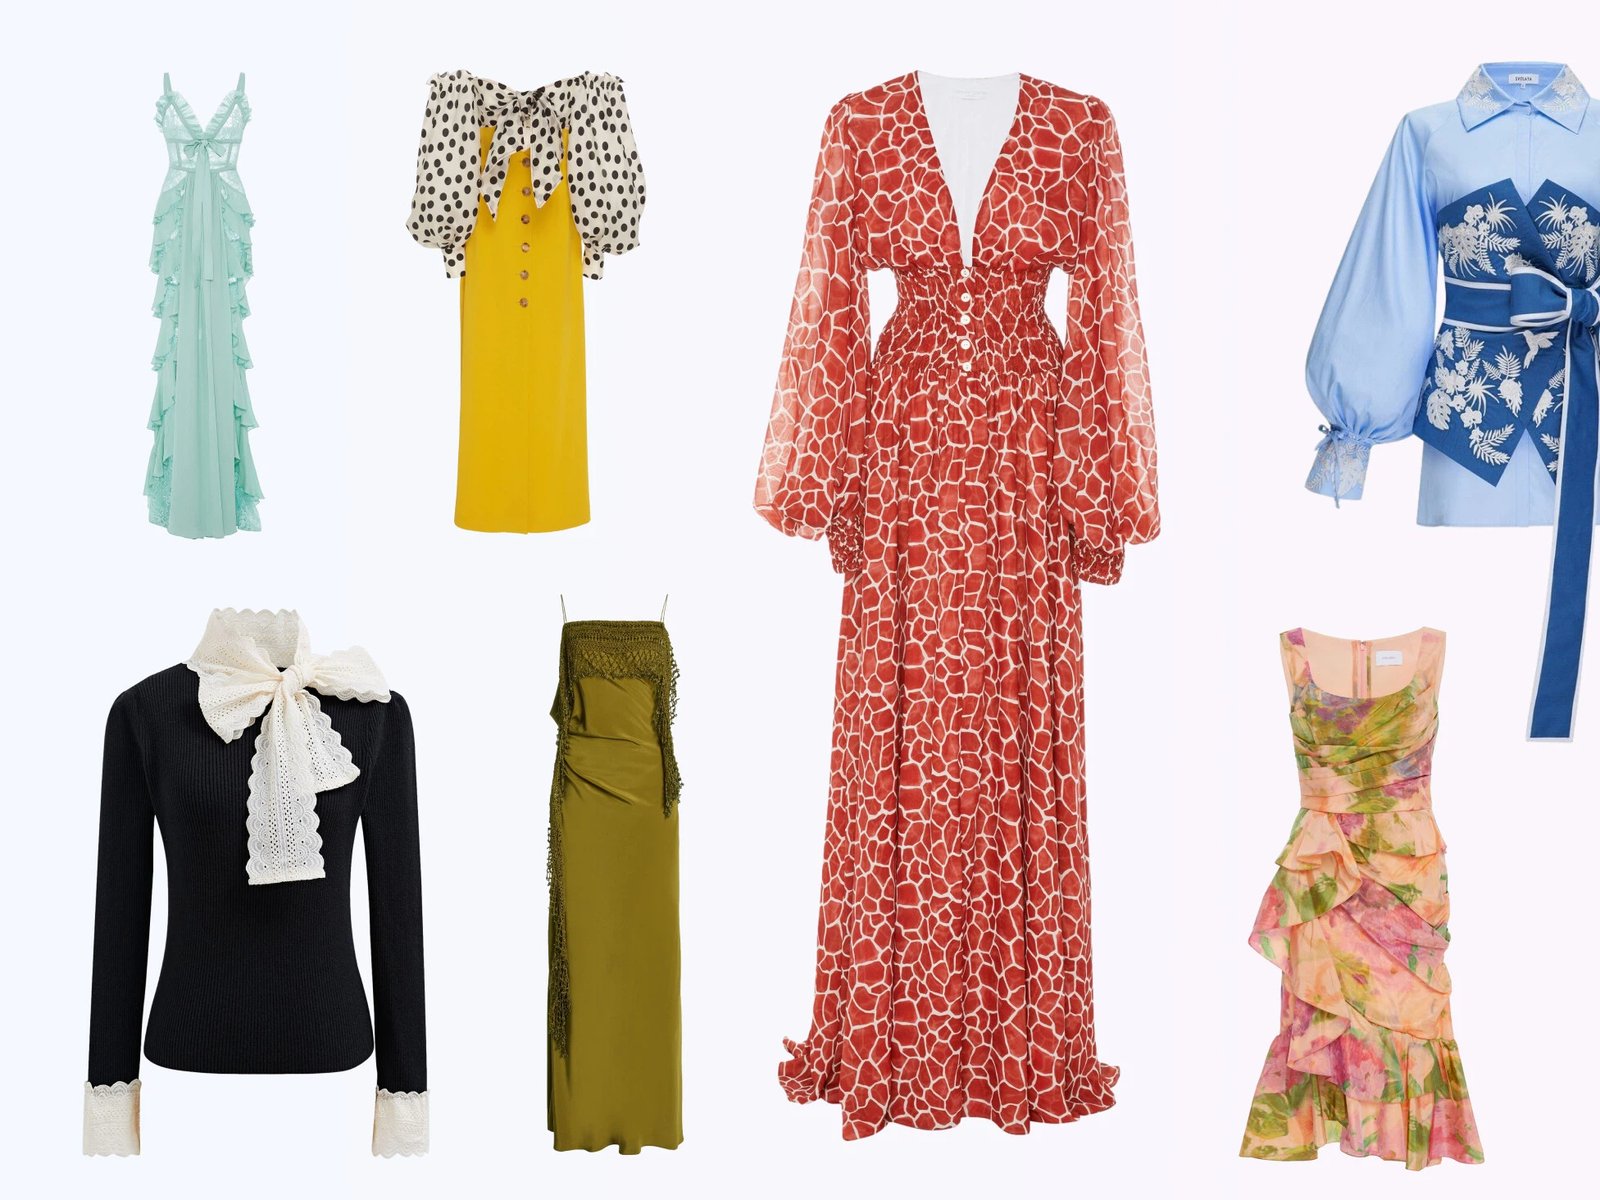
Skip the ghost mannequin when the garment lives or dies on movement and drape. Flowing evening gowns, activewear mid-stride, and oversized silhouettes lose their character pinned to a static form, and those pieces tell a better story on a real model. Very small accessories, like belts and socks, rarely justify the multi-shot overhead either. And if your brand leans hard into editorial, lifestyle scenes, the clinical ghost mannequin look will feel off as your primary imagery, though it can still serve as a secondary catalog view.
The best brands don't pick one method for everything. They treat it per product: ghost mannequins for the structured pieces that form the catalog backbone, flat lay for accessories, and on-model selectively for hero products and campaigns. Snappyit's ghost mannequin tool can also turn a single garment photo into the hollow effect automatically if you want to skip the manual compositing entirely.
Equipment you actually need
You don't need thousands of dollars of gear to produce clean ghost mannequin images. A photographer with one light and a basic torso mannequin can absolutely nail the technique. A three-light kit and articulated mannequins just do it faster and with fewer retakes. What you buy mostly affects speed and consistency, not whether the technique works at all.
The starter kit
Everything here is necessary to produce a usable composite. Skip any one item and you'll either struggle on set or burn time fixing it later.
- Camera with full manual controls — any DSLR or mirrorless that lets you set aperture, shutter, ISO, and white balance manually. An entry-level body like a Canon EOS Rebel or Nikon Z30 handles product work fine.
- 50mm or 85mm prime lens — this range minimizes barrel distortion and keeps garment proportions accurate. A 24-70mm zoom covers the same focal lengths with more framing flexibility.
- Sturdy tripod — non-negotiable. You need identical framing between the front shot and the interior shot, and any movement between takes creates alignment headaches in Photoshop.
- Matte white or light-gray torso mannequin — a matte finish prevents color casts from reflecting onto light fabrics; glossy mannequins create hotspots that bleed into the garment. Detachable-part forms (neck, arms, torso) are purpose-built for this technique.
- White or light-gray seamless paper backdrop — a 9-foot roll is the industry standard. White pushes most easily to pure white (RGB 255, 255, 255) in post, which is what Amazon and most Shopify stores expect.
- One diffused light source — a single LED panel or strobe with softbox at 45 degrees, paired with a white reflector on the opposite side, gives clean even light. LED lets beginners see exactly what the camera sees; a strobe delivers more power but needs a trigger.
- Garment prep tools — a handheld steamer, bulldog clips, pins, and double-sided fashion tape. Cheap and critical: wrinkles and loose fabric are the number-one cause of excessive retouching.
That kit produces professional composites for shirts, blouses, jackets, and dresses.
Upgrades worth making
Each of these earns its place by removing a specific bottleneck rather than just being nicer to have.
- A second light for fill — a fill light or second softbox opposite your key wraps the garment in even light and removes the constant reflector-juggling. Two softboxes at 45 degrees is the classic product setup because it's reliable and repeatable.
- Tethering cable and laptop — reviewing every frame at full resolution the moment you shoot catches soft focus and exposure drift immediately instead of hours later. This one upgrade nearly eliminates reshoots.
- Foam inserts and tissue paper — pre-cut forms for shoulders and sleeves give lightweight fabrics the volume to look natural. Without stuffing, jersey and chiffon cling to the form and look deflated.
- Category-specific mannequins — a torso handles most tops, but pants need a lower-body form and full-length dresses benefit from a complete figure. This removes awkward pinning workarounds.
- A color-calibration target — a gray card or color checker shot at the start of each session keeps your navy blues navy and whites neutral across hundreds of images.
Mannequin choice if you buy one thing
Start with a detachable-limb torso mannequin in matte white. It handles the widest range, from button-downs to structured blazers to sleeveless dresses, and its removable parts make interior shots easy without fully redressing the garment between takes. The mannequin is the one piece of gear where going too cheap creates problems that ripple through every later stage. Spending a bit more buys better joint mechanisms, more realistic proportions, and construction that survives thousands of dressings.
Mannequin types compared
Most photographers grab whatever torso is available, wrestle every garment onto it, then wonder why half their composites look awkward. The mannequin dictates how natural the garment sits, how easy the interior shot is, and how much fit cleanup you'll do in post. Three categories cover almost every need.
| Type | Garment fit | Compositing ease | Footprint |
|---|---|---|---|
| Full-body | Complete outfits, full-length dresses, coordinated sets | Moderate — more surface to mask | Large — needs dedicated floor space |
| Torso (with/without arms) | Shirts, jackets, blouses, short dresses | Easy — detachable parts simplify interiors | Compact — shelf or closet |
| Neck block | Collar and neckline detail only (secondary form) | Very easy — used only for interior layers | Minimal — fits in a drawer |
A torso is the workhorse for most ecommerce catalogs. If you mainly shoot shirts, jackets, blouses, or knee-length dresses, it handles all of it, and removable neck and arm sections make interior shots straightforward. A neck block is the specialist tool: it replicates just the neck and upper chest so you can shoot the garment inside-out and capture a clean interior collar layer for compositing. A torso paired with a neck block covers the large majority of standard apparel SKUs; add a full-body form only when full outfits or long dresses genuinely demand it.
Articulated mannequins add adjustable joints at the shoulders and elbows, so you can introduce subtle pose variation across a catalog while keeping one base form. The joints make compositing slightly fussier because each seam needs masking, but the payoff is a catalog that feels less rigid. Inflatable and soft-body mannequins are a niche tool for stretchy knits and jersey, where fabric conforms to any shape. They fall apart with structured garments, since a blazer on a soft form looks lumpy and shapeless.
One sizing rule matters more than anything else: the mannequin must match the sample size of the garments you shoot. Most brands shoot samples in one base size (often a 6 or 8 for women's, a medium for men's), so buy a mannequin to match and your styling time drops sharply. A size-10 blazer on a size-6 form bunches at the back and droops at the shoulders; the reverse stretches the garment and can damage delicate fabric. If you shoot a wide size range, keeping a standard and a plus-size torso on hand is cheaper than the retouching hours you'd otherwise lose.
Garment prep and styling
Every minute you skip in garment prep costs you several in post. Wrinkles that take thirty seconds to steam out can take ten minutes to clone and heal in Photoshop, and the healed result still looks worse than smooth fabric captured correctly. Most photographers rush this phase, then blame the camera when the result looks off.
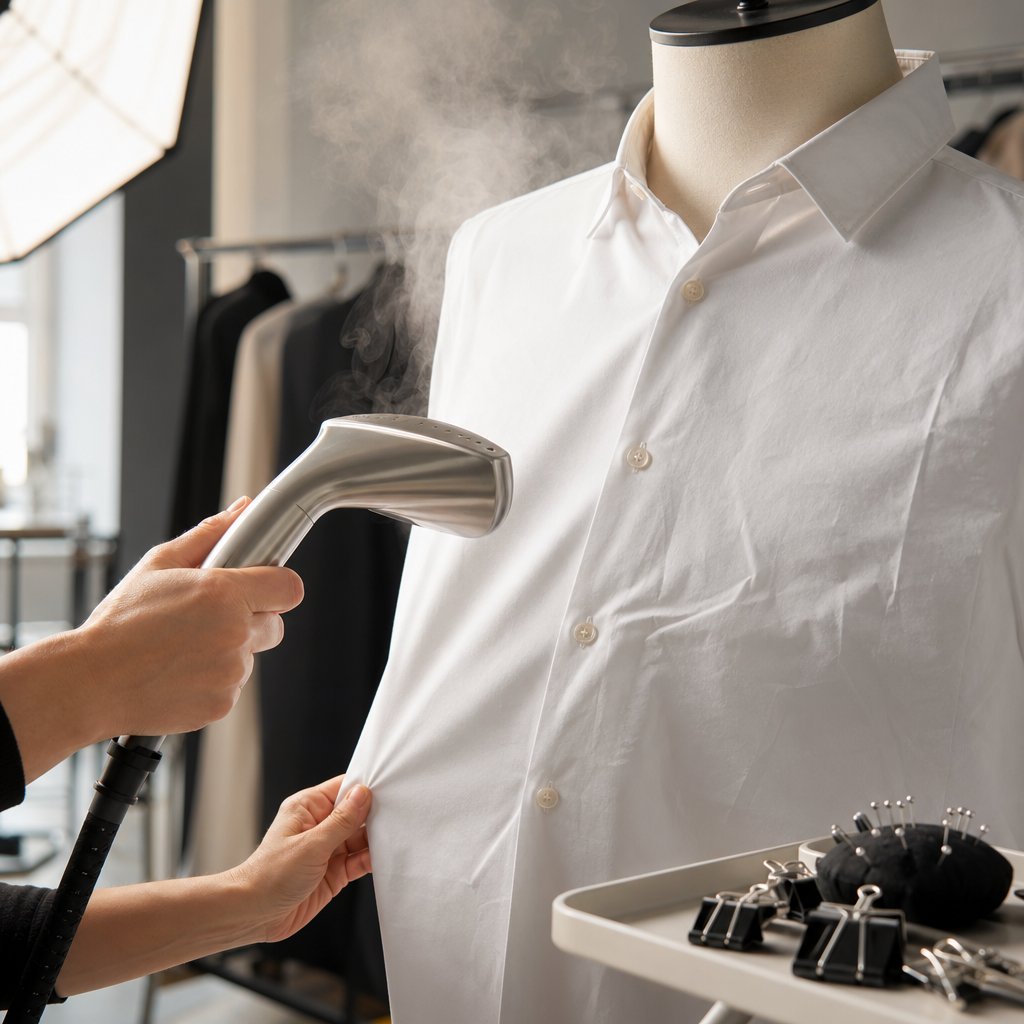
Steaming and wrinkle removal
Every garment gets steamed or pressed before it touches the mannequin. Even new samples arrive with packaging fold lines, and stored garments carry creases the camera magnifies. A handheld steamer is fast, portable, and gentle, and you can steam directly on the hanger or mannequin. Hold it close and pass slowly on wool and denim; keep it a few centimeters off silk with quick passes to avoid water spots. Keep an iron or press on standby for crisp, structured pieces like dress-shirt collars, blazer lapels, and pleated trousers, where flat direct heat sets sharp lines that steam alone can't.
One overlooked step: run a lint roller over the garment right after steaming. Steam loosens fibers and brings dust to the surface, especially on dark fabrics, and a quick roll catches it before it shows up as bright specks in a high-resolution capture.
Pinning, clipping, and stuffing
Styling on a mannequin is an illusion. You want the front to look naturally fitted and full, even if the back is a mess of clips, pins, and tape. The camera only sees what you show it. Keep styling clips, safety pins, double-sided tape, white tack, tissue paper, and fashion scissors within arm's reach. Here's a dressing sequence that keeps things consistent garment to garment:
- Inspect — check for stains, loose threads, and missing buttons. Trim hanging threads now to avoid a reshoot later.
- Steam or press — remove all wrinkles and fold lines, then run the lint roller.
- Dress the mannequin — slide the garment on, button or zip it to the final position, and smooth the fabric from the center outward.
- Pin and clip the back — clip vertically along the back seam and sides to pull excess fabric taut without creating horizontal wrinkles across the front. Pins work well in the shoulder and upper-back areas where they hide easily.
- Stuff sleeves and collar — roll tissue paper loosely into sleeves for a natural outward curve, and stuff the collar lightly so it holds shape. For trousers, pad the hem to round the leg opening.
- Secure lapels, hems, and cuffs — double-sided tape keeps lapels flat and cuffs in place; white tack holds heavier fabric and stays nearly invisible.
- Check from camera position — look through the viewfinder, confirm no clips or pins are visible, and verify the silhouette looks symmetrical before you shoot a frame.
One principle ties the whole sequence together: all pins and clips go where the camera can't see them or where they clone out easily. The back of the mannequin is your staging area. A visible bulldog clip in the final image screams amateur and takes far longer to remove than to reposition during the shoot.
Fabric-specific adjustments
- Sheer fabrics — chiffon, organza, and mesh let the mannequin show through. Slip a contrasting card stock layer between garment and form for definition, and use clips rather than pins, which won't hold sheer material without tearing it.
- Dark fabrics — black, navy, and charcoal absorb light and lose texture. Add fill light to reveal weave and stitching, and lint-roll thoroughly, since specks invisible on white are obvious on dark.
- Reflective and satin — silk, satin, and patent leather create hotspots. Move the key light further to the side or enlarge your diffusion to spread the reflection rather than concentrate it.
- Heavy knits and wool — these hold wrinkles stubbornly and need slow, close steaming. They also sag under their own weight, so pin the shoulders and upper back firmly.
Camera settings and studio setup
Manual mode is non-negotiable. Auto settings shift between garments of different colors and reflectivity, so a white oxford and a black wool blazer shot thirty seconds apart end up at completely different exposures. Lock everything down and let styling be the only variable that changes between SKUs.
Baseline settings
Aperture f/8 to f/11, ISO 100 to 200, shutter 1/125 to 1/200 (strobe sync) or metered for continuous light, manual white balance from a gray card, RAW format.
Each number solves a specific problem. f/8 to f/11 keeps the whole garment sharp from collar to hem; wider apertures blur parts of it, and narrower than f/16 introduces diffraction softening. ISO 100 to 200 keeps noise minimal and preserves fabric texture, which matters most on smooth satin and silk. With strobes, set shutter speed to your camera's flash sync (usually 1/200 or 1/250); with continuous LED, meter for correct exposure and let the tripod handle stability.
Manual white balance is the one that quietly wrecks catalog consistency if you leave it on auto, because the camera reads each garment differently and your "white" background drifts shade to shade. Shoot a gray card at the start of the session, set custom white balance from it, and lock it. RAW preserves the full sensor data you need for precise color and exposure adjustments across composited layers; JPEG throws away data you can't recover. Turn off in-camera sharpening and noise reduction too, since both bake in changes that interfere with masking; sharpen as the final editing step instead.
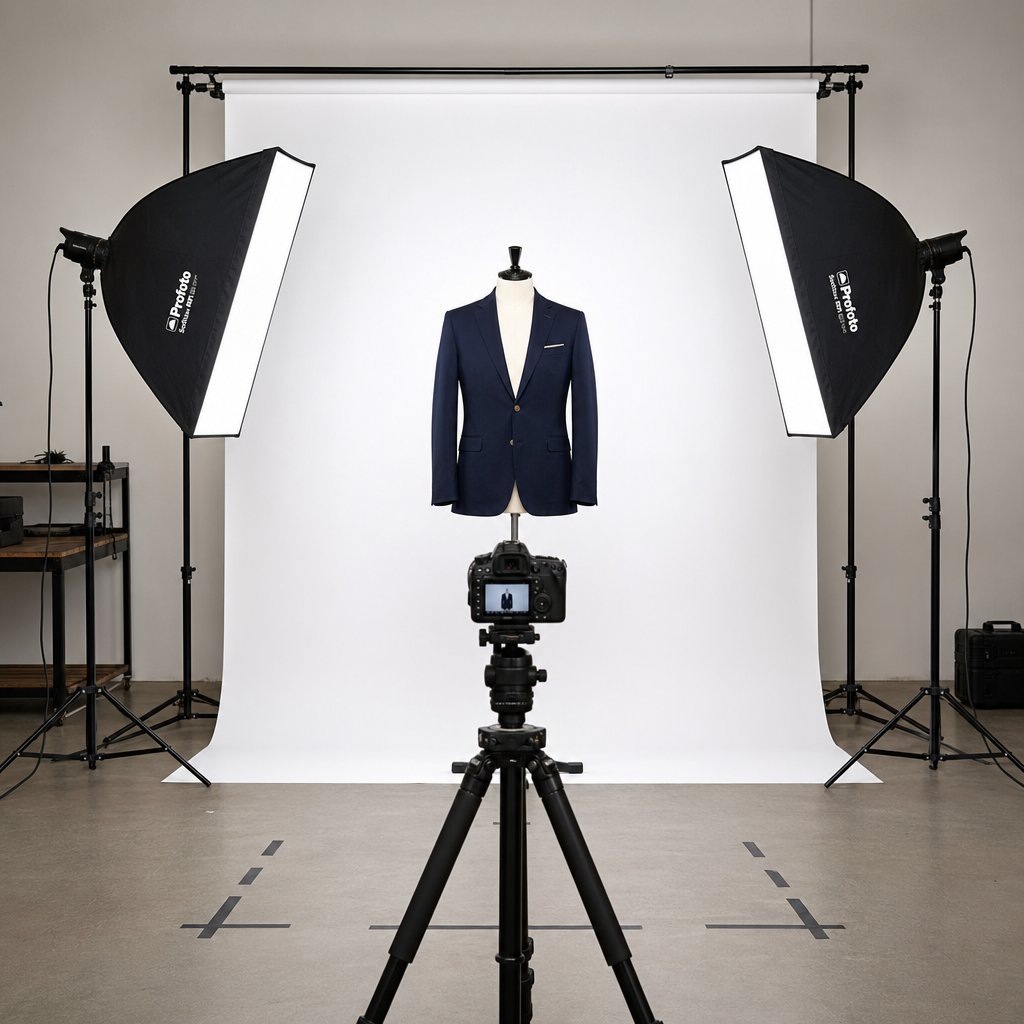
Lighting
The goal is flat, even illumination that reveals fabric texture without harsh shadows or blown highlights. A two-light setup covers most garments:
- Key light at 45 degrees, camera-left — a large softbox (36 inches or bigger) slightly above eye level wraps light around the garment's curves. Bigger softbox, softer light.
- Fill at camera-right — a second softbox or a large white reflector opens the shadows. Keep the fill about one stop dimmer than the key, or the garment looks flat and loses its contouring. A foam-board reflector works if you don't have a second light.
Dark garments need more. Add a third light or reflector positioned low and behind the garment, aimed upward, to create a subtle rim of light that separates it from the backdrop and reveals surface detail. One firm rule: never move your lights between the front shot and the interior shot of the same garment. Any change in direction or intensity creates a mismatched exposure that's immediately visible when you composite. Mark the stands on the floor and leave them alone until the garment is finished.
Backdrop and distance
White or light-gray seamless paper stays the standard. Mount a 9-foot roll on a crossbar curving down to the floor for a seamless sweep with no horizon line; it stays wrinkle-free, replaces cheaply when scuffed, and produces clean edges that simplify masking. Position your tripod roughly 4 to 6 feet from the mannequin with a 50-85mm lens to minimize barrel distortion. Mark the tripod's floor position with gaffer tape so you can return to the exact spot if it gets bumped, and use a remote release or two-second timer to kill shutter vibration.
The multi-shot capture workflow
Every garment needs a minimum set of captures to produce a clean composite: think of them as the raw ingredients your editor layers together. Capture too few and you'll have a gap no Photoshop skill can fill; capture too many and you waste time on angles that never make the final image.
The core three shots
- Front view on the mannequin — your primary product image. Camera centered at chest height, the whole garment in frame with even margins. Check styling, symmetry, and exposure before moving on.
- Back view — rotate the mannequin 180 degrees without touching the camera, tripod, or lights, so the two shots align perfectly when layered.
- Interior view — the shot beginners forget, and the one that makes the whole effect possible. Remove the neck and upper-torso sections (or flip the garment inside-out and lay it flat) to expose the inner collar, neckline, and armholes. This gives your editor real fabric to fill the gap where the mannequin was. Without it, the composite has a hole at the neckline.
Those three captures are the backbone of every workflow, and the interior shot is what separates a professional composite from an amateur cutout with an empty void at the collar.
Adapting by garment type
| Garment | Mannequin | Shots | Styling notes |
|---|---|---|---|
| Tops and shirts | Torso with removable neck | Front, back, interior | Pin back for a fitted silhouette; stuff collar lightly; fasten buttons consistently |
| Jackets and outerwear | Torso with removable arms | Add front-open and lining detail | Stuff sleeves aggressively; shoot buttoned and open; capture the lining separately |
| Pants and skirts | Lower-torso or waist form | Front, back, waistband interior | Pin at the back seam; stuff leg openings; fold the waist outward for the interior shot |
| Dresses | Full-body | Add a side or 3/4 angle | Side angle for A-line or asymmetric cuts; pin the back to preserve the silhouette |
| Accessories (hats, bags) | Form, head block, or stuffing | Front, back, detail | Usually no mannequin; stuff for shape; prop on a small stand |
Consistency across a full catalog
Getting one garment right is the easy part; getting two hundred to look like one catalog is the harder one, and the fix is mostly mechanical. Consistent product visuals build buyer trust, and inconsistency in framing or lighting erodes it fast on a product grid.
- Mark everything on the floor — tape the mannequin base, tripod legs, and light stands so every SKU shares identical framing and shadow direction.
- Lock camera settings for the session — if a dark garment needs more light, adjust strobe power rather than aperture or ISO, so depth of field and noise stay uniform.
- Keep a reference image — designate your first good frame as the session reference and pull it up beside each new capture (tethered software makes this instant).
- Batch by type — shoot all shirts, then all jackets, then all pants, to minimize mannequin swaps and keep your styling rhythm.
Nailing consistency during the shoot pays off directly in post. When every frame shares the same lighting, framing, and color baseline, your editor can batch-process adjustments instead of correcting each image by hand.
Editing: masking, compositing, and cleanup
Post-production is where the RAW files become product images, and it's where most photographers hit a wall. The shooting comes naturally; the editing feels closer to surgery, because every pixel matters at the neckline seam.
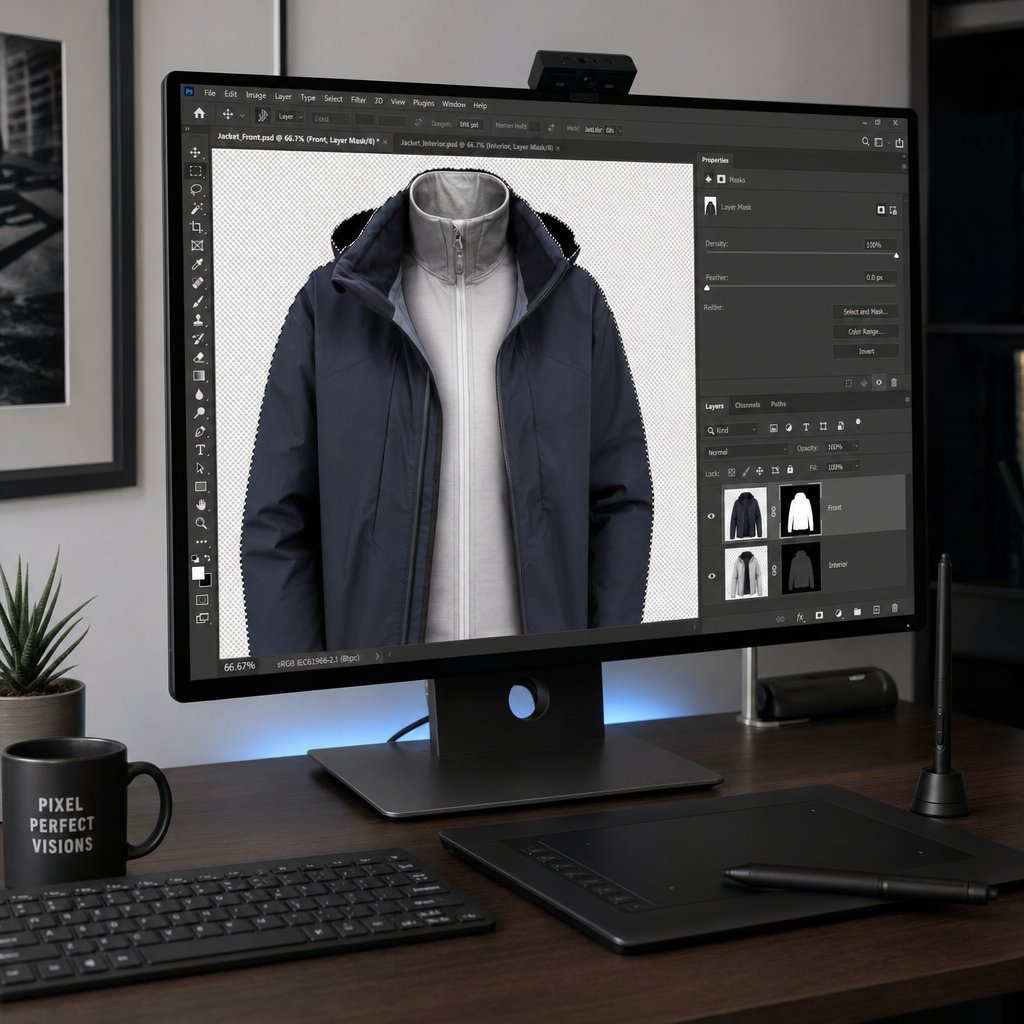
Removing the mannequin in Photoshop
- Import your files — open the front shot as your base layer and drag the interior shot in above it. Drop the interior layer's opacity to about 50% so you can see both for alignment.
- Select the garment — on the front layer, use the Pen Tool to trace a tight path around the garment's outer edge. It's the cleanest, most controllable selection, especially around the shoulders, collar, and hem. Zoom to 200-300% and work in short anchor-point segments on detailed areas.
- Mask out the mannequin — convert the path to a selection and add a layer mask. You'll immediately see the gap where the mannequin's neck and chest used to be.
- Align the interior layer — bring the interior shot behind the front. With the camera locked on a tripod between frames, the two register almost perfectly. Use Free Transform to nudge the collar and armhole fabric until it sits naturally behind the front outline.
- Blend the edges — mask the interior layer so only the parts visible through the neckline and armhole remain, then feather the transition with a soft, low-opacity brush.
- Clean up — zoom to 100%, scan every edge for stray mannequin pixels and color fringing, and fix small artifacts with the Clone Stamp and Healing Brush.
- Finalize — flatten, add a subtle drop shadow to ground the garment, do final color correction, and export. Save a high-res TIFF to archive and a web JPEG or WebP at 1000-2000px on the long side for listings.
The neckline is where composites fail
The neckline is the most demanding part of the edit, because two photos shot at slightly different angles and micro-exposures have to merge into one seamless surface. If it's even slightly off, the viewer's eye goes straight to it. Three things make the difference:
- Feather the mask edge — a 1-2 pixel feather turns a hard cut line into a soft gradient. Do it from the Properties panel or by painting along the edge with a soft black brush at low opacity.
- Match exposure and color — the interior shot often reads slightly darker or warmer because the fabric was angled differently to the light. Adjust the interior layer with Curves or Levels until it matches the front, plus a small Hue/Saturation tweak if it picked up a color cast.
- Smooth with Clone Stamp and Healing Brush — at 200% zoom, work the whole seam: Clone Stamp for precise placement, Healing Brush for natural blending.
Check the composite at multiple zoom levels. A neckline that looks perfect at 300% can still show a faint halo at the 100% view customers actually see, so always do a final review at display size before exporting.
Scaling without dropping quality
Perfecting a single composite is one thing; holding several hundred to the same standard is a production challenge. A few strategies keep quality intact as volume grows:
- Reusable templates per category — build a Photoshop template for shirts, one for jackets, one for pants, each with pre-built layer groups and roughed-in masks. Drop new captures in and the structural work is already done.
- Actions and batch processing — record an Action for the steps that never change (background cleanup, shadow, color-space conversion, export) and run them across whole folders. Masking still needs a human eye, but automating everything around it saves real time.
- A style guide — document background values, shadow opacity, crop margins, and export specs with a reference image per category, then share it with every editor in-house or outsourced. A photography style guide is what keeps a catalog cohesive when more than one person touches the files.
- AI-assisted editing — machine-learning tools now handle background removal, basic masking, and compositing well enough for many standard garments. Complex necklines and layered fabrics still benefit from human refinement, so the smart move is hybrid: automate the straightforward bulk of the catalog and hand-edit hero products and unusual construction. Platforms like Snappyit's fashion-brand tools are built for that catalog-scale automation, and the Snappyit photo-editing walkthrough covers the manual steps in more depth.
Common mistakes and fixes
Most ghost mannequin problems originate during capture, not editing. A mistake made in the studio gets baked into the RAW file, and Photoshop only partly compensates. These are the issues behind the bulk of reshoots and retouching hours.
| Problem | Cause | Fix |
|---|---|---|
| Garment doesn't fit — fabric bunches, shoulders droop | Mannequin size doesn't match the sample size, or too little pinning | Switch to a matching mannequin. If you can't mid-session, pin aggressively along the back seam and clip vertically on the sides to pull fabric taut without front wrinkles |
| Visible pins or clips | Clips placed too far forward, or pins where the camera sees them | Move everything to the back half before shooting. If a clip must sit on a side seam, angle its flat edge to the camera and plan to clone it out |
| Lighting mismatch between front and interior shots | Lights moved or exposure switched to auto between captures | Lock lights, mark stands with tape, and stay in manual. Front, back, and inner-neck shots must share identical lighting and white balance |
| Color cast on light fabrics | Glossy or colored mannequin reflecting tinted light, worst on whites and pastels | Use a matte white or gray form. If stuck with glossy, drape thin white fabric over it. Correct residue in post with a targeted Hue/Saturation layer |
| Wrinkles in the final image | Not steamed, or fabric shifted while dressing | Steam every garment right before it goes on the form, and do a final camera-position check after pinning and stuffing |
| Garment looks flat and lifeless | Sleeves, collar, or chest not stuffed, so fabric collapses | Roll tissue paper loosely into sleeves, collar, and chest for gentle volume, not stretch. Use less on jersey and chiffon |
Notice the common thread across these rows: the fix is faster and cheaper than the workaround. Swapping a mannequin size takes two minutes; cloning out a poorly fitted silhouette takes twenty. Steaming a shirt takes thirty seconds; healing the wrinkles takes ten minutes and still looks worse.
Editing introduces its own recurring problems, subtler ones that look fine at a glance and fall apart on zoom. Visible seam lines at the neckline are the most common; feather the mask by 1-2 pixels and blend with the Healing Brush in short strokes at high zoom. Mismatched exposure between layers comes from the interior fabric angling differently to the light, so correct it with Curves before you start blending, not after. Jagged garment edges usually trace back to a Quick Selection or Magic Wand mask with no refinement, fixed with a small feather and a soft brush at low opacity along the outline. And resist over-smoothing: blurring away every fold makes fabric look plastic, so preserve natural drape and remove only distracting creases.
Frequently Asked Questions
What does ghost mannequin photography cost per shot?
Cost depends on whether you shoot and edit in-house or outsource. Doing both yourself, your main costs are gear and time. If you outsource just the editing, dedicated retouching services charge per image based on garment complexity, and they handle the full compositing pipeline from masking to export. The main saving over on-model photography is that you skip model fees, hair, makeup, and studio rental entirely, which adds up fast across a large catalog.
Which camera settings deliver the cleanest ghost mannequin shots?
Use aperture f/8 to f/11 for edge-to-edge sharpness, ISO 100 to 200 for minimal noise, and shutter at your flash sync speed (around 1/125 to 1/200) when using strobes. Shoot in full manual mode with white balance set from a gray card rather than auto, which shifts between garment colors. Capture in RAW for editing latitude, and disable in-camera sharpening and noise reduction, since both interfere with precise masking.
What type of mannequin works best?
A detachable-limb torso mannequin in matte white or light gray is the most versatile choice. Removable neck, arm, and torso sections make interior shots easy without fully undressing the garment, and a matte finish prevents color casts on light fabrics. Pair a torso with a neck block to cover most standard SKUs, add a lower-body form for pants and skirts, and add a full-body mannequin only for complete outfits or full-length dresses.
How do you remove the mannequin in Photoshop?
Trace the garment on your front shot with the Pen Tool and convert it to a layer mask to hide the mannequin. Place the interior shot (showing collar and neckline fabric) as a layer behind the masked front, and align it so it fills the gap left at the neck and chest. Feather the mask edges by 1-2 pixels, match exposure between layers with Curves, and smooth the transitions with the Clone Stamp and Healing Brush.
Will AI editing replace hand-done ghost mannequin work?
For standard garments like t-shirts and simple button-downs, AI tools already handle background removal, basic masking, and compositing at close to manual quality, far faster. Complex necklines, layered fabrics, and unusual construction still benefit from human refinement. The most effective approach is hybrid: automate the bulk of straightforward items and hand-edit hero products and complex pieces.
When should I not use ghost mannequin photography?
Skip it when the garment depends on movement and drape, such as flowing gowns, activewear, and oversized silhouettes that only read on a real body, where on-model tells a better story. Very small accessories like belts and socks rarely justify the multi-shot overhead, and brands built on editorial, lifestyle imagery will find the clean ghost mannequin look too clinical for their primary photos.
Getting ghost mannequin clothing right is one chapter of the larger AI product photography story.