At a glance
Shoot a handbag, tote, or backpack listing with no model and no studio. Turn one phone photo into white-bg, on-model, ghost-mannequin, recolor, and video assets.
| Need | What to do |
|---|---|
| Get oriented | Read the short summary, then use the checklist below. |
| Create a test image | Try AI Fashion Model Free |
What a bag listing needs (main white-bg, 5+ angles, on-model held/shoulder/crossbody, detail, scale)
Before you shoot anything, it helps to know the finished image set you're aiming for. A bag is a hard product to sell online because shoppers can't pick it up, open the zip, or hold it against their body. Your photos have to answer every question a buyer would ask in a store, and a single flat-lay can't do that. A complete bag listing covers five jobs:
- The main image. A clean shot of the bag alone on a white or neutral background. This is the thumbnail that wins the click in search results, and on most marketplaces it has the strictest rules.
- Five-plus angles. Front, both sides (or one side plus the back), the top opening, the interior lining and pockets, and the base. Buyers infer durability and capacity from these.
- On-model context. The bag held in the hand, on the shoulder, or worn crossbody, so shoppers see how it sits on a real person.
- A scale reference. Either the on-model shot or a prop that makes the true size obvious. "Looks bigger online" is one of the most common bag-return complaints.
- A detail shot. A close crop of the hardware, zipper pulls, stitching, monogram, or material grain that justifies the price.
If you sell across several channels, you also need each of these in the right shape and background for each platform — square white-background for Amazon, lifestyle-friendly crops for Etsy and TikTok Shop, a consistent grid for Shopify. The good news: you can capture the raw material for all of it in about ten minutes at your kitchen table, then generate the rest.
The one capture that feeds everything
Stand the bag up, fill it lightly so it holds its shape, and shoot it in soft, even daylight from a window — no direct sun, no flash. Use a plain white wall, a poster board, or an ironed bedsheet as the backdrop. Capture the front, the sides, the top-open view, the inside, and the base, keeping the camera level with the middle of the bag so you don't distort the proportions. Those frames are your source files. Everything downstream — white-background cleanup, on-model, filled shape, recolor, video — is generated from them, so the sharper and truer-to-color this capture is, the better every output looks.
The old way: stuffing, fishing line, lightboxes, hiring a model — cost and effort
If you read the standard handbag-photography advice, it's mostly a list of physical tricks to fake what a bag can't do on its own. They work, but they cost time, money, and patience that a home seller running dozens of SKUs rarely has.
What the traditional playbook asks of you
- Stuffing. A bag photographed empty looks deflated and cheap, so you pack it with tissue, bubble wrap, or a small pillow to give it shape — then re-pack it for every angle and every SKU.
- Fishing line. To shoot a bag "floating" or to hold a strap up so it looks carried, sellers rig clear fishing line or wire, then spend ages editing the line out frame by frame.
- A lightbox or sweep. A pop-up lightbox or a seamless paper sweep with two lamps gets you an even white background — until the bag is bigger than the box, or the white comes out gray and needs correcting anyway.
- A model and location. For the on-model and lifestyle shots, the old answer is to hire a model, book a photographer, scout a location, and shoot a half-day. Even a modest local shoot can run into the hundreds of dollars, and you pay it again for the next collection.
The math is the real problem. A single traditional bag shoot — stylist time, model fee, photographer, retouching — commonly lands in the low hundreds of dollars per SKU once you total it up, and turnaround is measured in days. Multiply that across a colorway range or a seasonal drop and the photography line item rivals the cost of the inventory. For a reseller flipping vintage bags or a small label testing a new tote, that's not viable. The alternative isn't to skip the shots; it's to stop producing them physically.
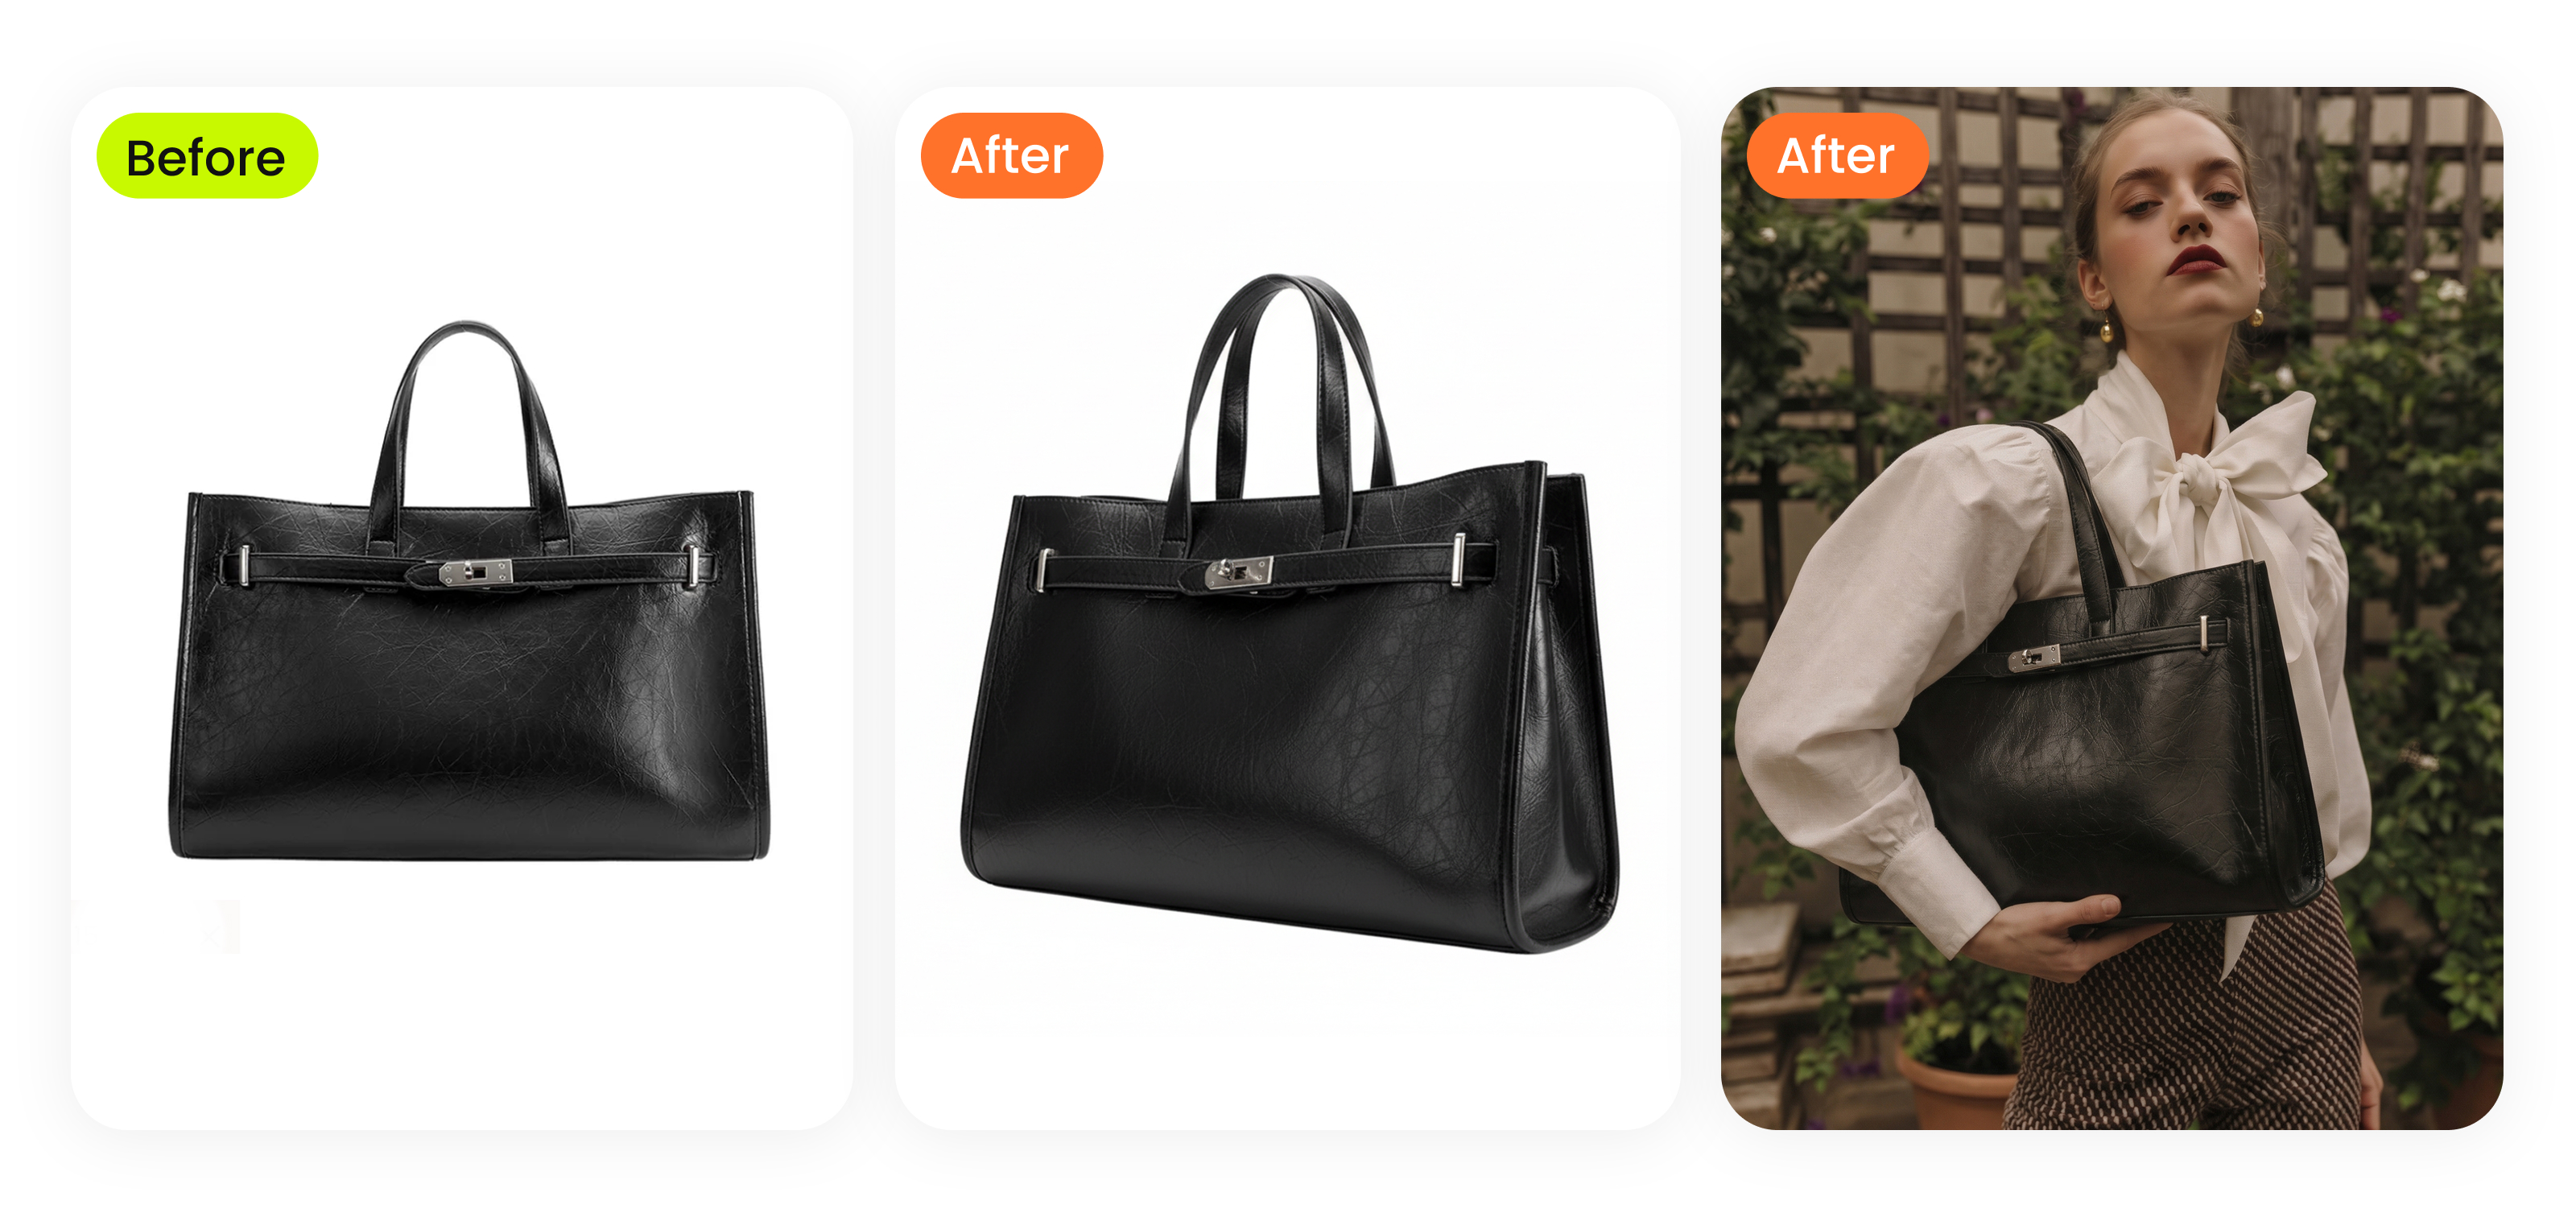
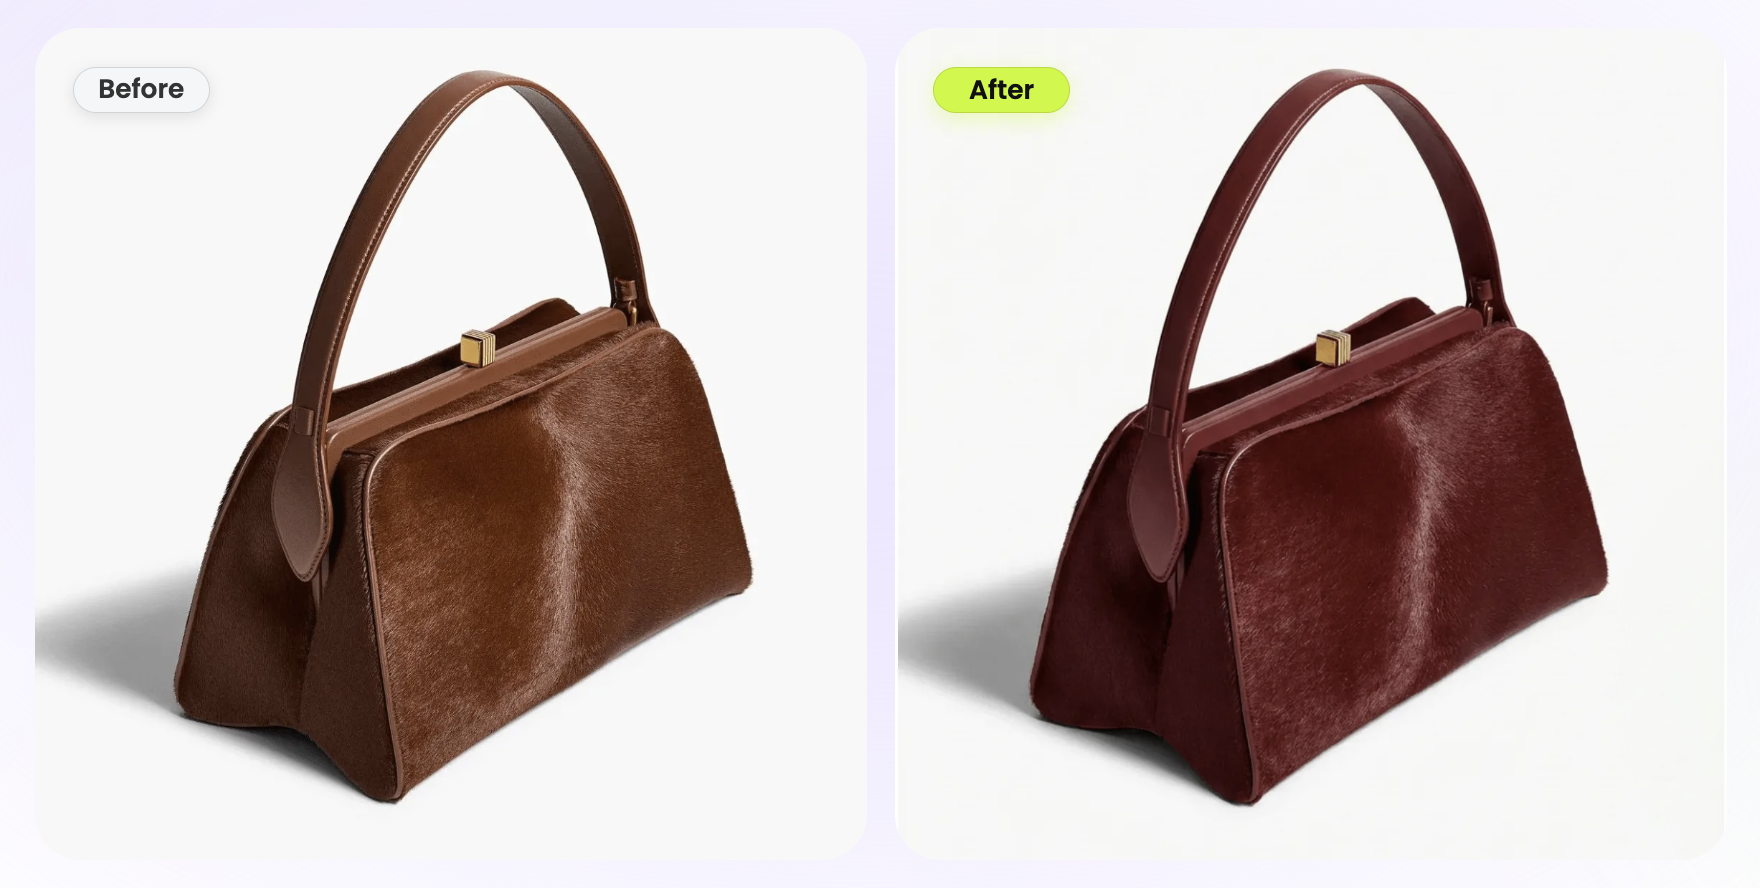
Bag on a model from one flat-lay or mannequin shot (no model, no shoot) — before/after
The most expensive image on the list — the on-model lifestyle shot — is now the easiest to fake convincingly. An AI fashion-model tool takes your single flat-lay or product photo of the bag and renders it held, on the shoulder, or worn crossbody by a generated model, with lighting and scale that read as a real shoot. You upload one image, choose a pose and a model, and get a lifestyle frame back in under a minute.
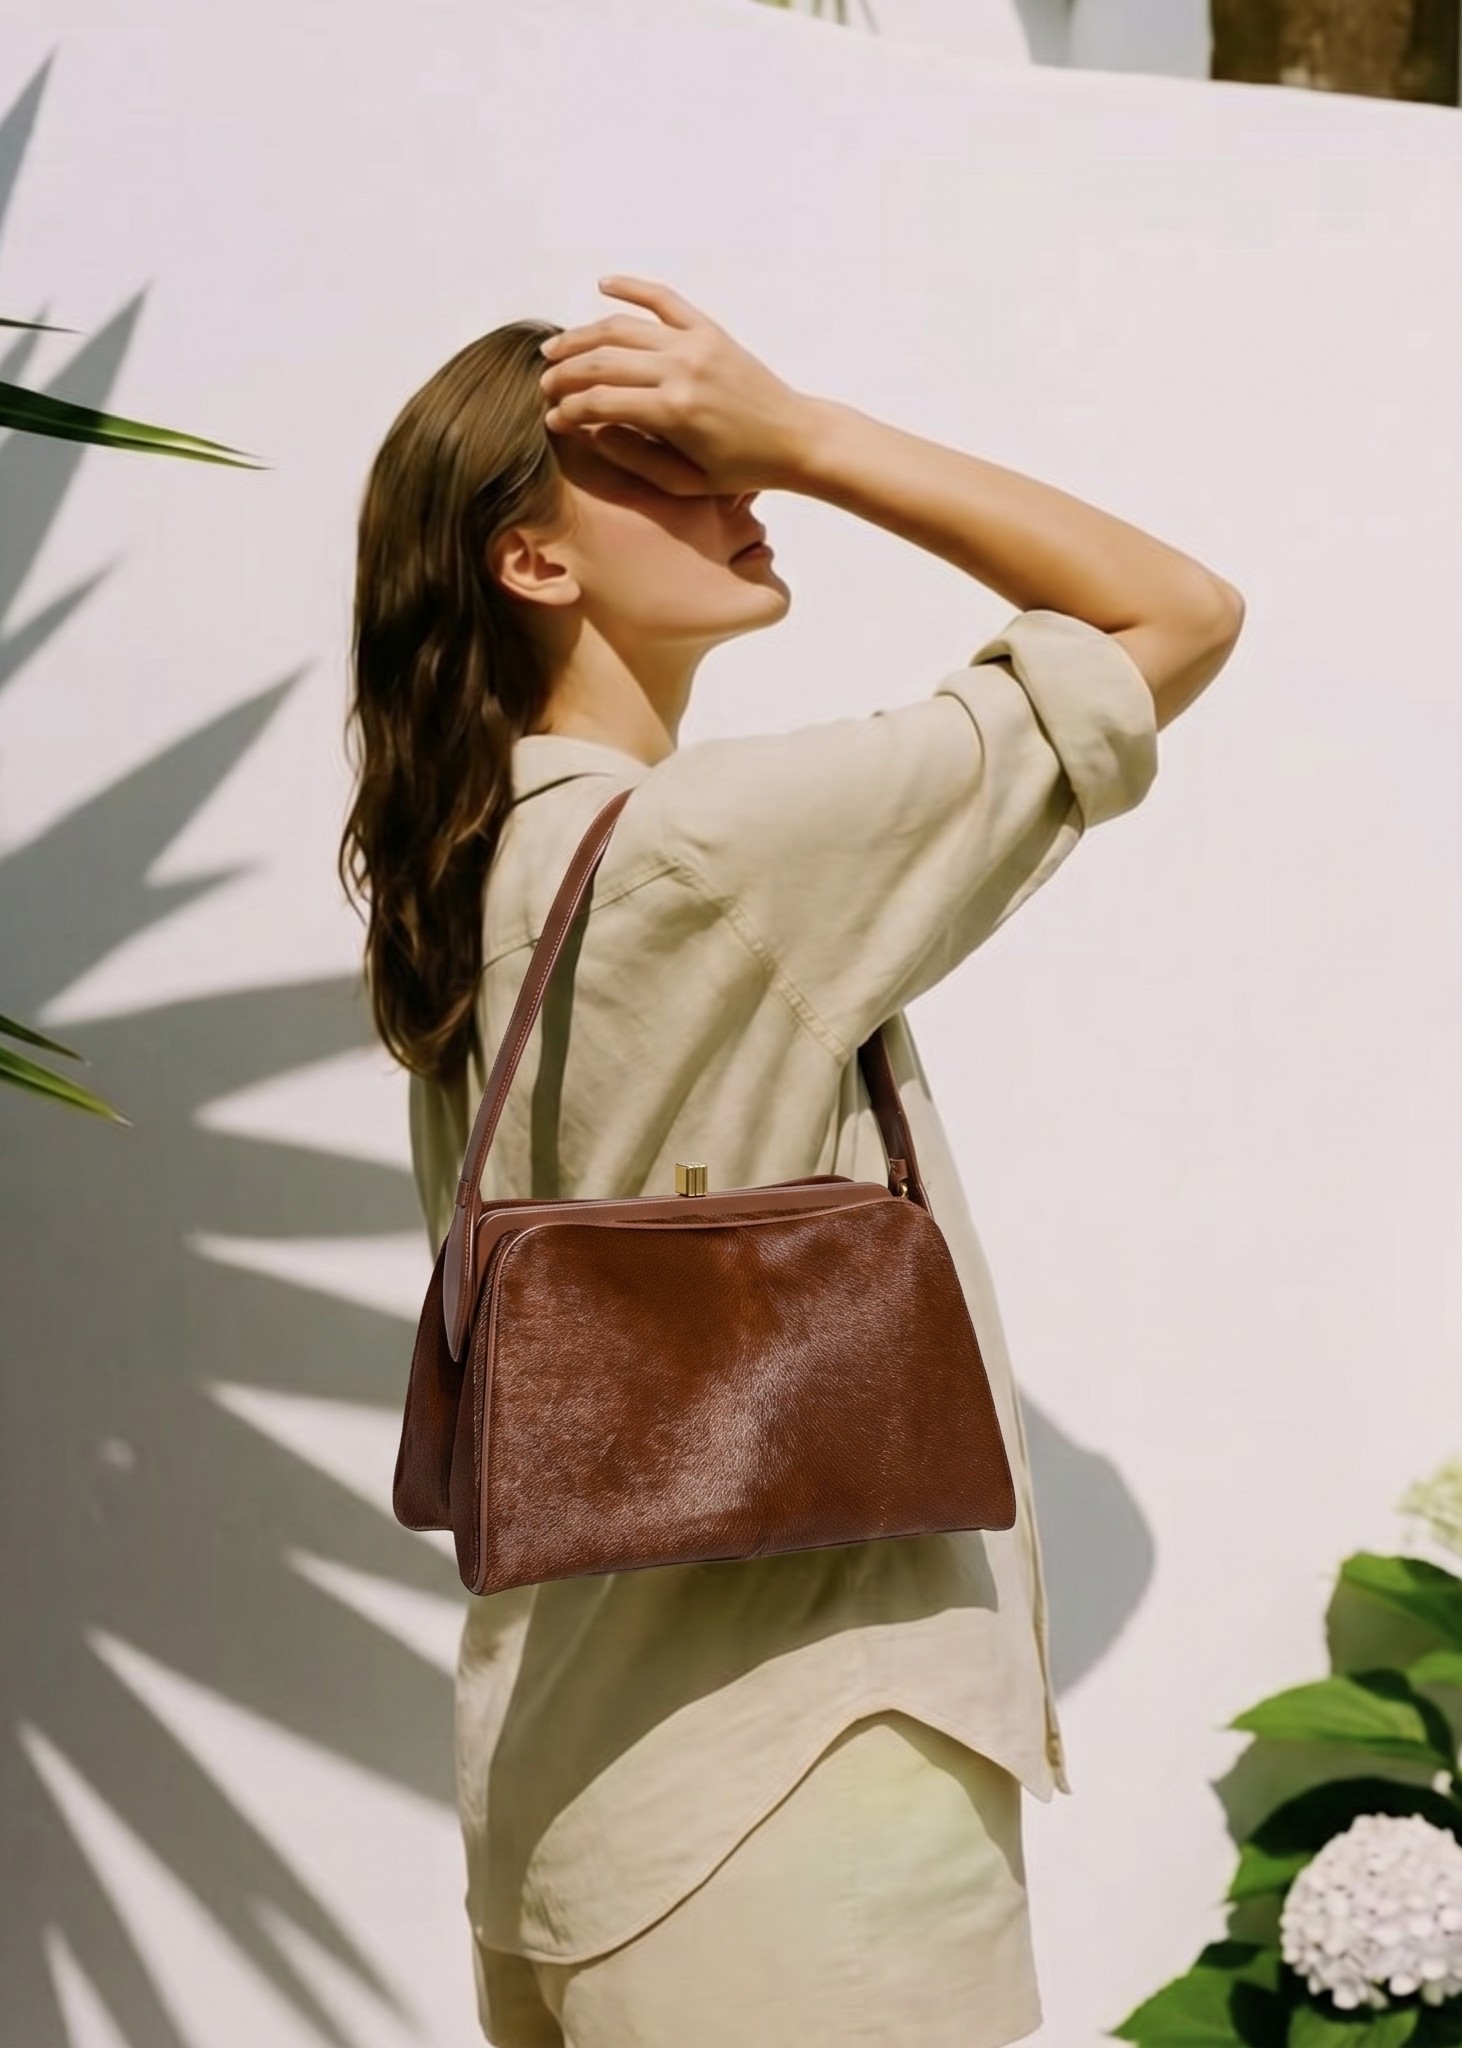
The before/after above shows the pattern: a plain phone capture on the left, a natural on-model render on the right. For bags specifically, the three poses that earn their place in a listing are:
- Held in hand. Best for clutches, top-handle bags, and small totes — it shows the handle drop and how the bag sits when carried.
- On the shoulder. The default for shoulder bags and mid-size totes; it communicates strap length and how the bag hangs against the body.
- Worn crossbody. Essential for crossbody and sling bags and small backpacks, because the strap-to-body ratio is exactly what a buyer is judging.
Where AI on-model wins and where it slips
The big win is scale and consistency: once you've found a model and pose that fit your brand, you can apply the same look across an entire catalog so every product page feels like one coordinated shoot. The failure modes to watch are realism details — a strap that floats instead of resting on the shoulder, a hand gripping the handle at an unnatural angle, or a generated reflection that doesn't match the bag's real hardware. Start from a sharp, well-lit source photo, pick poses that match the bag type, and review hands and straps at full zoom before you publish. If you want the deeper walkthrough of swapping context onto a product, our guide on changing clothes in a product photo with AI covers the same render-from-one-photo logic applied to apparel.
Put your bag on a model free →
Ghost mannequin / 3D shape for structured bags and backpacks (the uncontested angle)
Here's the angle almost no one covers. In apparel, the ghost mannequin effect shows a garment with a filled, three-dimensional "worn" shape and no visible body inside it. Search for ghost-mannequin content and you'll find it's almost entirely about shirts, dresses, and jackets — the technique for giving a bag its true filled form is barely written about, even though structured totes, satchels, and backpacks need it just as much.
A bag photographed flat or empty collapses. The gusset folds in, the front panel caves, and the buyer can't tell whether it holds a laptop or a phone. The ghost-mannequin idea, applied to bags, rebuilds that three-dimensional shape: the bag looks held open and carried, with the gusset at its real width and the panels standing up — without you stuffing it, rigging fishing line, or leaving a visible support in the frame. It's the cleanest way to show structure and capacity on a white background.
Which bags benefit most
- Structured totes and satchels where the silhouette is a selling point and a flat-lay hides it.
- Backpacks, which look like a deflated sack when empty but need to show volume and how the panels sit when packed.
- Boxy or framed bags — camera bags, lunch totes, structured crossbodies — where "does it keep its shape" is the buyer's main worry.
Soft, unstructured bags — slouchy hobos, bucket bags, drawstring pouches — are the exception; they're meant to slump, so a natural drape or an on-model shot represents them more honestly than a forced filled shape. The mechanics of the filled-shape effect, the neck-joint-style blending, and where it shines versus struggles are all covered in depth in our ghost mannequin for ecommerce guide and the broader accessory product photography without a photoshoot overview — rather than repeat the apparel walkthrough here, lean on those, then apply the same filled-form logic to your bag.
Build a filled 3D shape for your bag →
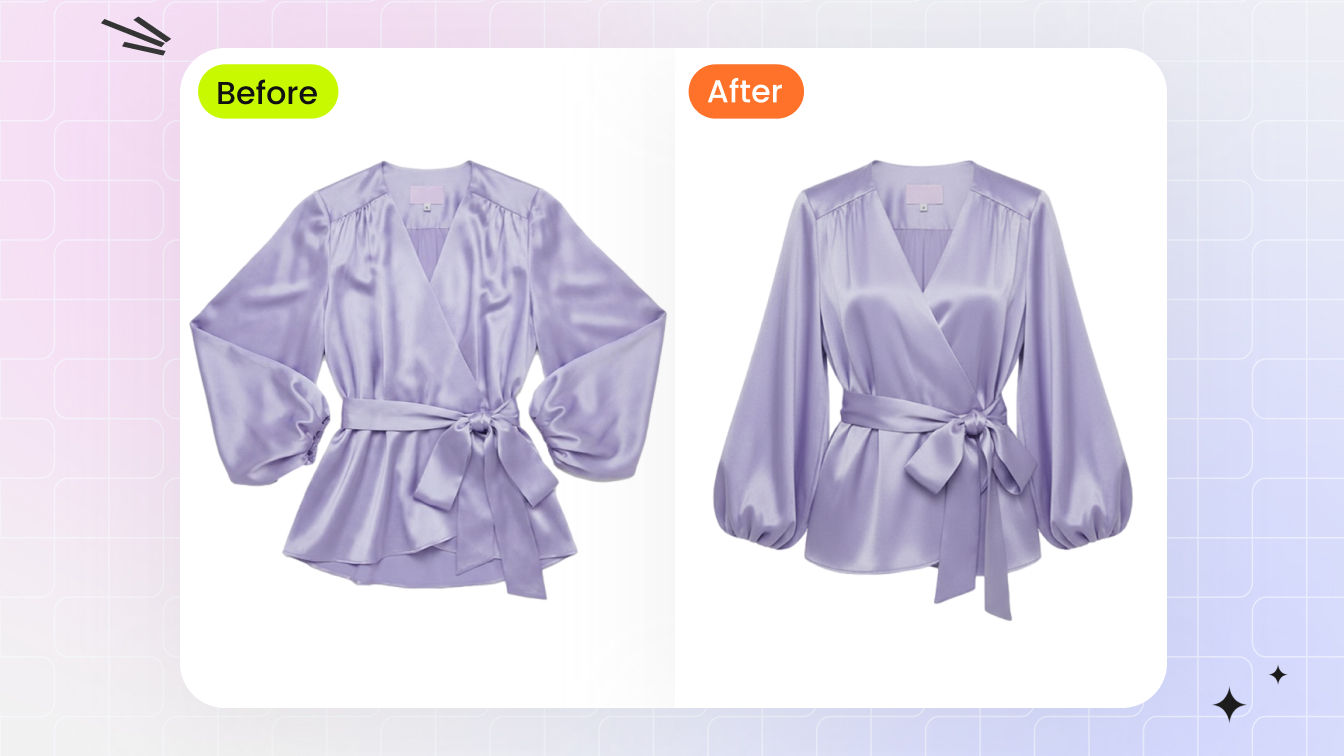
Per-colorway listing images of the same bag without re-shooting
If you sell the same tote in tan, black, olive, and burgundy, the old way means photographing four physical bags — or four shoots if they arrive at different times — and then fighting to make the lighting and angle match across them. An AI color-change tool collapses that into one capture. Photograph the bag once in a single colorway, then regenerate the image in every variant. The tool recolors only the bag and preserves the stitching, hardware, zipper pulls, material grain, and shadows, so a tan canvas tote becomes a black, olive, or wine version in seconds — with the angle and lighting identical across the whole set.
That consistency is the real prize. When every colorway shares the exact same frame, your product page swatches line up perfectly and the listing reads as a deliberate, professional range instead of four mismatched photos. It also means you can list colorways you haven't manufactured yet to test demand before committing inventory.
Where recolor needs a second look
Recolor is reliable on solid materials — canvas, smooth leather, nylon. It needs a closer review on metallic finishes, two-tone bags, and printed or patterned fabrics, where the tool has to decide which regions to change. Describe the exact area to recolor, keep hardware excluded, and check that contrast stitching stays its original color. Our deeper dive on changing product color walks through the region-selection controls that keep multi-material bags clean.
Generate every colorway from one photo →
Turn a static bag into a TikTok Shop / IG reel
On social-first marketplaces, motion outperforms a still in the feed. You don't need to film anything: an image-to-video tool animates a single bag photo into a short vertical clip — a slow 360-style rotation, a camera push-in on the hardware, or a model stepping forward with the bag — and exports it at 9:16 for TikTok Shop, Instagram Reels, and short-form ads.
Clips that actually convert for bags
- The rotation. Animate the bag turning so viewers see front, side, and back in one continuous motion — the fastest way to communicate shape in a scroll.
- The hardware push-in. A slow zoom toward the clasp, zipper, or logo sells perceived quality in under three seconds.
- The carry moment. Pair an on-model render with motion so the bag is seen being worn, which is the shot social shoppers respond to most.
Keep clips short (three to six seconds loops well), lead with the bag in the first frame, and caption the size and price since sound-off viewing is the norm. For a full breakdown of turning product stills into listing video, see our piece on the broader AI tools ecommerce sellers use in 2026.
Marketplace specifics: Amazon vs Etsy vs Shopify vs TikTok Shop
The same image set has to be dressed differently for each channel. Bags are non-apparel, which actually makes the main-image rule simpler than it is for clothing — a clean product shot of the bag alone is accepted as the main image everywhere, with no live-model requirement. Here's how the four platforms differ on the details that decide whether a listing goes live and ranks.
| Platform | Main image background | What wins the click | Best secondary assets |
|---|---|---|---|
| Amazon | Pure white, RGB 255, 255, 255; product fills ~85% of frame; no text, props, or logos | Sharp white-bg main + zoomable resolution (1600px+ on the long side) | On-model scale shot, interior, detail crop, infographic-style secondary images |
| Etsy | No strict rule; white or styled both allowed | First image should be square or landscape to avoid thumbnail crop; lifestyle context performs well | On-model, handmade/detail close-ups, scale prop, all 10 slots filled |
| Shopify | None enforced (white recommended for a clean grid) | Consistent aspect ratio across the catalog so collection pages look uniform | On-model hero, colorway variants tied to swatches, video on the product page |
| TikTok Shop | Clean product image accepted; lifestyle and video favored | 9:16 video and motion in the feed; a strong first frame | Vertical reels, on-model carry clips, recolor variants for the showcase |
Amazon is the gatekeeper. Its main-image rule is the strictest, and a non-compliant main image can be suppressed from search entirely. Export your bag's main shot on pure white at RGB 255, 255, 255, fill about 85% of the frame, and keep the file at 1600px or more on the long side so the zoom feature activates. Everything else — on-model, scale, interior, hardware detail — goes in the secondary slots.
Etsy rewards storytelling. There's no background mandate, so a styled or lifestyle first image often outperforms a stark white one, but make that first image square or landscape so the thumbnail doesn't crop awkwardly. Fill all ten photo slots; handmade and vintage bag buyers scrutinize detail shots.
Shopify gives you total freedom and therefore total responsibility for consistency. Pick one aspect ratio (square 1:1 is the safest) and one background treatment, and hold them across every SKU so collection pages read as a coherent set. Tie recolor variants directly to your color swatches.
TikTok Shop is motion-first. A clean product still is fine to clear listing requirements, but the feed favors vertical video, so prioritize the 9:16 clips and on-model carry moments you generated above. One bag photo can feed the compliant Amazon main image and the scroll-stopping TikTok reel at the same time.
Make-it-look-professional checklist for sellers with no photographer
You don't need gear or a studio, but you do need the source capture and the outputs to hold a consistent standard. Run this checklist before you publish a bag listing.
At capture
- Light evenly. Soft, indirect daylight near a window beats any phone flash. No hard shadows, no color cast from a lamp.
- Fill the bag lightly so it holds shape in the source frame — even if you'll rebuild the 3D shape later, a non-collapsed input gives the cleaner result.
- Shoot level. Keep the camera at the bag's mid-height so you don't distort proportions or exaggerate the base.
- Get the angles. Front, sides, top-open, interior, base — capture them all in one sitting so every downstream output has source material.
- Nail true color. Recolor and on-model outputs inherit your source color, so get the real hue right under neutral light.
At export
- One aspect ratio across the catalog. Square 1:1 is the safest multi-platform default; export platform-specific crops from one master.
- Pure white where required. For the Amazon main image, confirm the background reads RGB 255, 255, 255, not off-white.
- Resolution for zoom. 1600px or more on the long side so marketplace zoom activates and detail crops stay sharp.
- Check the realism details. Straps resting (not floating), hands gripping naturally, hardware reflections matching the real bag, stitching unchanged after recolor.
- Keep the set consistent. Same model, same lighting logic, same background treatment across colorways and angles so the listing looks like one shoot.
That's the whole pipeline: one phone capture at your table, then white-background cleanup, on-model, filled 3D shape, every colorway, and a video — no model, no fishing line, no studio. Sibling guides for photographing shoes for ecommerce and photographing hats without a model or mannequin apply the exact same single-photo-to-full-set logic to other accessories.
Bags are one of many accessories you can shoot this way. The same no-studio workflow — white-background, on-model, ghost-mannequin, recolor, and video — applies to hats, shoes, jewelry, and sunglasses, with each category's angles and marketplace rules in one place.
Open the accessory photography playbook →
Put your bag on a model in the next minute
A handbag, tote, or backpack listing doesn't need a budget anymore — it needs one good photo and the right tools. Upload a single phone shot of your bag and generate the on-model held, shoulder, and crossbody frames your listing has been missing, then build the white-background main image, the filled 3D shape, every colorway, and a vertical video from the same capture. No model, no photographer, no studio, no fishing line.
Start your bag photoshoot free →
More resources


Frequently asked questions
How do I photograph a bag for ecommerce without a model or studio?
Take one clean phone photo of the bag in soft, even daylight against a plain wall or sheet, capturing the front, both sides, the top opening, the interior, and the base. That gives you the raw angles a listing needs. Then use an AI tool to put the same bag on a clean white background, generate an on-model held or crossbody shot, and build per-color variants from that single capture, so you never need a model, a photographer, or a rented studio.
What images does a bag listing actually need?
A complete bag listing needs a clean main image on a white or neutral background, at least five supporting angles (front, side, back, top-open, and interior), a scale or on-model shot so buyers judge size, and a detail shot of hardware, stitching, or material. Marketplaces like Amazon require the main image to be a pure white background with the product filling most of the frame; Etsy, Shopify, and TikTok Shop are more flexible but reward the same five-plus-angle coverage.
Can AI put my bag on a model from just a flat-lay photo?
Yes. AI fashion-model tools take a single flat-lay or product photo of the bag and render it held, on the shoulder, or worn crossbody by a generated model, with consistent lighting and a believable scale. You upload one photo, pick a pose and model, and get an on-model lifestyle image in under a minute, with no casting, no location, and no shoot. It works best when your source photo is sharp and shows the bag's true color and hardware.
Is there a ghost mannequin equivalent for structured bags and backpacks?
Yes. The same ghost-mannequin idea used for apparel works for structured bags and backpacks: an AI tool rebuilds the bag's three-dimensional filled shape so it looks held open and carried, without stuffing, fishing line, or a visible support. It shows depth, gusset width, and how the bag holds its form, which a deflated flat-lay can't, and it is a near-uncontested angle because most ghost-mannequin content covers apparel only.
How do I make every color variant of a bag without re-shooting?
Photograph the bag once in a single colorway, then use an AI color-change tool to regenerate the same image in each variant. The tool recolors only the bag while preserving stitching, hardware, material grain, and shadows, so a tan tote becomes black, olive, or burgundy in seconds. One capture covers an entire colorway range, and every variant image stays perfectly consistent in angle and lighting.
Does Amazon require a white background for handbag main images?
Yes. Amazon requires the main image to be a pure white background at RGB 255, 255, 255, with the product filling about 85 percent of the frame and no text, logos, props, or watermarks. Bags are non-apparel, so a clean product shot of the bag alone is accepted as the main image, no live model required. On-model, lifestyle, and scale shots belong in the secondary image slots.
How do I turn a static bag photo into a TikTok Shop or Instagram reel?
Use an image-to-video tool to animate a single bag photo into a short vertical clip, adding a slow rotation, a camera push-in, or a model walking with the bag. You get a 9:16 video sized for TikTok Shop, Instagram Reels, and short-form ads without filming anything, which gives social-first marketplaces the motion they favor in the feed.
What's the cheapest way to get professional bag photos as a small seller?
The cheapest professional-looking route is one good phone capture plus AI generation. A traditional bag shoot with stuffing, fishing line, lighting, and a model on location can run into the hundreds of dollars per SKU and take days. Generating white-background, on-model, ghost-shape, recolor, and video assets from a single phone photo costs a fraction of that per image and turns around in minutes, which is why most home-based marketplace sellers now start there.