At a glance
Change clothes in a product photo with AI without Photoshop. A seller's router: turn a flat-lay, hanging, or mannequin shot into an on-model, recolored, or ghost-mannequin listing.
| Need | What to do |
|---|---|
| Get oriented | Read the short summary, then use the checklist below. |
| Create a test image | Try AI Fashion Model Free |
When sellers need to "change clothes in a photo" (new variant, missing on-model shot, recolor, ghost-mannequin)
When a shopper types how to change clothes in a photo with AI, they usually mean swapping an outfit on a person. When a seller searches the same thing, they mean something more concrete and more valuable: I have a product, I have a mediocre photo of it, and I need a different version of that photo to sell with. The garment isn't changing — the presentation is. That reframing is the whole point of this guide.
In practice, the request almost always lands in one of three buckets:
- I'm missing an on-model shot. You have a flat-lay from a supplier or a quick phone photo, but the listing needs to show the piece worn so buyers can read the fit. You want to change the garment photo to on-model without booking a model or a studio.
- I need a new colorway. The product comes in five colors but you only photographed one. Rather than re-shoot four times, you want to recolor the existing shot into accurate per-variant images.
- I need a clean catalog look. You want the hollow, worn-but-empty ghost-mannequin shape that reads as a professional apparel listing, starting from a mannequin or hanger photo you already have.
Each of those is a different destination, but they all start from the same place: a real photo of a real garment you control. That's the advantage sellers have over the selfie crowd — and the reason the output has to be honest. A buyer who receives the item compares it to your photo, so a warped print or a fantasy color drives returns. This guide treats the AI step as a production tool, not a toy, and routes you to the right output for each job. If you only do one of these, start with on-model — it carries the most weight on a product page.
What input photo works best (flat-lay vs mannequin vs hanging) and how to shoot it on a phone
Every method below is only as good as the photo you feed it. AI clothes changers reconstruct what they can see; they can't invent a print that's out of focus or guess a true color the camera never captured. Get the input right and you'll regenerate far less.
The three inputs, and what each is good for
| Input photo | Easiest to shoot? | Best output path | Watch out for |
|---|---|---|---|
| Flat-lay (garment laid on a surface) | Yes — phone + white sheet | On-model, recolor | Wrinkles and uneven lighting flatten the read |
| Hanging shot (on a hanger against a wall) | Fairly easy | On-model, recolor, ghost-mannequin | Hanger and crooked drape need cropping |
| Mannequin shot (on a dress form) | Needs a form | Ghost-mannequin, on-model | Form edges showing through thin fabric |
For most sellers, a clean flat-lay on white is the most versatile single input, because it feeds all three paths without a re-shoot. If you already own a dress form, a mannequin shot is the strongest starting point for ghost-mannequin output since the garment is already holding its three-dimensional shape.
How to shoot the input on a phone in five minutes
- Light it flat and even. Shoot near a large window with the light to one side, or use two cheap softbox lamps. Avoid direct sun and overhead spotlights — hard shadows confuse the AI's read of folds and color.
- Use a plain background. A white sheet, foam board, or seamless paper. The cleaner the separation between garment and background, the cleaner the AI's masking.
- Shoot straight-on and fill the frame. Hold the phone parallel to the garment (directly overhead for a flat-lay), and let the piece occupy most of the frame so detail survives.
- Steam first. Thirty seconds with a steamer removes the creases that otherwise bake into the output as permanent wrinkles.
- Lock focus and shoot the true color. Tap to focus on the fabric, and if your phone has it, set a neutral white balance so the color the AI sees matches the real garment. Shoot a couple of frames and keep the sharpest.
One careful five-minute capture per garment beats ten rushed ones. If your only source is a supplier image you can't re-shoot, pick the sharpest, most front-on, least-styled frame available — a plain product photo reconstructs far better than a busy lifestyle scene.
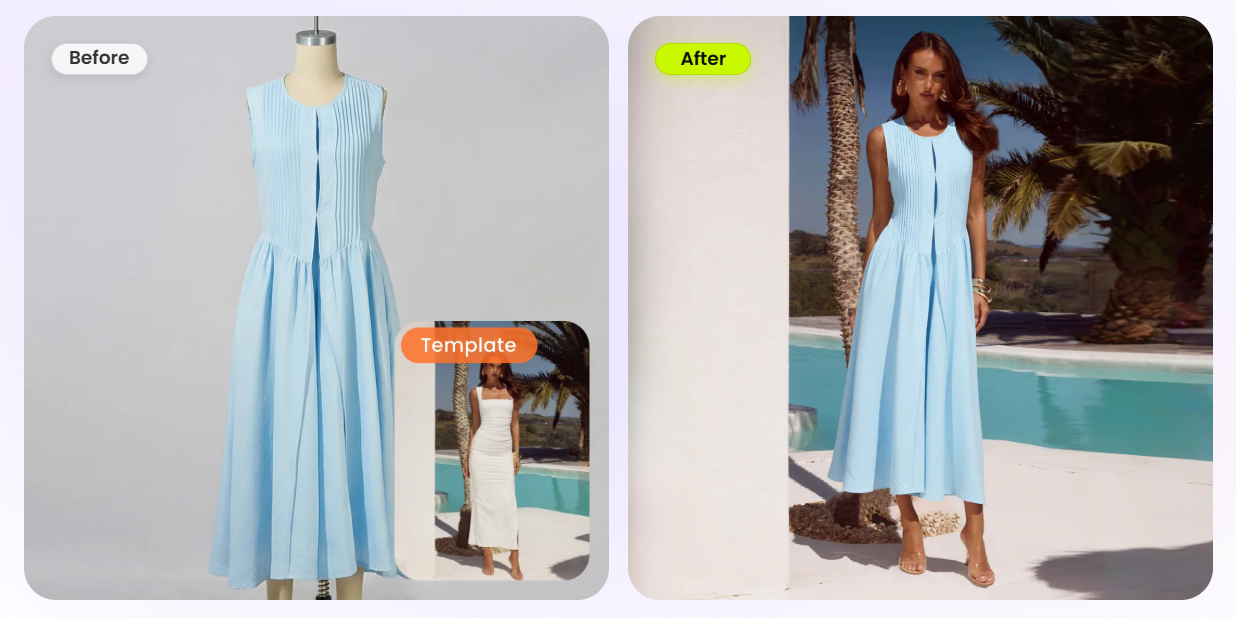
Method 1: put the garment on an AI model for a listing (keep SHORT — link to the deep tutorial)
This is the highest-impact output: take a flat-lay or hanging shot and render the garment worn by a photorealistic AI model, so buyers can read fit, drape, and proportion. It's the closest AI gets to replacing an on-model photoshoot.
The short version of the workflow:
- Upload your clean garment photo (flat-lay or hanging shot on a plain background).
- Pick a model — body type, skin tone, and pose — from the template library so the look fits your brand and stays consistent across SKUs.
- Choose a background: pure white for marketplace compliance, or a lifestyle scene for your own storefront.
- Generate, then check that the garment's print, logo, and proportions survived the transfer.
Because getting the on-model result right — natural hands, believable fabric physics, a model you can reuse across an entire catalog — has a lot of depth, this guide keeps it deliberately short. For the full step-by-step (choosing and locking a reusable model, prompt patterns for pose and framing, fixing the common artifacts, and keeping model identity consistent across a catalog), follow the canonical tutorial: how to create AI fashion models. The point here is just that the on-model path exists and starts from the same input as the other two. To try it on your own garment photo now, head to the AI fashion model tool and upload a flat-lay.
Put your garment on an AI model →
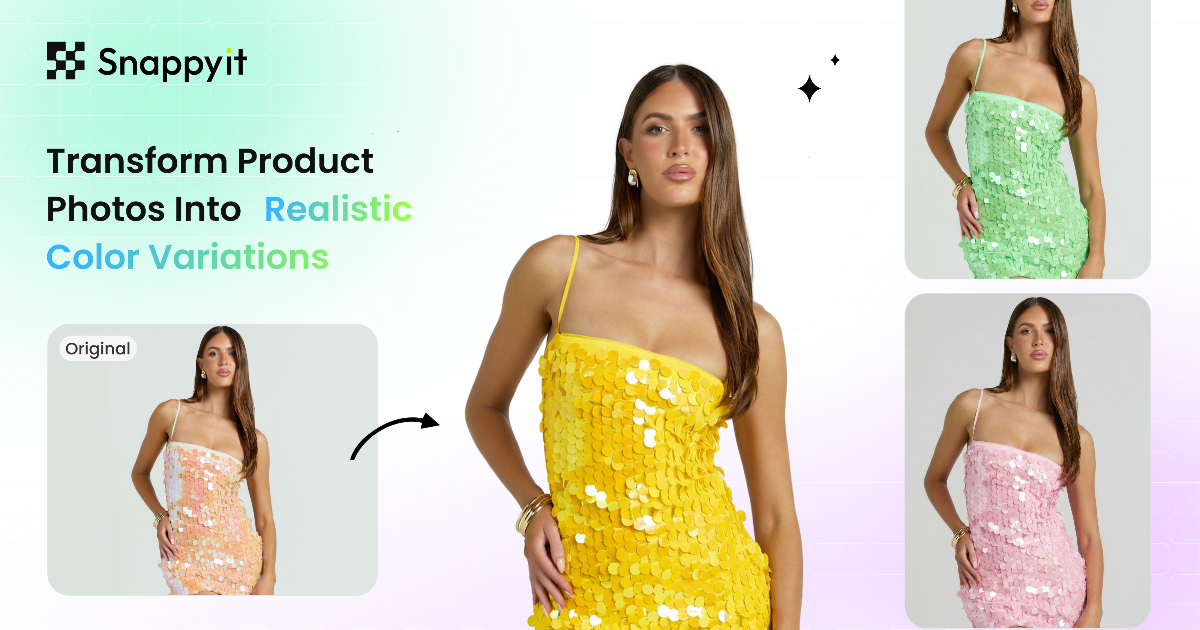
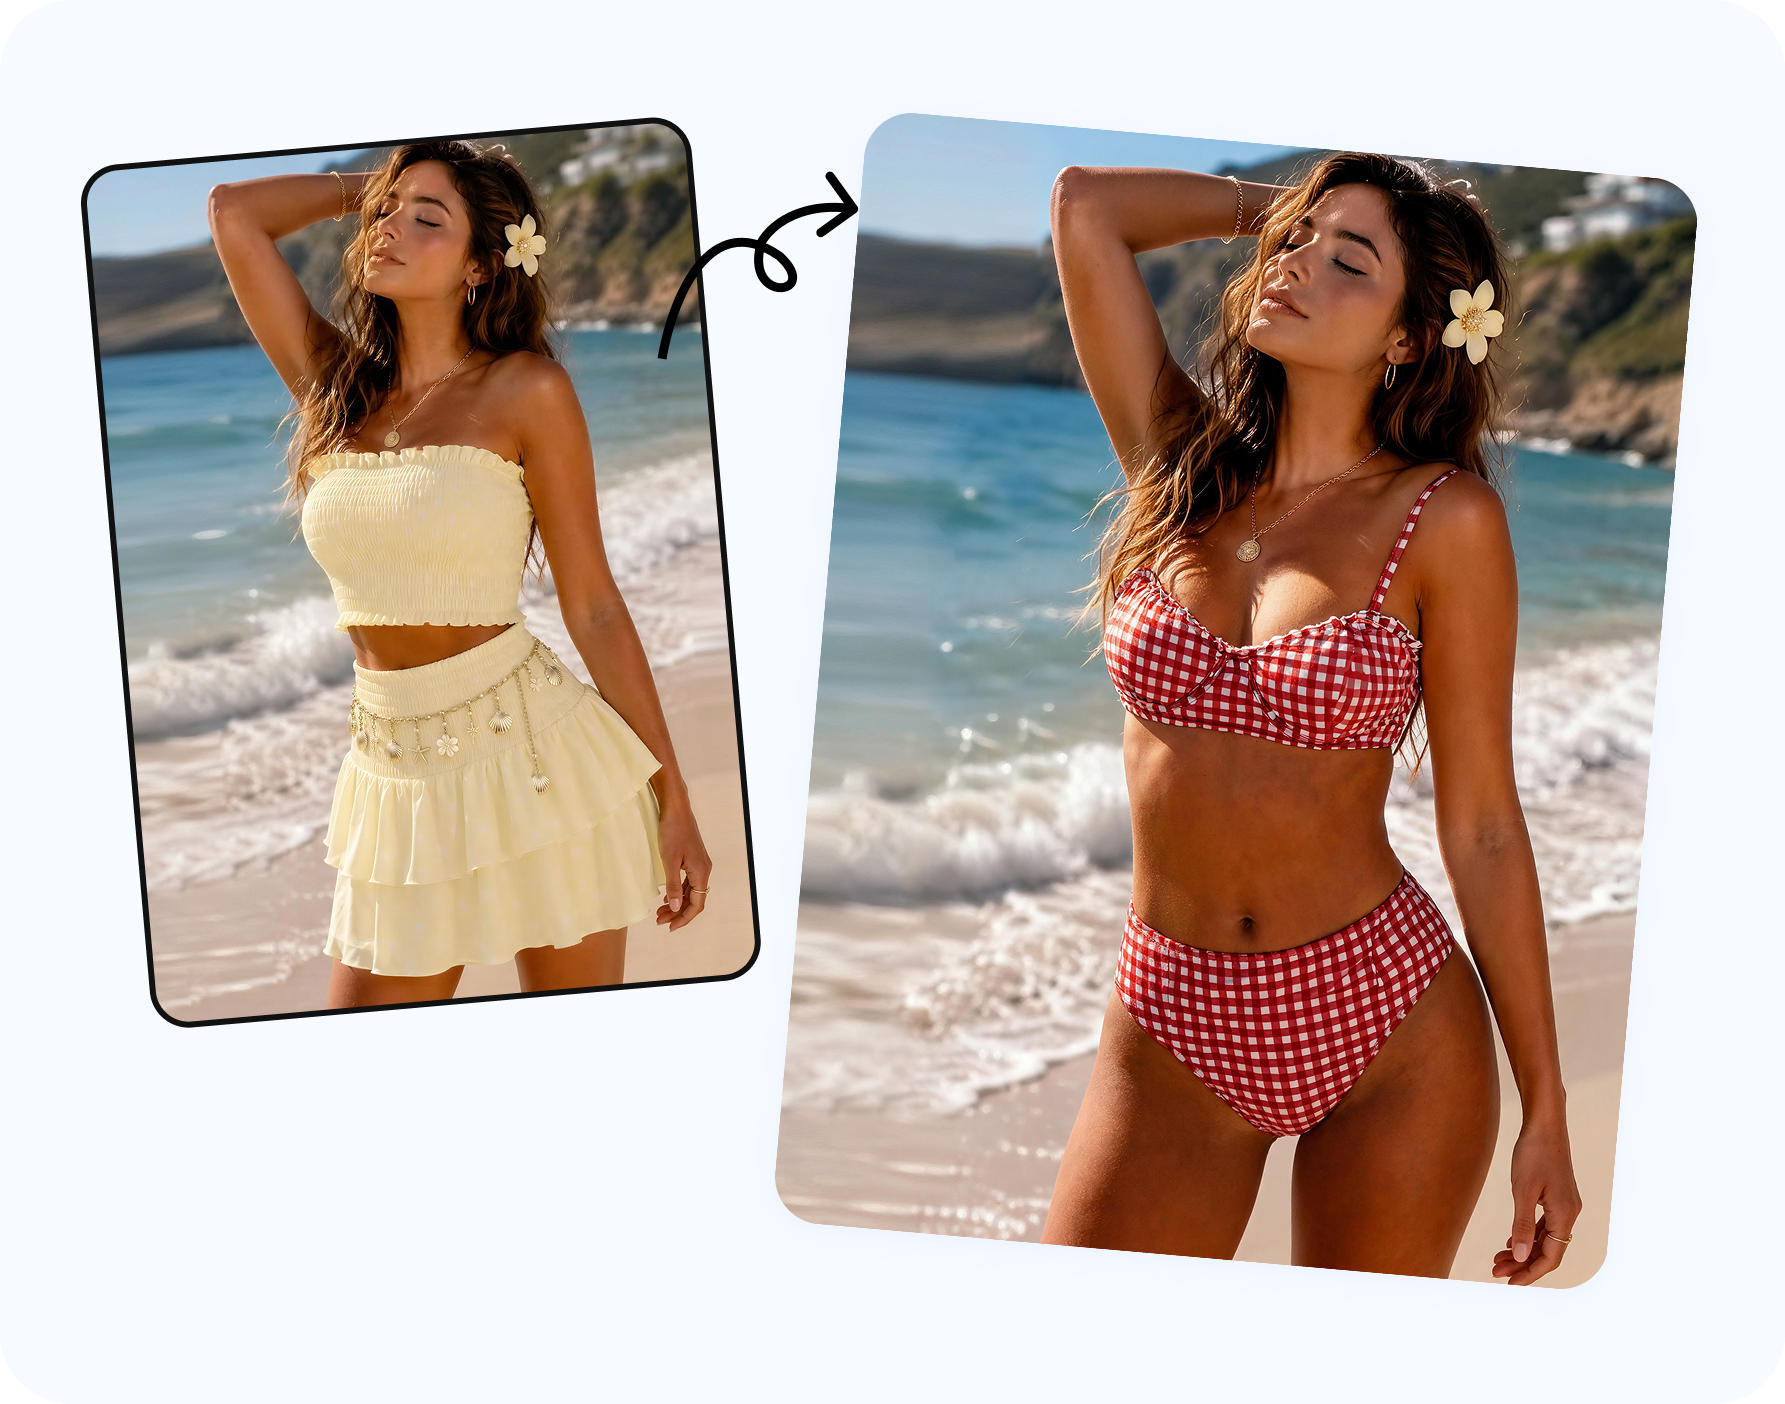
Method 2: change the garment color to spin up colorway variants
If your product sells in multiple colors, you don't need to photograph every one. Shoot the garment once, then use AI to change the garment color into accurate per-variant images. This is the cheapest, fastest win in the whole router — and it's where sellers most often leave money on the table by listing variants with no photo at all.
How to recolor a garment photo
- Upload the source photo of the garment in its photographed color.
- Point to the region to recolor — the AI isolates the garment so the background, tags, and any contrast trim stay put.
- Specify the target color by name (“forest green,” “burgundy”) or, better, by exact hex code so it matches your real product and your other listing assets.
- Generate and compare the output against the real swatch, then repeat for each remaining colorway.
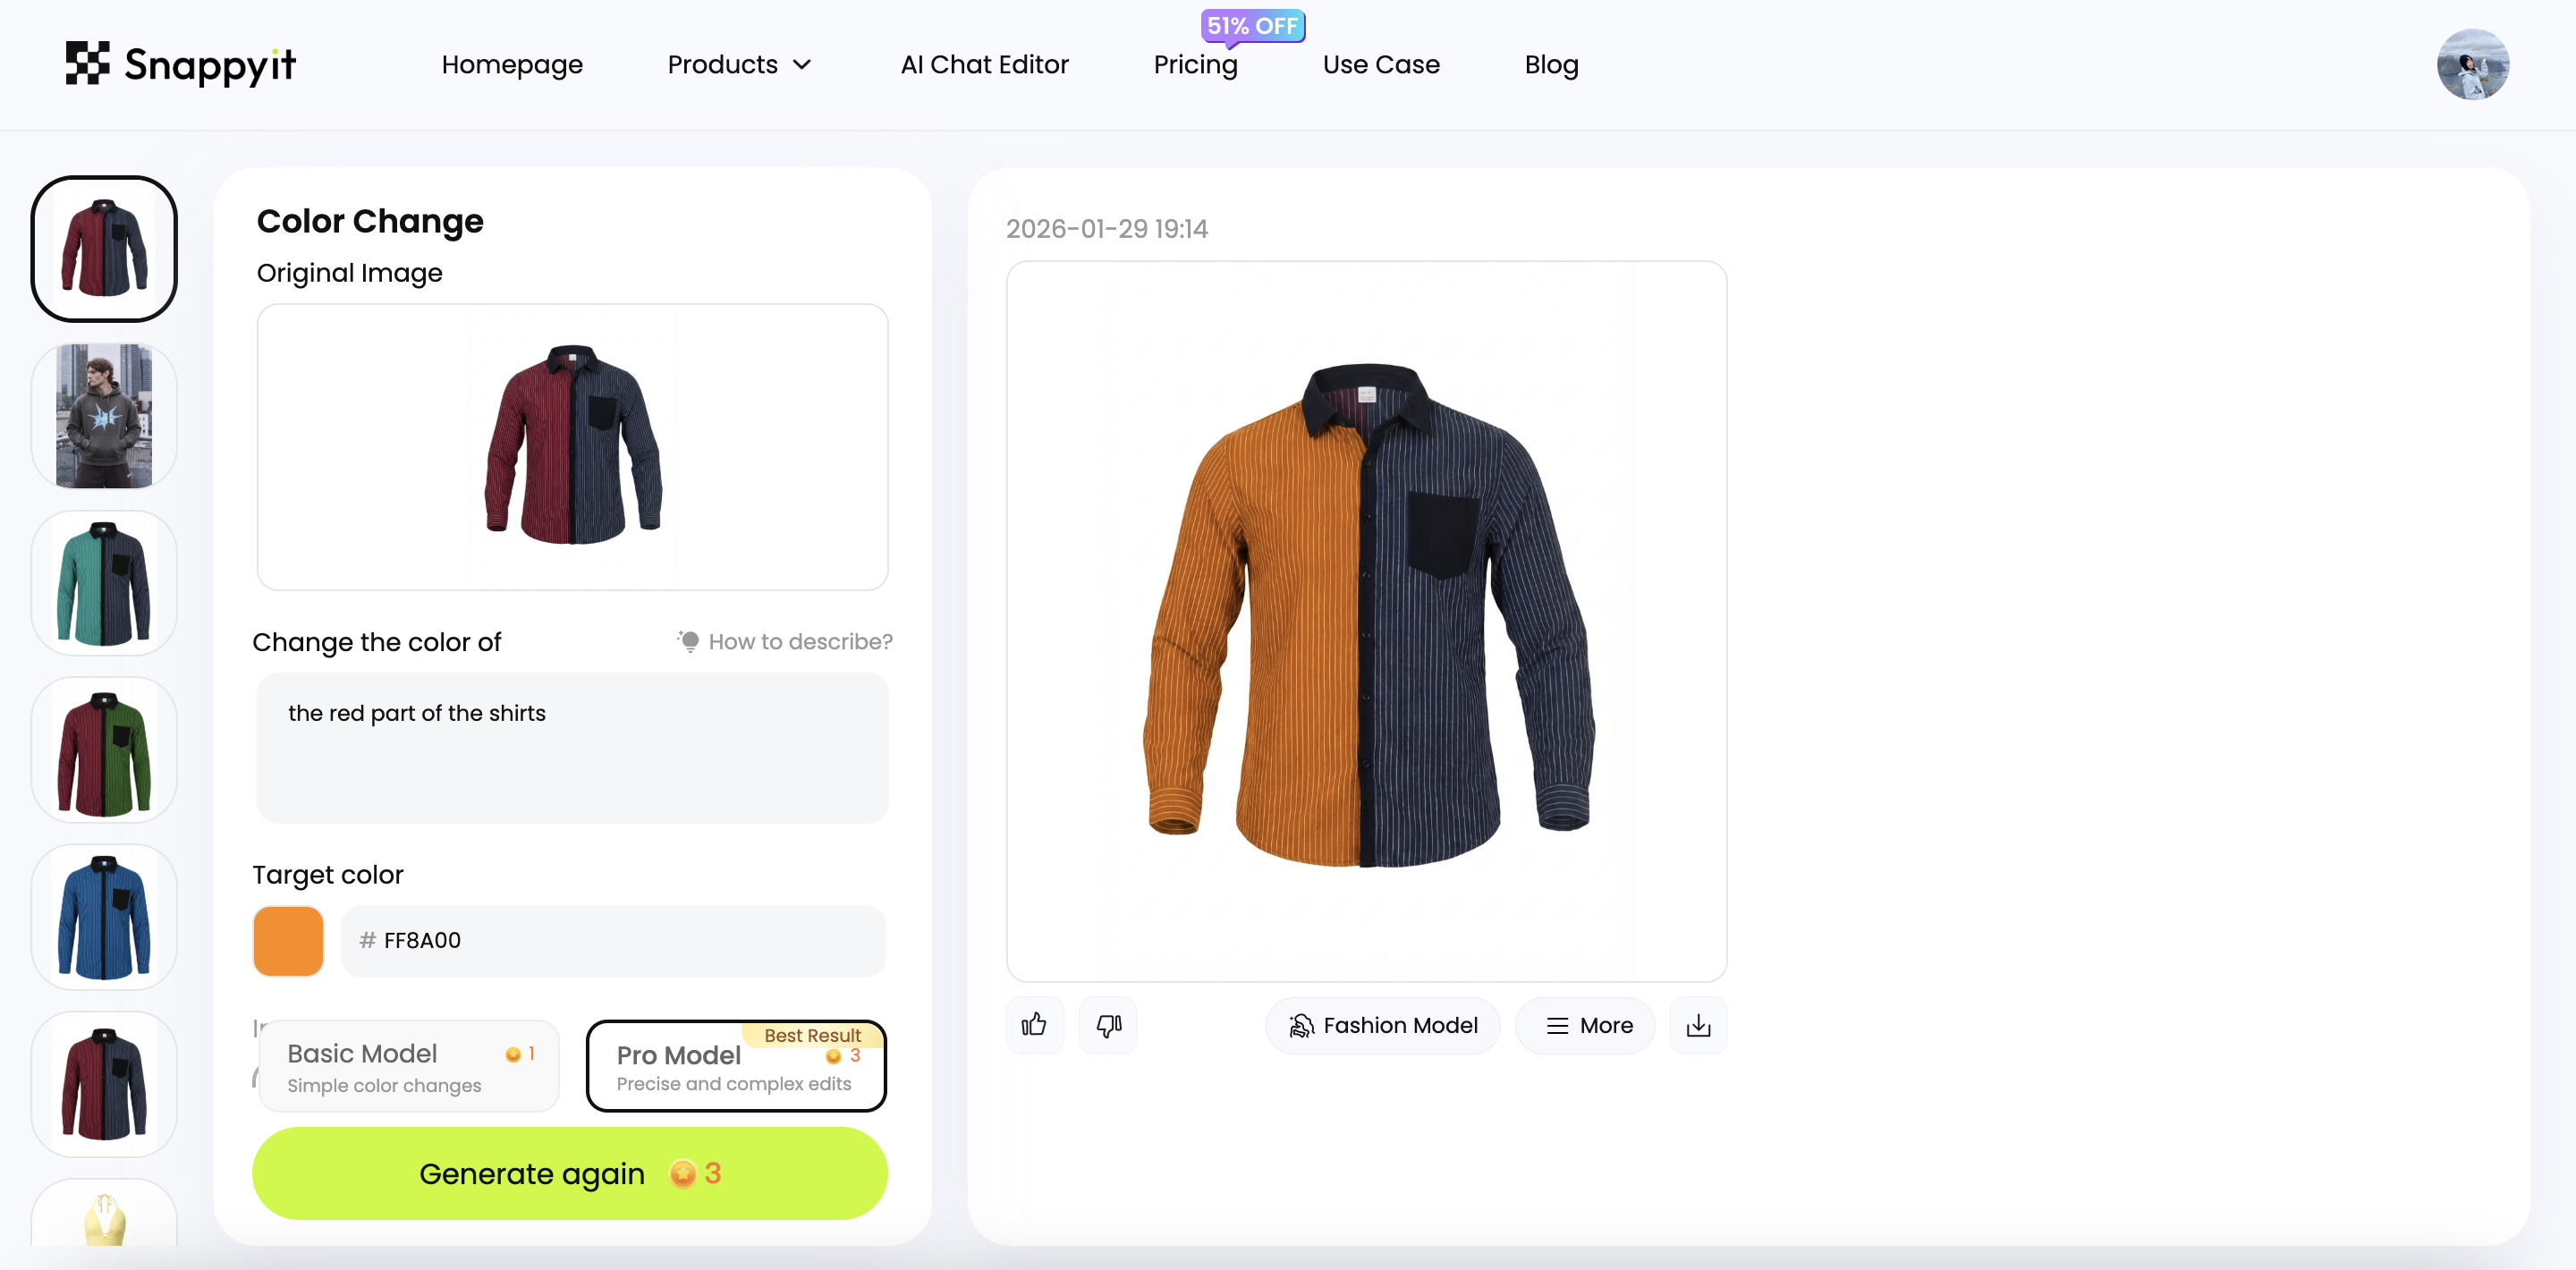
The reason this beats a paint-bucket fill is that good AI recolor keeps the fabric texture, folds, shadows, and stitching intact and only shifts the hue. A flat fill makes cotton look like plastic; AI recolor makes it look like a real photo of that colorway. Below, the same garment is regenerated in a new color with the weave and shading preserved — the kind of result a buyer can trust matches what ships.

A few seller-specific cautions. Match the color to your real product, not to what looks nice on screen — buyers compare the delivered item to the photo, and a fantasy shade drives returns. Saturated and metallic colors are harder than neutrals, so check highlights and the deepest folds for banding. And keep a clear naming convention (tee-navy.jpg, tee-olive.jpg) so a 6-color drop doesn't turn into a file-management mess. For a deeper walkthrough and a tool comparison, see how to change product color with AI and the best AI recolor tools for product photos.
Recolor a garment into new variants →
Method 3: strip to an invisible-mannequin (ghost-mannequin) product shot
The third destination is the hollow, worn-but-empty look that reads instantly as a professional apparel listing: the ghost-mannequin (or invisible-mannequin) effect. The garment holds a three-dimensional shape, the neckline shows depth, and there's no model or hanger in the frame. It's ideal as a clean catalog main image for non-adult apparel and accessories, and as a construction-showing secondary image everywhere else.
How to make a ghost-mannequin shot with AI
- Start from a garment that's holding its shape — a mannequin shot is ideal, but a hanging shot or even a well-stuffed flat-lay can work.
- Upload it to an AI ghost-mannequin tool and choose the ghost-mannequin output.
- Let the AI remove the form and rebuild the interior — the hollow neckline and visible inside-collar that sell the illusion.
- Export on pure white for marketplace use.
What makes this an AI win is what it removes from the traditional process. Classic ghost-mannequin photography needs a separate interior collar shot and a manual “neck joint” composite in Photoshop to blend the two — fiddly, slow work. The AI rebuilds that hollow interior for you, so a single input photo becomes a finished hollow-man image in seconds. Standard garments — tees, polos, shirts, hoodies, basic dresses — come out cleanest; very sheer, sequined, or heavily textured pieces are the hard cases worth a manual review.
For the full technique, when to use it as a main vs. secondary image, and the marketplace nuances, see the deep dives on the AI ghost-mannequin effect and the ghost-mannequin photography for ecommerce guide.
Generate a ghost-mannequin shot →
Avoiding the giveaways: warped fabric, melted hands, wrong drape, lighting mismatch
The difference between an AI image that sells and one that screams "fake" comes down to a handful of failure modes. Most are caused by a weak input or an over-asked prompt, and most are fixable. Know what to look for and you'll catch them before a buyer does.
- Melted or extra hands. The classic on-model tell. Request a natural, hands-relaxed-at-sides or hands-in-pockets pose rather than a complex gesture, and regenerate a few times — hands are probabilistic, so a fresh seed often fixes it. Crop tight to the garment if a hand still won't behave.
- Warped prints, logos, and text. If the garment has a graphic or brand mark, zoom to 100% and confirm it isn't smeared or invented. A sharper input helps most; for stubborn logos, a tool that preserves product detail beats a general image model.
- Wrong drape and fabric physics. Stiff fabric that should flow, or flowy fabric that looks like cardboard. This usually traces back to the input not showing the fabric's true weight. Feed a photo where the drape is already visible, and avoid poses that demand extreme stretching.
- Lighting and shadow mismatch. The garment is lit from one direction and the scene from another, so it looks pasted in. Pick a model/background preset whose lighting matches your input, or render on plain white where mismatch is least visible.
- Color drift. The output hue wandered off your real product. Recolor with an exact hex target and check against a physical swatch.
Build a five-second QC habit: before you publish, zoom to 100% and scan hands, hems, seams, logos, and pattern repeats in that order. Those five spots catch the overwhelming majority of AI artifacts. If two or three regenerations don't clear a problem, the input is the issue — re-shoot it cleaner rather than fighting the model.
Making it marketplace-ready: white background, angle set, commercial-use license
A great image still has to pass the platform's rules to go live. The good news: marketplaces judge the image, not how it was made, so a clean AI output that meets the spec is treated like any other photo. Get these three things right.
Background and resolution
Amazon requires a pure white background at RGB 255, 255, 255 for the main image of most apparel, with the product filling roughly 85% of the frame and no text, logos, or borders. Export at a high resolution (1600px+ on the longest side enables zoom) in sRGB. Amazon also wants a live model on the main image for adult apparel, which is exactly why the on-model path in Method 1 matters — your ghost-mannequin and recolored shots then slot in as secondary images that show construction and variants. For children's apparel, accessories, and non-apparel, a fully invisible ghost-mannequin can be the main image. Shopify, Etsy, and eBay are looser, but white-background consistency still makes a catalog look professional and helps search placement.
Build a full angle set, not one hero
One image rarely closes a sale. Plan to generate a small set per SKU from your single input: a main shot (on-model or ghost-mannequin), a back or alternate angle, and a detail crop for fabric or print. AI lets you produce that set without re-shooting, so there's no reason to ship a one-image listing.
Commercial-use rights
Before you list, confirm the tool grants commercial-use rights to the images it generates — this is non-negotiable for selling. Reputable product-photography tools built for ecommerce grant commercial use on paid plans; general consumer "face swap" or "outfit changer" apps often don't, and some prohibit commercial use outright. Read the license once so a viral listing doesn't become a takedown.
Doing it at SKU scale (batch) instead of one photo at a time
Changing one photo is a neat trick. Changing five hundred on a deadline is a business, and that's where AI clothes changing actually pays for itself. The leap from one image to a catalog is about standardizing the input and fixing the output template so every SKU comes out matching.
- Standardize the capture. Same lighting, same plain background, same straight-on angle, same framing for every garment. A consistent input is the single biggest lever on consistent output — and it's free.
- Lock one output template per path. For on-model, reuse the same model identity and pose across the catalog so the line looks like one coordinated shoot. For recolor, keep a fixed hex list per product. For ghost-mannequin, keep one background and shadow style.
- Batch by type and color. Group similar garments so you're not switching settings every image, then process the group in one pass.
- Run one QC gate. Have a single reviewer scan every output for the five giveaways before anything goes live, and re-shoot the inputs that keep failing rather than re-rolling forever.
- Name and export systematically. A clear convention (
SKU_garment_color_angle.jpg) plus platform-specific export sizes turns a pile of images into an upload-ready set.
Run this way and the cost math flips. A traditional on-model shoot runs into real per-image money once you add a model, photographer, studio, and editing; AI brings the marginal cost of an extra image or an extra colorway close to zero, which is what makes full per-variant coverage and a complete angle set affordable for a small catalog. The sellers who win treat this as infrastructure: one disciplined input standard, three output paths, and a repeatable pipeline. Pick your destination — on-model, recolor, or ghost-mannequin — and start with one garment today.
Turn one product photo into a full listing set
You don't need Photoshop, a studio, or a photoshoot to change clothes in a product photo. You need one clean input and the right output path. Upload a flat-lay, hanging, or mannequin shot, then route it to an on-model render, a recolored variant, or a ghost-mannequin product shot — and batch the whole catalog the same way. It's all part of one AI product photography workflow.
Change clothes in your product photo free →
Frequently Asked Questions
How do I change clothes in a photo with AI?
Upload your real product photo — a flat-lay, hanging shot, or mannequin shot — to an AI clothes changer, then pick the output you need: put the garment on an AI model, change its color to make a new variant, or remove the form for a ghost-mannequin shot. The AI rebuilds the garment in the new context in seconds, so you get a finished listing image without Photoshop, a studio, or a photoshoot.
Can I change an outfit in a photo without Photoshop?
Yes. AI clothes changers do the masking, relighting, and re-rendering that used to require manual Photoshop work. You upload the source photo, describe or select the change, and the tool generates a new image. There's no layer masking, clone-stamping, or compositing for you to do by hand, which is why sellers with no editing skills can produce on-model and recolored listing photos.
What input photo works best for changing clothes with AI?
A sharp, evenly lit shot of the full garment on a plain background. A flat-lay on white or a clean hanging shot both work well; a cheap mannequin shot works too. Shoot straight-on, fill the frame with the garment, keep the whole piece in focus, and avoid harsh shadows or busy backgrounds. The clearer the AI can see the garment's true color, print, and construction, the more accurate the output.
Is it better to use a flat-lay or a mannequin photo as the input?
A flat-lay is easiest to shoot and works well for on-model and recolor outputs. A mannequin or hanging shot already shows the garment's three-dimensional shape, which helps for ghost-mannequin results. For most sellers a clean flat-lay on white is the most versatile single input because it feeds all three output paths without re-shooting.
How do I change a garment's color to make new variants?
Use an AI color-change tool: upload the photo, point to the garment region, and specify the target color by name or hex code. The AI recolors only that region while keeping fabric texture, folds, shadows, and stitching intact, so the result looks like a real photo of that colorway rather than a flat paint fill. This lets you spin up a full set of per-variant listing images from one source photo.
How do I make a ghost-mannequin shot from a product photo with AI?
Photograph the garment on a mannequin or hanger so it holds its shape, then run it through an AI ghost-mannequin tool. The AI removes the form and rebuilds the hollow neckline and interior so the garment looks worn by an invisible person on a clean background. You skip the separate interior shot and the manual neck-joint compositing that traditional ghost-mannequin editing requires.
Why do AI clothes changers sometimes produce melted hands or warped fabric?
Those giveaways come from a low-quality input or an overworked prompt. Blurry source photos, busy backgrounds, and extreme pose requests push the model past what it can reconstruct cleanly, so hands, prints, and seams break down. Fixing the input — sharp focus, plain background, a natural pose request — and regenerating a few times usually clears it. Always zoom to 100% on hands, hems, logos, and pattern repeats before publishing.
Are AI-generated clothing photos allowed on Amazon and other marketplaces?
The marketplaces judge the image, not how it was made, so a clean AI image that meets the rules is fine. Amazon requires a pure white (RGB 255,255,255) main image for most apparel and a live model for adult-apparel main images, with ghost-mannequin and recolored shots used as secondary images. Export at a high resolution on white, keep the product realistic, and confirm you have commercial-use rights to the output before listing.
Can I change clothes across a whole catalog of photos at once?
Yes. The real payoff of AI clothes changing is batch scale: upload many garment photos, apply the same on-model template, colorway set, or ghost-mannequin setting, and process them together. A consistent input standard plus a fixed output template gives you a uniform catalog — same lighting, framing, and model across every SKU — far faster and cheaper than shooting each one.