At a glance
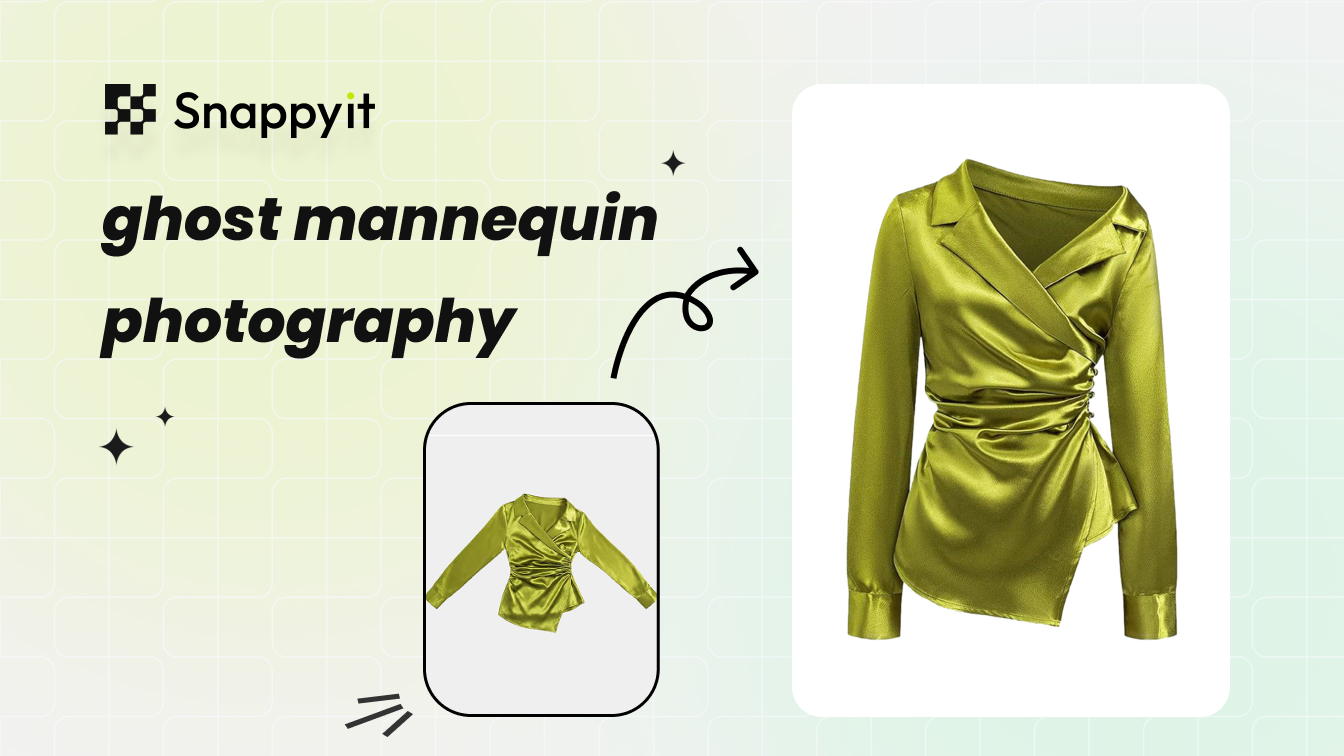
Ghost mannequin photography removes the form digitally so a garment looks worn by an invisible person. Here's how to shoot, edit, and scale it for ecommerce.
| Need | What to do |
|---|---|
| Get oriented | Read the short summary, then use the checklist below. |
| Create a test image | Try Ghost Mannequin Free |
What Ghost Mannequin Photography Is
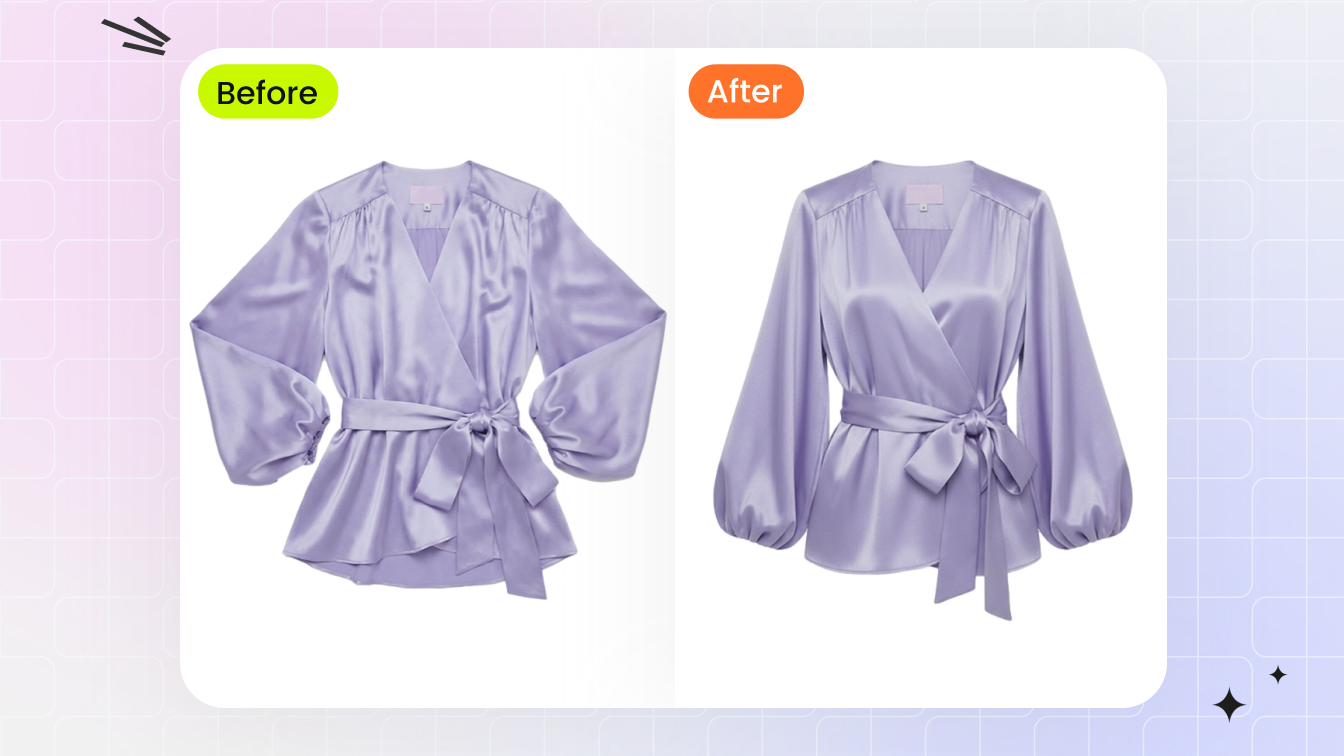
Ghost mannequin photography produces a garment image that looks like it's being worn by an invisible person. The clothing holds its shape, the neckline shows depth, and there's no model or hanger in the frame to distract from the product. It's also called the invisible mannequin or hollow-man effect, and it's the standard for apparel product pages.
The technique is mostly post-production. A garment is dressed on a mannequin, styled, and photographed front-on. Then the garment is turned inside out and the interior collar or lining is shot separately. In editing, the two images are composited so the inside of the collar shows through where the mannequin's neck used to be, and the mannequin body is masked out. That compositing step at the collar is called the neck joint, and it's the part that sells the illusion.
Sellers reach for it because it sits between two flawed options. Flat-lay shots are cheap and fast but flat — they don't show how a garment fills out. On-model shots look great but are slow and expensive to scale across a large catalog. Ghost mannequin gives you the dimensional realism of a model shoot with the consistency and lower cost of a studio setup, which is why it works so well for catalogs in the hundreds or thousands of SKUs.
Why It Matters for Online Apparel Sales
Online buyers can't touch the fabric, check the stitching, or hold a garment up to themselves, so the product image does that job for them. The Baymard Institute has found that shoppers often look at product images before reading the title or description. A clean, three-dimensional ghost mannequin shot communicates shape, fit, and construction in that first glance in a way a flat lay can't.
Image quality also affects whether people buy at all. Surveys of online shoppers consistently rank high-quality photos among the top factors in a purchase decision, and marketplaces have published listing data showing that better photos correlate with higher sell-through, with the strongest lifts in visually-driven categories like shoes and bags. For a catalog with hundreds of listings, even a small per-listing improvement adds up.
Consistency builds trust
Land on a store where one product is a white-background ghost mannequin shot, the next is a wrinkled flat lay on a bedsheet, and a third is a dark lifestyle photo, and the inconsistency reads as disorganized before you've read a word. Ghost mannequin photography uses a standardized setup, so every item shares the same lighting, background, and presentation. That uniformity makes the store feel professional and lets shoppers compare silhouettes and necklines across a collection without re-adjusting to a new image style each time.
It cuts size-and-fit returns
Returns are one of ecommerce's most expensive problems, and in apparel, size and fit drive a large share of them. Ghost mannequin images help by showing a garment's true shape, internal construction, and proportions — how the collar sits, how the sleeves taper, where the hem falls — without a model's pose or body type skewing the impression. When the picture matches what arrives in the box, fewer items come back.
- Consistent presentation across every SKU reinforces a professional brand.
- Clean, dimensional imagery signals quality and supports full-price selling.
- Accurate shape and construction set realistic fit expectations and reduce returns.
- Standardized framing lets shoppers compare items quickly.
Ghost Mannequin vs. Flat Lay, On-Model, and AI
No single method wins for every product. Ghost mannequin is best for structured garments that hold a shape; flat lay is the cheap workhorse for simple basics; on-model earns its premium when brand storytelling matters; and AI tools win on speed and volume. Here's how the four compare on the factors that actually drive the decision.
| Method | Relative cost | Turnaround | Scalability | Best for |
|---|---|---|---|---|
| Ghost mannequin (traditional) | Moderate (shoot + editing) | Days | Limited by studio and editing capacity | Blazers, jackets, tailored shirts, dresses, trousers |
| Flat lay | Low | Minutes to hours | High | Casual basics, T-shirts, accessories, social content |
| On-model | High | Days to weeks | Low | Premium brands, editorial, lookbooks, lifestyle |
| AI ghost mannequin | Very low | Seconds to minutes | Very high (batch) | High-volume catalogs, fast fashion, dropshipping |
When ghost mannequin isn't the right fit
The technique struggles with garments that aren't built to hold a shape on a form. Oversized knitwear, flowing chiffon, and loose linen are designed to move with a body; on a mannequin they bunch or deflate, and a flat lay or model shot often represents them more honestly.
Accessories without a standard form — handbags, belts, jewelry, hats — usually photograph better on props or in styled flat lays. Ultra-premium pieces, where the customer is partly buying the brand narrative, tend to lead with on-model imagery and use ghost mannequin only as a secondary detail shot. And highly reflective or transparent materials like sequins, metallics, and sheer lace create tricky reflections and edge-detection problems, especially for AI removal.
Where AI tools and traditional shoots each win
AI ghost mannequin tools have matured fast. They use generative models trained on garment construction to rebuild three-dimensional volume from a flat-lay or hanger photo, with no studio, mannequin, or retoucher involved. Upload a photo and get a processed image back in well under a minute. They win on speed, on cost at volume, on consistency (the same lighting and shadow logic applied to every image), and on batch throughput — upload dozens or hundreds at once with no physical bottleneck.
Traditional photography still wins on the hard cases: complex construction (asymmetrical cuts, layered pieces, intricate hardware), fabric texture where silk sheen or corduroy ridges are the selling point, natural shadows from real light, and the creative control a stylist has to pin, drape, and re-angle in the moment.
For the bulk of standard apparel — T-shirts, polos, jeans, basic dresses, hoodies — AI results are hard to tell apart from a traditional shoot at a fraction of the cost. For hero products and texture-driven pieces, a real shoot still earns its keep. Many growing brands run a hybrid: AI for the bulk catalog, traditional shoots for flagship and marketing assets. Snappyit's ghost mannequin tool handles the AI side, turning a single garment photo into a hollow-man image in seconds.
Equipment and Setup by Budget
If you're shooting traditionally, your gear determines how much post-production cleanup you create for yourself. You don't need a full studio to start, but you do need consistency from the first shot.
Entry level
An adjustable dress form, a crop-sensor DSLR or mirrorless with a 50mm prime, a single softbox, and a roll of white seamless paper will get you clean, workable files. Lock the camera on a tripod, mark the mannequin position on the floor with tape, and keep your light at the same angle for every shot. You'll do more in post than a pro studio would, but the raw material will hold up.
Mid-range and studio
As the catalog grows, a professional mannequin with detachable neck, arm, and torso sections speeds things up considerably — you can capture the interior collar shot without fully undressing the form. Pair that with a full-frame body, a two- or three-light softbox kit for even coverage, and a dedicated space.
| Tier | Mannequin | Camera and lens | Lighting |
|---|---|---|---|
| Entry | Adjustable dress form, fixed torso | Crop-sensor body, 50mm prime | Single softbox + reflector |
| Mid-range | Detachable neck and arms | Full-frame, 50mm or 85mm prime | Two-light softbox kit at 45° |
| Studio | Multiple forms with full detachable sections | Full-frame, 85mm prime + 24-70mm, tethered | Key, fill, and background lights |
Match the form to your line. A size 6 or 8 female form covers most women's apparel; menswear typically starts around a size 40 chest. If you sell both, get one form per gender rather than compromising fit. For hats, gloves, or scarves, partial forms (head, hand, shoulder-bust) extend the technique to categories a torso form can't handle.
Camera settings
- Aperture: f/8 to f/11 for edge-to-edge sharpness across the garment.
- Shutter speed: 1/125s or slower with studio strobes.
- ISO: 100-200 to keep noise out of fabric texture.
- White balance: set manually to your lights (around 5000-5500K for daylight strobes). Auto white balance shifts between frames and wrecks batch editing.
- File format: shoot RAW for latitude in exposure and color correction.
Garment Prep and Styling
You can own the best camera and the most expensive form and still get images that look off, because the result is decided in the few minutes before you press the shutter. Wrinkles, sags, and uneven sleeves all trace back to prep, and they're expensive to fix later.
The prep sequence
- Inspect. Check for loose threads, missing buttons, and stains. A high-resolution sensor amplifies anything you can see with your eye.
- Steam. A handheld steamer relaxes fibers without pressing in new lines the way a flat iron can. Hold it a few inches off the fabric and work top to bottom.
- Position. Align shoulder seams to the mannequin's shoulder points, center front-to-back, and button or zip the garment as it would be worn.
- Stuff and shape. Fill sleeves with tissue or crepe paper for natural roundness, and add light filler in the torso for subtle fullness. Double-sided tape holds cuffs, collars, and hemlines without visible clips.
- Pin from behind. Pull excess fabric to the center back and pin vertically down the spine so tension stays even. Never pin on the side facing the camera.
- Check through the lens. Look through the viewfinder and confirm sleeves are equal length, the collar is level, hems are even, and no pins or tape show from the shooting angle.
That last step is the one beginners skip, and it's where most problems get caught before they become editing headaches.
By fabric type
Knits and stretch fabrics distort if you overstuff them — the weave pulls and the silhouette stops matching the real garment. Use minimal soft tissue, let the knit drape, and pin gently to avoid leaving distortion marks in the stitches.
Structured blazers and jackets are the technique's best case. If the jacket has padded shoulders, reduce or remove the mannequin's shoulder inserts so the garment sits at its intended width. Button it, smooth the lapels, and use a dab of tape under any lapel that won't lie flat.
Lightweight and sheer fabrics collapse without a body and need invisible internal support. Layer flesh-toned or white tissue thinly inside to hold volume without showing through, and a reflector below the garment can lift sheer areas that otherwise look flat.
Common mistakes
Over-pinning bunches fabric between pin points; two or three well-placed pins beat a dozen scattered ones. Uneven stuffing — one fuller sleeve, a lopsided chest — makes the garment look defective, so stuff both sides equally and judge it from the camera angle, not from beside the mannequin. And re-steam after dressing: pulling a garment over a form introduces fresh creases around the shoulders and underarms. As Pixc's photography guide stresses, do your final inspection from the exact camera position and focal length you'll shoot with — what your eye sees standing next to the form isn't what the sensor captures.
The Post-Production Workflow
Post-production is where raw captures become finished ghost mannequin images, and it follows a specific order. Working out of sequence creates problems that compound and get harder to fix.
Removal and compositing, step by step
- Import and organize. Bring RAW files into Lightroom or Capture One and tag each by SKU, angle, and garment type.
- Base corrections. Batch-adjust exposure, contrast, and white balance across the whole shoot so front and interior shots share the same foundation.
- Pick the pair. For each garment, choose the sharpest front shot and its matching interior shot, then open both as layers in one Photoshop document.
- Mask the garment. Use the Pen Tool for clean edges and Refine Edge or manual masking for lace, loose knit, or frayed hems. Hide the mannequin body completely while preserving every fiber of the garment edge.
- Composite the interior. Position the interior image so the collar or lining fills the void left by the mannequin, then use Free Transform to match scale and perspective.
- Clean up. At 100%, use the Clone Stamp and Healing Brush to remove pin marks, tape residue, and any mannequin artifacts that survived the mask.
- Match color across layers. The interior shot often caught slightly different light; adjust Curves or Hue/Saturation until the tones blend.
- Final retouch. Remove lint, stray threads, and stubborn wrinkles — but don't over-smooth. Shoppers zoom in and want to see real fabric, not an airbrushed surface.
- Export. Save a layered master (TIFF or PSD) and a web version (JPEG or PNG at your platform's dimensions, typically 2000-3000px on the long side, sRGB).
For large catalogs, Photoshop Actions and Lightroom presets automate the repetitive steps — crop, background fill, sharpening, export — and shave minutes off every image, which adds up fast across a couple hundred SKUs.
The neck joint
The neck joint is the most technically demanding step. You're blending the interior collar with the front neckline to create the illusion of looking inside a worn garment, and the problem is alignment: the front and interior were shot at different moments, so even a small misalignment leaves a visible seam.
Drop the front layer's opacity to 50% so you can see both at once, then use Free Transform on the interior layer to match the collar's width and curvature exactly. Restore full opacity and feather the transition with a soft brush on the front layer's mask so the blend is gradual, not abrupt. Match the interior patch's brightness and contrast to the front so the lighting reads as continuous. V-necks are the hardest because the interior area is large and any mismatch shows; crew necks and collared shirts are more forgiving; hoods are the most complex and may need more than one interior shot.
Fixing common artifacts
Shadow lines at the neck joint come from mismatched shadow direction — paint a subtle gradient on a Multiply layer matching the front's lighting, building it up with a low-opacity brush. Color shifts between layers respond to a Curves adjustment clipped to the interior layer; sample a neutral spot like a white tag for an objective reference. Visible seams need feathered mask edges and a soft, low-opacity brush in the transition zone. Halos — a thin bright or dark line around the garment — come from imprecise masking; contract the selection by a pixel and use Layer > Matting > Defringe to clear residual edge color.
AI tools handle the initial removal and background cleanup well for standard garments and can process hundreds of images in the time a complex manual mask takes. For the neck joint, shadow refinement, and texture retouching, manual work still looks better. The most efficient high-volume setup uses AI for the heavy lifting and human retouchers for the finesse.
Scaling for High-Volume Catalogs
One polished image is a craft project. Five hundred a month on deadline is an operational system, and the difference is a repeatable pipeline that moves garments from shoot day to live listing without quality drifting.
Batch pipeline
Start with file naming. A consistent convention — SKU, garment type, angle, sequence, e.g. SKU12345_blazer_front_01.ARW — lets anyone on the team sort and batch-process files without opening them. From there, build defined stages with a quality checkpoint between each:
- Batch shooting blocks. Group garments by type and color so you're not constantly readjusting lighting or restyling.
- Ingest and tag. Import after each block and apply season/collection/category metadata so nothing gets orphaned.
- Base corrections. Apply white balance and exposure presets across the block before individual retouching.
- Removal and compositing. Run standard garments through AI removal first; route complex pieces to manual retouchers.
- Quality gate. One reviewer checks every image against brand standards and returns anything with color drift, inconsistent shadows, or artifacts.
- Export and deliver. Batch-export in platform-specific dimensions and push to your listing tool or upload queue.
High-volume studios run this like a production line: standardized steps, documented handoffs, and QC data feeding back into the process.
Web optimization
Beautiful images that take five seconds to load on mobile hurt you more than they help. A few defaults that keep files light without losing the detail you captured:
- Format: WebP is the default for product images, with broad browser support and noticeably smaller files than JPEG at the same quality. Use PNG only when you need true transparency; AVIF compresses even further as support widens.
- Compression: a quality setting in the mid-80s keeps artifacts invisible at normal viewing sizes while cutting file size substantially. Aim to keep product images well under 200 KB.
- Resolution: 2048 x 2048px for main images enables zoom and stays sharp on retina displays; thumbnails only need around 400 x 400px.
- Alt text: describe what's literally in frame in natural language — "Navy merino wool V-neck sweater for women, front view on white background" beats both a bare "sweater" and a keyword-stuffed string. Image SEO guidance recommends keeping it concise and skipping filler like "image of."
Catalog-wide consistency
When a shopper scrolls a collection page, every image should look like it belongs to the same set. Enforce a short list of standards: pure white (RGB 255, 255, 255) or one consistent neutral background; the same key-light angle and shadow depth on every garment; identical dimensions and aspect ratio (square 1:1 is the safest multi-platform default); consistent garment positioning and margins; one shadow style applied uniformly; and calibrated color, checked with a color card at the start of each session so products match when they sit side by side. Put these in a documented style guide so the standard survives new team members and outsourced editing.
Meeting Platform Image Standards
Each marketplace has its own image rules, and a listing that looks perfect on Shopify can get suppressed on Amazon or cropped on Etsy. Ghost mannequin editing already lines up with most requirements — clean white background, distraction-free framing, dimensional form — but the details decide whether listings go live and rank.
Amazon
Amazon is the strictest on main images, and its image guidelines directly affect whether a listing appears in search:
- Pure white background at RGB 255, 255, 255 — no off-white, gradients, or gray shadow bleed.
- At least 500px on the longest side (1600px+ recommended for zoom), up to 10,000px.
- No visible mannequin of any kind — Amazon excludes clear, solid-color, flesh-toned, framework, and hanger forms.
- Product fills about 85% of the frame, with no text, logos, borders, or watermarks.
- Adult apparel main images must show a live model; ghost mannequin is accepted for secondary images and for non-adult apparel.
So for adult clothing, your ghost mannequin shots become the secondary images that show construction, back views, and interior detail, while a model carries the main slot. For children's clothing, accessories, and non-apparel, a fully invisible ghost mannequin can serve as the main image. Non-compliant main images can be suppressed from search entirely, which makes the listing effectively invisible.
Shopify and others
Shopify gives more freedom but no single enforced standard, because themes crop and scale images differently. Recommended dimensions run from 800 x 800px up to 2048 x 2048px, and square (1:1) is the safest ratio to avoid cropping. Keep one aspect ratio across the whole catalog, compress to roughly 100-200 KB for page speed, and test images in your active theme's collection, product, and mobile views before publishing a batch. Shopify doesn't mandate a white background, but most apparel brands use it anyway for consistency.
For sellers running both a storefront and marketplace listings, Snappyit's Shopify and Amazon seller workflow helps move edited images into compliant listings across channels without re-formatting each one by hand.
| Platform | Background | Min resolution | Aspect ratio | Ghost mannequin notes |
|---|---|---|---|---|
| Amazon | Pure white for main image | 500px (1600px+ for zoom) | No strict ratio; square preferred | Live model required for adult apparel main image; ghost mannequin fine for secondary and non-adult. No visible mannequin parts. |
| Shopify | None enforced (white recommended) | 800px (2048px recommended) | Square preferred; 4:3 or 3:2 fine | Fully compliant. Keep sizing consistent for a clean grid. |
| Etsy | None enforced | 635px min; 2000px+ recommended | Landscape or square first image | Fully compliant. First image should be landscape or square to avoid thumbnail cropping. |
| eBay | White or light neutral for main | 500px (1600px+ recommended) | No strict ratio; square common | Fully compliant as long as the form is invisible. White backgrounds help search placement. |
Ghost mannequin images satisfy every major platform except Amazon's main-image rule for adult apparel. A practical approach: shoot and edit at the highest common denominator — 2048 x 2048px, pure white, sRGB — then batch-export platform-specific versions from that master. One shoot, one edit, multiple compliant outputs.
Choosing Your Approach
The right setup depends on where your catalog sits today, not on buying the most expensive gear. Match the workflow to your volume.
Under 50 SKUs. Keep it lean: an entry-level setup plus manual Photoshop editing gives you full control while you learn. Spend your time on garment prep and the neck joint composite — those skills compound as you grow. Quality matters more than speed here.
100-500 SKUs. This is where manual editing turns into a bottleneck. Upgrade to a mid-range form with detachable sections, adopt AI-assisted editing for standard garments, and keep manual retouching for complex pieces. Write down a style guide so every image matches whether you edit it or a freelancer does.
500+ SKUs, multi-channel. Run a professional studio with multiple forms, a hybrid AI-and-human pipeline, a dedicated QC step, and platform-specific batch exports. At this scale, connecting your image output directly to compliant listings — through a workflow like Snappyit's Shopify and Amazon integration — removes the manual reformatting bottleneck.
Whatever stage you're at, treat the ghost mannequin workflow as infrastructure rather than a one-off project. The sellers who do scale their catalogs without losing the image quality that earned buyer trust in the first place. To skip the studio and the retoucher entirely on standard garments, Snappyit's ghost mannequin tool turns a single flat-lay or hanger photo into a clean, dimensional image in seconds, and batches across a whole catalog.
Frequently Asked Questions
What is ghost mannequin photography?
It's a technique where a garment is photographed on a mannequin and the mannequin is then digitally removed, leaving the clothing with a hollow, three-dimensional shape that looks like it's worn by an invisible person. It's also called the invisible mannequin or hollow-man effect.
How is the ghost mannequin effect created?
You shoot the garment front-on on a mannequin, then shoot the interior collar or lining separately. In editing, the two images are composited so the inside of the collar shows through where the mannequin's neck was, and the mannequin body is masked out. That collar blend is called the neck joint.
Can AI replace traditional ghost mannequin photography?
For most standard garments — T-shirts, polos, jeans, basic dresses, hoodies — AI tools produce results that are hard to tell apart from a studio shoot, in seconds and at much lower cost. Complex construction, texture-driven fabrics, and hero products still benefit from a traditional shoot, so many brands use a hybrid of both.
Does Amazon allow ghost mannequin images?
For adult apparel, Amazon requires the main image to show a live model, so ghost mannequin shots are used as secondary images there. For children's clothing, accessories, and non-apparel, a fully invisible ghost mannequin can be the main image, as long as no part of the mannequin is visible.
What background and resolution should ghost mannequin images use?
A pure white background (RGB 255, 255, 255) and sRGB color work across all major platforms. Editing at 2048 x 2048px lets you export compliant versions for Amazon, Shopify, Etsy, and eBay from one master file, with square (1:1) the safest aspect ratio for multi-platform selling.
Does ghost mannequin photography reduce returns?
It can. By showing a garment's real shape, internal construction, and proportions, it sets more accurate fit expectations than a flat lay, which helps cut the size-and-fit returns that drive much of apparel's return volume.
Ecommerce ghost mannequin shots are one slot in a complete AI product photography system.