At a glance
A 2026 seller playbook for accessory product photography without a studio: turn one phone photo of hats, bags, shoes, jewelry and sunglasses into listing-ready images.
| Need | What to do |
|---|---|
| Get oriented | Read the short summary, then use the checklist below. |
| Create a test image | Try Ghost Mannequin Free |
Accessory photography decoded: photographing what you SELL, not camera bags
Search "accessory photography" and half the results are about photographing with accessories — tripods, lens filters, the gear in a camera bag. That's not this. This playbook is for sellers who photograph the accessory products they sell: the bucket hat, the crossbody bag, the chunky sneaker, the pavé hoop earring, the woven belt, the polarized sunglasses. The product is the subject, not the equipment.
That distinction matters because the whole job is different. A camera retailer wants you to buy a better lens. An accessory seller wants a buyer scrolling a marketplace grid to stop, trust the photo, and add to cart. The image is the product page's first impression, and in 2026 you can produce it without a lightbox, a macro rig, fishing line, or a hand model. You photograph each item once, on your phone, on a clean surface, and let AI tools generate the marketplace-ready variants.
This page is deliberately a hub. It gives you the one-source-of-truth workflow and the per-category quick rules, then routes you to the deep spokes — hats, shoes, and bags — plus the broader AI product photography guide for the generic mechanics and benefits. We won't re-explain "why AI photos are good" here; we'll show what changes per accessory type.
The thesis is simple, and it's the part incumbent how-to guides miss: accessories don't all photograph the same way, but they all start from one phone photo. A soft hat collapses; a structured bag needs to hold shape; jewelry throws reflections; sunglasses fingerprint instantly. The traditional fix for each is a different rig. The AI fix is the same pipeline with a different output target — and that's what makes a multi-category accessory catalog finally manageable for a solo seller.
The old way vs the AI way (cost, time, gear) — honest comparison table
Before committing to a workflow, it helps to see the two paths side by side honestly. The traditional path isn't wrong — it produces beautiful hero shots — but it doesn't scale to a multi-category accessory catalog run by one or two people. Here's the comparison that actually drives the decision.
| Factor | Traditional accessory shoot | AI-from-one-photo workflow |
|---|---|---|
| Gear needed | Camera, macro lens, lightbox or tent, polarizers, props, stuffing, fishing line, sometimes a model | A phone and a clean, evenly lit surface |
| Per-item time | 15–45 min to shoot + retouch each piece | Under a minute of processing per output |
| On-model / worn shots | Book a model or hand-model; schedule a shoot day | Generated on a model from the product photo |
| Color and material variants | Re-shoot every colorway physically | Recolor one source into many variants |
| Listing video | Separate video shoot and edit | Turn a still into a short listing clip |
| Cost at catalog scale | Adds up fast across hundreds of SKUs | Low and roughly flat per image |
| Best for | Hero pieces, texture-driven products, brand campaigns | Volume catalog SKUs, fast variants, multi-channel |
The honest read: a real macro shoot still wins when the surface is the story — hand-tooled leather grain, a watch dial's sunburst, the fire in a center stone. For everything else in a working catalog, shooting once and generating the rest is faster, cheaper, and more consistent. Most sellers end up running a hybrid, and that's the right answer, not a compromise. For the underlying mechanics of how a single photo becomes a clean catalog asset, the AI product photography guide covers it end to end.
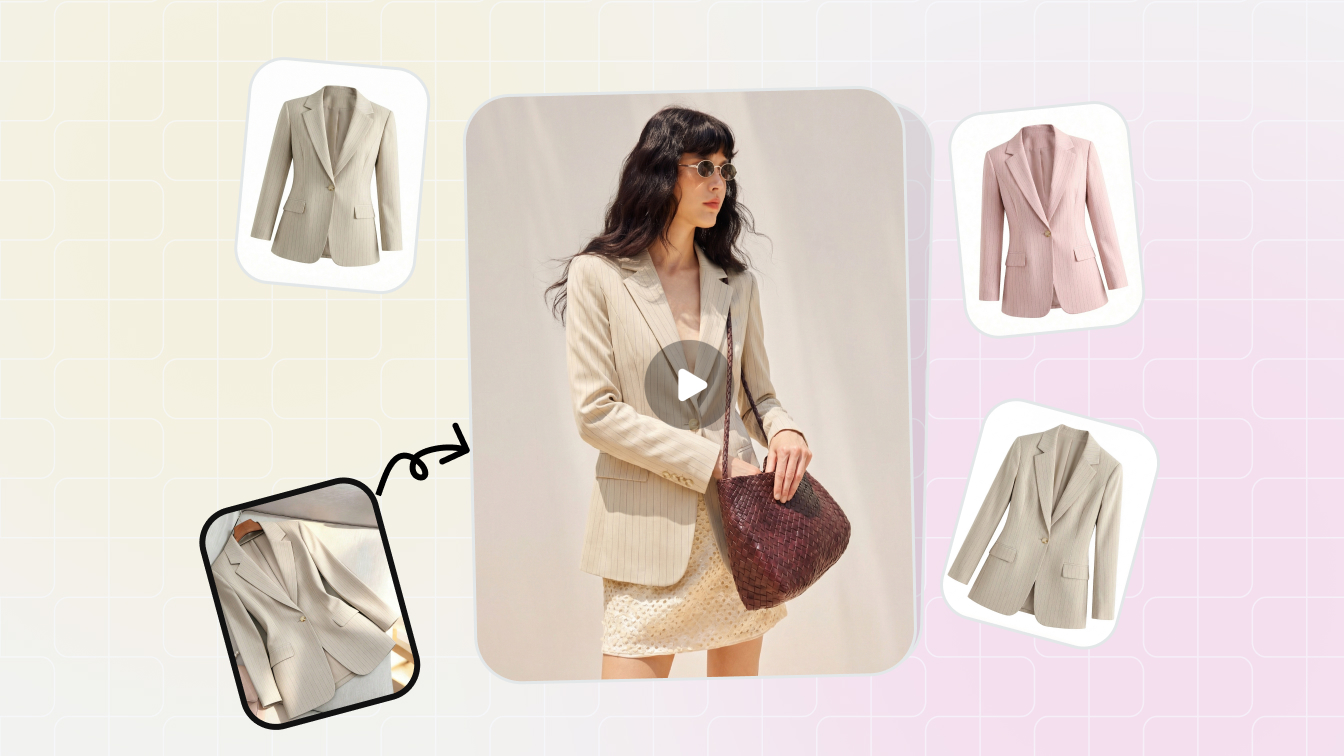
Soft accessories (hats, belts, scarves): ghost-mannequin and on-model from a flat-lay
Soft, shapeable accessories are the trickiest to shoot well and the easiest to fix with AI. A beanie photographed flat looks like a pancake. A leather belt coiled on a table reads as a brown lump. A silk scarf has no body at all without something to drape over. Traditionally you'd reach for a head form, a belt bar, or a steamer and a bust — props that each cost money and storage space, and that show up in the frame to be retouched out.
The flat-lay-to-dimensional move is the core trick here. You lay the item flat, light it evenly, and shoot one clean phone photo. From that, a ghost mannequin render rebuilds the worn shape — a hat with crown volume, a scarf with natural drape, a belt curved as if on a waist — with no visible form. If you'd rather show context, an on-model render puts the piece on a generated person so buyers see scale and styling. The difference between a flat supplier photo and a styled output is exactly the gap the flat-lay vs AI breakdown walks through.
Quick rules for soft accessories
Hats
shoot the brim and crown clearly so the AI has shape cues to rebuild; deep-dive in the hat photography spoke .
Belts
lay flat and fully visible, buckle clean and fingerprint-free, so hardware reflections don't fight the AI mask.
Scarves
capture the full print or weave flat; let the on-model or draped render add the body the flat shot lacks.
The failure mode to watch: if your source photo is folded or partially hidden, the render has to guess the hidden geometry and can invent detail that isn't real. Shoot the item as flat and fully exposed as possible, and the dimensional output stays honest to the product.
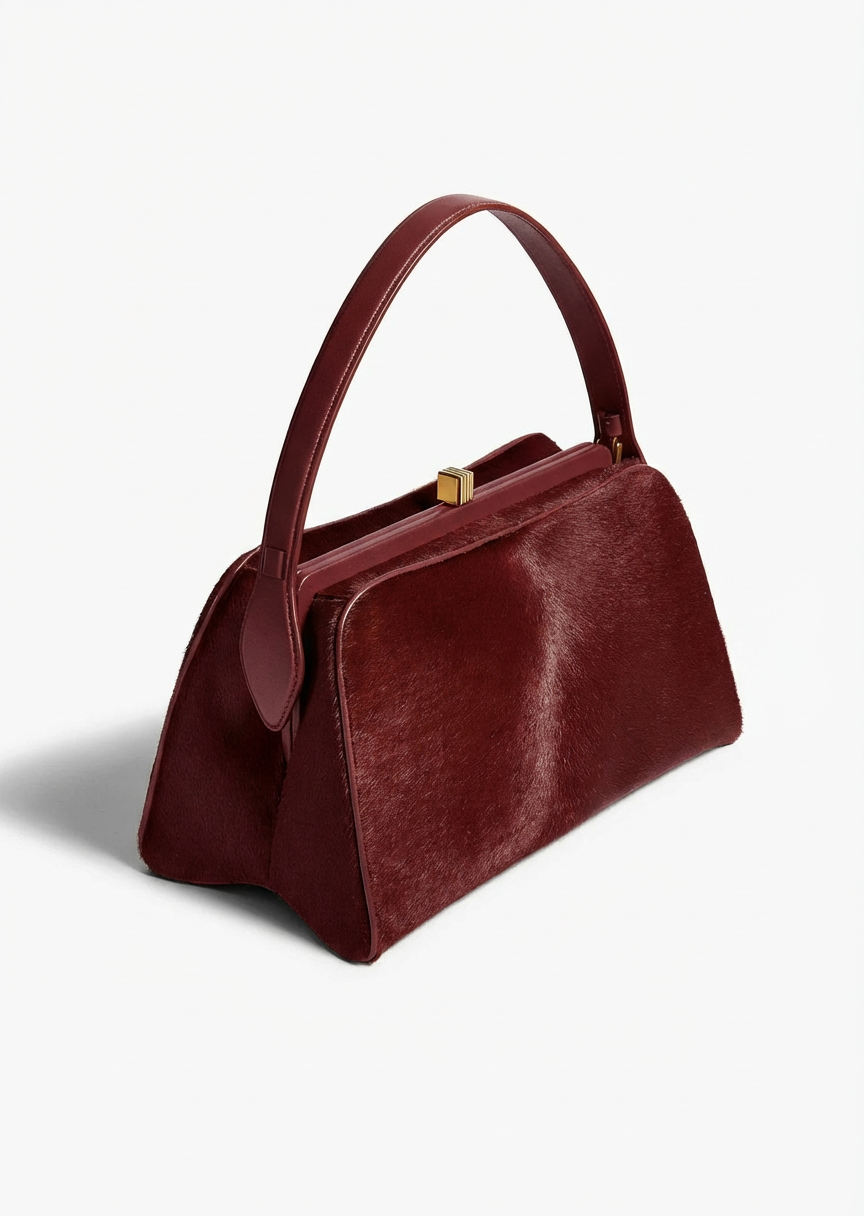
Structured accessories (bags, backpacks): keeping shape without stuffing or fishing line
Bags are where the old way gets fiddly. To make a handbag stand up cleanly you stuff it with tissue or acrylic inserts, prop it with hidden supports, and sometimes suspend a soft pouch on fishing line so it floats. Every one of those tricks leaves something to retouch — a bulge, a clip, a wire — and none of them are repeatable across a catalog without a lot of patience.
The AI move is to photograph the bag once, on a neutral surface, in whatever shape it naturally holds, and let the tool rebuild a clean, upright, dimensional version on a white or lifestyle background. No stuffing, no line, no clone-stamping out the supports. Because the same logic applies to every bag you upload, a tote, a crossbody, and a backpack all come back looking like they belong to the same catalog. The full structured-bag method — angles, hardware, interior shots — lives in the bag photoshoot spoke.
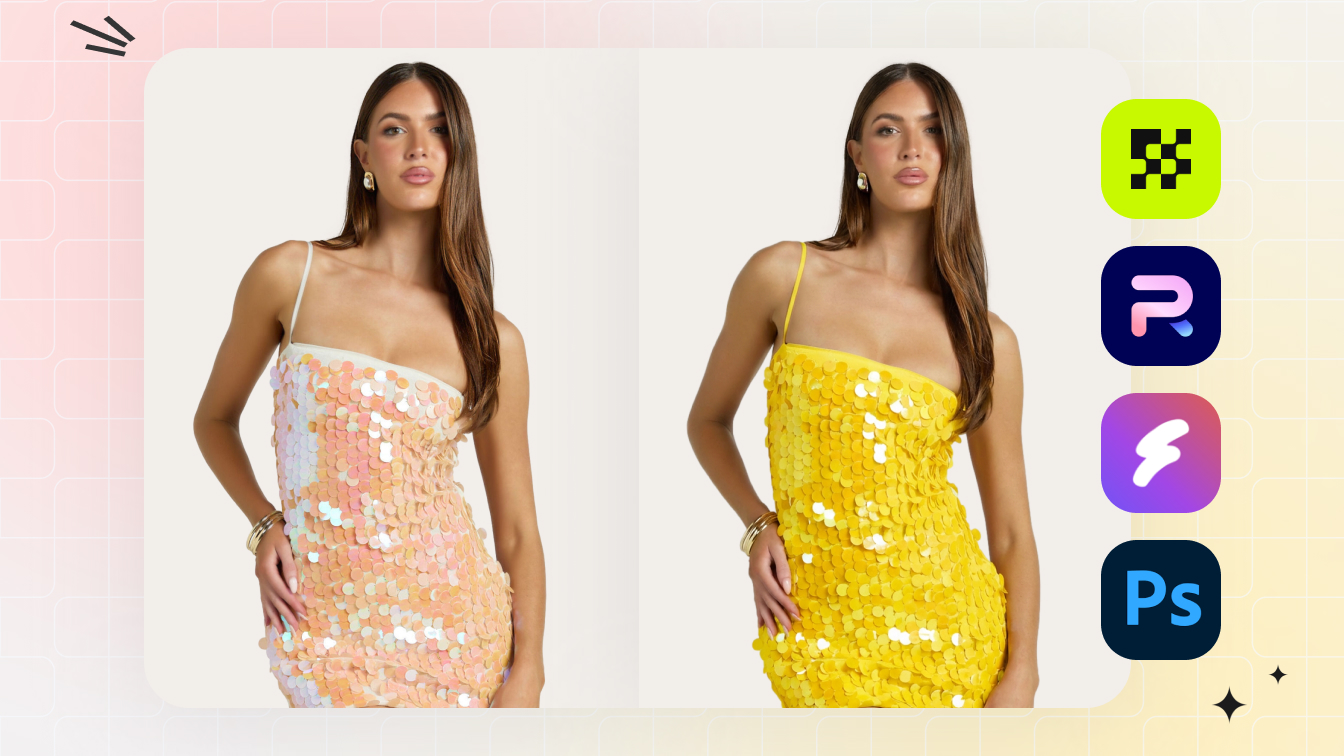
Recolor is where structured accessories really pay off. A bag often sells in four or five colorways, and physically re-shooting each one is the single biggest time sink in accessory catalogs. With AI color change you shoot one and generate the rest, with the material grain, stitching, and metal hardware kept intact in each variant. Here's that move on a real handbag source:

Try the marketplace-ready tool first
Rebuild a clean, upright bag shape from one phone photo — no stuffing, no line. Try Snappyit free →
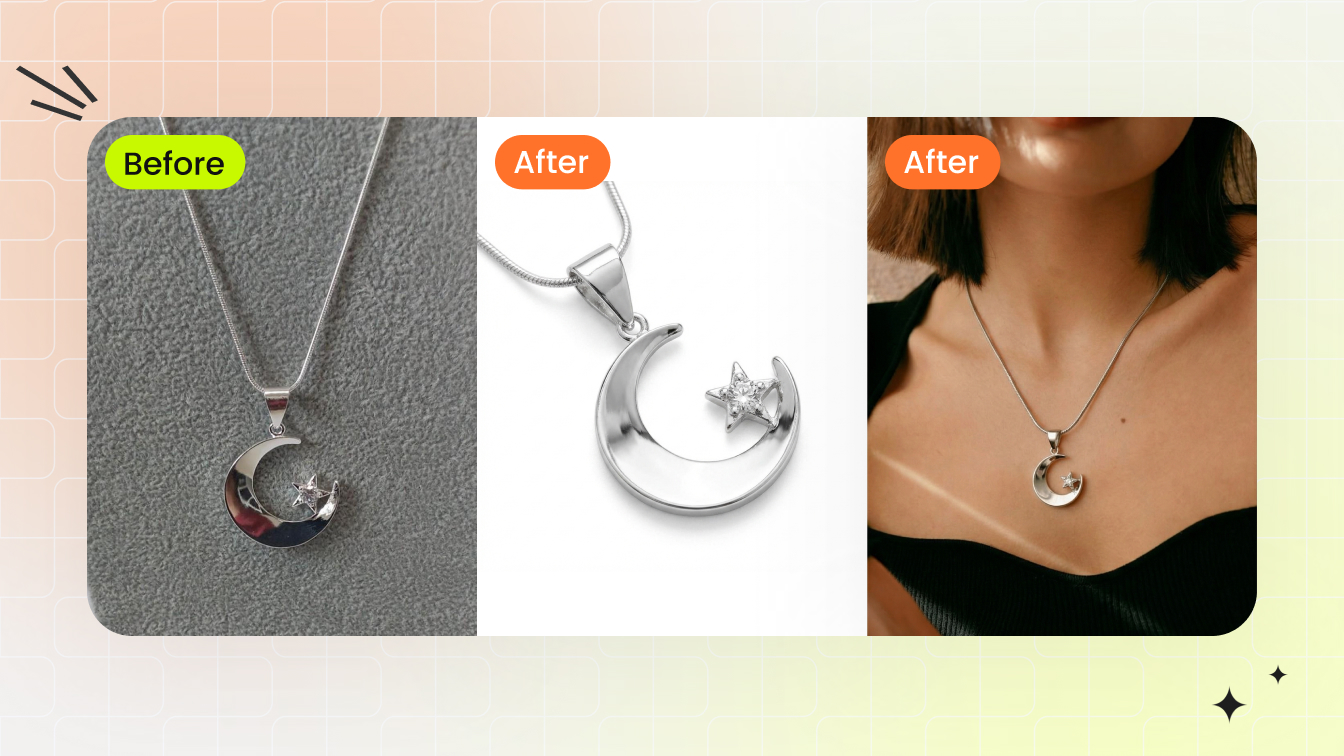
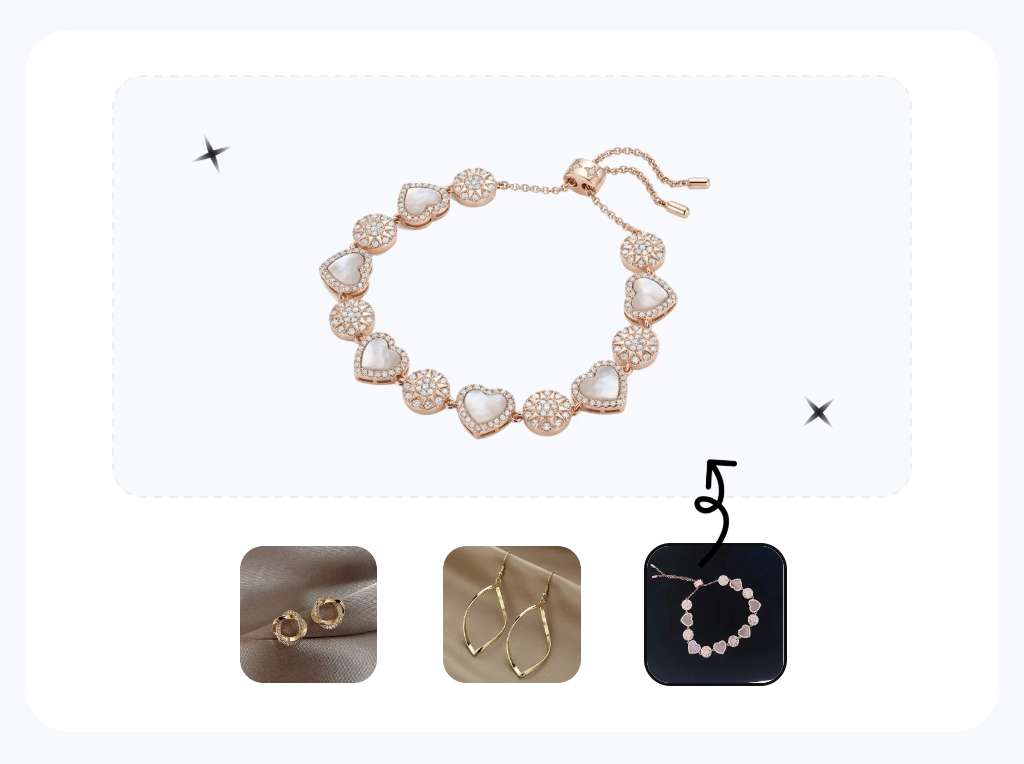
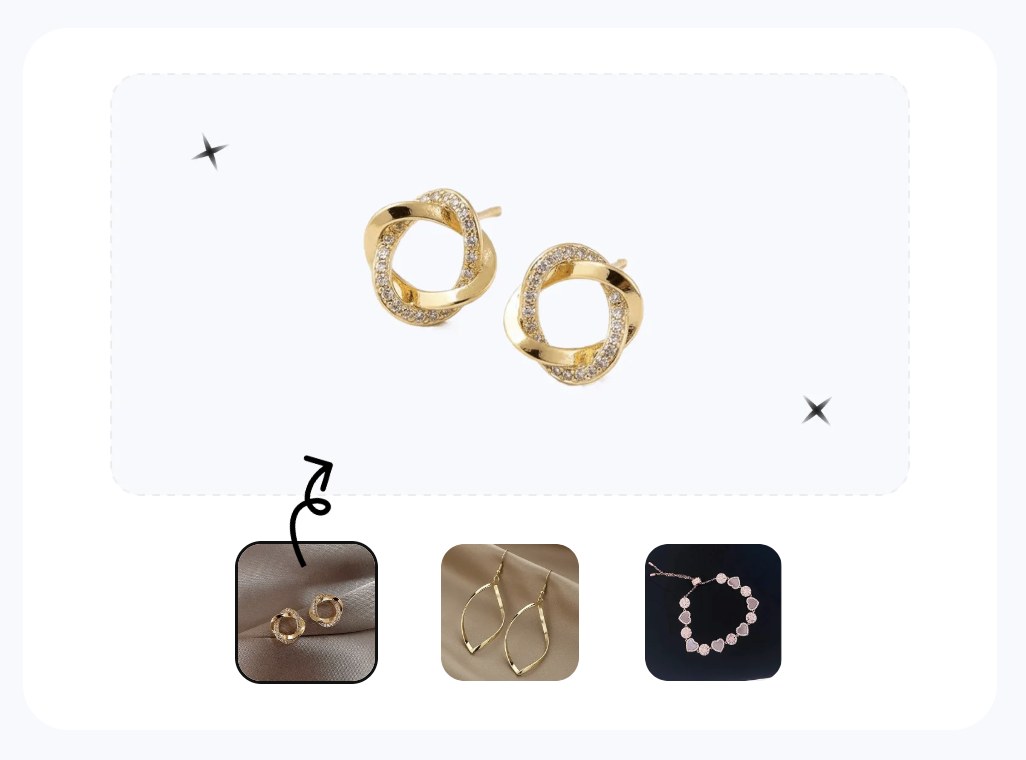
Jewelry, watches, sunglasses: killing reflections/fingerprints and putting them on a model
Reflective accessories are their own category of pain. Polished metal, gemstones, watch crystals, and sunglass lenses behave like tiny mirrors — they catch the room, the window, your phone, and your fingerprints. The traditional answer is polarizing filters, a light tent, white-glove handling, and hours of retouching to clean up the smudges and reflections that survive. It's the most studio-dependent corner of accessory photography.
The AI workflow attacks both problems. Jewelry retouching and on-model tools remove fingerprints, tame reflections, and render metal and stones cleanly, then place the piece on a hand, wrist, ear, or face at natural scale — no hand model, no ear template wrangling. That on-body context is what converts: a ring in a tray is abstract, a ring on a hand is a purchase. For the dedicated craft of metal, stones, and color accuracy, the jewelry model guide goes deep. Here's one jewelry photo turned into a clean main image with on-model and angle variations:
Reflection and fingerprint rules
- Wipe before you shoot. A microfiber pass on lenses, crystals, and metal removes the worst smudges so the AI has less to clean.
- Shoot in soft, even light. Harsh point sources create hot reflections; diffuse light gives the tool a cleaner surface to work from.
- One clear angle is enough. Capture the piece head-on and unobstructed; the on-model or worn render adds the wrist, ear, or face context.
The realism failure mode to avoid: over-aggressive reflection removal that flattens metal into a dull gray. Good output keeps the highlight pattern that makes gold read as gold and a diamond read as faceted — it cleans the distractions, not the material's character.
Marketplace outputs from one source image (Amazon white-bg vs Etsy lifestyle vs TikTok Shop video)
This is the payoff of shooting once: a single source photo becomes a different deliverable per channel, instead of a separate shoot per marketplace. Each platform rewards a different image, and the AI workflow lets you target each without re-photographing the product.
| Channel | What the main image wants | Output from your source photo |
|---|---|---|
| Amazon | Pure white background (RGB 255, 255, 255), product fills ~85% of frame, no text or props in the main slot | Clean white-background product or ghost-mannequin-style render |
| Etsy | Lifestyle and styled context; first image landscape or square to avoid thumbnail crop | On-model or in-scene lifestyle render |
| Shopify | Consistent square (1:1) grid; white background common but not enforced | Square white-bg main plus matching variant set |
| TikTok Shop | Short vertical video that shows the product moving in-feed | A still turned into a short listing clip |
A practical way to run it: produce the Amazon-compliant white-background main, an Etsy lifestyle shot, a square colorway set for Shopify, and a short vertical for TikTok Shop — all from the same upload. For the video output specifically, the image-to-video tool animates a still into a scroll-stopping clip without a separate shoot. One important honesty note on Amazon: its rules govern how the image looks, not how it was made, so an AI-generated image that meets the white-background and framing rules is compliant — but for adult apparel main images, Amazon wants a live model, a nuance that mostly affects clothing rather than non-apparel accessories.
Try the marketplace-ready tool first
Generate Amazon white-bg, Etsy lifestyle, and a listing video from one upload. Try Snappyit free →
How many photos and which angles each accessory listing needs
Marketplaces let you upload several images per listing, and buyers expect the slots filled. The good news for the AI workflow: you fill them from one source photo, not one shoot per slot. Here's a sane default of five to seven images that works across categories, with the per-type angle priorities.
- Main: clean white-background hero, product filling most of the frame.
- Secondary structure: a back, interior, or profile view that shows construction.
- Scale or worn: the item on a model, hand, head, or in a hand for size reference.
- Detail crops: one or two close-ups of hardware, stitching, clasp, or material.
- Lifestyle: the product in a styled scene to set the mood.
The angle priorities shift by category:
- Hats: front, 3/4, and a worn shot — the crown shape and how it sits matter most.
- Bags: front, back, interior, and a worn or held shot for scale; hardware close-ups sell quality.
- Shoes: a profile is non-negotiable, plus top-down, sole, and a 3/4 — fully covered in the shoe photography spoke.
- Jewelry and watches: a clean product shot plus an on-body render at true scale, and a macro of the setting or dial.
- Sunglasses and belts: a flat or front shot, a worn shot for fit, and a detail of the lens, buckle, or temple.
If you sell across more than one marketplace, the broader idea of generating a consistent, multi-channel set from a single AI workflow is the same one used by clothes-changer tools for ecommerce sellers — the accessory version just swaps garments for hats, bags, and jewelry.
Generate your first accessory set in 90 seconds
Pick one item — a hat, a bag, a pair of sunglasses — and shoot a single clean phone photo on a plain surface. Upload it, and produce a white-background main, an on-model or worn render, a colorway variant, and a short listing video, without a studio, a model, or a retoucher. Then repeat across the catalog, one source photo per SKU.
Per-product spoke guides (hats, shoes, bags) — internal links
This hub keeps the per-category depth in dedicated spokes so each one can go deep on its quirks. Route to the guide that matches what you're shooting next:
- Hats and headwear: crown volume, brim shape, and worn renders without a head form — How to photograph hats without a model or mannequin.
- Shoes and footwear: the profile-first angle stack, sole shots, and pairs that match — How to photograph shoes for ecommerce.
- Bags and backpacks: shape without stuffing, interior views, and colorway variants — Bag photoshoot without a model or studio.
- Jewelry and watches: reflections, metal, stones, and on-body scale — the jewelry model guide and the jewelry model tool.
- Changing clothes and styling in a photo: if your accessory shots also feature apparel, see how to change clothes in a product photo with AI.
And for the underlying mechanics — backgrounds, lighting cues, batch consistency — the AI product photography guide remains the master reference this hub routes back to.
Frequently Asked Questions
What does accessory product photography actually mean?
It means photographing the accessory products you sell — hats, bags, shoes, jewelry, belts, sunglasses, scarves — so they look listing-ready on a marketplace. It is not about camera gear or photographing camera bags; it is the craft of turning a flat-lay or phone snapshot of a wearable accessory into a clean white-background, on-model, or lifestyle image that earns the click.
Do I need a studio or a lightbox to photograph accessories for ecommerce?
No. For most accessory listings in 2026 you can skip the lightbox, macro rig, and fishing line. A single well-lit phone photo of each item, fed into AI product photography tools, produces the white-background, on-model, ghost-mannequin, recolor, and video outputs marketplaces want. A studio is only worth it for hero pieces or texture-driven products where a real shoot is the selling point.
How many photos does an accessory listing need?
A safe default is five to seven images: a clean white-background main, a back or interior view, a scale or worn shot, one or two detail crops of hardware and material, and a lifestyle or on-model image. Amazon needs the white-background main; Etsy rewards lifestyle; TikTok Shop benefits from a short video. One source photo per item can generate all of these.
Can AI put my accessories on a model without hiring one?
Yes. AI tools can place a bag, hat, belt, or pair of sunglasses on a generated model, and jewelry on a hand, ear, or neck, from a single product photo. This gives you scale and worn-context shots without booking a model, a hand-model, or a studio, and it keeps the same look consistent across an entire catalog.
How do I keep a bag or backpack in shape without stuffing it?
Traditionally you stuff structured bags with tissue or acrylic forms and suspend soft ones on fishing line. With AI, you photograph the bag once on a neutral surface and the tool rebuilds a clean, upright, dimensional shape on a white or lifestyle background — no stuffing, no clips, and no invisible wire to retouch out afterward.
What is the hardest part of photographing jewelry, watches, and sunglasses?
Reflections and fingerprints. Polished metal, gemstones, watch crystals, and sunglass lenses act like tiny mirrors that catch the room, your phone, and your hands. Traditionally this needs polarizers, tents, and heavy retouching. AI retouching removes smudges and tames reflections, and AI model tools place the piece on a hand, wrist, ear, or face at natural scale.
Does Amazon allow AI-generated accessory images?
Amazon's rules govern how the image looks, not how it was made. The main image must be a pure white background (RGB 255, 255, 255), the product must fill about 85% of the frame, and there can be no text, logos, or props in the main slot. For most non-apparel accessories a clean product or ghost-mannequin style image is fine as the main, with lifestyle and on-model shots in the secondary slots.
Can I get marketplace-specific images from one source photo?
Yes — that is the core of the AI workflow. From a single source photo you can export an Amazon-compliant white-background main, an Etsy lifestyle shot, a square set of variant colorways, and a short vertical video for TikTok Shop. You shoot once and produce a different output per channel instead of re-shooting for each marketplace's rules.
Which accessory types should I still shoot traditionally?
Hero or flagship pieces where the brand story matters, and texture-driven items where the surface itself is the selling point — hand-tooled leather grain, a watch dial's sunburst, an intricate gemstone setting — still benefit from a real macro shoot. Most volume catalog SKUs do not, which is why many sellers run a hybrid: AI for the bulk, a real shoot for the heroes.