At a glance
Shoot hat product photography at home with no model or foam head. A hat-type-by-type guide to on-model and ghost-mannequin caps, beanies, bucket hats, and more.
| Need | What to do |
|---|---|
| Get oriented | Read the short summary, then use the checklist below. |
| Create a test image | Try AI Fashion Model Free |
Why hats are hard to photograph (shape, brim shadow, head fit) and what shoppers need to see
Every other apparel category has something to drape over. A shirt has a torso, jeans have legs, even a scarf can hang. A hat is built to sit on a head that isn't there, and the moment you take that head away, three problems show up at once, and they're the reason so many headwear listings look cheap next to the competition.
Lost shape
Lay a baseball cap or a bucket hat flat on a table and the crown collapses. The dome that gives the hat its whole silhouette flattens into a disc, the brim curve reads as a flat line, and the depth a shopper needs to judge disappears. A structured fedora or a stiff cowboy hat holds up a little better, but a beanie or a soft dad cap turns into a shapeless lump.
Brim shadow
The brim is a horizontal plane sticking out from a vertical crown, so under almost any light it casts a hard, distracting shadow, onto the crown above it, onto the front panel where your logo lives, and onto the surface below. Those shadows hide the exact detail buyers are trying to see, and they make a clean white-background shot surprisingly hard to nail.
Missing head fit
The single biggest question a hat shopper has is "how will this sit on my head?" Is the crown shallow or deep? Does the brim curve tight or run flat? Is the beanie a snug fit or a slouchy one? A flat product shot answers none of that, which is why shoppers scroll right past listings that only show the hat lying on a table.
So a strong hat listing needs to do four things a flat shot can't: show the real three-dimensional shape (crown depth and brim curve), keep the front detail clean and shadow-free (logo, embroidery, panel color), show how it sits on a head so fit is obvious, and stay consistent across every SKU so the store looks professional. The rest of this guide is about hitting all four without hiring a model or buying a mannequin.
DIY mannequin/foam-head method vs AI — cost and effort compared
Before AI tools, the standard no-model workaround was a foam head, a wig stand, or a styrofoam ball, prop the hat on it, light it, shoot it, then crop or paint out the support in editing. It works, and for a tiny catalog it can be the right call. But it's worth being honest about what it actually costs in time and in results.
The DIY mannequin method means buying a foam head per size, steaming and shaping the hat, fighting the brim shadow with extra lights or reflectors, shooting, and then erasing the visible head and stand in Photoshop, because a bare foam head in the frame is not a sellable image. Every one of those steps is per-hat work, and the foam head still can't show how the hat reads on a real person with a hairline and a face.
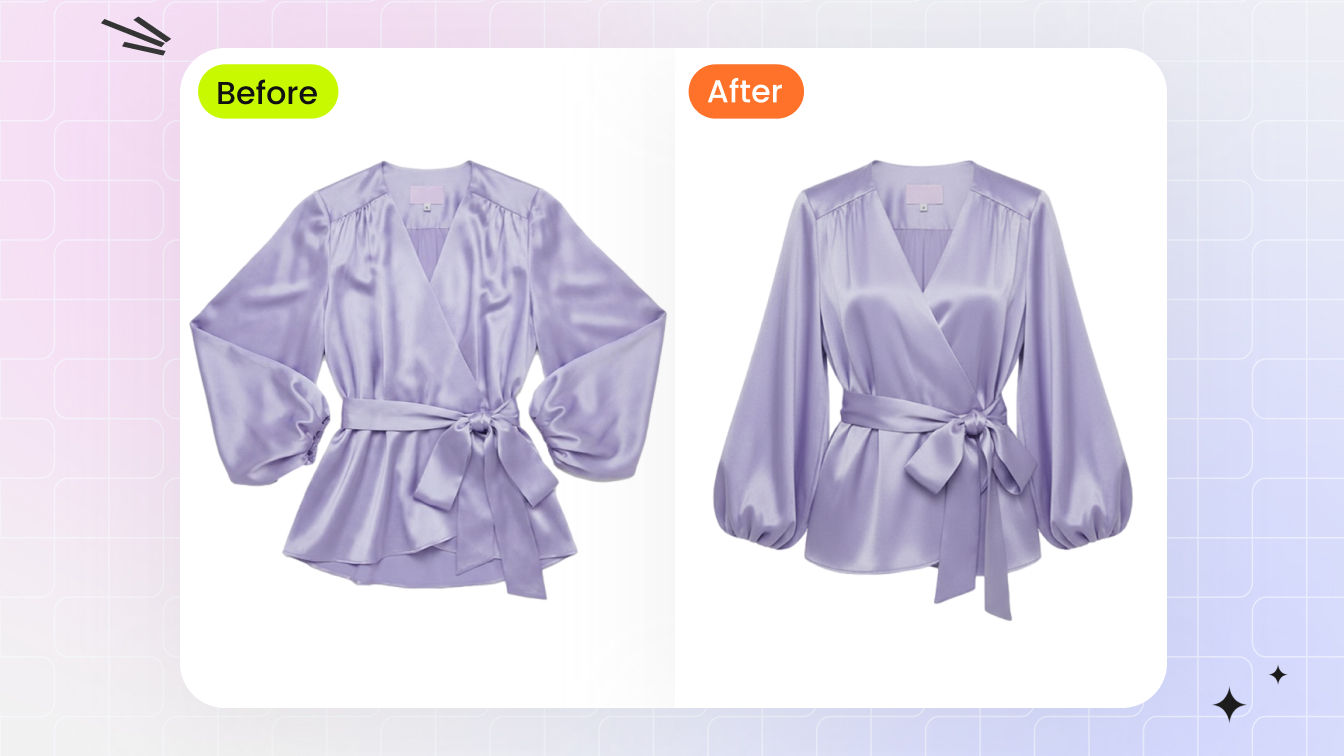
The AI route starts from the same single flat-lay or angled product photo and generates the rest. You upload one clean shot and get back an on-model version, a floating worn-shape version, or both, with the crown volume rebuilt, the brim curve restored, and the shadows handled. No foam head to buy, no support to erase, no compositing.
| Factor | DIY foam head / mannequin | AI from one flat-lay |
|---|---|---|
| Upfront cost | Foam head/wig stand per size, lights, backdrop | None beyond a phone camera |
| Per-hat effort | Style, light, shoot, then mask out the head | Upload one photo, pick the output |
| Turnaround | Minutes to hours per hat with editing | Seconds to minutes per image |
| Shows head fit | Shape only, no real person | On-model with realistic head and pose |
| Brim shadow | Must be fought with lighting and retouching | Handled in the render |
| Consistency at scale | Drifts as lighting and styling vary | Same model and light across the catalog |
The DIY method isn't wrong, it's just slow, and it tops out at "shape" when shoppers actually want "fit." If you sell five hats and enjoy the process, a foam head is fine. If you're listing dozens of caps and beanies and want every one to show a person wearing it, the math tips hard toward generating the images. For the broader accessory picture, our guide to accessory product photography without a photoshoot covers the same trade-off across bags, jewelry, and shoes.
On-model hats from one flat-lay (cap, beanie, bucket, fedora, cowboy) with before/after
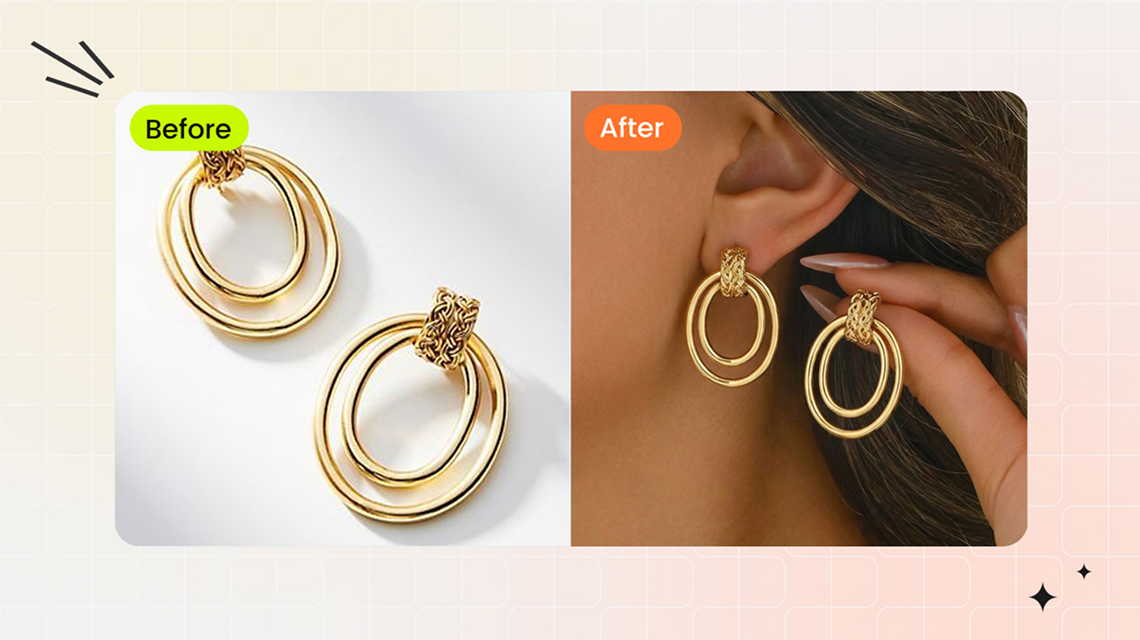
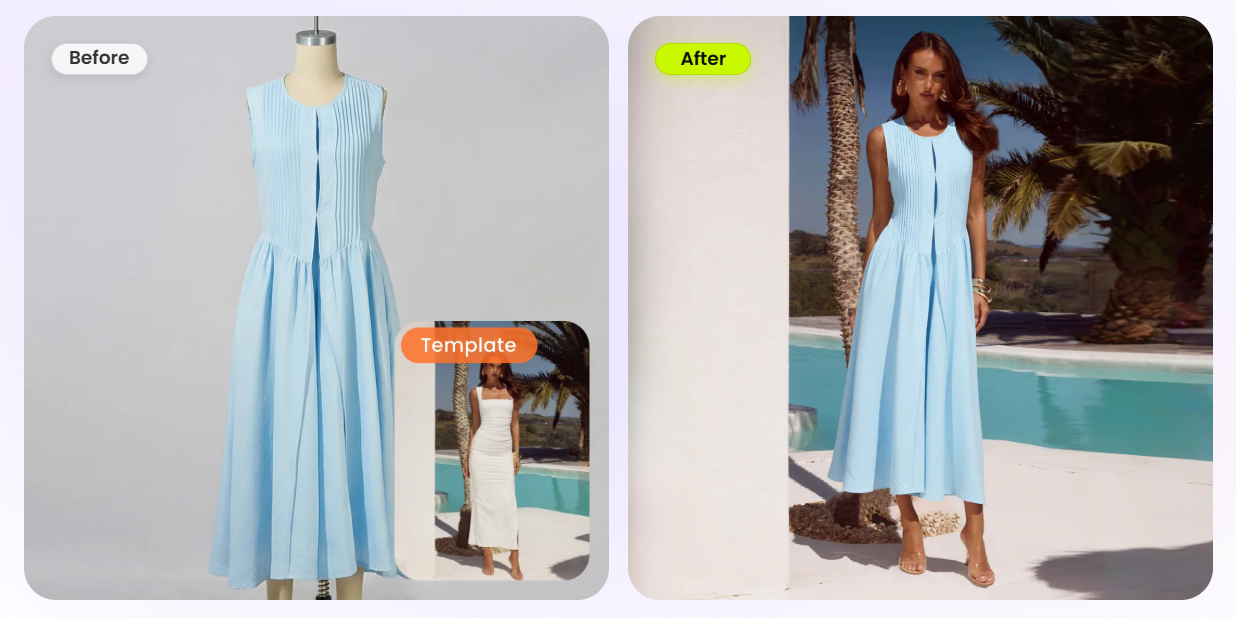
The most useful single image for a hat listing is a person wearing it, and that's exactly what an AI fashion-model tool produces from a flat-lay. You give it one clean photo of the hat, the embroidery, the logo, the panel color, the brim shape, and it generates a realistic model wearing it, complete with a natural hairline, head angle, and pose. The product detail is preserved; only the head, hair, and scene around it are new.
What makes this work across hat types is that the tool rebuilds the missing head context differently for each style:
Baseball cap and snapback
the model is rendered at a three-quarter angle so the front-panel logo and the curved (or flat-snapback) brim both read, and the crown sits at the right height on the head.
Beanie
the render shows the cuff fold and how much the beanie slouches at the back, the two things a flat shot flattens completely.
Bucket hat
the down-turned brim and the shallow crown are shown from a slightly raised angle, so shoppers can see how low it sits.
- Fedora: the pinched crown and the brim dip are visible from a side three-quarter view, which is how anyone actually evaluates a structured hat.
- Cowboy hat: the curled brim and the front crease show in a front three-quarter pose, the angle that sells the shape.
Because the same model and lighting can be reused, every hat in your catalog comes back looking like it was shot in one session. That consistency is most of what separates a professional headwear store from a pile of mismatched phone photos. If you want to go deeper on how these renders are built and kept realistic, see how to create AI fashion models, and our walkthrough on changing what a model wears in a product photo with AI uses the same flat-lay-to-on-model pipeline.
Invisible/floating hat (ghost mannequin) effect without a foam head or Photoshop
Not every listing wants a face in it. A lot of headwear sellers, especially on Amazon and for clean catalog grids, prefer the floating or ghost-mannequin hat look: the hat holding a full, rounded, worn shape on a plain background, with no head inside it and no visible support. It shows the true silhouette while keeping the image neutral and product-focused.
The traditional way to get this is the same foam-head-plus-Photoshop routine, shoot the hat on a head, then carefully mask the head out and rebuild the inside of the crown so it doesn't look hollow in the wrong way. It's fiddly, and the inside-of-the-brim area is where most DIY attempts fall apart.
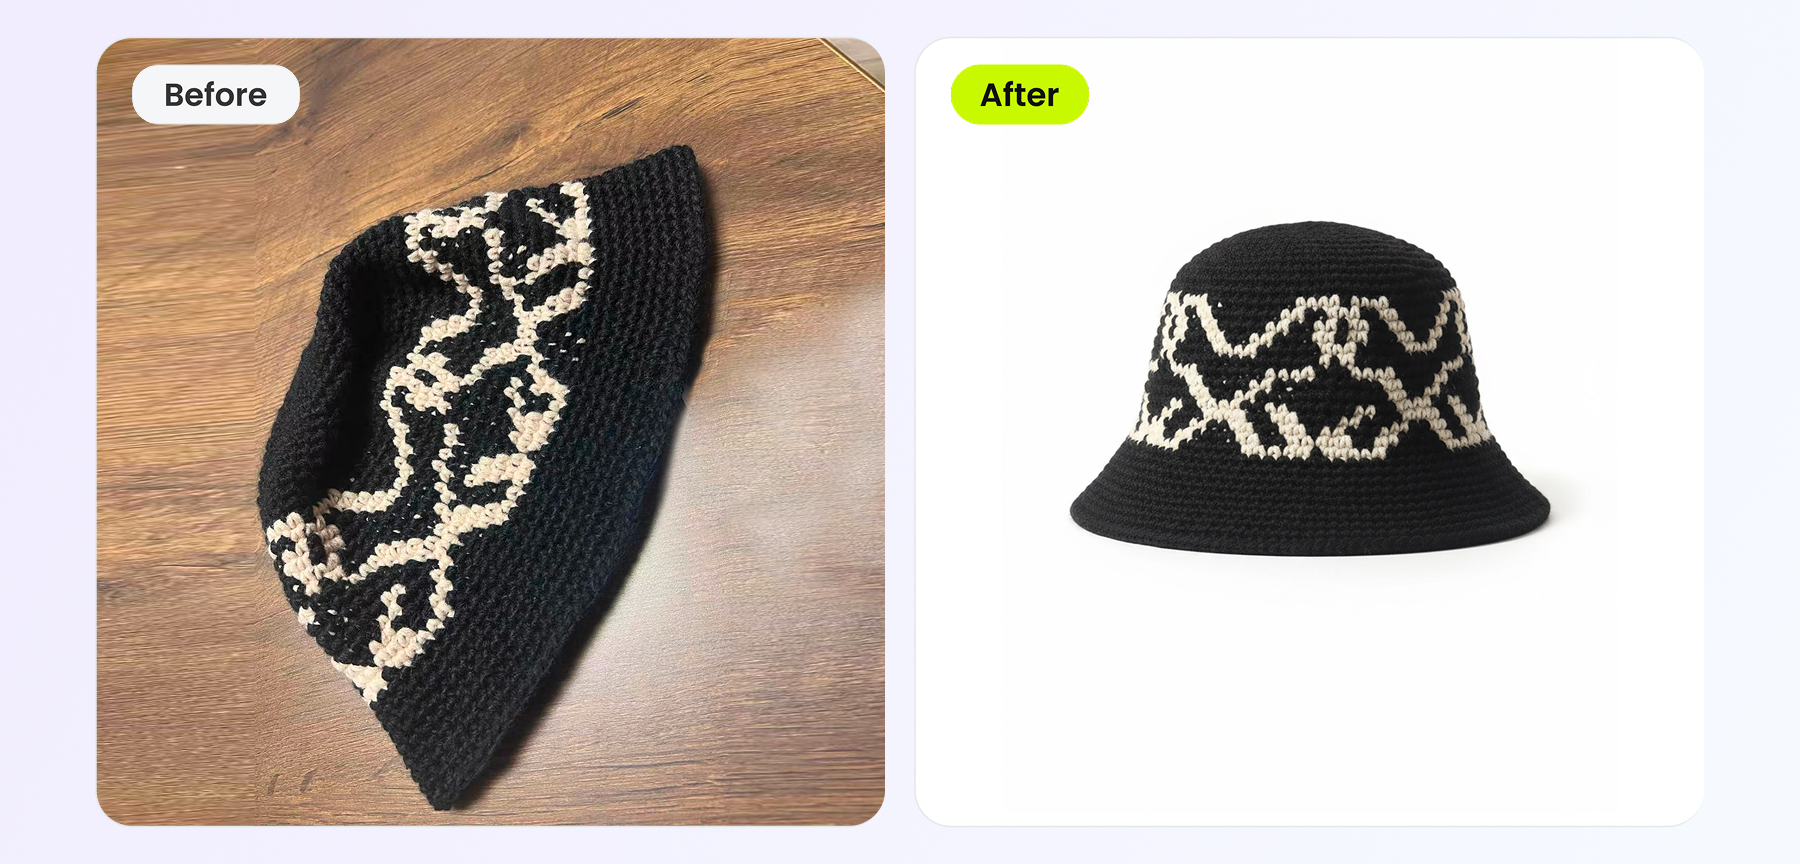
An AI ghost-mannequin tool does the same thing from one flat-lay in seconds. It reads the flat hat, rebuilds the crown volume and the brim curve, and renders the hat as if an invisible head were filling it, on a clean background, with the interior shadowed naturally so it reads as three-dimensional rather than pasted-on. The technique is identical in spirit to the apparel version covered in our ghost mannequin for ecommerce guide; it's just applied to a crown and brim instead of a collar and shoulders.
A practical workflow for most stores is to generate both from the same source photo: a floating worn-shape image for the clean main slot, and an on-model image for the secondary slot that shows fit. One upload, two of the strongest hat images you can put on a listing.
Hat-type cheat sheet: angles and fit cues per style
Whether you're styling a foam head or directing an AI render, the same per-style rules apply, because they come from how each hat is actually evaluated by a buyer. Use this as a quick reference for the angle to favor and the fit cue you must show.
| Hat type | Best angle | Fit cue to show | Common mistake |
|---|---|---|---|
| Baseball cap / dad cap | Three-quarter front | Front logo + brim curve depth | Brim shadow swallowing the front panel |
| Snapback | Three-quarter front, brim flat | Flat brim, structured front panel | Letting the flat brim look curved |
| Beanie | Straight-on or slightly raised front | Cuff fold + amount of slouch | Shooting it flat so it looks like a tube |
| Bucket hat | Slightly elevated front | Down-turned brim + crown depth | Top-down angle that hides the brim drop |
| Fedora | Side / three-quarter | Pinched crown + brim dip | Front-only view that flattens the crown |
| Cowboy hat | Front three-quarter | Curled brim + center crease | Hiding the brim curl with a flat angle |
The pattern across the table is consistent: hats are about volume and curve, and any angle that flattens those two things is the wrong angle. A flat top-down shot is the single most common mistake in hat photography because it kills both at once. Favor a slightly elevated three-quarter view for nearly everything, and let the structured styles (fedora, cowboy) lean toward the side so the crown shaping is unmistakable.
Generate on-model hats by type
Showing colorways from one photo without re-shooting
Headwear sells in colorways. The same cap exists in black, navy, olive, khaki, and red, and shoppers expect to see each one. Buying every color and shooting each separately is the slow, expensive path, and it usually produces variants that don't quite match in angle or lighting, which looks sloppy on the variant picker.
A faster route is to shoot one color cleanly and use an AI recolor tool to regenerate the same hat in every other color. The embroidery, stitching, panel seams, brim under-color, and fabric texture stay intact; only the target color region changes. Because every variant comes from one source image, the angle, crop, and lighting are identical across the whole colorway set, which is exactly what a clean variant grid needs.
This pairs naturally with the on-model and floating workflows above. A common sequence is: shoot one cap, recolor it into the full color range, then run the best-selling colors through the fashion-model tool so your hero colors get an on-model image while the long tail gets clean recolored product shots. One physical hat, one photo session, a complete listing.
Reducing fit-related returns with on-model hat images
Returns quietly eat headwear margins, and a lot of them trace back to the listing image. When a shopper can't tell how deep the crown is or how the brim curves, they guess, and a meaningful share of those guesses come back as "fits weird," "sits too high," or "the brim is flatter than I expected." Those aren't defects; they're expectation gaps the photo failed to close.
An on-model or worn-shape image closes the gap by showing the hat the way it will actually be worn. The shopper sees the crown depth on a real head, the brim curve at a real angle, and the proportion of the hat to a face, so the mental picture they buy from matches the item that ships. Fewer surprises in the box means fewer hats in the returns pile.
This is the same returns logic that applies across apparel, an accurate worn shape sets accurate expectations, and it's covered more broadly for garments in our piece on taking pictures of clothes without a mannequin. For hats specifically, the lever is simple: stop shipping listings that only show the hat lying flat, and add at least one image that shows it worn. Resellers juggling many one-off SKUs can lean on the same approach, and our roundup of the best AI clothes changers for ecommerce sellers shows how the on-model render fits a fast listing workflow.
Marketplace-ready outputs for Amazon/Etsy/eBay/Poshmark
Once you've generated the images, the last step is making sure they pass each platform's rules. Hat images are generally easy to make compliant because the product is small and a clean background is straightforward, but the main-image rules differ enough to be worth a quick checklist.
- Amazon: the main image needs a pure white background (RGB 255, 255, 255), the product filling roughly 85% of the frame, and no text, logos, or borders added to the image. A floating worn-shape hat on white is a strong main image here; on-model and lifestyle shots work well in the secondary slots.
- Etsy: far more flexible. On-model, floating, flat-lay, and lifestyle hat images are all fine. Make the first image landscape or square so it isn't awkwardly cropped in the thumbnail grid, and lead with whichever image shows the hat most clearly.
- eBay: wants a clean main image, ideally on a white or light neutral background, at a decent resolution (1600px on the longest side is a safe target for zoom). On-model and floating images both qualify as long as the form is clear.
- Poshmark and social-first resale: these reward a styled, worn look over a sterile white background. An on-model or lifestyle hat image tends to outperform a flat product shot on these platforms.
The efficient move is to generate at a high resolution on a clean background once, then export the platform-specific versions you need, a pure-white crop for Amazon, a square on-model shot for Etsy and Poshmark, and so on, from the same set of renders. One source photo, a couple of AI passes, and you have a compliant, consistent image set for every marketplace you sell on. The hat product photography that used to require a model, a foam head, and a retoucher now comes out of a single phone photo.
Hats are just one piece of a bigger accessory workflow
The same one-photo-to-listing method — on-model, ghost-mannequin, recolor, and video — works for bags, shoes, jewelry, belts, and sunglasses too. The cross-category playbook pulls it all together.
Read the full accessory photography playbook →
Frequently Asked Questions
How do I photograph a hat without a model or a mannequin?
Start with one clean flat-lay or angled shot of the hat on a neutral surface in soft, even light, with the brim and crown shaped the way they should sit. From that single photo you have two no-model paths: a DIY method that stuffs the crown with tissue and props the hat upright for a self-standing look, or an AI tool that generates an on-model or floating ghost-mannequin version from the same flat-lay. The AI route skips the foam head and the Photoshop compositing entirely.
Why are hats so hard to photograph for ecommerce?
A hat has no body to hold its shape, so laid flat it deflates and the crown depth and curved brim disappear. The brim also casts hard shadows onto the crown and the surface below, and shoppers need to judge how it sits on a head, which a flat product shot cannot show. Those three problems, lost shape, brim shadow, and missing head fit, are why hat listings so often look cheap.
Is a foam head or a DIY mannequin worth it for hat photos?
A foam head or wig stand gives a hat real shape and is cheap to buy, but it adds visible support you then have to crop or edit out, it cannot show how the hat reads on an actual person, and styling, lighting, and cleanup still take time per shot. For a handful of SKUs it can work. For a growing headwear catalog, generating on-model and floating versions with AI from one flat-lay is usually faster, more consistent, and shows fit better.
Can AI put my hat on a model from just a flat-lay photo?
Yes. AI fashion-model tools generate a person wearing your hat from a single flat-lay or angled product photo, preserving the embroidery, logo, panel color, and brim shape while adding a realistic head, hairline, and pose. You can produce caps, beanies, bucket hats, and more on a consistent model across the catalog without booking a photoshoot or buying a mannequin.
How do I get the invisible or floating hat effect without a foam head?
The floating or ghost-mannequin hat effect shows the hat holding a rounded, worn shape on a clean background with no head inside it. Traditionally you shoot on a foam head and erase it in Photoshop. An AI ghost-mannequin tool produces the same hollow, dimensional look from one flat-lay photo in seconds, rebuilding the crown volume and brim curve so the hat looks worn by an invisible head.
What angle is best for each type of hat?
Baseball caps and snapbacks photograph best at a three-quarter front angle that shows the front panel logo plus the brim curve. Beanies suit a straight-on or slightly raised front to show the cuff and slouch. Bucket hats want a slightly elevated angle so the down-turned brim and crown both read. Fedoras need a side or three-quarter view to show the pinched crown and brim dip, and cowboy hats want a front three-quarter to show the curled brim and crease.
How do I show different hat colors without re-shooting each one?
Shoot one colorway cleanly, then use an AI recolor tool to regenerate the same hat in every other color, keeping the embroidery, stitching, panel seams, and brim texture intact. One photo becomes a full colorway set for the listing, which is far cheaper than buying and shooting every color and keeps the angle and lighting identical across variants.
Do on-model hat photos reduce returns?
They help. A flat product shot leaves shoppers guessing how deep the crown is, how the brim curves, and how the hat sits on a head, which leads to wrong-size and wrong-look returns. An on-model or worn-shape image sets accurate fit and proportion expectations, so what arrives matches what the buyer pictured and fewer hats come back.
Are AI-generated hat photos allowed on Amazon, Etsy, and eBay?
Yes, as long as the image accurately represents the product. Amazon requires a pure white background (RGB 255, 255, 255) on the main image and allows on-model and clean product hat shots; Etsy and eBay are more flexible and accept on-model, floating, and lifestyle hat images. The practical rule is the same everywhere: the hat in the photo must match the hat in the box, so keep recolors and renders true to the real item.
On-model and floating hat shots are one slot in a complete AI product photography system for accessory sellers.