At a glance
How to photograph clothing laying flat — a garment-by-garment playbook for tops, shirts, dresses, knitwear, pants, and outerwear, plus the flat-to-AI workflow.
| Need | What to do |
|---|---|
| Get oriented | Read the short summary, then use the checklist below. |
| Create a test image | Try Product Photo Editor Free |
| Before publishing | What to check |
|---|---|
| Input quality | Use a clear source image, visible product details and enough resolution for the final channel. |
| Output accuracy | Compare color, edges, scale, text, logos and product shape against the original before publishing. |
| Rights and usage | Use images you own, licensed assets or authorized adult model photos for commercial work. |
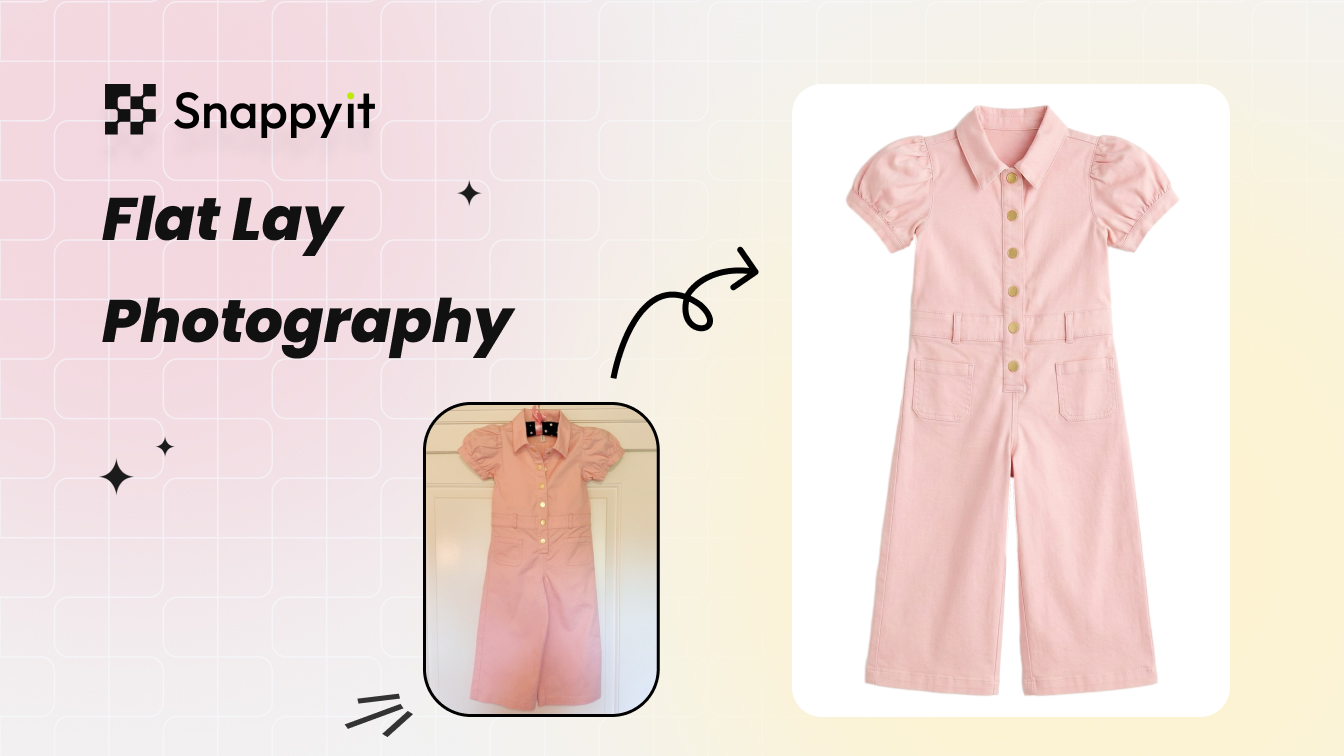
Why photograph clothing laying flat
A flat lay is a top-down photo of a garment styled on a flat surface, shot with the camera pointing straight down. For apparel sellers it is the workhorse format: no model to book, no mannequin to dress, no fitting — just garment after garment through one locked overhead setup, which is the most scalable way to give hundreds of SKUs a clean, consistent image. It shines for soft, packable pieces where color, print, and the cut read perfectly from above.
There is one catch worth knowing before you start, because it shapes your whole shot list. On Amazon, a plain flat lay is the required main image for Kids & Baby clothing, multi-packs, sets, and accessories — but Women's and Men's (adult) clothing main images must be on a human model or a ghost mannequin. So for adult apparel, the flat lay you shoot is a secondary gallery image and the perfect input for an AI ghost-mannequin or on-model main, not the hero itself. We will come back to that workflow at the end; for now, the craft of laying the garment well is what every downstream image depends on. (For the broader, all-category fundamentals, see our marketplace product photo guide.)
Which garments suit flat — and which need a form
Before you lay anything down, run one test: does the silhouette sell it? If the garment reads fine as a 2D outline, it is a flat-lay candidate. If the buyer is really buying the 3D shape, flat lay will undersell it and you should reach for a ghost mannequin or a model. The dividing line is structure, not category.
- Flat-lay friendly (soft, low-structure): t-shirts, tanks, knit sweaters, hoodies, sweatpants, leggings and activewear, scarves, beanies, socks, baby and kids basics, and any multi-pack.
- Needs a form (structured, fit-critical): blazers and tailored jackets, structured dresses, coats, denim jackets, swimwear, and molded or underwire bras. Laid flat, a tailored blazer's shoulders splay wide, the waist goes boxy, and the lapel loses its roll — a $400 jacket can read like a $40 one.
The fast tie-breaker: if the piece has a defined collar or lapel, engineered shoulders, a waistband meant to sit on the hips, or a shaped cup or bust, treat it as fit-critical and shoot it on a form for the hero — then use flat lay for the supporting detail, lining, and bundle shots it does brilliantly.
Setup: rig, lens, light & prep
The hardware is simple but non-negotiable. Get the camera directly above the garment at a true 90 degrees, sensor parallel to the surface — a horizontal tripod arm, a copy stand, a C-stand boom, or a tripod with a 90-degree center column all work (the point is keeping the legs out of frame, not that a normal tripod can't aim down). Even a few degrees of tilt skews the rectangle and makes the hem look wider than the shoulders, and it sabotages any AI shape generation later. Check it with a bubble level.
- Lens: 50-100mm full-frame equivalent for distortion-free edges. Avoid anything wider than ~35mm — wide-angle lenses bow the straight edges. On a 1.5x crop sensor a 35mm lens frames like ~50mm, so it works as a minimum there.
- Exposure: manual mode, f/8-f/11 for corner-to-corner sharpness, ISO 100-200. The garment is on one flat plane, so depth of field isn't the issue — f/8-f/11 is simply the lens's sharpest range, and stopping down past f/11 only invites diffraction softening.
- Light: one large diffused source raking across the set from about 45 degrees, with a white foam-board bounce on the opposite side to lift the shadows. The camera shoots straight down, but the key light comes from the side — flat, dead-overhead light erases the weave, ribbing, and seams that make fabric look like fabric.
- Surface: pure white seamless paper or a matte white board for marketplace work; frame so the garment fills roughly 75-90% with clean white margin around it.
- Color: lock white balance off a grey card placed in a test frame so the color is true and consistent across the catalog — wrong color is a top driver of returns.
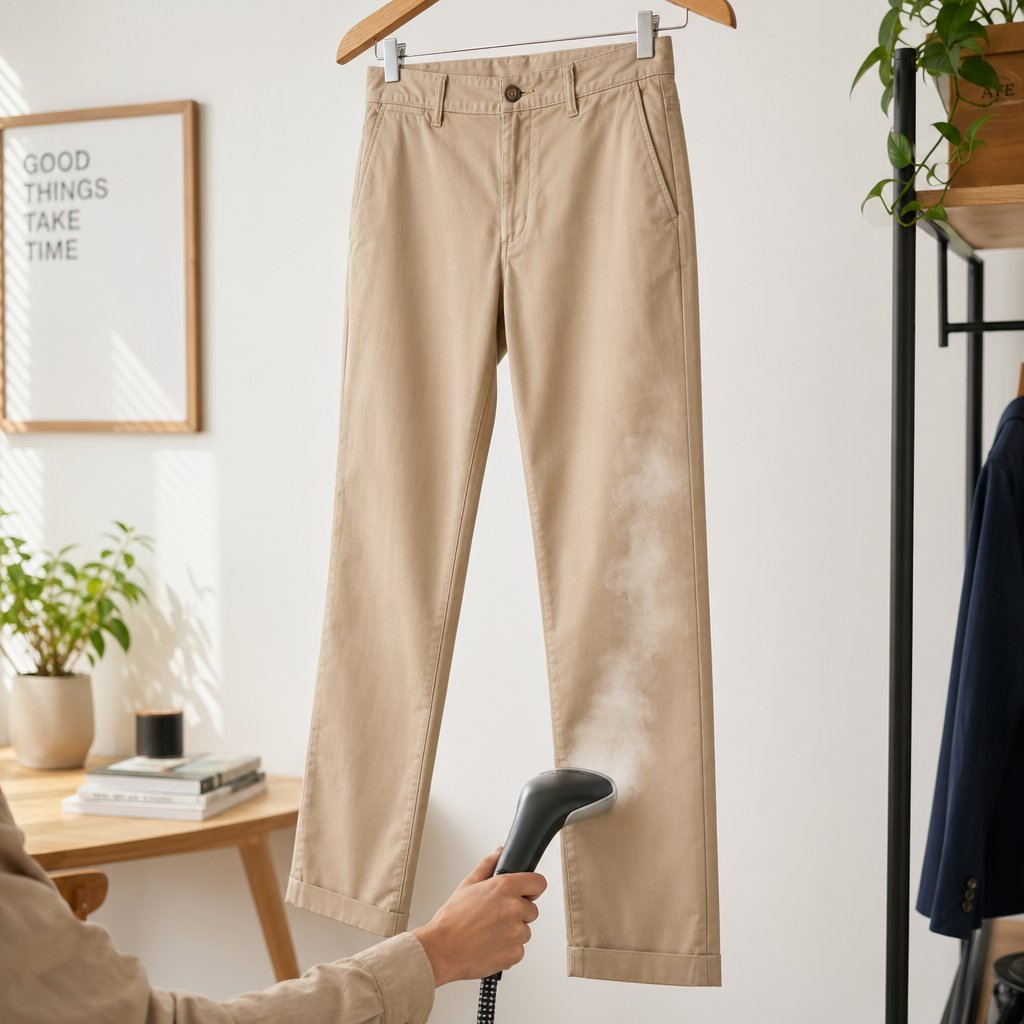
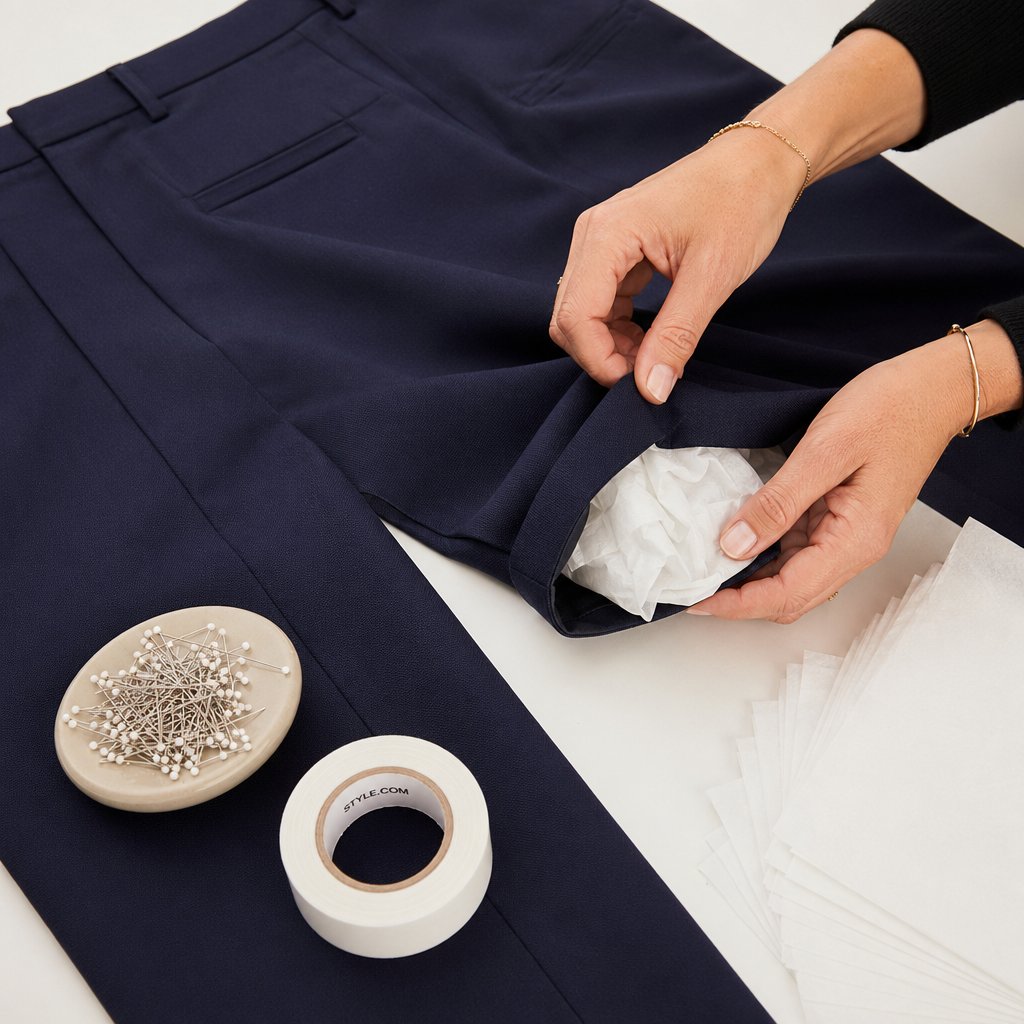
Prep is most of the result. Steam every garment before it touches the surface — never iron knitwear or wool, where heat and pressure crush the loft and can scorch the fibres; a handheld steamer held a few centimetres off relaxes wrinkles without flattening texture. Lint-roll, wipe with a microfibre cloth, and have stiff card or foam board, acid-free tissue, small pins, and double-sided fashion tape ready. (A window-and-foam-board home studio setup covers all of this on a budget.)
The garment-by-garment laying playbook
This is where clothing flat lays are won or lost. Each garment type has its own failure mode and its own fix.
T-shirts & soft tops
The pro trick for a ruler-straight tee is a card backer: cut stiff card to the shirt's silhouette (slightly narrower than the chest), lay the tee face-down, set the card on the back with its top edge on the shoulder seams, then fold each side panel back over the card and pull taut so the card's straight edge becomes the body line. Square the shoulders and open the neckline symmetrically first — a crooked shoulder is the number-one amateur tell and can't be fixed in retouch. Fold sleeves back diagonally and pin them at the seam (so the pin hides in the seam), tuck the underarm under the body, and conceal the back hem so only one clean front hem shows. For a graphic tee, center the print on the garment's own centerline, not the frame. If the fabric is sheer and the card shows through, slip white paper between them; for tanks and camis, stuff lightly or not at all and just keep the straps flat and mirrored.
Button-down shirts & blouses
Back the body with card or foam-core slid inside, then attack the placket, which is the make-or-break line. Don't chase a twisting placket at the hem — square the yoke and shoulders first, then run the button line as your plumb line and pin it invisibly from behind at three points (under the collar, at the sternum, at the bottom button). Button the shirt fully except the top collar button so the neck doesn't choke, and kill any bust gaping with a hidden pin or a sliver of tissue behind the placket. Lay the collar open in an even mirror-image V (collar stays or a little spray starch keep it crisp); to pop it, tuck a small tissue wad under the collar stand. Bring the sleeves down across the lower body in a soft S-curve and twist each cuff so the camera sees the button or buttonhole. Stiff fabrics want more steam and heavier pinning; drapey silk and viscose want more internal tissue, tape, closer pins, and a touch of anti-static spray.
Dresses & skirts
Tape a plumb line on the surface and align the dress's center-front to it before styling anything. Shape the bodice with tissue under each bust point, tapering thinner toward the waist, and nip the waist by reaching under the garment to pull the side seams in and pin them on the underside. For a full or A-line skirt, fan the hem wider than its natural drop and lock the sweep with hidden pins or a little invisible thread; for accordion pleats, separate each fold by hand and slip thin tissue between layers; for a bodycon piece, do the opposite and pull everything smooth and taut. Lay straps and sleeves in a soft S, never two stiff parallel lines. For a maxi or gown that overruns the frame, shoot two overhead frames (bodice-down, then waist-to-hem) without moving the camera or garment, with floor registration marks, and composite them on a seam. Sheer chiffon and lace get a backing cloth in their lining's color, and you pin only into seam allowances or the backing — never through the face, since holes in silk are permanent.
Sweaters & knitwear
Knit has no internal structure, so it photographs as a lopsided blob unless you set it. Steam (never iron) on a hanger first to let the stitches bloom, then lay it down and block it square: mist lightly, reshape, and measure both half-chests and both sleeve lengths so left and right match. Tension the ribbed cuffs and hem out to their natural width and lay them dead-straight so the ribs read as clean parallel bands. Pin sagging necklines into an even opening but never stretch them past the garment's built shape. Stuff the shoulders lightly with acid-free tissue — less than you think for chunky knits, which already have bulk — and lay the sleeves in an S-curve to keep the footprint compact. Crucially, light knitwear from the side with raking light so cables and stitches cast micro-shadows and pop in 3D; flat light turns a beautiful cable into a printed pattern. De-pill on the table, pulled taut over a hard surface (a sweater comb or stone for delicate cashmere). Cardigans: shoot buttoned or open, but make the plackets and lapels perfectly symmetric either way.
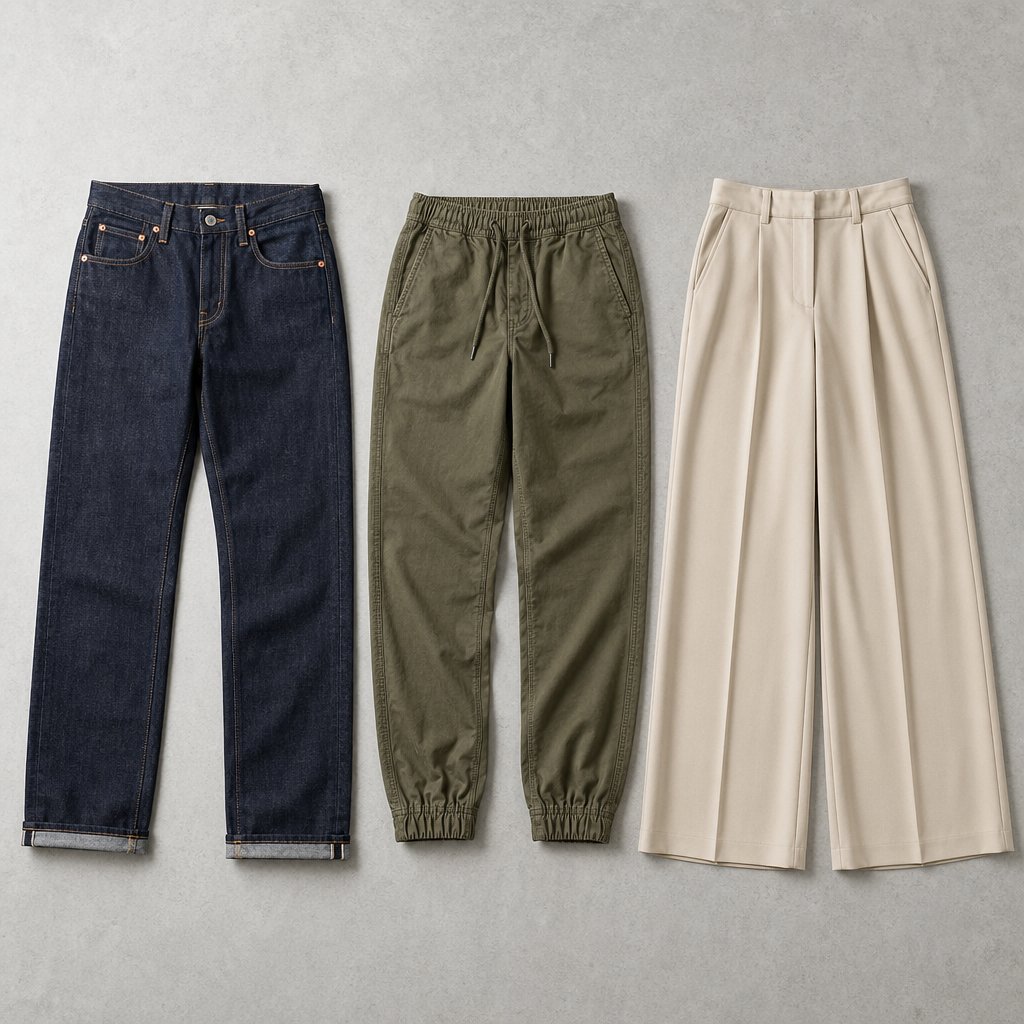
Pants, jeans & leggings
Center the fly on the vertical axis so both legs mirror, then smooth with flat palms waistband-to-hem only — downward, so gravity helps and you don't trap air at the crotch (the worst bubble zone). Keep the front waistband fully flat and visible to communicate rise and band width, and shape the back waist with a tuck pinned from behind. The combination shot that sells fit: keep the waistband flat and fold one leg back so the hem and leg-opening face the camera, showing rise, inseam length, leg-opening width, and cuff finish in a single frame. Stiff denim locks in every crease, so commit to placement on the first pass; stuff legs with stiff kraft-paper bundles for a worn 3D bend, or thin card inserts for crisp chinos. Leggings cling and curl, so lift-and-place rather than drag, set them down in sections from the waistband, relax then add only gentle tension, and shoot with even diffused light to tame the sheen. (Pants have enough quirks for their own deep-dive — see how to flat lay pants.)
Hoodies, jackets & outerwear
Decide the hood first: flip it inside-out and pull it down over the body for a compact resale look, or fan it open and prop it with tissue for a hero shot where the hood is the feature — never leave it as a flat crumpled lump above the shoulders. Zip or button the body closed and center the placket for the main silhouette (an open jacket flops 20-30% wider than worn), then shoot a second frame with the closure peeled back and pinned to reveal the lining and any branded interior, lit with extra fill so the cavity doesn't go muddy. Pull bulky sleeves slightly inward and break them with a soft S-curve. Coax a blazer lapel into its natural roll and prop the underside with rolled tissue — pressing a lapel flat instantly reads cheap. And remember the structure test: a genuinely tailored blazer or structured coat belongs on a ghost mannequin or model for its main image, with flat lay demoted to detail and lining shots.
Activewear & sports bras
Technical fabrics are lint and static magnets, so lint-roll, microfibre-wipe, and hit them with anti-static spray, then steam from the back so you don't glaze the surface or a heat-pressed logo. Don't over-tension stretch fabric — pulling leggings taut gapes the seams and makes a medium look like a small; lay relaxed, smooth from the center, then add only gentle, even tension at the waistband and cuffs. Tuck small tissue wads into the hip, glute, and calf and rake the light from the side so compression panels and flatlock seams stand off the surface (that 3D seam detail is what activewear sells on). For shiny or reflective trim, skim it with large diffused light and flag the opposite side so logos catch a controlled gleam instead of blowing out. A sports bra laid truly flat looks unsupportive — lightly stuff each cup with tissue or a foam disc to restore the molded dome, and lay the straps in symmetric mirrored curves.
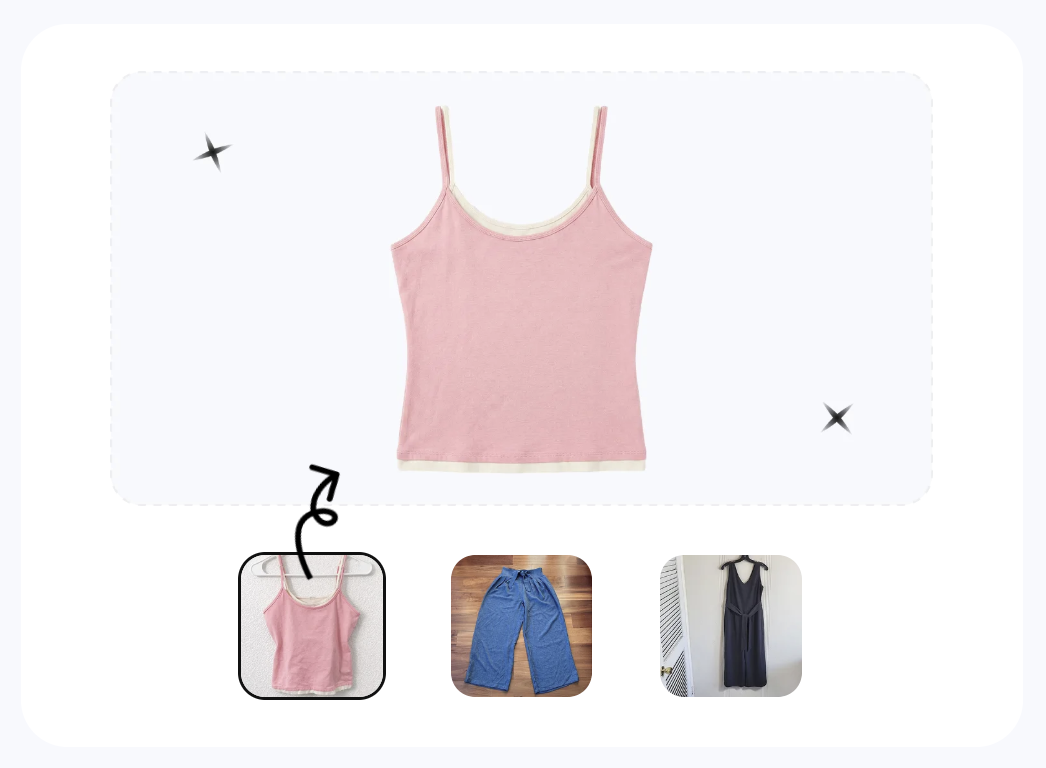
Kids & baby
Tiny garments collapse into shapeless scraps, so the fix is gentle stuffing for proportion: tuck small tissue balls into a onesie's chest, the seat of pants, and the toe of socks so each piece reads as a wearable item, square the shoulders, and align the snap placket dead-center. Turn up a cuff or flip a hood to show contrast lining and construction. For sets and outfits, lay the pieces in their natural wear relationship — top above, bottoms below with a slight waist overlap, hat and socks flanking to fill space and signal scale — aligned to a grid so it looks deliberate, not dumped. This is one of the categories where flat is the required Amazon main image (along with multi-packs, sets, and accessories), so it pays to get it clean: pure white, product filling about 85% of the frame, nothing cropped.
Make a flat garment look 3D (the phantom-body method)
Every technique above shares one goal: make a flat garment read as if a body were inside it. That illusion comes from three moves used together. Stuff for volume — ball acid-free tissue (acid-free so it won't transfer onto light fabric) and slide wads under the shoulders, chest, and hips so the fabric domes up a centimetre or two, then press it with your fingers to break the uniform dome into natural-looking drape. Curve, don't straighten — sleeves and pant legs laid dead-straight look lifeless, so bend them into a gentle, mirrored S. Rake the light — a low side light turns your tissue-built volume into soft, believable shadow that separates the garment from the white background.
The discipline that makes it look effortless: every pin, clip, strip of tape, and tissue wad must be invisible to the lens. Pin only through seam allowances or from underneath, tuck every edge under the garment, and remember that all of this rigging gets cloned out in retouching — you're building shadow and shape, not a permanent prop.
Skip the rigging entirely? AI can build the worn 3D shape from a clean flat lay in seconds. Try Snappyit AI Ghost Mannequin free →
The clothing flat-lay shoot, step by step
Run every garment through the same sequence so the catalog stays consistent and almost nothing needs fixing in post:
- Steam and de-lint the garment on a hanger; let knits bloom before laying them down.
- Set the surface — clean white seamless, with card/foam backers and tissue within reach.
- Mount the camera dead-overhead at 90 degrees and confirm level with a bubble level.
- Light it — one large diffused key raking from ~45 degrees, white bounce opposite.
- Lay and square the garment: shoulders level, neckline symmetric, centerline straight.
- Shape it — tissue under shoulders/chest, sleeves in an S-curve, all rigging hidden.
- Tether and grid — review on a big screen, verify the garment is square to the frame.
- Shoot front, then back and details under identical light; check focus and color at 100% before tearing down.
In post, work in a fixed order — white balance and color first, then perspective/straighten and crop, then push the background to pure white (RGB 255,255,255), then retouch dust, lint, and any leftover wrinkles, and finally sync one preset across the whole set. If wrinkles are your recurring enemy, an AI wrinkle-removal pass is faster than fixing them by hand.
Clean up a clothing flat lay with AI →
Clothing flat-lay mistakes to avoid
- Crooked shoulders or a tilted centerline — square the shoulders first and check against a grid; it can't be fixed later.
- Wrinkles and creases — steam before laying, never iron knitwear; overhead light magnifies every fold.
- A flat, lifeless garment — no tissue volume and ramrod-straight sleeves; build a phantom body and curve the limbs.
- Texture washed out — dead-overhead light flattens knit and weave; rake the key from the side.
- Visible pins, tape, or tissue — pin through seams only, tuck every edge under, plan to clone the rest out.
- Keystone distortion — camera tilted or lens too wide; shoot a true 90 degrees at 50mm or longer.
- Inconsistent color — auto white balance drifting frame to frame; lock WB off a grey card.
- Flat-laying a structured piece as the hero — blazers, coats, and bras need a form; don't make flat lay do a job it can't.
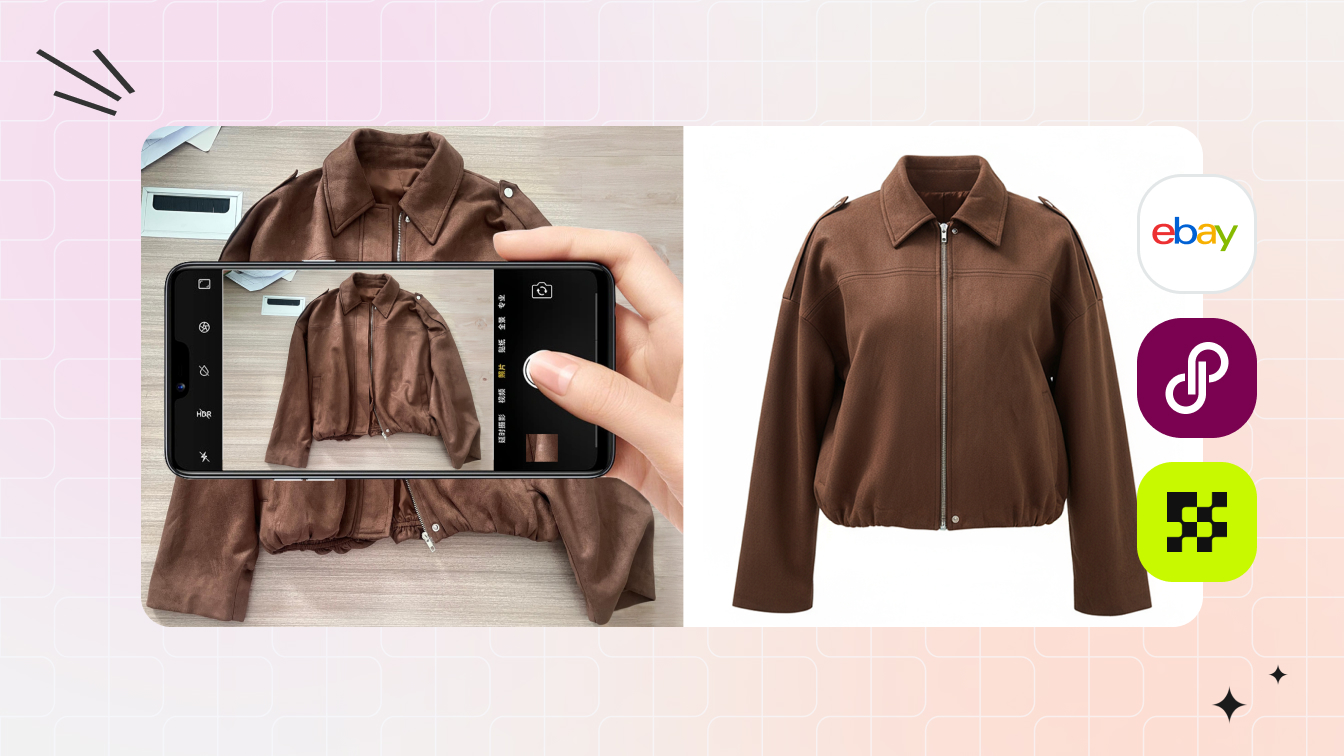
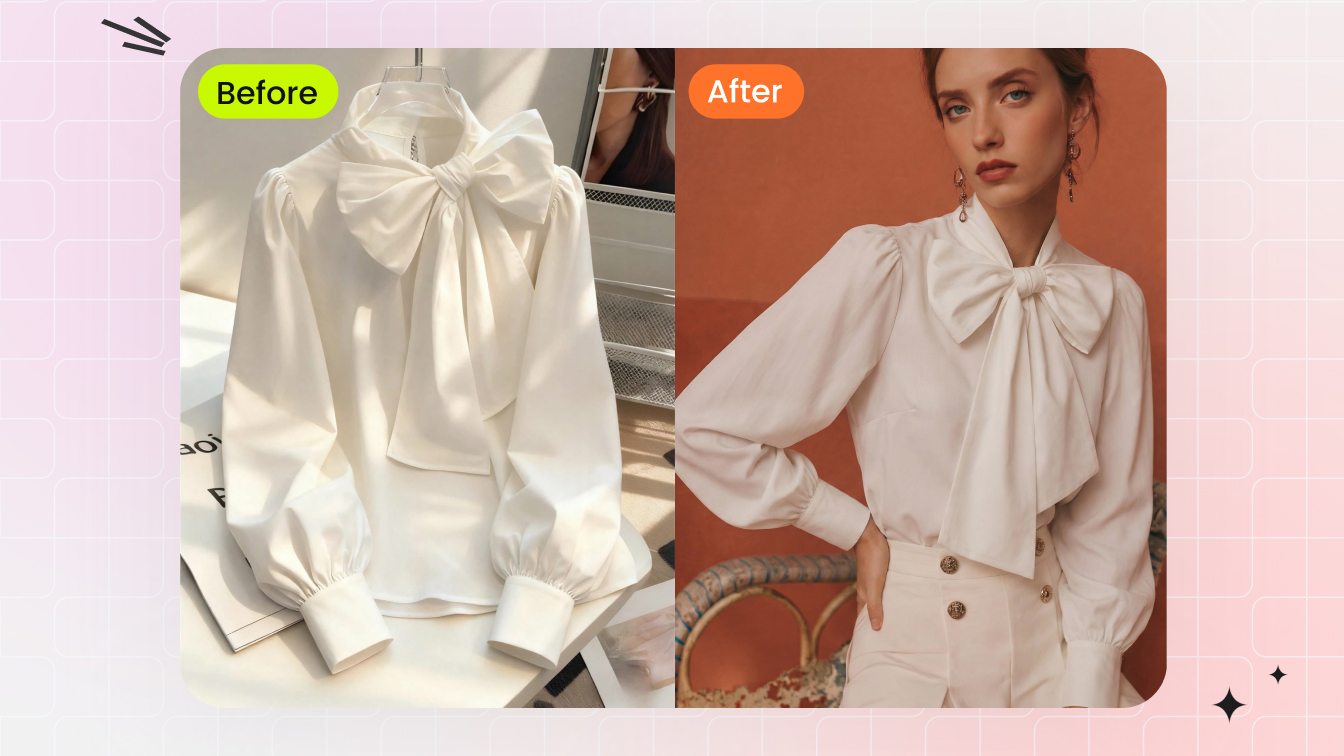
From one flat lay to ghost mannequin, on-model & video
Here is why a clean flat lay is worth the effort even when it can't be your main image: it is the master file for an entire AI pipeline. Shoot the garment once, well — white-balanced, evenly lit, high resolution (aim for a 2,000px long edge or larger) — and the rest is generated.
- Clean to pure white. AI background removal lifts the garment onto a true #FFFFFF field and clears stray lint and pins. Zoom to 100% and confirm thin straps, lace, and sheer hems survived the cleanup — every later step inherits this file. AI Flat Lay and AI Color Change handle this stage.
- Build the ghost-mannequin shape. AI infers a hollow worn shape — filled shoulders, open collar, an invented inner neck — from your flat. Quality tracks your prep: square shoulders give clean geometry; check the back-neck reconstruction, which is where AI most often guesses wrong. (AI Ghost Mannequin; compare tools in our invisible mannequin roundup.)
- Place it on a model. Generate the on-model image adult apparel needs for its main slot — then compare it against the flat at 100% so the AI didn't quietly change the neckline depth, sleeve length, or print scale. (AI Fashion Model.)
- Recolor every variant from the one shot instead of reshooting, hand-checking the hex against your real dye lot (AI recolor drifts on saturated reds and sheeny fabric).
- Animate it into a short, subtle product clip for the PDP video module and social. (Image to Video.)
Two rules keep this compliant. Accuracy: marketplaces allow AI imagery only if it represents the real product — never use AI to change color, size, or material, and make sure the item in the photo matches what ships. Disclosure: the FTC and Amazon expect substantially AI-generated images — especially a fully synthetic human model used in advertising — to be disclosed, while AI-cleaning a background or recoloring a true variant is low-risk. The safest pattern is AI cleanup and ghost-mannequin of the real garment. (Amazon's apparel image rules are in Seller Central.)
Frequently asked questions
How do you photograph clothing laying flat?
Mount the camera directly overhead at a true 90 degrees so the lens is parallel to the surface, lay the steamed garment on a clean white seamless surface, and square the shoulders and hem so it reads as a true rectangle. Style the piece to suggest a body — open the neckline evenly, fold the sleeves into a soft S-curve, and lift the shoulders and chest with balled tissue underneath. Light it with one large diffused source raking across from about 45 degrees with a white bounce on the opposite side, then shoot at f/8 to f/11, ISO 100-200, with a 50mm or longer lens.
How do you make flat clothes look 3D instead of lifeless?
Build a phantom body. Ball up acid-free tissue and slide small wads under the shoulders, chest, and hips so the fabric domes up a centimetre or two as if a body were inside, then press the tissue with your fingers to vary the surface. Lay sleeves and pant legs in a gentle S-curve rather than dead-straight, and light the garment from one side at a low raking angle so weave, ribbing, and seams cast soft shadows. Every pin, clip, and tissue wad stays hidden behind or under the garment and is removed in retouching.
Should you iron or steam clothes before a flat lay?
Steam, do not iron — and do it before the garment touches the surface. Overhead studio light magnifies every crease, so a wrinkled garment adds hours of retouching. A hot iron pressed onto knitwear or wool crushes the loft and can scorch or glaze the fabric, while a handheld steamer held a few centimetres off the surface relaxes the fibres without flattening the texture you are trying to sell. Steam synthetics and prints from the back so you do not glaze the surface or melt a logo.
Can you use a flat lay as your Amazon main image for clothing?
Only for some categories. Amazon requires Women's and Men's (adult) clothing main images to be on a human model or a ghost mannequin, so a plain flat lay can only be a secondary image for adult apparel. Flat (off-model) is the required main image for Kids and Baby clothing, multi-packs, sets, and accessories. Every main image also needs a pure white background at RGB 255,255,255, the product filling about 85 percent of the frame, and no text or logos. This is why apparel sellers shoot one clean flat lay and then use AI to generate the ghost-mannequin or on-model main image.
What camera settings are best for clothing flat lays?
Shoot in manual mode from a locked overhead rig. Use a 50mm or longer lens (50-100mm equivalent) to avoid the barrel distortion that wide-angle lenses add, set the aperture to f/8-f/11 for corner-to-corner sharpness, and keep ISO at base (100-200) for a clean file. Because the garment sits on one flat plane, depth of field is not the limiter, so there is no need to stop down past f/11 where diffraction starts to soften the image. Set white balance off a grey card placed in a test frame so colour stays accurate across the whole set.
Can AI turn a flat lay into a model photo?
Yes. From one clean flat lay, AI tools can lift the garment onto a pure-white background, build a ghost-mannequin 3D worn shape, place it on a generated model, recolor every variant, and animate it into a short video. The quality depends on your flat-lay prep — squared shoulders and even styling give the AI accurate geometry to work from. Always compare the generated result against the real garment so the fit, neckline, print, and colour are not altered, and disclose fully synthetic human models where the marketplace or advertising rules require it.
Shoot one flat lay, ship every image
Lay the garment well once, then let Snappyit do the rest — clean it to pure white, build the ghost-mannequin shape, place it on a model, recolor every variant, and turn it into a video, all at marketplace specs.
Try Snappyit AI Flat Lay free →