"You Can't Make a Small Photo Bigger" — Where That Belief Comes From
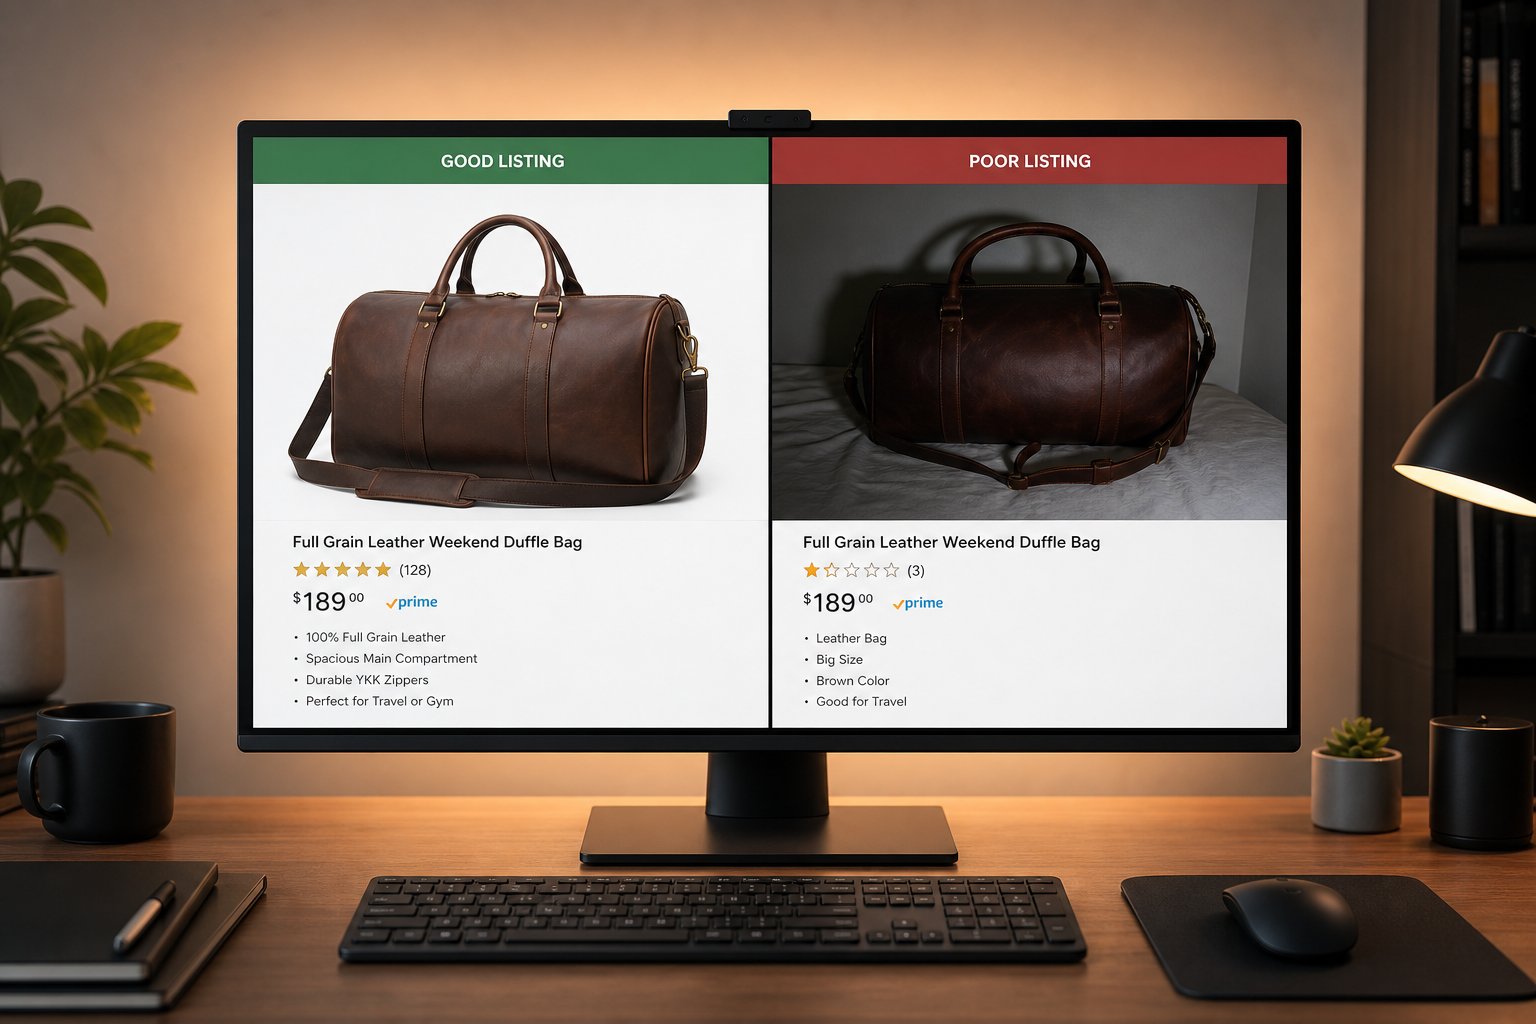
Almost every seller has heard a version of it: enlarging a low-resolution image just blows up the blur, so the only real fix is to reshoot. The advice is repeated in Amazon forums, dropshipping groups, and by well-meaning designers, and for a long time it was simply correct. It is also why so many sellers either ship undersized photos or pay for a reshoot they did not need.
The frustrating part is that the supply problem and the requirement rarely line up. Marketplaces expect roughly 1,000 to 2,000 pixels or more per side for zoom to work, yet suppliers and dropship vendors routinely hand over 400 to 600px files pulled straight off a manufacturer catalog page (Wearview; Pixelpanda). You cannot go back and reshoot a product you have never physically held. So the question is not philosophical — it is operational: can a 500px supplier image be brought to listing spec without a camera, and if so, how, and where does it stop being honest?
This page is the argument, not the walkthrough. If you want the click-by-click version, our hub on how to make product photos clearer covers the workflow. Here we are settling the why: why the old resizing failed, what changed, and what still cannot be done at any price.
Why Bicubic Resize Goes Soft: It Can Preserve Detail, Never Create It
To see why the old advice was right, you have to understand what your image editor was actually doing when you dragged a photo larger. Classic resampling methods — nearest-neighbor, bilinear, and bicubic interpolation — enlarge an image by computing each new pixel from a weighted average of its existing neighbors (Bicubic interpolation, Wikipedia). They spread the pixels you already have across a bigger grid and fill the gaps with blends of what was nearby.
The decisive consequence: these methods are information-preserving at best, never information-creating (Wink.ai). The crisp high-frequency content that makes an edge look like an edge — the sharp boundary of a ring, the thread-by-thread weave of fabric, the strokes of label text — was never recorded in a 500px file. Averaging neighbors cannot conjure it, so a bicubic enlargement lands exactly where the skeptics promised: bigger and softer. In a 2025 benchmark, plain bicubic was the weakest method tested, with an average RMSE around 131.48 — roughly four times worse than any learning-based approach (HTX super-resolution comparison).
This is also why Walmart explicitly warns sellers not to resize smaller images up, because doing so "reduces image quality" (Walmart Marketplace image guidelines). They are right — about naive resize. They are describing the bicubic stretch, not modern reconstruction, and conflating the two is the single biggest source of the "just reshoot" myth.
What AI Super-Resolution Actually Does: Predict, Not Stretch
AI super-resolution attacks the problem from the opposite direction. Instead of averaging the pixels in front of it, a deep-learning model predicts the plausible high-frequency detail — edges, fabric weave, fine repeating patterns — using statistical relationships it learned from millions of low-versus-high-quality image pairs (Ultralytics; DigitalOcean). It has, in effect, seen what sharp velvet, brushed metal, and printed cardboard look like at full resolution, so when it meets a soft 500px version it reconstructs a detailed result consistent with those patterns.
The word that keeps this honest is predict, not recover. The model is not retrieving the original photons your supplier's camera missed; it is generating a statistically likely high-resolution version. For ordinary product surfaces that distinction is academic — the prediction is correct because weave and grain are highly predictable. It matters enormously for text and logos, which we cover below. On perceptual quality, learned models such as Real-ESRGAN and BSRGAN decisively outperform bicubic in head-to-head testing (HTX comparison), which is why the answer to "does upscaling reduce image quality?" flips depending on the method: bicubic degrades perceived sharpness; AI super-resolution generally increases it.
Why One AI Pass Deblurs, Denoises, and Upscales Together
Sellers often expect to run three separate tools — one to sharpen, one to clean up grain, one to enlarge. A modern super-resolution model does all three at once, and the reason is baked into how it was trained. Real-ESRGAN (Wang et al., ICCV 2021 Workshop) builds its training data by taking clean high-resolution images and deliberately degrading them through a randomized pipeline: several kinds of blur, sensor noise, JPEG compression artifacts, and downsampling, all stacked together (Real-ESRGAN, arXiv:2107.10833).
The network is then trained to invert that whole degradation in one shot — to look at a small, blurry, noisy, compression-mangled input and predict the clean high-resolution original. Because the damage it learned to undo is precisely the damage a real supplier photo carries (soft focus, ISO grain, heavy JPEG, low pixel count), the same forward pass that enlarges the image also removes blur and noise (WaveSpeed). Architecturally it pairs RRDB generator blocks with a U-Net discriminator that gives per-pixel feedback on whether the output looks real, which is what pushes it toward believable texture rather than a plastic smear. The practical payoff for a catalog: you do not chain tools, and a single clarity pass is what carries a low-res supplier file toward spec. The full sequence is laid out in fixing low-quality AliExpress supplier photos.
The Honest Limits: What Upscaling Cannot Invent
If this page only sold you on the upside it would be doing exactly what the myth does, just in reverse. So here is the hard boundary, stated plainly: upscaling cannot recover information that was never captured (Snapcorn). A model predicts what is plausible, and when the source is too far gone, plausible and accurate stop being the same thing.
- Text and logos on degraded inputs. If a brand name or ingredient panel is an unreadable smear, the model may produce sharp-but-wrong characters — text that reads cleanly yet does not match reality (Let's Enhance). For regulated or branded copy, always proofread the output against the real product.
- Missing information, not low resolution. Severe motion blur, extreme out-of-focus, or a blown-out exposure are not resolution problems — the detail is genuinely gone, and no upscaler restores it (Pixelpanda). That is the one case where the "just reshoot" advice still holds.
- It is clarity-only. Super-resolution sharpens, denoises, and enlarges. It will not relight your shot, recolor a garment, or swap a background — different jobs entirely (white-background prep is its own topic; see the AI product photography pillar for that side of the workflow).
The honest frame: AI upscaling is a finishing step for under-resolution images, not a rescue mission for badly damaged ones. A small-but-properly-exposed supplier photo is the ideal candidate. A motion-smeared phone snap is not.

How Far Is Too Far? The ~4x Diminishing-Returns Ceiling
"How to enlarge image without losing quality" has a practical answer with a ceiling. Practitioner consensus puts the reliable limit at roughly 4x on each side — about 16x the original area — with returns dropping off noticeably beyond that and the model effectively "running out of information to hallucinate plausibly" past around 8x (AIOFM; Lovart). Push past the comfort zone and the model increasingly invents structural detail rather than texture — averaged features in place of actual ones, and the wrong-text problem from the previous section gets worse.
Treat that 4x figure as an engineering rule of thumb, not a fixed law. The point is to size your enlargement to the gap you actually need to close. A 500px supplier file going to a 2,000px listing is a 4x jump — right at the dependable edge and usually fine. The same 500px file forced to a 9,000px output is asking the model to fabricate eighteen times the linear detail, and it will look like it. When in doubt, enlarge enough to hit your platform's requirement and stop there.
The Targets You're Actually Aiming At, Per Platform
"Without losing quality" is meaningless without a destination size. Each marketplace publishes a concrete pixel target, and knowing it tells you how much enlargement you genuinely need — and whether a 4x pass clears the bar. These are the current published figures; confirm against each platform's own help center, as specs do drift.
| Platform | Practical target (longest/shortest side) | Floor / zoom trigger |
|---|---|---|
| Amazon | 1,600px+ recommended for sharpest zoom | Zoom activates at 1,000px; 500px absolute minimum; 10,000px max (Jungle Scout) |
| Walmart | 2,200×2,200px recommended (1:1) | 1,500×1,500px zoom minimum; 500×500px hard floor (below it, primary images auto-unpublish) (Walmart) |
| Shopify | 2,048×2,048px recommended (1:1) | Zoom switches on above ~800×800px (Photoroom) |
| eBay | 1,600px+ recommended | 500px minimum to list; 1,600px unlocks zoom/Supersize; eBay downsizes uploads over 1,600px on the longest side (Zentail) |
| Etsy | 2,000px+ on the shortest side; ideal ~2,700×2,025 | 4:3 landscape preferred (Ailee) |
Notice that a 500px supplier file reaching these is roughly a 3x–5x enlargement depending on the platform — the marketplace floors and the lower recommended targets (Amazon and eBay at 1,600px, ~3.2x) sit squarely inside the dependable ~4x range from the previous section, while the highest recommended targets (Walmart 2,200px at 4.4x, Etsy's ideal ~2,700px at 5.4x) sit just past it. Either way it is far short of a reshoot, which is exactly why the "just reshoot" rule overshoots for most under-resolution cases. The platform-by-platform breakdown lives in our guide to meeting marketplace image size and zoom requirements, and Amazon's specific rejection messages in Amazon image rejected: too small.
For Print and POD: It's Pixels, Not a "DPI" Slider
Print-on-demand sellers hit a different version of the same myth, because they think in DPI. The reliable fact: standard print resolution is 300 DPI/PPI, rooted in offset-press physics where image resolution runs about twice the halftone screen ruling (150 lpi to 300 dpi) (Printivity). The trap is treating DPI as a quality dial you can crank in metadata. It is not — DPI is just pixels divided by inches.
The math is simple: print size in inches × 300 = the pixel dimensions you need. A 10×10-inch print at 300 DPI requires a 3,000×3,000px file; fine-detail work may call for 600 PPI (PrintNinja). Bumping the DPI tag on a 1,000px file to "300" without adding pixels does nothing but shrink the print to roughly 3 inches. Genuine enlargement means producing the real pixels — which is super-resolution, not a field in your export dialog. Sellers prepping artwork should read the dedicated walkthrough on upscaling images for print on demand at 300 DPI.
Try It on Your Worst File First
The fastest way to settle the debate for your own catalog is to test it on a file you would otherwise have written off. Snappyit's free Product Photo Upscaler runs the deblur-denoise-upscale pass described above toward 4K, with no login, no watermark, and no daily cap — and it handles both single images and full batch catalogs, plus a marketplace pixel-spec check so you know whether the output clears your platform before you upload.
It is deliberately a clarity-only tool, consistent with everything on this page: it sharpens, denoises, and enlarges, and it will tell you honestly when an input is too degraded to save rather than fabricate detail you cannot verify. Run your softest supplier photo through it, zoom in, and compare against the bicubic stretch you would have gotten from a manual resize.
Enlarge a product photo free — no login →
If you are evaluating against a paid desktop tool, the comparison on a Topaz Gigapixel alternative for product photos covers where free, browser-based super-resolution is enough for listing work — and where it is not.
Frequently Asked Questions
Does upscaling reduce image quality?
It depends entirely on the method. Old-style bicubic or bilinear resizing does reduce perceived quality — it stretches existing pixels across a bigger grid and adds no new detail, so edges go soft. AI super-resolution generally increases perceived sharpness, because instead of averaging pixels it predicts plausible high-frequency detail like edges and texture. In benchmark testing, bicubic scored about four times worse than learning-based models on error metrics.
Can you really enlarge a low-resolution product image without losing quality?
For under-resolution images — small but properly exposed and focused — yes, within reason. AI super-resolution can take a 500px supplier file to roughly 2,000px (a 4x jump) and produce sharp, listing-ready results, because product surfaces like fabric weave and metal grain are highly predictable. It will not work on images that are genuinely damaged by severe blur or blown exposure, where the detail was never captured.
How much can I enlarge before it stops looking real?
The practical, reliable ceiling is about 4x on each side, roughly 16x the original area. Returns drop off noticeably beyond that, and past around 8x the model runs out of information to predict plausibly and starts inventing structural detail. Size your enlargement to hit your platform's pixel requirement and stop there rather than maxing out the scale.
Why does AI upscaling deblur and denoise at the same time as enlarging?
Because of how the models are trained. Tools like Real-ESRGAN learn by taking clean high-resolution images, deliberately degrading them with blur, noise, JPEG artifacts, and downsampling, then learning to reverse that whole degradation in one pass. Since real supplier photos carry the same kinds of damage, the single forward pass that enlarges the image also removes blur and noise.
Will an AI upscaler get the text and logos right?
Not always, and this is the main risk to check. If text or a logo is an unreadable smear in the source, the model may produce sharp characters that look clean but do not match reality. Treat the output as predicted, not recovered, and proofread any brand names, ingredient panels, or regulated copy against the real product before publishing.
Why does Walmart warn against resizing small images up if upscaling works?
Walmart is warning against naive resizing — the bicubic stretch built into most image editors, which genuinely reduces quality. That caution does not describe AI super-resolution, which reconstructs detail rather than spreading existing pixels thinner. The two are different processes; the warning is correct about the old method and not about the new one.
For print on demand, can't I just set the DPI to 300?
No. DPI is simply pixels divided by inches, not a quality dial. Tagging a 1,000px file as 300 DPI without adding pixels just shrinks the printable size to about 3 inches. To print a 10×10-inch image at 300 DPI you need a real 3,000×3,000px file, which means genuine super-resolution that produces actual pixels, not a metadata change.
What's the difference between this and a background-removal or white-background tool?
They are different jobs. Upscaling is clarity-only: it sharpens, denoises, and enlarges. It does not change the background, relight the shot, or recolor anything. White-background prep and transparent cutouts are a separate workflow — useful alongside upscaling, but handled by different tools.