
What Is the Invisible Mannequin Effect?
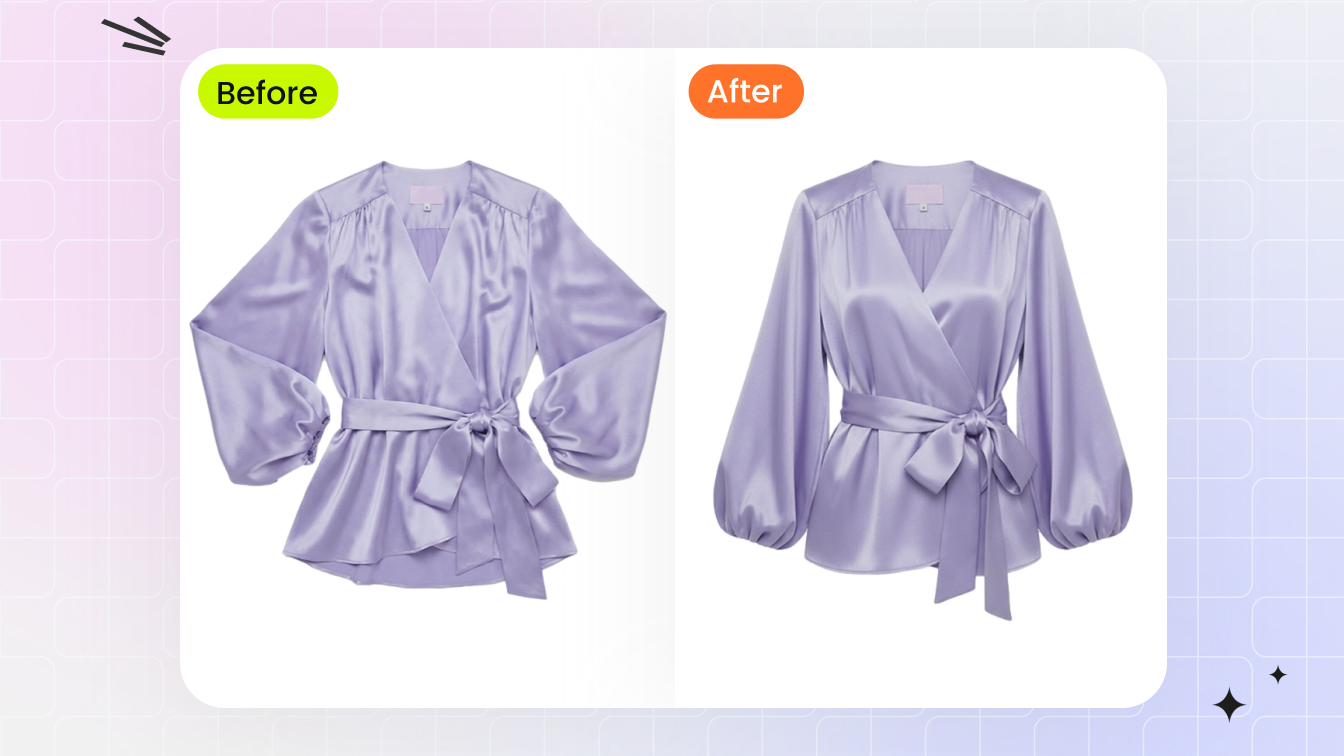
The invisible mannequin effect is an apparel image in which a garment keeps a three-dimensional, worn-looking shape while no person, mannequin, hanger, or support remains visible. The same result is also called a ghost mannequin or hollow man image.[1]
“Effect” refers to the finished presentation, not the software or production method behind it. A studio composite and an AI-generated image can both create the look. For your product page, the job is the same: show the garment's structure without a visible body competing for attention.
Do not use it as a fit simulation. A shaped torso can clarify the neckline, shoulders, sleeves, waist, and hem, but it cannot show how the item behaves on a particular height, size, pose, or body type. Keep measurements and on-model images in the gallery when those questions affect the purchase.
What Makes the Effect Look Convincing?
A convincing invisible mannequin image has more than a removed background. The garment should read as a hollow shell with believable depth and complete construction.
- A clean outer silhouette. Shoulder lines, sleeves, side seams, and hems should remain continuous, without mannequin fragments or cut-out edges.
- A believable interior. The viewer may see the inside back of a collar, neck label, sleeve opening, waistband, or hem. Those surfaces must agree with the garment's real construction.
- Consistent volume. The torso cavity and fabric drape should look intentional rather than inflated, flattened, or pinched.
- Product fidelity. Color, print, logo, buttons, zippers, stitching, trim, and fabric texture should match the item being sold.
- No hidden support. Skin, plastic, stand poles, hanger hooks, and mannequin shadows should be absent from openings and translucent areas.
A background-removal job stops after isolating the visible garment. An invisible mannequin image must also rebuild exposed interiors and believable volume. Make sure a provider quote—or an internal brief—covers that extra work.
Invisible Mannequin vs Flat-Lay and On-Model Images
Choose each image style by the shopper question it needs to answer; a useful apparel gallery will often combine more than one.
| Image style | Best at showing | What it does not prove |
|---|---|---|
| Flat-lay | Overall design, color, print, and the complete garment laid out clearly | Body volume, natural drape, or fit |
| Invisible mannequin | Product-first shape, neckline depth, sleeve form, and a consistent catalog silhouette | Fit on a real body, movement, or personal styling |
| On-model | Scale, styling, body context, movement, and how the garment may be worn | A neutral product-only view across every SKU |
As an editorial recommendation, use the invisible mannequin view to answer structure-related questions and keep other views for fit, scale, material, and construction details. Do not assume one image format meets every sales channel's rules: for example, Google Merchant Center requires the submitted image to accurately display the product and warns against generic or placeholder imagery.[4] Check the current requirements for the exact channel and category before choosing a main image.
How Is the Invisible Mannequin Effect Created?
For ecommerce teams, two practical production routes cover most day-to-day cases discussed here: a manual composite built from photographed product views, or an AI-generated worn-shape image. This is a workflow distinction, not a claim that no other production method exists.
1. Manual neck-joint composite
The garment is photographed on a mannequin, then photographed again to capture hidden interior areas such as the back of the collar. An editor removes the mannequin and combines the exterior and interior views. Editable layer masks, as documented by Adobe, let the editor hide or reveal parts of layers without permanently erasing the source pixels.[2] The composite still depends on matched angles, lighting, color, and careful alignment.
If your team is preparing a traditional shoot, use the dedicated ghost mannequin photography guide for the shot list and the photo editing guide for masking, neck joints, and catalog QA.
2. AI-generated worn shape
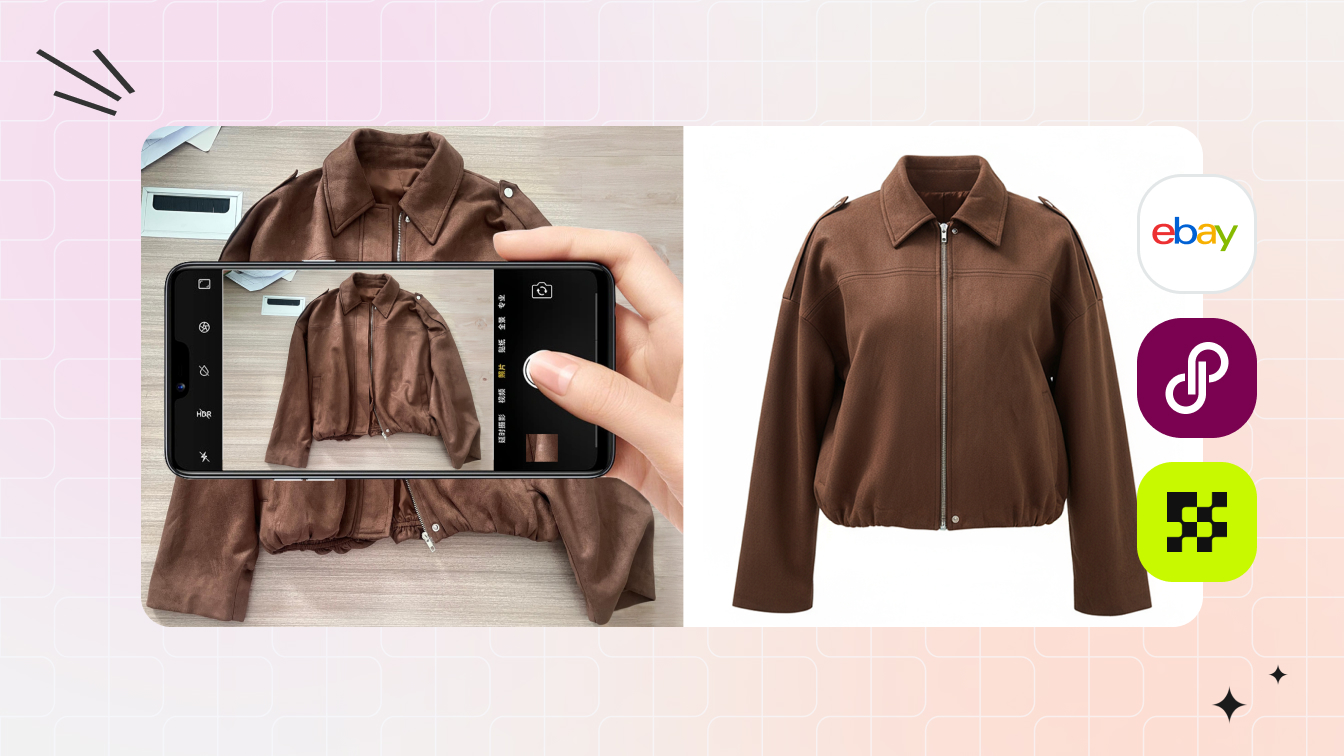
An AI workflow creates a new invisible mannequin image from a supported garment photo. Snappyit lists flat-lay, hanger, and model photos as supported inputs, while PhotoRoom lists flat-lay, hanging, mannequin, and model images.[3][1] These are provider capability statements, not a guarantee that every SKU will be reconstructed accurately. The model may misread an opening, simplify trim, alter a print, or infer the wrong silhouette, so treat the output as a draft until it passes product review.
For side-by-side product tests and pricing, use the separate AI invisible mannequin tools comparison. Keeping tests out of this explainer prevents a temporary product ranking from defining the meaning of the effect.
How to Turn a Flat Lay into a Floating Invisible Mannequin Image
A flat lay can become a floating garment or ghost mannequin effect when the source clearly shows the SKU and the workflow adds believable worn volume. This is a presentation conversion, not proof of fit or hidden construction.
- Prepare a clean flat-lay source. Smooth avoidable wrinkles, keep the entire garment inside the frame, separate sleeves and openings, and use even light with accurate white balance.
- Preserve the product reference. Keep a separate approved photo for color, logo, print, seams, fasteners, labels, and proportions. If the back or lining matters, supply real reference views rather than asking a tool to guess.
- Create the worn shape. Use a garment-specific AI workflow, or photograph the item on a mannequin and build a manual composite. Aim for natural shoulder, torso, sleeve, and hem volume—not an exaggerated floating pose.
- Reconstruct only what is supportable. The inner collar or sleeve opening must agree with visible source evidence. Do not present an invented pocket, lining, back panel, or closure as the real product.
- Approve the result as a listing image. Compare source and output at 100% zoom, then check the product-page crop and mobile thumbnail. Reject changes to silhouette, color, pattern spacing, text, labels, trim, or garment length.
Before scaling, test a simple top, a dark garment, a print or logo, and one difficult material or construction. Track how many results pass review and how much correction each one needs. That publishable yield is a better buying signal than generation speed alone.
Where Invisible Mannequin Images Work Well
Use this format when the listing needs a repeatable, product-first view of garment structure rather than a styling story.
- Category grids with many related SKUs. A shared crop, angle, and background make colorways and designs easier to compare.
- Garments with clear visible construction. Shirts, jackets, dresses, knitwear, and trousers can be practical candidates when the source clearly shows collars, shoulders, sleeves, waistbands, and hems. Treat this as a testing shortlist, not a guaranteed pass by garment category.
- Product-first secondary views. The effect can bridge a plain flat-lay and a more expressive on-model or lifestyle image.
- Catalog refreshes from usable source photos. AI may provide a testable route when a seller has clear garment images but no matching mannequin shoot.
When the Effect Is the Wrong Choice
Skip or demote the invisible mannequin view when the shopper's main question is about fit on a body, movement, or material behavior.
- Fit-sensitive products. Compression wear, tailored sizing, adaptive clothing, and garments with unusual proportions need measurements and real-body context.
- Sheer or highly reflective materials. Removing the support can leave ambiguous transparency, reflections, or invented interior surfaces.
- Complex construction. Open backs, crossed straps, layered ruffles, draped panels, cutouts, and asymmetry can be misread in both manual and AI workflows.
- Movement-led products. Flow, stretch, and fabric weight are often clearer in on-model images or video.
If the effect hides information instead of clarifying it, use a flat-lay, detail view, on-model photo, measurement graphic, or video for that part of the listing.
Seller Review Checklist Before Publishing
Review the image against the physical sample or an approved source photograph. Do not judge it only by whether it looks polished. This product-accuracy check is consistent with Google Merchant Center's requirement that product imagery accurately display the submitted product.[4]
- Trace the outline. Check both sides, shoulders, cuffs, openings, waist, and hem for missing or invented fabric.
- Inspect identity details. Compare color, pattern placement, labels, logos, buttons, zippers, pockets, stitching, and trim.
- Check the hollow areas. Necklines, armholes, sleeves, cutouts, waist openings, and translucent panels should contain no skin, plastic, hanger, or stand residue.
- Question the volume. Reject a silhouette that makes the garment look tighter, wider, longer, more structured, or more symmetrical than the item.
- Review at listing size and zoom. Small edge errors may disappear in a thumbnail but become obvious when shoppers enlarge the image.
- Keep supporting views honest. Use real back, detail, label, measurement, and on-model images instead of asking one generated view to answer every product question.
The Right Role in an Apparel Image Set
The invisible mannequin effect has one clear job: show garment structure in a clean, product-first way. A useful listing may pair it with a flat-lay for complete design visibility, a real back view, close-ups of material and construction, measurements, and an on-model or lifestyle image for scale and styling. Sellers planning the wider gallery can use this AI product photography guide to assign a specific purpose to each image type.
Give each image one job. Let the invisible mannequin view explain shape, and use real back, detail, measurement, or on-model images for information it cannot prove. Before rolling the format across a catalog, test a simple garment, a dark color, a print or logo, a textured fabric, and one difficult construction. Agree on the rejection rules before the first large batch.
Frequently Asked Questions
1. What is the invisible mannequin effect in product photography?
The invisible mannequin effect shows a garment in a three-dimensional, worn shape without a visible person or mannequin. It keeps the product central while making the neckline, sleeves, and silhouette easier to read than in a flat-lay alone.
2. Is the invisible mannequin effect the same as ghost mannequin?
Yes. Invisible mannequin, ghost mannequin, and hollow man effect describe the same final look: clothing shaped as if worn, with the supporting body removed or never shown.
3. How is an invisible mannequin image different from a flat-lay?
A flat-lay records the garment resting on a surface, so the body volume is mostly flattened. An invisible mannequin image adds a worn-looking cavity and silhouette, which helps shoppers read structure, but it still does not prove fit on a real body.
4. How is the invisible mannequin effect created?
Two practical ecommerce production routes are a manual neck-joint composite, which combines a mannequin photo with separate interior views, and an AI workflow, which creates a new worn-looking image from a supported garment photo. Both require a final accuracy check against the real item.
5. Can AI create an invisible mannequin image from a flat-lay photo?
Some AI ghost mannequin products explicitly accept flat-lay or hanging garment photos as inputs. That confirms the supported workflow, not the accuracy of every output. Sellers should compare color, print, closures, seams, trim, and silhouette with the real SKU before publishing.
6. Which garments work best with the invisible mannequin effect?
Garments with clear edges and visible construction are generally easier candidates to test. Sheer fabrics, complex draping, open backs, overlapping straps, reflective materials, and hidden construction create more ambiguity and therefore need additional source views or closer review.
7. When should a seller avoid using an invisible mannequin image?
Avoid relying on it when body fit, scale, movement, transparency, or styling is the main buying question. In those cases, use on-model, detail, measurement, or lifestyle images and treat the invisible mannequin view as supporting content.
Sources
- PhotoRoom, AI Ghost Mannequin Generator. Official feature page defining the effect and listing flat-lay, hanging, mannequin, and model inputs. Provider performance and sales claims were not used as independent evidence. Accessed August 12, 2026.
- Adobe, Add layer masks. Official documentation explaining non-destructive hiding and revealing of layer content. Accessed August 12, 2026.
- Snappyit, AI Ghost Mannequin Generator. Official product page listing supported flat-lay, hanger, and model-photo inputs. Used only as first-party evidence of supported inputs, not as independent proof of output accuracy. Accessed August 12, 2026.
- Google Merchant Center, Image link requirements and best practices. Official guidance requiring product imagery to accurately display the submitted product. Accessed August 12, 2026.